2016 MERCEDES-BENZ S-Class SEDAN reset
[x] Cancel search: resetPage 186 of 438
Setting the maximum charge current
GWARNING
If the charge current draw via a mains socket
is too high during the charging process, the
external electrical system may overheat.
There is a risk of fire.
Before beginning the charging process, check
the maximum permissible charge current
locally. Consult a qualified expert to do so
where necessary.
If necessary, adjust your vehicle's settings.
!An excessive charge current can blow a fuse
or lead to overheating of the external power
supply. Check whether the external power
supply is compatible with the set charge cur-
rent. If necessary, lower the set charge cur-
rent or use another power socket.
Before starting the charging process at a power
socket, check the maximum permissible charge current for the relevant power socket or the
building.
You can set the maximum permissible charge
current:
Ron the controls of the charging cable
Rin the on-board computer menu
(Ypage 272).
The lower value of the two charge current set-
tings – on the charge cable controls and in the
on-board computer – determines the maximum
charge current. If you cannot set the precise
maximum permitted charge current, select the
next lowest available value.
Only set the maximum permitted charge current in the on-board computer menu if:
Rit is not possible to set the charge current on
the charging cable
Rthe precise maximum permitted charge cur-
rent can only be set via the on-board com-
puter
How to set the maximum permissible charge
current on the charging cable, is described as
follows.
XTo adjust the setting: press button?
repeatedly until the desired setting is selec-
ted in display =.
RTwo LEDs are flashing: minimum setting
RAll LEDs are flashing: maximum setting If, after the charging process, the charging cable
is:
Rleft connected to the power socket, the cur-
rently selected values will be used for the next
charging process.
Rremoved from the power socket, the values
will be reset to the minimum setting for the
next charging process. You may then need to
reset the values of the maximum charge cur-
rent.
iIf the vehicle requires more time than usual
when charging, check the maximum charge
current settings using the controls on the
charging cable or in the on-board comput
er's
menu.
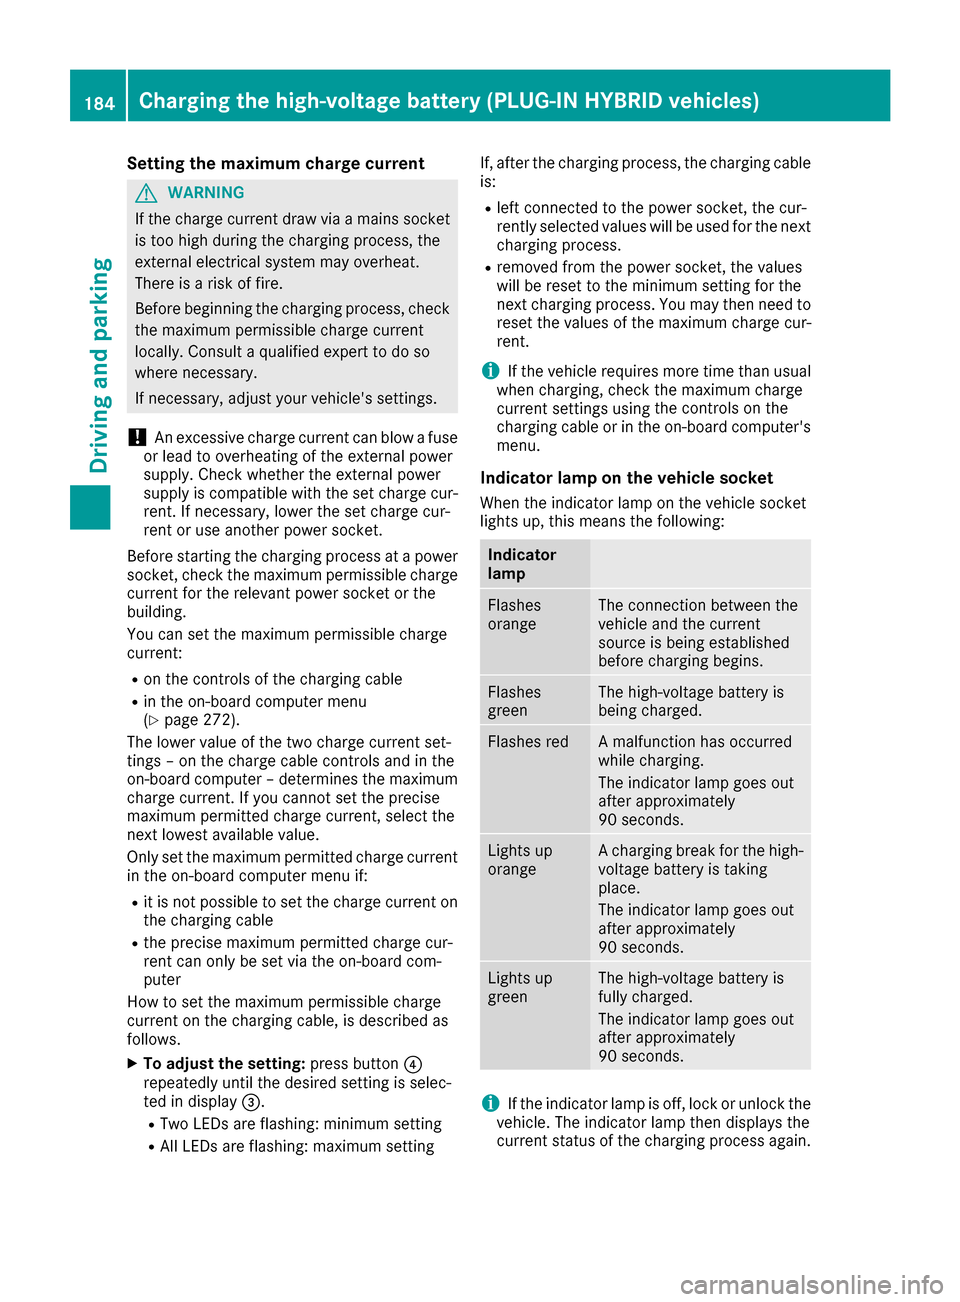
Indicator lamp on the vehicle socket
When the indicator lamp on the vehicle socket
lights up, this means the following:
Indicator
lamp
Flashes
orangeThe connection between the
vehicle and the current
source is being established
before charging begins.
Flashes
greenThe high-voltage battery is
being charged.
Flashes redA malfunction has occurred
while charging.
The indicator lamp goes out
after approximately
90 seconds.
Lights up
orangeA charging break for the high-
voltage battery is taking
place.
The indicator lamp goes out
after approximately
90 seconds.
Lights up
greenThe high-voltage battery is
fully charged.
The indicator lamp goes out
after approximately
90 seconds.
iIf the indicator lamp is off, lock or unlock the
vehicle. The indicator lamp then displays the
current status of the charging process again.
184Charging the high-voltage battery (PLUG-IN HYBRID vehicles)
Driving and parking
Page 191 of 438
iPrevent unauthorized persons from
accessing this data.
Every person who has access to the informa-
tion stated can use the functions on the "My
Mercedes Electric - Vehicle Homepage".
iInformation when selling a vehicle or
buying a used vehicle:
RIf you sell your vehicle, you are obliged to
delete the vehicle from your personal area
on the "My Mercedes Electric - Vehicle
Homepage".
RIf you have bought a used vehicle, it is pos-
sible that the previous owner still has
access to the "My Mercedes Electric - Vehi-
cle Homepage".
Calling up functions
The "My Mercedes Electric - Vehicle Homepage"
allows you access to information about your
vehicle and its functions using remote query and
remote configuration.
The following functions can be accessed:
Rrequest the current condition of charge of the
high-voltage battery
Rprogram the departure time (Ypage 272)
Rset or activate the "Pre-entry climate control
at departure time" function (see the separate
COMAND operating instructions)
Information on additional functions and operat- ing instructions can be found on the "My
Mercedes Electric - Vehicle Homepage".
Connecting the vehicle to the Internet
iThis function is not available in all countries
and requires activated access to the mbrace
emergency call system.
The "My Mercedes Electric - Vehicle Homepage"
can be used if the vehicle has a connection to
the Internet via a mobile phone network. The
necessary data is transmitted by radio. The vehi-
cle automatically recognizes whether a connec- tion to the Internet is possible or not. No presets
are necessary.
iRestrictions in reception are possible if the
vehicle is in an underground car park, for
example. Restrictions may also occur in areas with poor mobile network coverage.
Parking
Important safety notes
GWARNING
Flammable material such as leaves, grass or
twigs may ignite if they come into contact with
hot parts of the exhaust system or exhaust
gas flow. There is a risk of fire.
Park the vehicle so that no flammable mate-
rials come into contact with parts of the vehi-
cle which are hot. Take particular care not to
park on dry grassland or harvested grain
fields.
GWARNING
If you leave children unsupervised in the vehi-
cle, they could set it in motion by, for example:
Rrelease the parking brake.
Rshift the automatic transmission out of the
parking position P.
Rstart the engine.
In addition, they may operate vehicle equip-
ment and become trapped. There is a risk of
an accident and injury.
When leaving the vehicle, always take the
SmartKey with you and lock the vehicle. Never
leave children unsupervised in the vehicle.
!Always secure the vehicle correctly against
rolling away. Otherwise, the vehicle or its driv-
etrain could be damaged.
To ensure that the vehicle is secured against
rolling away unintentionally:
Rthe electric parking brake must be applied.
Rthe transmission must be in position Pand the
SmartKey must be removed from the ignition
lock.
Rthe front wheels must be turned towards the
curb on steep uphill or downhill gradients.
Rthe empty vehicle must be secured at the
front axle with a wheel chock or similar, for
example, on uphill or downhill gradients.
Ra laden vehicle must also be secured at the
rear axle with a wheel chock or similar, for
example, on uphill or downhill gradients.
Parking189
Driving and parking
Z
Page 196 of 438
RAccel.(evaluation of all acceleration pro-
cesses)
-The bar fills up: moderate acceleration,
especially at higher speeds
-The bar empties: sporty acceleration
RConstant(assessment of driving behavior at
all times)
-The bar fills up: constant speed and avoid-
ance of unnecessary acceleration and
deceleration
-The bar empties: fluctuations in speed
RCoasting(assessment of all deceleration
processes)
-The bar fills up: anticipatory driving, keep-
ing your distance and early release of the
accelerator. The vehicle can coast without
use of the brakes.
-The bar empties: frequent braking
An economical driving style specially requires
driving at moderate engine speeds.
To achieve a higher value in the categories
Accel.
and Constant,
Robserve the gearshift recommendations.
Rdrive in drive program E
On long journeys at a constant speed, e.g. on the
highway, only the bar for Constant
will change.
The ECO display summarizes the driving char-
acteristics from the start of the journey to its
completion. For this reason, the bars change
dynamically at the beginning of the journey. On
longer journeys, there are fewer changes. For
more dynamic changes, carry out a manual
reset.
For further information on the ECO display, see
(
Ypage 262).
Brakes
Important safety notes
GWARNING
If you shift down on a slippery road surface in an attempt to increase the engine's braking
effect, the drive wheels could lose their grip.
There is an increased danger of skidding and
accidents.
Do not shift down for additional engine brak-
ing on a slippery road surface.
Downhill gradients
!On long and steep gradients, you must
reduce the load on the brakes by shifting to a
lower gear in good time. This allows you to
take advantage of the engine's braking effect.
This helps you to avoid overheating the
brakes and wearing them out excessively.
When you take advantage of engine braking, a
drive wheel may not turn for some time, e.g.
on a slippery road surface. This could cause
damage to the drive train. This type of damage
is not covered by the Mercedes-Benz war-
ranty.
Heavy and light loads
GWARNING
If you rest your foot on the brake pedal while
driving, the braking system can overheat. This increases the stopping distance and can even
cause the braking system to fail. There is a
risk of an accident.
Never use the brake pedal as a footrest. Never
depress the brake pedal and the accelerator
pedal at the same time.
!Depressing the brake pedal constantly
results in excessive and premature wear to
the brake pads.
If the brakes have been subjected to a heavy
load, do not stop the vehicle immediately. Drive
on for a short while. This allows the airflow to
cool the brakes more quickly.
Wet roads
If you have driven for a long time in heavy rain
without braking, there may be a delayed reac-
tion from the brakes when braking for the first
time. This may also occur after the vehicle has
been washed or driven through deep water.
You have to depress the brake pedal more
firmly. Maintain a greater distance from the
vehicle in front.
After driving on a wet road or having the vehicle
washed, brake firmly while paying attention to
the traffic conditions. This will warm up the
brake discs, thereby drying them more quickly
and protecting them against corrosion.
194Driving tips
Driving and parking
Page 251 of 438
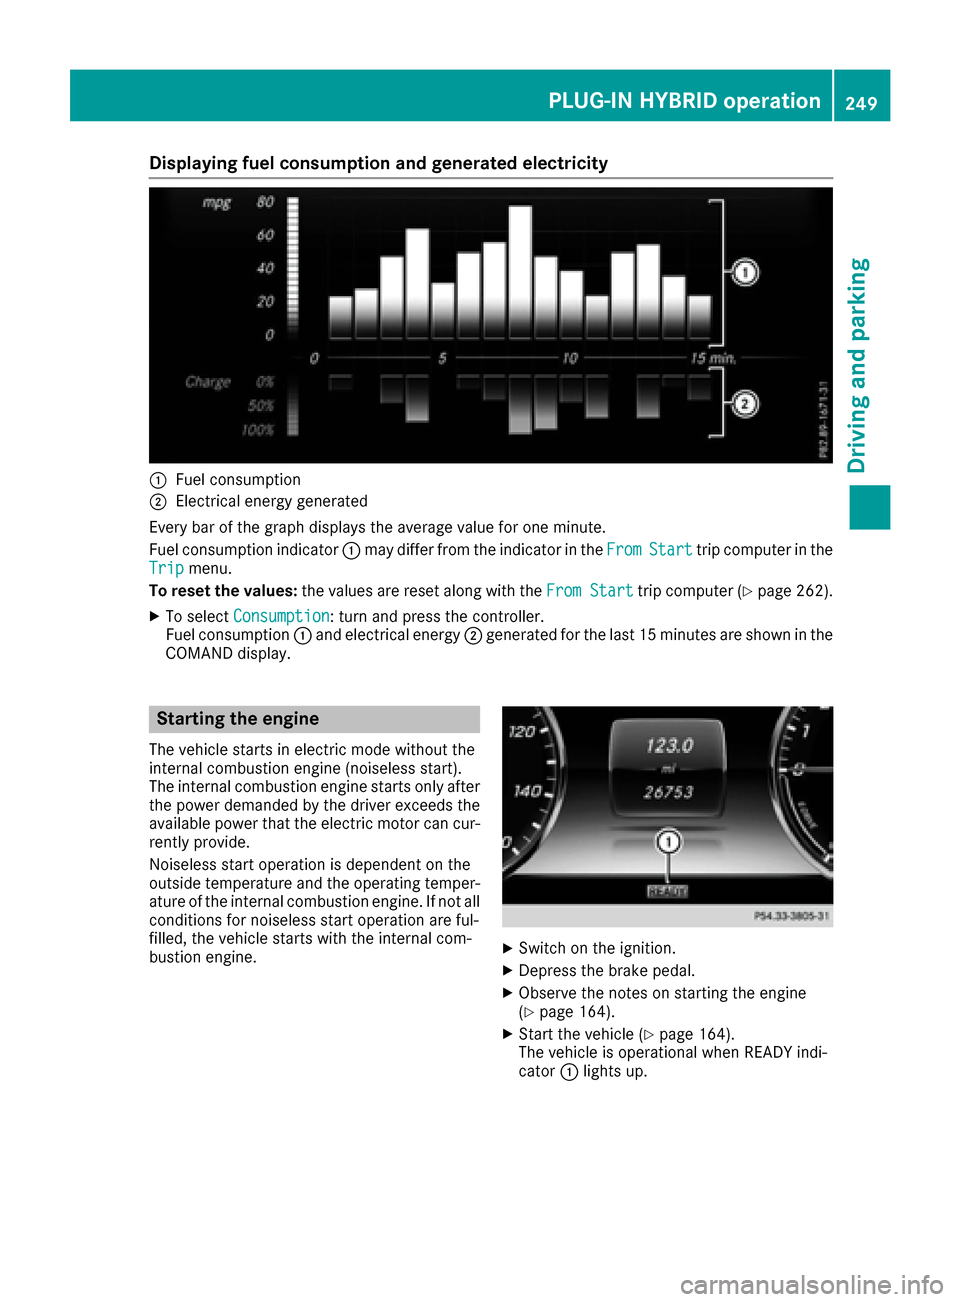
Displaying fuel consumption andgenerated electricit y
:Fuelconsumption
;Electrical energ ygenerate d
Every bar of th egraph displays th eaverag evalu efo ron eminute.
Fue lconsumption indicator :may diffe rfrom th eindicator in th eFro m
Starttrip compute rin th e
Tri pmenu.
To reset th evalues: thevalues are reset alon gwit hth eFro mStart
trip compute r (Ypage 262).
XTo selectConsumption:turn and press th econtroller .
Fue lconsumption :and electrical energ y; generate dfo rth elast 15 minutes are shown in th e
COMAN Ddisplay.
Starting th eengin e
The vehicle start sin electric mode without th e
internal combustion engin e(noiseles sstart).
The internal combustion engin estart sonly after
th epowe rdemanded by th edriver exceeds th e
available powe rthat th eelectric moto rcan cur -
rentl yprovide.
Noiseless start operation is dependen ton th e
outsid etemperature and th eoperatin gtemper-
ature of th einternal combustion engine. If no tall
condition sfo rnoiseles sstart operation are ful-
filled, th evehicle start swit hth einternal com-
bustion engine.
XSwitc hon th eignition .
XDepress th ebrake pedal.
XObserv eth enote son startin gth eengin e
(Ypage 164).
XStart th evehicle (Ypage 164).
The vehicle is operational when READY indi-
cator :lights up.
PLUG‑ IN HYBRID operation249
Driving an d parking
Z
Page 264 of 438
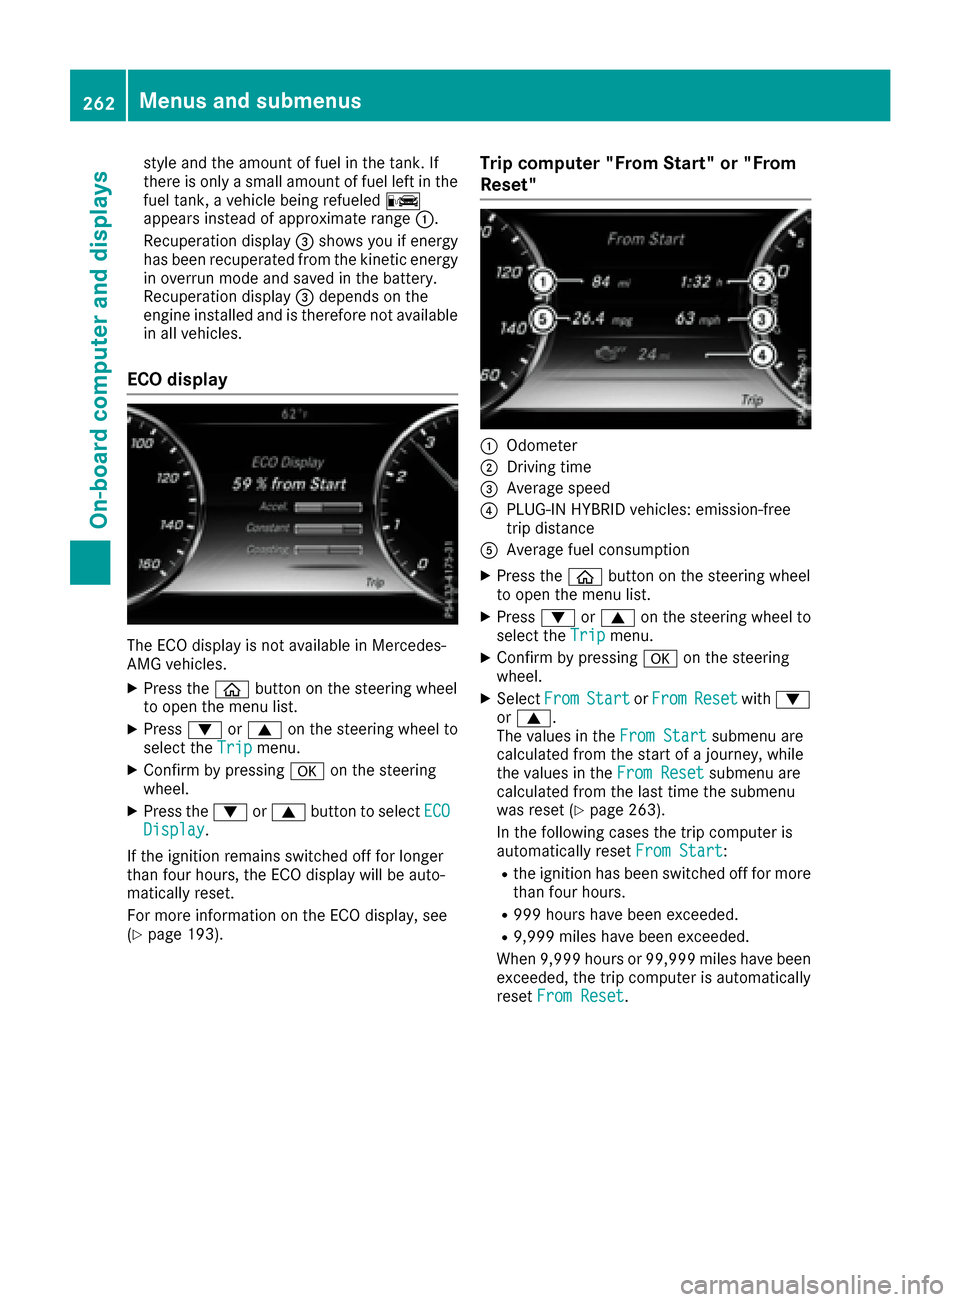
style and the amount of fuel in the tank. If
there is only a small amount of fuel left in the
fuel tank, a vehicle being refueledC
appears instead of approximate range :.
Recuperation display =shows you if energy
has been recuperated from the kinetic energy in overrun mode and saved in the battery.
Recuperation display =depends on the
engine installed and is therefore not available
in all vehicles.
ECO display
The ECO display is not available in Mercedes-
AMG vehicles.
XPress the òbutton on the steering wheel
to open the menu list.
XPress :or9 on the steering wheel to
select the Tripmenu.
XConfirm by pressing aon the steering
wheel.
XPress the :or9 button to select ECODisplay.
If the ignition remains switched off for longer
than four hours, the ECO display will be auto-
matically reset.
For more information on the ECO display, see
(
Ypage 193).
Trip computer "From Start" or "From
Reset"
:Odometer
;Driving time
=Average speed
?PLUG-IN HYBRID vehicles: emission-free
trip distance
AAverage fuel consumption
XPress the òbutton on the steering wheel
to open the menu list.
XPress :or9 on the steering wheel to
select the Tripmenu.
XConfirm by pressing aon the steering
wheel.
XSelect FromStartorFromResetwith :
or 9.
The values in the From Start
submenu are
calculated from the start of a journey, while
the values in the From Reset
submenu are
calculated from the last time the submenu
was reset (
Ypage 263).
In the following cases the trip computer is
automatically reset From Start
:
Rthe ignition has been switched off for more
than four hours.
R999 hours have been exceeded.
R9,999 miles have been exceeded.
When 9,999 hours or 99,999 miles have been
exceeded, the trip computer is automatically
reset From Reset
.
262Menus and submenus
On-board computer and displays
Page 265 of 438

Digital speedometer
XPress theò buttonon th esteerin gwhee l
to ope nth emen ulist .
XPress :or9 on thesteerin gwhee lto
selec tth eTri pmenu.
XConfir mby pressing aon thesteerin g
wheel.
XPress th e: or9 buttonto selec tth e
digita lspeedometer.
Resetting value s
XPress theò buttonon th esteerin gwhee l
to ope nth emen ulist .
XPress :or9 on thesteerin gwhee lto
selec tth eTri pmenu.
XConfir mby pressing aon thesteerin g
wheel.
XPress th e: or9 buttonto selec tth e
function that you wish to reset .
XPressato confirm your selection .
XPress:to selec tYesand confirm wit h
a.
You can reset th evalues of th efollowin gfunc-
tions:
RTrip odometer
R"From Start "trip compute r
R"From Reset" trip compute r
RECOdisplay
If you reset th evalues in th eEC Odisplay, th e
values in th e"From Start "trip compute rare
also reset .If you reset th evalues in th e"From
Start "trip computer, th evalues in th eEC O
display are also reset .
Navigation systemmenu
Displaying navigation instructions
In th eNav imenu, th emultifunction display
shows navigation instructions. You can fin dfur -
ther information on navigation instruction sin
th eseparat eoperatin ginstructions.
XSwitc hon th emultimedia system (se esepa-
rat eoperatin ginstructions).
XPress th eò buttonon th esteerin gwhee l
to ope nth emen ulist .
XPress :or9 on thesteerin gwhee lto
selec tth eNav imenu.
XConfir mby pressing aon thesteerin g
wheel.
Route guidance not active
:Direction of trave l
;Currentroad
Menus and submenus263
On-board computer and displays
Z
Page 267 of 438

Other status indicators of the naviga-
tion system
:Additional information
Other possible additional information:
RNew Route...orCalculating Route...
A new route is calculated.
RRoad Not Mapped
The vehicle position is inside the area of the
digital map but the road is not recognized, e.g. newly built streets, car parks or private land.
RNo Route
No route could be calculated to the selected
destination.
RO
You have reached the destination or an inter-
mediate destination.
Radio menu
:Frequency range
;Station frequency with memory position
=Name of artist
?Name of track
AGenre The multifunction display shows station
;with
station frequency or station name. The preset
position is only displayed along with station ;if
this has been stored. You can store radio sta-
tions in the multimedia system.
XSwitch on the multimedia system (see sepa-
rate operating instructions).
XPress the òbutton on the steering wheel
to open the menu list.
XPress :or9 on the steering wheel to
select the Radiomenu.
XConfirm by pressing aon the steering
wheel.
Currently set station ;appears in the multi-
function display.
XTo open the station list: press the:or
9 button briefly.
XTo select a station in the station list: press
the : or9 button briefly.
XTo select a station in the station list using
rapid scrolling: press and hold the :or
9 button.
XTo select the frequency range or station
memory: pressabriefly.
XPress :or9 to select the frequency
range or station memory.
XPress ato confirm the selection.
iSIRIUS XM satellite radio functions like a
normal radio.
Further information on radio operation can be
found in the multimedia system (see the sep-
arate operating instructions).
Media menu
Changing the media source
Menus and submenus265
On-board computer and displays
Z
Page 274 of 438
XUse: or9 to select the DriveAssistsubmenu.
XPressato confirm your selection.
XPress the :or9 button to select
Lane Keeping Assist.
XPress ato confirm.
The current selection, StandardorAdap‐tive, appears.
XTo change the setting: pressaagain.
For further information about Active Lane Keep-
ing Assist, see (
Ypage 237).
HYBRID submenu (PLUG-IN HYBRID
vehicles)
Setting the maximum charge current
Using the Max.ChargeCurrentfunction, you
can limit the charge current value at which the
high-voltage battery should be charged.
Before starting the charging process at a power
socket, check the maximum permissible charge current for the relevant power socket or the
building.
Only set the maximum permissible charge cur-
rent using the function if:
Rit is not possible to set the charge current on
the charging cable
Rthe precise maximum permitted charge cur-
rent can only be set via the on-board com-
puter
Before charging the high-voltage battery at a
wallbox or charging station, ensure that the
charging current is not limited by the function. If
charging at a wallbox or a charging station,
select the maximum value.
Further information on charging the high-volt-
age battery and setting the charge current
(PLUG-IN HYBRID vehicles) (
Ypage 181).
XPress òon the steering wheel to open the
menu list.
XPress :or9 on the steering wheel to
select the Settingsmenu.
XConfirm by pressing aon the steering
wheel.
XPress :or9 to select the Hybridsubmenu.
XPressato confirm.
XPress :or9 to select the Max.Charge Currentfunction.
You will see the selected setting.
XPress the abutton to save the setting.
Before charging the high-voltage battery, check
the maximum permissible charge current for the
relevant power socket.
Further information on charging the high-volt-
age battery (PLUG-IN HYBRID vehicles)
(
Ypage 181).
Setting the departure time
You can climatize the vehicle interior prior to
your departure with the "Set departure time"
function. Further information on pre-entry cli-
mate control (
Ypage 157).
If you recharge the high-voltage battery, the
function also displays the charging prediction.
XPress the òbutton on the steering wheel
to open the menu list.
XPress :or9 on the steering wheel to
select the Settingsmenu.
XConfirm by pressing aon the steering
wheel.
XPress :or9 to select the Hybridsubmenu.
XPressato confirm.
XPress :or9 to select the DepartureTimefunction.
You will see the selected setting.
XPress the abutton to save the setting.
XTo set no departure time: press:or
9 to select No Pre-selection
.
XPressato confirm.
If you recharge the high-voltage battery, the
multifunction display also shows the time
when the high-voltage battery will be fully
charged.
or
XTo set a departure time: press:or9
A
, Bor Cto select the desired preset.
XPress the abutton to confirm the selec-
tion.
XPress :or9 to set the hours.
XPress ato confirm.
XPress :or9 to set the minutes.
XPress ato confirm.
If you recharge the high-voltage battery, the
multifunction display shows the expected
272Menus and submenus
On-board computer and displays