2016 MERCEDES-BENZ S-Class SEDAN change wheel
[x] Cancel search: change wheelPage 226 of 438
Object detection
The rear view camera can detect moving and
stationary objects. If, for example, a pedestrian
or another vehicle is detected, these objects are
marked with bars. The system is only able to
detect and mark stationary objects when your
vehicle is moving. When the vehicle is station-
ary, moving objects can be detected and
marked.
To ensure that you can use the function, it must
be switched on in the multimedia system (see
the separate operating instructions).
360° camera (surround view)
General notes
The 360° camera is a system consisting of four
cameras.
The system processes images from the follow-
ing cameras:
RRear view camera
RFront camera
RTwo side cameras in the exterior mirrors
The cameras capture the immediate surround-
ings of the vehicle. The 360° camera assists
you, for instance when parking or at exits with
reduced visibility.
You can show images from the 360° camera in
full-screen mode or in six different split-screen
views on the multimedia system. A split-screen
view also includes a top view of the vehicle. This
view is calculated from the data supplied by the installed cameras (virtual camera).
The six split-screen views are:
Rtop view and picture from the rear view cam-
era (130° viewing angle)
Rtop view and image from the front camera
(130° viewing angle without displaying the
maximum steering wheel angle)
Rtop view and enlarged rear view
Rtop view and enlarged front view
Rtop view and images from the rear-facing side
cameras (rear wheel view)
Rtop view and images from the forward-facing
side cameras (front wheel view)
When the function is active and you shift the
transmission from Dor Rto N, the guide lines
are hidden in the multimedia system. When you change between transmission posi-
tions
Dand R, you see the previously selected
front or rear view.
Distances measured by PARKTRONIC will also
be optically displayed:
Rin split screen view as red or yellow brackets around the vehicle icon in the top view, or
Rat the bottom right as red or yellow brackets
around the vehicle symbol in full-screen mode
The line thickness and color of the brackets
show how far the vehicle is from an object.
Ryellow brackets with thin lines: PARKTRONIC
is active
Ryellow brackets with normal lines: an object is present in close range of the vehicle
Rred line: an object is present in the immediate
close range of the vehicle
Important safety notes
The 360°camera is only an aid and may show a
distorted view of obstacles, show them incor-
rectly or not at all. The 360°camera is not a
substitute for attentive driving.
You are always responsible for safe maneuver-
ing and parking. When maneuvering or parking,
make sure that there are no persons, animals or
objects in the area in which you are maneuver-
ing.
You are always responsible for safety, and must
always pay attention to your surroundings when
parking and maneuvering. This applies to the
areas behind, in front of and beside the vehicle.
You could otherwise endanger yourself and oth-
ers.
The 360° camera will not function or will func-
tion in a limited manner:
Rif the doors are open
Rif the exterior mirrors are folded in
Rif the trunk lid is open
Rin heavy rain, snow or fog
Rat night or in very dark places
Rif the cameras are exposed to very bright light
Rif the area is lit by fluorescent bulbs or LED
lighting (the display may flicker)
Rif the camera lenses fog up, e.g. when driving
into a heated garage in winter, causing a rapid
change in temperature
224Driving systems
Driving and parking
Page 240 of 438

Rthe radar sensors in the front or rear bumpers
or the radiator trim are dirty, e.g. obscured by
snow
Rthere are no, several or unclear lane markings
for a lane, e.g. in areas with road construction
work
Rthe lane markings are worn away, dark or cov-
ered up, e.g. by dirt or snow
Rthe distance to the vehicle in front is too small
and the lane markings thus cannot be detec-
ted
Rthe lane markings change quickly, e.g. lanes
branch off, cross one another or merge
Rthe road is narrow and winding
Rthere are strong shadows cast on the road
If no vehicle is detected in the adjacent lane and
broken lane markings are detected, no lane-cor-
recting brake application is made.
Warning vibration in the steering wheel
A warning may be given if a front wheel passes
over a lane marking. It will warn you by means of
intermittent vibration in the steering wheel for
up to 1.5 second s.
In orde r that you are warned only when neces-
sary and in good time if you cross the lane mark-
ing, the system recognizes certain conditions
and warns you accordingly.
The warning vibration occurs earlier if:
Ryou approach the outer lane marking on a
bend.
Rthe road has very wide lanes, e.g. a highway.
Rthe system recognizes solid lane markings.
The warning vibration occurs later if:
Rthe road has narrow lanes
Ryou cut the corner on a bend
Lane-correcting brake application
If you leave your lane, under certain circumstan-
ces the vehicle will brake briefly on one side.
This is meant to assist you in bringing the vehicle
back to the original lane.
GWARNING
A lane-correcting brake application cannot
always bring the vehicle back into the original lane. There is a risk of an accident.
Always steer, brake or accelerate yourself,
especially if Active Lane Keeping Assist warns
you or makes a lane-correcting brake appli-
cation.
GWARNING
Active Lane Keeping Assist does not detect
traffic conditions or road users. In very rare
cases, the system may make an inappropriate brake application, e.g. after intentionally driv-
ing over a solid lane marking. There is a risk of
an accident.
An inappropriate brake application may be
interrupted at any time if you steer slightly in
the opposite direction. Always make sure that
there is sufficient distance on the side for
other traffic or obstacles.
If a lane-correcting brake application occurs,
display :appears in the multifunction display.
The brake application also slightly reduces vehi-
cle speed.
A lane-correcting brake application can be made
after driving over a lane marking recognized as
being solid or broken. Before this, a warning
must be given by means of intermittent vibration
in the steering wheel. In addition, a lane with
lane markings on both sides must be recog-
nized.
In the case of a broken lane marking being
detected, a lane-correcting brake application
can only be made if a vehicle has been detected
in the adjacent lane. The following vehicles can
have an influence on brake application: oncom-
ing traffic, vehicles that are overtaking and vehi-
cles that are driving parallel to your vehicle.
iA further lane-correcting brake application
can only occur after your vehicle has returned
to the original lane.
238Driving systems
Driving and parking
Page 252 of 438
Pulling away
XDepress the brake pedal and keep it
depressed.
XShift the transmission to positionDor R.
XIf the Apply Brake to Shift from 'P'display message appears in the multifunction
display, depress the brake pedal more firmly
and select the desired transmission position.
XRelease the brake pedal.
XCarefully depress the accelerator pedal.
For further information on pulling away
(
Ypage 165).
Driving
Program selector button
Automatic drive programs E, S and E+
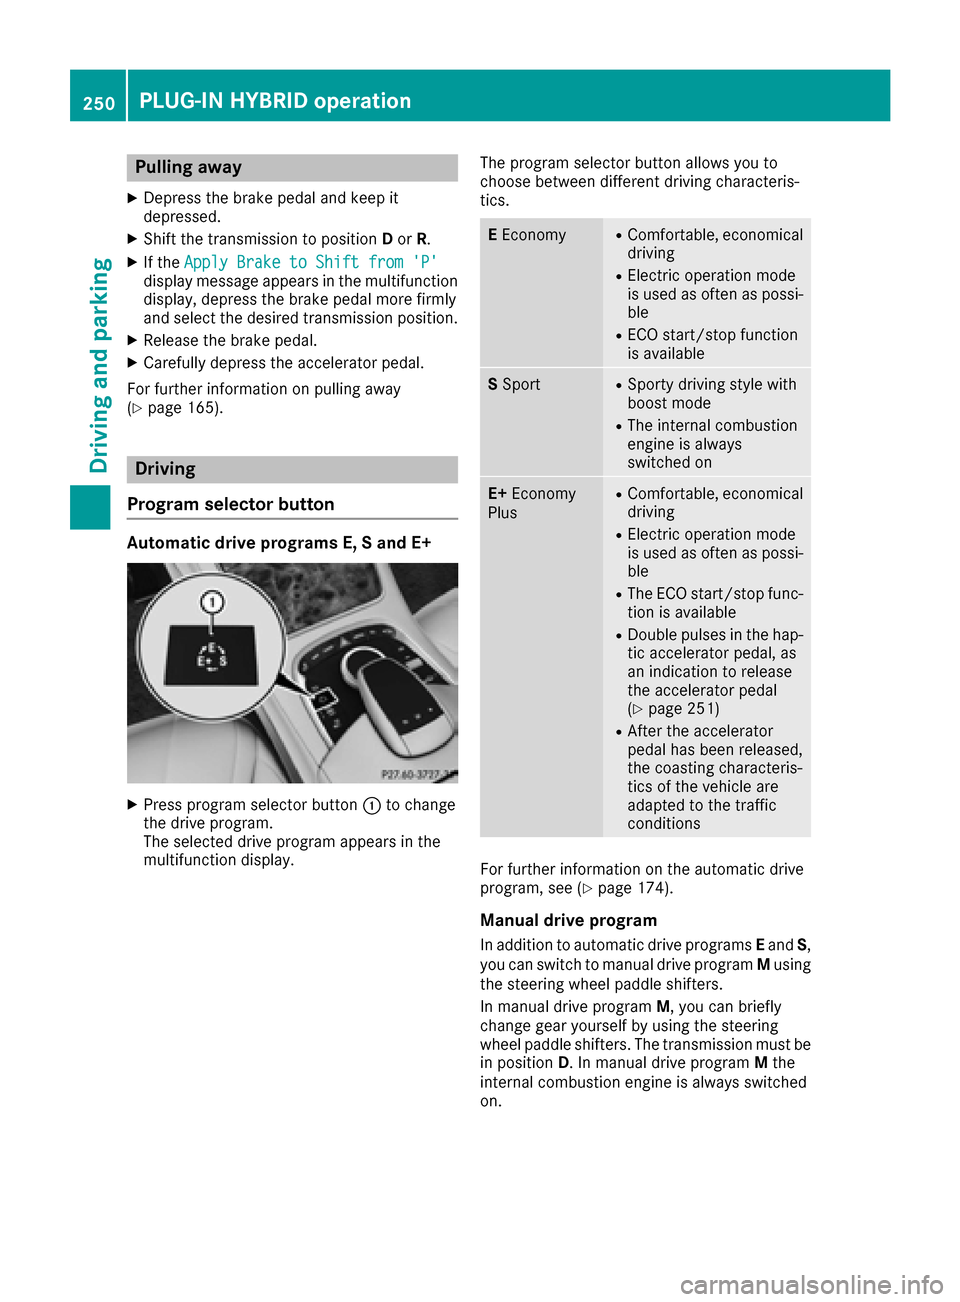
XPress program selector button :to change
the drive program.
The selected drive program appears in the
multifunction display. The program selector button allows you to
choose between different driving characteris-
tics.
E
EconomyRComfortable, economical
driving
RElectric operation mode
is used as often as possi-
ble
RECO start/stop function
is available
S SportRSporty driving style with
boost mode
RThe internal combustion
engine is always
switched on
E+ Economy
PlusRComfortable, economical
driving
RElectric operation mode
is used as often as possi-
ble
RThe ECO start/stop func-
tion is available
RDouble pulses in the hap-
tic accelerator pedal, as
an indication to release
the accelerator pedal
(
Ypage 251)
RAfter the accelerator
pedal has been released,
the coasting characteris-
tics of the vehicle are
adapted to the traffic
conditions
For further information on the automatic drive
program, see (Ypage 174).
Manual drive program
In addition to automatic drive programs Eand S,
you can switch to manual drive program Musing
the steering wheel paddle shifters.
In manual drive program M, you can briefly
change gear yourself by using the steering
wheel paddle shifters. The transmission must be
in position D. In manual drive program Mthe
internal combustion engine is always switched
on.
250PLUG‑IN HYBRID operation
Driving and parking
Page 259 of 438
Outside temperature display
You should pay special attention to road condi-
tions when temperatures are around freezing
point.
Bear in mind that the outside temperature dis-
play indicates the temperature measured and
does not record the road temperature.
The outside temperature display is in the multi-function display (
Ypage 258).
There is a short delay before a change in outside
temperature is shown in the multifunction dis-
play.
Coolant temperature display
GWARNING
Opening the hood when the engine is over-
heated or when there is a fire in the engine
compartment could expose you to hot gases
or other service products. There is a risk of
injury.
Let an overheated engine cool down before
opening the hood. If there is a fire in the
engine compartment, keep the hood closed
and contact the fire department.
!A display message is shown if the coolant
temperature is too high.
If the coolant temperature is above 257 ‡
(125 †) do not drive any further. The engine
will otherwise be damaged.
All vehicles except PLUG‑ IN HYBRID vehicles:
the coolant temperature gauge is in the lower
area of the tachometer (
Ypage 33).
PLUG-IN HYBRID vehicles: the multifunction dis-
play shows the coolant temperature in the
Coolant
submenu (Ypage 269).
Under normal operating conditions and with the
specified coolant level, the coolant temperature
may rise to 255 ‡ (124 †).
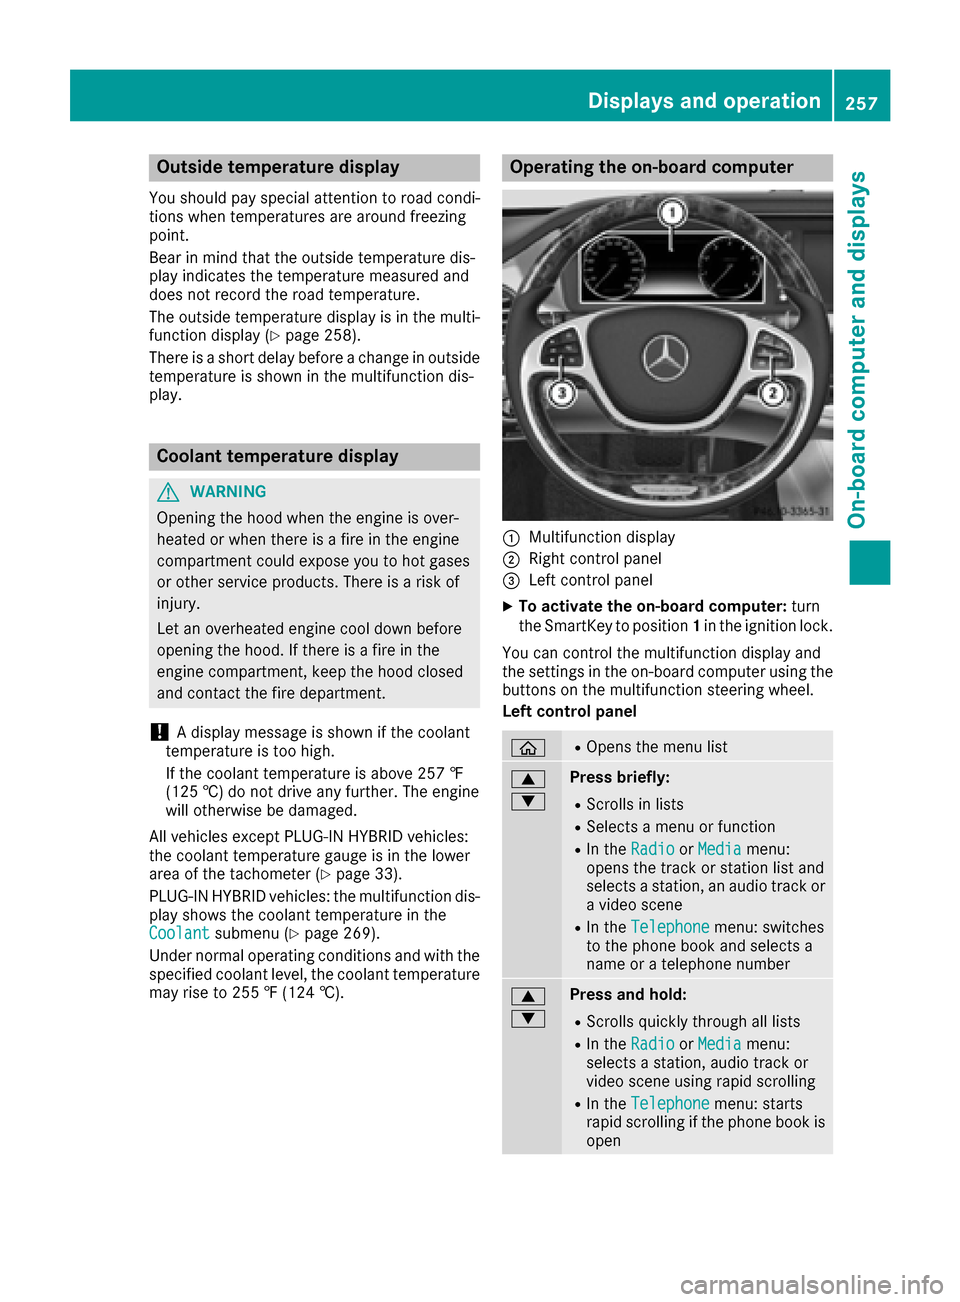
Operating the on-board computer
:Multifunction display
;Right control panel
=Left control panel
XTo activate the on-board computer: turn
the SmartKey to position 1in the ignition lock.
You can control the multifunction display and
the settings in the on-board computer using the
buttons on the multifunction steering wheel.
Left control panel
òROpens the menu list
9
:Press briefly:
RScrolls in lists
RSelects a menu or function
RIn the RadioorMediamenu:
opens the track or station list and
selects a station, an audio track or
a video scene
RIn the Telephonemenu: switches
to the phone book and selects a
name or a telephone number
9
:Press and hold:
RScrolls quickly through all lists
RIn the RadioorMediamenu:
selects a station, audio track or
video scene using rapid scrolling
RIn the Telephonemenu: starts
rapid scrolling if the phone book is
open
Displays and operation257
On-board computer and displays
Z
Page 268 of 438
You can change the media source and playback
mode (audio, video or TV) at any time in the
Media
menu.
XSwitch on the multimedia system (see sepa-
rate operating instructions).
XPress theòbutton on the steering wheel
to open the menu list.
XPress :or9 on the steering wheel to
select the Mediamenu.
XConfirm by pressing aon the steering
wheel.
XTo open/close the media sources list:
press abriefly.
The list shows the following media sources,
for example:
RDisc (CD/DVD)
RSD memory card
RMedia Register
RUSB storage device
RBluetooth®capable audio device
Please observe further information on media
support and media operation in the multimedia
system (see separate operating instructions).
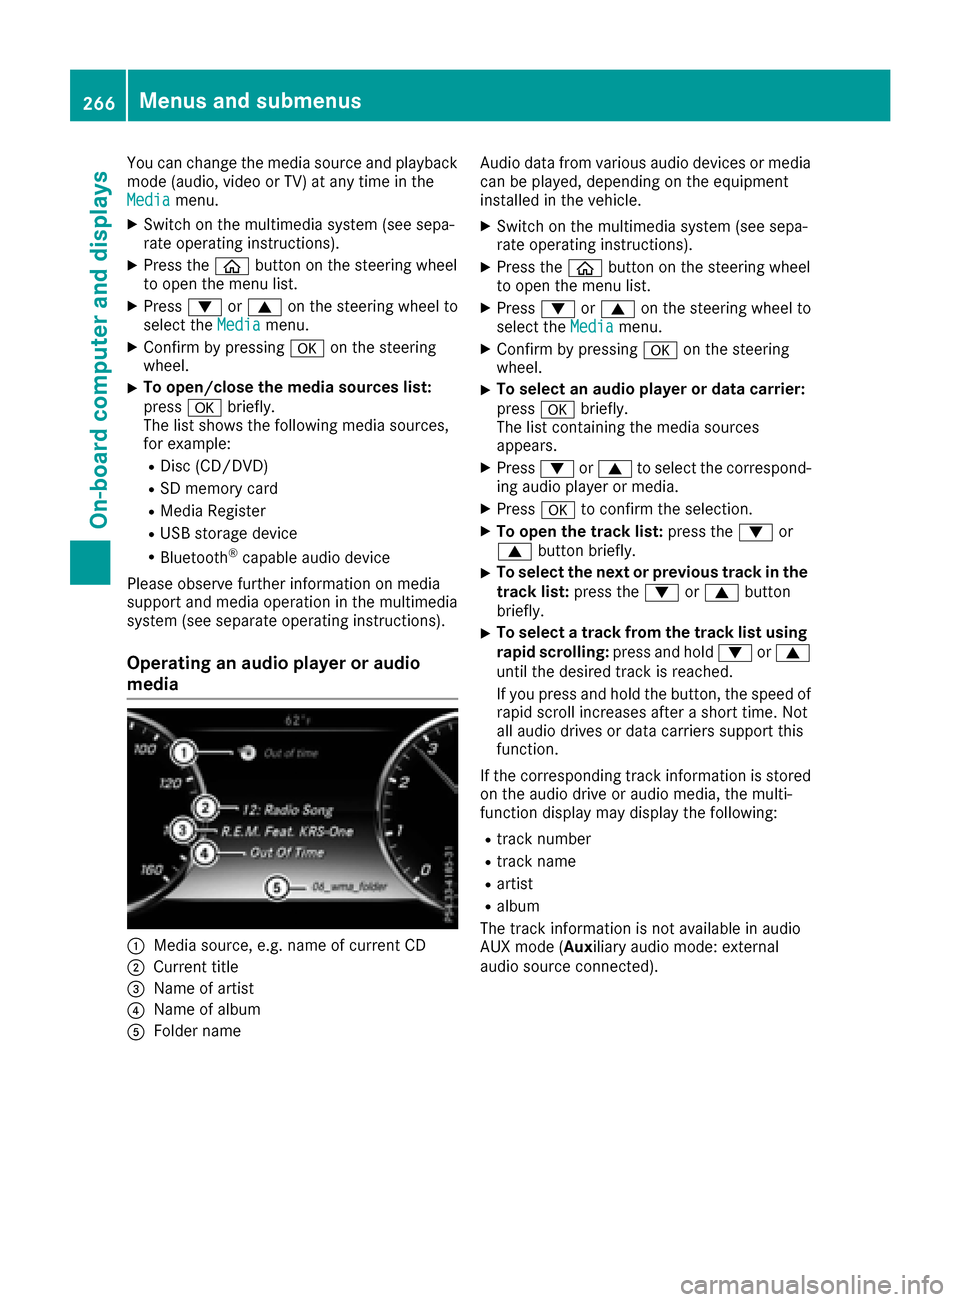
Operating an audio player or audio
media
:Media source, e.g. name of current CD
;Current title
=Name of artist
?Name of album
AFolder name Audio data from various audio devices or media
can be played, depending on the equipment
installed in the vehicle.
XSwitch on the multimedia system (see sepa-
rate operating instructions).
XPress the
òbutton on the steering wheel
to open the menu list.
XPress :or9 on the steering wheel to
select the Mediamenu.
XConfirm by pressing aon the steering
wheel.
XTo select an audio player or data carrier:
press abriefly.
The list containing the media sources
appears.
XPress :or9 to select the correspond-
ing audio player or media.
XPress ato confirm the selection.
XTo open the track list: press the:or
9 button briefly.
XTo select the next or previous track in the
track list: press the:or9 button
briefly.
XTo select a track from the track list using rapid scrolling: press and hold:or9
until the desired track is reached.
If you press and hold the button, the speed of
rapid scroll increases after a short time. Not
all audio drives or data carriers support this
function.
If the corresponding track information is stored
on the audio drive or audio media, the multi-
function display may display the following:
Rtrack number
Rtrack name
Rartist
Ralbum
The track information is not available in audio
AUX mode (Auxiliary audio mode: external
audio source connected).
266Menus and submenus
On-board computer and displays
Page 274 of 438
XUse: or9 to select the DriveAssistsubmenu.
XPressato confirm your selection.
XPress the :or9 button to select
Lane Keeping Assist.
XPress ato confirm.
The current selection, StandardorAdap‐tive, appears.
XTo change the setting: pressaagain.
For further information about Active Lane Keep-
ing Assist, see (
Ypage 237).
HYBRID submenu (PLUG-IN HYBRID
vehicles)
Setting the maximum charge current
Using the Max.ChargeCurrentfunction, you
can limit the charge current value at which the
high-voltage battery should be charged.
Before starting the charging process at a power
socket, check the maximum permissible charge current for the relevant power socket or the
building.
Only set the maximum permissible charge cur-
rent using the function if:
Rit is not possible to set the charge current on
the charging cable
Rthe precise maximum permitted charge cur-
rent can only be set via the on-board com-
puter
Before charging the high-voltage battery at a
wallbox or charging station, ensure that the
charging current is not limited by the function. If
charging at a wallbox or a charging station,
select the maximum value.
Further information on charging the high-volt-
age battery and setting the charge current
(PLUG-IN HYBRID vehicles) (
Ypage 181).
XPress òon the steering wheel to open the
menu list.
XPress :or9 on the steering wheel to
select the Settingsmenu.
XConfirm by pressing aon the steering
wheel.
XPress :or9 to select the Hybridsubmenu.
XPressato confirm.
XPress :or9 to select the Max.Charge Currentfunction.
You will see the selected setting.
XPress the abutton to save the setting.
Before charging the high-voltage battery, check
the maximum permissible charge current for the
relevant power socket.
Further information on charging the high-volt-
age battery (PLUG-IN HYBRID vehicles)
(
Ypage 181).
Setting the departure time
You can climatize the vehicle interior prior to
your departure with the "Set departure time"
function. Further information on pre-entry cli-
mate control (
Ypage 157).
If you recharge the high-voltage battery, the
function also displays the charging prediction.
XPress the òbutton on the steering wheel
to open the menu list.
XPress :or9 on the steering wheel to
select the Settingsmenu.
XConfirm by pressing aon the steering
wheel.
XPress :or9 to select the Hybridsubmenu.
XPressato confirm.
XPress :or9 to select the DepartureTimefunction.
You will see the selected setting.
XPress the abutton to save the setting.
XTo set no departure time: press:or
9 to select No Pre-selection
.
XPressato confirm.
If you recharge the high-voltage battery, the
multifunction display also shows the time
when the high-voltage battery will be fully
charged.
or
XTo set a departure time: press:or9
A
, Bor Cto select the desired preset.
XPress the abutton to confirm the selec-
tion.
XPress :or9 to set the hours.
XPress ato confirm.
XPress :or9 to set the minutes.
XPress ato confirm.
If you recharge the high-voltage battery, the
multifunction display shows the expected
272Menus and submenus
On-board computer and displays
Page 275 of 438

condition of charge of the high-voltage bat-
tery for the departure time set.
Further information on charging the high-volt-
age battery (PLUG-IN HYBRID vehicles)
(
Ypage 181).
Head-up display submenu
Selecting other displays
:Vehicle speed display
;Vehicle speed and navigation instruction
display
=Vehicle speed display and Traffic Sign Assist
Using the Display Content
function, you can
choose from up to four display options depend-
ing on the vehicle's equipment. The selected
contents appear in the head-up display.
In Mercedes-AMG vehicles, you can also choose
between two AMG displays. If you select an
AMG display, the head-up display shows AMG-
specific contents.
XPress the òbutton on the steering wheel
to open the menu list.
XPress :or9 on the steering wheel to
select the Settingsmenu.
XConfirm by pressing aon the steering
wheel.
XPress :or9 to select the Head-upDisplaysubmenu.
XPressato confirm.
XPress :or9 to select Display Con‐tent.
XPressato confirm.
A graphic selection list appears.
XPress :or9 to select the desired dis-
play.
XPress the abutton to confirm the selec-
tion. For further information about the traffic sign
displays, see Traffic Sign Assist (
Ypage 229).
Further information on navigation displays can
be found in the multimedia system; see the sep-
arate operating instructions.
Setting the position
You can adjust the position of the head-up dis-
play on the windshield. You can compensate for
height differences if the seat positions are
changed, for example.
XSwitch on the head-up display (Ypage 259).
XPress the òbutton on the steering wheel
to open the menu list.
XPress the :or9 button on the steering
wheel to select the Settingsmenu.
XConfirm by pressing aon the steering
wheel.
XPress :or9 to select the Head-upDisplaysubmenu.
XPressato confirm.
XPress :or9 to select the Positionfunction.
XPress theabutton to save the setting.
XPress :or9 to adjust the position to a
level from Level+5(up) toLevel-5(down).
XPress the aor% button to save the
setting.
Using the Memory function, you can save and
call up the set position of the head-up display as
a single memory preset (
Ypage 126).
Setting the brightness
The brightness of the head-up display is auto-
matically adjusted to the surrounding ambient
light. You can also individually adjust the bright-
ness of the head-up display.
XSwitch on the head-up display (Ypage 259).
XPress òon the steering wheel to open the
menu list.
XPress the :or9 button on the steering
wheel to select the Settingsmenu.
XConfirm by pressing aon the steering
wheel.
XUse : or9 to select the Head-upDisplaysubmenu.
XPressato confirm.
XPress :or9 to select the Brightnessfunction.
XPress theabutton to save the setting.
Menus and submenus273
On-board computer and displays
Z
Page 308 of 438
Tires
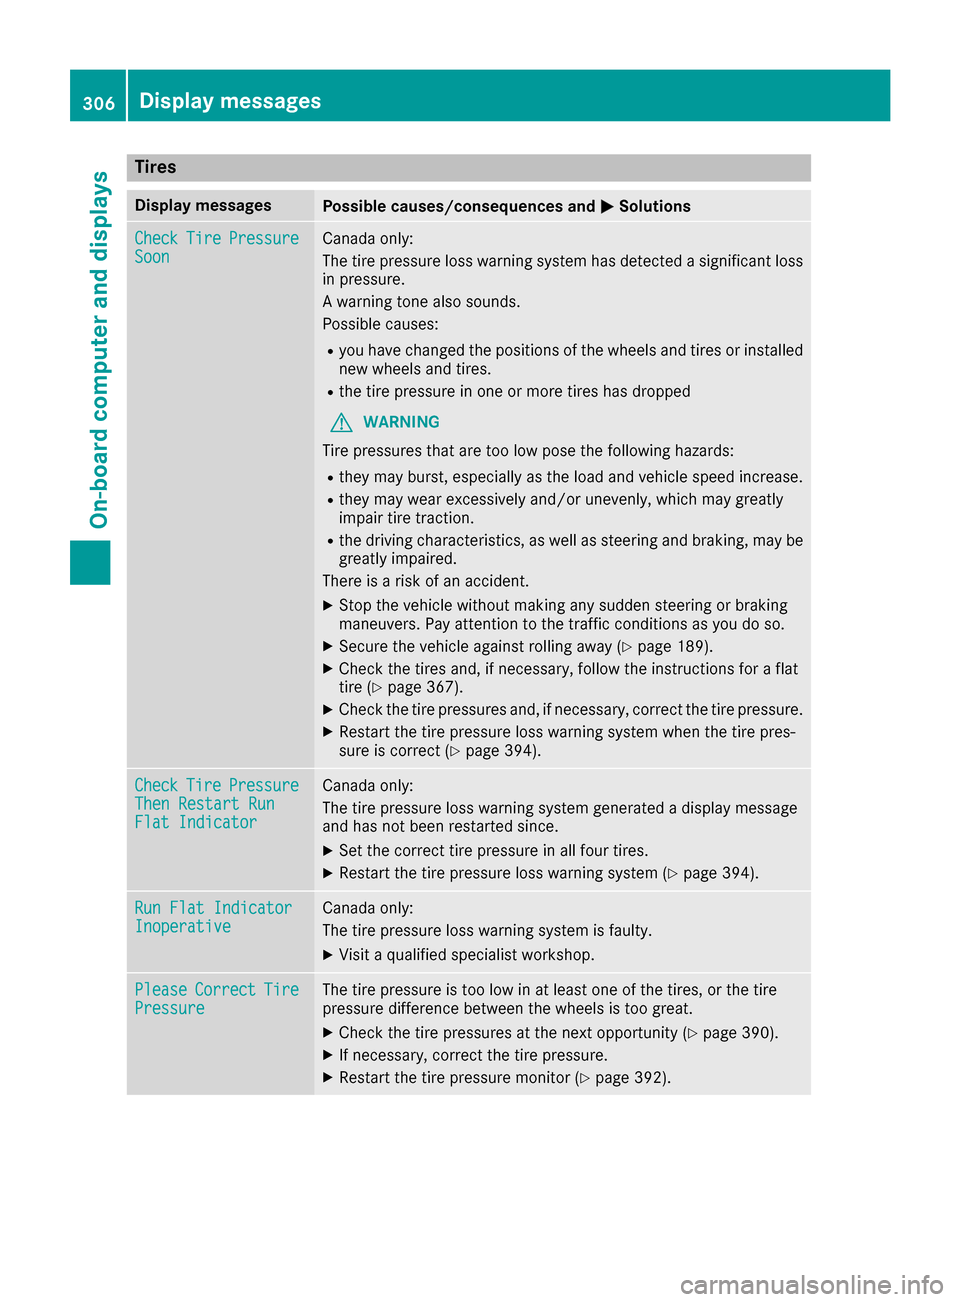
Display messagesPossible causes/consequences andMSolutions
CheckTirePressureSoonCanada only:
The tire pressure loss warning system has detected a significant loss
in pressure.
A warning tone also sounds.
Possible causes:
Ryou have changed the positions of the wheels and tires or installed
new wheels and tires.
Rthe tire pressure in one or more tires has dropped
GWARNING
Tire pressures that are too low pose the following hazards:
Rthey may burst, especially as the load and vehicle speed increase.
Rthey may wear excessively and/or unevenly, which may greatly
impair tire traction.
Rthe driving characteristics, as well as steering and braking, may be
greatly impaired.
There is a risk of an accident.
XStop the vehicle without making any sudden steering or braking
maneuvers. Pay attention to the traffic conditions as you do so.
XSecure the vehicle against rolling away (Ypage 189).
XCheck the tires and, if necessary, follow the instructions for a flat
tire (Ypage 367).
XCheck the tire pressures and, if necessary, correct the tire pressure.
XRestart the tire pressure loss warning system when the tire pres-
sure is correct (Ypage 394).
CheckTirePressureThen Restart RunFlat Indicator
Canada only:
The tire pressure loss warning system generated a display message
and has not been restarted since.
XSet the correct tire pressure in all four tires.
XRestart the tire pressure loss warning system (Ypage 394).
Run Flat IndicatorInoperativeCanada only:
The tire pressure loss warning system is faulty.
XVisit a qualified specialist workshop.
PleaseCorrectTirePressureThe tire pressure is too low in at least one of the tires, or the tire
pressure difference between the wheels is too great.
XCheck the tire pressures at the next opportunity (Ypage 390).
XIf necessary, correct the tire pressure.
XRestart the tire pressure monitor (Ypage 392).
306Displa y messages
On-board computer and displays