2016 MERCEDES-BENZ S-Class SEDAN battery light
[x] Cancel search: battery lightPage 155 of 438
Front control panel
XTurn theSmartKey to position 0in th eignition
loc kor remove it (Ypage 162).
XTo activate: press the! orÁ rocker
switch up or down .
The indicator lamp in th e! orÁ rocke r
switch lights up.
The blowe rwill run at alow spee dregardless of
th eairflow setting .
If you activat eth eresidual heat function at high
temperatures ,only th eventilation will be acti-
vated. The blowe rrun sat medium speed.
XTo deactivate: press the! orÁ
rocke rswitch up or down .
The indicator lamp in th e! orÁ rocke r
switch goes out .
Rear control panel
XTurn theSmartKey to position 0in th eignition
loc kor remove it (Ypage 162).
The RESTdisplay appear son th erear com-
partmen tdisplay.
XTo activate: press rockerswitch Lup or
down (Ypage 141).
The indicator lamp in rocke rswitch Llights
up.
XTo deactivate: press rockerswitch Lup or
down (Ypage 141).
The indicator lamp in rocke rswitch Lgoes
out .RES Tgoes out on th erear compartmen t
display.
iIf you do no tactivat eth eresidual heat func-
tion ,RES Tgoes out automatically after fiv e
minute son th erear compartmen tdisplay.
Residual heat is deactivated automatically:
Rafter approximately 30 minute sif the residual
heat function is activated in the front or rear
compartment
Rafter approximately 15 minutes if the residual
heat function is activated in the front and rear
compartments
Rwhen the ignition is switched on
Rif the battery voltage drops
Perfume atomizer
Operating the perfume atomizer
GWARNING
If children open the vial, they could drink the
perfume or it could come into contact with
their eyes. There is a risk of injury. Do not
leave children unsupervised in the vehicle.
If the perfume liquid has been drunk, consult
a doctor. If perfume comes into contact with
your eyes or skin, rinse the eyes with clean
water. If you continue to experience difficul-
ties, consult a doctor.
HEnvironmental note
Full vials must not be dis-
posed of with household
waste. They must be collec-
ted separately and recycled
to protect the environment.
Dispose of full vials in an
environmentally responsible
manner and take them to a
harmful substance collec-
tion point.
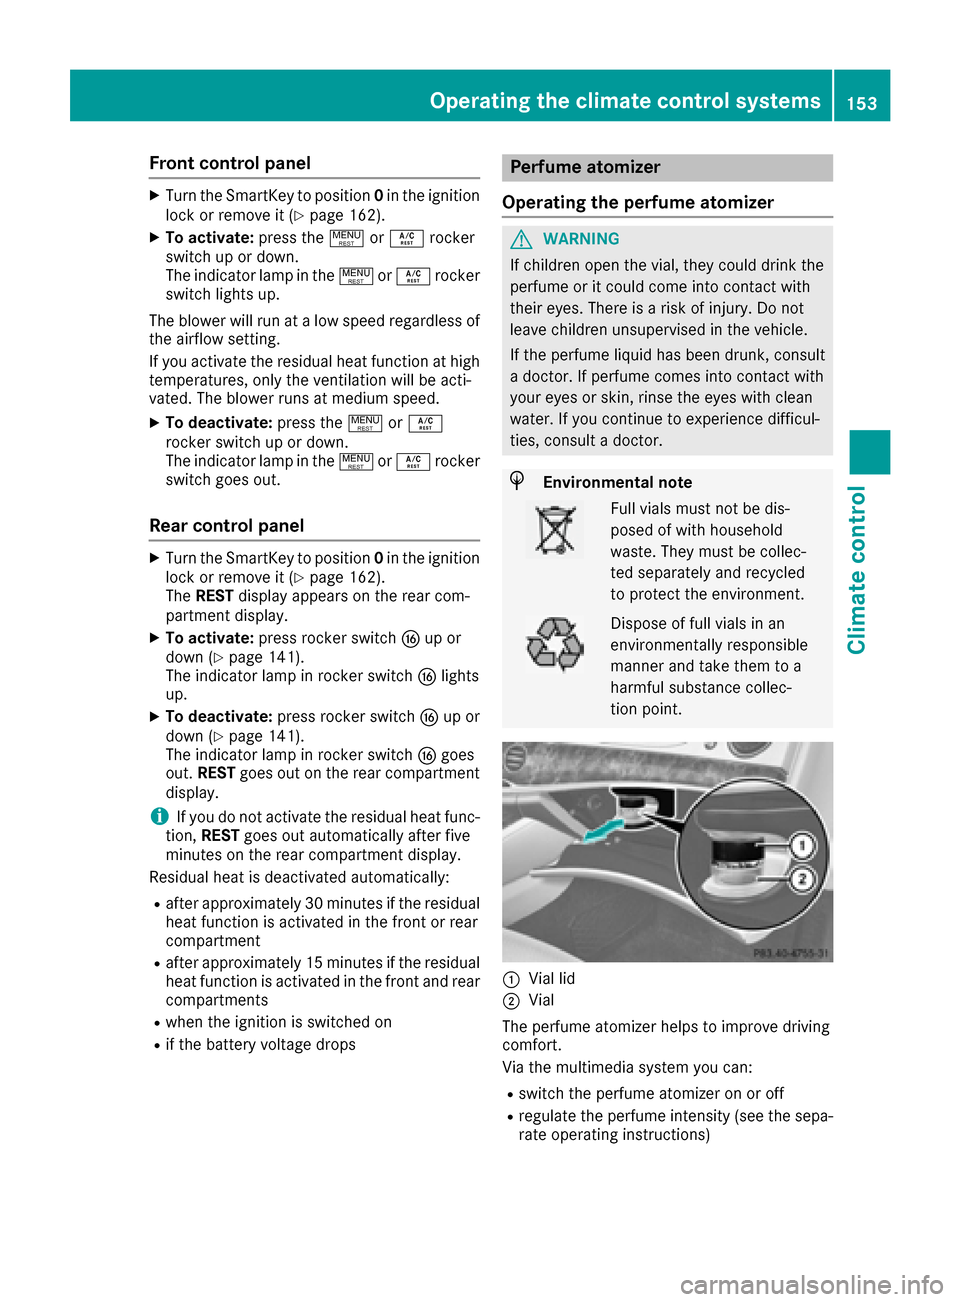
:Vial lid
;Vial
The perfume atomizer helps to improve driving
comfort.
Via the multimedia system you can:
Rswitch the perfume atomizer on or off
Rregulate the perfume intensity (see the sepa-
rate operating instructions)
Operating the climate control systems153
Climate control
Z
Page 169 of 438
then not necessary to continue applying the
brakes during the automatic stop phase. When
you depress the accelerator pedal, the engine
starts automatically and the braking effect of
the HOLD function is deactivated.
All vehicles (except Mercedes-AMG vehi-
cles):automatic engine switch-off can take
place a maximum of four times in a row (initial
stop, then three subsequent stops).
Mercedes-AMG vehicles: the number of con-
secutive automatic engine switch-offs is unlimi-
ted.
Automatic engine start
The engine starts automatically if:
Ryou switch off the ECO start/stop function by pressing the ECO button
Ryou switch to drive program Sor M
Rin transmission position Dor Nthe brake
pedal is released and the HOLD function is not
active
Ryou depress the accelerator pedal
Ryou engage reverse gear R
Ryou move the transmission out of position P
Ryou unfasten your seat belt or open the driv-
er's door
Rthe vehicle starts to roll
Rthe brake system requires this
Rthe temperature in the vehicle interior devi-
ates from the set range
Rthe system detects moisture on the wind-
shield when the air-conditioning system is
switched on
Rthe battery's condition of charge is too low
Shifting the transmission to position Pdoes not
start the engine.
Deactivating or activating the ECO
start/stop function
All vehicles (except Mercedes-AMG vehi-
cles)
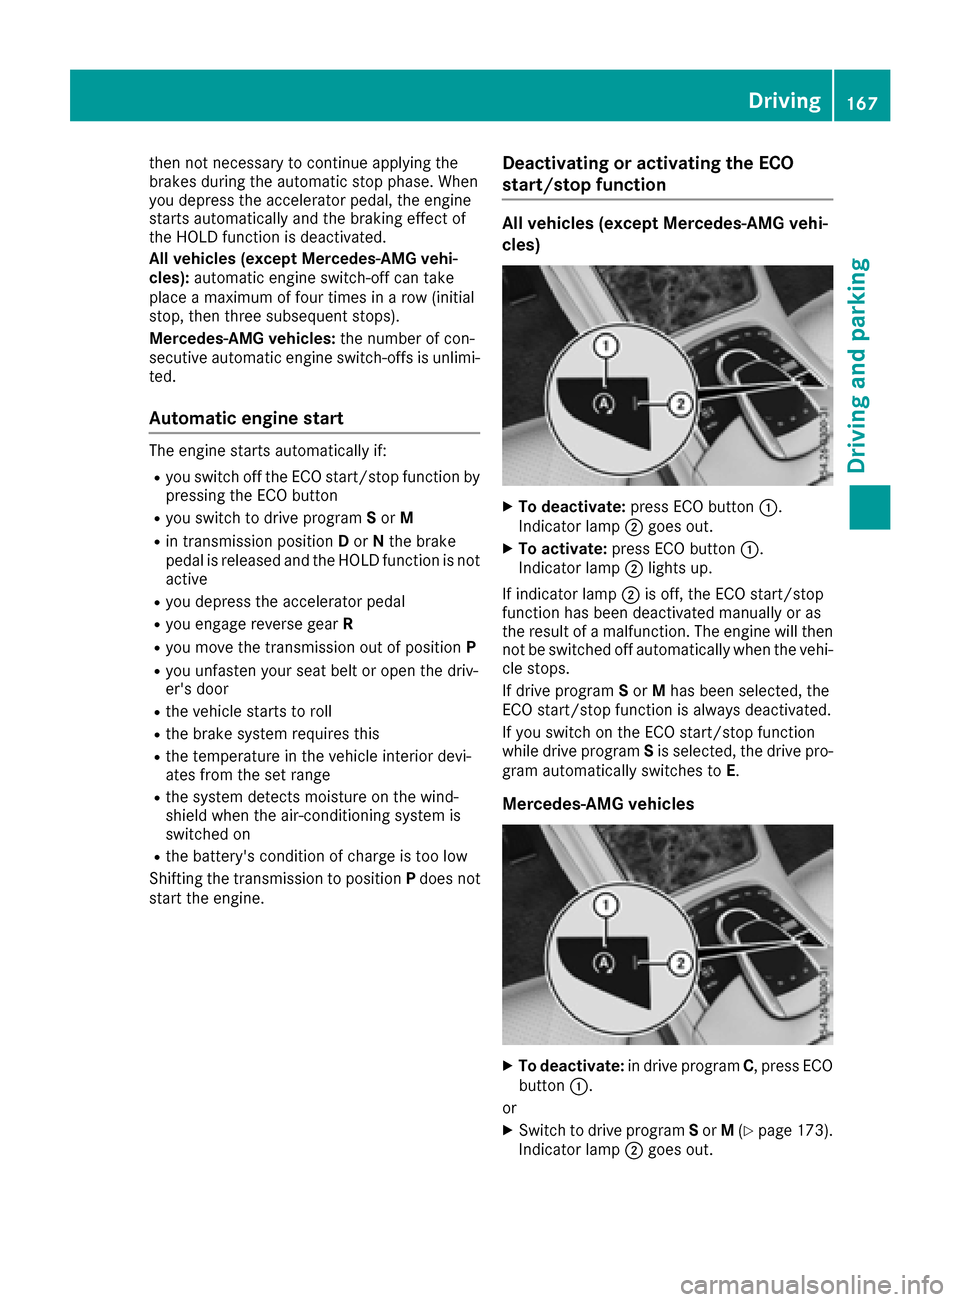
XTo deactivate: press ECO button :.
Indicator lamp ;goes out.
XTo activate: press ECO button :.
Indicator lamp ;lights up.
If indicator lamp ;is off, the ECO start/stop
function has been deactivated manually or as
the result of a malfunction. The engine will then
not be switched off automatically when the vehi- cle stops.
If drive program Sor Mhas been selected, the
ECO start/stop function is always deactivated.
If you switch on the ECO start/stop function
while drive program Sis selected, the drive pro-
gram automatically switches to E.
Mercedes-AMG vehicles
XTo deactivate: in drive program C, press ECO
button :.
or
XSwitch to drive program Sor M(Ypage 173).
Indicator lamp ;goes out.
Driving167
Driving an d parking
Z
Page 171 of 438
Problems with the engine
ProblemPossible causes/consequences andMSolutions
The engine does not
start. The starter motor
can be heard.RThere is a malfunction in the engine electronics.
RThere is a malfunction in the fuel supply.
Before attempting to start the engine again:
XTurn the SmartKey back to position 0in the ignition lock.
or
XPress the Start/Stop button repeatedly until all indicator lamps in
the instrument cluster go out.
XTry to start the engine again (Ypage 164). Avoid excessively long
and frequent attempts to start the engine as these will drain the
battery.
If the engine does not start after several attempts:
XConsult a qualified specialist workshop.
The engine does not
start. You cannot hear
the starter motor.The on-board voltage is too low because the battery is too weak or
discharged.
XJump-start the vehicle (Ypage 376).
If the engine does not start despite attempts to jump-start it:
XConsult a qualified specialist workshop.
The starter motor was exposed to a thermal load that was too high.
XTry to start the engine again.
If the engine still does not start:
XConsult a qualified specialist workshop.
The engine is not running
smoothly and is misfir-
ing.There is a malfunction in the engine electronics or in a mechanical
component of the engine management system.
XOnly depress the accelerator pedal slightly.
Otherwise, non-combusted fuel may get into the catalytic converter
and damage it.
XHave the cause rectified immediately at a qualified specialist work-
shop.
The coolant temperature
gauge shows a value
above 248 ‡ (120 †).The coolant level is too low. The coolant is too hot and the engine is no
longer being cooled sufficiently.
XStop as soon as possible and allow the engine and the coolant to
cool down.
XCheck the coolant level (Ypage 356). Observe the warning notes
as you do so and add coolant if necessary.
Driving169
Driving and parking
Z
Page 185 of 438
Switch on the building protection system again
after it has been triggered. Otherwise, the
charging process cannot be continued.
General information about the charging
procedure
Pay attention to the "Important safety notes"
(Ypage 180).
The vehicle socket is located in the rear bumper on the right below the tail lamp.
The charge socket flap and the vehicle are cen-
trally locked or unlocked simultaneously.
Charging the high-voltage battery via
the electrical outlet
Charging cable for electrical outlets
Important safety notes
!Only use the charging cable to charge the
high-voltage battery. Do not use the charging
cable for other purposes. It may otherwise be damaged.
The vehicle is supplied with a country-specific
charging cable for connection to a mains socket.
Only use the charging cable supplied with the
vehicle or a charging cable approved for the
vehicle.
iIf you use the supplied 12 A charging cable
to charge a high-voltage battery:
Rthe charge time increases considerably
Relectrical consumption increases consider-
ably
Where possible, charge the high-voltage bat-
tery at a charging station (
Ypage 186). Only
then can certified electrical energy consump-
tion levels be reached.
iThe charging process can vary depending on
the power supply. Therefore, always observe
the local information.
Information about charging from a wallbox can
be found at (
Ypage 185).
Information about charging at a charging station
can be found at (
Ypage 186).
Stowing the charging cable
The charging cable can be stowed and held in
place in the bag provided in the trunk of the
vehicle.
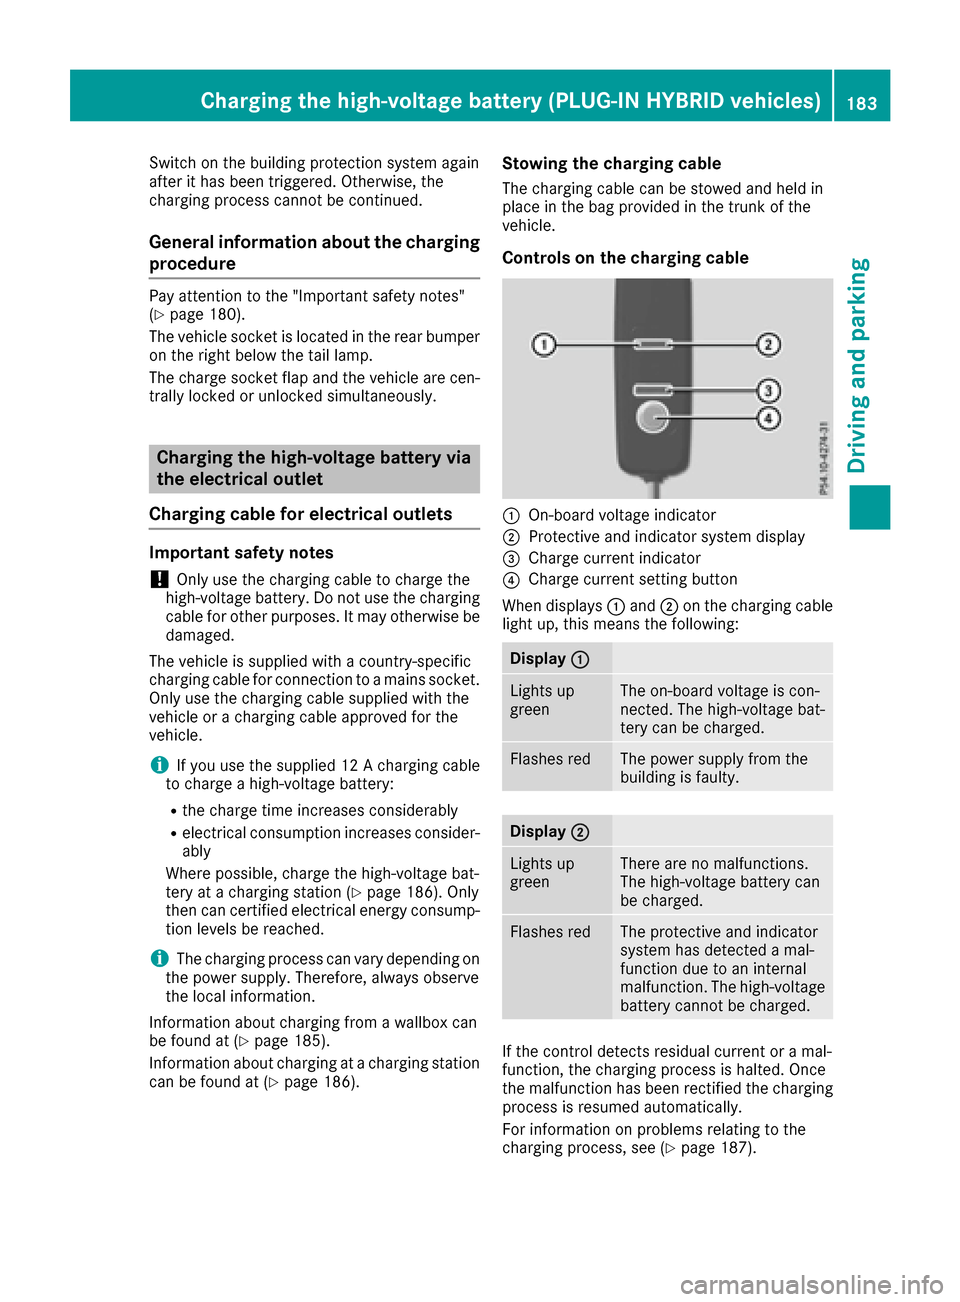
Controls on the charging cable
:On-board voltage indicator
;Protective and indicator system display
=Charge current indicator
?Charge current setting button
When displays :and ;on the charging cable
light up, this means the following:
Display :
Lights up
greenThe on-board voltage is con-
nected. The high-voltage bat-
tery can be charged.
Flashes redThe power supply from the
building is faulty.
Display;
Lights up
greenThere are no malfunctions.
The high-voltage battery can
be charged.
Flashes redThe protective and indicator
system has detected a mal-
function due to an internal
malfunction. The high-voltage
battery cannot be charged.
If the control detects residual current or a mal-
function, the charging process is halted. Once
the malfunction has been rectified the charging
process is resumed automatically.
For information on problems relating to the
charging process, see (
Ypage 187).
Charging the high-voltage battery (PLUG-IN HYBRID vehicles)183
Driving and parking
Z
Page 186 of 438
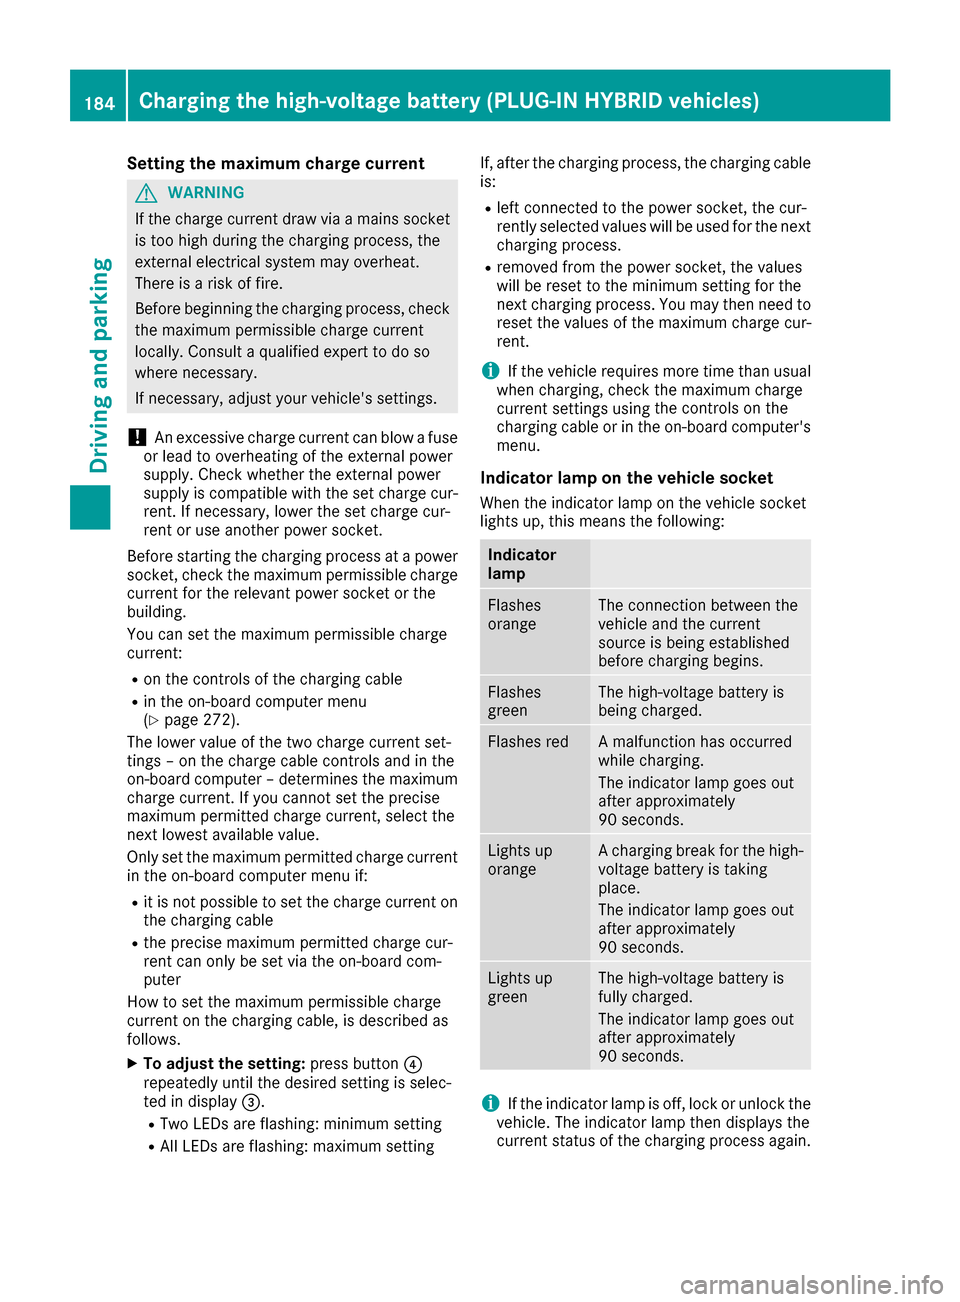
Setting the maximum charge current
GWARNING
If the charge current draw via a mains socket
is too high during the charging process, the
external electrical system may overheat.
There is a risk of fire.
Before beginning the charging process, check
the maximum permissible charge current
locally. Consult a qualified expert to do so
where necessary.
If necessary, adjust your vehicle's settings.
!An excessive charge current can blow a fuse
or lead to overheating of the external power
supply. Check whether the external power
supply is compatible with the set charge cur-
rent. If necessary, lower the set charge cur-
rent or use another power socket.
Before starting the charging process at a power
socket, check the maximum permissible charge current for the relevant power socket or the
building.
You can set the maximum permissible charge
current:
Ron the controls of the charging cable
Rin the on-board computer menu
(Ypage 272).
The lower value of the two charge current set-
tings – on the charge cable controls and in the
on-board computer – determines the maximum
charge current. If you cannot set the precise
maximum permitted charge current, select the
next lowest available value.
Only set the maximum permitted charge current in the on-board computer menu if:
Rit is not possible to set the charge current on
the charging cable
Rthe precise maximum permitted charge cur-
rent can only be set via the on-board com-
puter
How to set the maximum permissible charge
current on the charging cable, is described as
follows.
XTo adjust the setting: press button?
repeatedly until the desired setting is selec-
ted in display =.
RTwo LEDs are flashing: minimum setting
RAll LEDs are flashing: maximum setting If, after the charging process, the charging cable
is:
Rleft connected to the power socket, the cur-
rently selected values will be used for the next
charging process.
Rremoved from the power socket, the values
will be reset to the minimum setting for the
next charging process. You may then need to
reset the values of the maximum charge cur-
rent.
iIf the vehicle requires more time than usual
when charging, check the maximum charge
current settings using the controls on the
charging cable or in the on-board comput
er's
menu.
Indicator lamp on the vehicle socket
When the indicator lamp on the vehicle socket
lights up, this means the following:
Indicator
lamp
Flashes
orangeThe connection between the
vehicle and the current
source is being established
before charging begins.
Flashes
greenThe high-voltage battery is
being charged.
Flashes redA malfunction has occurred
while charging.
The indicator lamp goes out
after approximately
90 seconds.
Lights up
orangeA charging break for the high-
voltage battery is taking
place.
The indicator lamp goes out
after approximately
90 seconds.
Lights up
greenThe high-voltage battery is
fully charged.
The indicator lamp goes out
after approximately
90 seconds.
iIf the indicator lamp is off, lock or unlock the
vehicle. The indicator lamp then displays the
current status of the charging process again.
184Charging the high-voltage battery (PLUG-IN HYBRID vehicles)
Driving and parking
Page 187 of 438
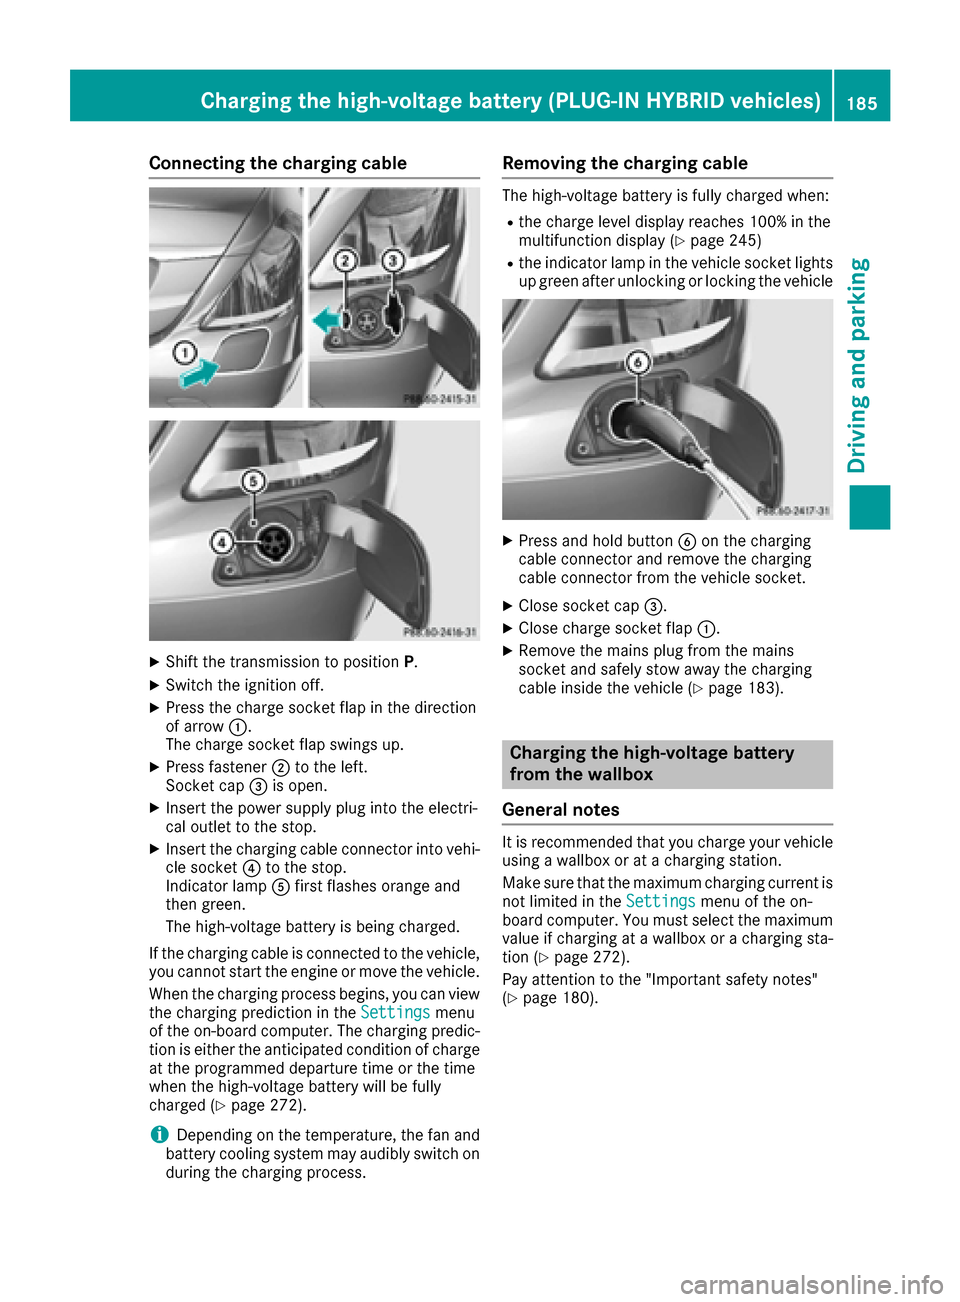
Connecting the charging cable
XShift the transmission to positionP.
XSwitch the ignition off.
XPress the charge socket flap in the direction
of arrow:.
The charge socket flap swings up.
XPress fastener ;to the left.
Socket cap =is open.
XInsert the power supply plug into the electri-
cal outlet to the stop.
XInsert the charging cable connector into vehi-
cle socket ?to the stop.
Indicator lamp Afirst flashes orange and
then green.
The high-voltage battery is being charged.
If the charging cable is connected to the vehicle,
you cannot start the engine or move the vehicle.
When the charging process begins, you can view
the charging prediction in the Settings
menu
of the on-board computer. The charging predic-
tion is either the anticipated condition of charge
at the programmed departure time or the time
when the high-voltage battery will be fully
charged (
Ypage 272).
iDepending on the temperature, the fan and
battery cooling system may audibly switch on
during the charging process.
Removing the charging cable
The high-voltage battery is fully charged when:
Rthe charge level display reaches 100% in the
multifunction display (Ypage 245)
Rthe indicator lamp in the vehicle socket lights up green after unlocking or locking the vehicle
XPress and hold button Bon the charging
cable connector and remove the charging
cable connector from the vehicle socket.
XClose socket cap =.
XClose charge socket flap :.
XRemove the mains plug from the mains
socket and safely stow away the charging
cable inside the vehicle (
Ypage 183).
Charging the high-voltage battery
from the wallbox
General notes
It is recommended that you charge your vehicle
using a wallbox or at a charging station.
Make sure that the maximum charging current is
not limited in the Settings
menu of the on-
board computer. You must select the maximum
value if charging at a wallbox or a charging sta-
tion (
Ypage 272).
Pay attention to the "Important safety notes"
(
Ypage 180).
Charging the high-voltage battery (PLUG-IN HYBRID vehicles)185
Driving and parking
Z
Page 188 of 438
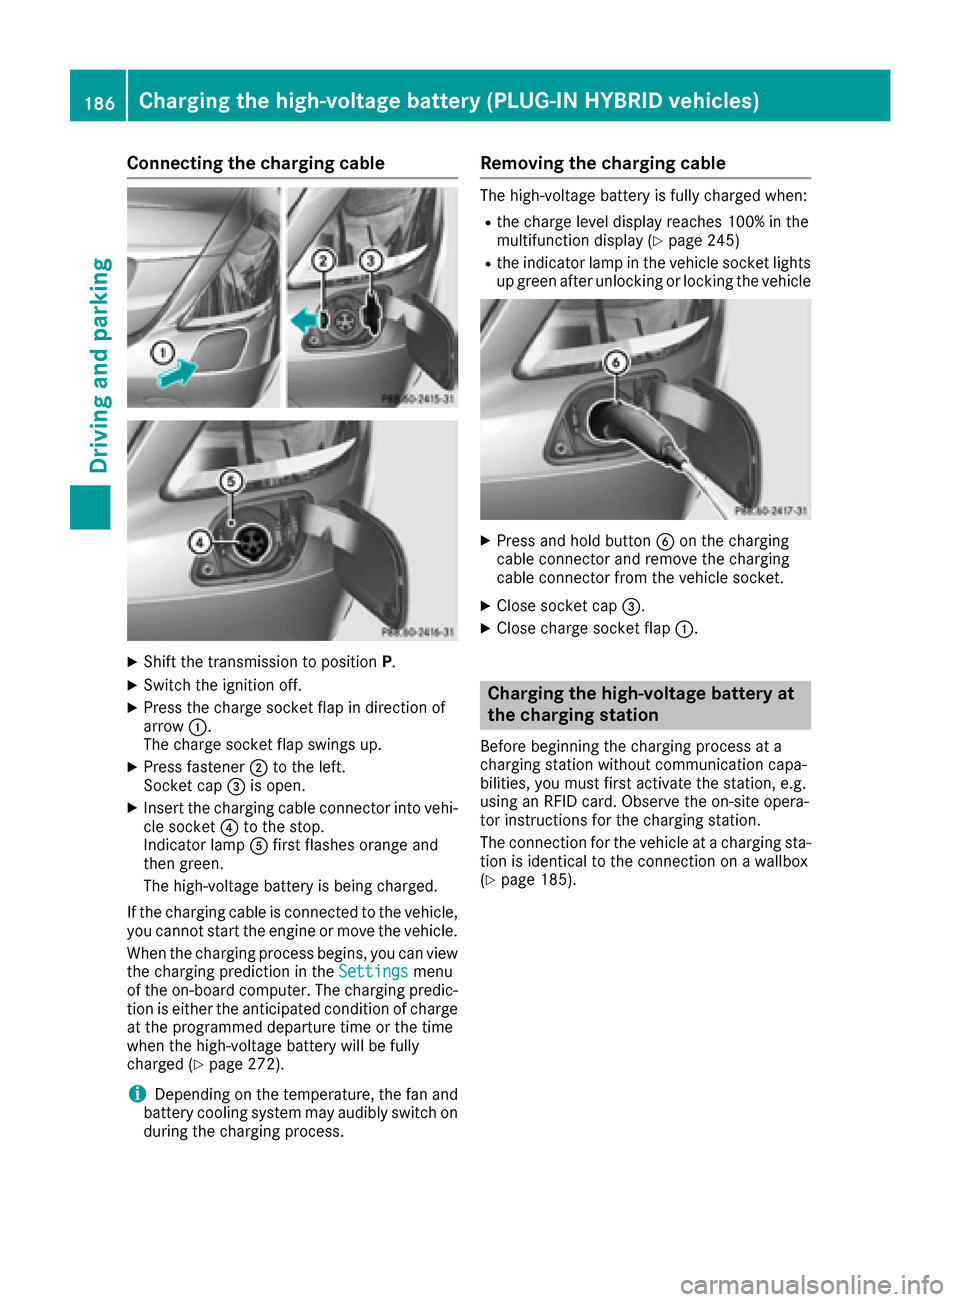
Connecting the charging cable
XShift the transmission to positionP.
XSwitch the ignition off.
XPress the charge socket flap in direction of
arrow:.
The charge socket flap swings up.
XPress fastener ;to the left.
Socket cap =is open.
XInsert the charging cable connector into vehi-
cle socket ?to the stop.
Indicator lamp Afirst flashes orange and
then green.
The high-voltage battery is being charged.
If the charging cable is connected to the vehicle,
you cannot start the engine or move the vehicle.
When the charging process begins, you can view
the charging prediction in the Settings
menu
of the on-board computer. The charging predic-
tion is either the anticipated condition of charge
at the programmed departure time or the time
when the high-voltage battery will be fully
charged (
Ypage 272).
iDepending on the temperature, the fan and
battery cooling system may audibly switch on
during the charging process.
Removing the charging cable
The high-voltage battery is fully charged when:
Rthe charge level display reaches 100% in the
multifunction display (Ypage 245)
Rthe indicator lamp in the vehicle socket lights up green after unlocking or locking the vehicle
XPress and hold button Bon the charging
cable connector and remove the charging
cable connector from the vehicle socket.
XClose socket cap =.
XClose charge socket flap :.
Charging the high-voltage battery at
the charging station
Before beginning the charging process at a
charging station without communication capa-
bilities, you must first activate the station, e.g.
using an RFID card. Observe the on-site opera-
tor instructions for the charging station.
The connection for the vehicle at a charging sta-
tion is identical to the connection on a wallbox
(
Ypage 185).
186Charging the high-voltage battery (PLUG-IN HYBRID vehicles)
Driving and parking
Page 190 of 438
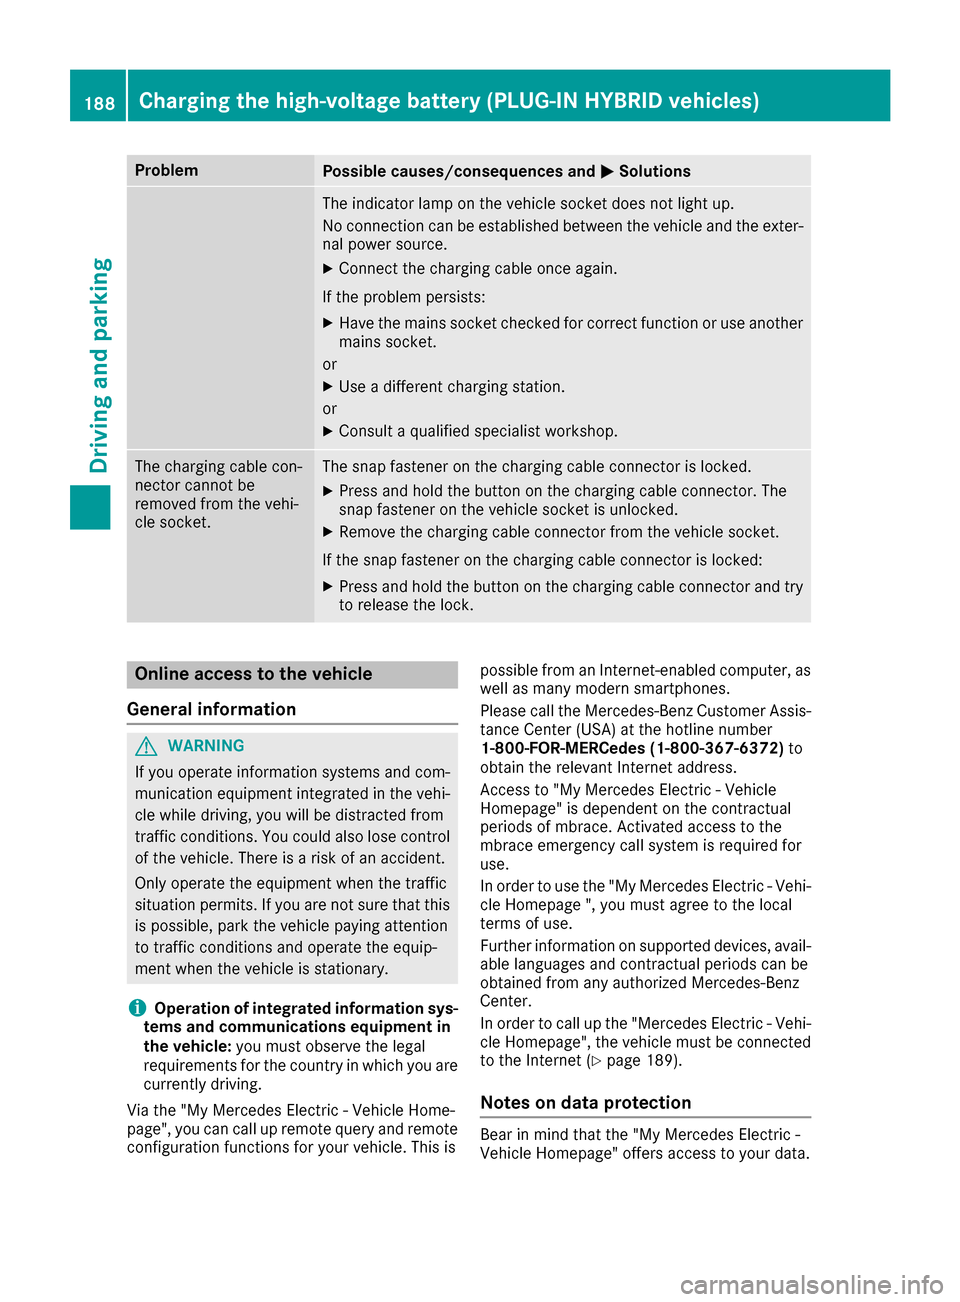
ProblemPossible causes/consequences andMSolutions
The indicator lamp on the vehicle socket does not light up.
No connection can be established between the vehicle and the exter-
nal power source.
XConnect the charging cable once again.
If the problem persists:
XHave the mains socket checked for correct function or use another
mains socket.
or
XUse a different charging station.
or
XConsult a qualified specialist workshop.
The charging cable con-
nector cannot be
removed from the vehi-
cle socket.The snap fastener on the charging cable connector is locked.
XPress and hold the button on the charging cable connector. The
snap fastener on the vehicle socket is unlocked.
XRemove the charging cable connector from the vehicle socket.
If the snap fastener on the charging cable connector is locked:
XPress and hold the button on the charging cable connector and try
to release the lock.
Online access to the vehicle
General information
GWARNING
If you operate information systems and com-
munication equipment integrated in the vehi-
cle while driving, you will be distracted from
traffic conditions. You could also lose control
of the vehicle. There is a risk of an accident.
Only operate the equipment when the traffic
situation permits. If you are not sure that this
is possible, park the vehicle paying attention
to traffic conditions and operate the equip-
ment when the vehicle is stationary.
iOperation of integrated information sys-
tems and communications equipment in
the vehicle: you must observe the legal
requirements for the country in which you are currently driving.
Via the "My Mercedes Electric - Vehicle Home-
page", you can call up remote query and remote
configuration functions for your vehicle. This is possible from an Internet-enabled computer, as
well as many modern smartphones.
Please call the Mercedes-Benz Customer Assis-
tance Center (USA) at the hotline number
1-800-FOR-MERCedes (1-800-367-6372)
to
obtain the relevant Internet address.
Access to "My Mercedes Electric - Vehicle
Homepage" is dependent on the contractual
periods of mbrace. Activated access to the
mbrace emergency call system is required for
use.
In order to use the "My Mercedes Electric - Vehi-
cle Homepage ", you must agree to the local
terms of use.
Further information on supported devices, avail-
able languages and contractual periods can be
obtained from any authorized Mercedes-Benz
Center.
In order to call up the "Mercedes Electric - Vehi-
cle Homepage", the vehicle must be connected
to the Internet (
Ypage 189).
Notes on data protection
Bear in mind that the "My Mercedes Electric -
Vehicle Homepage" offers access to your data.
188Charging the high-voltage battery (PLUG-IN HYBRID vehicles)
Driving and parking