2016 MERCEDES-BENZ GLS SUV park assist
[x] Cancel search: park assistPage 234 of 397
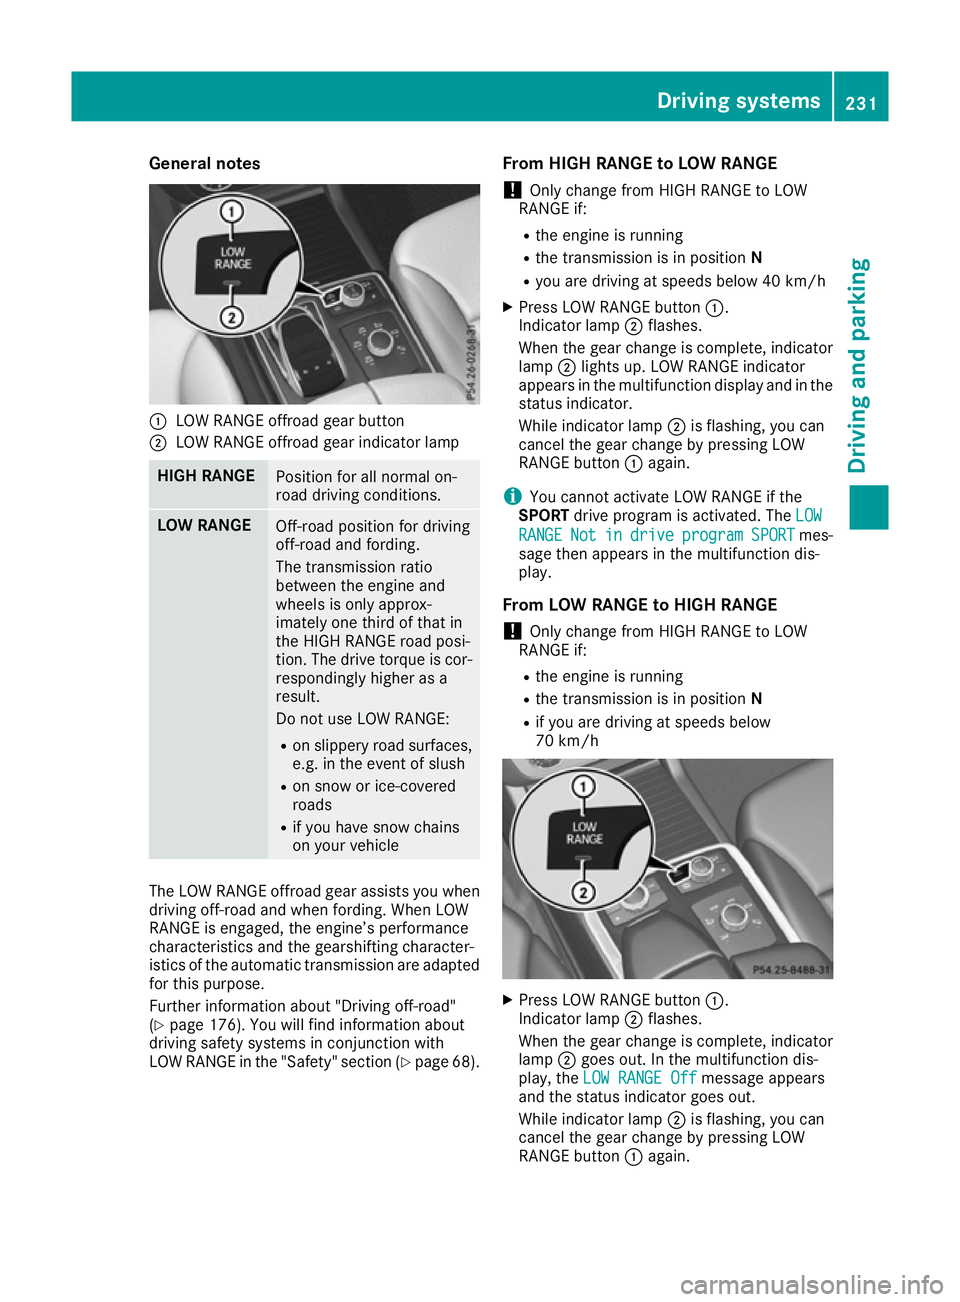
General notes
:
LOW RANGE offroad gear button
; LOW RANGE offroad gear indicator lamp HIGH RANGE
Position for all normal on-
road driving conditions.
LOW RANGE
Off-road position for driving
off-road and fording.
The transmission ratio
between the engine and
wheels is only approx-
imately one third of that in
the HIGH RANGE road posi-
tion. The drive torque is cor-
respondingly higher as a
result.
Do not use LOW RANGE:
R on slippery road surfaces,
e.g. in the event of slush
R on snow or ice-covered
roads
R if you have snow chains
on your vehicle The LOW RANGE offroad gear assists you when
driving off-road and when fording. When LOW
RANGE is engaged, the engine’s performance
characteristics and the gearshifting character-
istics of the automatic transmission are adapted
for this purpose.
Further information about "Driving off-road"
(Y page 176). You will find information about
driving safety systems in conjunction with
LOW RANGE in the "Safety" section (Y page 68).From HIGH RANGE to LOW RANGE
! Only change from HIGH RANGE to LOW
RANGE if:
R the engine is running
R the transmission is in position N
R you are driving at speeds below 40 km/h
X Press LOW RANGE button :.
Indicator lamp ;flashes.
When the gear change is complete, indicator
lamp ;lights up. LOW RANGE indicator
appears in the multifunction display and in the
status indicator.
While indicator lamp ;is flashing, you can
cancel the gear change by pressing LOW
RANGE button :again.
i You cannot activate LOW RANGE if the
SPORT drive program is activated. The LOW LOW
RANGE RANGE Not Notin
indrive
drive program
program SPORT
SPORTmes-
sage then appears in the multifunction dis-
play.
From LOW RANGE to HIGH RANGE ! Only change from HIGH RANGE to LOW
RANGE if:
R the engine is running
R the transmission is in position N
R if you are driving at speeds below
70 km/h X
Press LOW RANGE button :.
Indicator lamp ;flashes.
When the gear change is complete, indicator
lamp ;goes out. In the multifunction dis-
play, the LOW RANGE Off
LOW RANGE Off message appears
and the status indicator goes out.
While indicator lamp ;is flashing, you can
cancel the gear change by pressing LOW
RANGE button :again. Driving systems
231Driving and parking Z
Page 237 of 397
R
the permissible rear axle load of the towing
vehicle
R the maximum permissible gross vehicle
weight of both the towing vehicle and the
trailer
The applicable permissible values, which must
not be exceeded, can be found:
R in your vehicle documents
R on the identification plates of the trailer tow
hitch and the trailer
R on the vehicle identification plate
If the values differ, the lowest value applies.
You will find the values approved by the manu-
facturer on the vehicle identification plates and
those for the towing vehicle under "Technical
data" (Y page 390).
When towing a trailer, your vehicle's handling
characteristics will be different in comparison to
when driving without a trailer.
The vehicle/trailer combination:
R is heavier
R is restricted in its acceleration and gradient-
climbing capability
R has an increased braking distance
R is affected more by strong crosswinds
R demands more sensitive steering
R has a larger turning circle
This can impair the vehicle's handling charac-
teristics. Adapt your driving style accordingly.
Maintain a safe distance. Drive carefully.
When towing a trailer, always adjust your speed to the current road and weather conditions. Do
not exceed the maximum permissible speed for
your vehicle/trailer combination. Notes on towing a trailer
General notes !
If you have a trailer tow hitch retrofitted,
changes to the engine cooling system may be necessary, depending on the vehicle type.
If you have a trailer tow hitch retrofitted,
observe the anchorage points on the chassis.
Check the tyre pressures when towing a trailer.
You will find the values in the tyre pressure table in the vehicle fuel filler flap (Y page 364).Please note that when towing a trailer, the fol-
lowing driving systems have limited availability
or are not available at all.
R Parking Assist PARKTRONIC (Y page 201)
R Blind Spot Assist (Y page 219)
R Active Lane Keeping Assist (Y page 224)
R Parking Pilot (Y page 204)
On vehicles without level control, the height of
the ball coupling will alter according to the load
placed on the vehicle. If necessary, use a trailer
with a height-adjustable drawbar.
You will find permissible trailer loads under
"Technical data" (Y page 390).
Driving tips Observe the information on ESP
®
trailer stabili-
sation (Y page 74) and on pulling away with a
trailer (Y page 151).
Select the Comfortdrive program using the
DYNAMIC SELECT controller (Y page 155).
The maximum permissible speed for vehicle/
trailer combinations depends on the type of
trailer. Before beginning the journey, check the
trailer's documents to see what the maximum
permissible speed is for your trailer. Observe the legally prescribed maximum speed in the rele-
vant country.
For certain Mercedes-Benz vehicles, the maxi-
mum permissible rear axle load is increased
when towing a trailer. See the "Technical Data"
section to find out whether this applies to your
vehicle (Y page 390). If you utilise any of the
added maximum rear axle load when towing a
trailer, the vehicle/trailer combination may not
exceed a maximum speed of 100 km/h for rea-
sons concerning the operating permit. This also
applies in countries in which the permissible
maximum speed for vehicle/trailer combina-
tions is above 100 km/h.
When towing a trailer, your vehicle's handling
characteristics will be different to when driving
without a trailer and the vehicle will consume
more fuel.
Use the left-hand gearshift paddle to shift to a
lower gear on long and steep downhill gradients.
This also applies if you have activated cruise
control, the speed limiter or Distance Pilot
DISTRONIC.
This will use the braking effect of the engine, so
less braking will be required to maintain the
vehicle speed. This relieves the load on the 234
Towing a trailerDriving an
d parking
Page 240 of 397
Vehicles with the AIRMATIC package
!
Before beginning the journey, make sure
that the trailer support wheel is completely
raised. Otherwise, the trailer or the vehicle
could be damaged by the lowered trailer sup- port wheel during the journey.
X Shift the transmission to position P.
X Apply the electric parking brake.
X Start the engine.
X Vehicles with the Off-Road Engineering
package:
set the vehicle level to normal level
(Y page 192).
X Vehicles without the Off-Road Engineer-
ing package: select theComfortdrive pro-
gram using the DYNAMIC SELECT controller
(Y page 197).
X Switch off the engine.
X Close the doors and tailgate.
X Position the trailer horizontally behind the
vehicle.
X Couple up the trailer.
X Establish the electrical connection between
the vehicle and the trailer.
X Check that the trailer lighting system is work-
ing.
X Push the combination switch upwards and
downwards and check whether the corre-
sponding turn signal indicator on the trailer is
flashing.
A connected trailer is only detected when the
electrical connection is established correctly
and when the lighting system is working prop-
erly. The function of other systems also depends on this, for example:
R ESP ®
R Parking Assist PARKTRONIC
R Parking Pilot
R Active Blind Spot Assist
R Active Lane Keeping Assist
i Vehicles with the AIRMATIC package:
if
you couple up a trailer, the vehicle initially
remains at the selected level of the drive pro- gram set. Observe the following when cou-
pling up a trailer:
R If the normal level was not selected previ-
ously, the vehicle automatically adopts the normal level starting from a speed of 30 km/h. Even at higher speeds, it does not
drop below the normal level.
R Vehicle levels below the normal level are
not available.
R The raised level is available up to a speed of
30 km/h.
R This also applies when using accessories
that are plugged into the socket of the
trailer tow hitch (e.g. a bicycle rack).
R Before driving with a trailer, please observe
the information on the trailer support
wheel. Uncoupling a trailer
Important safety notes G
WARNING
If you uncouple a trailer with an engaged over- run brake, you could trap your hand between
the vehicle and the trailer drawbar. This poses a risk of injury.
Do not uncouple a trailer with an engaged
overrun brake. G
WARNING
Vehicles with level control:
If you disconnect the trailer cable, the vehicle is lowered. This can cause you or others to
become trapped between the vehicle body
and tyres, or underneath the vehicle. This
poses a risk of injury.
Make sure that no-one is in the immediate
vicinity of the wheel arch or underneath the
vehicle when disconnecting the trailer cable.
! Do not disconnect a trailer with an engaged
overrun brake. Otherwise, your vehicle could
be damaged by the rebounding of the overrun
brake.
! Remove the adapter cable before folding in
the ball coupling. You could otherwise dam-
age the rear bumper and the adapter cable.
Vehicles with the AIRMATIC package X
Shift the transmission to position P.
X Apply the electric parking brake. Towing a trailer
237Driving and parking Z
Page 247 of 397
i
Set the time using the multimedia system
(see the Digital Owner's Manual).
Possible displays on the multifunction dis-
play:
R ZGearshift recommendation, when shifting
manually (Y page 160)
R j Parking Pilot (Y page 204)
R ¯ Cruise control (Y page 180)
R LIM
LIM Limiter (Y page 182)
R _ Adaptive Highbeam Assist Plus
(Y page 124)
R è ECO start/stop function (Y page 151)
R ë HOLD function (Y page 195)
R a Distance Pilot DISTRONIC Steering Pilot
(Y page 250)
R 120 km/h!
120 km/h! Maximum permissible speed
exceeded (only for certain countries)
R DSR DSR Downhill Speed Regulation
(Y page 227) Menus and submenus
Menu overview
Press the =or; button on the steering
wheel to call up the menu bar and select a menu.
Operating the on-board computer (Y page 242).
Depending on the equipment fitted in the vehi-
cle, you can call up the following menus:
R Trip
Trip menu (Y page 244)
R Navi
Navi menu (navigation instructions)
(Y page 245)
R Audio
Audio menu (Y page 247)
R Tel
Tel menu (telephone) (Y page 248)
R Assist.
Assist. menu (assistance) (Y page 249)
R Serv.
Serv. menu (Y page 251)
R Settings
Settings menu (settings) (Y page 251)
R ON&OFFROAD
ON&OFFROAD menu (Ypage 255)
R AMG
AMG menu (Mercedes-AMG vehicles)
(Y page 255) Trip menu
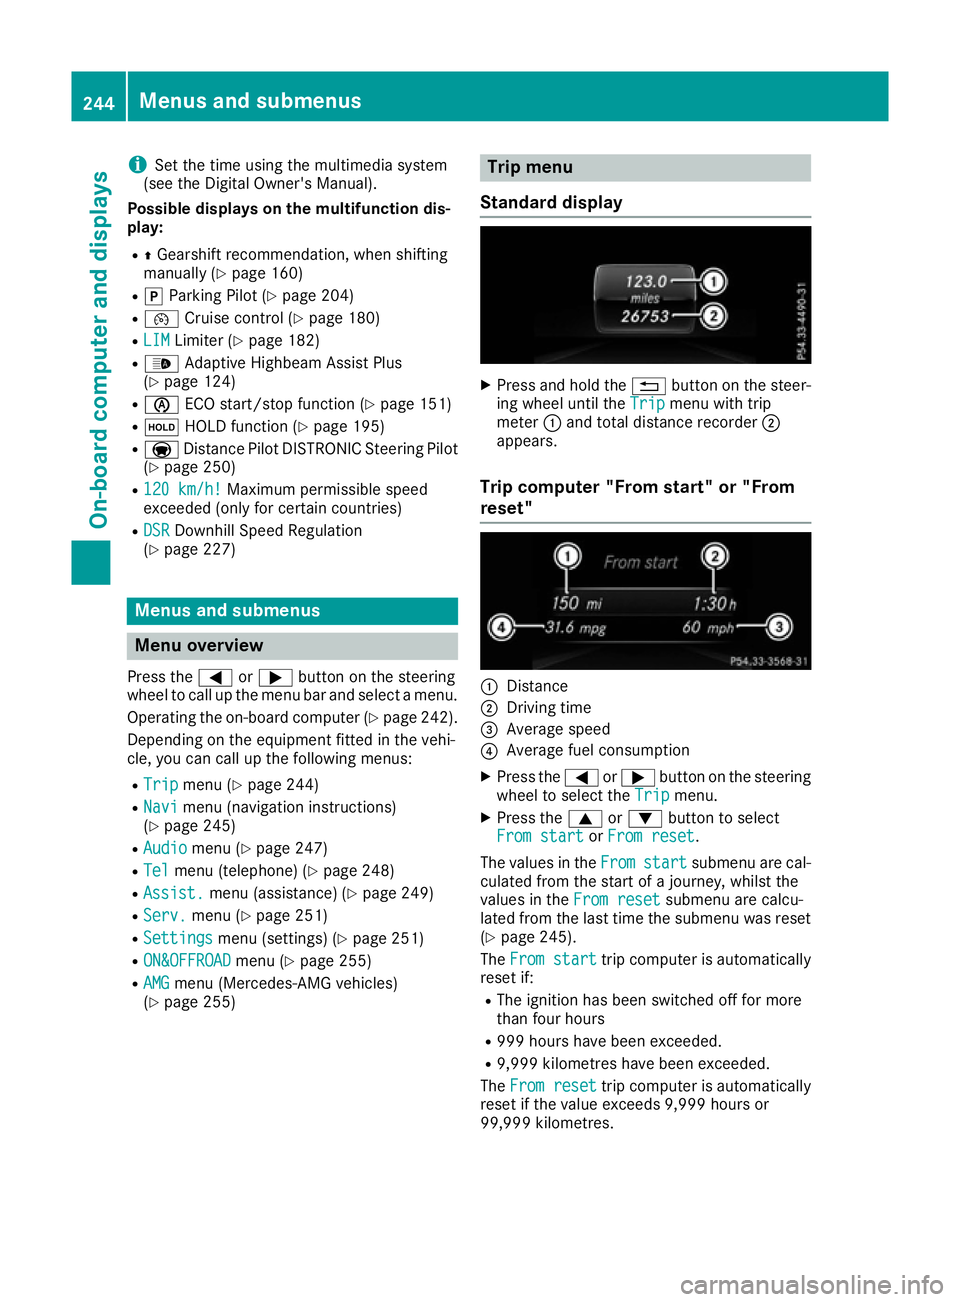
Standard display X
Press and hold the %button on the steer-
ing wheel until the Trip
Tripmenu with trip
meter :and total distance recorder ;
appears.
Trip computer "From start" or "From
reset" :
Distance
; Driving time
= Average speed
? Average fuel consumption
X Press the =or; button on the steering
wheel to select the Trip Tripmenu.
X Press the 9or: button to select
From start
From start orFrom reset
From reset.
The values in the From
Fromstart
start submenu are cal-
culated from the start of a journey, whilst the
values in the From reset
From resetsubmenu are calcu-
lated from the last time the submenu was reset
(Y page 245).
The From start
From start trip computer is automatically
reset if:
R The ignition has been switched off for more
than four hours
R 999 hours have been exceeded.
R 9,999 kilometres have been exceeded.
The From reset From reset trip computer is automatically
reset if the value exceeds 9,999 hours or
99,999 kilometres. 244
Menus and submenusOn-board computer and displays
Page 282 of 397
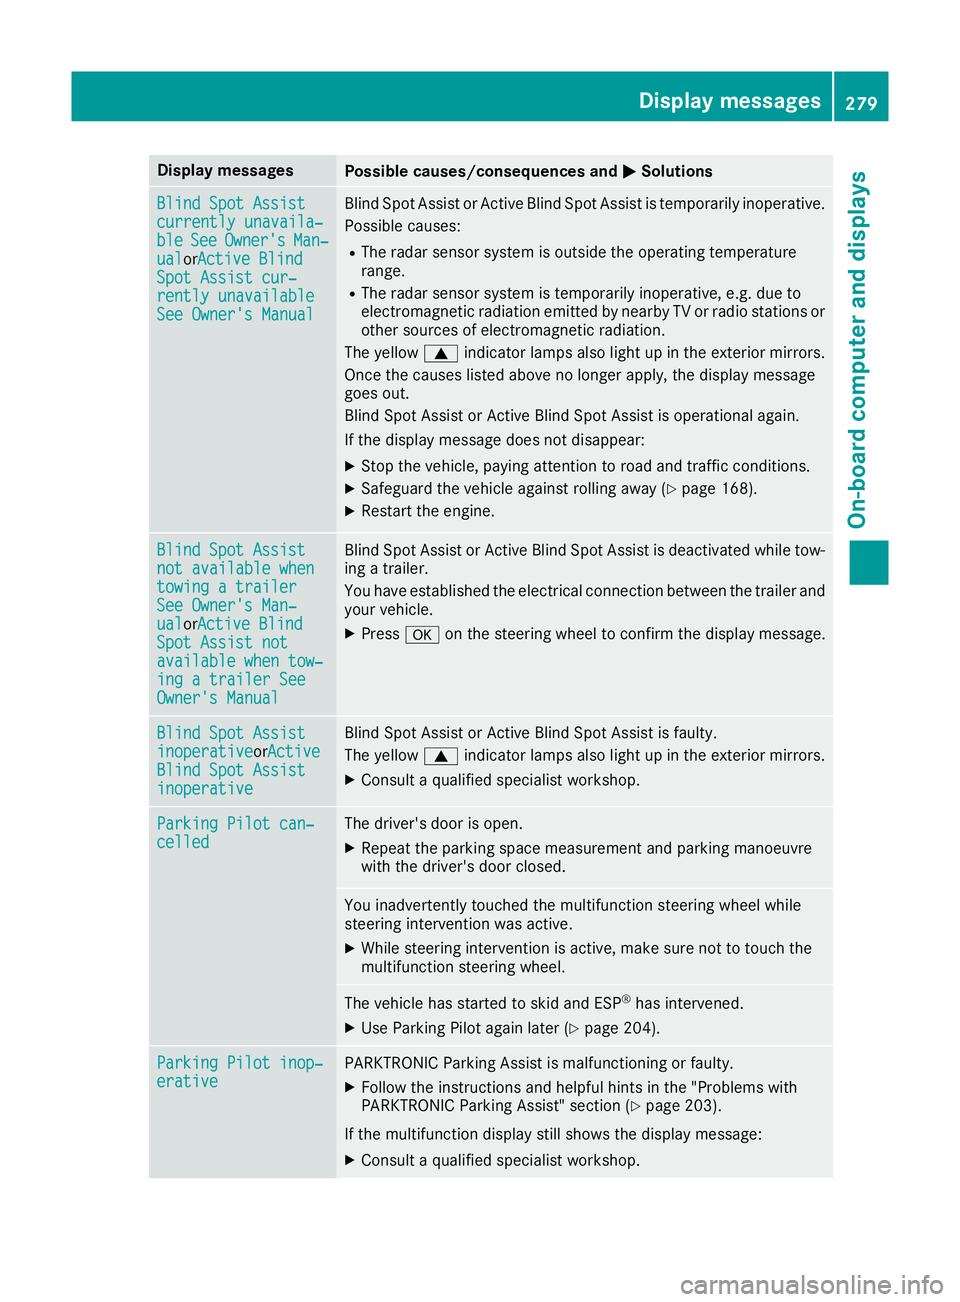
Display messages
Possible causes/consequences and
M
MSolutions Blind Spot Assist
Blind Spot Assist
currently unavaila‐ currently unavaila‐
ble ble
See
SeeOwner's
Owner's Man‐
Man‐
ual
ual orActive BlindActive Blind
Spot Assist cur‐
Spot Assist cur‐
rently unavailable rently unavailable
See Owner's Manual See Owner's Manual Blind Spot Assist or Active Blind Spot Assist is temporarily inoperative.
Possible causes:
R The radar sensor system is outside the operating temperature
range.
R The radar sensor system is temporarily inoperative, e.g. due to
electromagnetic radiation emitted by nearby TV or radio stations or
other sources of electromagnetic radiation.
The yellow 9indicator lamps also light up in the exterior mirrors.
Once the causes listed above no longer apply, the display message
goes out.
Blind Spot Assist or Active Blind Spot Assist is operational again.
If the display message does not disappear:
X Stop the vehicle, paying attention to road and traffic conditions.
X Safeguard the vehicle against rolling away (Y page 168).
X Restart the engine. Blind Spot Assist Blind Spot Assist
not available when not available when
towing a trailer towing a trailer
See Owner's Man‐ See Owner's Man‐
ual ual
orActive BlindActive Blind
Spot Assist not
Spot Assist not
available when tow‐ available when tow‐
ing a trailer See ing a trailer See
Owner's Manual Owner's Manual Blind Spot Assist or Active Blind Spot Assist is deactivated while tow-
ing a trailer.
You have established the electrical connection between the trailer and
your vehicle.
X Press aon the steering wheel to confirm the display message. Blind Spot Assist Blind Spot Assist
inoperative inoperativeorActive
Active
Blind Spot Assist
Blind Spot Assist
inoperative inoperative Blind Spot Assist or Active Blind Spot Assist is faulty.
The yellow 9indicator lamps also light up in the exterior mirrors.
X Consult a qualified specialist workshop. Parking Pilot can‐
Parking Pilot can‐
celled celled The driver's door is open.
X Repeat the parking space measurement and parking manoeuvre
with the driver's door closed. You inadvertently touched the multifunction steering wheel while
steering intervention was active.
X While steering intervention is active, make sure not to touch the
multifunction steering wheel. The vehicle has started to skid and ESP
®
has intervened.
X Use Parking Pilot again later (Y page 204).Parking Pilot inop‐ Parking Pilot inop‐
erative erative PARKTRONIC Parking Assist is malfunctioning or faulty.
X Follow the instructions and helpful hints in the "Problems with
PARKTRONIC Parking Assist" section (Y page 203).
If the multifunction display still shows the display message:
X Consult a qualified specialist workshop. Display
messages
279On-board computer and displays Z
Page 283 of 397
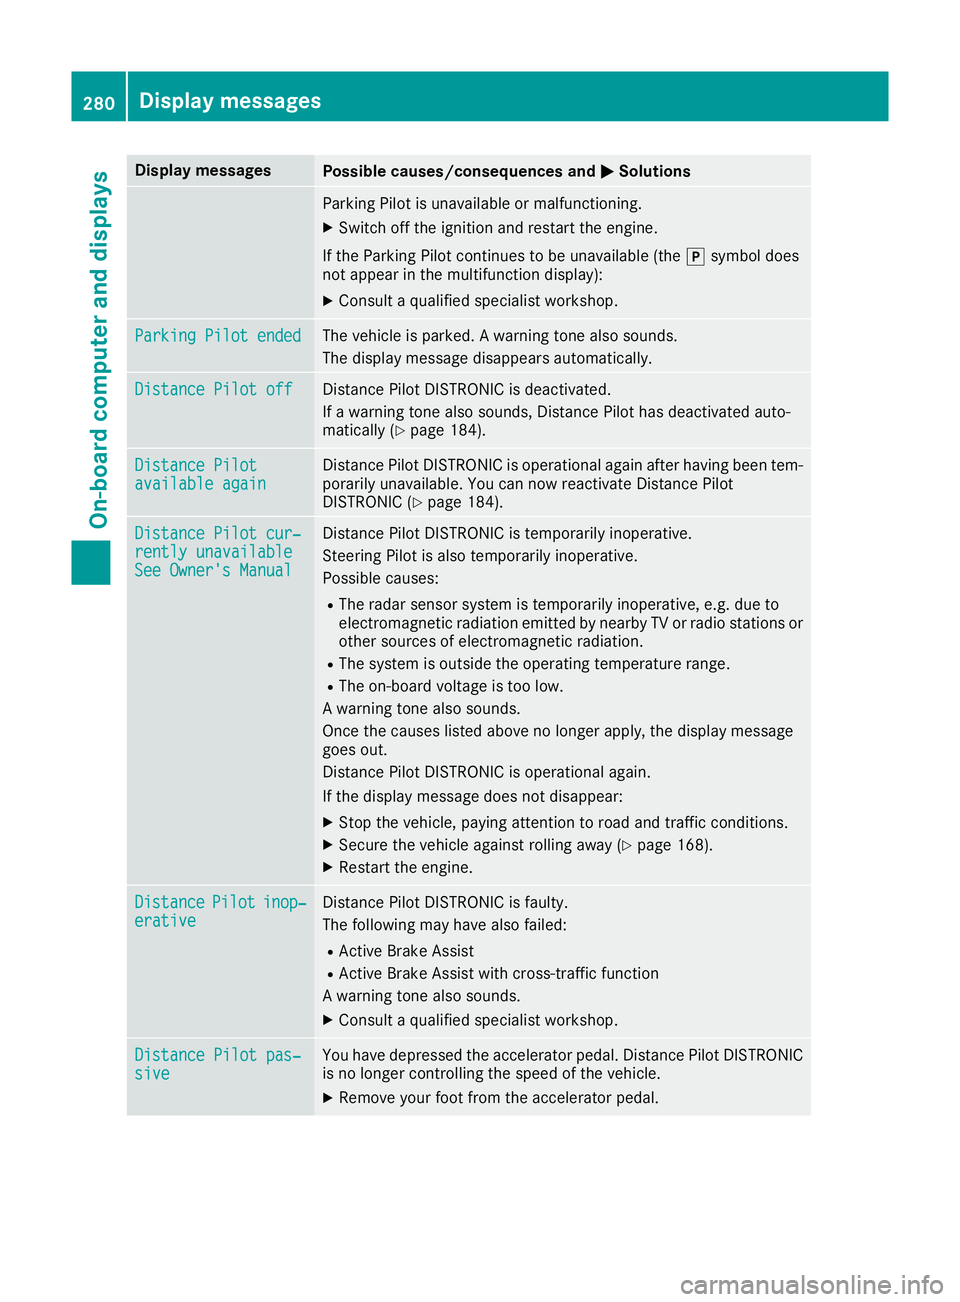
Display messages
Possible causes/consequences and
M
MSolutions Parking Pilot is unavailable or malfunctioning.
X Switch off the ignition and restart the engine.
If the Parking Pilot continues to be unavailable (the jsymbol does
not appear in the multifunction display):
X Consult a qualified specialist workshop. Parking Pilot ended
Parking Pilot ended The vehicle is parked. A warning tone also sounds.
The display message disappears automatically. Distance Pilot off
Distance Pilot off Distance Pilot DISTRONIC is deactivated.
If a warning tone also sounds, Distance Pilot has deactivated auto-
matically (Y page 184). Distance Pilot
Distance Pilot
available again available again Distance Pilot DISTRONIC is operational again after having been tem-
porarily unavailable. You can now reactivate Distance Pilot
DISTRONIC (Y page 184). Distance Pilot cur‐
Distance Pilot cur‐
rently unavailable rently unavailable
See Owner's Manual See Owner's Manual Distance Pilot DISTRONIC is temporarily inoperative.
Steering Pilot is also temporarily inoperative.
Possible causes:
R The radar sensor system is temporarily inoperative, e.g. due to
electromagnetic radiation emitted by nearby TV or radio stations or
other sources of electromagnetic radiation.
R The system is outside the operating temperature range.
R The on-board voltage is too low.
A warning tone also sounds.
Once the causes listed above no longer apply, the display message
goes out.
Distance Pilot DISTRONIC is operational again.
If the display message does not disappear:
X Stop the vehicle, paying attention to road and traffic conditions.
X Secure the vehicle against rolling away (Y page 168).
X Restart the engine. Distance Distance
Pilot
Pilotinop‐
inop‐
erative
erative Distance Pilot DISTRONIC is faulty.
The following may have also failed:
R Active Brake Assist
R Active Brake Assist with cross-traffic function
A warning tone also sounds.
X Consult a qualified specialist workshop. Distance Pilot pas‐ Distance Pilot pas‐
sive sive You have depressed the accelerator pedal. Distance Pilot DISTRONIC
is no longer controlling the speed of the vehicle.
X Remove your foot from the accelerator pedal. 280
Display
messagesOn-board computer and displays
Page 355 of 397
R
It is important that you observe the descri-
bed order of the battery terminals when
connecting and disconnecting a battery.
R When jump-starting, make sure that the
battery poles with identical polarity are
connected.
R It is particularly important to observe the
described order when connecting and dis-
connecting the jump leads.
R Never connect or disconnect the battery
terminals while the engine is running. G
WARNING
Battery acid is caustic. There is a risk of injury. Avoid contact with the skin, eyes or clothing.
Do not breathe in any battery gases. Do not
lean over the battery. Keep the batteries out
of the reach of children. Immediately rinse off
battery acid thoroughly with plenty of clean
water and seek medical attention at once. H
Environmental note Batteries contain pollutants.
It is illegal to dispose of them with the household rubbish.
They must be collected sep-
arately and disposed of in anenvironmentally responsible
recycling system. Dispose of batteries in an
environmentally responsible
manner. Take discharged
batteries to a qualified spe-
cialist workshop or to a col-
lection point for used batter-
ies.
! Have the battery checked regularly at a
qualified specialist workshop.
Observe the service intervals in the Service
Booklet or contact a qualified specialist work- shop for more information. !
Always have work on the batteries carried
out at a qualified specialist workshop. Should
it, in exceptional circumstances, be abso-
lutely necessary to disconnect the 12-volt
battery yourself, please observe the follow-
ing:
R secure the vehicle to prevent it from rolling
away.
R switch the ignition off.
R first, disconnect the negative terminal, fol-
lowed by the positive terminal.
The transmission is locked in position Pafter
disconnecting the battery.
After the work has been completed, firmly
reinstall the battery and the cover of the pos- itive terminal.
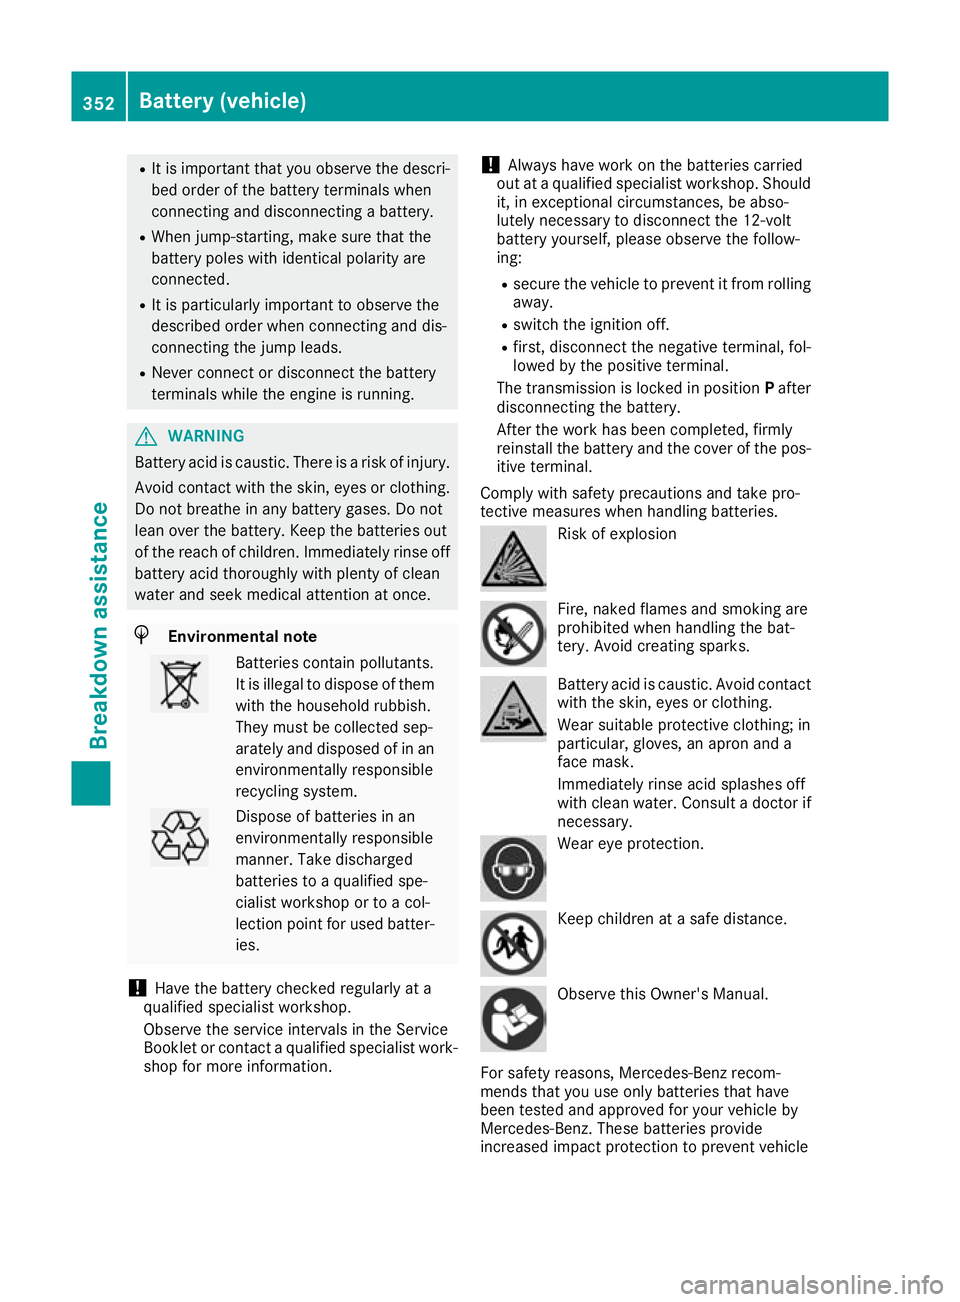
Comply with safety precautions and take pro-
tective measures when handling batteries. Risk of explosion
Fire, naked flames and smoking are
prohibited when handling the bat-
tery. Avoid creating sparks. Battery acid is caustic. Avoid contact
with the skin, eyes or clothing.
Wear suitable protective clothing; in
particular, gloves, an apron and a
face mask.
Immediately rinse acid splashes off
with clean water. Consult a doctor if necessary. Wear eye protection.
Keep children at a safe distance.
Observe this Owner's Manual.
For safety reasons, Mercedes-Benz recom-
mends that you use only batteries that have
been tested and approved for your vehicle by
Mercedes-Benz. These batteries provide
increased impact protection to prevent vehicle 352
Battery (vehicle)Breakdown assistance
Page 356 of 397

occupants from suffering acid burns should the
battery be damaged in the event of an accident.
In order for the battery to achieve the maximum possible service life, it must always be suffi-
ciently charged.
Like other batteries, the vehicle battery may
discharge over time if you do not use the vehicle. In such cases, have the battery disconnected ata qualified specialist workshop. You can also
charge the battery with a charger recommended
by Mercedes-Benz. For more information,
please contact a qualified specialist workshop.
Have the battery charge checked more fre-
quently if you use the vehicle mainly for short
trips or if you leave it standing idle for a lengthy period. Consult a qualified specialist workshop
if you wish to leave your vehicle parked up for a
long period of time.
When you park the vehicle, remove the key if you do not require any electrical consumers. The
vehicle will then use very little energy, thus con- serving battery power.
If the power supply has been interrupted, e.g. if the battery was discharged, you will have to:
R set the clock (see the Digital Owner's Manual)
On vehicles with a multimedia system and
navigation system, the clock is set automati-
cally.
R reset the function for folding the exterior mir-
rors in/out automatically, by folding the mir-
rors out once (Y page 117). Charging the 12 V battery
G
WARNING
During charging and jump-starting, explosive
gases can escape from the battery. There is a risk of an explosion.
Particularly avoid fire, naked flames, creating
sparks and smoking. Ensure there is sufficient
ventilation while charging and jump-starting.
Do not lean over a battery. G
WARNING
Battery acid is caustic. There is a risk of injury. Avoid contact with the skin, eyes or clothing.
Do not breathe in any battery gases. Do not lean over the battery. Keep the batteries out
of the reach of children. Immediately rinse off
battery acid thoroughly with plenty of clean
water and seek medical attention at once. G
WARNING
A discharged battery can freeze at tempera-
tures below freezing point. When jump-start-
ing the vehicle or charging the battery, gases can escape from the battery. There is a risk of
an explosion.
Allow the frozen battery to thaw out before
charging it or jump-starting.
! Only use battery chargers with a maximum
charging voltage of 14.8 V.
! Only charge the battery using the jump-start
connection point.
The jump-starting connection point is in the
engine compartment (Y page 354).
X Open the bonnet.
X Connect the battery charger to the positive
terminal and earth point in the same order as
when connecting the donor battery in the
jump-starting procedure (Y page 354).
Keep away from fire and naked flames. Do not
lean over the battery. Never charge the battery
if it is still fitted to the vehicle, unless you are
using a battery charger that has been tested and approved by Mercedes-Benz. A battery charger
unit specially adapted for Mercedes-Benz vehi-
cles and tested and approved by Mercedes-
Benz is available as an accessory. This device
permits charging of the battery while it is instal-
led. Contact a Mercedes-Benz Service Centre
for information and availability. Read the battery charger's operating instructions before charg-
ing the battery.
If the indicator/warning lamps do not light up at
low temperatures, it is very likely that the dis-
charged battery has frozen. In this case you may
neither jump-start the vehicle nor charge the
battery. The service life of a battery that has
been thawed may be reduced. The starting char-
acteristics may be impaired, especially at low
temperatures. Have the thawed battery
checked at a qualified specialist workshop. Battery (vehicle)
353Breakdown assistance Z