2016 MERCEDES-BENZ GLS SUV check engine
[x] Cancel search: check enginePage 301 of 397
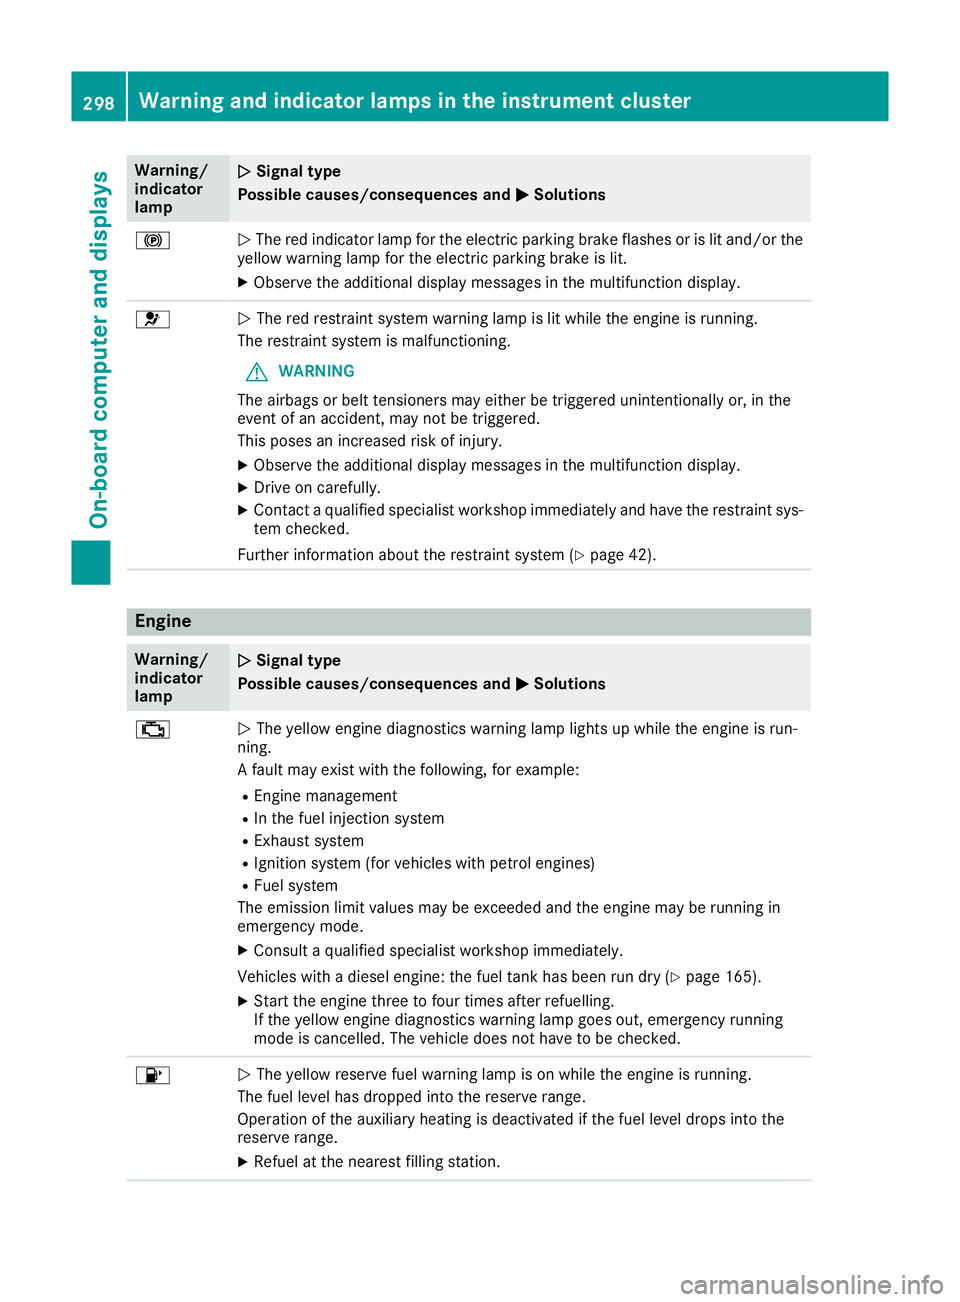
Warning/
indicator
lamp
N N
Signal type
Possible causes/consequences and M
M Solutions !
N
The red indicator lamp for the electric parking brake flashes or is lit and/or the
yellow warning lamp for the electric parking brake is lit.
X Observe the additional display messages in the multifunction display. 6
N
The red restraint system warning lamp is lit while the engine is running.
The restraint system is malfunctioning.
G WARNING
The airbags or belt tensioners may either be triggered unintentionally or, in the
event of an accident, may not be triggered.
This poses an increased risk of injury.
X Observe the additional display messages in the multifunction display.
X Drive on carefully.
X Contact a qualified specialist workshop immediately and have the restraint sys-
tem checked.
Further information about the restraint system (Y page 42).Engine
Warning/
indicator
lamp
N N
Signal type
Possible causes/consequences and M
M Solutions ;
N
The yellow engine diagnostics warning lamp lights up while the engine is run-
ning.
A fault may exist with the following, for example:
R Engine management
R In the fuel injection system
R Exhaust system
R Ignition system (for vehicles with petrol engines)
R Fuel system
The emission limit values may be exceeded and the engine may be running in
emergency mode.
X Consult a qualified specialist workshop immediately.
Vehicles with a diesel engine: the fuel tank has been run dry (Y page 165).
X Start the engine three to four times after refuelling.
If the yellow engine diagnostics warning lamp goes out, emergency running
mode is cancelled. The vehicle does not have to be checked. 8
N
The yellow reserve fuel warning lamp is on while the engine is running.
The fuel level has dropped into the reserve range.
Operation of the auxiliary heating is deactivated if the fuel level drops into the
reserve range.
X Refuel at the nearest filling station. 298
Warning and indicator lamps in the instrument clusterOn-board computer and displays
Page 303 of 397
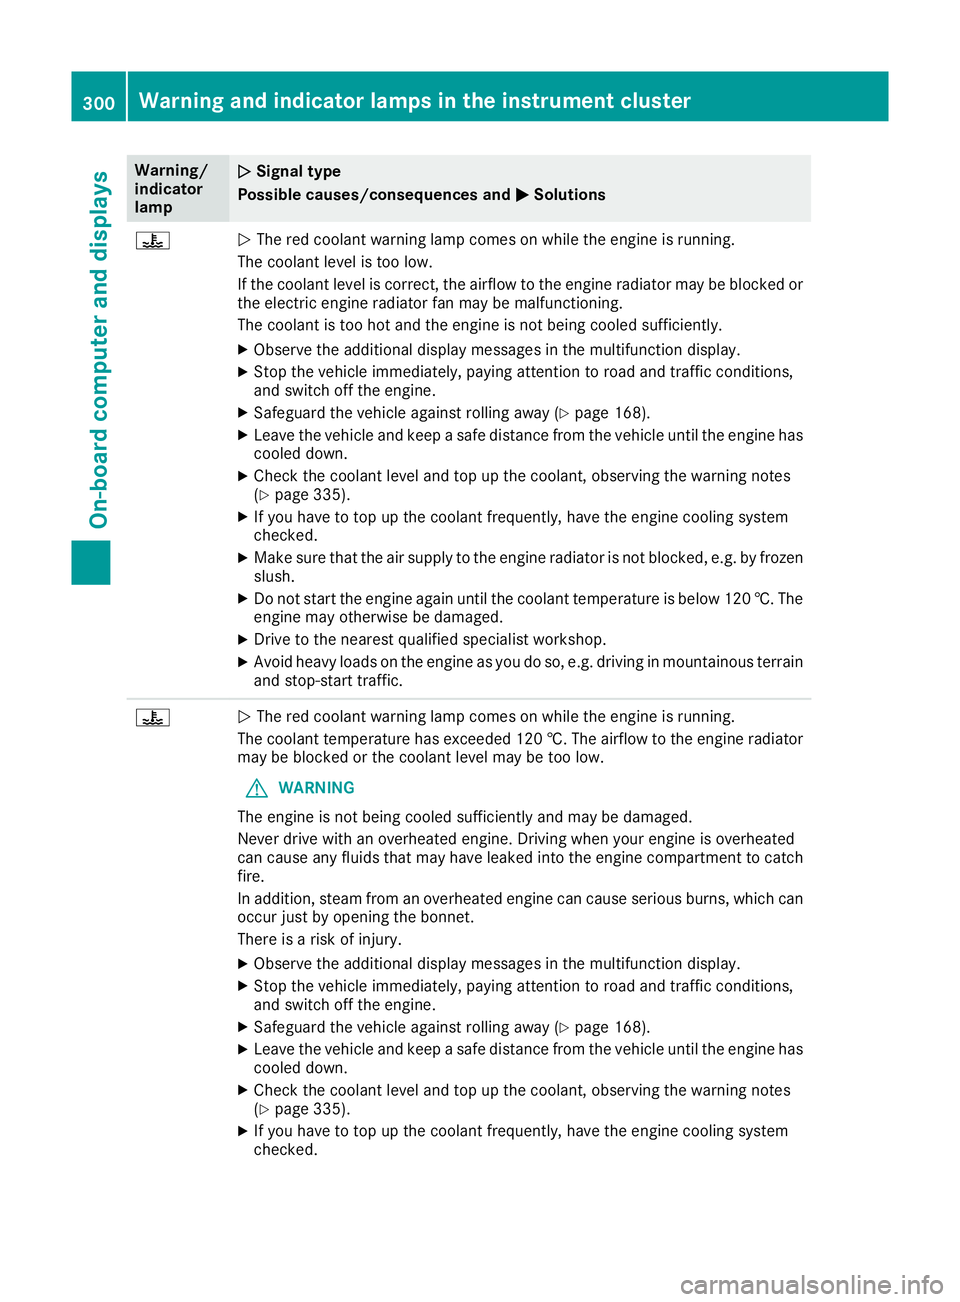
Warning/
indicator
lamp
N N
Signal type
Possible causes/consequences and M
M Solutions ?
N
The red coolant warning lamp comes on while the engine is running.
The coolant level is too low.
If the coolant level is correct, the airflow to the engine radiator may be blocked or the electric engine radiator fan may be malfunctioning.
The coolant is too hot and the engine is not being cooled sufficiently.
X Observe the additional display messages in the multifunction display.
X Stop the vehicle immediately, paying attention to road and traffic conditions,
and switch off the engine.
X Safeguard the vehicle against rolling away (Y page 168).
X Leave the vehicle and keep a safe distance from the vehicle until the engine has
cooled down.
X Check the coolant level and top up the coolant, observing the warning notes
(Y page 335).
X If you have to top up the coolant frequently, have the engine cooling system
checked.
X Make sure that the air supply to the engine radiator is not blocked, e.g. by frozen
slush.
X Do not start the engine again until the coolant temperature is below 120 †. The
engine may otherwise be damaged.
X Drive to the nearest qualified specialist workshop.
X Avoid heavy loads on the engine as you do so, e.g. driving in mountainous terrain
and stop-start traffic. ?
N
The red coolant warning lamp comes on while the engine is running.
The coolant temperature has exceeded 120 †. The airflow to the engine radiator may be blocked or the coolant level may be too low.
G WARNING
The engine is not being cooled sufficiently and may be damaged.
Never drive with an overheated engine. Driving when your engine is overheated
can cause any fluids that may have leaked into the engine compartment to catch fire.
In addition, steam from an overheated engine can cause serious burns, which can
occur just by opening the bonnet.
There is a risk of injury.
X Observe the additional display messages in the multifunction display.
X Stop the vehicle immediately, paying attention to road and traffic conditions,
and switch off the engine.
X Safeguard the vehicle against rolling away (Y page 168).
X Leave the vehicle and keep a safe distance from the vehicle until the engine has
cooled down.
X Check the coolant level and top up the coolant, observing the warning notes
(Y page 335).
X If you have to top up the coolant frequently, have the engine cooling system
checked. 300
Warning and indicator lamps in the instrument clusterOn-board computer and displays
Page 336 of 397
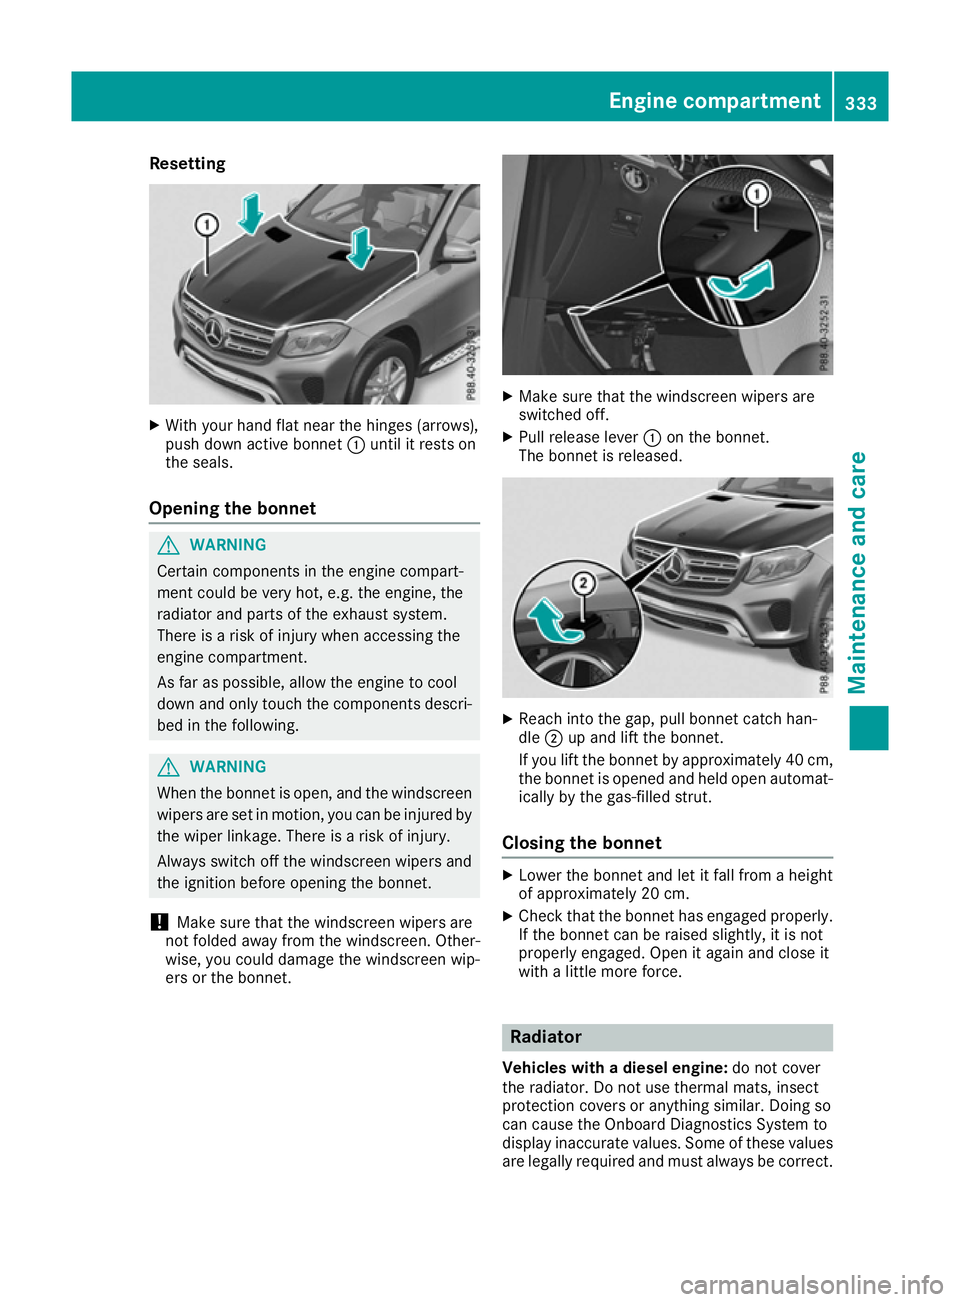
Resetting
X
With your hand flat near the hinges (arrows),
push down active bonnet :until it rests on
the seals.
Opening the bonnet G
WARNING
Certain components in the engine compart-
ment could be very hot, e.g. the engine, the
radiator and parts of the exhaust system.
There is a risk of injury when accessing the
engine compartment.
As far as possible, allow the engine to cool
down and only touch the components descri- bed in the following. G
WARNING
When the bonnet is open, and the windscreen wipers are set in motion, you can be injured by
the wiper linkage. There is a risk of injury.
Always switch off the windscreen wipers and
the ignition before opening the bonnet.
! Make sure that the windscreen wipers are
not folded away from the windscreen. Other-
wise, you could damage the windscreen wip-
ers or the bonnet. X
Make sure that the windscreen wipers are
switched off.
X Pull release lever :on the bonnet.
The bonnet is released. X
Reach into the gap, pull bonnet catch han-
dle ;up and lift the bonnet.
If you lift the bonnet by approximately 40 cm, the bonnet is opened and held open automat-
ically by the gas-filled strut.
Closing the bonnet X
Lower the bonnet and let it fall from a height
of approximately 20 cm.
X Check that the bonnet has engaged properly.
If the bonnet can be raised slightly, it is not
properly engaged. Open it again and close it
with a little more force. Radiator
Vehicles with a diesel engine: do not cover
the radiator. Do not use thermal mats, insect
protection covers or anything similar. Doing so
can cause the Onboard Diagnostics System to
display inaccurate values. Some of these values are legally required and must always be correct. Engine compartment
333Maintenance and care Z
Page 337 of 397
Engine oil
Important safety notes G
WARNING
Certain components in the engine compart-
ment could be very hot, e.g. the engine, the
radiator and parts of the exhaust system.
There is a risk of injury when accessing the
engine compartment.
As far as possible, allow the engine to cool
down and only touch the components descri- bed in the following. G
WARNING
If engine oil comes into contact with hot com- ponents in the engine compartment, it may
ignite. There is a risk of fire and injury.
Make sure that engine oil does not spill out
over the filler neck. Allow the engine to cool
down and thoroughly clean the components
that have come into contact with engine oil
before you start the engine.
General notes Depending on your driving style, the vehicle
consumes up to 0.8 litres of oil per 1,000 km.
The oil consumption may be higher than this
when the vehicle is new or if you frequently drive at high engine speeds.
Depending on the engine, the oil dipstick may beinstalled at a different location.
When checking the oil level:
R park the vehicle on a level surface.
R the engine should be switched off for approx-
imately five minutes if the engine is at normal
operating temperature.
R if the engine is not at normal operating tem-
perature, e.g. if the engine was only started
briefly, wait approximately 30 minute sbefore
carrying out the measurement. Checking the oil level using the oil dip-
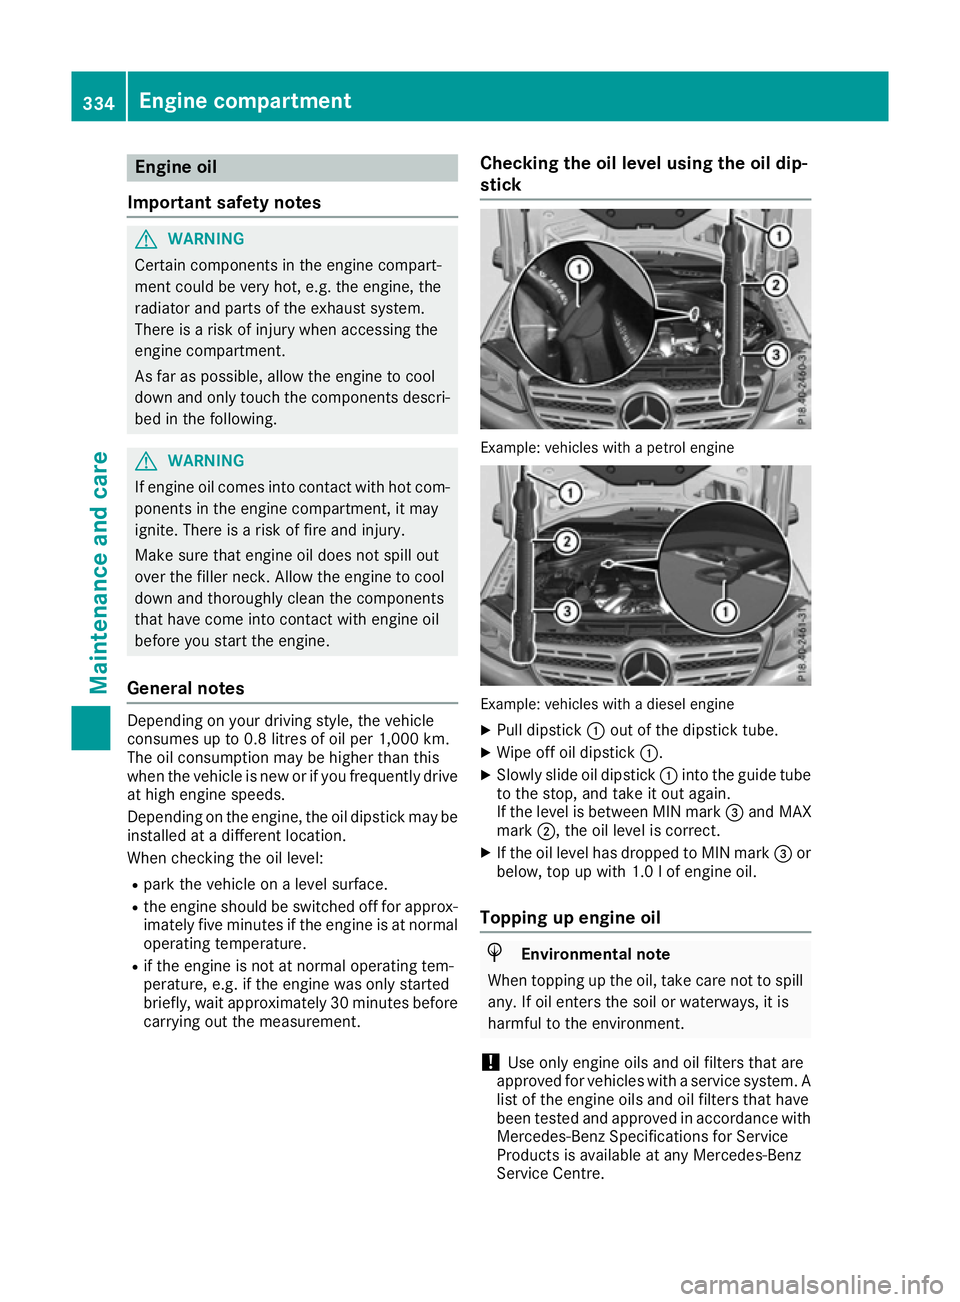
stick Example: vehicles with a petrol engine
Example: vehicles with a diesel engine
X Pull dipstick :out of the dipstick tube.
X Wipe off oil dipstick :.
X Slowly slide oil dipstick :into the guide tube
to the stop, and take it out again.
If the level is between MIN mark =and MAX
mark ;, the oil level is correct.
X If the oil level has dropped to MIN mark =or
below, top up with 1.0 lof engine oil.
Topping up engine oil H
Environmental note
When topping up the oil, take care not to spill any. If oil enters the soil or waterways, it is
harmful to the environment.
! Use only engine oils and oil filters that are
approved for vehicles with a service system. A list of the engine oils and oil filters that have
been tested and approved in accordance with
Mercedes-Benz Specifications for Service
Products is available at any Mercedes-Benz
Service Centre. 334
Engine compartmentMaintenance and care
Page 338 of 397
The following cause engine failure or damage
to the exhaust system:
R Use of engine oils and oil filters that have
not been expressly approved for the service
system
R Replacement of engine oil and oil filter after
the replacement interval specified by the
service system has expired
R Use of engine oil additives
! Do not add too much oil. Topping up with too
much engine oil can result in damage to the
engine or to the catalytic converter. Have
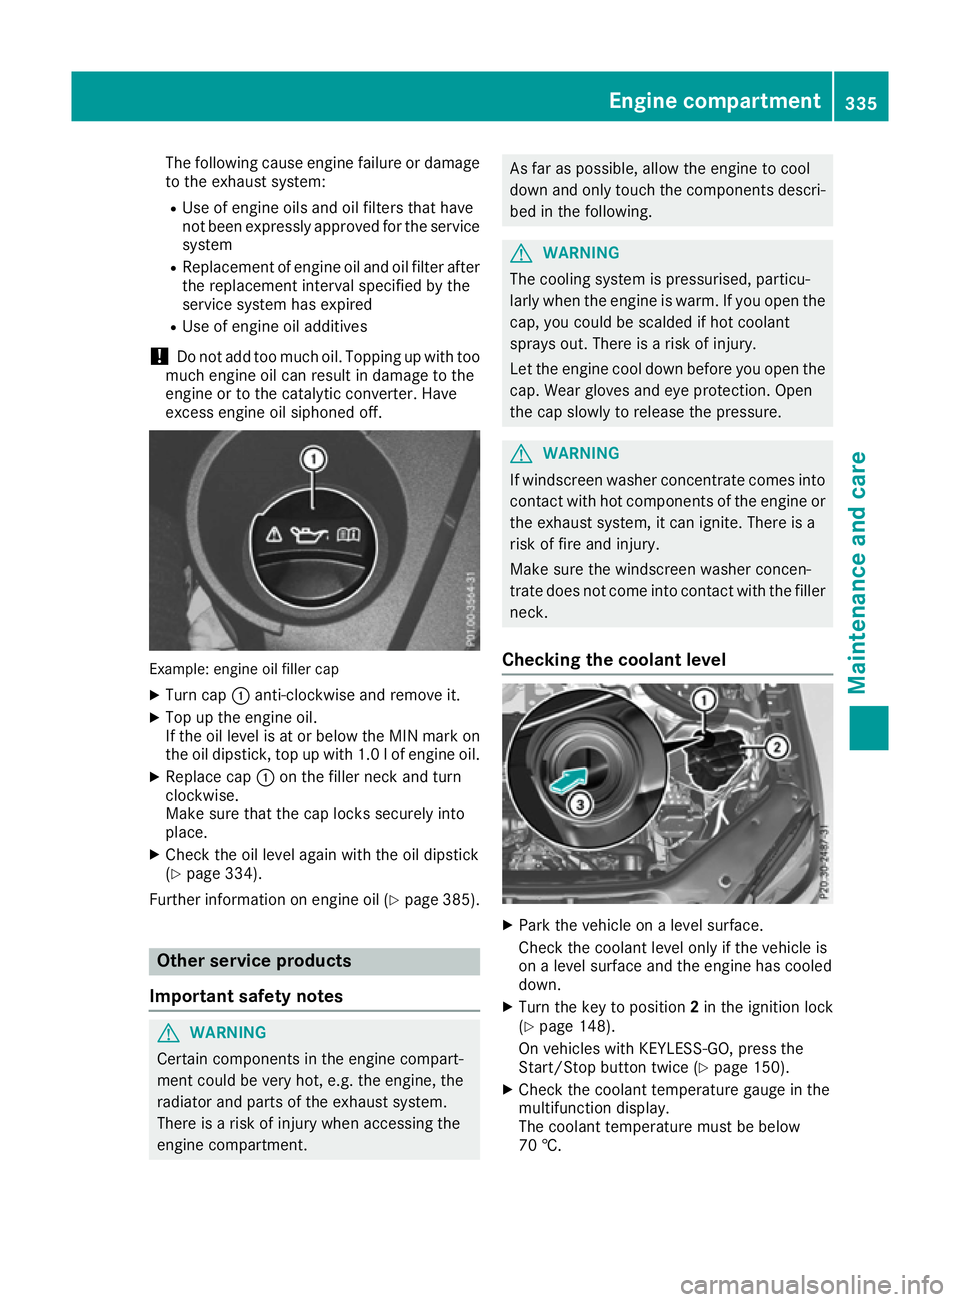
excess engine oil siphoned off. Example: engine oil filler cap
X Turn cap :anti-clockwise and remove it.
X Top up the engine oil.
If the oil level is at or below the MIN mark on
the oil dipstick, top up with 1.0 lof engine oil.
X Replace cap :on the filler neck and turn
clockwise.
Make sure that the cap locks securely into
place.
X Check the oil level again with the oil dipstick
(Y page 334).
Further information on engine oil (Y page 385).Other service products
Important safety notes G
WARNING
Certain components in the engine compart-
ment could be very hot, e.g. the engine, the
radiator and parts of the exhaust system.
There is a risk of injury when accessing the
engine compartment. As far as possible, allow the engine to cool
down and only touch the components descri-
bed in the following. G
WARNING
The cooling system is pressurised, particu-
larly when the engine is warm. If you open the cap, you could be scalded if hot coolant
sprays out. There is a risk of injury.
Let the engine cool down before you open the
cap. Wear gloves and eye protection. Open
the cap slowly to release the pressure. G
WARNING
If windscreen washer concentrate comes into contact with hot components of the engine or
the exhaust system, it can ignite. There is a
risk of fire and injury.
Make sure the windscreen washer concen-
trate does not come into contact with the filler neck.
Checking the coolant level X
Park the vehicle on a level surface.
Check the coolant level only if the vehicle is
on a level surface and the engine has cooled
down.
X Turn the key to position 2in the ignition lock
(Y page 148).
On vehicles with KEYLESS-GO, press the
Start/Stop button twice (Y page 150).
X Check the coolant temperature gauge in the
multifunction display.
The coolant temperature must be below
70 †. Engine compartment
335Maintenance and care Z
Page 340 of 397
Displaying service messages
X Switch the ignition on.
X Press the =or; button on the steering
wheel to select the Serv.
Serv.menu.
X Press the 9or: button to select the
ASSYST
ASSYST PLUS
PLUSsubmenu and confirm by press-
ing the abutton.
The service due date appears in the multi-
function display. Information about service
Resetting the ASSYST PLUS service
interval display !
If the ASSYST PLUS service interval display
has been inadvertently reset, this setting can
be corrected at a qualified specialist work-
shop.
Have service work carried out as described in the Service Booklet. This may otherwise lead
to increased wear and damage to the major
assemblies or the vehicle.
A qualified specialist workshop, e.g. a
Mercedes-Benz Service Centre, will reset the
ASSYST PLUS service interval display after the
service work has been carried out. You can also
obtain further information on maintenance
work, for example.
Special service requirements The prescribed service interval is based on nor-
mal operation of the vehicle. Service work will
need to be performed more often if the vehicle is
operated under arduous conditions or increased loads, for example:
R regular city driving with frequent intermediate
stops
R if the vehicle is primarily used to travel short
distances
R for frequent operation in mountainous terrain
or on poor road surfaces
R if the engine is often left idling for long periods
In these or similar operating conditions, have,
for example, the air filter, engine oil and oil filter changed more frequently. The tyres must be
checked more frequently if the vehicle is oper-
ated under increased loads. Further informationcan be obtained at a qualified specialist work-
shop, e.g. a Mercedes-Benz Service Centre. Driving abroad An extensive Mercedes-Benz Service network is
also available in other countries. You can obtain further information from any Mercedes-Benz
Service Centre. Care
General notes
H
Environmental note
Dispose of empty packaging and cleaning
cloths in an environmentally responsible man-
ner.
! For cleaning your vehicle, do not use any of
the following:
R dry, rough or hard cloths
R abrasive cleaning agents
R solvents
R cleaning agents containing solvents
Do not scrub.
Do not touch the surfaces or protective films
with hard objects, e.g. a ring or ice scraper.
You could otherwise scratch or damage the
surfaces and protective film.
! Do not park up your vehicle for a long period
of time immediately after cleaning, particu-
larly after cleaning the wheel rim with wheel
cleaner. Wheel cleaner may lead to increased corrosion of the brake discs and pads. You
should therefore drive for a few minutes after
cleaning. By heating up the brakes, the brake
discs and pads dry. The vehicle can then be
parked up for a long period of time.
Regular care of your vehicle is a condition for
retaining quality in the long term.
Use care products and cleaning agents recom-
mended and approved by Mercedes-Benz. Care
337Maintenance and care Z
Page 345 of 397
Cleaning the exhaust pipe
G
WARNING
The exhaust tail pipe and tail pipe trim can
become very hot. If you come into contact
with these parts of the vehicle, you could burn
yourself. There is a risk of injury.
Always be particularly careful around the
exhaust tail pipe and the tail pipe trim. Allow
these components to cool down before touch-
ing them.
! Mercedes-AMG GLE 63 vehicles with black
exhaust pipes: black chromed exhaust tips
should not be polished with a chrome polish. They will otherwise lose their black shine. For
optimal care, the tips should be rubbed with a lightly oiled cloth after every car wash. Com-
mercially available engine and care oils are
suitable for this.
For heavier soiling, you can apply a fine paint-
work polish with a microfibre cloth. Remove
the excess polish residue after polishing.
Impurities combined with the effects of road grit
and corrosive environmental factors may cause
flash rust to form on the surface. You can
restore the original shine of the exhaust pipe by cleaning it regularly, especially in winter and
after washing the vehicle.
X Clean the exhaust pipe with a chrome care
product tested and approved by Mercedes-
Benz.
Cleaning the trailer tow hitch H
Environmental note
Dispose of oily and greasy cloths in an envi-
ronmentally-responsible manner.
! Do not clean the ball coupling with a high-
pressure cleaner. Do not use solvents.
! Please note the care instructions in the
trailer coupling manufacturer's operating
instructions. The ball coupling must be cleaned if it becomes
dirty or corroded.
X Remove rust on the ball of the ball coupling,
e.g. with a wire brush.
X Remove dirt with a clean, lint-free cloth or a
brush.
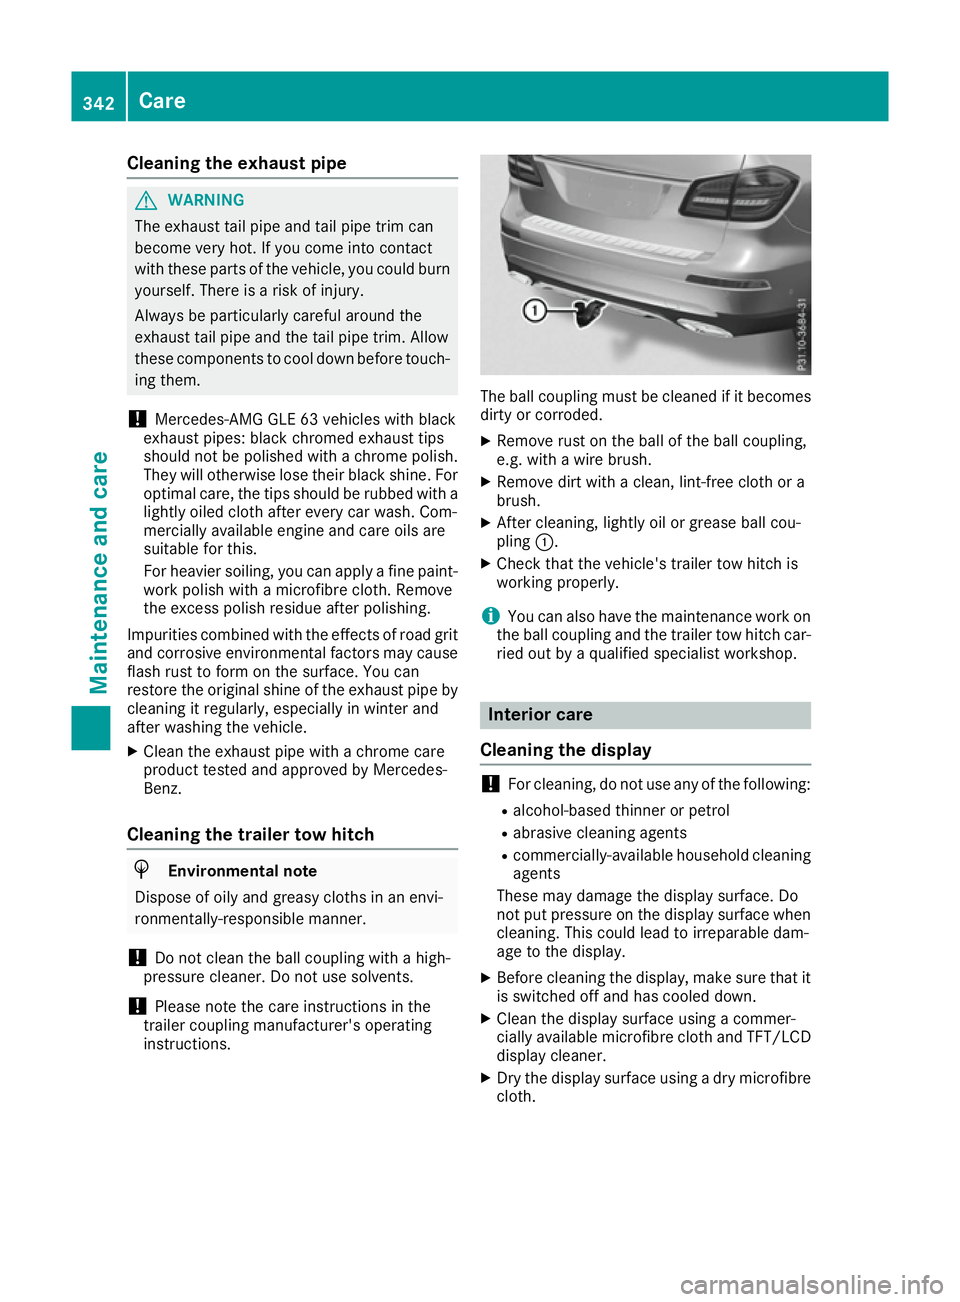
X After cleaning, lightly oil or grease ball cou-
pling :.
X Check that the vehicle's trailer tow hitch is
working properly.
i You can also have the maintenance work on
the ball coupling and the trailer tow hitch car-
ried out by a qualified specialist workshop. Interior care
Cleaning the display !
For cleaning, do not use any of the following:
R alcohol-based thinner or petrol
R abrasive cleaning agents
R commercially-available household cleaning
agents
These may damage the display surface. Do
not put pressure on the display surface when
cleaning. This could lead to irreparable dam-
age to the display.
X Before cleaning the display, make sure that it
is switched off and has cooled down.
X Clean the display surface using a commer-
cially available microfibre cloth and TFT/LCD
display cleaner.
X Dry the display surface using a dry microfibre
cloth. 342
CareMaintenance and care
Page 350 of 397
X
Stop the vehicle as far away as possible from
traffic on solid, non-slippery and level ground.
X Switch on the hazard warning lamps.
X Safeguard the vehicle against rolling away
(Y page 168).
X If possible, bring the front wheels into the
straight-ahead position.
X Vehicles with the AIRMATIC package:
make sure that the normal vehicle level is
selected (Y page 198).
X Vehicles with the Off-Road Engineering
package:
make sure that the normal level is
selected (Y page 192).
X Switch off the engine.
X Vehicles without KEYLESS-GO: remove the
key from the ignition lock.
X Vehicles with KEYLESS-GO: open the driv-
er's door.
The on-board electronics now have status 0.
This is the same as the key having been
removed.
X Vehicles with KEYLESS-GO: remove the
Start/Stop button from the ignition lock
(Y page 148).
X Make sure that the passengers are not endan-
gered as they do so. Make sure that no one is
near the danger area while a wheel is being
changed. Anyone who is not directly assisting in the wheel change should, for example,
stand behind the barrier.
X Get out of the vehicle. Pay attention to traffic
conditions when doing so.
X Close the driver's door.
X Place the warning triangle at a suitable dis-
tance (Y page 345). Observe legal require-
ments.
X Unload heavy luggage.
i Only operate the tyre inflation compressor
using a 12 V socket, even if the ignition is
turned off (Y page 324).
An emergency cut-off ensures that the on-
board voltage does not drop too low. If the on-
board voltage is too low, the power to the
sockets is automatically cut. This ensures
that there is sufficient power to start the
engine. MOExtended tyres (tyres with run-flat
characteristics)
General notes With MOExtended tyres (tyres with run-flat char-
acteristics), you can continue to drive your vehi- cle even if there is a total loss of pressure in one
or more tyres. The affected tyre must not show
any clearly visible damage.
You can recognise MOExtended tyres by the
MOExtended marking which appears on the tyre wall. You will find this marking next to the tyre
size designation, the load-bearing capacity and
the speed index.
MOExtended tyres may only be used in conjunc-tion with an activated tyre pressure loss warning
system or tyre pressure monitor.
If a pressure loss warning message appears in the multifunction display:
R observe the instructions in the display mes-
sages (Y page 283)
R check the tyre for damage
R if driving on, observe the following notes
The driving distance possible in run-flat mode is
approximately 80 km when the vehicle is parti-
ally laden and approximately 30 km when the
vehicle is fully laden.
In addition to the vehicle load, the driving dis-
tance possible depends upon:
R vehicle speed
R road condition
R outside temperature
The driving distance possible in run-flat mode
may be reduced by extreme driving conditions/
manoeuvres, or it can be increased through a
moderate style of driving.
The driving distance possible in run-flat mode is counted from the moment the tyre pressure loss
warning appears in the multifunction display.
You must not exceed a maximum speed of
80 km/h.
i When replacing one or all tyres, observe the
following specifications for your vehicle's
tyres:
R size
R type and
R the "MOExtended" mark
If a tyre has gone flat and cannot be replaced
with an MOExtended tyre, a standard tyre Flat tyre
347Breakdown assistance