2016 MERCEDES-BENZ GLS SUV tailgate
[x] Cancel search: tailgatePage 242 of 397
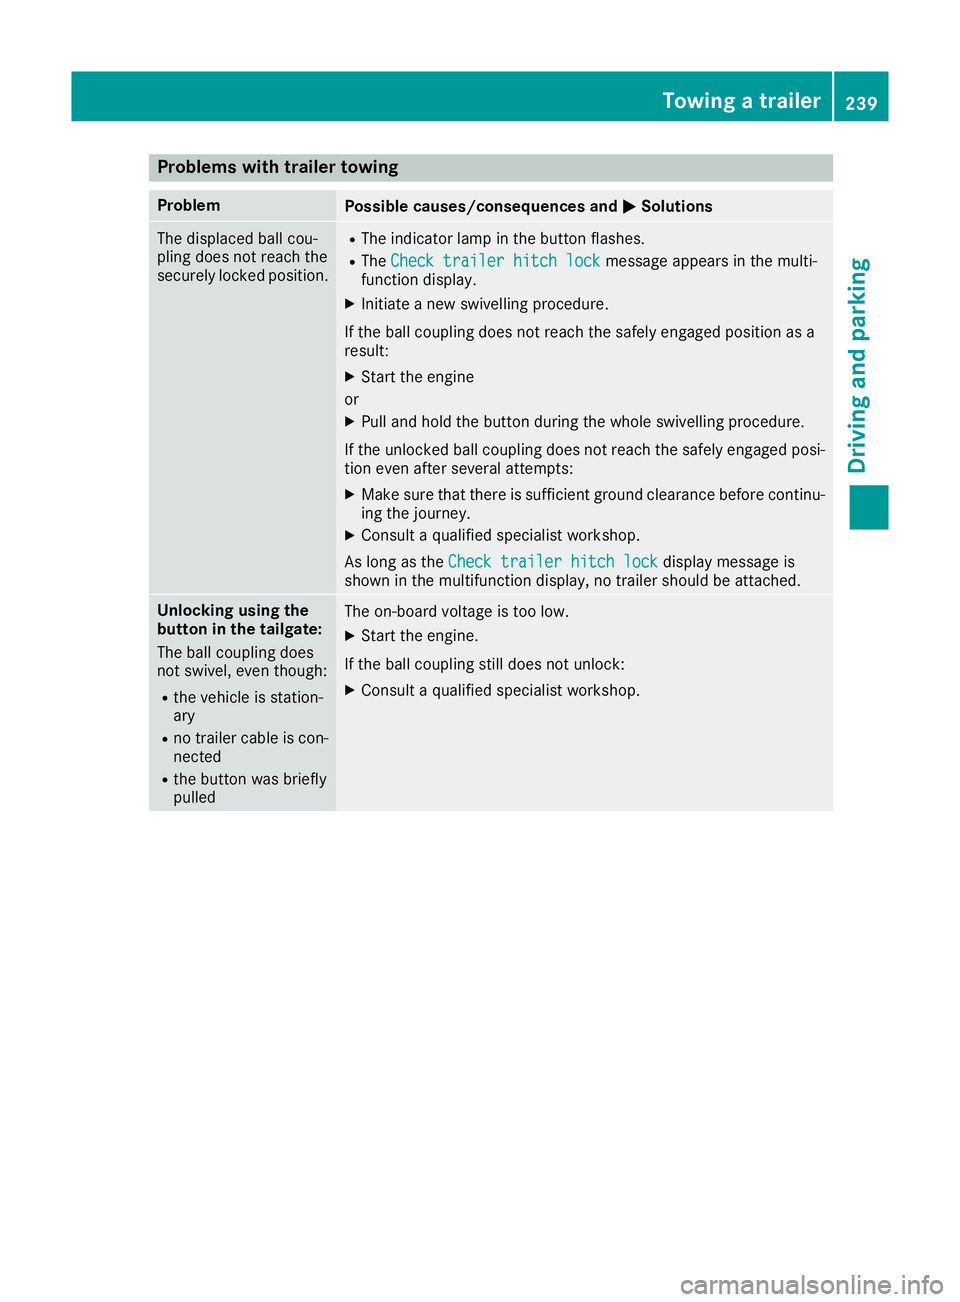
Problems with trailer towing
Problem
Possible causes/consequences and
M
MSolutions The displaced ball cou-
pling does not reach the
securely locked position. R
The indicator lamp in the button flashes.
R The Check trailer hitch lock Check trailer hitch lock message appears in the multi-
function display.
X Initiate a new swivelling procedure.
If the ball coupling does not reach the safely engaged position as a
result:
X Start the engine
or
X Pull and hold the button during the whole swivelling procedure.
If the unlocked ball coupling does not reach the safely engaged posi- tion even after several attempts:
X Make sure that there is sufficient ground clearance before continu-
ing the journey.
X Consult a qualified specialist workshop.
As long as the Check trailer hitch lock
Check trailer hitch lock display message is
shown in the multifunction display, no trailer should be attached. Unlocking using the
button in the tailgate:
The ball coupling does
not swivel, even though:
R
the vehicle is station-
ary
R no trailer cable is con-
nected
R the button was briefly
pulled The on-board voltage is too low.
X Start the engine.
If the ball coupling still does not unlock:
X Consult a qualified specialist workshop. Towing a trailer
239Driving and parking Z
Page 243 of 397
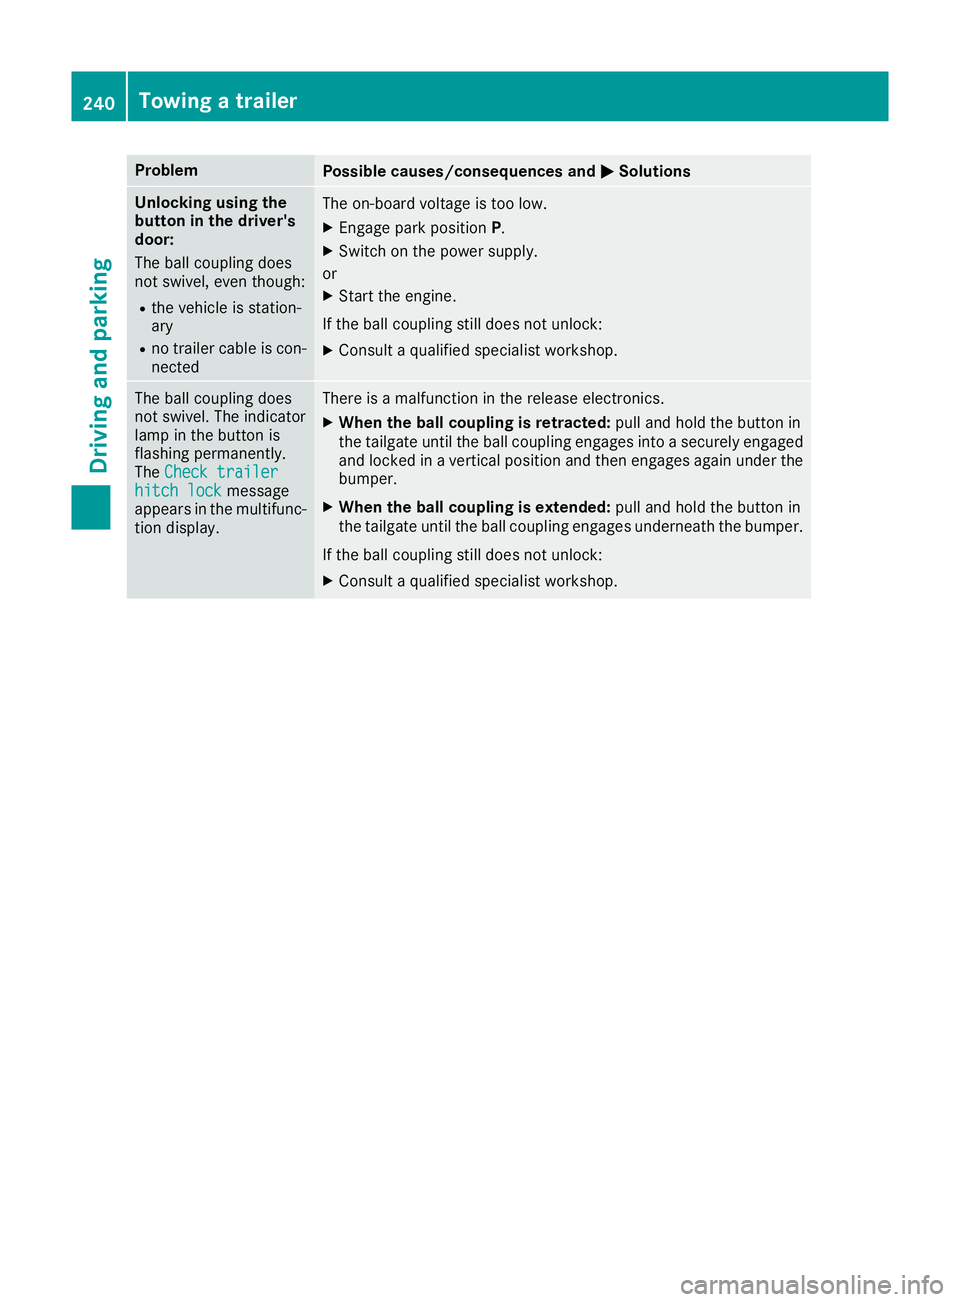
Problem
Possible causes/consequences and
M
MSolutions Unlocking using the
button in the driver's
door:
The ball coupling does
not swivel, even though:
R the vehicle is station-
ary
R no trailer cable is con-
nected The on-board voltage is too low.
X Engage park position P.
X Switch on the power supply.
or X Start the engine.
If the ball coupling still does not unlock: X Consult a qualified specialist workshop. The ball coupling does
not swivel. The indicator
lamp in the button is
flashing permanently.
The
Check trailer Check trailer
hitch lock
hitch lock message
appears in the multifunc- tion display. There is a malfunction in the release electronics.
X When the ball coupling is retracted: pull and hold the button in
the tailgate until the ball coupling engages into a securely engaged
and locked in a vertical position and then engages again under the
bumper.
X When the ball coupling is extended: pull and hold the button in
the tailgate until the ball coupling engages underneath the bumper.
If the ball coupling still does not unlock:
X Consult a qualified specialist workshop. 240
Towing a trailerDriving and parking
Page 289 of 397
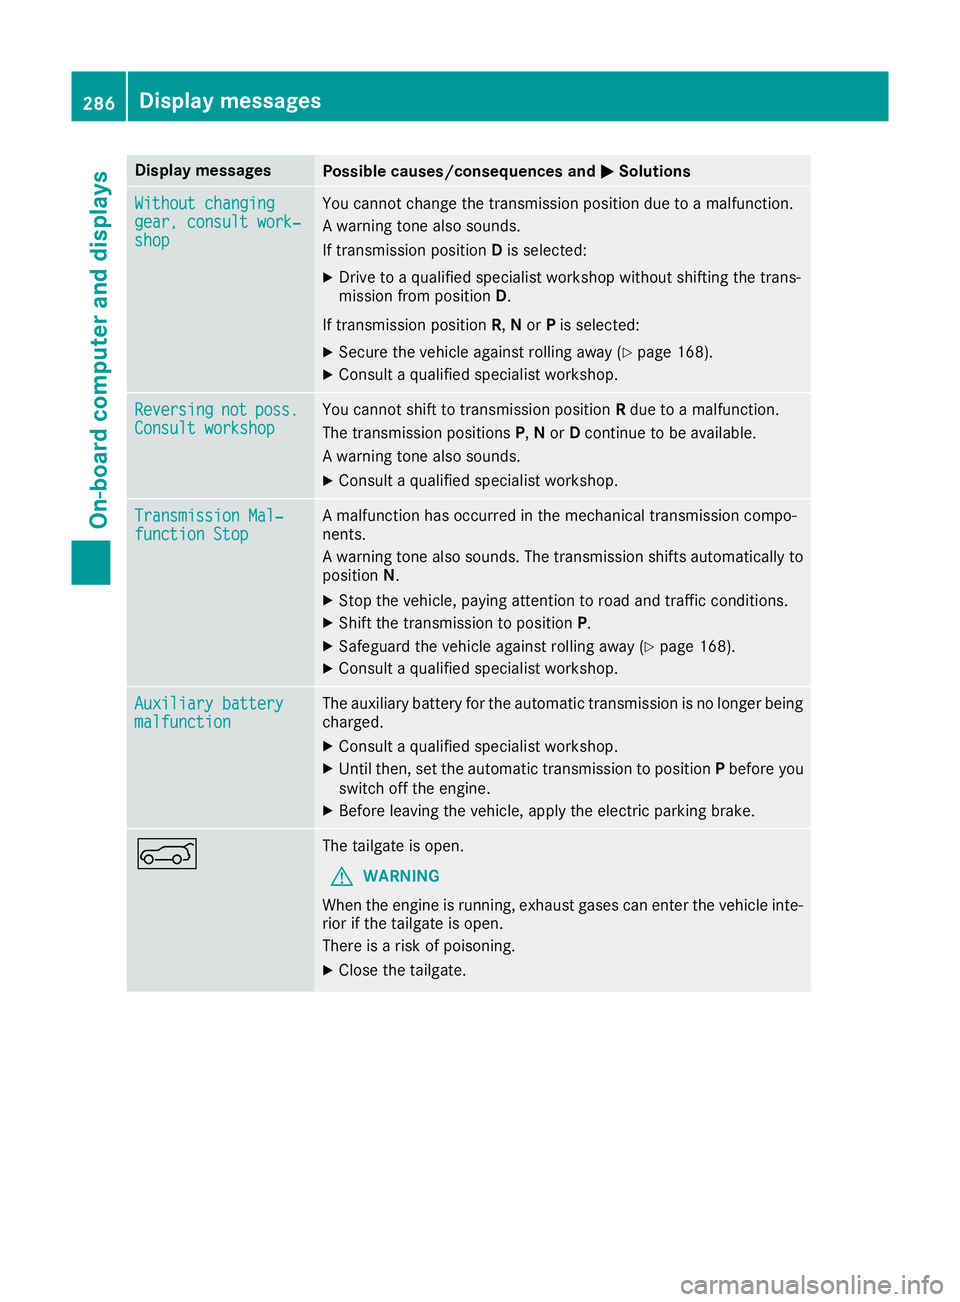
Display messages
Possible causes/consequences and
M
MSolutions Without changing
Without changing
gear, consult work‐ gear, consult work‐
shop shop You cannot change the transmission position due to a malfunction.
A warning tone also sounds.
If transmission position
Dis selected:
X Drive to a qualified specialist workshop without shifting the trans-
mission from position D.
If transmission position R,Nor Pis selected:
X Secure the vehicle against rolling away (Y page 168).
X Consult a qualified specialist workshop. Reversing Reversing
not
not poss.
poss.
Consult workshop
Consult workshop You cannot shift to transmission position
Rdue to a malfunction.
The transmission positions P,Nor Dcontinue to be available.
A warning tone also sounds.
X Consult a qualified specialist workshop. Transmission Mal‐
Transmission Mal‐
function Stop function Stop A malfunction has occurred in the mechanical transmission compo-
nents.
A warning tone also sounds. The transmission shifts automatically to position N.
X Stop the vehicle, paying attention to road and traffic conditions.
X Shift the transmission to position P.
X Safeguard the vehicle against rolling away (Y page 168).
X Consult a qualified specialist workshop. Auxiliary battery Auxiliary battery
malfunction malfunction The auxiliary battery for the automatic transmission is no longer being
charged.
X Consult a qualified specialist workshop.
X Until then, set the automatic transmission to position Pbefore you
switch off the engine.
X Before leaving the vehicle, apply the electric parking brake. A The tailgate is open.
G WARNING
When the engine is running, exhaust gases can enter the vehicle inte- rior if the tailgate is open.
There is a risk of poisoning.
X Close the tailgate. 286
Display
messagesOn-board computer and displays
Page 315 of 397
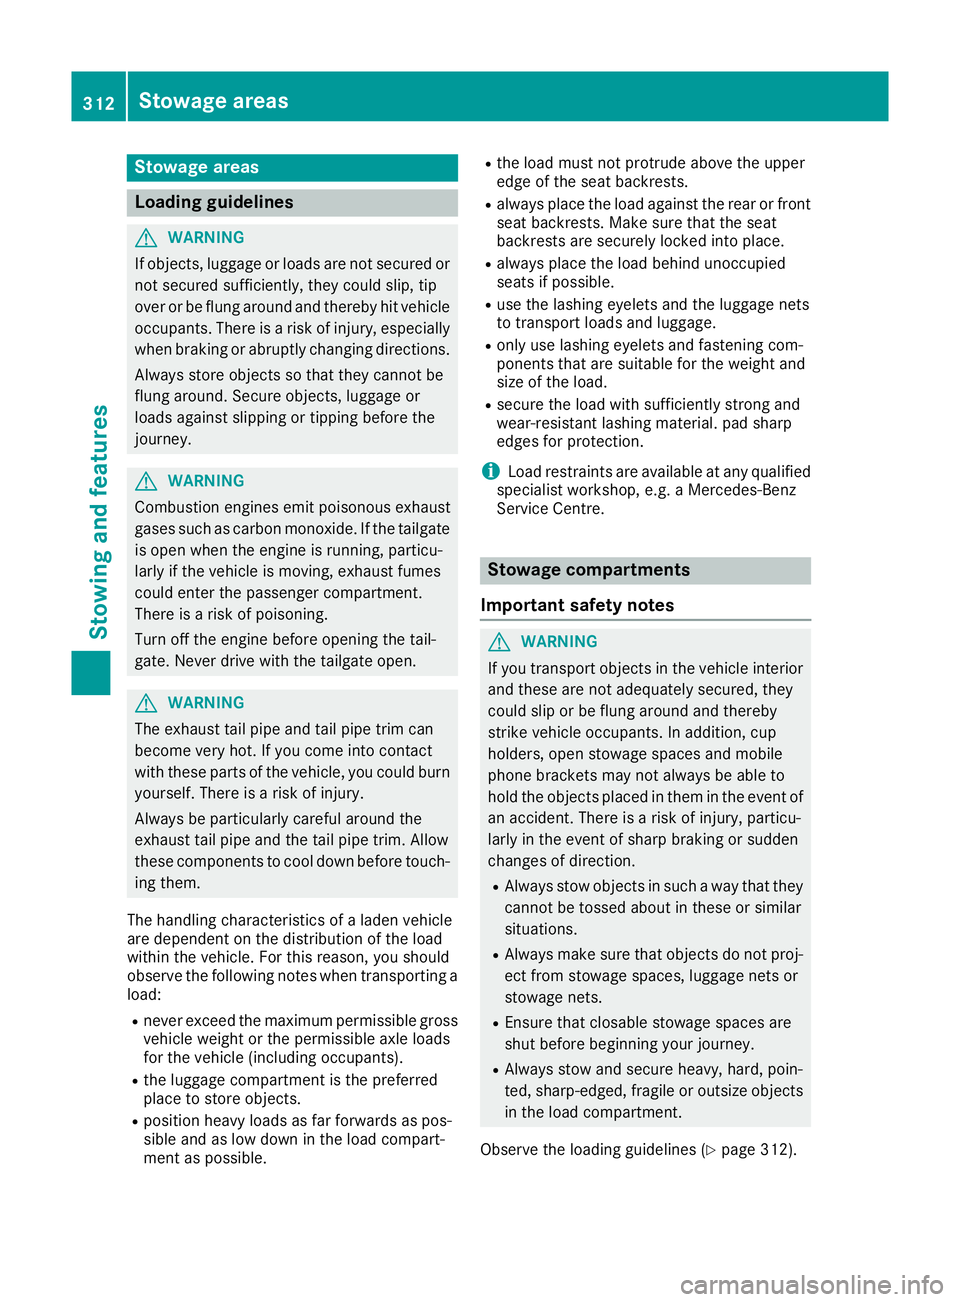
Stowage areas
Loading guidelines
G
WARNING
If objects, luggage or loads are not secured or not secured sufficiently, they could slip, tip
over or be flung around and thereby hit vehicle
occupants. There is a risk of injury, especially when braking or abruptly changing directions.
Always store objects so that they cannot be
flung around. Secure objects, luggage or
loads against slipping or tipping before the
journey. G
WARNING
Combustion engines emit poisonous exhaust
gases such as carbon monoxide. If the tailgate is open when the engine is running, particu-
larly if the vehicle is moving, exhaust fumes
could enter the passenger compartment.
There is a risk of poisoning.
Turn off the engine before opening the tail-
gate. Never drive with the tailgate open. G
WARNING
The exhaust tail pipe and tail pipe trim can
become very hot. If you come into contact
with these parts of the vehicle, you could burn
yourself. There is a risk of injury.
Always be particularly careful around the
exhaust tail pipe and the tail pipe trim. Allow
these components to cool down before touch-
ing them.
The handling characteristics of a laden vehicle
are dependent on the distribution of the load
within the vehicle. For this reason, you should
observe the following notes when transporting a
load:
R never exceed the maximum permissible gross
vehicle weight or the permissible axle loads
for the vehicle (including occupants).
R the luggage compartment is the preferred
place to store objects.
R position heavy loads as far forwards as pos-
sible and as low down in the load compart-
ment as possible. R
the load must not protrude above the upper
edge of the seat backrests.
R always place the load against the rear or front
seat backrests. Make sure that the seat
backrests are securely locked into place.
R always place the load behind unoccupied
seats if possible.
R use the lashing eyelets and the luggage nets
to transport loads and luggage.
R only use lashing eyelets and fastening com-
ponents that are suitable for the weight and
size of the load.
R secure the load with sufficiently strong and
wear-resistant lashing material. pad sharp
edges for protection.
i Load restraints are available at any qualified
specialist workshop, e.g. a Mercedes-Benz
Service Centre. Stowage compartments
Important safety notes G
WARNING
If you transport objects in the vehicle interior and these are not adequately secured, they
could slip or be flung around and thereby
strike vehicle occupants. In addition, cup
holders, open stowage spaces and mobile
phone brackets may not always be able to
hold the objects placed in them in the event of an accident. There is a risk of injury, particu-
larly in the event of sharp braking or sudden
changes of direction.
R Always stow objects in such a way that they
cannot be tossed about in these or similar
situations.
R Always make sure that objects do not proj-
ect from stowage spaces, luggage nets or
stowage nets.
R Ensure that closable stowage spaces are
shut before beginning your journey.
R Always stow and secure heavy, hard, poin-
ted, sharp-edged, fragile or outsize objects
in the load compartment.
Observe the loading guidelines (Y page 312).312
Stowage areasStowing and features
Page 321 of 397
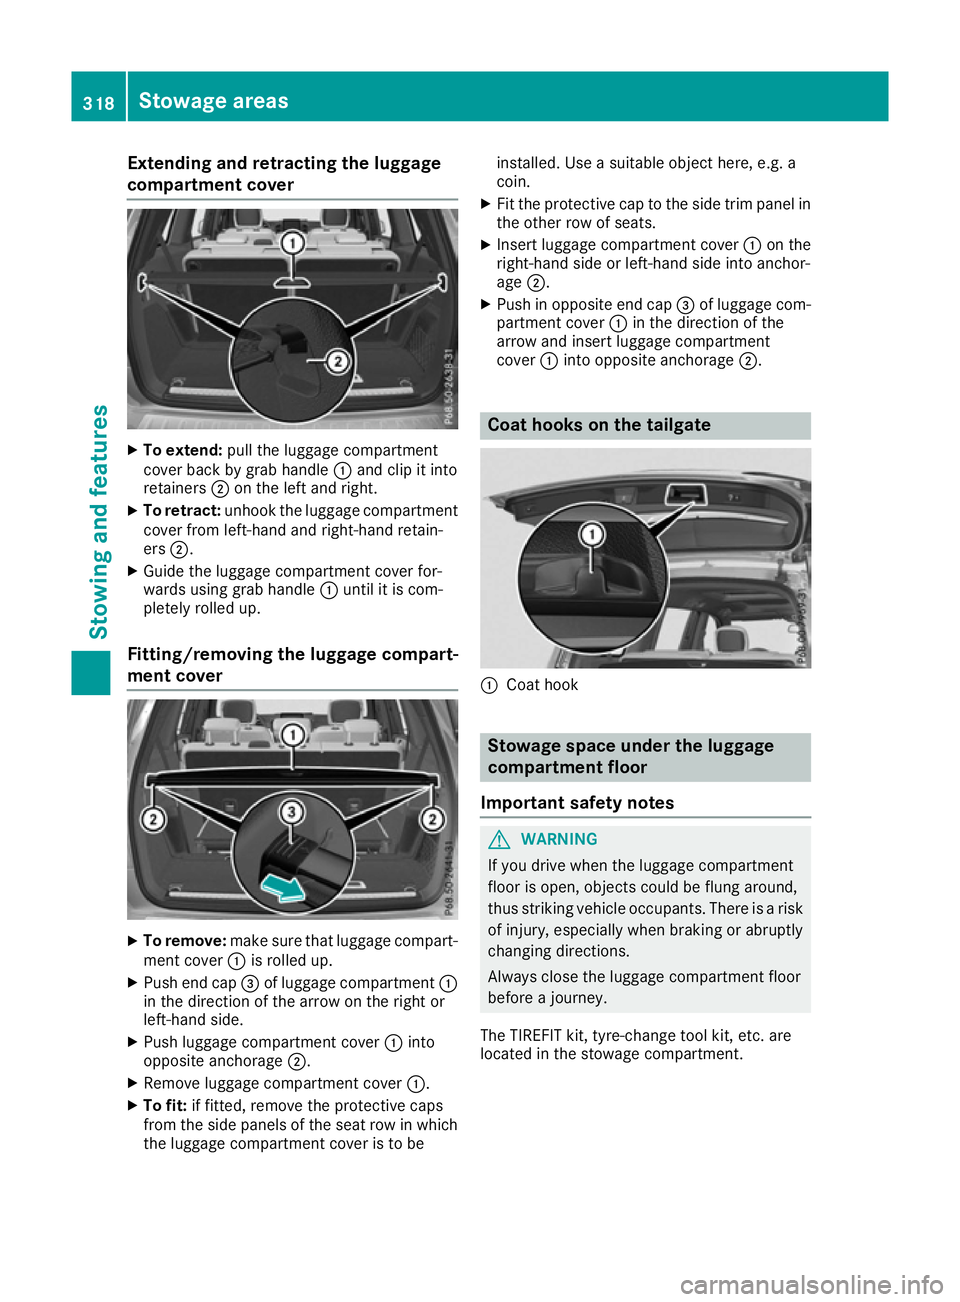
Extending and retracting the luggage
compartment cover X
To extend: pull the luggage compartment
cover back by grab handle :and clip it into
retainers ;on the left and right.
X To retract: unhook the luggage compartment
cover from left-hand and right-hand retain-
ers ;.
X Guide the luggage compartment cover for-
wards using grab handle :until it is com-
pletely rolled up.
Fitting/removing the luggage compart-
ment cover X
To remove: make sure that luggage compart-
ment cover :is rolled up.
X Push end cap =of luggage compartment :
in the direction of the arrow on the right or
left-hand side.
X Push luggage compartment cover :into
opposite anchorage ;.
X Remove luggage compartment cover :.
X To fit: if fitted, remove the protective caps
from the side panels of the seat row in which
the luggage compartment cover is to be installed. Use a suitable object here, e.g. a
coin.
X Fit the protective cap to the side trim panel in
the other row of seats.
X Insert luggage compartment cover :on the
right-hand side or left-hand side into anchor-
age ;.
X Push in opposite end cap =of luggage com-
partment cover :in the direction of the
arrow and insert luggage compartment
cover :into opposite anchorage ;. Coat hooks on the tailgate
:
Coat hook Stowage space under the luggage
compartment floor
Important safety notes G
WARNING
If you drive when the luggage compartment
floor is open, objects could be flung around,
thus striking vehicle occupants. There is a risk of injury, especially when braking or abruptly
changing directions.
Always close the luggage compartment floor
before a journey.
The TIREFIT kit, tyre-change tool kit, etc. are
located in the stowage compartment. 318
Stowage areasStowing and features
Page 323 of 397
Depending on the vehicle equipment, ensure
that when the roof carrier is fitted you can:
R raise the sliding sunroof fully
R open the panorama sliding sunroof fully
R open the tailgate fully
You will find information on the maximum roof
load in the "Technical data" section
(Y page 387).
An incorrectly secured roof carrier or roof load
may become detached from the vehicle. You
must therefore ensure that you observe the roof
carrier manufacturer's installation instructions.
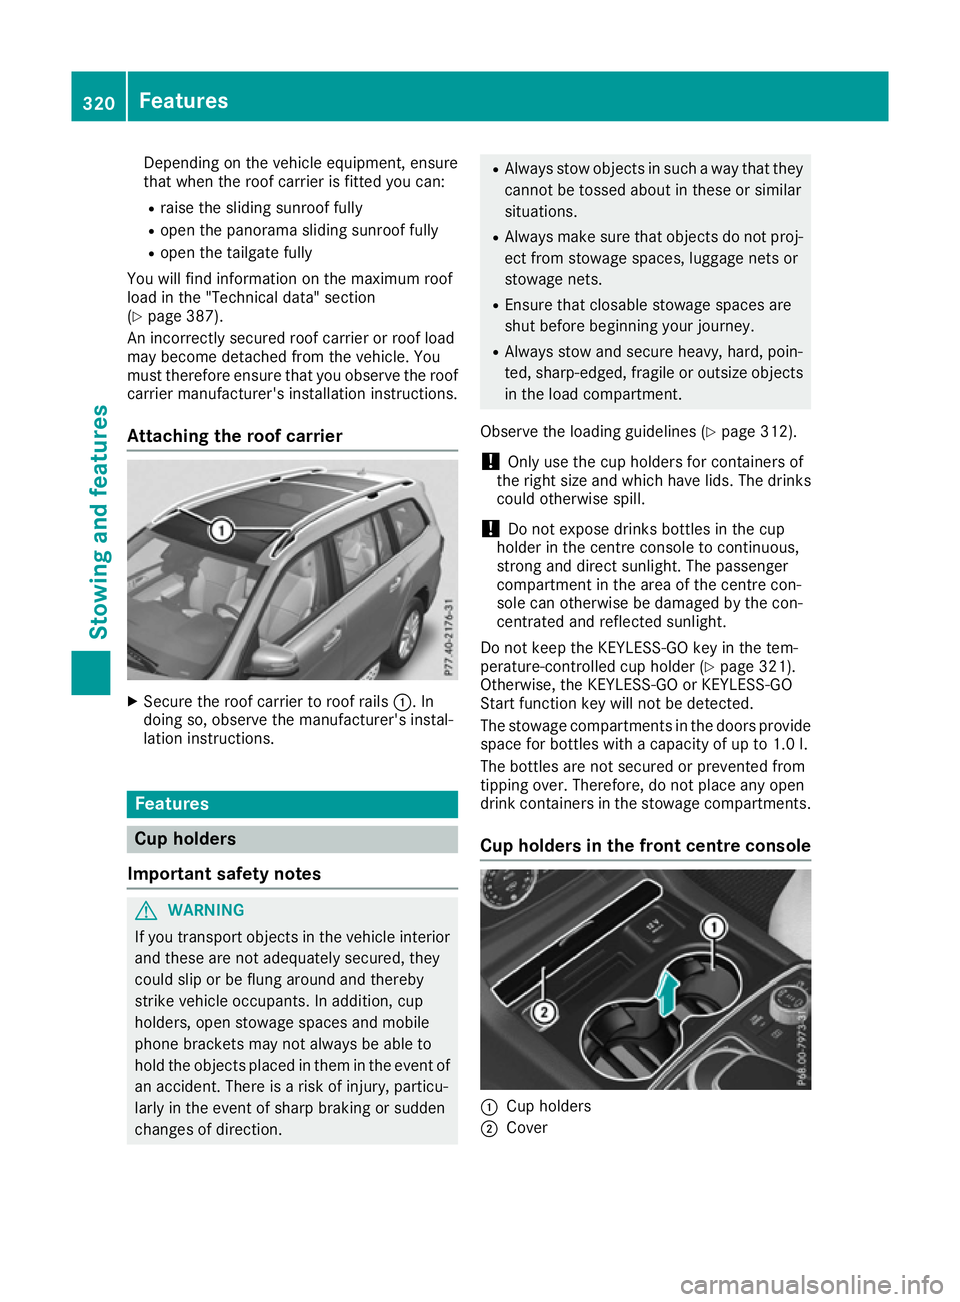
Attaching the roof carrier X
Secure the roof carrier to roof rails :. In
doing so, observe the manufacturer's instal-
lation instructions. Features
Cup holders
Important safety notes G
WARNING
If you transport objects in the vehicle interior and these are not adequately secured, they
could slip or be flung around and thereby
strike vehicle occupants. In addition, cup
holders, open stowage spaces and mobile
phone brackets may not always be able to
hold the objects placed in them in the event of an accident. There is a risk of injury, particu-
larly in the event of sharp braking or sudden
changes of direction. R
Always stow objects in such a way that they
cannot be tossed about in these or similar
situations.
R Always make sure that objects do not proj-
ect from stowage spaces, luggage nets or
stowage nets.
R Ensure that closable stowage spaces are
shut before beginning your journey.
R Always stow and secure heavy, hard, poin-
ted, sharp-edged, fragile or outsize objects
in the load compartment.
Observe the loading guidelines (Y page 312).
! Only use the cup holders for containers of
the right size and which have lids. The drinks
could otherwise spill.
! Do not expose drinks bottles in the cup
holder in the centre console to continuous,
strong and direct sunlight. The passenger
compartment in the area of the centre con-
sole can otherwise be damaged by the con-
centrated and reflected sunlight.
Do not keep the KEYLESS-GO key in the tem-
perature-controlled cup holder (Y page 321).
Otherwise, the KEYLESS-GO or KEYLESS-GO
Start function key will not be detected.
The stowage compartments in the doors provide
space for bottles with a capacity of up to 1.0 l.
The bottles are not secured or prevented from
tipping over. Therefore, do not place any open
drink containers in the stowage compartments.
Cup holders in the front centre console :
Cup holders
; Cover 320
FeaturesStowing and features
Page 348 of 397
Where will I find...?
Warning triangle
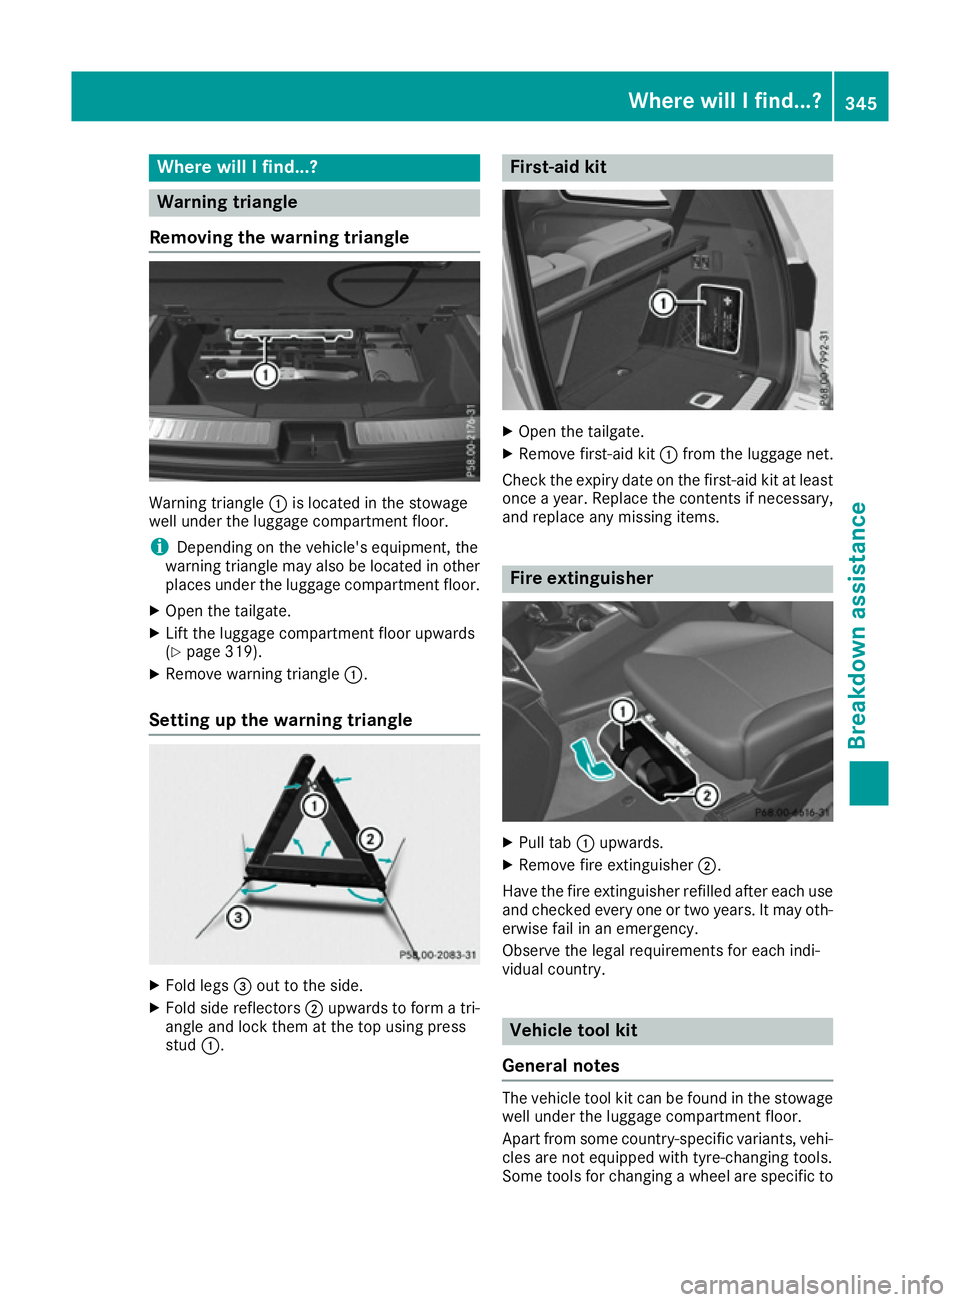
Removing the warning triangle Warning triangle
:is located in the stowage
well under the luggage compartment floor.
i Depending on the vehicle's equipment, the
warning triangle may also be located in other
places under the luggage compartment floor.
X Open the tailgate.
X Lift the luggage compartment floor upwards
(Y page 319).
X Remove warning triangle :.
Setting up the warning triangle X
Fold legs =out to the side.
X Fold side reflectors ;upwards to form a tri-
angle and lock them at the top using press
stud :. First-aid kit
X
Open the tailgate.
X Remove first-aid kit :from the luggage net.
Check the expiry date on the first-aid kit at least once a year. Replace the contents if necessary,
and replace any missing items. Fire extinguisher
X
Pull tab :upwards.
X Remove fire extinguisher ;.
Have the fire extinguisher refilled after each use and checked every one or two years. It may oth-
erwise fail in an emergency.
Observe the legal requirements for each indi-
vidual country. Vehicle tool kit
General notes The vehicle tool kit can be found in the stowage
well under the luggage compartment floor.
Apart from some country-specific variants, vehi-
cles are not equipped with tyre-changing tools.
Some tools for changing a wheel are specific to Where will I find...?
345Breakdown assistance
Page 349 of 397
the vehicle. For more information on which tools
are required to perform a wheel change on your vehicle, consult a qualified specialist workshop.
Necessary tyre-changing tools may include, for
example:
R jack
R wheel chock
R wheel wrench
R ratchet ring spanner
R centring pin
i The jack weighs approximately 3.4 kg.
The maximum load-bearing capacity of the
jack can be found on the adhesive label on the
jack.
The jack is maintenance-free. If there is a
malfunction, please contact a qualified spe-
cialist workshop.
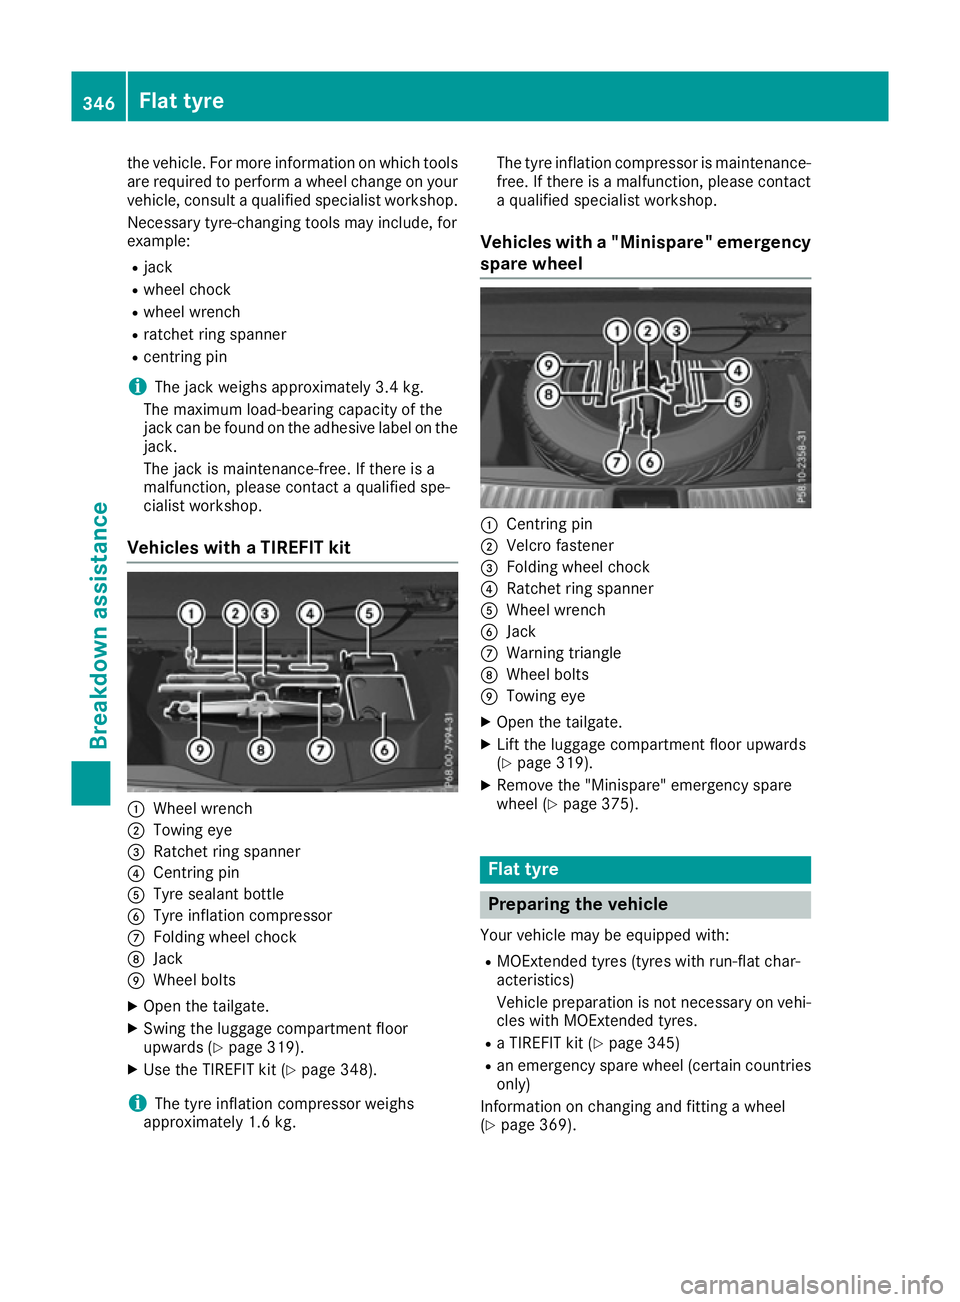
Vehicles with a TIREFIT kit :
Wheel wrench
; Towing eye
= Ratchet ring spanner
? Centring pin
A Tyre sealant bottle
B Tyre inflation compressor
C Folding wheel chock
D Jack
E Wheel bolts
X Open the tailgate.
X Swing the luggage compartment floor
upwards (Y page 319).
X Use the TIREFIT kit (Y page 348).
i The tyre inflation compressor weighs
approximately 1.6 kg. The tyre inflation compressor is maintenance-
free. If there is a malfunction, please contact a qualified specialist workshop.
Vehicles with a "Minispare" emergency
spare wheel :
Centring pin
; Velcro fastener
= Folding wheel chock
? Ratchet ring spanner
A Wheel wrench
B Jack
C Warning triangle
D Wheel bolts
E Towing eye
X Open the tailgate.
X Lift the luggage compartment floor upwards
(Y page 319).
X Remove the "Minispare" emergency spare
wheel (Y page 375). Flat tyre
Preparing the vehicle
Your vehicle may be equipped with: R MOExtended tyres (tyres with run-flat char-
acteristics)
Vehicle preparation is not necessary on vehi- cles with MOExtended tyres.
R a TIREFIT kit (Y page 345)
R an emergency spare wheel (certain countries
only)
Information on changing and fitting a wheel
(Y page 369). 346
Flat tyreBreakdown assistance