2016 MERCEDES-BENZ GLS SUV sensor
[x] Cancel search: sensorPage 98 of 397
Convenience opening feature
General notes Vehicles with KEYLESS-GO or KEYLESS-GO
start function: you can ventilate the vehicle
before you start driving.
To do this, the key is used to carry out the fol-
lowing functions simultaneously:
R unlock the vehicle
R open the side windows
R open the hinged side windows
R open the sliding sunroof or the panorama slid-
ing sunroof and the roller sunblinds
R switch on the seat ventilation for the driver's
seat
The convenience opening feature can only be
operated using the key. The key must be close to
the vehicle. For vehicles without KEYLESS-GO,
the key must be near the driver's door handle.
The "convenience opening" feature is also avail-
able when the vehicle is unlocked.
Convenience opening feature X
Vehicles without KEYLESS-GO: point the tip
of the key at the door handle on the driver's
door.
X Press and hold the %button until the side
windows and the sliding sunroof or panorama
sliding sunroof are in the desired position.
If the roller sunblinds of the panorama sliding sunroof are closed, the roller sunblinds are
opened first.
X Press and hold the %button again until the
panorama sliding sunroof is in the desired
position.
X To interrupt convenience opening: release
the % button. Convenience closing feature
Important safety notes G
WARNING
When the convenience closing feature is oper- ating, parts of the body could become trapped
in the closing area of the side window and the
sliding sunroof. There is a risk of injury. Observe the complete closing procedure
when the convenience closing feature is oper-
ating. When closing make sure that no parts of the body are in the closing area.
When you lock the vehicle, you can simultane-
ously: R close the side windows
R close the hinged side windows
R close the sliding sunroof or the panorama
sliding sunroof
On vehicles with a panorama sliding sunroof,
you can then close the roller sunblinds.
Proceed as follows if someone is trapped:
R Release the &button to interrupt the clos-
ing procedure.
R Press and hold the %button to open.
Vehicles with KEYLESS-GO:
R Release the sensor surfaces on the exterior
door handle to interrupt the closing proce-
dure.
R To open, pull the same door handle immedi-
ately and hold it firmly. The side windows and the sliding sunroof open for as long as the
door handle is held and the door is not
opened.
Notes on the automatic reversing feature for:
R the side windows (Y page 93)
R the sliding sunroof (Y page 97)
R the panorama sliding sunroof (Y page 97)
Using the key The key must be close to the vehicle. For vehi-
cles without KEYLESS-GO, the key must be near
the driver's door handle.
X Vehicles without KEYLESS-GO: point the tip
of the key at the door handle on the driver's
door.
X Press and hold the &button until the side
windows and the sliding sunroof or the pano-
rama sliding sunroof are fully closed.
X Make sure that all the side windows and the
sliding sunroof or panorama sliding sunroof
are closed.
On vehicles with a panorama sliding sunroof: X Press and hold the &button again until the
roller sunblinds of the panorama sliding sun-
roof close. Side windows
95Opening and closing Z
Page 99 of 397
X
To interrupt convenience closing: release
the & button.
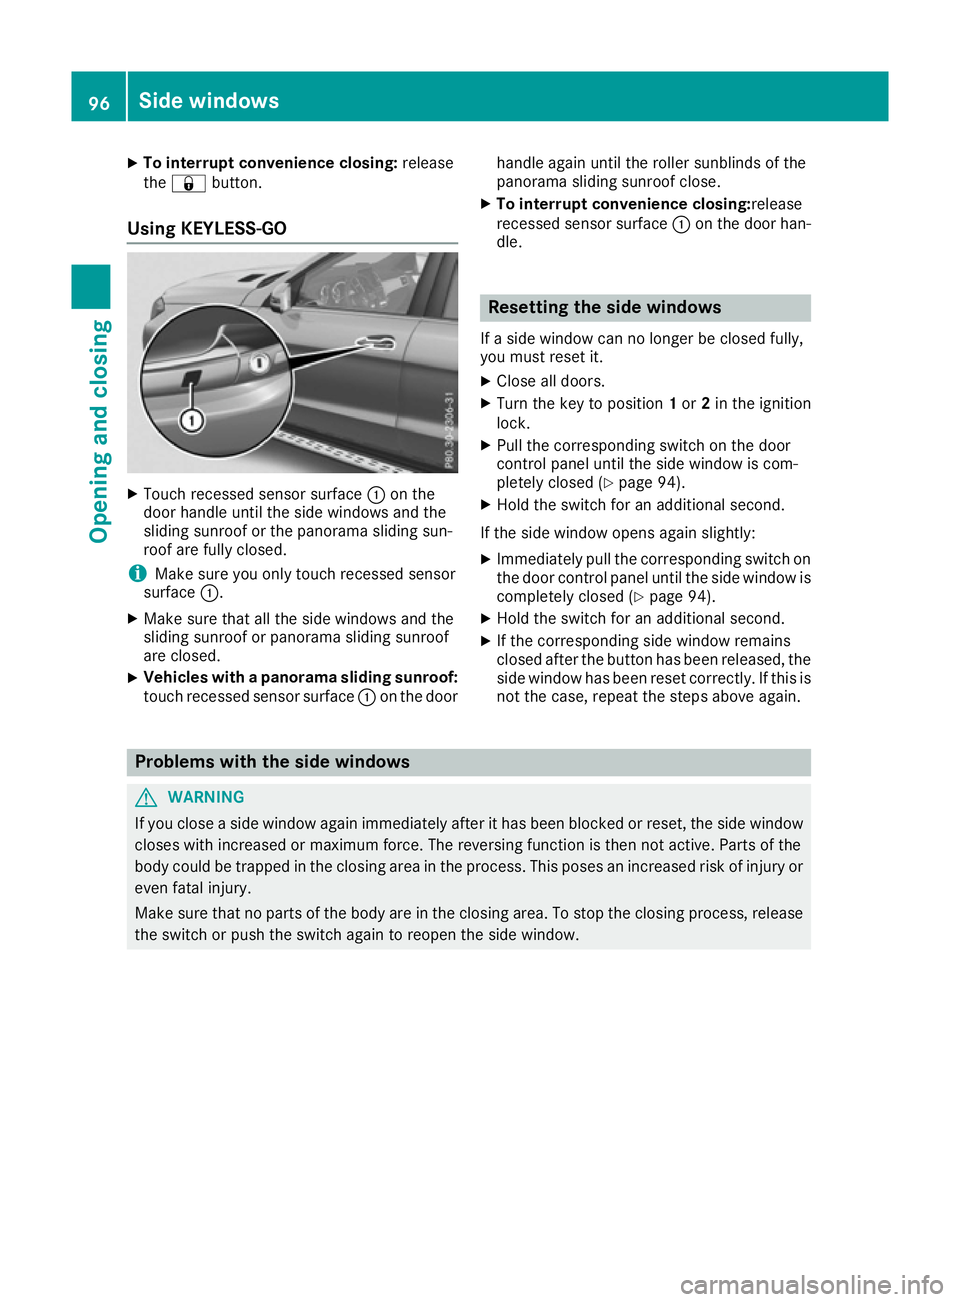
Using KEYLESS-GO X
Touch recessed sensor surface :on the
door handle until the side windows and the
sliding sunroof or the panorama sliding sun-
roof are fully closed.
i Make sure you only touch recessed sensor
surface :.
X Make sure that all the side windows and the
sliding sunroof or panorama sliding sunroof
are closed.
X Vehicles with a panorama sliding sunroof:
touch recessed sensor surface :on the door handle again until the roller sunblinds of the
panorama sliding sunroof close.
X To interrupt convenience closing: release
recessed sensor surface :on the door han-
dle. Resetting the side windows
If a side window can no longer be closed fully,
you must reset it.
X Close all doors.
X Turn the key to position 1or 2in the ignition
lock.
X Pull the corresponding switch on the door
control panel until the side window is com-
pletely closed (Y page 94).
X Hold the switch for an additional second.
If the side window opens again slightly: X Immediately pull the corresponding switch on
the door control panel until the side window is completely closed (Y page 94).
X Hold the switch for an additional second.
X If the corresponding side window remains
closed after the button has been released, the
side window has been reset correctly. If this is
not the case, repeat the steps above again. Problems with the side windows
G
WARNING
If you close a side window again immediately after it has been blocked or reset, the side window
closes with increased or maximum force. The reversing function is then not active. Parts of the
body could be trapped in the closing area in the process. This poses an increased risk of injury or even fatal injury.
Make sure that no parts of the body are in the closing area. To stop the closing process, releasethe switch or push the switch again to reopen the side window. 96
Side windowsOpening and closing
Page 101 of 397
G
WARNING
The reversing feature does not react:
R to soft, light and thin objects, e.g. small fin-
gers
R over the last 4 mm of the closing movement
R during resetting
R when closing the sliding sunroof again man-
ually immediately after automatic reversing
This means that the reversing feature cannot
prevent someone being trapped in these sit-
uations. There is a risk of injury.
When closing make sure that no body parts
are in the closing area.
If someone is trapped:
R release the switch immediately or
R press the switch in any direction during the
automatic closing process
The closing process is stopped. Operating the sliding sunroof
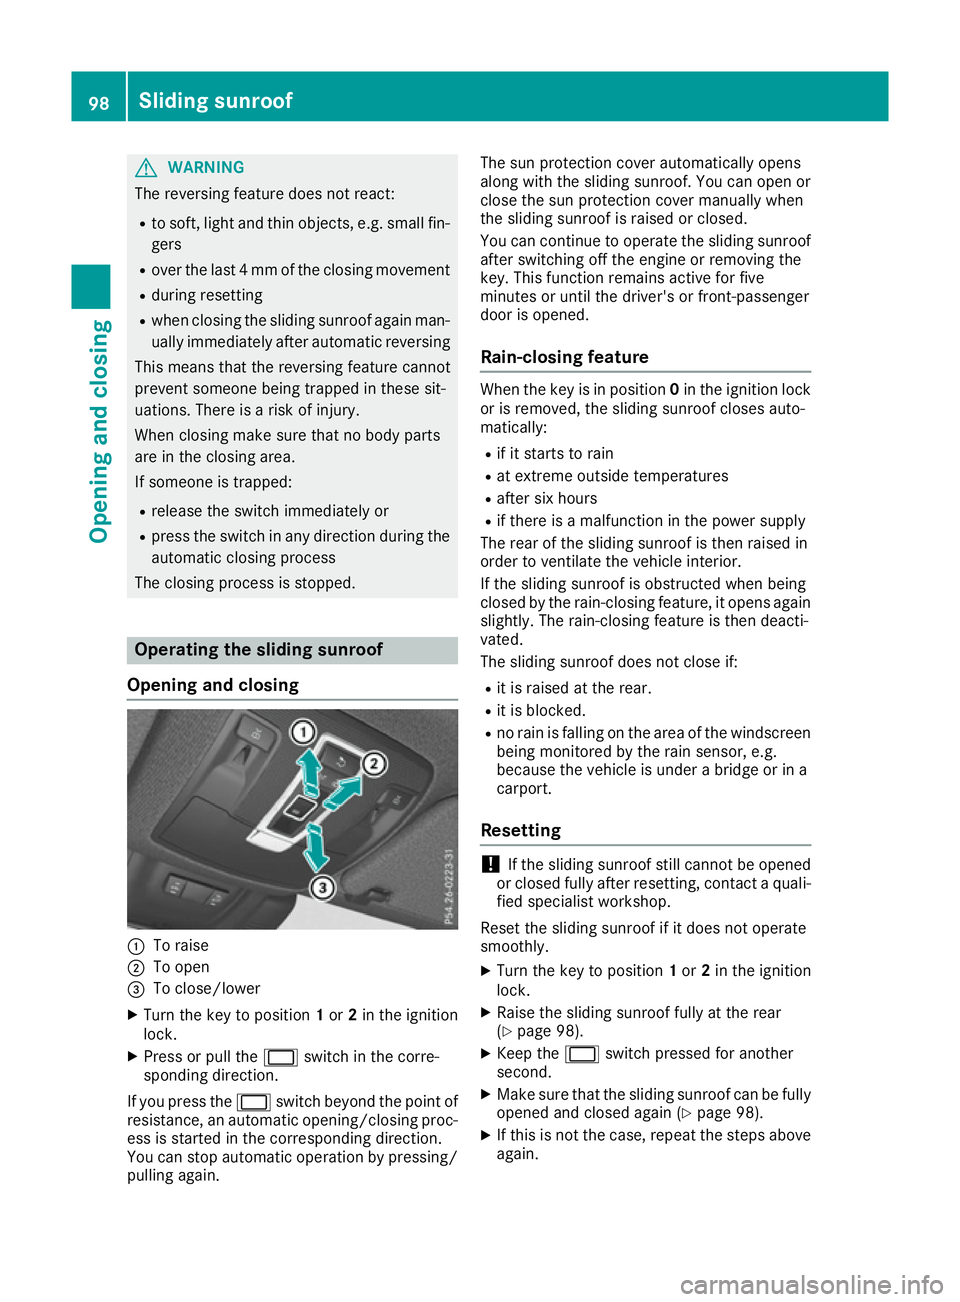
Opening and closing :
To raise
; To open
= To close/lower
X Turn the key to position 1or 2in the ignition
lock.
X Press or pull the 2switch in the corre-
sponding direction.
If you press the 2switch beyond the point of
resistance, an automatic opening/closing proc-
ess is started in the corresponding direction.
You can stop automatic operation by pressing/
pulling again. The sun protection cover automatically opens
along with the sliding sunroof. You can open or
close the sun protection cover manually when
the sliding sunroof is raised or closed.
You can continue to operate the sliding sunroof
after switching off the engine or removing the
key. This function remains active for five
minutes or until the driver's or front-passenger
door is opened.
Rain-closing feature When the key is in position
0in the ignition lock
or is removed, the sliding sunroof closes auto-
matically:
R if it starts to rain
R at extreme outside temperatures
R after six hours
R if there is a malfunction in the power supply
The rear of the sliding sunroof is then raised in
order to ventilate the vehicle interior.
If the sliding sunroof is obstructed when being
closed by the rain-closing feature, it opens again
slightly. The rain-closing feature is then deacti-
vated.
The sliding sunroof does not close if:
R it is raised at the rear.
R it is blocked.
R no rain is falling on the area of the windscreen
being monitored by the rain sensor, e.g.
because the vehicle is under a bridge or in a
carport.
Resetting !
If the sliding sunroof still cannot be opened
or closed fully after resetting, contact a quali- fied specialist workshop.
Reset the sliding sunroof if it does not operate
smoothly.
X Turn the key to position 1or 2in the ignition
lock.
X Raise the sliding sunroof fully at the rear
(Y page 98).
X Keep the 2switch pressed for another
second.
X Make sure that the sliding sunroof can be fully
opened and closed again (Y page 98).
X If this is not the case, repeat the steps above
again. 98
Sliding sunroofOpening and closing
Page 102 of 397
Operating the panorama sliding sun-
roof
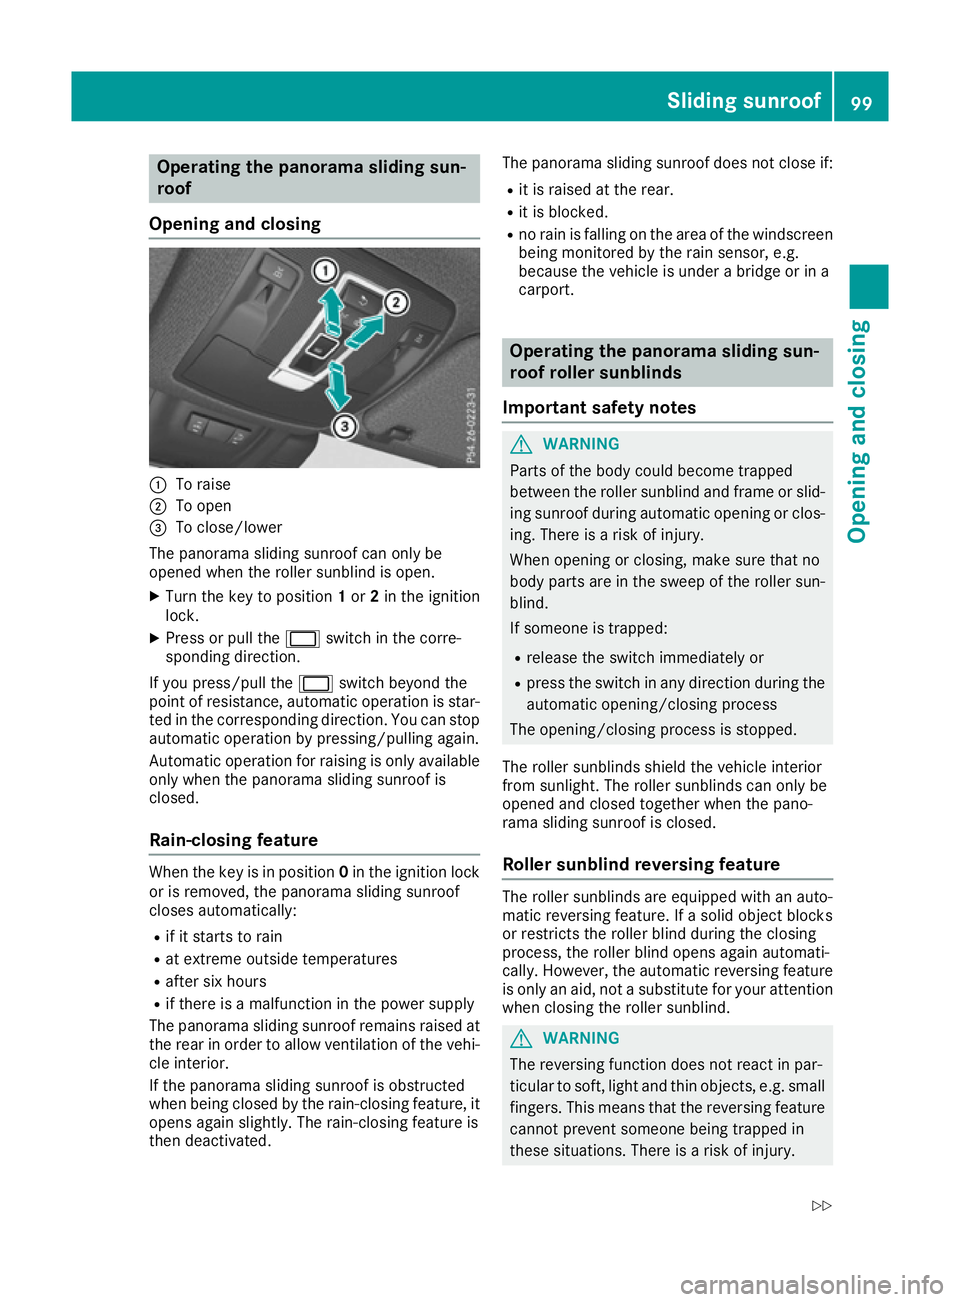
Opening and closing :
To raise
; To open
= To close/lower
The panorama sliding sunroof can only be
opened when the roller sunblind is open.
X Turn the key to position 1or 2in the ignition
lock.
X Press or pull the 2switch in the corre-
sponding direction.
If you press/pull the 2switch beyond the
point of resistance, automatic operation is star-
ted in the corresponding direction. You can stop automatic operation by pressing/pulling again.
Automatic operation for raising is only available
only when the panorama sliding sunroof is
closed.
Rain-closing feature When the key is in position
0in the ignition lock
or is removed, the panorama sliding sunroof
closes automatically:
R if it starts to rain
R at extreme outside temperatures
R after six hours
R if there is a malfunction in the power supply
The panorama sliding sunroof remains raised at
the rear in order to allow ventilation of the vehi-
cle interior.
If the panorama sliding sunroof is obstructed
when being closed by the rain-closing feature, it opens again slightly. The rain-closing feature is
then deactivated. The panorama sliding sunroof does not close if:
R it is raised at the rear.
R it is blocked.
R no rain is falling on the area of the windscreen
being monitored by the rain sensor, e.g.
because the vehicle is under a bridge or in a
carport. Operating the panorama sliding sun-
roof roller sunblinds
Important safety notes G
WARNING
Parts of the body could become trapped
between the roller sunblind and frame or slid- ing sunroof during automatic opening or clos-
ing. There is a risk of injury.
When opening or closing, make sure that no
body parts are in the sweep of the roller sun- blind.
If someone is trapped:
R release the switch immediately or
R press the switch in any direction during the
automatic opening/closing process
The opening/closing process is stopped.
The roller sunblinds shield the vehicle interior
from sunlight. The roller sunblinds can only be
opened and closed together when the pano-
rama sliding sunroof is closed.
Roller sunblind reversing feature The roller sunblinds are equipped with an auto-
matic reversing feature. If a solid object blocks
or restricts the roller blind during the closing
process, the roller blind opens again automati-
cally. However, the automatic reversing feature
is only an aid, not a substitute for your attention
when closing the roller sunblind. G
WARNING
The reversing function does not react in par-
ticular to soft, light and thin objects, e.g. small fingers. This means that the reversing featurecannot prevent someone being trapped in
these situations. There is a risk of injury. Sliding sunroof
99Opening and closing
Z
Page 123 of 397

Exterior lighting
General notes
For reasons of safety, Mercedes-Benz recom-
mends that you drive with the lights switched on even during the daytime. In some countries,
operation of the headlamps varies due to legal
requirements and self-imposed obligations. Driving abroad
General notes If your journey takes you to countries where
vehicles are driven on the opposite side of the
road to the country in which the vehicle is reg-
istered, your headlamps must be switched to
symmetrical dipped beam as soon as possible
after crossing the border. This prevents oncom-
ing traffic from being dazzled. Symmetrical
lights do not illuminate as large an area of the
edge of the carriageway.
Vehicles with halogen headlamps X
Turn cap :anti-clockwise and remove it.
X Push switchover lever ;down.
X Replace cap :and turn it clockwise.
Convert the headlamps back to asymmetrical
dipped beam as soon as possible after returning across the border.
Vehicles with Intelligent Light System X
Before crossing the border, set the head-
lamps to symmetrical dipped beam and after
returning back to asymmetrical dipped beam via the "Dipped-beam headlamps for driving
on the right/left" function in the on-board
computer (Y page 252). If the headlamps are converted to symmetrical
dipped beam, the "motorway mode" and "exten-
ded range foglamps" functions are not available. Setting the exterior lighting
Setting options Exterior lighting can be set using:
R the light switch
R headlamp range control (vehicles with halo-
gen headlamps only) (Y page 122)
R the combination switch (Y page 122)
R the on-board computer (Y page 252)
Light switch Operation
1
W
Left-hand parking lamps
2 X
Right-hand parking lamps
3 T
Side lamps, licence plate and instru-
ment cluster lighting
4 c
Automatic headlamps, controlled by
the light sensor
5 L
Dipped-beam/main-beam headlamps
B R
Rear foglamp
If you hear a warning tone when you leave the
vehicle, the lights may still be switched on.
X Turn the light switch to c.
The exterior lighting (except the side lamps/
parking lamps) switches off automatically if you: R remove the key from the ignition lock
R open the driver's door with the key in posi-
tion 0in the ignition lock 120
Exterior lightingLights and windscreen wipers
Page 124 of 397
Automatic headlamps
c is the preferred light switch position. The
light setting is automatically selected according to the brightness of the ambient light (excep-
tion: poor visibility due to weather conditions
such as fog, snow or spray):
R key in position 1in the ignition lock: the side
lamps are switched on or off automatically
depending on the brightness of the ambient
light
R with the engine running: depending on the
ambient light conditions, the daytime driving
lights or the side lamps and dipped-beam
headlamps are switched on or off automati-
cally
X To switch on automatic headlamp mode:
turn the light switch to c. G
WARNING
When the light switch is set to Ã, the
dipped-beam headlamps may not be switched on automatically if there is fog, snow or othercauses of poor visibility due to the weather
conditions such as spray. There is a risk of an
accident.
In such situations, turn the light switch to
L.
The automatic headlamp feature is only an aid.
You are responsible for the vehicle lighting at all times.
The daytime driving lights improve the visibility
of your vehicle during the day.
When the side lamps and dipped-beam head-
lamps are switched on, the green T(side
lamps) and L(dipped-beam headlamps)
indicator lamps in the instrument cluster light
up.
Dipped-beam headlamps
When the ignition is switched on and the light
switch is in the Lposition, the side lamps
and dipped-beam headlamps are switched on
even if the light sensor does not sense dark
ambient light conditions. This is particularly
advantageous when there is fog or rain. X
To switch on the dipped-beam headlamps:
turn the key in the ignition lock to position 2
or start the engine.
X Turn the light switch to L.
The green Lindicator lamp on the instru-
ment cluster lights up.
Rear foglamp
The rear foglamp improves the visibility of your
vehicle in heavy fog for the following traffic.
Please observe the country-specific laws on the
use of rear foglamps.
X To switch on the rear foglamp: turn the key
in the ignition lock to position 2or start the
engine.
X Turn the light switch to Lorc .
X Press the Rbutton.
The yellow Rindicator lamp in the instru-
ment cluster lights up.
X To switch off the rear foglamp: press the
R button.
The yellow Rindicator lamp in the instru-
ment cluster goes out.
Side lamps ! When the battery is discharged heavily, the
side lamps or parking lamps are automatically
switched off to facilitate an engine start.
Always park your vehicle safely and in a well lit area, in accordance with the relevant legal
stipulations. Avoid using the Tside lamps
for periods lasting several hours. Where pos-
sible, switch on the right Xor left W
parking lamp.
X To switch on: turn the light switch to T.
The green Tindicator lamp in the instru-
ment cluster lights up.
Parking lamps Switching on the parking lamps ensures that the
corresponding side of the vehicle is illuminated.
X To switch on the parking lamps: the key
should not be in the ignition lock or it should
be in position 0.
X Turn the light switch to W(left-hand side of
the vehicle) or X(right-hand side of the
vehicle). Exterior lighting
121Lights and windscreen wipers Z
Page 127 of 397
Adaptive Highbeam Assist Plus
General notes With Adaptive Highbeam Assist Plus, you can
automatically switch between dipped-beam,
partial main-beam and main-beam headlamps.
Partial main-beam illumination is a form of illu-
mination whereby the main beam is directed
past other road users. Other road users are kept
out of the main beam. This prevents glare. If
there is a vehicle in front, for example, the main- beam headlamps illuminate the areas to its right
and left, and the vehicle in front is illuminated by
the dipped-beam headlamps.
The system automatically adapts the dipped-
beam headlamp range depending on the dis-
tance to the other vehicle. Once the system no
longer detects any other vehicles, it switches on the main-beam headlamps again.
If the main-beam or partial main-beam head-
lamps are causing too much reflection from traf-fic signs, the lights are automatically dimmed
and glare for the driver caused by the reflections
is thus avoided.
The system's optical sensor is located behind
the windscreen near the overhead control
panel.
Vehicles with drive program S+(Sport Plus): the
speed at which Adaptive Highbeam Assist Plus
switches between full beam and dipped beam is
increased when the drive program is switched
on.
Important safety notes G
WARNING
Adaptive Highbeam Assist Plus does not rec-
ognise road users:
R who have no lights, e.g. pedestrians
R who have poor lighting, e.g. cyclists
R whose lighting is blocked, e.g. by a barrier
In very rare cases, Adaptive Highbeam Assist
Plus may not recognise road users who do
have lights, or may recognise them too late. In this, or in similar situations, the automatic
main-beam headlamps will not be deactivated
or will be activated despite the presence of
other road users. There is a risk of an acci-
dent. Always carefully observe the traffic conditions
and switch off the main-beam headlamps in
good time.
Adaptive Highbeam Assist Plus cannot take into
account road, weather or traffic conditions.
Adaptive Highbeam Assist Plus is only an aid.
You are responsible for adjusting the vehicle's
lighting to the prevailing light, visibility and traf-
fic conditions.
In particular, the detection of obstacles can be
restricted if there is:
R poor visibility, e.g. due to fog, heavy rain or
snow
R dirt on the sensors or if the sensors are
obscured
Switching Adaptive Highbeam Assist
Plus on/off X
To switch on: turn the light switch to Ã.
X Press the combination switch beyond the
pressure point in the direction of arrow :.
The _ indicator lamp in the multifunction
display lights up when it is dark and the light
sensor switches on the dipped-beam head-
lamps.
At speeds above approx.25 km/h: the
headlamp range is automatically controlled
according to the distance to other road users.
At speeds above approx.30 km/h:
R if no other road users are detected, the
main-beam headlamps are automatically
switched on
R if other road users are detected, the partial
main-beam headlamps are automatically
switched on
The K indicator lamp in the instrument
cluster also lights up.
At speeds below approx.25 km/hor when
there is sufficient street lighting:
R the partial main-beam headlamps are
switched off automatically
R the main-beam headlamps are switched off
automatically 124
Exterior lightingLights and windscreen wipers
Page 131 of 397

X
Simultaneously press bulb holder ;and pull
lever =downwards.
X Press on housing cover :and turn it to the
right. Turn signals
X
Switch off the lights.
X Open the bonnet.
X Turn housing cover :anti-clockwise and
remove it.
X Turn bulb holder ;anti-clockwise and pull
out.
X Pull the bulb out of bulb holder ;.
X Insert new bulb into bulb holder ;.
X Insert bulb holder ;and turn it clockwise.
X Press on housing cover :and turn it to the
right. Windscreen wipers
Switching the windscreen wipers on/
off
! Do not operate the windscreen wipers when
the windscreen is dry, as this could damage
the wiper blades. Moreover, dust that has col-
lected on the windscreen can scratch the
glass if wiping takes place when the wind-
screen is dry.
If it is necessary to switch on the windscreen wipers in dry weather conditions, always
operate them using washer fluid.
! If the windscreen wipers leave smears on
the windscreen after the vehicle has been
washed in an automatic car wash, this may be
due to wax or other residue. Clean the wind- screen with washer fluid after an automatic
car wash.
! Intermittent wiping with rain sensor: due to
optical influences and the windscreen becom-
ing dirty in dry weather conditions, the wind-
screen wipers may be activated inadvertently. This could damage the windscreen wiper
blades or scratch the windscreen.
For this reason, you should always switch off
the windscreen wipers in dry weather. Combination switch
1 $ Windscreen wipers off
2 Ä Intermittent wipe, low (rain sensor set
to low sensitivity)
3 Å Intermittent wipe, high (rain sensor
set to high sensitivity)
4 ° Continuous wipe, slow
5 ¯ Continuous wipe, fast
B í Single wipe
C î Wipes with washer fluid
X Turn the key to position 1or 2in the ignition
lock (Y page 148).
X Turn the combination switch to the corre-
sponding position.
In the ÄorÅ position, the appropriate
wiping frequency is set automatically according to the intensity of the rain. In the Åposition,
the rain sensor is more sensitive than in the
Ä position, causing the windscreen wiper to
wipe more frequently.
Vehicles with MAGIC VISION CONTROL: the
washer fluid is fed through the wiper blades and when wiping with washer fluid îthe washer
fluid is emitted directly from the blades.
If the wiper blades are worn, the windscreen will
no longer be wiped properly. This could mean
you are unable to observe the traffic conditions. 128
Windscreen wipersLights and windscreen wipers