2016 MERCEDES-BENZ GLE tow
[x] Cancel search: towPage 50 of 450
R
The seat belt is not routed over sharp, pointed
or fragile objects.
If these items are on or in your clothing, e.g.
eyeglasses, pens, keys, etc., stow these items
in a more suitable location. R
Only one person should use each seat belt at
any one time.
On no account should babies or children
travel sitting on the lap of another vehicle
occupant. During an accident, they could be
crushed between the occupant and seat belt. R
Objects are not secured with a seat belt if the
seat belt is being used by one of the vehicle’s
occupants.
Also make sure that there are no objects, e.g.
cushions, between the occupant and the seat.
Seat belts are solely intended for the protection
and restraint of the vehicle occupants. To
secure objects, luggage or loads, always
observe the "Loading guidelines" ( Y
page 329).
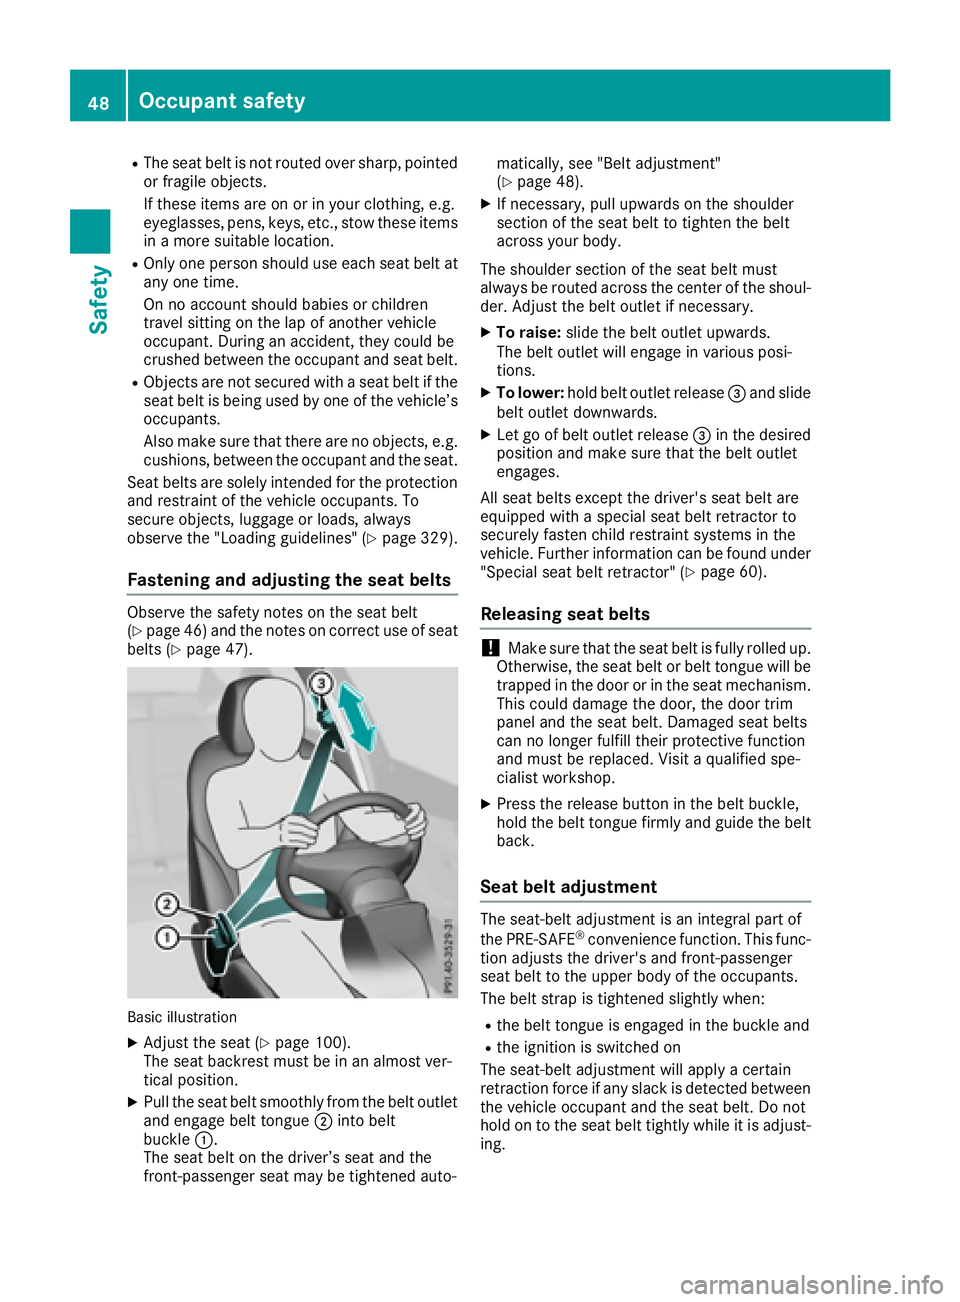
Fastening and adjusting the seat belts Observe the safety notes on the seat belt
( Y
page 46) and the notes on correct use of seat
belts ( Y
page 47).
Basic illustration X
Adjust the seat ( Y
page 100).
The seat backrest must be in an almost ver-
tical position. X
Pull the seat belt smoothly from the belt outlet
and engage belt tongue �D into belt
buckle �C .
The seat belt on the driver’s seat and the
front-passenger seat may be tightened auto- matically, see "Belt adjustment"
( Y
page 48). X
If necessary, pull upwards on the shoulder
section of the seat belt to tighten the belt
across your body.
The shoulder section of the seat belt must
always be routed across the center of the shoul-
der. Adjust the belt outlet if necessary. X
To raise: slide the belt outlet upwards.
The belt outlet will engage in various posi-
tions. X
To lower: hold belt outlet release �
Page 59 of 450
Have the vehicle towed to a qualified special-
ist workshop in order to have a deployed air
bag replaced.
It is important for your safety and that of your
passenger to have deployed air bags replaced
and to have any malfunctioning air bags
repaired. This will help to make sure the air bags
continue to perform their protective function for
the vehicle occupants in the event of a crash.
G WARNING
Pyrotechnic Emergency Tensioning Devices
that have been deployed are no longer opera-
tional and are unable to perform their inten-
ded protective function. This poses an
increased risk of injury or even fatal injury.
Therefore, have pyrotechnic Emergency Ten-
sioning Devices which have been triggered
immediately replaced at a qualified specialist
workshop.
An electric motor is used by PRE-SAFE ®
to trig-
ger the tightening of the seat belt in hazardous
situations. This procedure is reversible.
If Emergency Tensioning Devices are triggered
or air bags are deployed, you will hear a bang,
and a small amount of powder may also be
released. The �u restraint system warning
lamp lights up.
Only in rare cases will the bang affect your hear-
ing. The powder that is released generally does
not constitute a health hazard, but it may cause
short-term breathing difficulties in people with
asthma or other respiratory problems. Provided
it is safe to do so, you should leave the vehicle
immediately or open the window in order to pre-
vent breathing difficulties.
Air bags and pyrotechnic Emergency Tensioning
Devices (ETDs) contain perchlorate material,
which may require special handling and regard
for the environment. National guidelines must
be observed during disposal. In California, see
www.dtsc.ca.gov/HazardousWaste/
Perchlorate/index.cfm . Method of operation During the first stage of a collision, the restraint
system control unit evaluates important physi-
cal data relating to vehicle deceleration or accel-
eration, such as: R
duration R
direction R
intensity
Based on the evaluation of this data, the
restraint system control unit triggers the Emer-
gency Tensioning Devices during a frontal or
rear collision.
An Emergency Tensioning Device can only be
triggered, if: R
the ignition is switched on R
the components of the restraint system are
operational. You can find further information
under: "Restraint system warning lamp"
( Y
page 45) R
the belt tongue is engaged in the buckle on
the respective front-passenger seat
The Emergency Tensioning Devices in the rear
compartment are triggered independently of the
lock status of the seat belts.
If the restraint system control unit detects a
more severe accident, further components of
the restraint system are activated independ-
ently of each other in certain frontal collision
situations: R
Front air bags and driver's knee bag R
Window curtain air bag, if the system deter-
mines that deployment can offer additional
protection to that provided by the seat belt
The front-passenger front air bag is activated or
deactivated depending on the person on the
front-passenger seat. The front-passenger front
air bag can only deploy in an accident if the
PASSENGER AIR BAG ON indicator lamp is lit.
Observe the information on the PASSENGER AIR
BAG indicator lamps ( Y
page 45).
Your vehicle has two-stage front air bags. During
the first d eployment stage, the front air bag is
fi
lled with propellant gas to reduce the risk of
injuries. The front air bag is fully deployed with
the maximum amount of propellant gas if a sec-
ond deployment threshold is reached within a
few milliseconds.
The activation threshold of the Emergency Ten-
sioning Devices and the air bag are determined
by evaluating the rate of vehicle deceleration or
acceleration which occurs at various points inOccupant safety 57
Safety Z
Page 63 of 450
retractor. When activated, the special seat belt
retractor ensures that the seat belt cannot
slacken once the child seat is secured.
Installing a child restraint system: X
Make sure you observe the child restraint
system manufacturer's installation instruc-
tions. X
Pull the seat belt smoothly from the belt out-
let. X
Engage seat belt tongue in belt buckle.
Activating the special seat belt retractor: X
Pull the seat belt out fully and let the inertia
reel retract it again.
While the seat belt is retracting, you should
hear a ratcheting sound. The special seat belt
retractor is enabled. X
Push the child restraint system down so that
the seat belt is tight and does not loosen.
Removing the child restraint system and deac-
tivating the special seat belt retractor: X
Make sure you observe the child restraint
system manufacturer's installation instruc-
tions. X
Press the release button of the seat belt
buckle and guide the seat belt tongue back
towards the belt sash guide.
The special seat belt retractor is deactivated.
Child restraint system The use of seat belts and child restraint systems
is required by law in: R
all 50 states R
the U.S. territories R
the District of Columbia R
all Canadian provinces
If you install a rearward-facing child restraint
system on the center rear seat, the rear arm rest
must be folded back as far as possible.
You can obtain further information about the
correct child restraint system from any author-
ized Mercedes-Benz Center.
G WARNING
If the child restraint system is installed incor-
rectly on a suitable seat, it cannot protect as
intended. The child cannot then be restrained
in the event of an accident, heavy braking or sudden changes of direction. There is an
increased risk of injury, possibly even fatal.
Make sure that you observe the child restraint
system manufacturer's installation instruc-
tions and the notes on use. Please ensure,
that the base of the child restraint system is
always resting completely on the seat cush-
ion. Never place objects, e.g. cushions, under
or behind the child restraint system. Only use
child restraint systems with the original cover
designed for them. Only replace damaged
covers with genuine covers.
G WARNING
If the child restraint system is installed incor-
rectly or is not secured, it can come loose in
the event of an accident, heavy braking or a
sudden change in direction. The child
restraint system could be thrown about, strik-
ing vehicle occupants. There is an increased
risk of injury, possibly even fatal.
Always install child restraint systems prop-
erly, even if they are not being used. Make
sure that you observe the child restraint sys-
tem manufacturer's installation instructions.
You will find further information on stowing
objects, luggage or loads under "Loading guide-
lines" ( Y
page 329).
G WARNING
Child restraint systems or their securing sys-
tems which have been damaged or subjected
to a load in an accident can no longer protect
as intended. The child cannot then be
restrained in the event of an accident, heavy
braking or sudden changes of direction. There
is an increased risk of injury, possibly even
fatal.
Replace child restraint systems which have
been damaged or subjected to a load in an
accident as soon as possible. Have the secur-
ing systems on the child restraint system
checked at a qualified specialist workshop,
before you install a child restraint system
again.Children in the vehicle 61
Safety Z
Page 88 of 450
You could therefore be locked out if: R
the vehicle is being pushed. R
the vehicle is being towed. R
the vehicle is on a roller dynamometer.
You can also switch the automatic locking func-
tion on and off using the on-board computer
( Y
page 275).
Power closing Power closing pulls the doors and tailgate into
their locks automatically even if they are not
completely closed. X
To power close a door: push the door into
the lock up to the first detent position.
Power closing will pull the door fully closed. X
To power close the tailgate: lightly press
the tailgate downwards.
Power closing will pull the tailgate fully
closed.
Unlocking the driver's door (mechan-
ical key) If the vehicle can no longer be locked or
unlocked with the SmartKey or KEYLESS-GO,
use the mechanical key. X
Take the mechanical key out of the SmartKey
( Y
page 80).X
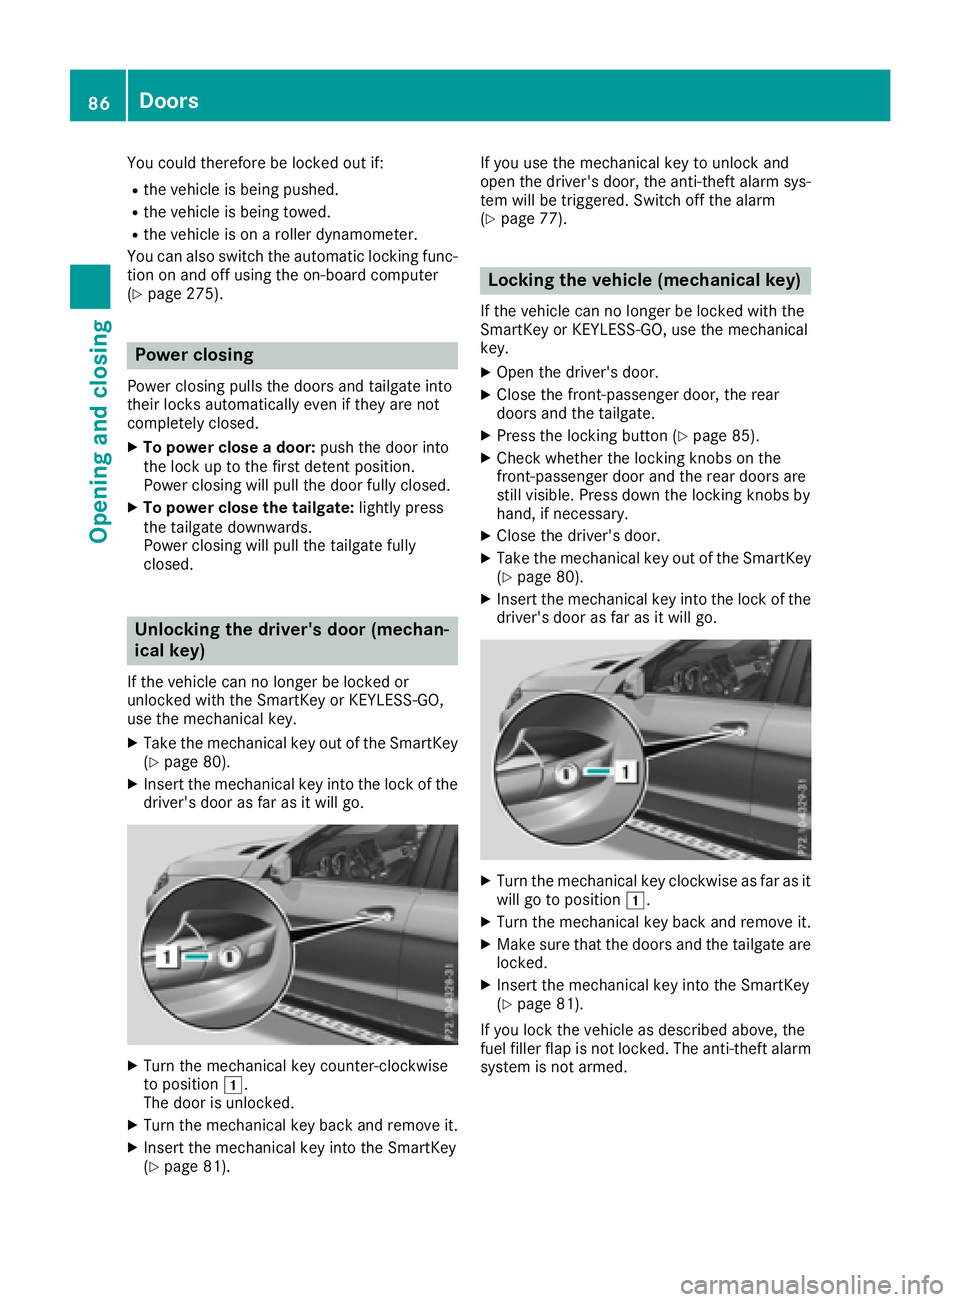
Insert the mechanical key into the lock of the
driver's door as far as it will go.
X
Turn the mechanical key counter-clockwise
to position �G .
The door is unlocked. X
Turn the mechanical key back and remove it. X
Insert the mechanical key into the SmartKey
( Y
page 81). If you use the mechanical key to unlock and
open the driver's door, the anti-theft alarm sys-
tem will be triggered. Switch off the alarm
( Y
page 77).
Locking the vehicle (mechanical key) If the vehicle can no longer be locked with the
SmartKey or KEYLESS-GO, use the mechanical
key. X
Open the driver's door. X
Close the front-passenger door, the rear
doors and the tailgate. X
Press the locking button ( Y
page 85).X
Check whether the locking knobs on the
front-passenger door and the rear doors are
still visible. Press down the locking knobs by
hand, if necessary. X
Close the driver's door. X
Take the mechanical key out of the SmartKey
( Y
page 80). X
Insert the mechanical key into the lock of the
driver's door as far as it will go.
X
Turn the mechanical key clockwise as far as it
will go to position �G .X
Turn the mechanical key back and remove it. X
Make sure that the doors and the tailgate are
locked. X
Insert the mechanical key into the SmartKey
( Y
page 81).
If you lock the vehicle as described above, the
fuel filler flap is not locked. The anti-theft alarm
system is not armed.86
Doors
Opening and closing
Page 117 of 450
The daytime running lamps improve the visibility
of your vehicle during the day. The daytime run-
ning lamps function is required by law in Can-
ada. It cannot therefore be deactivated.
When the engine is running and the vehicle is
stationary: if you move the selector lever from a
drive position to P , the daytime running lamps/
low-beam headlamps go out after three
minutes.
When the engine is running, the vehicle is sta-
tionary and in bright ambient light: if you turn the
light switch to �` , the daytime running lamps
and parking lamps switch on.
If the engine is running and you turn the light
switch to �X , the manual settings take prec-
edence over the daytime running lamps.
USA only:
The daytime running lamps improve the visibility
of your vehicle during the day. To do this, the
daytime running lamps function must be
switched on using the on-board computer
( Y
page 275).
If the engine is running and you turn the light
switch to �` or �X , the manual settings
take precedence over the daytime running
lamps.
Low-beam headlamps Even if the light sensor does not detect that it is
dark, the parking lamps and low-beam head-
lamps switch on when the ignition is switched on
and the light switch is set to the �X position.
This is a particularly useful function in the event
of rain and fog. X
To switch on the low-beam headlamps:
turn the SmartKey in the ignition lock to posi-
tion 2 or start the engine.X
Turn the light switch to �X .
The green �X indicator lamp in the instru-
ment cluster lights up.
Rear fog lamp
The rear fog lamp improves visibility of your
vehicle for the traffic behind in the event of thick
fog. Please take note of the country-specific
regulations for the use of rear fog lamps. X
To switch on the rear fog lamp: turn the
SmartKey in the ignition lock to position 2 or
start the engine. X
Turn the light switch to �X or �X . X
Press the �^ button.
The yellow �^ indicator lamp in the instru-
ment cluster lights up. X
To switch off the rear fog lamp: press the
�^ but ton.
The yellow �^ indicator lamp in the instru-
ment cluster goes out.
Parking lamps
! If the battery has been excessively dis-
charged, the parking lamps or standing lamps
are automatically switched off to enable the
next engine start. Always park your vehicle
safely and sufficiently lit according to legal
standards. Avoid the continuous use of the
�` parking lamps for several hours. If pos-
sible, switch on the �d right or the �c left
standing lamp. X
To switch on: turn the light switch to �` .
The green �` indicator lamp in the instru-
ment cluster lights up.
Standing lamps Switching on the standing lamps ensures the
corresponding side of the vehicle is illuminated. X
To switch on the standing lamps: the
SmartKey should not be in the ignition lock or
it should be in position 0 .X
Turn the light switch to �c (left-hand side of
the vehicle) or �d (right-hand side of the
vehicle).
Vehicles towing a trailer: both the right-hand
and left-hand standing lamps (tail lamps) are
always illuminated on the trailer.Exterior lighting 115
Lights and windshield wipers Z
Page 158 of 450
If you want the automatic transmission to
remain in neutral N , e.g. when having the vehicle
cleaned in an automatic car wash with a towing
system:
Using the SmartKey: X
Switch on the ignition. X
Depress the brake pedal and keep it
depressed. X
Shift to neutral N .X
Release the brake pedal. X
Release the electric parking brake. X
Switch off the ignition and leave the SmartKey
in the ignition lock.
With the Start/Stop button: X
Remove the Start/Stop button from the igni-
tion lock. X
Insert the SmartKey into the ignition lock. X
Switch on the ignition. X
Depress the brake pedal and keep it
depressed. X
Shift to neutral N .X
Release the brake pedal. X
Release the electric parking brake. X
Switch off the ignition and leave the SmartKey
in the ignition lock.
Engaging drive position D X
If the transmission is in position R or N : push
the DIRECT SELECT lever down past the first
point of resistance. X
If the transmission is in position P : depress
the brake pedal and push the DIRECT SELECT
lever down past the first point of resistance. Transmission positions �E Park position
Only shift the transmission into posi-
tion P when the vehicle is stationary
( Y
page 178). The parking lock
should not be used as a brake when
parking. Always apply the electronic
parking brake in addition to the park-
ing lock in order to secure the vehi-
cle.
If the vehicle electronics are malfunc-
tioning, the transmission may be
locked in position P . Have the vehicle
electronics checked immediately at a
qualified specialist workshop.
Park position P is automatically
engaged if: R
you switch off the engine using the
SmartKey and remove the Smart-
Key R
you switch off the engine using the
SmartKey or using the Start/Stop
button and open the driver's door
or front-passenger door R
the driver's door is opened when
the vehicle is stationary or driving
at very low speed and the trans-
mission is in position D or R
�F Reverse gear
Only shift the transmission into posi-
tion R when the vehicle is stationary.156
Automatic transmission
Driving and parking
Page 159 of 450
�D Neutral
Do not shift the transmission to N
while driving. Otherwise, the auto-
matic transmission could be dam-
aged.
No power is transmitted from the
engine to the drive wheels.
Releasing the brakes will allow you to
move the vehicle freely, e.g. to push
it or tow it.
If ESP ®
is deactivated or faulty: shift
the transmission to position N if the
vehicle is in danger of skidding, e.g.
on icy roads.
If you switch the engine off with the
transmission in position R or D , the
automatic transmission shifts to N
automatically.
! Rolling in neutral N can damage
the drive train.
�: Drive
The automatic transmission changes
gear automatically. All forward gears
are available.
Driving tips
Changing gear The automatic transmission shifts to the indi-
vidual gears automatically when it is in trans-
mission position D . This automatic gear shifting
behavior is determined by: R
the selected drive program R
the position of the accelerator pedal R
the road speed
Accelerator pedal position Your style of driving influences how the auto-
matic transmission shifts gear: R
little throttle: early upshifts R
more throttle: late upshifts Kickdown Use kickdown for maximum acceleration. X
Depress the accelerator pedal beyond the
pressure point.
The automatic transmission shifts to a lower
gear depending on the engine speed. X
Ease off the accelerator pedal once the
desired speed is reached.
The automatic transmission shifts back up.
Rocking the vehicle free Shifting the transmission repeatedly between
gears D and R may help to free the vehicle if it
has become stuck in slush or snow. The vehi-
cle's engine management system limits the
speed to a maximum of 5 mph (9 km/h) when
shifting back and forth. To shift back and forth
between transmission positions D and R , move
the DIRECT SELECT lever up and down past the
point of resistance.
Gliding mode
All vehicles (except Mercedes-AMG vehi-
cles) Gliding mode is characterized by the following: R
the combustion engine is disconnected from
the drive train. R
the engine speed corresponds to the idling
speed. R
the gear indicated after the transmission
position D disappears in the multifunction
display ( Y
page 154).
Gliding mode can be activated under the follow-
ing conditions: R
you select the "ECO" setting for the drive sys-
tem within the Individual drive program. You
can find information about this in the Digital
Operator's Manual. R
the speed is within a suitable range. R
the course of the road is suitable, e.g. there
are no steep up or downhill gradients. R
you are no longer depressing the accelerator
pedal.
Gliding mode is deactivated under the following
conditions: R
you depress the accelerator pedal. R
you depress the brake pedal.Automatic transmission 157
Driving an d parking Z
Page 160 of 450
R
you use th e DIRECT SELECT lever to switch
th e transmission position ( Y
page 154).R
use th e DYNAMIC SELECT controller to
chang e th e drive progra m ( Y
page 152).R
you activat e manual gearshiftin g
( Y
page 159).R
you leav e th e suitable speed range.
Mercedes-AMG vehicles Glidin g mod e is characterized by th e following:R
th e combustion engin e is disconnected from
th e drive train .R
th e engin e speed corresponds to th e idlin g
speed. R
in th e multifunction display, th e glidin g sym -
bol appears in th e drive progra m display.
Glidin g mod e can be activated under th e follow-
in g conditions: R
th e Comfor t drive progra m is activated or you
select th e "Comfort" setting for th e drive sys-
te m within th e Individua l drive program. You
can fin d information about this in th e Digital
Operator' s Manual.R
th e ECO start/sto p function is activated.R
you are drivin g carefully wit h low acceleration
of th e vehicle.R
th e engin e is at normal operating tempera-
ture. R
th e speed is within a suitable range.R
th e cours e of th e roa d is suitable, e.g. there
are no steep up or downhill gradients .R
you are no longer depressin g th e accelerato r
pedal .
Glidin g mod e is d eactivated under th e fo
llowin g
conditions: R
you hav e deactivated th e ECO start/sto p
function .R
you depress th e accelerato r pedal .R
you depress th e brak e pedal .R
you use th e DIRECT SELECT lever to switch
th e transmission position ( Y
page 154).R
use th e DYNAMIC SELECT controller to
chang e th e drive progra m ( Y
page 152).R
you activat e manual gearshiftin g
( Y
page 159).R
you leav e th e suitable speed range. Towing a trailer X
Drive in th e middle of th e engin e speed range
on uphil l gradients .X
Dependin g on th e uphil l or downhill gradient,
use left-han d steerin g whee l paddl e shifter
( Y
page 159) to select a lower gear , eve n if
cruise control or DISTRONI C PLU S are acti-
vated.
Drive programs
Slippery drive program The Slipper y drive progra m has th e followin g
characteristics : R
reduce d engin e and transmission setting s for
optimum propulsion on slipper y or snow-cov-
ere d roads. R
optimized ES P ®
stabilit y control on slipper y or
snow-covered roads. R
th e vehicl e has improved drivin g stabilit y on
slipper y or snow-covered roads, for example.
Comfort drive program The Comfor t drive progra m has th e followin g
characteristics : R
comfort-oriented engin e and transmission
settings. R
optimal fuel consumption resultin g from th e
automati c transmission shiftin g up sooner.R
th e vehicl e pullin g away mor e gentl y in
forward and revers e gears, unless th e accel-
erator pedal is depressed fully. R
th e automati c transmission shiftin g up
sooner. This result s in th e vehicl e bein g driven
at lower engin e speeds and th e wheels bein g
less likely to spin .
Sp or t drive program The Sport drive progra m has th e followin g char-
acteristics : R
sport y engin e and transmission settings. R
th e automati c transmission shiftin g up later.
th e fuel consumption possibl y bein g higher as
a result of th e later automati c transmission
shift points . R
th e suspension exhibits sport y dampin g (vehi-
cle s wit h AIRMATIC) .158
Automatic transmission
Driving an d parking