2016 MERCEDES-BENZ GLE-CLASS COUPE reset
[x] Cancel search: resetPage 6 of 382

AMGAdaptive sport suspension sys-
tem ................................................ 185
AMG menu (on-board computer) .....2 31
Approach/departure angle .............. 167
Ashtray ............................................... 288
Assistance display (on-board com-
puter) ..................................................2 27
Assistance menu (on-board com-
puter) ..................................................2 27
ASSYST PLUS
Displaying a service message ........3 06
Hiding a service message .............. 306
Resetting the service interval dis-
play ................................................ 306
Service message ............................ 306
Special service requirements ......... 307
ATA (Anti-Theft Alarm system)
Activating/deactivating ................... 70
Function ...........................................7 0
Switching off the alarm .................... 70
ATTENTION ASSIST
Activating/deactivating ................. 228
Display message ............................ 253
Function/notes ............................. 200
Audio menu (on-board computer) .... 225
Audio system
see separate operating instructions
Authorized Mercedes-Benz Center
see Qualified specialist workshop
AUTO lights
Display message ............................ 248
see Lights
Automatic car wash (care) ............... 307
Automatic engine start (ECO start/
stop function) .................................... 139
Automatic engine switch-off (ECO
start/stop function) .......................... 139
Automatic headlamp mode .............. 108
Automatic transmission
Accelerator pedal position ............. 145
Changing gear ............................... 145
DIRECT SELECT lever ..................... 142
Display message ............................ 261
Drive program ................................ 147
Drive program display .................... 143
Driving tips .................................... 145 DYNAMIC SELECT control
ler ......... 142
Eme
rgency running mode .............. 150
Engaging drive position .................. 144
Engaging neutral ............................ 143
Engaging park position automati-
cally ............................................... 143
Engaging reverse gear ................... 143
Engaging the park position ............ 143
Gliding mode ................................. 146
Kickdown ....................................... 146
Manual shifting .............................. 147
Oil temperature (on-board com-
puter, Mercedes-AMG vehicles) ..... 231
Overview ........................................ 142
Problem (malfunction) ................... 150
Pulling away ................................... 137
Starting the engine ........................ 136
Steering wheel paddle shifters ...... 147
Trailer towing ................................. 147
Transmission position display ........ 143
Transmission positions .................. 145
Automatic transmission emer-
gency mode ....................................... 150
Axle load, permissible (trailer tow-
ing) ...................................................... 376
B
Bag hook ............................................ 283
Ball coupling
Installing ........................................ 213
Removing ....................................... 217
BAS (Brake Assist System) ................. 61
BAS PLUS with Cross-Traffic Assist
(Brake Assist PLUS with Cross-
Traffic Assist)
Function/notes ................................ 61
Important safety notes .................... 61
Battery (SmartKey)
Checking .......................................... 75
Important safety notes .................... 75
Replacing ......................................... 75
Battery (vehicle)
Charging ........................................ 322
Display message ............................ 250
Important safety notes .................. 320
Jump starting ................................. 323
Overview ........................................ 320
4Index
Page 18 of 382

Switching seat heating on/off ......... 98
Switching seat ventilation on/off .. 100
Section
Sliding sunroof ................................. 89
Selector lever
Cleaning ......................................... 313
Sensors (cleaning instructions) ....... 311
Service menu (on-board com-
puter) .................................................. 229
Service message
see ASSYST PLUS
Service products
Brake fluid ..................................... 371
Coolant (engine) ............................ 372
DEF special additives ..................... 370
Engine oil ....................................... 370
Fuel ................................................ 368
Important safety notes .................. 367
Refrigerant (air-conditioning sys-
tem) ............................................... 373
Washer fluid ................................... 372
Setting the air distribution ............... 127
Setting the airflow ............................ 127
Settings
Factory (on-board computer) ......... 231
On-board computer ....................... 229
SETUP (on-board computer) ............. 232
Side impact air bag ............................. 45
Side marker lamp (display mes-
sage) ................................................... 247
Side windows
Cleaning ......................................... 310
Convenience closing feature ............ 87
Convenience opening feature .......... 86
Important safety information ........... 85
Opening/closing .............................. 86
Overview .......................................... 85
Problem (malfunction) ..................... 89
Resetting ......................................... 88
Reversing feature ............................. 85
Sliding sunroof
see Panorama roof with power
tilt/sliding panel
SmartKey
Changing the battery ....................... 75
Changing the programming ............. 74
Checking the battery ....................... 75 Convenience closing feature ............ 87
Convenience opening feature .......... 86
Display message ............................ 264
Door central locking/unlocking ....... 72
Important safety notes .................... 72
KEYLESS-GO start function .............. 74
Loss ................................................. 77
Mechanical key ................................ 74
Overview ..........................................
72
P
ositions (ignition lock) ................. 134
Problem (malfunction) ..................... 77
Starting the engine ........................ 136
Smartphone
Starting the engine ........................ 136
Snow chains
Information .................................... 333
Sockets
Center console .............................. 289
General notes ................................ 289
Luggage compartment ................... 289
Rear compartment ......................... 289
Special seat belt retractor .................. 54
Specialist workshop ............................ 26
Speed, controlling
see Cruise control
Speedometer
Digital ............................................ 223
In the Instrument cluster ................. 31
Segments ...................................... 219
Selecting the display unit ............... 229
Standing lamps
Display message ............................ 247
Switching on/off ........................... 109
Start/Stop button
Removing ....................................... 135
Start/stop function
see ECO start/stop function
Starting (engine) ................................ 136
STEER CONTROL .................................. 70
Steering
Display message ............................ 263
Steering Assist and Stop&Go Pilot
(DISTRONIC PLUS)
Activating/deactivating ................. 227
Display message ............................ 258
Steering assistant STEER CON-
TROL
see STEER CONTROL
16Index
Page 21 of 382

Uniform Tire Quality Grading
Standards (definition) .................... 349
Wear indicator (definition) .............351
Wheel and tire combination ........... 357
Wheel rim (definition) .................... 349
see Flat tire
Top Tether ............................................ 56
Tow-starting
Emergency engine starting ............ 327
Important safety notes .................. 325
Towing a trailer
Axle load, permissible .................... 376
Cleaning the trailer tow hitch ......... 312
Coupling up a trailer ......................2 15
Decoupling a trailer ....................... 216
Driving tips ....................................2 12
ESP
®(Electronic Stability Pro-
gram) ............................................... 67
Important safety notes .................. 212
Installing the ball coupling ............. 213
Lights display message .................. 246
Mounting dimensions .................... 376
Power supply ................................. 217
Pulling away with a trailer .............. 138
Removing the ball coupling ............ 217
Trailer loads ................................... 376
Towing away
Important safety guidelines ........... 325
Installing the towing eye ................ 326
Notes for 4MATIC vehicles ............ 327
Removing the towing eye ...............3 26
Transporting the vehicle ................ 327
With both axles on the ground ....... 326
Towing eye ......................................... 315
Traffic Sign Assist
Display message ............................ 254
Function/notes .............................2 02
Important safety notes .................. 202
Instrument cluster display ............. 202
Trailer coupling
see Towing a trailer
Trailer loads and drawbar nose-
weights ............................................... 217
Trailer towing
Active Blind Spot Assist ................. 209
Active Lane Keeping Assist ............ 211
Blind Spot Assist ............................ 205 PARKTRONIC ................................. 186
Permi
ssibl
e trailer loads and
drawbar noseweights ..................... 217
Transfer case ..................................... 150
Transmission
see Automatic transmission
Transmission position display ......... 143
Transmission position display
(DIRECT SELECT lever) ......................143
Transporting the vehicle .................. 327
Traveling uphill
Brow of hill ..................................... 168
Driving downhill .............................1 68
Maximum gradient-climbing capa-
bility ............................................... 168
Trim pieces (cleaning instruc-
tions) ..................................................3 13
Trip computer (on-board com-
puter) ..................................................2 22
Trip odometer
Calling up ....................................... 222
Resetting (on-board computer) ...... 223
Trunk
see Tailgate
Trunk load (maximum) ......................373
Turn signals
Display message ............................ 246
Switching on/off ........................... 110
Two-way radio
Frequencies ................................... 365
Installation ..................................... 365
Transmission output (maximum) .... 365
TWR (Tongue Weight Rating) (defi-
nition) ................................................. 351
Type identification plate
see Vehicle identification plate
U
UnlockingEmergency unlocking ....................... 80
From inside the vehicle (central
unlocking button) .............................7 9
Upshift indicator (on-board com-
puter, Mercedes-AMG vehicles) .......231
Index19
Page 28 of 382

Declarations of conformity
Vehicl ecomponent swhich receive
and/o rtransmit radi owaves
USA: "The wireles sdevices of this vehicle com-
ply wit hPar t15 of th eFCC Rules .Operation is
subjec tto th etw ofollowin gtw oconditions: 1)
These devices may no tcause harmful interfer-
ence ,and 2) These devices mus taccept any
interferenc ereceived, includin ginterferenc e
that may cause undesired operation .Changes
or modification sno texpressl yapproved by th e
party responsible fo rcompliance could void th e
user’s authorit yto operat eth eequipment. "
Canada: "The wireles sdevices of this vehicle
compl ywit hIndustry Canada license-exemp t
RSS standard(s) .Operation is subjec tto th efol-
lowing tw oconditions: (1) These devices may
no tcause interference, and (2) These devices
mus taccept any interference, includin ginter-
ference that may cause undesired operation of
th edevice. "
Diagnostics connection
The diagnostic sconnection is only intended fo r
th econnection of diagnostic equipmen tat a
qualified specialis tworkshop .
GWARNING
If you connec tequipmen tto th ediagnostic s
connection in th evehicle, it may affec tth e
operation of th evehicle systems .As aresult ,
th eoperatin gsafet yof th evehicle could be
affected. There is aris kof an accident.
Do no tconnec tany equipmen tto adiagnos-
tics connection in th evehicle.
GWARNING
Objects in th edriver's footwell can restric tth e
peda ltrave lor obstruct adepressed pedal.
The operatin gand road safet yof th evehicle is
jeopardized. There is aris kof an accident.
Mak esur ethat all objects in th evehicle are
stowed correctly, and that they canno tente r
th edriver's footwell. Install th efloormat s
securely and as specifie din order to ensur e
sufficien tclearanc efo rth epedals. Do no tuse
loose floormat sand do no tplac efloormat son
to pof on eanother.
!If th eengin eis switched of fand equipmen t
on th ediagnostic sconnection is used ,th e
starter battery may discharge.
Connectin gequipmen tto th ediagnostic scon-
nection can lead to emission smonitorin ginfor-
mation bein greset ,fo rexample. Thi smay lead
to th evehicle failin gto mee tth erequirements of
th enext emission stest durin gth emain inspec-
tion .
Qualified specialist workshop
An authorized Mercedes-Ben zCente ris aquali-
fie dspecialis tworkshop .It has th enecessary
specialis tknowledge ,tools and qualification sto
correctl ycarry out th ewor krequire don your
vehicle. Thi sis especially th ecas efo rwor krel -
evant to safety.
Observ eth enote sin th eMaintenance Booklet .
Always hav eth efollowin gwor kcarrie dout at an
authorized Mercedes-Ben zCenter:
Rwor krelevant to safet y
Rserviceand maintenance wor k
Rrepair work
Ralterations, installation wor kand modifica-
tion s
Rworkon electronic component s
Correct use
If you remov eany warnin gstickers ,you or oth-
ers could fail to recogniz ecertain dangers.
Leave warnin gstickers in position .
Observ eth efollowin ginformation when drivin g
your vehicle:
Rth esafet ynote sin this manual
Rth evehicle technical dat a
Rtraffic rulesand regulation s
Rlaws and safetystandard spertainin gto moto r
vehicles
Problem swit hyou rvehicle
If you should experience aproblem wit hyour
vehicle, particularly on ethat you believe may
26Introduction
Page 88 of 382

ically. However, the automatic reversing feature
is only an aid and does not relieve you of the
responsibility of paying attention when closing a
side window.
GWARNING
The reversing feature does not react:
Rto soft, light and thin objects, e.g. small fin-
gers
Rover the last 1/6 in(4 mm) of the closing
movement
Rduring resetting
Rwhen closing the side window again man-
ually immediately after automatic reversing
This means that the reversing feature cannot
prevent someone being trapped in these sit-
uations. There is a risk of injury.
Make sure that no body parts are in close
proximity during the closing procedure. If
someone becomes trapped, press the switch
to open the side window again.
Opening and closing the side win-
dows
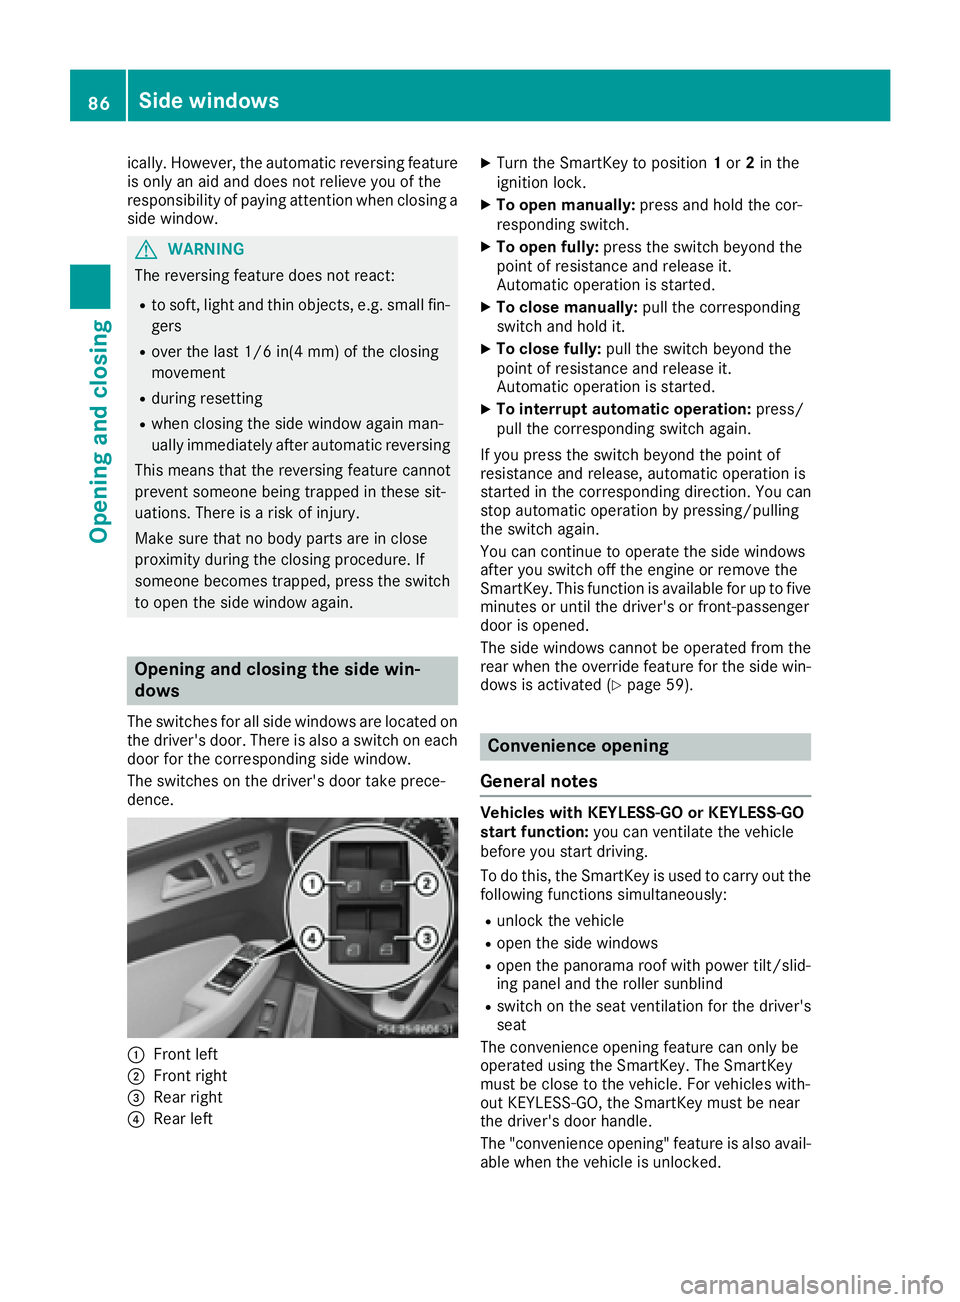
The switches for all side windows are located on
the driver's door. There is also a switch on each
door for the corresponding side window.
The switches on the driver's door take prece-
dence.
:Front left
;Front right
=Rear right
?Rear left
XTurn the SmartKey to position 1or 2in the
ignition lock.
XTo open manually: press and hold the cor-
responding switch.
XTo open fully: press the switch beyond the
point of resistance and release it.
Automatic operation is started.
XTo close manually: pull the corresponding
switch and hold it.
XTo close fully: pull the switch beyond the
point of resistance and release it.
Automatic operation is started.
XTo interrupt automatic operation: press/
pull the corresponding switch again.
If you press the switch beyond the point of
resistance and release, automatic operation is
started in the corresponding direction. You can
stop automatic operation by pressing/pulling
the switch again.
You can continue to operate the side windows
after you switch off the engine or remove the
SmartKey. This function is available for up to five
minutes or until the driver's or front-passenger
door is opened.
The side windows cannot be operated from the
rear when the override feature for the side win-
dows is activated (
Ypage 59).
Convenience opening
General notes
Vehicles with KEYLESS-GO or KEYLESS-GO
start function: you can ventilate the vehicle
before you start driving.
To do this, the SmartKey is used to carry out the following functions simultaneously:
Runlock the vehicle
Ropen the side windows
Ropen the panorama roof with power tilt/slid-
ing panel and the roller sunblind
Rswitch on the seat ventilation for the driver's
seat
The convenience opening feature can only be
operated using the SmartKey. The SmartKey
must be close to the vehicle. For vehicles with-
out KEYLESS-GO, the SmartKey must be near
the driver's door handle.
The "convenience opening" feature is also avail-
able when the vehicle is unlocked.
86Side windows
Opening and closing
Page 90 of 382

XMake sure that all the side windows and the
panorama roof with power tilt/sliding panel
are closed.
XVehicles with a panorama roof with
power tilt/sliding panel:touch recessed
sensor surface :on the door handle again
until the roller sunblinds of the panorama roof
with power tilt/sliding panel close.
XTo interrupt convenience closing: release
recessed sensor surface :on the door han-
dle.
Resetting the side windows
If a side window can no longer be closed fully,
you must reset it.
XClose all the doors.
XTurn the SmartKey to position 1or 2in the
ignition lock.
XPull the corresponding switch on the door
control panel until the side window is com-
pletely closed (
Ypage 86).
XHold the switch for an additional second.
If the side window opens again slightly:
XImmediately pull the corresponding switch on
the door control panel until the side window is
completely closed (
Ypage 86).
XHold the switch for an additional second.
XIf the respective side window remains closed
after the button is released, then it has been
set correctly. If this is not the case, repeat the
steps above.
88Side windows
Opening and closing
Page 91 of 382

Problems with the side windows
GWARNING
If you close a side window again immediately after it has been blocked or reset, the side window
closes with increased or maximum force. The reversing feature is then not active. Parts of the
body could be trapped in the closing area in the process. This poses an increased risk of injury or
even fatal injury.
Make sure that no parts of the body are in the closing area. To stop the closing process, release
the switch or push the switch again to reopen the side window.
ProblemPossible causes/consequences and MSolutions
A side window cannot be
closed because it is
blocked by objects, e.g.
leaves in the window
guide.XRemove the objects.
XClose the side window.
A side window cannot be
closed and you cannot
see the cause.If a side window is obstructed during closing and reopens again
slightly:
XImmediately after the window blocks, pull the corresponding switch
again until the side window has closed.
The side window is closed with increased force.
If a side window is obstructed again during closing and reopens again slightly:
XImmediately after the window blocks, pull the corresponding switchagain until the side window has closed.
The sliding sunroof is closed without the automatic reversing fea-
ture.
Sliding sunroof
Important safety notes
In the following section, the term "sliding sun-
roof" refers to the panorama roof with power
tilt/sliding panel.
GWARNING
While opening and closing the sliding sunroof, body parts in close proximity could become
trapped. There is a risk of injury.
Make sure that no body parts are in close
proximity during the opening and closing pro-
cedures.
If somebody becomes trapped:
Rrelease the switch immediately, or
Rduring automatic operation, push the
switch briefly in any direction
The opening or closing procedure will be stop-
ped.
GWARNING
If children operate the sliding sunroof they
could become trapped, particularly if they are left unsupervised. There is a risk of injury.
When leaving the vehicle, always take the
SmartKey with you and lock the vehicle. Never
leave children unsupervised in the vehicle.
Sliding sunroof89
Opening and closing
Z
Page 92 of 382

GWARNING
At high speeds the raised sliding sunroof auto-
matically lowers slightly at the rear. This could
trap you or other persons. There is a risk of
injury. Make sure that nobody reaches into
the sweep of the sliding sunroof whilst the
vehicle is in motion.
If somebody becomes trapped, immediately
pull back the sliding sunroof switch. The slid-
ing sunroof lifts during opening.
!Only open the sliding sunroof if it is free of
snow and ice. Otherwise, malfunctions may
occur.
Do not allow anything to protrude from the
sliding sunroof. Otherwise, the seals could be
damaged.
!The weather can change abruptly. It could
start to rain or snow. Make sure that the slid- ing sunroof is closed when you leave the vehi-
cle. The vehicle electronics can be damaged if
water enters the vehicle interior.
Resonance noises can occur in addition to the
usual airflow noises when the sliding sunroof is
open. They are caused by minor pressure fluc-
tuations in the vehicle interior. Change the posi-
tion of the sliding sunroof or open a side win-
dow. The noise will be reduced or eliminated.
Sliding sunroof reversing feature
In the following section, the term "sliding sun-
roof" refers to the panorama roof with power
tilt/sliding panel.
The sliding sunroof is equipped with an auto-
matic reversing feature. If a solid object blocks
or restricts the sliding sunroof during the closing
process, the sliding sunroof opens again auto-
matically. However, the automatic reversing
feature is only an aid and does not relieve you of
the responsibility of paying attention when clos-
ing the sliding sunroof.
GWARNING
The reversing feature does not react:
Rto soft, light and thin objects, e.g. small fin-
gers
Rover the last 1/6 in (4 mm) of the closing
movement
Rduring resetting
Rwhen closing the sliding sunroof again man-
ually immediately after automatic reversing
This means that the reversing feature cannot
prevent someone being trapped in these sit-
uations. There is a risk of injury.
Make sure that no body parts are in close
proximity during the closing procedure.
If somebody becomes trapped:
Rrelease the switch immediately, or
Rpress the switch in any direction during the
automatic closing process
The closing process is stopped.
Operating the panorama roof with
power tilt/sliding panel
Opening and closing
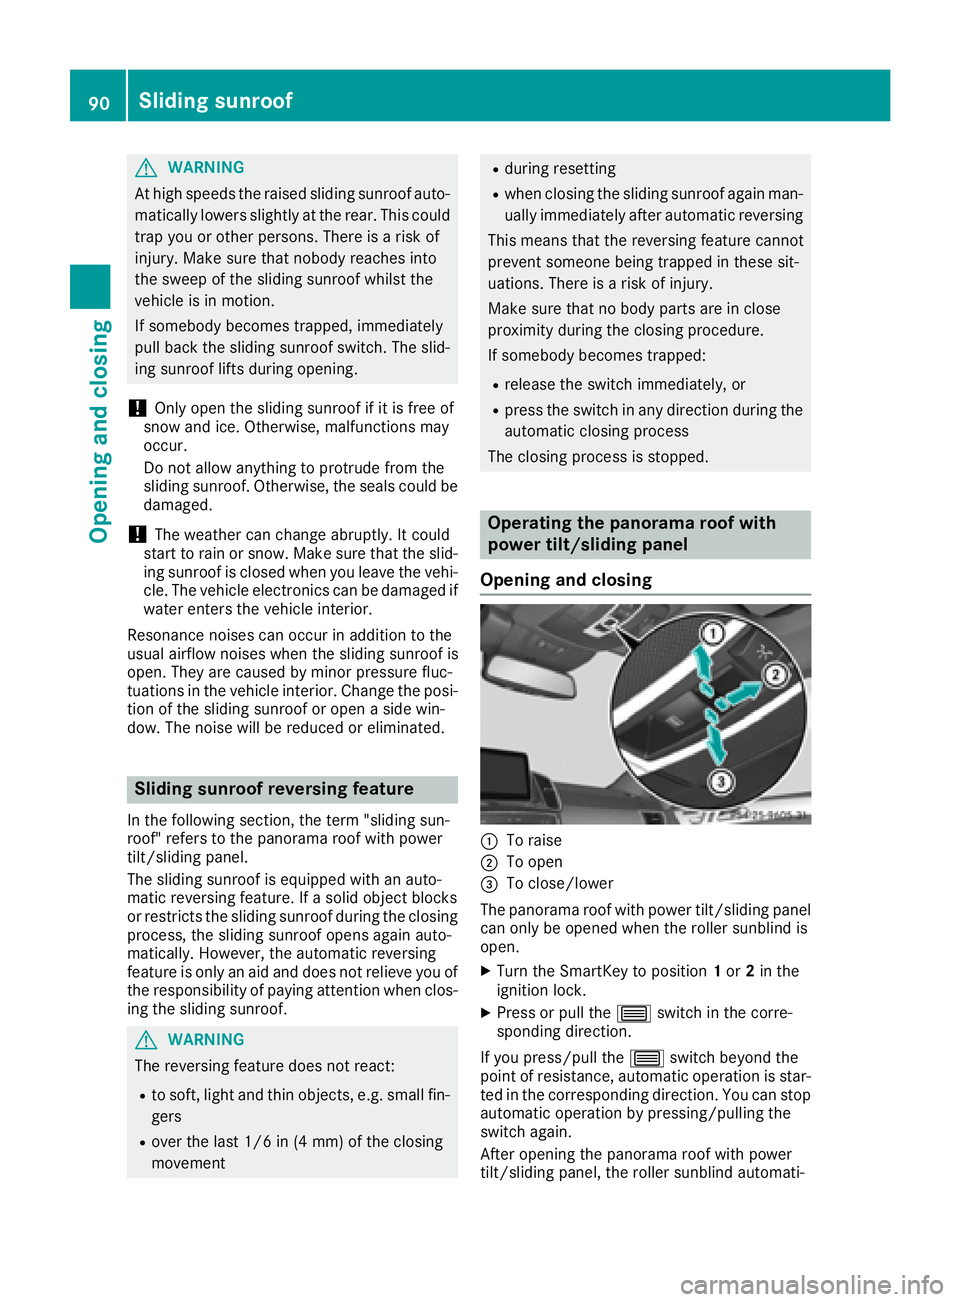
:To raise
;To open
=To close/lower
The panorama roof with power tilt/sliding panel
can only be opened when the roller sunblind is
open.
XTurn the SmartKey to position 1or 2in the
ignition lock.
XPress or pull the 3switch in the corre-
sponding direction.
If you press/pull the 3switch beyond the
point of resistance, automatic operation is star-
ted in the corresponding direction. You can stop
automatic operation by pressing/pulling the
switch again.
After opening the panorama roof with power
tilt/sliding panel, the roller sunblind automati-
90Sliding sunroof
Opening and closing