2016 MERCEDES-BENZ GLE-CLASS COUPE reset
[x] Cancel search: resetPage 94 of 382
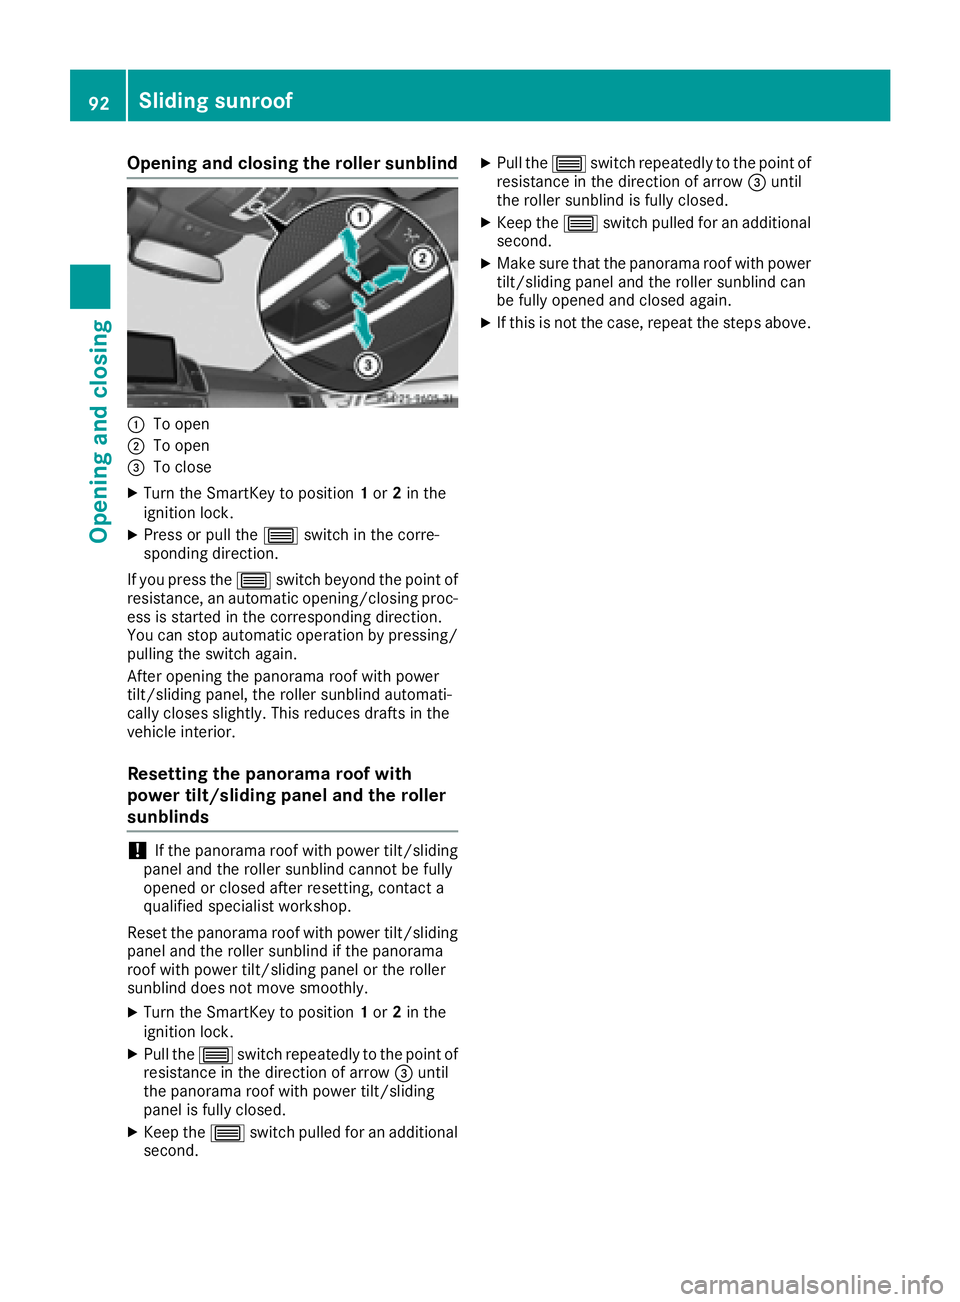
Opening and closing the roller sunblind
:To open
;To open
=To close
XTurn the SmartKey to position1or 2in the
ignition lock.
XPress or pull the 3switch in the corre-
sponding direction.
If you press the 3switch beyond the point of
resistance, an automatic opening/closing proc-
ess is started in the corresponding direction.
You can stop automatic operation by pressing/ pulling the switch again.
After opening the panorama roof with power
tilt/sliding panel, the roller sunblind automati-
cally closes slightly. This reduces drafts in the
vehicle interior.
Resetting the panorama roof with
power tilt/sliding panel and the roller
sunblinds
!If the panorama roof with power tilt/sliding
panel and the roller sunblind cannot be fully
opened or closed after resetting, contact a
qualified specialist workshop.
Reset the panorama roof with power tilt/sliding
panel and the roller sunblind if the panorama
roof with power tilt/sliding panel or the roller
sunblind does not move smoothly.
XTurn the SmartKey to position 1or 2in the
ignition lock.
XPull the 3switch repeatedly to the point of
resistance in the direction of arrow =until
the panorama roof with power tilt/sliding
panel is fully closed.
XKeep the 3switch pulled for an additional
second.
XPull the 3switch repeatedly to the point of
resistance in the direction of arrow =until
the roller sunblind is fully closed.
XKeep the 3switch pulled for an additional
second.
XMake sure that the panorama roof with power
tilt/sliding panel and the roller sunblind can
be fully opened and closed again.
XIf this is not the case, repeat the steps above.
92Sliding sunroof
Opening and closing
Page 95 of 382
Problems with the sliding sunroof
In the following section, the term "sliding sunroof" refers to the panorama roof with power tilt/
sliding panel.
GWARNING
If you close the sliding sunroof again immediately after it has been blocked or reset, the sliding
sunroof closes with increased or maximum force. The reversing feature is then not active. Parts
of the body could be trapped in the closing area in the process. This poses an increased risk of
injury or even fatal injury.
Make sure that no parts of the body are in the closing area.
If somebody becomes trapped:
Rrelease the switch immediately, or
Rpress the switch in any direction during the automatic closing process
The closing process is stopped.
!If the sliding sunroof still cannot be opened or closed as a result of a malfunction, contact a
qualified specialist workshop.
ProblemPossible causes/consequences and MSolutions
The sliding sunroof can-
not be closed and you
cannot see the cause.If the sliding sunroof is obstructed during closing and reopens again
slightly:
XImmediately after the sliding sunroof blocks, pull the 3switch in
the overhead control panel down to the point of resistance and hold it until the sliding sunroof is closed.
The sliding sunroof is closed with increased force.
If the sliding sunroof is obstructed again during closing and then
reopens slightly:
XImmediately after the sliding sunroof blocks, pull the 3switch in
the overhead control panel down to the point of resistance and hold it until the sliding sunroof is closed.
The sliding sunroof is closed without the automatic reversing fea-
ture.
Sliding sunroof93
Opening and closing
Z
Page 107 of 382
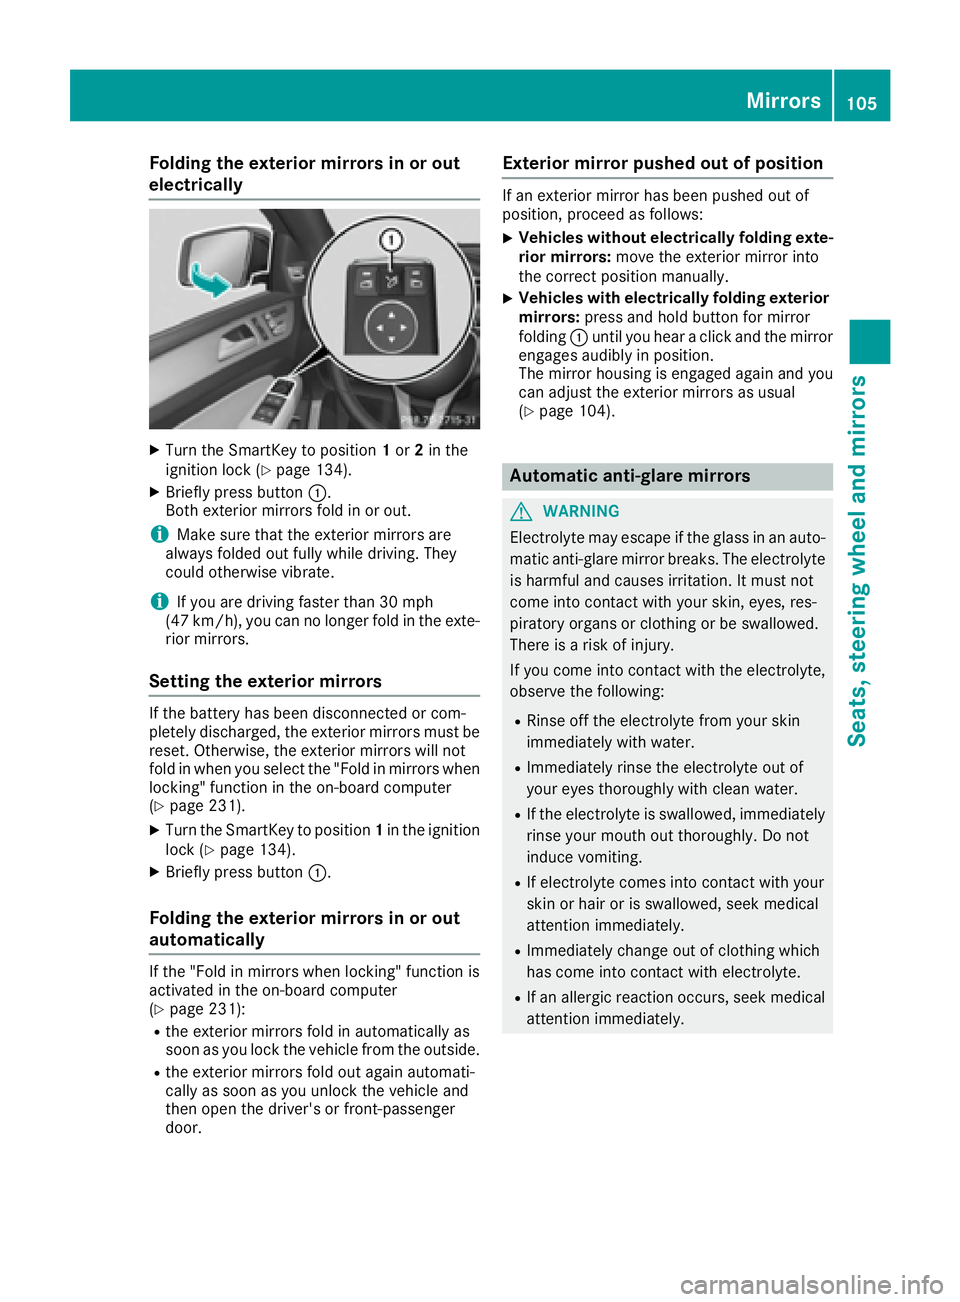
Folding the exterior mirrors in or out
electrically
XTurn theSmartKey to position 1or 2in th e
ignition loc k (Ypage 134).
XBriefly press butto n:.
Both exterio rmirror sfol din or out .
iMakesure that th eexterio rmirror sare
always folded out fully while driving .They
could otherwise vibrate .
iIf you are driving fasterthan 30 mph
(47 km/h), you can no longer fol din th eexte -
rio rmirrors.
Setting the exterior mirrors
If th ebattery has been disconnected or com-
pletely discharged, th eexterio rmirror smust be
reset .Otherwise, th eexterio rmirror swill no t
fol din when you select th e"Fold in mirror swhen
locking" function in th eon-board computer
(
Ypage 231).
XTurn th eSmartKey to position 1in th eignition
loc k (Ypage 134).
XBriefly press butto n:.
Folding the exterior mirrors in or out
automatically
If th e"Fold in mirror swhen locking" function is
activated in th eon-board computer
(
Ypage 231):
Rth eexterio rmirror sfol din automatically as
soo nas you loc kth evehicl efrom th eoutside .
Rtheexterio rmirror sfol dout again automati-
call yas soo nas you unlock th evehicl eand
then open th edriver' sor front-passenger
door .
Exterior mirror pushed out of position
If an exterio rmirror has been pushed out of
position ,procee das follows :
XVehicles without electricall yfolding exte-
rior mirrors :mov eth eexterio rmirror int o
th ecorrect position manually.
XVehicles with electricall yfolding exterior
mirrors :press and hold butto nfor mirror
foldin g: until you hear aclick and th emirror
engage saudibly in position .
The mirror housing is engage dagain and you
can adjust th eexterio rmirror sas usual
(
Ypage 104).
Automatic anti-glare mirrors
GWARNIN G
Electrolyte may escape if th eglass in an auto -
matic anti-glare mirror breaks .The electrolyt e
is harmful and causes irritation .It must no t
come int ocontact wit hyour skin, eyes, res -
piratory organs or clothing or be swallowed.
Ther eis aris kof injury.
If you come int ocontact wit hth eelectrolyte,
observ eth efollowing:
RRins eoff th eelectrolyt efrom your skin
immediately wit hwater.
RImmediately rinse th eelectrolyt eout of
your eyes thoroughly wit hclean water.
RIf th eelectrolyt eis swallowed, immediately
rinse your mout hout thoroughly. Do no t
induce vomiting .
RIf electrolytecomes int ocontact wit hyour
skin or hair or is swallowed, seek medical
attention immediately.
RImmediately chang eout of clothing whic h
has come int ocontact wit helectrolyte.
RIf an allergic reaction occurs, seek medical
attention immediately.
Mirrors105
Seats, steering wheel and mirrors
Z
Page 108 of 382
The rear-view mirror and the exterior mirror on
the driver's side automatically go into anti-glare
mode if the following conditions are met simul-
taneously:
Rthe ignition is switched on and
Rincident light from headlamps strikes the sen-
sor in the rear-view mirror
The mirrors do not go into anti-glare mode if
reverse gear is engaged or if the interior lighting
is switched on.
Parking position for the exterior mir-
ror on the front-passenger side
Setting and storing the parking position
You can position the front-passenger side exte-
rior mirror in such a way that you can see the
rear wheel on that side as soon as you engage
reverse gear. You can store this position.
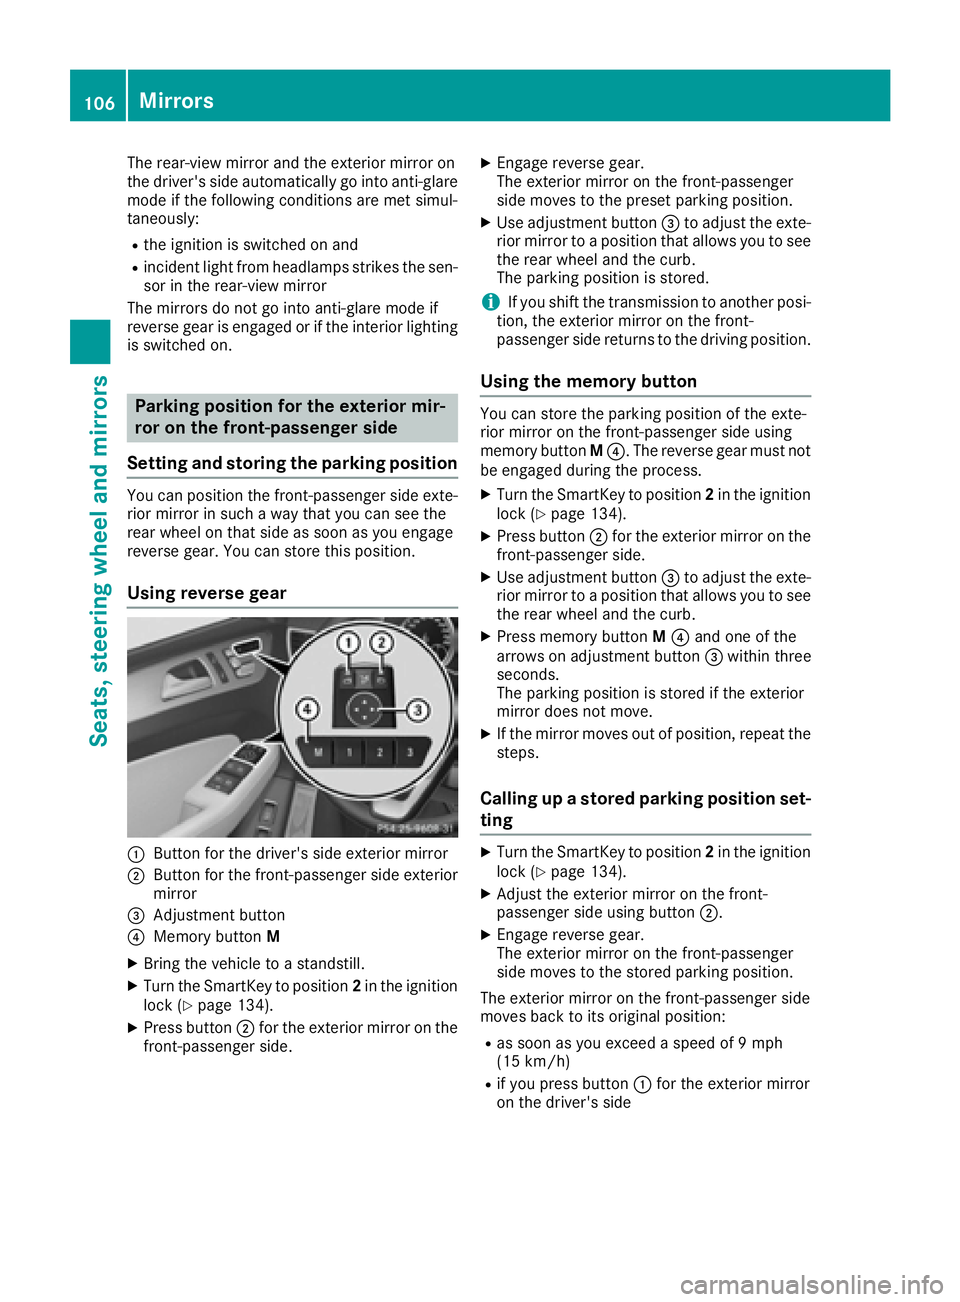
Using reverse gear
:Button for the driver's side exterior mirror
;Button for the front-passenger side exterior
mirror
=Adjustment button
?Memory button M
XBring the vehicle to a standstill.
XTurn the SmartKey to position 2in the ignition
lock (Ypage 134).
XPress button ;for the exterior mirror on the
front-passenger side.
XEngage reverse gear.
The exterior mirror on the front-passenger
side moves to the preset parking position.
XUse adjustment button =to adjust the exte-
rior mirror to a position that allows you to see
the rear wheel and the curb.
The parking position is stored.
iIf you shift the transmission to another posi-
tion, the exterior mirror on the front-
passenger side returns to the driving position.
Using the memory button
You can store the parking position of the exte-
rior mirror on the front-passenger side using
memory button M?. The reverse gear must not
be engaged during the process.
XTurn the SmartKey to position 2in the ignition
lock (Ypage 134).
XPress button ;for the exterior mirror on the
front-passenger side.
XUse adjustment button =to adjust the exte-
rior mirror to a position that allows you to see
the rear wheel and the curb.
XPress memory button M? and one of the
arrows on adjustment button =within three
seconds.
The parking position is stored if the exterior
mirror does not move.
XIf the mirror moves out of position, repeat the
steps.
Calling up a stored parking position set-
ting
XTurn the SmartKey to position 2in the ignition
lock (Ypage 134).
XAdjust the exterior mirror on the front-
passenger side using button ;.
XEngage reverse gear.
The exterior mirror on the front-passenger
side moves to the stored parking position.
The exterior mirror on the front-passenger side
moves back to its original position:
Ras soon as you exceed a speed of 9 mph
(15 km/h)
Rif you press button :for the exterior mirror
on the driver's side
106Mirrors
Seats, steering wheel and mirrors
Page 109 of 382
Memory function
Storing settings
GWARNING
If you use the memory function on the driver's side while driving, you could lose control of
the vehicle as a result of the adjustments
being made. There is a risk of an accident.
Only use the memory function on the driver's
side when the vehicle is stationary.
GWARNING
When the memory function adjusts the seat or steering wheel, you and other vehicle occu-
pants – particularly children – could become
trapped. There is a risk of injury.
While the memory function is making adjust-
ments, make sure that no one has any body
parts in the sweep of the seat or steering
wheel. If somebody becomes trapped, imme-
diately release the memory function position
button. The adjustment process is stopped.
GWARNING
Children could become trapped if they acti-
vate the memory function, particularly when
unattended. There is a risk of injury.
When leaving the vehicle, always take the
SmartKey with you and lock the vehicle. Never
leave children unsupervised in the vehicle.
The memory function can be used at any time,
e.g. even when the SmartKey isn't in the ignition
lock.
With the memory function, you can store up to
three different settings, e.g. for three different
people.
The following settings are stored as a single
memory preset:
Rposition of the seat, backrest and head
restraint
Rdriver's side: steering wheel position
Rdriver's side: position of the exterior mirrors
on the driver's and front-passenger sides
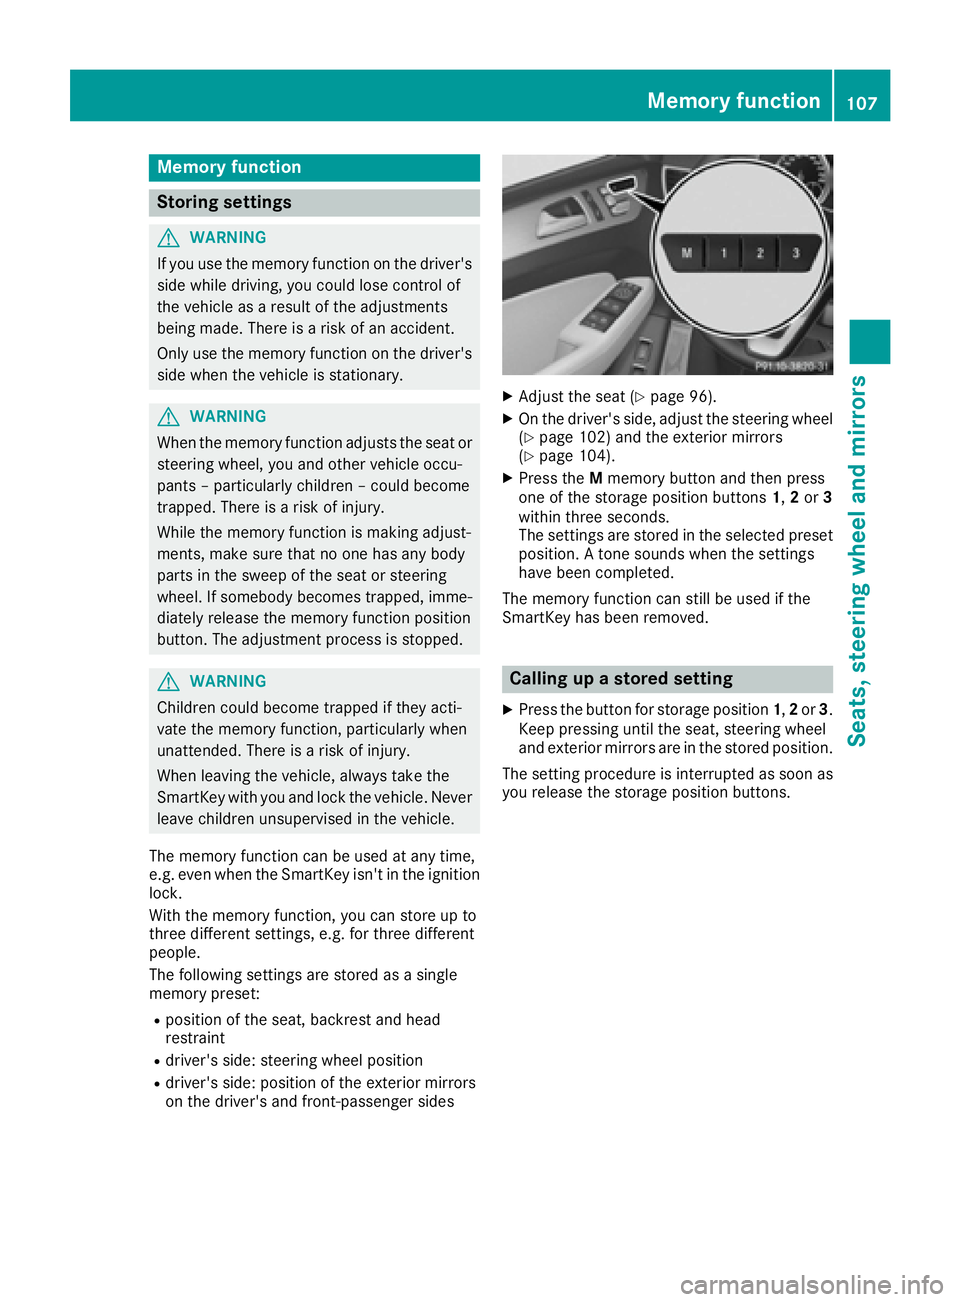
XAdjust the seat (Ypage 96).
XOn the driver's side, adjust the steering wheel (Ypage 102) and the exterior mirrors
(Ypage 104).
XPress the Mmemory button and then press
one of the storage position buttons 1,2or 3
within three seconds.
The settings are stored in the selected preset
position. A tone sounds when the settings
have been completed.
The memory function can still be used if the
SmartKey has been removed.
Calling up a stored setting
XPress the button for storage position 1,2or 3.
Keep pressing until the seat, steering wheel
and exterior mirrors are in the stored position.
The setting procedure is interrupted as soon as
you release the storage position buttons.
Memory function107
Seats, steering wheel and mirrors
Z
Page 222 of 382
Outside temperature display
You should pay special attention to road condi-
tions when temperatures are around freezing
point.
Bear in mind that the outside temperature dis-
play indicates the temperature measured and
does not record the road temperature.
The outside temperature display is in the multi-function display (
Ypage 221).
There is a short delay before a change in outside
temperature appears in the multifunction dis-
play.
Coolant temperature display
GWARNING
Opening the hood when the engine is over-
heated or when there is a fire in the engine
compartment could expose you to hot gases
or other service products. There is a risk of
injury.
Let an overheated engine cool down before
opening the hood. If there is a fire in the
engine compartment, keep the hood closed
and contact the fire department.
!A display message is shown if the coolant
temperature is too high.
If the coolant temperature is over 248 ‡
(120 †), do not continue driving. The engine
will otherwise be damaged.
The coolant temperature gage is in the instru-
ment cluster on the right-hand side (
Ypage 31).
Under normal operating conditions and with the
specified coolant level, the coolant temperature
may rise to 248 ‡ (120 †).
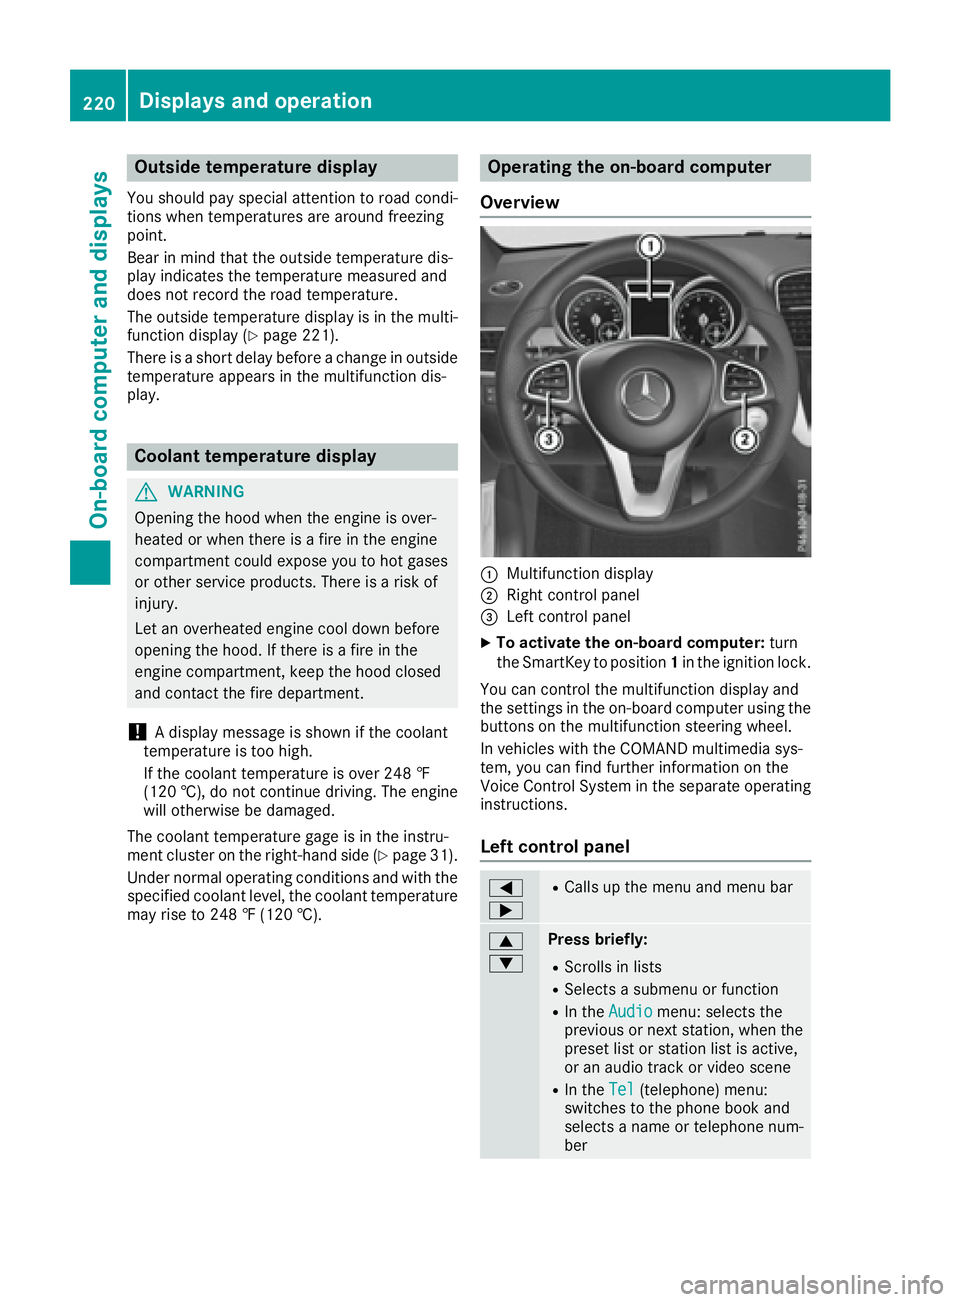
Operating the on-board computer
Overview
:Multifunction display
;Right control panel
=Left control panel
XTo activate the on-board computer: turn
the SmartKey to position 1in the ignition lock.
You can control the multifunction display and
the settings in the on-board computer using the
buttons on the multifunction steering wheel.
In vehicles with the COMAND multimedia sys-
tem, you can find further information on the
Voice Control System in the separate operating
instructions.
Left control panel
=
;RCalls up the menu and menu bar
9
:Press briefly:
RScrolls in lists
RSelects a submenu or function
RIn the Audiomenu: selects the
previous or next station, when the
preset list or station list is active,
or an audio track or video scene
RIn the Tel(telephone) menu:
switches to the phone book and
selects a name or telephone num-
ber
220Displays and operation
On-board computer and displays
Page 224 of 382
Menus and submenus
Menu overview
Press the=or; button on the steering
wheel to call up the menu bar and select a menu.
Operating the on-board computer (
Ypage 220).
Depending on the equipment installed in the
vehicle, you can call up the following menus:
RTripmenu (Ypage 222)
RNavimenu (navigation instructions)
(Ypage 223)
RAudiomenu (Ypage 225)
RTelmenu (telephone) (Ypage 226)
RDriveAssistmenu (assistance)
(Ypage 227)
RServ.menu (Ypage 229)
RSett.menu (settings) (Ypage 229)
RAMGmenu (Mercedes-AMG vehicles)
(Ypage 231)
Trip menu
Standard display
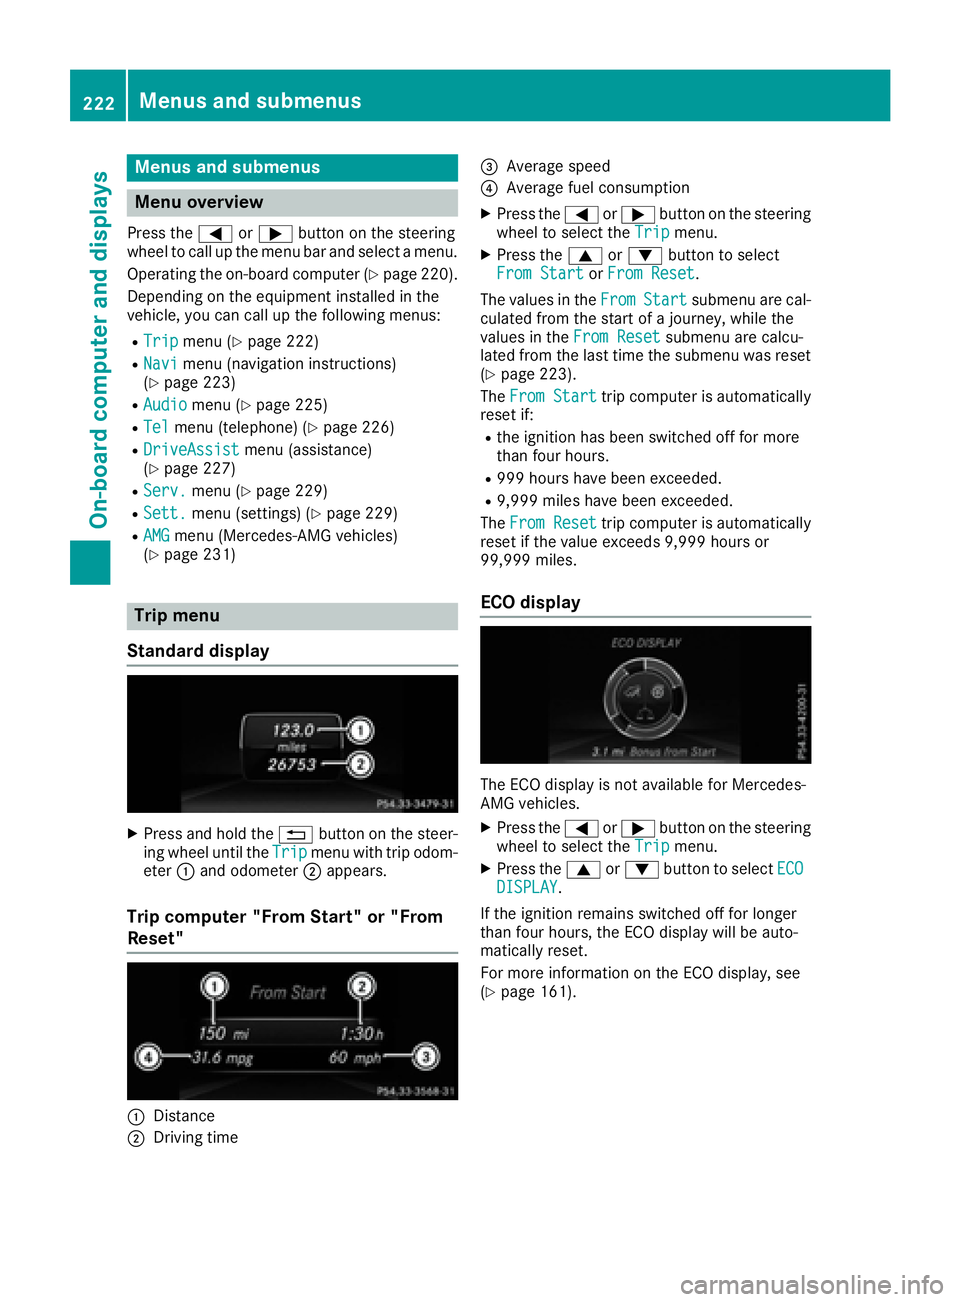
XPress and hold the %button on the steer-
ing wheel until the Tripmenu with trip odom-
eter :and odometer ;appears.
Trip computer "From Start" or "From
Reset"
:Distance
;Driving time
=Average speed
?Average fuel consumption
XPress the =or; button on the steering
wheel to select the Tripmenu.
XPress the9or: button to select
From Startor From Reset.
The values in the From
Startsubmenu are cal-
culated from the start of a journey, while the
values in the From Reset
submenu are calcu-
lated from the last time the submenu was reset
(
Ypage 223).
The From Start
trip computer is automatically
reset if:
Rthe ignition has been switched off for more
than four hours.
R999 hours have been exceeded.
R9,999 miles have been exceeded.
The From Reset
trip computer is automatically
reset if the value exceeds 9,999 hours or
99,999 miles.
ECO display
The ECO display is not available for Mercedes-
AMG vehicles.
XPress the =or; button on the steering
wheel to select the Tripmenu.
XPress the9or: button to select ECODISPLAY.
If the ignition remains switched off for longer
than four hours, the ECO display will be auto-
matically reset.
For more information on the ECO display, see
(
Ypage 161).
222Menus and submenus
On-board computer and displays
Page 225 of 382
Displaying therange an dcurrent fuel
consumption
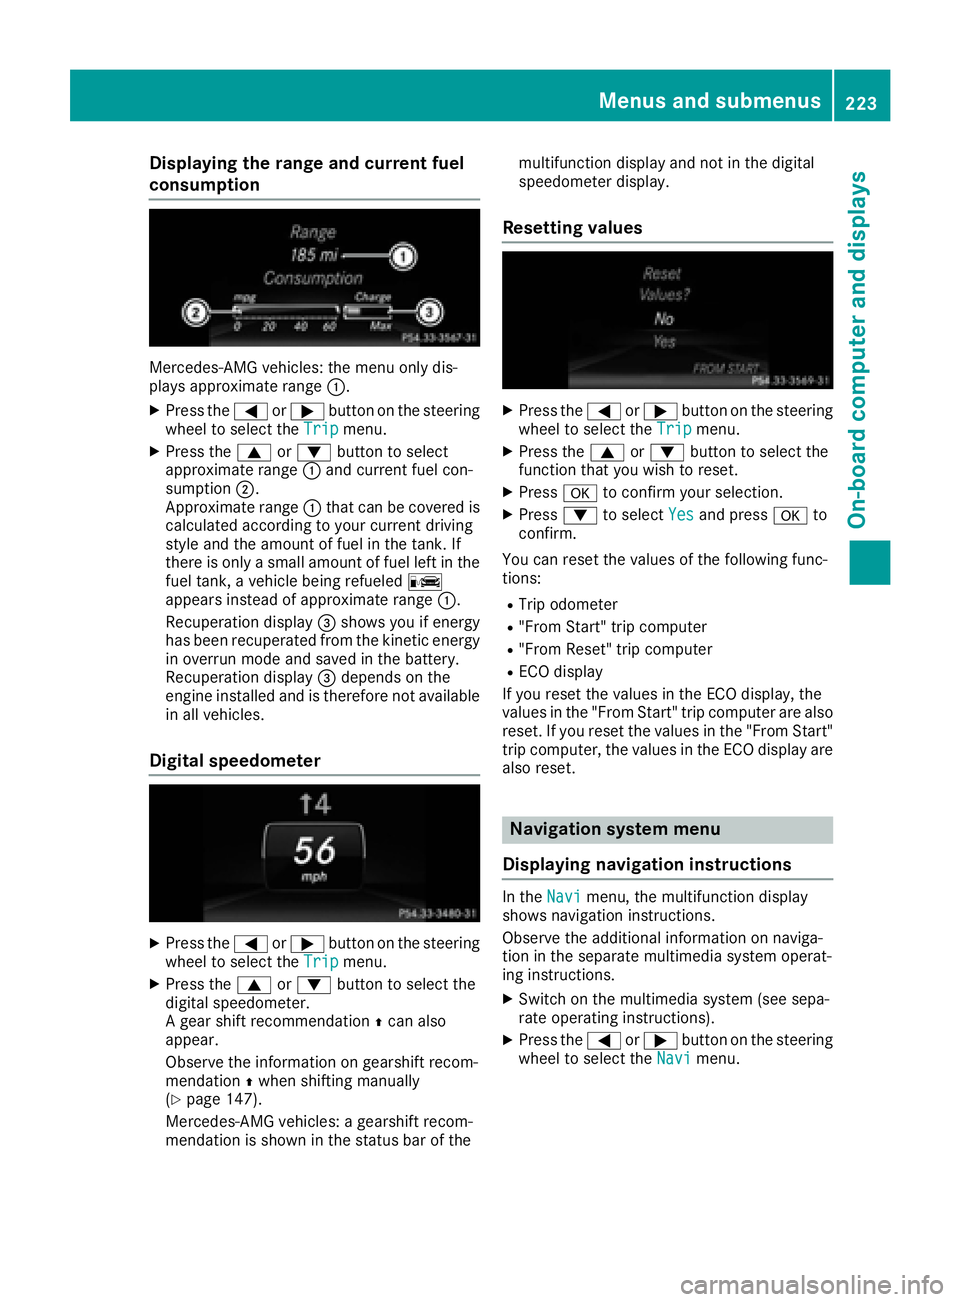
Mercedes-AMG vehicles :th emen uonly dis -
plays approximat erange :.
XPress th e= or; buttonon th esteerin g
whee lto selec tth eTri pmenu.
XPress th e9 or: buttonto selec t
approximat erange :and curren tfue lcon-
sumption ;.
Approximat erange :that can be covered is
calculated accordin gto your curren tdrivin g
style and th eamount of fue lin th etank .If
there is only asmall amount of fue llef tin th e
fue ltank , avehicle bein grefuele dC
appears instead of approximat erange :.
Recuperation display =shows you if energ y
has bee nrecuperated from th ekineti cenerg y
in overrun mode and saved in th ebattery.
Recuperation display =depend son th e
engin einstalled and is therefore no tavailable
in all vehicles .
Digital speedometer
XPress the= or; buttonon th esteerin g
whee lto selec tth eTri pmenu.
XPress th e9 or: buttonto selec tth e
digita lspeedometer.
A gear shift recommendation Zcan also
appear.
Observ eth einformation on gearshift recom -
mendation Zwhen shiftin gmanually
(
Ypage 147).
Mercedes-AMG vehicles : agearshift recom -
mendation is shown in th estatus bar of th emultifunction display and no
tin th edigita l
speedometer display.
Resetting value s
XPress the= or; buttonon th esteerin g
whee lto selec tth eTri pmenu.
XPress th e9 or: buttonto selec tth e
function that you wish to reset .
XPressato confirm your selection .
XPress:to selec tYesand press ato
confirm .
You can reset th evalues of th efollowin gfunc-
tions:
RTrip odometer
R"From Start "trip compute r
R"From Reset" trip compute r
RECOdisplay
If you reset th evalues in th eEC Odisplay, th e
values in th e"From Start "trip compute rare also
reset .If you reset th evalues in th e"From Start "
trip computer, th evalues in th eEC Odisplay are
also reset .
Navigation syste mmenu
Displaying navigation instructions
In th eNav imenu, th emultifunction display
shows navigation instructions.
Observ eth eadditional information on naviga-
tion in th eseparat emultimedia system operat -
in g instructions.
XSwitc hon th emultimedia system (se esepa-
rat eoperatin ginstructions).
XPress th e= or; buttonon th esteerin g
whee lto selec tth eNav imenu.
Menus and submenus223
On-board computer and displays
Z