2016 MERCEDES-BENZ GLE-CLASS COUPE ECO mode
[x] Cancel search: ECO modePage 6 of 382

AMGAdaptive sport suspension sys-
tem ................................................ 185
AMG menu (on-board computer) .....2 31
Approach/departure angle .............. 167
Ashtray ............................................... 288
Assistance display (on-board com-
puter) ..................................................2 27
Assistance menu (on-board com-
puter) ..................................................2 27
ASSYST PLUS
Displaying a service message ........3 06
Hiding a service message .............. 306
Resetting the service interval dis-
play ................................................ 306
Service message ............................ 306
Special service requirements ......... 307
ATA (Anti-Theft Alarm system)
Activating/deactivating ................... 70
Function ...........................................7 0
Switching off the alarm .................... 70
ATTENTION ASSIST
Activating/deactivating ................. 228
Display message ............................ 253
Function/notes ............................. 200
Audio menu (on-board computer) .... 225
Audio system
see separate operating instructions
Authorized Mercedes-Benz Center
see Qualified specialist workshop
AUTO lights
Display message ............................ 248
see Lights
Automatic car wash (care) ............... 307
Automatic engine start (ECO start/
stop function) .................................... 139
Automatic engine switch-off (ECO
start/stop function) .......................... 139
Automatic headlamp mode .............. 108
Automatic transmission
Accelerator pedal position ............. 145
Changing gear ............................... 145
DIRECT SELECT lever ..................... 142
Display message ............................ 261
Drive program ................................ 147
Drive program display .................... 143
Driving tips .................................... 145 DYNAMIC SELECT control
ler ......... 142
Eme
rgency running mode .............. 150
Engaging drive position .................. 144
Engaging neutral ............................ 143
Engaging park position automati-
cally ............................................... 143
Engaging reverse gear ................... 143
Engaging the park position ............ 143
Gliding mode ................................. 146
Kickdown ....................................... 146
Manual shifting .............................. 147
Oil temperature (on-board com-
puter, Mercedes-AMG vehicles) ..... 231
Overview ........................................ 142
Problem (malfunction) ................... 150
Pulling away ................................... 137
Starting the engine ........................ 136
Steering wheel paddle shifters ...... 147
Trailer towing ................................. 147
Transmission position display ........ 143
Transmission positions .................. 145
Automatic transmission emer-
gency mode ....................................... 150
Axle load, permissible (trailer tow-
ing) ...................................................... 376
B
Bag hook ............................................ 283
Ball coupling
Installing ........................................ 213
Removing ....................................... 217
BAS (Brake Assist System) ................. 61
BAS PLUS with Cross-Traffic Assist
(Brake Assist PLUS with Cross-
Traffic Assist)
Function/notes ................................ 61
Important safety notes .................... 61
Battery (SmartKey)
Checking .......................................... 75
Important safety notes .................... 75
Replacing ......................................... 75
Battery (vehicle)
Charging ........................................ 322
Display message ............................ 250
Important safety notes .................. 320
Jump starting ................................. 323
Overview ........................................ 320
4Index
Page 19 of 382

Steering wheelAdjusting (electrically) ...................1 02
Adjusting (manually) ...................... 101
Button overview ............................... 33
Buttons (on-board computer) ......... 220
Cleaning ......................................... 313
Important safety notes .................. 101
Steering wheel heating .................. 102
Storing settings (memory func-
tion) ............................................... 107
Steering wheel heating
Problem (malfunction) ................... 103
Switching on/off ........................... 102
Steering wheel paddle shifters ........ 147
Stopwatch (RACETIMER) ................... 232
Stowage areas ................................... 278
Stowage compartments
Armrest (under) ............................. 279
Center console .............................. 280
Center console (rear) ..................... 280
Cup holders ................................... 285
Eyeglasses compartment ............... 280
Glove box ....................................... 279
Important safety information ......... 279
Stowage net ................................... 280
Stowage net ....................................... 280
Summer tires ..................................... 332
Sun visor ............................................ 287
Suspension setting
AMG adaptive sport suspension
system ........................................... 185
Suspension settings
SETUP (on-board computer) .......... 232
SUV
(Sport Utility Vehicle) ....................... 25
Switching air-recirculation mode
on/off ................................................. 130
T
Tachometer ........................................ 219
Tailgate
Display message ............................ 262
Emergency unlocking ....................... 85
Important safety notes .................... 81
Limiting the opening angle ............... 84
Opening dimensions ...................... 373 Opening/closing (automatically
from inside) ...................................... 84
Opening/closing (automatically
from outside) ................................... 82
Opening/closing (from outside) ....... 82
Tank content
Fuel gauge ....................................... 31
Technical data
Capacities ...................................... 367
Emergency spare wheel ................. 364
Information .................................... 365
Tires/wheels ................................. 356
Trailer loads ................................... 376
Vehicle data ................................... 373
Telephone
Accepting a call (multifunction
steering wheel) .............................. 226
Display message ............................ 263
Menu (on-board computer) ............ 226
Number from the phone book ........ 226
Redialing ........................................ 226
Rejecting/ending a call ................. 226
Temperature
Coolant (display in the instrument
cluster) .......................................... 220
Coolant (on-board computer,
Mercedes-AMG vehicles) ............... 231
Engine oil (on-board computer,
Mercedes-AMG vehicles) ............... 231
Outside temperature ...................... 220
Setting (climate control) ................ 126
Transmission oil (on-board com-
puter, Mercedes-AMG vehicles) ..... 231
Through-loading feature ................... 281
Time
see separate operating instructions
Timing (RACETIMER) ......................... 232
Tire pressure
Calling up (on-board computer) ..... 337
Checking manually ........................ 336
Display message ............................ 259
Maximum ....................................... 336
Not reached (TIREFIT) .................... 318
Notes ............................................. 335
Reached (TIREFIT) .......................... 319
Recommended ............................... 333
Tire pressure loss warning system
Genera l note
s ................................ 336
Index17
Page 26 of 382

have directly notified Mercedes-Benz USA,
LLC in writing of the need for its repair.
(2) the same substantial defect or malfunction of a less serious nature than category (1)
has been subject to repair four or more
times and you have directly notified
Mercedes-Benz in writing of the need for its
repair.
(3) the vehicle is out of service by reason of repair of the same or different substantial
defects or malfunctions for a cumulative
total of more than 30 calendar days.
Please send your written notice to:
Mercedes-Benz USA, LLC
Customer Assistance Center
One Mercedes Drive
Montvale, NJ 07645-0350
Maintenance
The Service and Warranty Booklet describes all
the necessary maintenance work which should
be done at regular intervals.
Always have the Service and Warranty Booklet
with you when you bring the vehicle to an
authorized Mercedes-Benz Center. The service
advisor will record every service for you in the
Service and Warranty Booklet.
Roadside Assistance
The Mercedes-Benz Roadside Assistance Pro-
gram offers technical help in the event of a
breakdown. Calls to the toll-free Roadside Assis-
tance Hotline are answered by our agents 24
hours a day, 365 days a year.
1-800-FOR-MERCedes(1-800-367-6372)
(USA)
1-800-387-0100 (Canada)
For additional information, refer to the
Mercedes-Benz Roadside Assistance Program
brochure (USA) or the "Roadside Assistance"
section in the Service and Warranty booklet
(Canada). You will find both in your vehicle lit-
erature portfolio.
Change of address or change of own-
ership
In the event of a change of address, please send us the "Notification of Address Change" in the
Service and Guarantee booklet or simply call the
Mercedes-Benz Customer Assistance Center
(USA) at the hotline number
1-800-FOR-MERCedes(1-800-367-6372) or
Customer Service Center (Canada) at
1-800-387-0100. This will assist us in contact-
ing you in a timely manner should the need arise.
If you sell your Mercedes, please leave the entire
literature in the vehicle so that it is available to
the next owner.
If you have purchased a used car, please send us the "Notification of Used Car Purchase" in the
Service and Guarantee booklet or simply call the
Mercedes-Benz Customer Assistance Center
(USA) at the hotline number
1-800-FOR-MERCedes(1-800-367-6372) or
Customer Service (Canada) at 1-800-387-0100.
Vehicle operation outside the USA
and Canada
If you plan to operate your vehicle in foreign
countries, please be aware that:
Rservice facilities or replacement parts may
not be readily available.
Runleaded fuel for vehicles with a catalytic
converter may not be available. Leaded fuel
may cause damage to the catalytic converter.
Rthe fuel may have a considerably lower octane
rating. Unsuitable fuel can cause engine dam-
age.
Some Mercedes-Benz models are available for
delivery in Europe through our European Deliv-
ery Program. For details, consult an authorized
Mercedes-Benz Center or write to one of the
following addresses.
In the USA
Mercedes-Benz USA, LLC
European Delivery Department
One Mercedes Drive
Montvale, NJ 07645-0350
In Canada
Mercedes-Benz Canada, Inc.
European Delivery Department
98 Vanderhoof Avenue
Toronto, Ontario M4G 4C9
24Introduction
Page 40 of 382

Useful information
i
This Operator's Manual describes all models
and all standard and optional equipment of
your vehicle available at the time of publica-
tion of the Operator's Manual. Country-spe-
cific differences are possible. Please note
that your vehicle may not be equipped with all
features described. This also applies to
safety-related systems and functions.
iRead the information on qualified specialist
workshops (Ypage 26).
Panic alarm
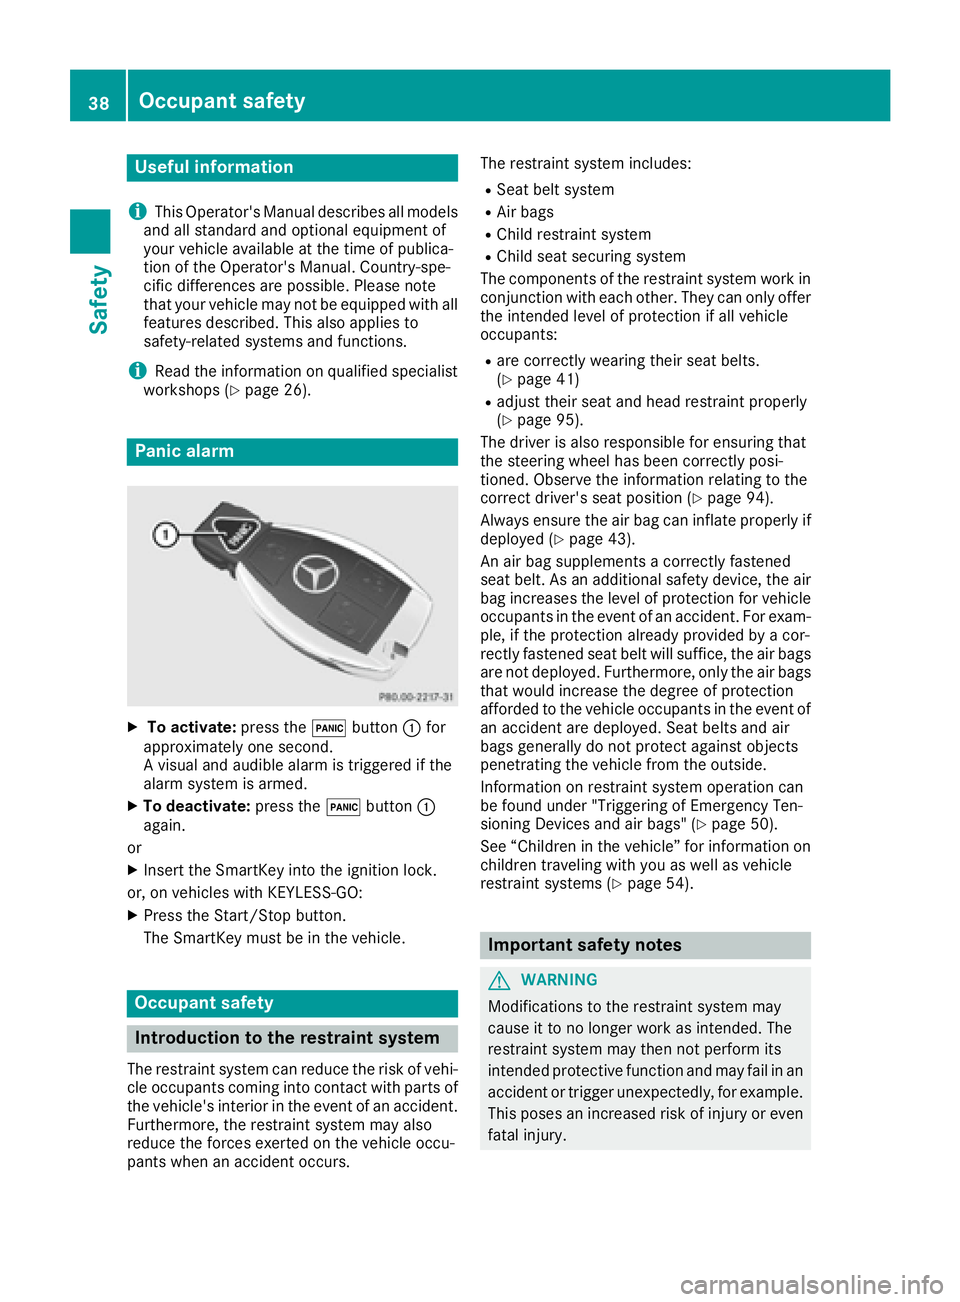
XTo activate: press the!button :for
approximately one second.
A visual and audible alarm is triggered if the
alarm system is armed.
XTo deactivate: press the!button :
again.
or
XInsert the SmartKey into the ignition lock.
or, on vehicles with KEYLESS ‑GO:
XPress the Start/Stop button.
The SmartKey must be in the vehicle.
Occupant safety
Introduction to the restraint system
The restraint system can reduce the risk of vehi-
cle occupants coming into contact with parts of
the vehicle's interior in the event of an accident.
Furthermore, the restraint system may also
reduce the forces exerted on the vehicle occu-
pants when an accident occurs. The restraint system includes:
RSeat belt system
RAir bags
RChild restraint system
RChild seat securing system
The components of the restraint system work in
conjunction with each other. They can only offer
the intended level of protection if all vehicle
occupants:
Rare correctly wearing their seat belts.
(Ypage 41)
Radjust their seat and head restraint properly
(Ypage 95).
The driver is also responsible for ensuring that
the steering wheel has been correctly posi-
tioned. Observe the information relating to the
correct driver's seat position (
Ypage 94).
Always ensure the air bag can inflate properly if
deployed (
Ypage 43).
An air bag supplements a correctly fastened
seat belt. As an additional safety device, the air
bag increases the level of protection for vehicle
occupants in the event of an accident. For exam-
ple, if the protection already provided by a cor-
rectly fastened seat belt will suffice, the air bags
are not deployed. Furthermore, only the air bags that would increase the degree of protection
afforded to the vehicle occupants in the event of
an accident are deployed. Seat belts and air
bags generally do not protect against objects
penetrating the vehicle from the outside.
Information on restraint system operation can
be found under "Triggering of Emergency Ten-
sioning Devices and air bags" (
Ypage 50).
See “Children in the vehicle” for information on
children traveling with you as well as vehicle
restraint systems (
Ypage 54).
Important safety notes
GWARNING
Modifications to the restraint system may
cause it to no longer work as intended. The
restraint system may then not perform its
intended protective function and may fail in an
accident or trigger unexpectedly, for example.
This poses an increased risk of injury or even fatal injury.
38Occupant safety
Safety
Page 74 of 382

Useful information
i
This Operator's Manual describes all models
and all standard and optional equipment of
your vehicle available at the time of publica-
tion of the Operator's Manual. Country-spe-
cific differences are possible. Please note
that your vehicle may not be equipped with all
features described. This also applies to
safety-related systems and functions.
iRead the information on qualified specialist
workshops (Ypage 26).
SmartKey
Important safety notes
GWARNING
If children are left unsupervised in the vehicle,
they could:
Ropen the doors, thus endangering other
people or road users.
Rget out and disrupt traffic.
Roperate the vehicle's equipment.
Additionally, children could set the vehicle in
motion if, for example, they:
Rrelease the parking brake.
Rshifting the automatic transmission out of
park position P
RStart the engine.
There is a risk of an accident and injury.
When leaving the vehicle, always take the
SmartKey with you and lock the vehicle. Never
leave children or animals unattended in the
vehicle. Always keep the SmartKey out of
reach of children.
GWARNING
If you attach heavy or large objects to the
SmartKey, the SmartKey could be uninten-
tionally turned in the ignition lock. This could
cause the engine to be switched off. There is a risk of an accident.
Do not attach any heavy or large objects to theSmartKey. Remove any bulky key rings before
inserting the SmartKey into the ignition lock.
!Keep the SmartKey away from strong mag-
netic fields. Otherwise, the remote control
function could be affected.
Strong magnetic fields can occur in the vicin-
ity of powerful electrical installations.
Do not keep the SmartKey:
Rwith electronic devices, e.g. a mobile phone
or another SmartKey.
Rwith metallic objects, e.g. coins or metal foil.
Rinside metallic objects, e.g. a metal case.
This can affect the functionality of the Smart-
Key.
Do not keep the KEYLESS-GO or KEYLESS-GO
Start function key in the temperature-controlled
cup holder. Otherwise, the KEYLESS-GO or KEY-
LESS-GO Start function key will not be detected. Vehicles with KEYLESS-GO start function: do
not keep the SmartKey in the cargo compart-
ment. Otherwise, the SmartKey may not be
detected, e.g. when starting the engine using
the Start/Stop button.
SmartKey functions
:& Locks the vehicle
;FOpens/closes the tailgate
=%Unlocks the vehicle
XTo unlock centrally: press the%button.
If you do not open the vehicle within approx-
imately 40 seconds of unlocking:
Rthe vehicle is locked again.
Ranti-theft protection is reactivated.
XTo lock centrally: press the&button.
72SmartKey
Opening and closing
Page 108 of 382

The rear-view mirror and the exterior mirror on
the driver's side automatically go into anti-glare
mode if the following conditions are met simul-
taneously:
Rthe ignition is switched on and
Rincident light from headlamps strikes the sen-
sor in the rear-view mirror
The mirrors do not go into anti-glare mode if
reverse gear is engaged or if the interior lighting
is switched on.
Parking position for the exterior mir-
ror on the front-passenger side
Setting and storing the parking position
You can position the front-passenger side exte-
rior mirror in such a way that you can see the
rear wheel on that side as soon as you engage
reverse gear. You can store this position.
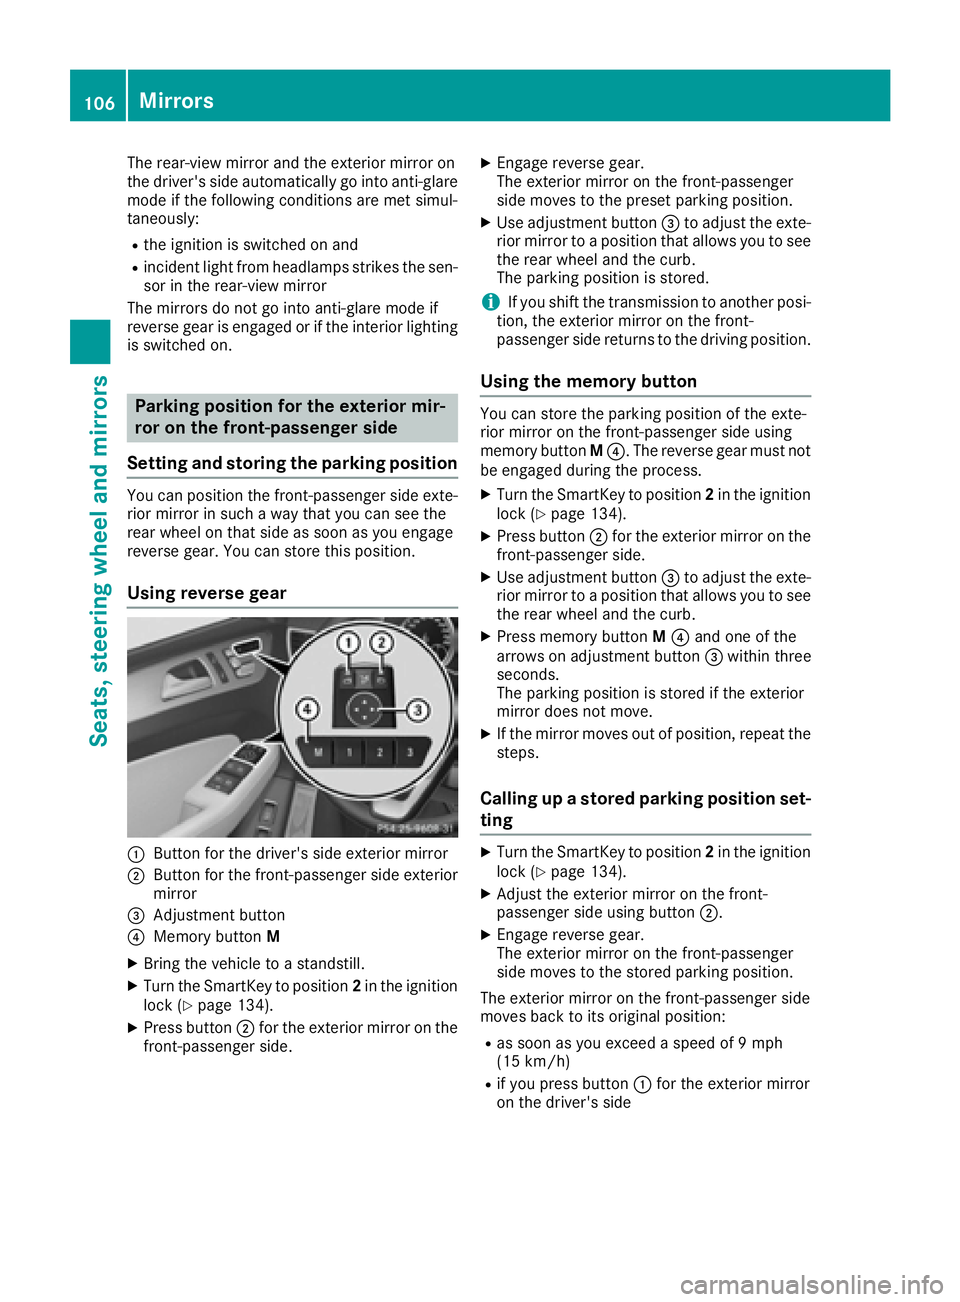
Using reverse gear
:Button for the driver's side exterior mirror
;Button for the front-passenger side exterior
mirror
=Adjustment button
?Memory button M
XBring the vehicle to a standstill.
XTurn the SmartKey to position 2in the ignition
lock (Ypage 134).
XPress button ;for the exterior mirror on the
front-passenger side.
XEngage reverse gear.
The exterior mirror on the front-passenger
side moves to the preset parking position.
XUse adjustment button =to adjust the exte-
rior mirror to a position that allows you to see
the rear wheel and the curb.
The parking position is stored.
iIf you shift the transmission to another posi-
tion, the exterior mirror on the front-
passenger side returns to the driving position.
Using the memory button
You can store the parking position of the exte-
rior mirror on the front-passenger side using
memory button M?. The reverse gear must not
be engaged during the process.
XTurn the SmartKey to position 2in the ignition
lock (Ypage 134).
XPress button ;for the exterior mirror on the
front-passenger side.
XUse adjustment button =to adjust the exte-
rior mirror to a position that allows you to see
the rear wheel and the curb.
XPress memory button M? and one of the
arrows on adjustment button =within three
seconds.
The parking position is stored if the exterior
mirror does not move.
XIf the mirror moves out of position, repeat the
steps.
Calling up a stored parking position set-
ting
XTurn the SmartKey to position 2in the ignition
lock (Ypage 134).
XAdjust the exterior mirror on the front-
passenger side using button ;.
XEngage reverse gear.
The exterior mirror on the front-passenger
side moves to the stored parking position.
The exterior mirror on the front-passenger side
moves back to its original position:
Ras soon as you exceed a speed of 9 mph
(15 km/h)
Rif you press button :for the exterior mirror
on the driver's side
106Mirrors
Seats, steering wheel and mirrors
Page 110 of 382

Useful information
i
This Operator's Manual describes all models
and all standard and optional equipment of
your vehicle available at the time of publica-
tion of the Operator's Manual. Country-spe-
cific differences are possible. Please note
that your vehicle may not be equipped with all
features described. This also applies to
safety-related systems and functions.
iRead the information on qualified specialist
workshops (Ypage 26).
Exterior lighting
General notes
For reasons of safety, Mercedes-Benz recom-
mends that you drive with the lights switched on
even during the daytime. In some countries,
operation of the headlamps varies due to legal
requirements and self-imposed obligations.
Setting the exterior lighting
Setting options
Exterior lighting can be set using:
Rthe light switch
Rthe combination switch (Ypage 110)
Rthe on-board computer (Ypage 229)
Light switch
Operation
1 WLeft-hand standing lamps
2XRight-hand standing lamps
3TParking lamps, license plate and
instrument cluster lighting
4ÃAutomatic headlamp mode, controlled
by the light sensor
5 LLow-beam/high-beam headlamps
BRRear fog lamp
If you hear a warning tone when you leave the
vehicle, the lights may still be switched on.
XTurn the light switch to Ã.
The exterior lighting (except the parking/stand-
ing lamps) switches off automatically if you:
Rremove the SmartKey from the ignition lock
Ropen the driver's door with the SmartKey in
position 0in the ignition lock
Automatic headlamp mode
à is the favored light switch setting. The light
setting is automatically selected according to
the brightness of the ambient light (exception:
poor visibility due to weather conditions such as
fog, snow or spray):
RSmartKey in position 1in the ignition lock: the
parking lamps are switched on or off auto-
matically depending on the brightness of the
ambient light.
RWith the engine running (USA only): if you
have switched on the Daytime Running
Lightsfunction in the on-board computer,
the daytime running lamps or the parking
lamps and low-beam headlamps are switched
on or off automatically depending on the
brightness of the ambient light.
XTo switch on automatic headlamp mode:
turn the light switch to Ã.
GWARNING
When the light switch is set to Ã, the low-
beam headlamps may not be switched on
automatically if there is fog, snow or other
causes of poor visibility due to the weather
conditions such as spray. There is a risk of an
accident.
In such situations, turn the light switch to
L.
The automatic headlamp feature is only an aid.
The driver is responsible for the vehicle's light-
ing at all times.
Canada only:
108Exterior lighting
Lights and windshield wipers
Page 120 of 382

Useful information
i
This Operator's Manual describes all models
and all standard and optional equipment of
your vehicle available at the time of publica-
tion of the Operator's Manual. Country-spe-
cific differences are possible. Please note
that your vehicle may not be equipped with all
features described. This also applies to
safety-related systems and functions.
iRead the information on qualified specialist
workshops (Ypage 26).
Overview of climate control systems
General notes
Observe the settings recommended on the fol-
lowing pages. The windows could otherwise fog
up.
To prevent the windows from fogging up:
Rswitch off climate control only briefly
Rswitch on air-recirculation mode only briefly
Rswitch on the cooling with air dehumidifica-
tion function
Rswitch on the defrost windshield function
briefly, if required
Climate control regulates the temperature and
the humidity in the vehicle interior and filters
undesirable substances out of the air.
The residual heat function can only be activated
or deactivated with the ignition switched off
(
Ypage 130).
iVentilate the vehicle for a brief period during
warm weather, e.g. using the convenience
opening feature (
Ypage 86).
This will speed up the cooling process and the
desired interior temperature will be reached
more quickly.
If you start the engine using your smartphone,
the last selected climate control setting is reac-
tivated (
Ypage 136).
iThe integrated filter filters out most parti-
cles of dust and soot and completely filters
out pollen. It also reduces gaseous pollutants
and odors. A clogged filter reduces the
amount of air supplied to the vehicle interior.
For this reason, you should always observe
the interval for replacing the filter, which is
specified in the Maintenance Booklet. As it depends on environmental conditions, e.g.
heavy air pollution, the interval may be
shorter than stated in the Maintenance Book-
let.
iVehicles with AIR-BALANCE package:
in
addition to ionization, the vehicle has an air
filter with anti-allergenic properties that con-
tribute to improved air filtration.
iIt is possible that under certain circumstan-
ces the residual heat function may be activa-
ted automatically an hour after the SmartKey
has been removed in order to dry the auto-
matic climate control. The vehicle is then ven-
t
ilated for 30 minutes.
118Overview of climate control systems
Climate control