2016 MERCEDES-BENZ GLE-CLASS COUPE buttons
[x] Cancel search: buttonsPage 19 of 382

Steering wheelAdjusting (electrically) ...................1 02
Adjusting (manually) ...................... 101
Button overview ............................... 33
Buttons (on-board computer) ......... 220
Cleaning ......................................... 313
Important safety notes .................. 101
Steering wheel heating .................. 102
Storing settings (memory func-
tion) ............................................... 107
Steering wheel heating
Problem (malfunction) ................... 103
Switching on/off ........................... 102
Steering wheel paddle shifters ........ 147
Stopwatch (RACETIMER) ................... 232
Stowage areas ................................... 278
Stowage compartments
Armrest (under) ............................. 279
Center console .............................. 280
Center console (rear) ..................... 280
Cup holders ................................... 285
Eyeglasses compartment ............... 280
Glove box ....................................... 279
Important safety information ......... 279
Stowage net ................................... 280
Stowage net ....................................... 280
Summer tires ..................................... 332
Sun visor ............................................ 287
Suspension setting
AMG adaptive sport suspension
system ........................................... 185
Suspension settings
SETUP (on-board computer) .......... 232
SUV
(Sport Utility Vehicle) ....................... 25
Switching air-recirculation mode
on/off ................................................. 130
T
Tachometer ........................................ 219
Tailgate
Display message ............................ 262
Emergency unlocking ....................... 85
Important safety notes .................... 81
Limiting the opening angle ............... 84
Opening dimensions ...................... 373 Opening/closing (automatically
from inside) ...................................... 84
Opening/closing (automatically
from outside) ................................... 82
Opening/closing (from outside) ....... 82
Tank content
Fuel gauge ....................................... 31
Technical data
Capacities ...................................... 367
Emergency spare wheel ................. 364
Information .................................... 365
Tires/wheels ................................. 356
Trailer loads ................................... 376
Vehicle data ................................... 373
Telephone
Accepting a call (multifunction
steering wheel) .............................. 226
Display message ............................ 263
Menu (on-board computer) ............ 226
Number from the phone book ........ 226
Redialing ........................................ 226
Rejecting/ending a call ................. 226
Temperature
Coolant (display in the instrument
cluster) .......................................... 220
Coolant (on-board computer,
Mercedes-AMG vehicles) ............... 231
Engine oil (on-board computer,
Mercedes-AMG vehicles) ............... 231
Outside temperature ...................... 220
Setting (climate control) ................ 126
Transmission oil (on-board com-
puter, Mercedes-AMG vehicles) ..... 231
Through-loading feature ................... 281
Time
see separate operating instructions
Timing (RACETIMER) ......................... 232
Tire pressure
Calling up (on-board computer) ..... 337
Checking manually ........................ 336
Display message ............................ 259
Maximum ....................................... 336
Not reached (TIREFIT) .................... 318
Notes ............................................. 335
Reached (TIREFIT) .......................... 319
Recommended ............................... 333
Tire pressure loss warning system
Genera l note
s ................................ 336
Index17
Page 38 of 382
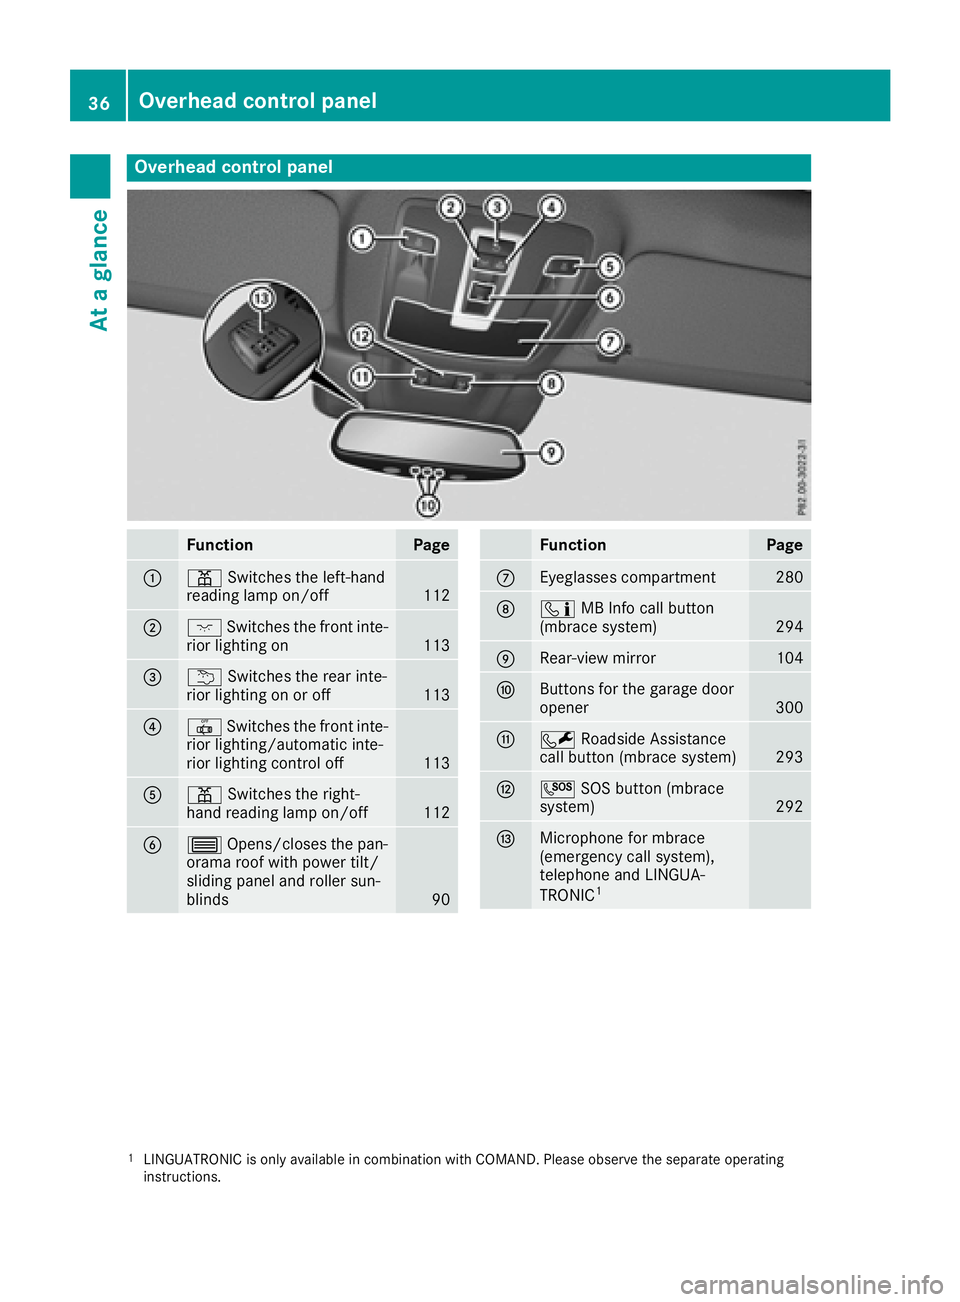
Overhead control panel
FunctionPage
:pSwitches the left-hand
reading lamp on/off112
;c Switches the front inte-
rior lighting on113
=u Switches the rear inte-
rior lighting on or off113
?| Switches the front inte-
rior lighting/automatic inte-
rior lighting control off
113
Ap Switches the right-
hand reading lamp on/off112
B3 Opens/closes the pan-
orama roof with power tilt/
sliding panel and roller sun-
blinds
90
FunctionPage
CEyeglasses compartment280
Dï MB Info call button
(mbrace system)294
ERear-view mirror104
FButtons for the garage door
opener300
GF Roadside Assistance
call button (mbrace system)293
HG SOS button (mbrace
system)292
IMicrophone for mbrace
(emergency call system),
telephone and LINGUA-
TRONIC
1
1LINGUATRONIC is only available in combination with COMAND. Please observe the separate operating
instructions.
36Overhead control panel
At a glance
Page 61 of 382
GWARNING
If the child restraint system is subjected to
direct sunlight, parts may get very hot. Chil-
dren may burn themselves on these parts,
particularly on the metal parts of the child
restraint system. There is a risk of injury.
If you leave the vehicle, taking the child with
you, always ensure that the child restraint
system is not exposed to direct sunlight. Pro- tect it with a blanket, for example. If the child
restraint system has been exposed to direct
sunlight, let it cool down before securing the
child in it. Never leave children unattended in
the vehicle.
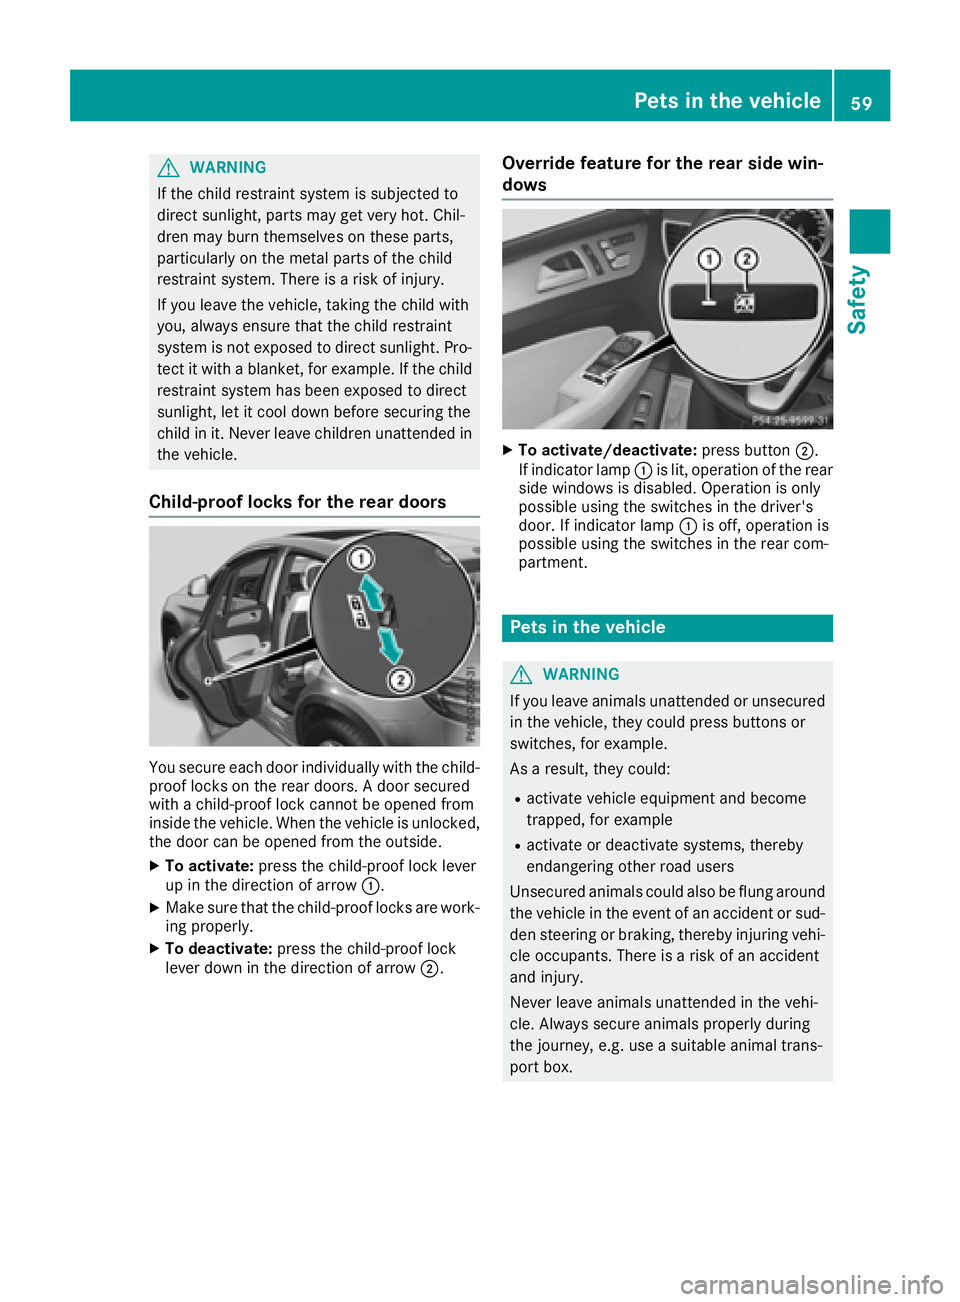
Child-proof locks for the rear doors
You secure each door individually with the child-
proof locks on the rear doors. A door secured
with a child-proof lock cannot be opened from
inside the vehicle. When the vehicle is unlocked,the door can be opened from the outside.
XTo activate: press the child-proof lock lever
up in the direction of arrow :.
XMake sure that the child-proof locks are work-
ing properly.
XTo deactivate: press the child-proof lock
lever down in the direction of arrow ;.
Override feature for the rear side win-
dows
XTo activate/deactivate:press button;.
If indicator lamp :is lit, operation of the rear
side windows is disabled. Operation is only
possible using the switches in the driver's
door. If indicator lamp :is off, operation is
possible using the switches in the rear com-
partment.
Pets in the vehicle
GWARNING
If you leave animals unattended or unsecured
in the vehicle, they could press buttons or
switches, for example.
As a result, they could:
Ractivate vehicle equipment and become
trapped, for example
Ractivate or deactivate systems, thereby
endangering other road users
Unsecured animals could also be flung around
the vehicle in the event of an accident or sud-
den steering or braking, thereby injuring vehi-
cle occupants. There is a risk of an accident
and injury.
Never leave animals unattended in the vehi-
cle. Always secure animals properly during
the journey, e.g. use a suitable animal trans-
port box.
Pets in the vehicle59
Safety
Z
Page 76 of 382

XTo deactivate:press the&button on the
SmartKey twice in rapid succession.
The battery check lamp of the SmartKey
flashes twice briefly and lights up once, then
KEYLESS-GO is deactivated (
Ypage 75).
XTo activate: press any button on the Smart-
Key.
or
XInsert the SmartKey into the ignition lock.
KEYLESS-GO and all of its associated features
are available again.
KEYLESS-GO start function
General notes
Bear in mind that the engine can be started by
any of the vehicle occupants if there is a Smart-
Key in the vehicle (
Ypage 136).
Changing the settings of the locking
system
You can change the settings of the locking sys-
tem. This means that only the driver's door and
the fuel filler flap are unlocked when the vehicle
is unlocked. This is useful if you frequently travel
on your own.
XTo change the setting: press and hold down
the % and& buttons simultaneously
for about six seconds until the battery indica-
tor lamp flashes twice (
Ypage 75).
If the setting of the locking system is changed
within the signal range of the vehicle, pressing
the & or% button:
Rlocks or
Runlocks the vehicle
The SmartKey now functions as follows:
XTo unlock: press the%button once.
XTo unlock centrally: press the%button
twice.
XTo lock centrally: press the&button. The KEYLESS-GO function is changed as fol-
lows:
XTo unlock the driver's door:
touch the inner
surface of the door handle on the driver's
door.
XTo unlock centrally: touch the inner surface
of the door handle on the front-passenger
door or the rear door.
XTo lock centrally: touch the outer sensor
surface on one of the door handles
(
Ypage 73).
XTo restore the factory settings: press and
hold down the %and& buttons simul-
taneously for approximately si x se
conds until
the battery check lamp flashes twice
(
Ypage 75).
Mechanical key
General notes
If the vehicle can no longer be locked or
unlocked with the SmartKey or the KEYLESS-GO
key, use the mechanical key.
If you use the mechanical key to unlock and
open the driver's door, the anti-theft alarm sys-
tem will be triggered. Switch off the alarm
(
Ypage 70).
If you unlock the vehicle using the mechanical
key, the fuel filler flap will not be unlocked auto- matically.
XTo unlock the fuel filler flap: insert the
SmartKey into the ignition lock.
Removing the mechanical key
74SmartKey
Opening and closing
Page 78 of 382
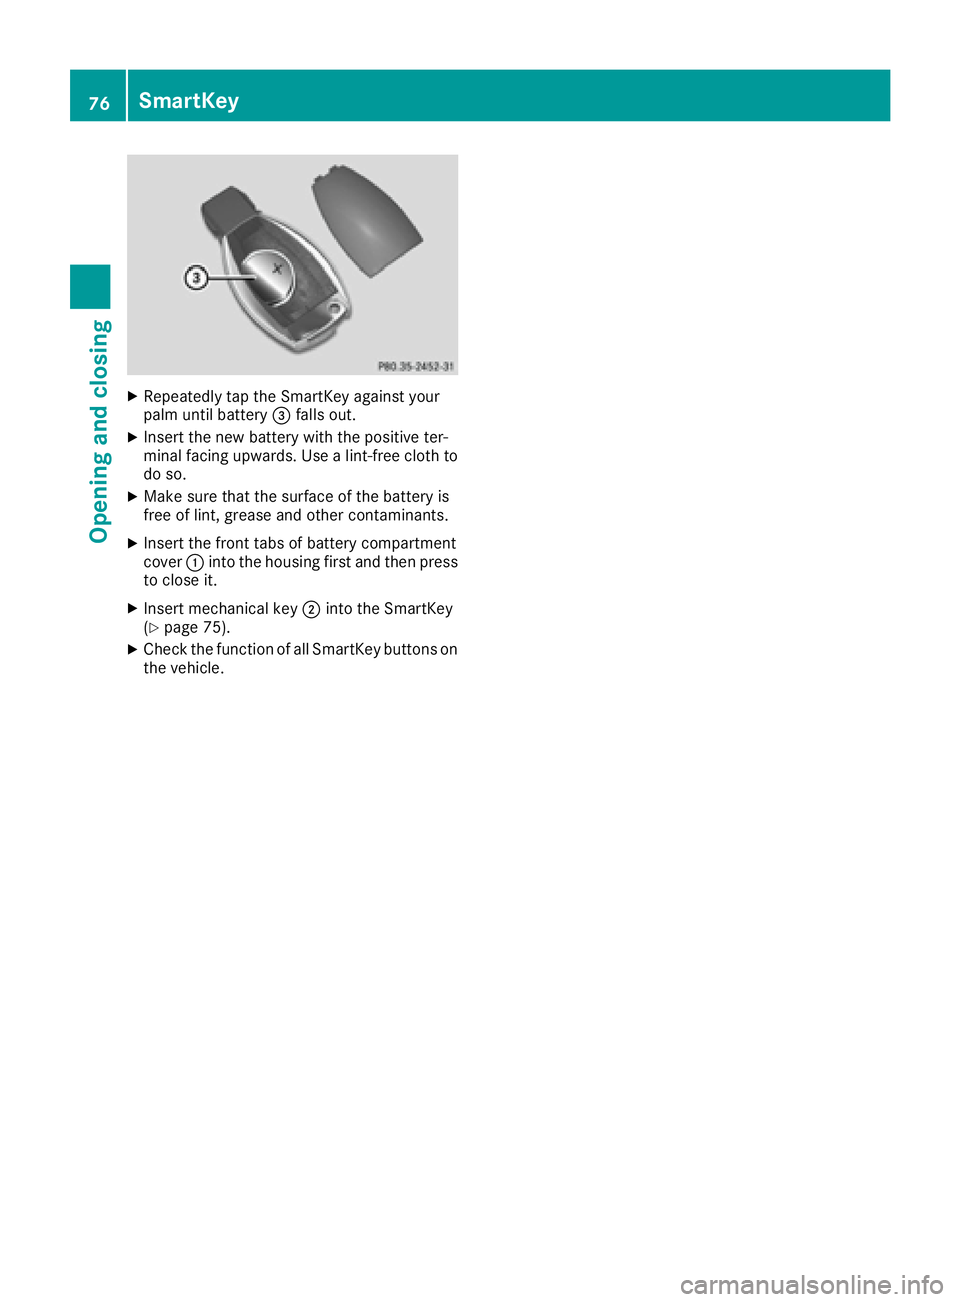
XRepeatedly tap theSmartKey against your
palm until battery =falls out .
XInsertth ene wbattery wit hth epositive ter-
minal facing upwards. Use alint-free cloth to
do so.
XMak esur ethat th esurfac eof th ebattery is
free of lint, grease and other contaminants.
XInser tth efron ttab sof battery compartmen t
cover :intoth ehousing first and then press
to close it .
XInsertmechanical ke y; intoth eSmartKey
(Ypage 75).
XChec kth efunction of all SmartKey buttons on
th evehicle.
76SmartKey
Opening and closing
Page 81 of 382
Unlocking and opening doors from
the inside
You can open a door from inside the vehicle
even if it has been locked. You can only open the
rear doors from inside the vehicle if they are notsecured by the child-proof locks (
Ypage 59).
If the vehicle has previously been locked from
the outside, opening a door from the inside will
trigger the anti-theft alarm system. Switch off
the alarm (
Ypage 70).
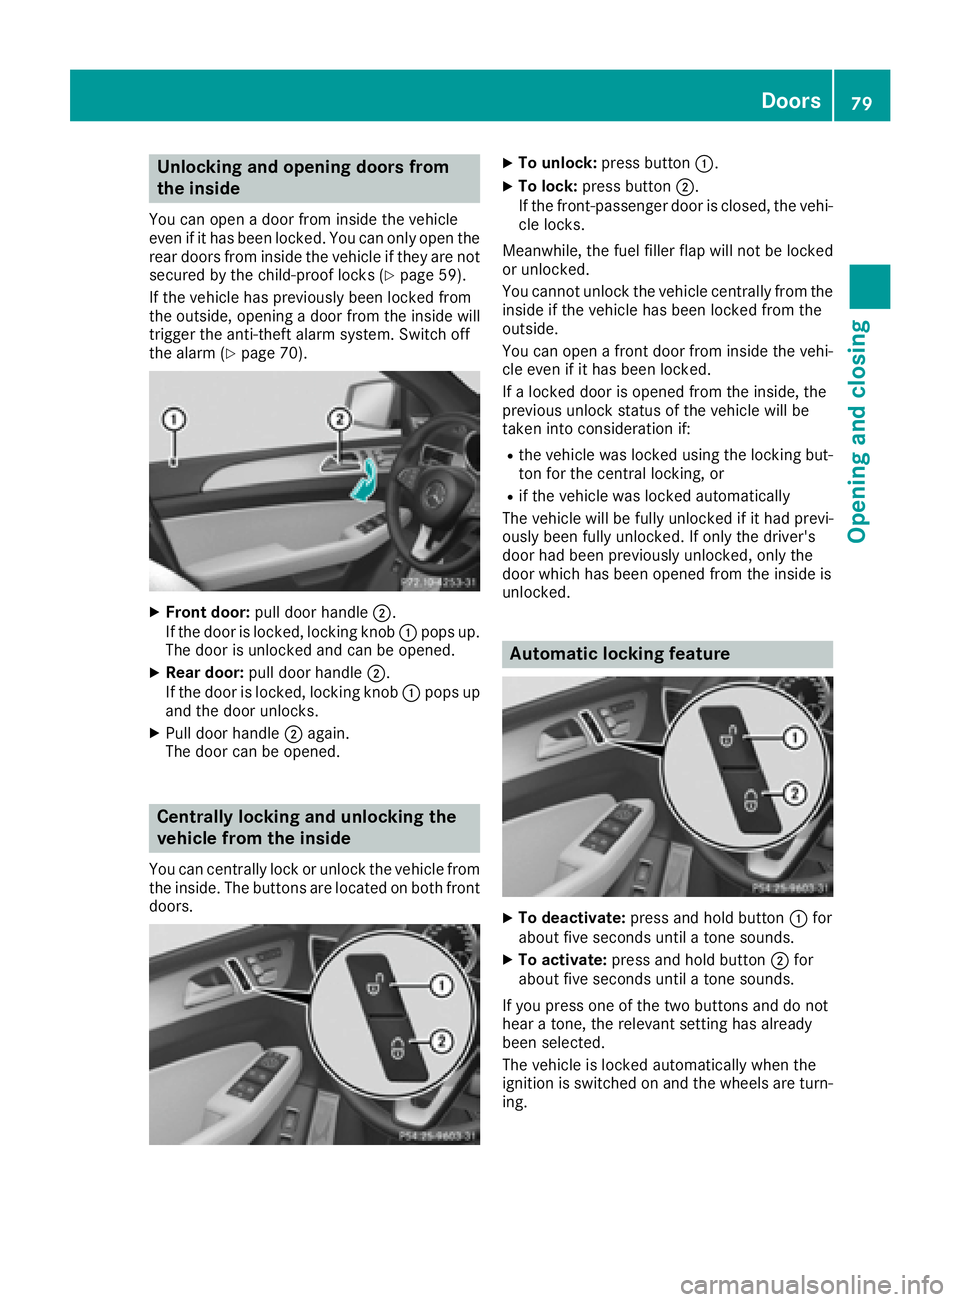
XFront door: pull door handle ;.
If the door is locked, locking knob :pops up.
The door is unlocked and can be opened.
XRear door: pull door handle ;.
If the door is locked, locking knob :pops up
and the door unlocks.
XPull door handle ;again.
The door can be opened.
Centrally locking and unlocking the
vehicle from the inside
You can centrally lock or unlock the vehicle from
the inside. The buttons are located on both front
doors.
XTo unlock: press button :.
XTo lock:press button ;.
If the front-passenger door is closed, the vehi-
cle locks.
Meanwhile, the fuel filler flap will not be locked
or unlocked.
You cannot unlock the vehicle centrally from the
inside if the vehicle has been locked from the
outside.
You can open a front door from inside the vehi-
cle even if it has been locked.
If a locked door is opened from the inside, the
previous unlock status of the vehicle will be
taken into consideration if:
Rthe vehicle was locked using the locking but-
ton for the central locking, or
Rif the vehicle was locked automatically
The vehicle will be fully unlocked if it had previ-
ously been fully unlocked. If only the driver's
door had been previously unlocked, only the
door which has been opened from the inside is
unlocked.
Automatic locking feature
XTo deactivate: press and hold button :for
about five seconds until a tone sounds.
XTo activate: press and hold button ;for
about five seconds until a tone sounds.
If you press one of the two buttons and do not
hear a tone, the relevant setting has already
been selected.
The vehicle is locked automatically when the
ignition is switched on and the wheels are turn-
ing.
Doors79
Opening and closing
Z
Page 97 of 382
Seats
Important safety notes
GWARNING
Children could become trapped if they adjust
the seats, particularly when unattended.
There is a risk of injury.
When leaving the vehicle, always take the
SmartKey with you and lock the vehicle. Never
leave children unsupervised in the vehicle.
The seats can still be adjusted when there is no
SmartKey in the ignition lock.
GWARNING
When you adjust a seat, you or other vehicle
occupants could become trapped, e.g. on the seat guide rail. There is a risk of injury.
Make sure when adjusting a seat that no one
has any body parts in the sweep of the seat.
Observe the safety notes on "Air bags"
(
Ypage 43) and "Children in the Vehicle"
(Ypage 54).
GWARNING
You could lose control of your vehicle if you do the following while driving:
Radjust the driver's seat, head restraint,
steering wheel or mirrors
Rfasten the seat belt
There is a risk of an accident.
Adjust the driver's seat, head restraint, steer-
ing wheel and mirror and fasten your seat belt before starting the engine.
GWARNING
If you adjust the seat height carelessly, you or
other vehicle occupants could be trapped and
thereby injured. Children in particular could
accidentally press the electrical seat adjust-
ment buttons and become trapped. There is a
risk of injury.
While moving the seats, make sure that your
hands or other body parts do not get under the
lever assembly of the seat adjustment sys-
tem.
GWARNING
If the head restraints are not installed or not
adjusted correctly, they cannot provide pro-
tection as intended. There is an increased risk
of injury in the head and neck area, e.g. in the event of an accident or when braking.
Always drive with the head restraints instal-
led. Before driving off, make sure for every
vehicle occupant that the center of the head
restraint supports the back of the head at
about eye level.
GWARNING
The seat belt does not offer the intended level of protection if you have not moved the back-
rest to an almost vertical position. When brak-
ing or in the event of an accident, you could
slide underneath the seat belt and sustain
abdomen or neck injuries, for example. This
poses an increased risk of injury or even fatal injury.
Adjust the seat properly before beginning
your journey. Always ensure that the backrest
is in an almost vertical position and that the
shoulder section of your seat belt is routed
across the center of your shoulder.
!To avoid damage to the seats and the seat
heating, observe the following information:
Rkeep liquids from spilling on the seats. If
liquid is spilled on the seats, dry them as
soon as possible.
Rif the seat covers are damp or wet, do not
switch on the seat heating. The seat heat-
ing should also not be used to dry the seats.
Rclean the seat covers as recommended;
see "Interior care".
Rdo not transport heavy loads on the seats.
Do not place sharp objects on the seat
cushions, e.g. knives, nails or tools. The
seats should only be occupied by passen-
gers, if possible.
Rwhen the seat heating is in operation, do
not cover the seats with insulating materi-
als, e.g. blankets, coats, bags, seat covers,
child seats or booster seats.
!Make sure that there are no objects in the
footwell under or behind the seats when mov-
Seats95
Seats, steering wheel and mirrors
Z
Page 102 of 382
Problems with the seat heating
ProblemPossible causes/consequences andMSolutions
The seat heating has
switched off prematurely
or cannot be switched
on.The on-board voltage is too low because too many electrical consum-
ers are switched on.
XSwitch off electrical consumers that you do not need, such as the
rear window defroster or interior lighting.
Once the battery is sufficiently charged, the seat heating will switch
back on automatically.
Switching the seat ventilation on/off
Switching on/off
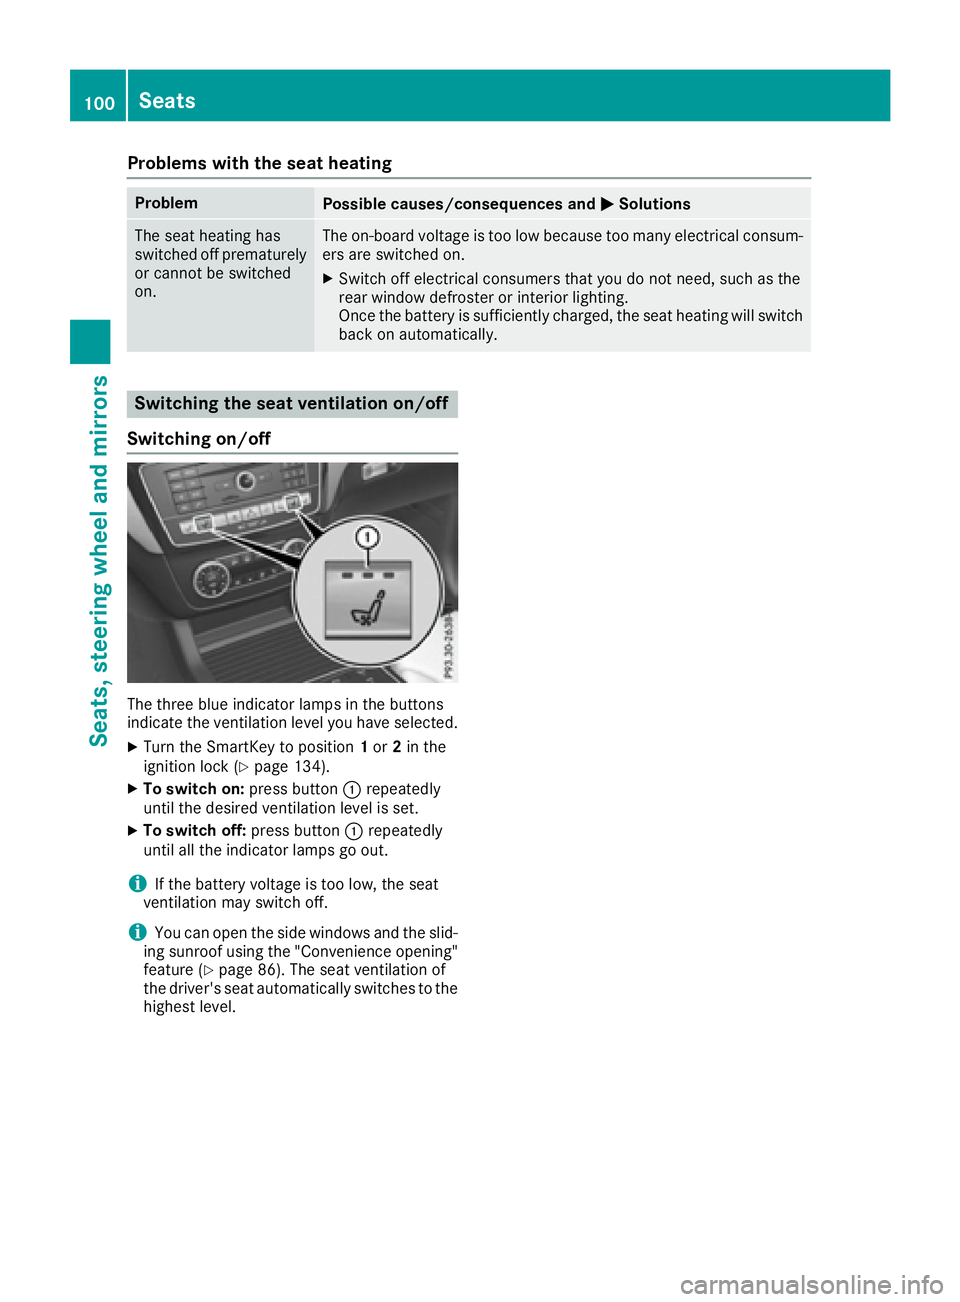
The three blue indicator lamps in the buttons
indicate the ventilation level you have selected.
XTurn the SmartKey to position 1or 2in the
ignition lock (Ypage 134).
XTo switch on: press button:repeatedly
until the desired ventilation level is set.
XTo switch off: press button:repeatedly
until all the indicator lamps go out.
iIf the battery voltage is too low, the seat
ventilation may switch off.
iYou can open the side windows and the slid-
ing sunroof using the "Convenience opening"
feature (
Ypage 86). The seat ventilation of
the driver's seat automatically switches to the
highest level.
100Seats
Seats, steering wheel and mirrors