2016 MERCEDES-BENZ GLE-CLASS COUPE ECO mode
[x] Cancel search: ECO modePage 123 of 382
ADirects the airflow through the footwell vents
BSwitches the seat heating on the left-hand side on/off
Optimum use of dual-zone climate
control
The following contains notes and recommenda-
tions on optimum use of dual-zone climate con-
trol.
RYou can switch on climate control by using the
Ãand¿ orà andÁ buttons.
The indicator lamps in the Ãand
¿ buttons or the ÃandÁ buttons
light up.
RSet the temperature to 72 ‡ (22 †).
ROnly use the "Windshield defrosting" function
briefly until the windshield is clear again.
ROnly use air-recirculation mode briefly, e.g. if
there are unpleasant outside odors or when in
a tunnel. The windows could otherwise fog up,
since no fresh air is drawn into the vehicle in
air-recirculation mode.
RUse the ZONE function to adopt the temper-
ature settings on the driver's side for the
front-passenger side as well. The indicator
lamp above the ábutton goes out.
RIf you change the settings of the climate con-
trol system, the climate status display
appears for approximately three seconds at
the bottom of the screen in the multimedia
system display. You will see the current set-
tings of the various climate control functions.
During automatic engine switch-off, the climate
control system only operates at a reduced capa-
city. If you require the full cl
imate control output,
you can switch off the ECO start/stop function
by pressing the ECO button (
Ypage 139).
Overview of climatecont rol systems121
Climate control
Page 126 of 382
Optimum use of 3-zone automatic cli-
mate control
The following contains instructions and recom-
mendations to enable you to get the most out of
your 3-zone automatic climate control.
RActivate climate control using theÃand
¿ buttons. The indicator lamps above the
à and¿ buttons light up.
RIn automatic mode, you can also use the ñ
button to set a climate mode (FOCUS/
MEDIUM/DIFFUSE). The MEDIUM level is
recommended.
RSet the temperature to 72 ‡ (22 †).
ROnly use the "Windshield defrosting" function
briefly until the windshield is clear again.
ROnly use air-recirculation mode briefly, e.g. if
there are unpleasant outside odors or when in
a tunnel. The windows could otherwise fog up, since no fresh air is drawn into the vehicle in
air-recirculation mode.
RUse the ZONE function to adopt the temper-
ature settings on the driver's side for the
front-passenger side and the rear compart-
ment as well. The indicator lamp above the
á button goes out.
RUse the residual heat function if you want to
heat or ventilate the vehicle interior when the
ignition is switched off. The residual heat
function can only be activated or deactivated with the ignition switched off.
RIf you change the settings of the climate con-
trol system, the climate status display
appears for approximately three seconds at
the bottom of the screen in the multimedia
system display. You will see the current set-
tings of the various climate control functions.
During automatic engine switch-off, the climate
control system only operates at a reduced capa-
city. If you require the full climate control output,
you can switch off the ECO start/stop function
by pressing the ECO button (
Ypage 139).
Operating the climate control sys-
tems
Activating/deactivating climate con-
trol
General notes
When the climate control is switched off, the air
supply and air circulation are also switched off.
The windows could fog up. Therefore, switch off
climate control only briefly
iSwitch on climate control primarily using
the à button (Ypage 126).
In the rear compartment, you can also switch
climate control on and off using the Ãand
^ buttons.
Activating or deactivating
XTurn the SmartKey to position 2in the ignition
lock (Ypage 134).
XTo activate: press theÃbutton.
The indicator lamp in the Ãbutton lights
up. Airflow and air distribution are set to auto-
matic mode.
or
XPress the ^button.
The indicator lamp in the ^button goes
out. The previously selected settings are
restored.
XTo deactivate: press the^button.
The indicator lamp in the ^button lights
up.
Switching cooling with air dehumidi-
fication on/off
General notes
If you deactivate the "Cooling with air-dehumid-
ification" function, the air inside the vehicle will
not be cooled. The air inside the vehicle will also
not be dehumidified. The windows can fog up
more quickly. Therefore, only deactivate the
"Cooling with air-dehumidification" function
briefly.
The "Cooling with air dehumidification" function is only available when the engine is running. The
air inside the vehicle is cooled and dehumidified
according to the temperature selected.
124Operating the climate control systems
Climate control
Page 137 of 382
To start the vehicle without actively using the
SmartKey:
Rthe Start/Stop button must be inserted in the
ignition lock.
Rthe SmartKey must be in the vehicle.
Rthe vehicle must not be locked with the
SmartKey or KEYLESS-GO (Ypage 73).
Do not keep the SmartKey:
Rwith electronic devices, e.g. a mobile phone
or another SmartKey.
Rwith metallic objects, e.g. coins or metal foil.
Rinside metallic objects, e.g. a metal case.
This can affect the functionality of the Smart- Key.
Do not keep the SmartKey in the temperature-
controlled cup holder (
Ypage 286). Otherwise
the SmartKey will not be detected.
If you lock the vehicle with the SmartKey's
remote control or with KEYLESS-GO, after a
short time:
Ryou will not be able to switch on the ignition
with the Start/Stop button.
Ryou will not be able to start the engine with the
Start/Stop button until the vehicle is
unlocked again.
If you lock the vehicle centrally using the button
on the front door (
Ypage 79), you can continue
to start the engine with the Start/Stop button.
The engine can be switched off while the vehicle
is in motion by pressing and holding the Start/
Stop button for three seconds. This function
operates independently of the ECO start/stop
automatic engine switch-off function.
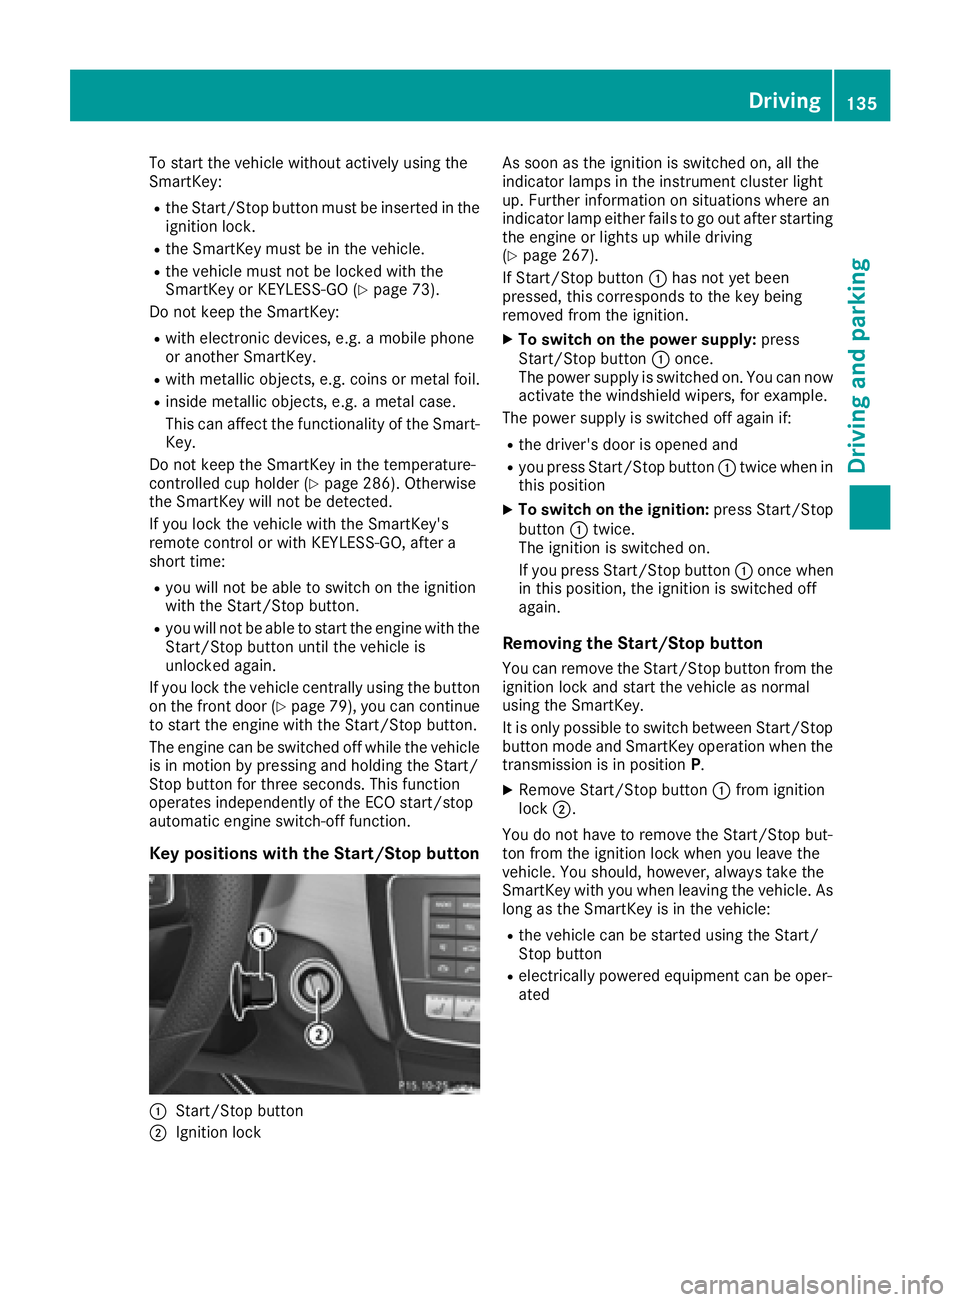
Key positions with the Start/Stop button
:Start/Stop button
;Ignition lock As soon as the ignition is switched on, all the
indicator lamps in the instrument cluster light
up. Further information on situations where an
indicator lamp either fails to go out after starting
the engine or lights up while driving
(
Ypage 267).
If Start/Stop button :has not yet been
pressed, this corresponds to the key being
removed from the ignition.
XTo switch on the power supply: press
Start/Stop button :once.
The power supply is switched on. You can now activate the windshield wipers, for example.
The power supply is switched off again if:
Rthe driver's door is opened and
Ryou press Start/Stop button :twice when in
this position
XTo switch on the ignition: press Start/Stop
button :twice.
The ignition is switched on.
If you press Start/Stop button :once when
in this position, the ignition is switched off
again.
Removing the Start/Stop button
You can remove the Start/Stop button from the
ignition lock and start the vehicle as normal
using the SmartKey.
It is only possible to switch between Start/Stop button mode and SmartKey operation when the
transmission is in position P.
XRemove Start/Stop button :from ignition
lock ;.
You do not have to remove the Start/Stop but-
ton from the ignition lock when you leave the
vehicle. You should, however, always take the
SmartKey with you when leaving the vehicle. As
long as the SmartKey is in the vehicle:
Rthe vehicle can be started using the Start/
Stop button
Relectrically powered equipment can be oper-
ated
Driving135
Driving and parking
Z
Page 138 of 382
Starting the engine
Important safety notes
GWARNING
If children are left unsupervised in the vehicle,
they could:
Ropen the doors, thus endangering other
people or road users.
Rget out and disrupt traffic.
Roperate the vehicle's equipment.
Additionally, children could set the vehicle in
motion if, for example, they:
Rrelease the parking brake.
Rshifting the automatic transmission out of
park position P
RStart the engine.
There is a risk of an accident and injury.
When leaving the vehicle, always take the
SmartKey with you and lock the vehicle. Never
leave children or animals unattended in the
vehicle. Always keep the SmartKey out of
reach of children.
GWARNING
Combustion engines emit poisonous exhaust
gases such as carbon monoxide. Inhaling
these exhaust gases leads to poisoning. There
is a risk of fatal injury. Therefore never leave
the engine running in enclosed spaces with-
out sufficient ventilation.
GWARNING
Flammable materials introduced through
environmental influence or by animals can
ignite if in contact with the exhaust system or
parts of the engine that heat up. There is a risk
of fire.
Carry out regular checks to make sure that
there are no flammable foreign materials in
the engine compartment or in the exhaust
system.
!Do not depress the accelerator when start-
ing the engine.
General notes
Vehicles with a gasoline engine: the catalytic
converter is preheated for up to 30 seconds
after a cold start. The sound of the engine may
change during this time.
Automatic transmission
XShift the transmission to position P
(Ypage 143).
The transmission position display in the mul-
tifunction display shows P(
Ypage 143).
iYou can start the engine in transmission
position Pand N.
Starting procedure with the SmartKey
XTo start a diesel engine : turn the SmartKey
to position 2in the ignition lock (Ypage 134).
The % preglow indicator lamp in the instru-
ment cluster lights up.
XTurn the SmartKey to position 3in the ignition
lock and release it as soon as the engine is
running (
Ypage 134).
iVehicles with a diesel engine: you can
start the engine without preglow if the engine
is warm.
Using KEYLESS-GO to start the engine
The Start/Stop button can be used to start the
vehicle without inserting the SmartKey into the
ignition lock. The Start/Stop button must be
inserted in the ignition lock and the SmartKey
must be in the vehicle. This mode for starting the
engine operates independently of the ECO
start/stop automatic engine start function.
XDepress the brake pedal and keep it
depressed.
XPress the Start/Stop button once
(Ypage 134).
Vehicles with a gasoline engine: the engine
starts.
Vehicles with a diesel engine: preglow is
activated and the engine starts.
Starting procedure via smartphone
Observe the important safety notes on starting
the engine (Ypage 136).
136Driving
Driving and parking
Page 148 of 382

Kickdown
Use kickdown for maximum acceleration.
XDepress theaccelerato rpedal beyon dth e
pressur epoint.
The automatic transmission shift sto alower
gear depending on th eengin espeed.
XEas eoff th eaccelerato rpedal once th e
desire dspeed is reached.
The automatic transmission shift sbac kup.
Rocking the vehicle free
Shifting th etransmission repeatedly between
gear sD and Rmay help to free th evehicl eif it
has become stuck in slus hor snow. The vehi-
cle's engin emanagemen tsystem limits th e
speed to amaximum of 5mph (9 km/h) when
shifting bac kand forth .To shift bac kand forth
between transmission position sD and R,mov e
th eDIRECT SELECT lever up and down past th e
poin tof resistance.
Gliding mode
All vehicles (excep tMercedes-AM G vehi-
cles)
Glidin gmod eis characterized by th efollowing:
Rth ecombustion engin eis disconnected from
th edrive train .
Rtheengin espeed correspond sto th eidlin g
speed.
Rth egear indicated after th etransmission
position Ddisappear sin th emultifunction
display (
Ypage 143).
Glidin gmod ecan be activated under th efollow-
ing conditions:
Ryou select th e"ECO "setting for th edrive sys-
te m within th eIndividua ldrive program. You
can fin dinformation about this in th eDigital
Operator' sManual.
Rth espeed is within asuitable range.
Rth ecours eof th eroad is suitable, e.g. there
are no steep up or downhill gradients .
Ryou are no longer depressing theaccelerato r
pedal .
Glidin gmod eis deactivated under th efollowin g
conditions:
Ryou depress th eaccelerato rpedal .
Ryou depress th ebrak epedal .
Ryou use th eDIRECT SELECT lever to switch
th etransmission position (Ypage 142).
Ruse theDYNAMIC SELECT controller to
chang eth edrive progra m (Ypage 142).
Ryou activatemanual gearshifting
(Ypage 147).
Ryou leav eth esuitable speed range.
Mercedes-AMG vehicles
Glidin gmod eis characterized by th efollowing:
Rth ecombustion engin eis disconnected from
th edrive train .
Rtheengin espeed corresponds to th eidlin g
speed.
Rin th emultifunction display, th egliding sym-
bol appear sin th edrive progra mdisplay.
Glidin gmod ecan be activated under th efollow-
ing conditions:
Rth eComfor tdrive progra mis activated or you
select th e"Comfort" setting for th edrive sys-
te m within th eIndividua ldrive program. You
can fin dinformation about this in th eDigital
Operator' sManual.
Rth eECO start/sto pfunction is activated.
Ryou are drivin gcarefully wit hlow acceleration
of th evehicle.
Rth eengin eis at normal operating tempera-
ture.
Rth espeed is within asuitable range.
Rth ecours eof th eroa dis suitable, e.g. there
are no steep up or downhill gradients .
Ryou are no longer depressing theaccelerato r
pedal .
Glidin gmod eis deactivated under th efollowin g
conditions:
Ryou hav edeactivated th eECO start/sto p
function .
Ryou depress th eaccelerato rpedal .
Ryou depress th ebrak epedal .
Ryou use th eDIRECT SELECT lever to switch
th etransmission position (Ypage 142).
Ruse theDYNAMIC SELECT controller to
chang eth edrive progra m (Ypage 142).
Ryou activatemanual gearshifting
(Ypage 147).
Ryou leav eth esuitable speed range.
146Automatic transmission
Driving an d parking
Page 152 of 382
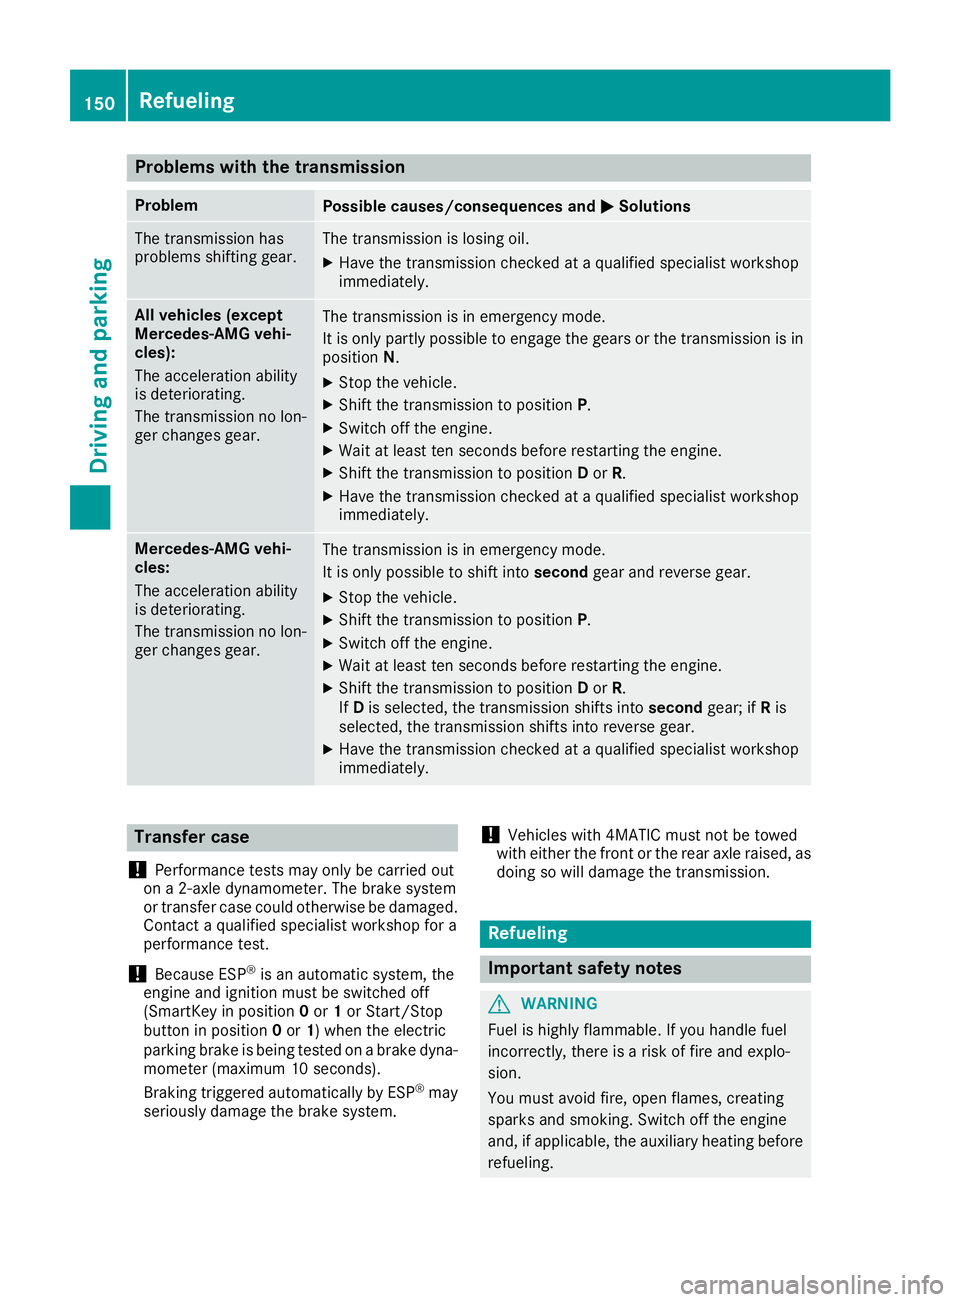
Problems with the transmission
ProblemPossible causes/consequences andMSolutions
The transmission has
problems shifting gear.The transmission is losing oil.
XHave the transmission checked at a qualified specialist workshop
immediately.
All vehicles (except
Mercedes-AMG vehi-
cles):
The acceleration ability
is deteriorating.
The transmission no lon-
ger changes gear.The transmission is in emergency mode.
It is only partly possible to engage the gears or the transmission is in
positionN.
XStop the vehicle.
XShift the transmission to position P.
XSwitch off the engine.
XWait at least ten seconds before restarting the engine.
XShift the transmission to positionDor R.
XHave the transmission checked at a qualified specialist workshop
immediately.
Mercedes-AMG vehi-
cles:
The acceleration ability
is deteriorating.
The transmission no lon-
ger changes gear.The transmission is in emergency mode.
It is only possible to shift into secondgear and reverse gear.
XStop the vehicle.
XShift the transmission to position P.
XSwitch off the engine.
XWait at least ten seconds before restarting the engine.
XShift the transmission to positionDor R.
If D is selected, the transmission shifts into secondgear; ifRis
selected, the transmission shifts into reverse gear.
XHave the transmission checked at a qualified specialist workshop
immediately.
Transfer case
!
Performance tests may only be carried out
on a 2-axle dynamometer. The brake system
or transfer case could otherwise be damaged.
Contact a qualified specialist workshop for a
performance test.
!Because ESP®is an automatic system, the
engine and ignition must be switched off
(SmartKey in position 0or 1or Start/Stop
button in position 0or 1) when the electric
parking brake is being tested on a brake dyna-
mometer (maximum 10 seconds).
Braking triggered automatically by ESP
®may
seriously damage the brake system.
!Vehicles with 4MATIC must not be towed
with either the front or the rear axle raised, as
doing so will damage the transmission.
Refueling
Important safety notes
GWARNING
Fuel is highly flammable. If you handle fuel
incorrectly, there is a risk of fire and explo-
sion.
You must avoid fire, open flames, creating
sparks and smoking. Switch off the engine
and, if applicable, the auxiliary heating before refueling.
150Refueling
Driving and parking
Page 162 of 382
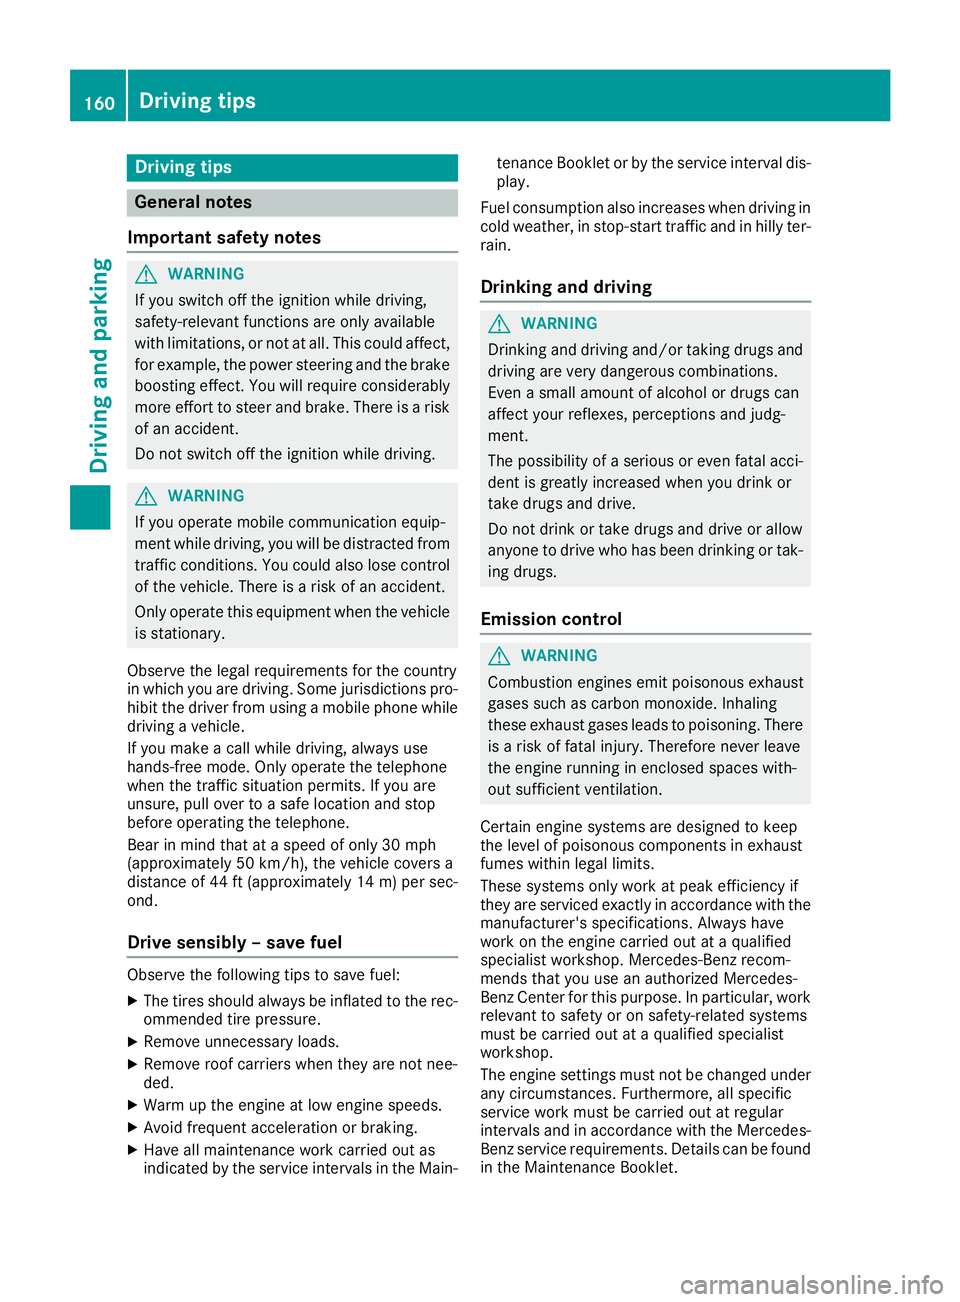
Drivingtips
General notes
Important safet ynotes
GWARNING
If you switch of fth eignition whil edriving,
safety-relevant function sare only available
wit hlimitations, or no tat all. Thi scould affect,
fo rexample, th epowe rsteerin gand th ebrake
boostin geffect .You will require considerably
more effort to steer and brake .There is aris k
of an accident.
Do no tswitch of fth eignition whil edriving.
GWARNING
If you operat emobile communication equip -
men twhil edriving, you will be distracted from
traffic conditions. You could also los econtro l
of th evehicle. There is aris kof an accident.
Only operat ethis equipmen twhen th evehicle
is stationary.
Observ eth elega lrequirements fo rth ecountry
in whic hyou are driving. Some jurisdiction spro -
hibi tth edriver from usin g amobile phone whil e
drivin g avehicle.
If you mak e acallwhil edriving, always use
hands-free mode. Only operat eth etelephon e
when th etraffic situation permits. If you are
unsure ,pull over to asaf elocation and stop
befor eoperatin gth etelephone.
Bear in min dthat at aspeed of only 30 mph
(approximately 50 km/h), th evehicle cover s a
distanc eof 44 ft (approximately 14 m)per sec-
ond.
Drive sensibly – save fuel
Observe the following tips to save fuel:
XThe tires should always be inflated to the rec-
ommended tire pressure.
XRemove unnecessary loads.
XRemove roof carriers when they are not nee-
ded.
XWarm up the engine at low engine speeds.
XAvoid frequent acceleration or braking.
XHave all maintenance work carried out as
indicated by the service intervals in the Main- tenance Booklet or by the service interval dis-
play.
Fuel consumption also increases when driving in
cold weather, in stop-start traffic and in hilly ter-
rain.
Drinking and driving
GWARNING
Drinking and driving and/or taking drugs and driving are very dangerous combinations.
Even a small amount of alcohol or drugs can
affect your reflexes, perceptions and judg-
ment.
The possibility of a serious or even fatal acci-
dent is greatly increased when you drink or
take drugs and drive.
Do not drink or take drugs and drive or allow
anyone to drive who has been drinking or tak-
ing drugs.
Emission control
GWARNING
Combustion engines emit poisonous exhaust
gases such as carbon monoxide. Inhaling
these exhaust gases leads to poisoning. There
is a risk of fatal injury. Therefore never leave
the engine running in enclosed spaces with-
out sufficient ventilation.
Certain engine systems are designed to keep
the level of poisonous components in exhaust
fumes within legal limits.
These systems only work at peak efficiency if
they are serviced exactly in accordance with the
manufacturer's specifications. Always have
work on the engine carried out at a qualified
specialist workshop. Mercedes-Benz recom-
mends that you use an authorized Mercedes-
Benz Center for this purpose. In particular, work
relevant to safety or on safety-related systems
must be carried out at a qualified specialist
workshop.
The engine settings must not be changed under any circumstances. Furthermore, all specific
service work must be carried out at regular
intervals and in accordance with the Mercedes-
Benz service requirements. Details can be found in the Maintenance Booklet.
160Driving tips
Driving and parking
Page 163 of 382
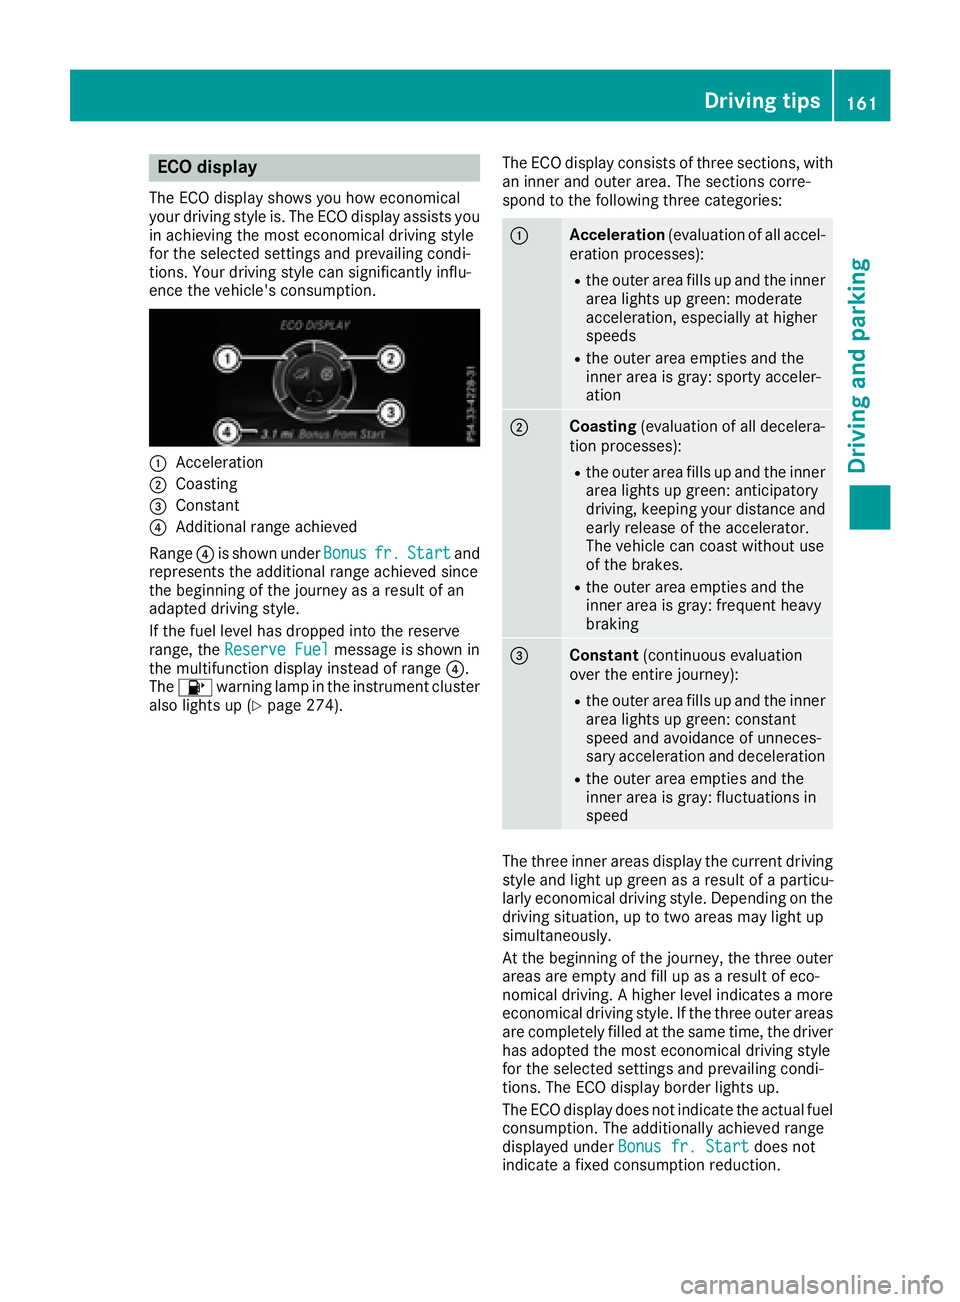
ECO display
The ECO display shows you how economical
your driving style is. The ECO display assists you
in achieving the most economical driving style
for the selected settings and prevailing condi-
tions. Your driving style can significantly influ-
ence the vehicle's consumption.
:Acceleration
;Coasting
=Constant
?Additional range achieved
Range ?is shown under Bonus
fr.Startand
represents the additional range achieved since
the beginning of the journey as a result of an
adapted driving style.
If the fuel level has dropped into the reserve
range, the Reserve Fuel
message is shown in
the multifunction display instead of range ?.
The 8 warning lamp in the instrument cluster
also lights up (
Ypage 274). The ECO display consists of three sections, with
an inner and outer area. The sections corre-
spond to the following three categories:
:Acceleration
(evaluation of all accel-
eration processes):
Rthe outer area fills up and the inner area lights up green: moderate
acceleration, especially at higher
speeds
Rthe outer area empties and the
inner area is gray: sporty acceler-
ation
;Coasting (evaluation of all decelera-
tion processes):
Rthe outer area fills up and the inner area lights up green: anticipatory
driving, keeping your distance and
early release of the accelerator.
The vehicle can coast without use
of the brakes.
Rthe outer area empties and the
inner area is gray: frequent heavy
braking
=Constant (continuous evaluation
over the entire journey):
Rthe outer area fills up and the inner area lights up green: constant
speed and avoidance of unneces-
sary acceleration and deceleration
Rthe outer area empties and the
inner area is gray: fluctuations in
speed
The three inner areas display the current driving
style and light up green as a result of a particu-
larly economical driving style. Depending on thedriving situation, up to two areas may light up
simultaneously.
At the beginning of the journey, the three outer
areas are empty and fill up as a result of eco-
nomical driving. A higher level indicates a more
economical driving style. If the three outer areas
are completely filled at the same time, the driver
has adopted the most economical driving style
for the selected settings and prevailing condi-
tions. The ECO display border lights up.
The ECO display does not indicate the actual fuel consumption. The additionally achieved range
displayed under Bonus fr. Start
does not
indicate a fixed consumption reduction.
Driving tips161
Driving and parking
Z