2016 MERCEDES-BENZ GLE-CLASS COUPE warning light
[x] Cancel search: warning lightPage 213 of 382
If a lane-correcting brake application occurs,
display:appears in the multifunction display.
A lane-correcting brake application can be made after driving over a lane marking recognized as
being solid or broken. Before this, a warning
must be given by means of intermittent vibration
in the steering wheel. In addition, a lane with
lane markings on both sides must be recog-
nized.
In the case of a broken lane marking being
detected, a lane-correcting brake application
can only be made if a vehicle has been detected
in the adjacent lane. The following vehicles can
have an influence on brake application: oncom-
ing traffic, vehicles that are overtaking and vehi-
cles that are driving parallel to your vehicle.
iA further lane-correcting brake application
can only occur after your vehicle has returned
to the original lane.
No lane-correcting brake application occurs if:
Ryou clearly and actively steer, brake or accel-
erate.
Ryou cut the corner on a sharp bend.
Ryou have switched on the turn signal.
Ra driving safety system intervenes, e.g. ESP®,
PRE-SAFE®Brake or Active Blind Spot Assist.
Ryou have adopted a sporty driving style with
high cornering speeds or high rates of accel-
eration.
RESP®is switched off.
Rthe transmission is not in position D.
Ron vehicles with a trailer tow hitch, the elec-
trical connection to the trailer has been cor-
rectly established.
Ran obstacle has been detected in the lane in
which you are driving.
Rwhen a loss of tire pressure or a defective tire
has been detected and displayed.
There is a possibility that the Active Lane Keep- ing Assist could misjudge the given traffic sit-
uation. An inappropriate brake application may
be interrupted at any time if you:
Rsteer slightly in the opposite direction
Rswitch on the turn signal
Rclearly brake or accelerate A lane-correcting brake application is interrup-
ted automatically if:
Ra driving safety system intervenes, e.g. ESP®,
PRE-SAFE®Brake or Active Blind Spot Assist
Rlane markings are no longer detected
Switching on Active Lane K eeping Assist
XSwitch on Active Lane Keeping Assist using
the on-board computer; to do so, select
Standard
orAdaptive(Ypage 228).
If you drive at speeds above 40 mph
(60 km/h) and lane markings are detected,
the lines in the assistance graphics display
(
Ypage 227) are shown in green. Active Lane
Keeping Assist is ready for use.
If Standard
is selected, no warning vibration
occurs if:
Ryou switch on the turn signals. In this event,
the warnings are suppressed for a certain
period of time.
Ra driving safety system intervenes, such as
ABS, BAS or ESP®.
When Adaptive
is selected, no warning vibra-
tion occurs if:
Ryou switch on the turn signals. In this event,
the warnings are suppressed for a certain
period of time.
Ra driving safety system intervenes, e.g.
ABS, BAS or ESP®.
Ryou accelerate hard, e.g. kickdown.
Ryou brake hard.
Ryou steer actively, e.g. swerve to avoid an
obstacle or change lanes quickly.
Ryou cut the corner on a sharp bend.
Towing a trailer
When you attach a trailer, make sure you have
correctly established the electrical connection.
This can be accomplished by checking the trailer
lighting. Lane-correcting brake application does
not take place when towing a trailer. Active Lane Keeping Assist is not activated and the lines in
the assistance graphic are gray.
Driving systems211
Driving and parking
Z
Page 218 of 382
Towing a trailer
There are numerous legal requirements con-
cerning the towing of a trailer, e.g. speed restric-tions. Make sure that your car/trailer combina-
tion complies with the local regulations:
Rin your place of residence
Rin the location to which you are driving
The police and local authorities can provide reli- able information.
Observe the following when towing a trailer:
RTo gain driving experience and to become
accustomed to the new handling characteris-
tics, you should practice the following in a
traffic-free location:
-cornering
-stopping
-backing up
RBefore driving, check:
-trailer tow hitch
-safety switch for braked trailers
-safety chains
-electrical connections
-lights
-wheels
RAdjust the exterior mirrors to provide an
unobstructed view of the rear section of the
trailer.
RIf the trailer has electronically controlled
brakes, pull away carefully. Brake manually
using the brake controller and check whether
the brakes function correctly.
RSecure any objects on the trailer to prevent
the cargo from slipping when the vehicle is in
motion.
RWhen you couple up a trailer, check at regular
intervals that the load is firmly secured. If the
tra
iler is equipped with trailer lights and
brakes, check the trailer to ensure that these
are working.
RBear in mind that the handling will be less
stable when towing a trailer than when driving
without one. Avoid sudden steering move-
ments.
RThe vehicle/trailer combination is heavier,
accelerates more slowly, has a decreased
gradient climbing capability and a longer
braking distance.
It is more susceptible to side winds and
requires more careful steering.
RIf possible, do not brake suddenly, but instead depress the brake pedal moderately at first so
that the trailer can activate its brakes. Then
increase the pressure on the brake pedal.
RIf the automatic transmission repeatedly
shifts between gears on uphill or downhill gra-
dients, shift to a lower gear using the left-hand
steering wheel paddle shifter.
A lower gear and lower speed reduce the risk
of engine failure.
RWhen driving downhill, shift to a lower gear toutilize the engine's braking effect.
Avoid continuous brake application as this
may overheat the vehicle brakes and, if instal-
led, the trailer brakes.
RIf the coolant temperature increases dramat-
ically while the air-conditioning system is
switched on, switch off the air-conditioning
system.
Coolant heat can also be dissipated by open-
ing the windows and switching the ventilation blower and the interior temperature to the
highest level.
RWhen overtaking, pay particular attention to
the extended length of your vehicle/trailer
combination.
Due to the length of the vehicle/trailer com-
bination, you require additional road space in
relation to the vehicle you are overtaking
before you can change back to the original
lane.
Decoupling a trailer
GWARNING
If you uncouple a trailer with the overrun
brake engaged, you could trap your hand
between the vehicle and the trailer drawbar.
There is a risk of injury.
Do not uncouple a trailer if the overrun brake
is engaged.
GWARNING
Vehicles with level control:
The vehicle is lowered as soon as you discon-
nect the trailer cable. This could result in your
limbs or those of other people that are
between the vehicle body and tires or under-
216Towing a trailer
Driving an d parking
Page 221 of 382

Useful information
i
This Operator's Manual describes all models
and all standard and optional equipment of
your vehicle available at the time of publica-
tion of the Operator's Manual. Country-spe-
cific differences are possible. Please note
that your vehicle may not be equipped with all
features described. This also applies to
safety-related systems and functions.
iRead the information on qualified specialist
workshops (Ypage 26).
Important safety notes
GWARNING
If you operate information systems and com-
munication equipment integrated in the vehi-
cle while driving, you will be distracted from
traffic conditions. You could also lose control
of the vehicle. There is a risk of an accident.
Only operate the equipment when the traffic
situation permits. If you are not sure that this
is possible, park the vehicle paying attention
to traffic conditions and operate the equip-
ment when the vehicle is stationary.
You must observe the legal requirements for the
country in which you are currently driving when
operating the on-board computer.
GWARNING
If the instrument cluster has failed or mal-
functioned, you may not recognize function
restrictions in systems relevant to safety. The
operating safety of your vehicle may be
impaired. There is a risk of an accident.
Drive on carefully. Have the vehicle checked
at a qualified specialist workshop immedi-
ately.
If the operating safety of your vehicle is
impaired, pull over as soon as it is safe to do so.
Contact a qualified specialist workshop.
The on-board computer only shows messages or
warnings from certain systems in the multifunc-
tion display. You should therefore make sure
your vehicle is operating safely at all times. For an overview, see the instrument panel illus-
tration (
Ypage 31).
Displays and operation
Instrument cluster lighting
The lighting in the instrument cluster, in the dis-
plays and the controls in the vehicle interior can
be adjusted using the brightness control knob.
The brightness control knob is located on the
bottom left of the instrument cluster
(
Ypage 31).
XTurn the brightness control knob clockwise or
counter-clockwise.
If you turn the light switch to Ã,Tor
L, the brightness is dependent upon the
brightness of the ambient light.
iThe light sensor in the instrument cluster
automatically controls the brightness of the
multifunction display.
In daylight, the displays in the instrument
cluster are not illuminated.
Speedometer with segments
The speedometer is divided into segments only
on vehicles with DISTRONIC PLUS.
The segments in the speedometer indicate
which speed range is available.
RDISTRONIC PLUS activated (Ypage 170):
One or two segments in the set speed range
light up.
RDISTRONIC PLUS detects a vehicle in front
that is driving at a slower speed than the
stored speed:
The segments between the speed of the vehi- cle in front and the stored speed light up.
Tachometer
!
Do not drive in the overrevving range, as this
could damage the engine.
The red band in the tachometer indicates the
engine's overrevving range.
The fuel supply is interrupted to protect the
engine when the red band is reached.
Displays and operation219
On-board computer and displays
Z
Page 231 of 382
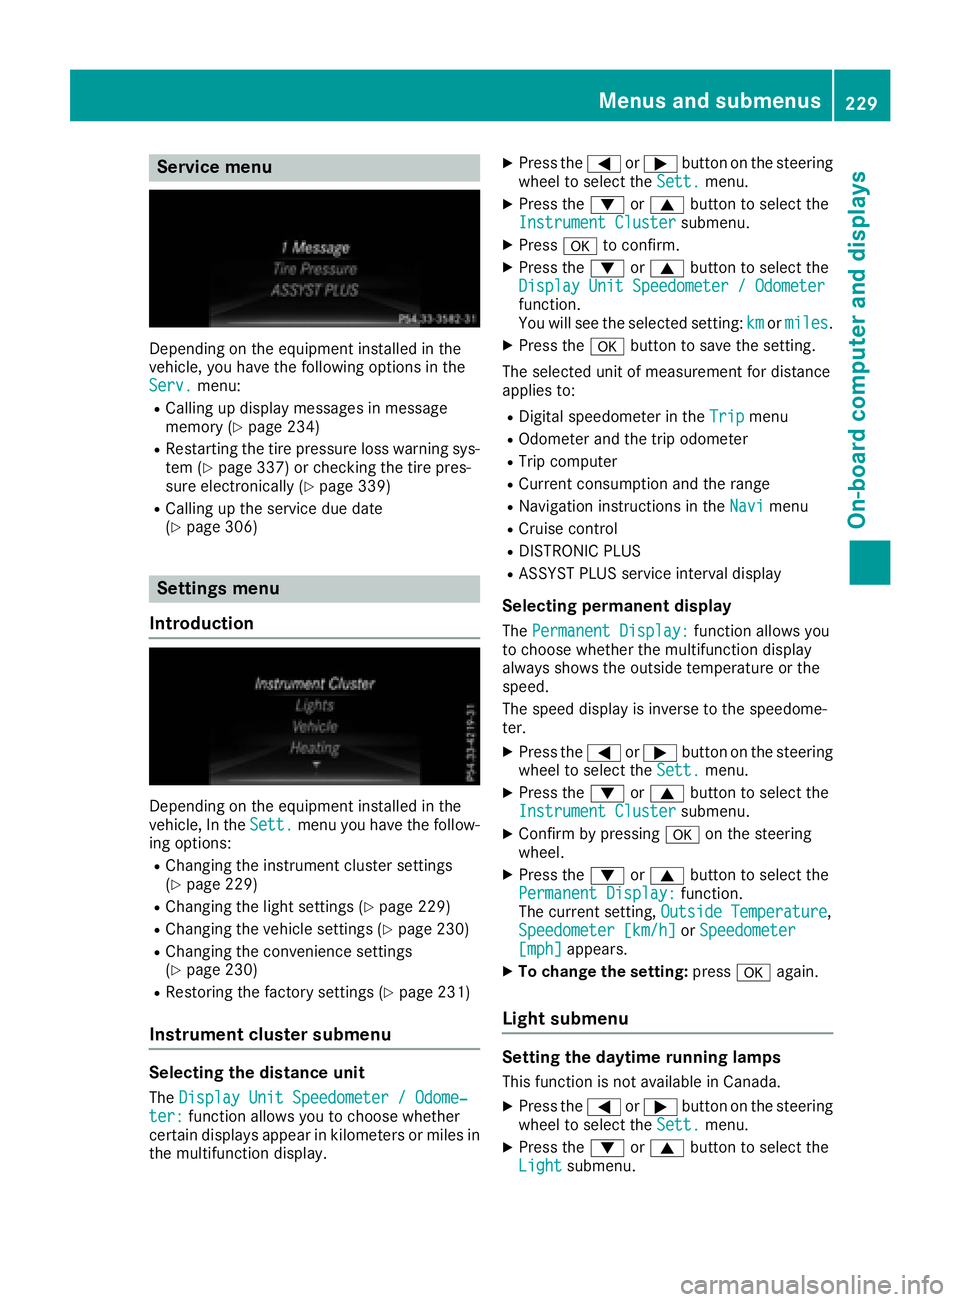
Service menu
Depending on the equipment installed in the
vehicle, you have the following options in the
Serv.
menu:
RCalling up display messages in message
memory (Ypage 234)
RRestarting the tire pressure loss warning sys-
tem (Ypage 337) or checking the tire pres-
sure electronically (Ypage 339)
RCalling up the service due date
(Ypage 306)
Settings menu
Introduction
Depending on the equipment installed in the
vehicle, In the Sett.menu you have the follow-
ing options:
RChanging the instrument cluster settings
(Ypage 229)
RChanging the light settings (Ypage 229)
RChanging the vehicle settings (Ypage 230)
RChanging the convenience settings
(Ypage 230)
RRestoring the factory settings (Ypage 231)
Instrument cluster submenu
Selecting the distance unit
The Display Unit Speedometer / Odome‐ter:function allows you to choose whether
certain displays appear in kilometers or miles in
the multifunction display.
XPress the =or; button on the steering
wheel to select the Sett.menu.
XPress the:or9 button to select the
Instrument Clustersubmenu.
XPress ato confirm.
XPress the :or9 button to select the
Display Unit Speedometer / Odometer
function.
You will see the selected setting: kmormiles.
XPress the abutton to save the setting.
The selected unit of measurement for distance
applies to:
RDigital speedometer in the Tripmenu
ROdometer and the trip odometer
RTrip computer
RCurrent consumption and the range
RNavigation instructions in the Navimenu
RCruise control
RDISTRONIC PLUS
RASSYST PLUS service interval display
Selecting permanent display
ThePermanent Display:function allows you
to choose whether the multifunction display
always shows the outside temperature or the
speed.
The speed display is inverse to the speedome-
ter.
XPress the =or; button on the steering
wheel to select the Sett.menu.
XPress the:or9 button to select the
Instrument Clustersubmenu.
XConfirm by pressing aon the steering
wheel.
XPress the :or9 button to select the
Permanent Display:function.
The current setting, Outside Temperature,
Speedometer [km/h]or Speedometer[mph]appears.
XTo change the setting: pressaagain.
Light submenu
Setting the daytime running lamps
This function is not available in Canada.
XPress the =or; button on the steering
wheel to select the Sett.menu.
XPress the:or9 button to select the
Lightsubmenu.
Menus and submenus229
On-board computer and displays
Z
Page 232 of 382
XPressato confirm.
XPress :or9 to select the DaytimeRunning Lightsfunction.
If the DaytimeRunningLightsfunction has
been switched on, the cone of light and the
W symbol in the multifunction display are
shown in orange.
XPress the abutton to save the setting.
Further information on daytime running lamps
(
Ypage 108).
Vehicle submenu
Activating/deactivating the automatic
door locking mechanism
If you activate the AutomaticDoorLockfunc-
tion, the vehicle is centrally locked above a
speed of approximately 9 mph (15 km/ h).
XPress the =or; button on the steering
wheel to select the Sett.menu.
XPress the:or9 button to select the
Vehiclesubmenu.
XPress ato confirm.
XPress the :or9 button to select the
Automatic Door Lockfunction.
When the Automatic Door Lockfunction is
activated, the vehicle doors are displayed in
orange in the multifunction display.
XPress the abutton to save the setting.
For further information on the automatic locking feature, see (
Ypage 79).
Activating/deactivating the acoustic
locking verification signal
If you switch on the AcousticLockfunction, an
acoustic signal sounds when you lock the vehi-
cle.
XPress the =or; button on the steering
wheel to select the Settingsmenu.
XPress the:or9 button to select the
Vehiclesubmenu.
XPress ato confirm.
XPress the :or9 button to select the
Acoustic Lockfunction.
If the Acoustic Lockfunction is activated,
the & symbol in the multifunction display
lights up orange.
XPress the abutton to save the setting.
Convenience submenu
Activating/deactivating the EASY-
ENTRY/EXIT feature
GWARNING
When the EASY-ENTRY/EXIT feature adjusts
the steering wheel, you and other vehicle
occupants – particularly children – could
become trapped. There is a risk of injury.
While the EASY-ENTRY/EXIT feature is mak-
ing adjustments, make sure that no one has
any body parts in the sweep of the steering
wheel.
If somebody becomes trapped:
Rpress one of the memory function position
buttons, or
Rmove the switch for steering wheel adjust-
ment in the opposite direction to that in
which the steering wheel is moving.
The adjustment process is stopped.
XPress the =or; button on the steering
wheel to select the Sett.menu.
XPress the:or9 button to select the
Conveniencesubmenu.
XPress ato confirm.
XUsing :or9, select the EasyEntry/Exitfunction.
If the EasyEntry/Exitfunction is activated,
the vehicle steering wheel is displayed in
orange in the multifunction display.
XPress the abutton to save the setting.
Further information on the EASY-ENTRY/EXIT
feature (
Ypage 103).
Switching the belt adjustment on/off
XPress the =or; button on the steering
wheel to select the Settingsmenu.
XPress the:or9 button to select the
Conveniencesubmenu.
XPress ato confirm.
XPress the :or9 button to select the
Belt Adjustmentfunction.
If the BeltAdjustmentfunction is activated,
the vehicle seat belt is shown in orange in the
multifunction display.
XPress the abutton to save the setting.
230Menus and submenus
On-board computer and displays
Page 237 of 382
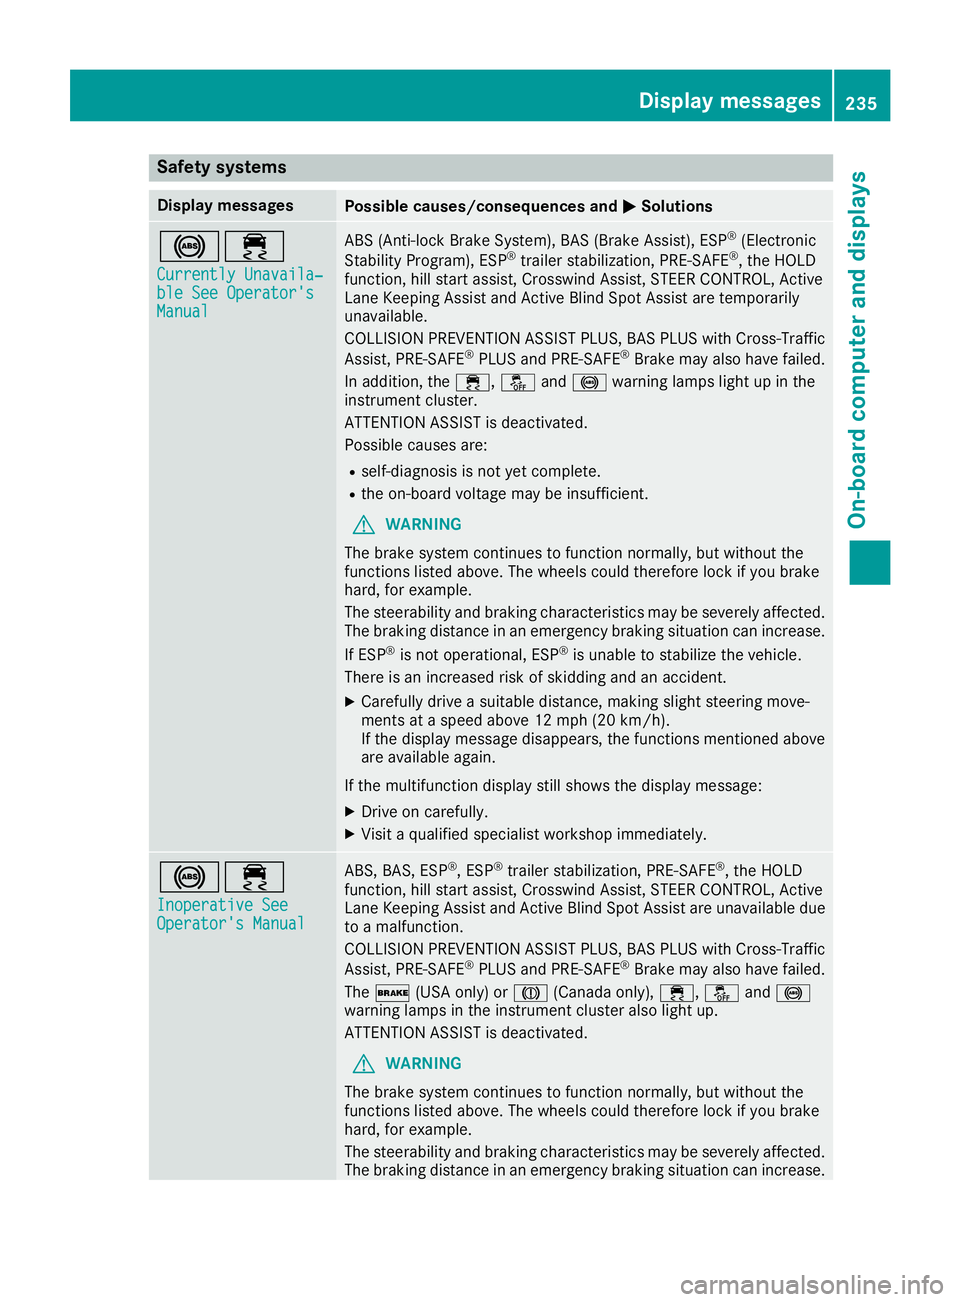
Safety systems
Display messagesPossible causes/consequences andMSolutions
!÷
Currently Unavaila‐ble See Operator'sManual
ABS (Anti-lock Brake System), BAS (Brake Assist), ESP®(Electronic
Stability Program), ESP®trailer stabilization, PRE‑ SAFE®, the HOLD
function, hill start assist, Crosswind Assist, STEER CONTROL, Active
Lane Keeping Assist and Active Blind Spot Assist are temporarily
unavailable.
COLLISION PREVENTION ASSIST PLUS, BAS PLUS with Cross-Traffic
Assist, PRE ‑SAFE
®PLUS and PRE ‑SAFE®Brake may also have failed.
In addition, the ÷,åand! warning lamps light up in the
instrument cluster.
ATTENTION ASSIST is deactivated.
Possible causes are:
Rself-diagnosis is not yet complete.
Rthe on-board voltage may be insufficient.
GWARNING
The brake system continues to function normally, but without the
functions listed above. The wheels could therefore lock if you brake
hard, for example.
The steerability and braking characteristics may be severely affected.
The braking distance in an emergency braking situation can increase.
If ESP
®is not operational, ESP®is unable to stabilize the vehicle.
There is an increased risk of skidding and an accident.
XCarefully drive a suitable distance, making slight steering move-
ments at a speed above 12 mph (20 km/h).
If the display message disappears, the functions mentioned above are available again.
If the multifunction display still shows the display message:
XDrive on carefully.
XVisit a qualified specialist workshop immediately.
!÷
Inoperative SeeOperator's Manual
ABS, BAS, ESP®, ESP®trailer stabilization, PRE‑ SAFE®, the HOLD
function, hill start assist, Crosswind Assist, STEER CONTROL, Active
Lane Keeping Assist and Active Blind Spot Assist are unavailable due
to a malfunction.
COLLISION PREVENTION ASSIST PLUS, BAS PLUS with Cross-Traffic
Assist, PRE ‑SAFE
®PLUS and PRE‑SAFE®Brake may also have failed.
The $ (USA only) or J(Canada only), ÷,åand!
warning lamps in the instrument cluster also light up.
ATTENTION ASSIST is deactivated.
GWARNING
The brake system continues to function normally, but without the
functions listed above. The wheels could therefore lock if you brake
hard, for example.
The steerability and braking characteristics may be severely affected.
The braking distance in an emergency braking situation can increase.
Display messages235
On-board computer and displays
Z
Page 238 of 382
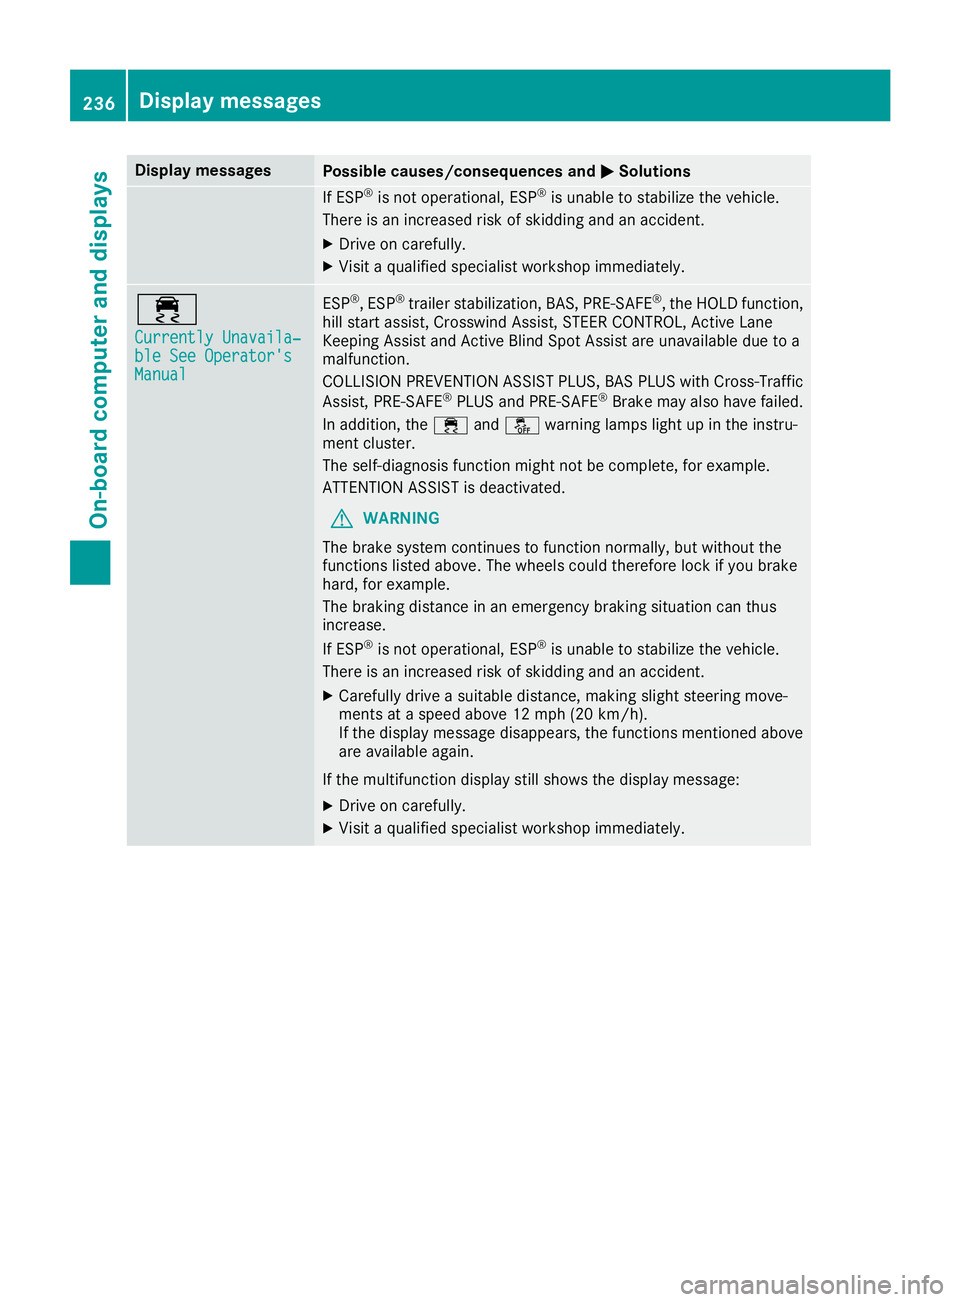
Display messagesPossible causes/consequences andMSolutions
If ESP®is no toperational, ES P®is unable to stabiliz eth evehicle.
There is an increased ris kof skiddin gand an accident.
XDrive on carefully.
XVisit aqualified specialist workshop immediately.
÷
Currently Unavaila‐ble See Operator' sManual
ESP®,ES P®trailer stabilization ,BAS, PRE ‑SAFE®, th eHOLD function ,
hill start assist ,Crosswin dAssist, STEE RCONTROL, Active Lan e
Keepin gAssis tand Active Blind Spot Assis tare unavailable due to a
malfunction .
COLLISION PREVENTION ASSIST PLUS, BA SPLU Swit hCross-Traffic
Assist, PRE ‑S AF E
®PLU Sand PRE ‑SAFE®Brake may also hav efailed.
In addition ,th e÷ andå warning lamp sligh tup in th einstru-
men tcluster.
The self-diagnosis function might no tbe complete, for example.
ATTENTION ASSIST is deactivated.
GWARNIN G
The brak esystem continues to function normally, but without th e
function slisted above. The wheels could therefor eloc kif you brak e
hard, for example.
The braking distanc ein an emergenc ybraking situation can thus
increase.
If ES P
®is no toperational, ES P®is unable to stabiliz eth evehicle.
There is an increased ris kof skiddin gand an accident.
XCarefully drive asuitable distance, making slight steering move-
ments at aspeed abov e12 mph (20 km/ h).
If the display message disappears, the functions mentioned above are available again.
If the multifunction display still shows the display message:
XDrive on carefully.
XVisit a qualified specialist workshop immediately.
236Display messages
On-board computer and displays
Page 240 of 382
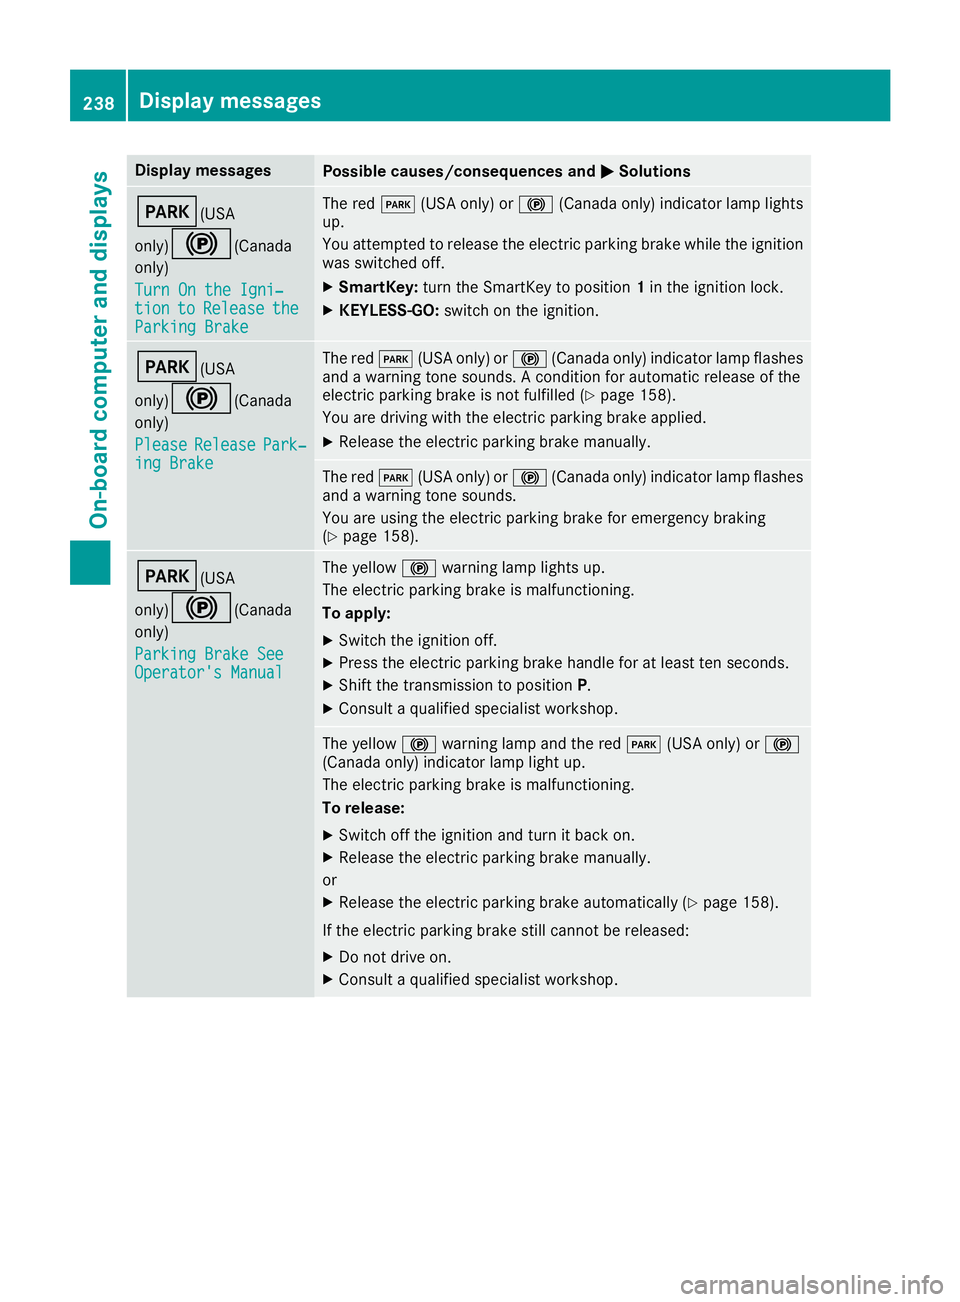
Display messagesPossible causes/consequences andMSolutions
F(USA
only)
!( Canada
only)
Tur nOn the Igni‐
tio ntoReleas etheParkingBrake
The red F(USAonly) or !(Canada only) indicator lamp lights
up.
You attempte dto release th eelectric parking brak ewhile th eignition
was switched off .
XSmartKey:tur nth eSmartKey to position 1in th eignition lock.
XKEYLESS-GO: switch on theignition .
F(USA
only)
!( Canada
only)
Please
Releas ePark‐ing Brake
The red F(USAonly) or !(Canada only) indicator lamp flashes
and awarning tone sounds. Acondition for automatic release of th e
electric parking brak eis no tfulfilled (
Ypage 158).
You are drivin gwit hth eelectric parking brak eapplied.
XReleas eth eelectric parking brak emanually.
The red F(USAonly) or !(Canada only) indicator lamp flashes
and awarning tone sounds.
You are usin gth eelectric parking brak efor emergenc ybraking
(
Ypage 158).
F(USA
only)
!( Canada
only)
Parkin gBrake See
Operator' sManual
The yellow !warning lamp lights up.
The electric parking brak eis malfunctioning .
To apply :
XSwitchth eignition off .
XPress theelectric parking brak ehandle for at least te nseconds.
XShift th etransmission to position P.
XConsultaqualified specialist workshop .
The yellow!warning lamp and th ered F (USAonly) or !
(Canada only) indicator lamp ligh tup.
The electric parking brak eis malfunctioning .
To release:
XSwitc hoff th eignition and tur nit bac kon .
XReleas eth eelectric parking brak emanually.
or
XReleas eth eelectric parking brak eautomatically (Ypage 158).
If th eelectric parking brak estill canno tbe released:
XDo no tdrive on .
XConsult aqualified specialist workshop .
238Display messages
On-board computer and displays