2016 MERCEDES-BENZ GLC COUPE cruise control
[x] Cancel search: cruise controlPage 184 of 389

Vehicles with COMAND Online multimedia
system: when you change lanes, DISTRONIC
PLUS monitors the right lane in the case of left-
side traffic or the left lane in the case of right-
side traffic.
Vehicles with Audio 20 multimedia system:
when you change lanes, DISTRONIC PLUS mon- itors the left lane on left-hand-drive vehicles or
the right lane on right-hand-drive vehicles.
Road and traffic conditions The following function is available only in vehi-
cles with the Driving Assistance Plus package.
The function is not operational in all countries.
DISTRONIC PLUS uses additional information
from your navigation system so that it can adapt to certain traffic situations.
This is the case if, while you are following a vehi-
cle, DISTRONIC PLUS is active and you:
R approach or drive around a roundabout
R approach a T-junction
R turn off at a motorway exit
R approach a tollgate
Even if the vehicle in front leaves the detection
range, DISTRONIC PLUS temporarily maintains
the current driving speed and does not acceler-
ate. This is based on the current map data in the navigation system.
Afterwards, the vehicle accelerates back to the
speed you set.
The system takes into account the fact that
overtaking on the right is not permitted on
motorways or high-speed major roads at speeds
of more than 80 km/h. The driving speed is
adjusted to the speed of the queue of vehicles in
the adjacent lane to the left.
Prevention of overtaking on the right applies to
countries where traffic drives on the right. In
countries where traffic drives on the left, over-
taking on the left is prevented accordingly. Stopping G
WARNING
When leaving the vehicle, even if it is braked
only by DISTRONIC PLUS, it could roll away if:
R there is a malfunction in the system or in
the voltage supply.
R DISTRONIC PLUS has been deactivated
with the cruise control lever, e.g. by a vehi-
cle occupant or from outside the vehicle.
R the electrical system in the engine com-
partment, the battery or the fuses have
been tampered with.
R the battery is disconnected.
R the accelerator pedal has been depressed,
e.g. by a vehicle occupant.
There is a risk of an accident.
If you wish to exit the vehicle, always turn off
DISTRONIC PLUS and secure the vehicle
against rolling away.
Further information on deactivating DISTRONIC PLUS (Y page 183).
If DISTRONIC PLUS detects that the vehicle in
front has stopped, it will cause your vehicle to
brake to a standstill.
Once your vehicle is stationary, it remains sta-
tionary and you do not need to depress the
brake.
After a short period, the vehicle is secured by
the electric parking brake, thus relieving the
service brake.
Depending on the specified minimum distance,
your vehicle will come to a standstill at a suffi-
cient distance behind the vehicle in front. The
specified minimum distance is set using the
control on the cruise control lever.
When DISTRONIC PLUS is activated, the trans-
mission is shifted automatically to position Pin
the following situations:
R the driver's seat belt is not fastened and the
driver's door is open
R The engine is switched off, unless it is auto-
matically switched off by the ECO start/stop
function Driving systems
181Driving and parking Z
Page 185 of 389
The electric parking brake secures the vehicle
automatically if DISTRONIC PLUS is activated
when the vehicle is stationary and:
R a system fault occurs
R the power supply is insufficient
If a fault occurs, the transmission may also shift
to position Pautomatically.
Setting a speed X
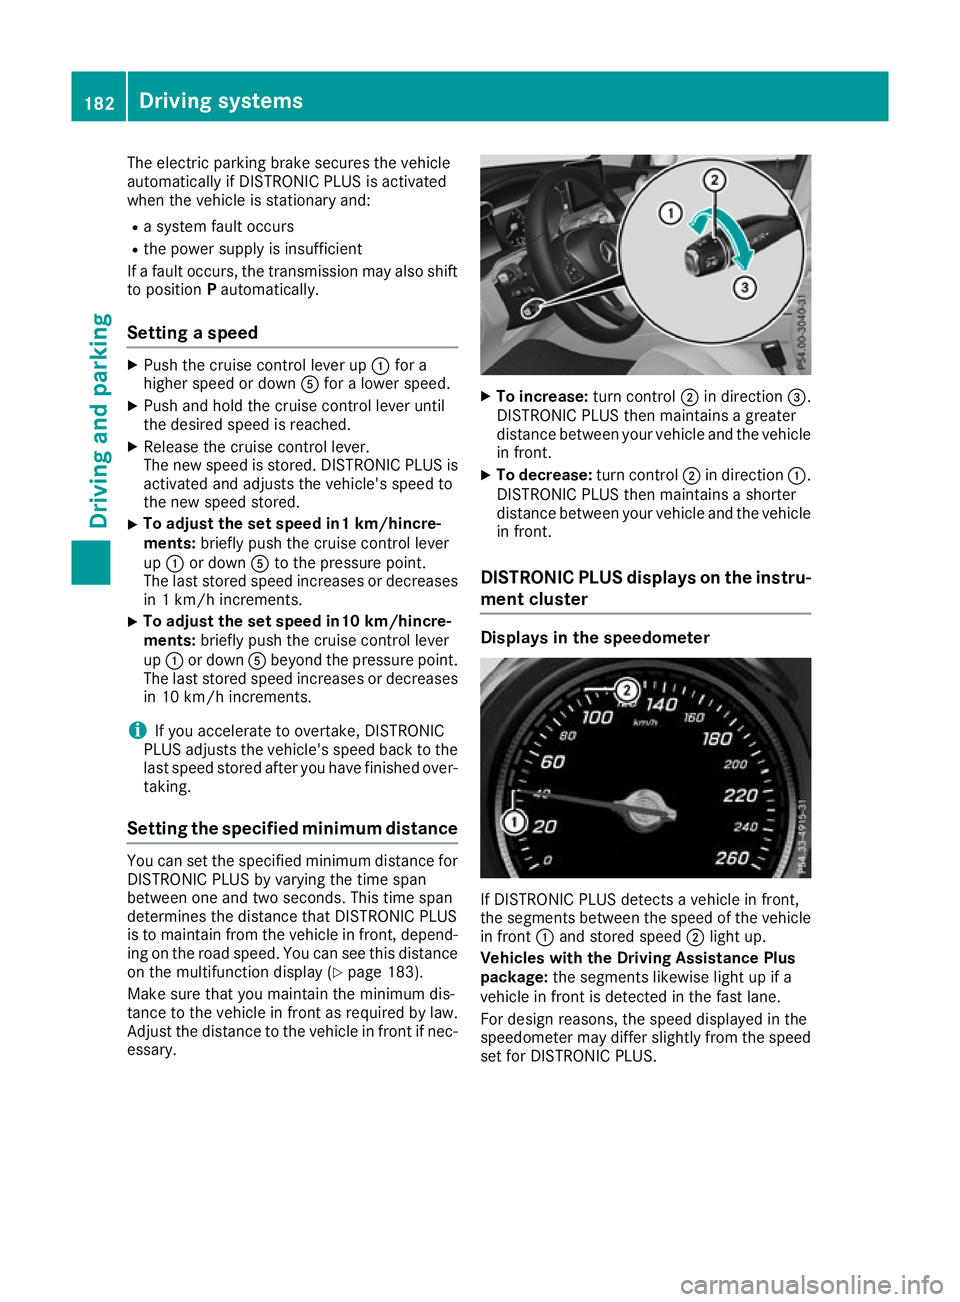
Push the cruise control lever up :for a
higher speed or down Afor a lower speed.
X Push and hold the cruise control lever until
the desired speed is reached.
X Release the cruise control lever.
The new speed is stored. DISTRONIC PLUS is
activated and adjusts the vehicle's speed to
the new speed stored.
X To adjust the set speed in1 km/hincre-
ments:
briefly push the cruise control lever
up : or down Ato the pressure point.
The last stored speed increases or decreases in 1 km/h increments.
X To adjust the set speed in10 km/hincre-
ments:
briefly push the cruise control lever
up : or down Abeyond the pressure point.
The last stored speed increases or decreases
in 10 km/h increments.
i If you accelerate to overtake, DISTRONIC
PLUS adjusts the vehicle's speed back to the
last speed stored after you have finished over-
taking.
Setting the specified minimum distance You can set the specified minimum distance for
DISTRONIC PLUS by varying the time span
between one and two seconds. This time span
determines the distance that DISTRONIC PLUS
is to maintain from the vehicle in front, depend- ing on the road speed. You can see this distance
on the multifunction display (Y page 183).
Make sure that you maintain the minimum dis-
tance to the vehicle in front as required by law.
Adjust the distance to the vehicle in front if nec- essary. X
To increase: turn control;in direction =.
DISTRONIC PLUS then maintains a greater
distance between your vehicle and the vehicle in front.
X To decrease: turn control;in direction :.
DISTRONIC PLUS then maintains a shorter
distance between your vehicle and the vehicle
in front.
DISTRONIC PLUS displays on the instru- ment cluster Displays in the speedometer
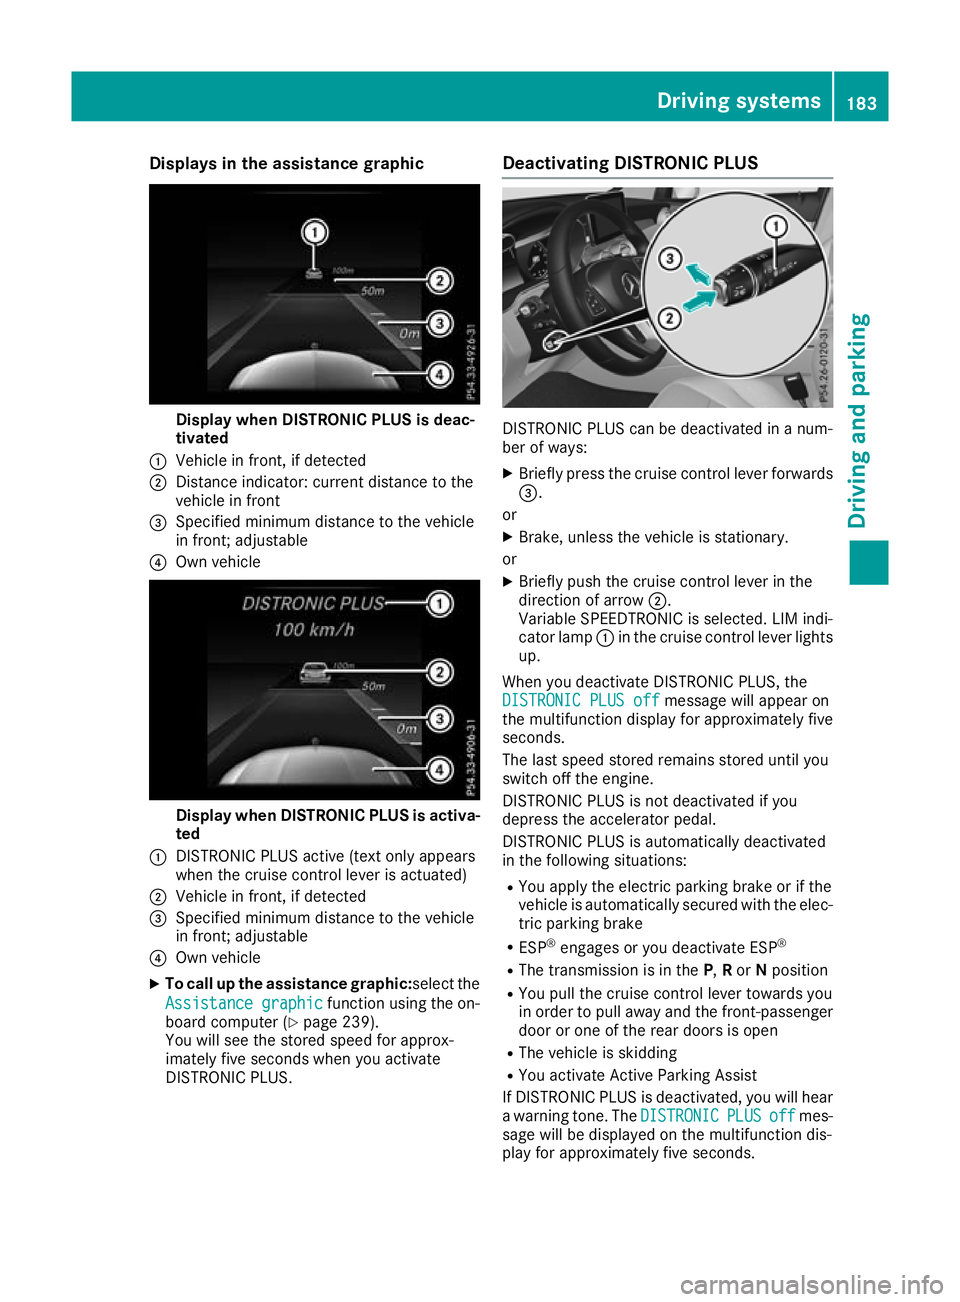
If DISTRONIC PLUS detects a vehicle in front,
the segments between the speed of the vehicle
in front :and stored speed ;light up.
Vehicles with the Driving Assistance Plus
package: the segments likewise light up if a
vehicle in front is detected in the fast lane.
For design reasons, the speed displayed in the
speedometer may differ slightly from the speed
set for DISTRONIC PLUS. 182
Driving systemsDriving and parking
Page 186 of 389
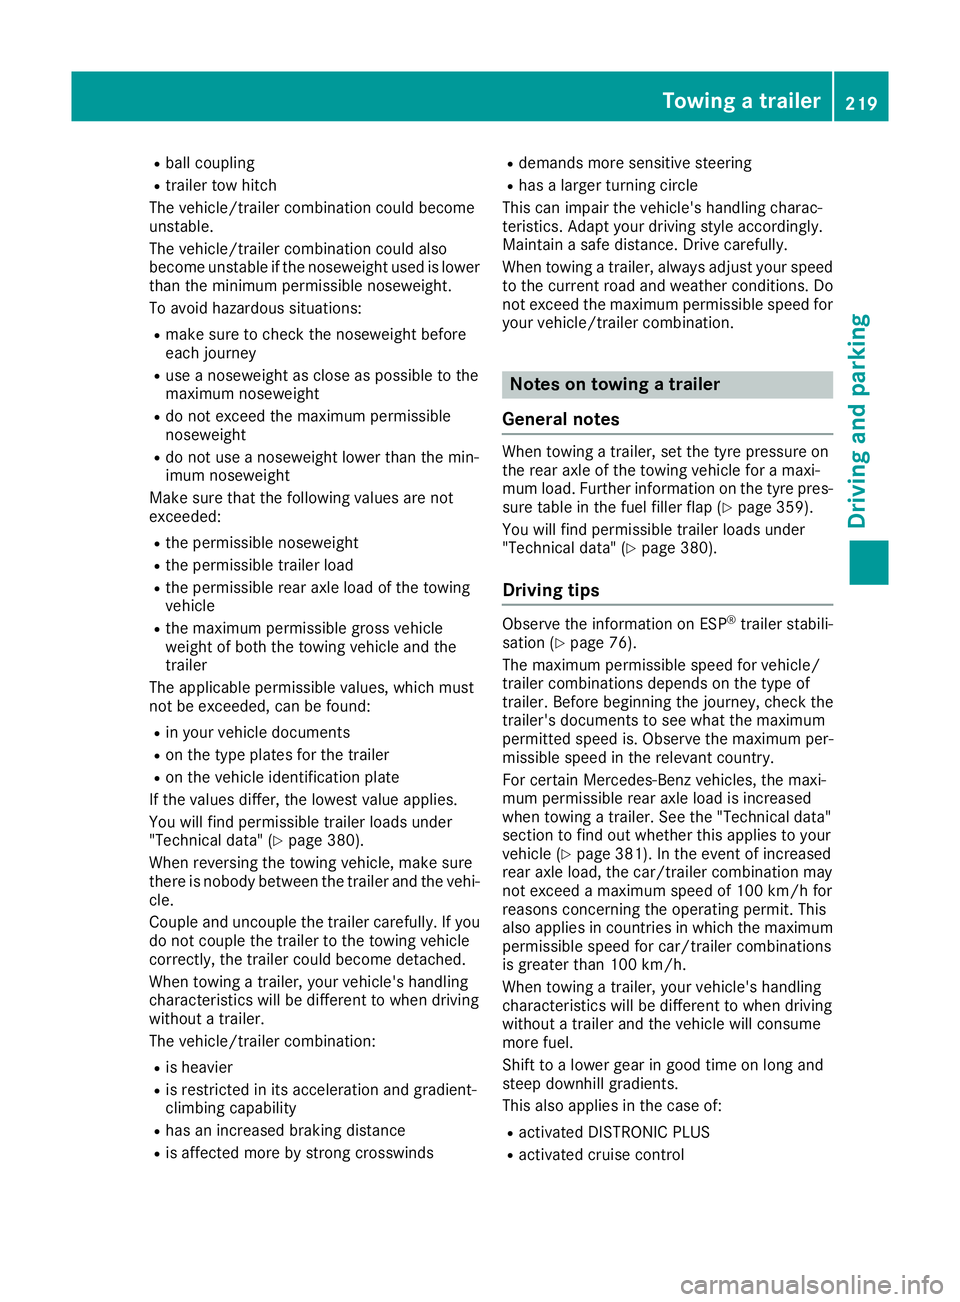
Displays in the assistance graphic
Display when DISTRONIC PLUS is deac-
tivated
: Vehicle in front, if detected
; Distance indicator: current distance to the
vehicle in front
= Specified minimum distance to the vehicle
in front; adjustable
? Own vehicle Display when DISTRONIC PLUS is activa-
ted
: DISTRONIC PLUS active (text only appears
when the cruise control lever is actuated)
; Vehicle in front, if detected
= Specified minimum distance to the vehicle
in front; adjustable
? Own vehicle
X To call up the assistance graphic:select the
Assistance graphic
Assistance graphic function using the on-
board computer (Y page 239).
You will see the stored speed for approx-
imately five seconds when you activate
DISTRONIC PLUS. Deactivating DISTRONIC PLUS
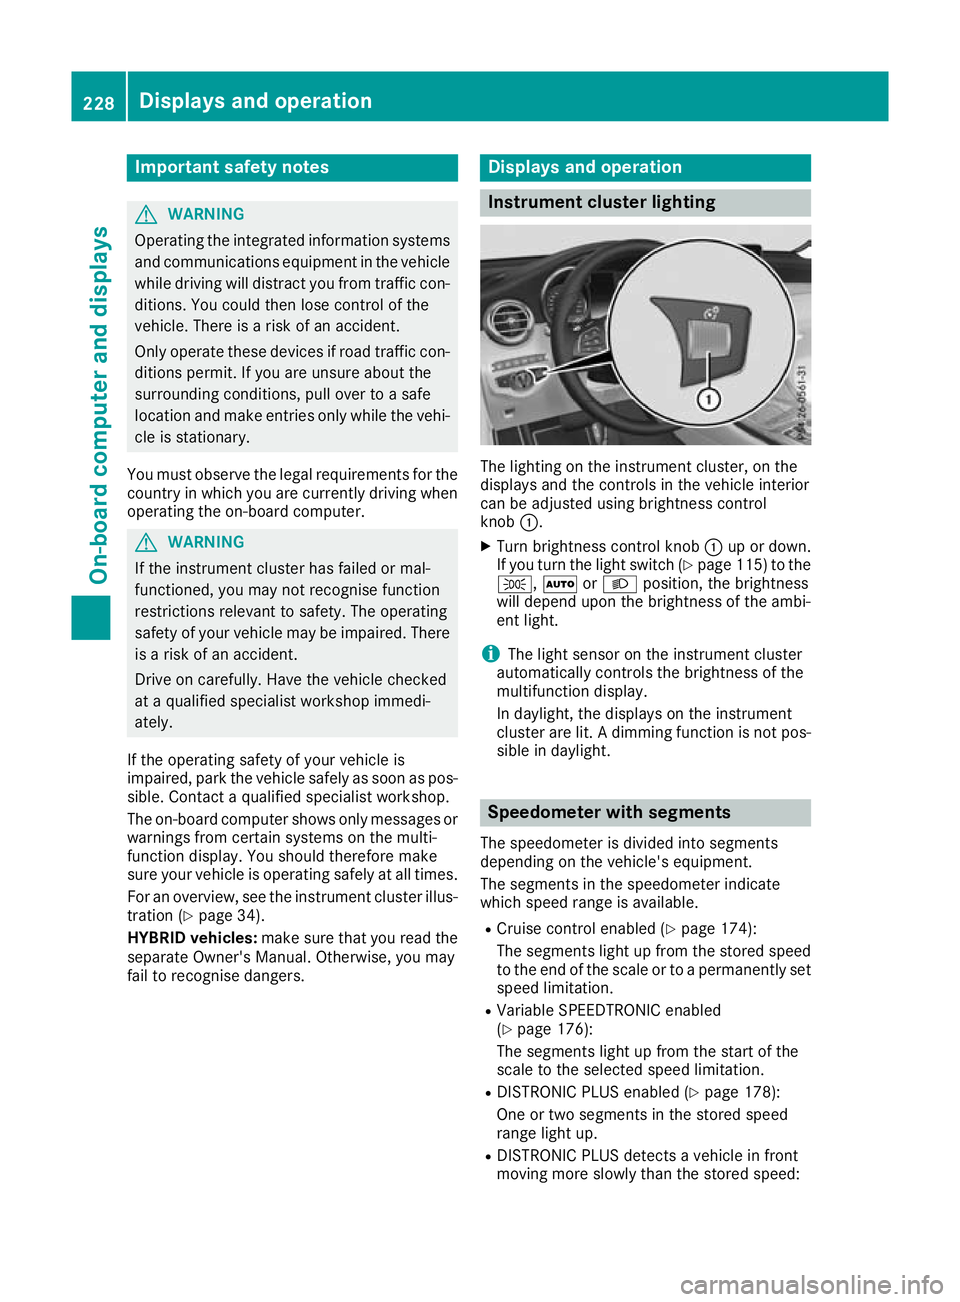
DISTRONIC PLUS can be deactivated in a num-
ber of ways:
X Briefly press the cruise control lever forwards
=.
or X Brake, unless the vehicle is stationary.
or X Briefly push the cruise control lever in the
direction of arrow ;.
Variable SPEEDTRONIC is selected. LIM indi-
cator lamp :in the cruise control lever lights
up.
When you deactivate DISTRONIC PLUS, the DISTRONIC PLUS off DISTRONIC PLUS off message will appear on
the multifunction display for approximately five
seconds.
The last speed stored remains stored until you
switch off the engine.
DISTRONIC PLUS is not deactivated if you
depress the accelerator pedal.
DISTRONIC PLUS is automatically deactivated
in the following situations:
R You apply the electric parking brake or if the
vehicle is automatically secured with the elec-
tric parking brake
R ESP ®
engages or you deactivate ESP ®
R The transmission is in the P,Ror Nposition
R You pull the cruise control lever towards you
in order to pull away and the front-passenger
door or one of the rear doors is open
R The vehicle is skidding
R You activate Active Parking Assist
If DISTRONIC PLUS is deactivated, you will hear
a warning tone. The DISTRONIC DISTRONICPLUS
PLUSoff
offmes-
sage will be displayed on the multifunction dis-
play for approximately five seconds. Driving syste
ms
183Driving an d parking Z
Page 222 of 389
R
ball coupling
R trailer tow hitch
The vehicle/trailer combination could become
unstable.
The vehicle/trailer combination could also
become unstable if the noseweight used is lower
than the minimum permissible noseweight.
To avoid hazardous situations:
R make sure to check the noseweight before
each journey
R use a noseweight as close as possible to the
maximum noseweight
R do not exceed the maximum permissible
noseweight
R do not use a noseweight lower than the min-
imum noseweight
Make sure that the following values are not
exceeded:
R the permissible noseweight
R the permissible trailer load
R the permissible rear axle load of the towing
vehicle
R the maximum permissible gross vehicle
weight of both the towing vehicle and the
trailer
The applicable permissible values, which must
not be exceeded, can be found:
R in your vehicle documents
R on the type plates for the trailer
R on the vehicle identification plate
If the values differ, the lowest value applies.
You will find permissible trailer loads under
"Technical data" (Y page 380).
When reversing the towing vehicle, make sure
there is nobody between the trailer and the vehi- cle.
Couple and uncouple the trailer carefully. If you
do not couple the trailer to the towing vehicle
correctly, the trailer could become detached.
When towing a trailer, your vehicle's handling
characteristics will be different to when driving
without a trailer.
The vehicle/trailer combination:
R is heavier
R is restricted in its acceleration and gradient-
climbing capability
R has an increased braking distance
R is affected more by strong crosswinds R
demands more sensitive steering
R has a larger turning circle
This can impair the vehicle's handling charac-
teristics. Adapt your driving style accordingly.
Maintain a safe distance. Drive carefully.
When towing a trailer, always adjust your speed to the current road and weather conditions. Do
not exceed the maximum permissible speed for
your vehicle/trailer combination. Notes on towing a trailer
General notes When towing a trailer, set the tyre pressure on
the rear axle of the towing vehicle for a maxi-
mum load. Further information on the tyre pres-
sure table in the fuel filler flap (Y page 359).
You will find permissible trailer loads under
"Technical data" (Y page 380).
Driving tips Observe the information on ESP
®
trailer stabili-
sation (Y page 76).
The maximum permissible speed for vehicle/
trailer combinations depends on the type of
trailer. Before beginning the journey, check the
trailer's documents to see what the maximum
permitted speed is. Observe the maximum per-
missible speed in the relevant country.
For certain Mercedes-Benz vehicles, the maxi-
mum permissible rear axle load is increased
when towing a trailer. See the "Technical data"
section to find out whether this applies to your
vehicle (Y page 381). In the event of increased
rear axle load, the car/trailer combination may
not exceed a maximum speed of 100 km/ hfor
reasons concerning the operating permit. This
also applies in countries in which the maximum
permissible speed for car/trailer combinations
is greater than 100 km/h.
When towing a trailer, your vehicle's handling
characteristics will be different to when driving
without a trailer and the vehicle will consume
more fuel.
Shift to a lower gear in good time on long and
steep downhill gradients.
This also applies in the case of:
R activated DISTRONIC PLUS
R activated cruise control Towing a trailer
219Driving and parking Z
Page 231 of 389
Important safety notes
G
WARNING
Operating the integrated information systems and communications equipment in the vehicle
while driving will distract you from traffic con-
ditions. You could then lose control of the
vehicle. There is a risk of an accident.
Only operate these devices if road traffic con-
ditions permit. If you are unsure about the
surrounding conditions, pull over to a safe
location and make entries only while the vehi-
cle is stationary.
You must observe the legal requirements for the country in which you are currently driving whenoperating the on-board computer. G
WARNING
If the instrument cluster has failed or mal-
functioned, you may not recognise function
restrictions relevant to safety. The operating
safety of your vehicle may be impaired. There is a risk of an accident.
Drive on carefully. Have the vehicle checked
at a qualified specialist workshop immedi-
ately.
If the operating safety of your vehicle is
impaired, park the vehicle safely as soon as pos- sible. Contact a qualified specialist workshop.
The on-board computer shows only messages or warnings from certain systems on the multi-
function display. You should therefore make
sure your vehicle is operating safely at all times.
For an overview, see the instrument cluster illus-
tration (Y page 34).
HYBRID vehicles: make sure that you read the
separate Owner's Manual. Otherwise, you may
fail to recognise dangers. Displays and operation
Instrument cluster lighting
The lighting on the instrument cluster, on the
displays and the controls in the vehicle interior
can be adjusted using brightness control
knob :.
X Turn brightness control knob :up or down.
If you turn the light switch (Y page 115) to the
T, ÃorL position, the brightness
will depend upon the brightness of the ambi-
ent light.
i The light sensor on the instrument cluster
automatically controls the brightness of the
multifunction display.
In daylight, the displays on the instrument
cluster are lit. A dimming function is not pos-
sible in daylight. Speedometer with segments
The speedometer is divided into segments
depending on the vehicle's equipment.
The segments in the speedometer indicate
which speed range is available.
R Cruise control enabled (Y page 174):
The segments light up from the stored speed to the end of the scale or to a permanently set
speed limitation.
R Variable SPEEDTRONIC enabled
(Y page 176):
The segments light up from the start of the
scale to the selected speed limitation.
R DISTRONIC PLUS enabled (Y page 178):
One or two segments in the stored speed
range light up.
R DISTRONIC PLUS detects a vehicle in front
moving more slowly than the stored speed: 228
Displays and operationOn-board computer and displays
Page 234 of 389
R
È SPEEDTRONIC (Y page 176)
R ¯ Cruise control (Y page 174)
R a DISTRONIC PLUS Steering Assist and
Stop&Go Pilot (Y page 184)
R _ Adaptive Highbeam Assist
(Y page 119)
R _ Adaptive Highbeam Assist Plus
(Y page 119)
R è ECO start/stop function (Y page 148)
R ë HOLD function (Y page 186)
R ð Maximum permissible speed exceeded
(for certain countries only) Head-up display
General notes The Head-up Display projects information from
the navigation system and the driver assistance
systems above the dashboard into the driver's
field of vision. This way, the Head-up Display
enables drivers to see information without hav-
ing to take their eyes off the road.
A requirement for the display of the content is
that the following functions are available in the
vehicle and are switched on:
R Cruise control
R SPEEDTRONIC
R DISTRONIC PLUS
R Traffic Sign Assist
R Navigation
Important safety notes The head-up display is only an aid and is not a
substitute for attentive driving.
Speed limits and overtaking restrictions are not
always correctly displayed. Traffic signs always
have priority over the Traffic Sign Assist display.
The visibility of the head-up display is influenced by the following conditions:
R the driver's seat position
R the positioning of the display image
R the general light conditions
R sunglasses with polarisation filters
R wet road surfaces
R blocking of sunlight by objects on the display
cover In the event of extreme sunlight, sections of the
display may fade. This can be reversed by
switching the head-up display off and on again.
i Vehicles with the head-up display are equip-
ped with a special windscreen. Should repairs
be necessary, have the windscreen replaced
at a qualified specialist workshop.
Displays and operation Switching the head-up display on/off
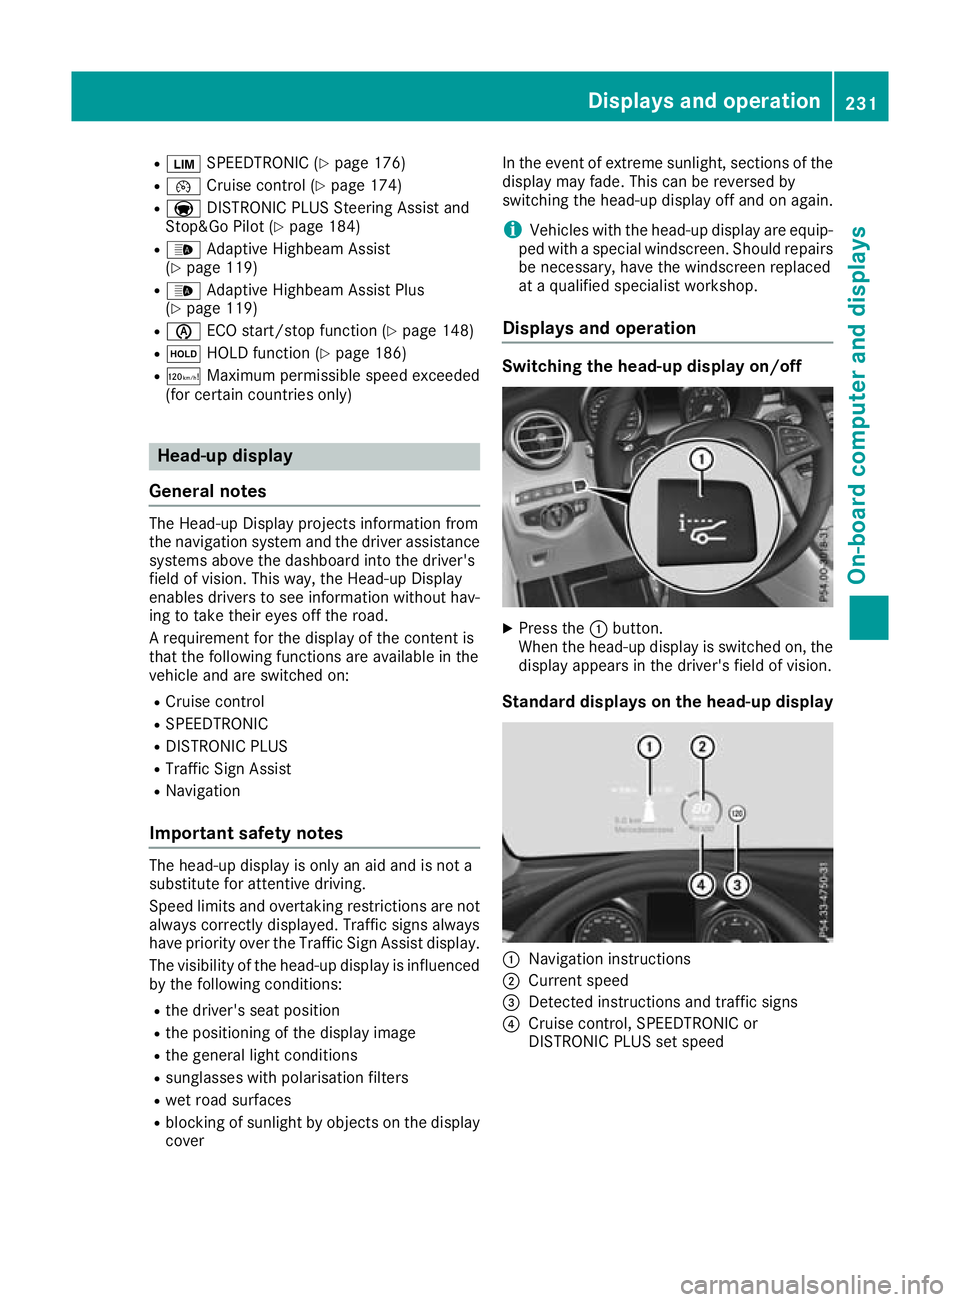
X
Press the :button.
When the head-up display is switched on, the display appears in the driver's field of vision.
Standard displays on the head-up display :
Navigation instructions
; Current speed
= Detected instructions and traffic signs
? Cruise control, SPEEDTRONIC or
DISTRONIC PLUS set speed Displays and operation
231On-board computer and displays Z
Page 247 of 389
Setting the dipped-beam headlamps for
driving on the left/right
This function is only available in vehicles with
the Intelligent Light System.
You can use this function to switch between
symmetrical and asymmetrical dipped beam
(Y page 115).
X Press òon the steering wheel to open the
menu list.
X Press :or9 on the steering wheel to
select the Settings
Settings menu.
X Confirm by pressing aon the steering
wheel.
X Press :or9 to select the Lights Lights
submenu.
X Press ato confirm.
X Press :or9 to select the Dipped
Dipped
beams Setting for
beams Setting for function.
You will see the selected setting, right-
right-
side traffic
side traffic orleft-side traffic
left-side traffic.
X Press the abutton to save the setting.
If you change the setting, conversion does not
take place until the next time the vehicle is
stationary.
If you set the dipped-beam headlamps for driv-
ing on the right/left, then motorway mode and
the extended range foglamps are unavailable.
These are only deactivated if the setting for driv-
ing on the left/right is set opposite to your vehi- cle's country version.
A qualified specialist workshop can set the
dipped-beam headlamps for driving on the left/
right.
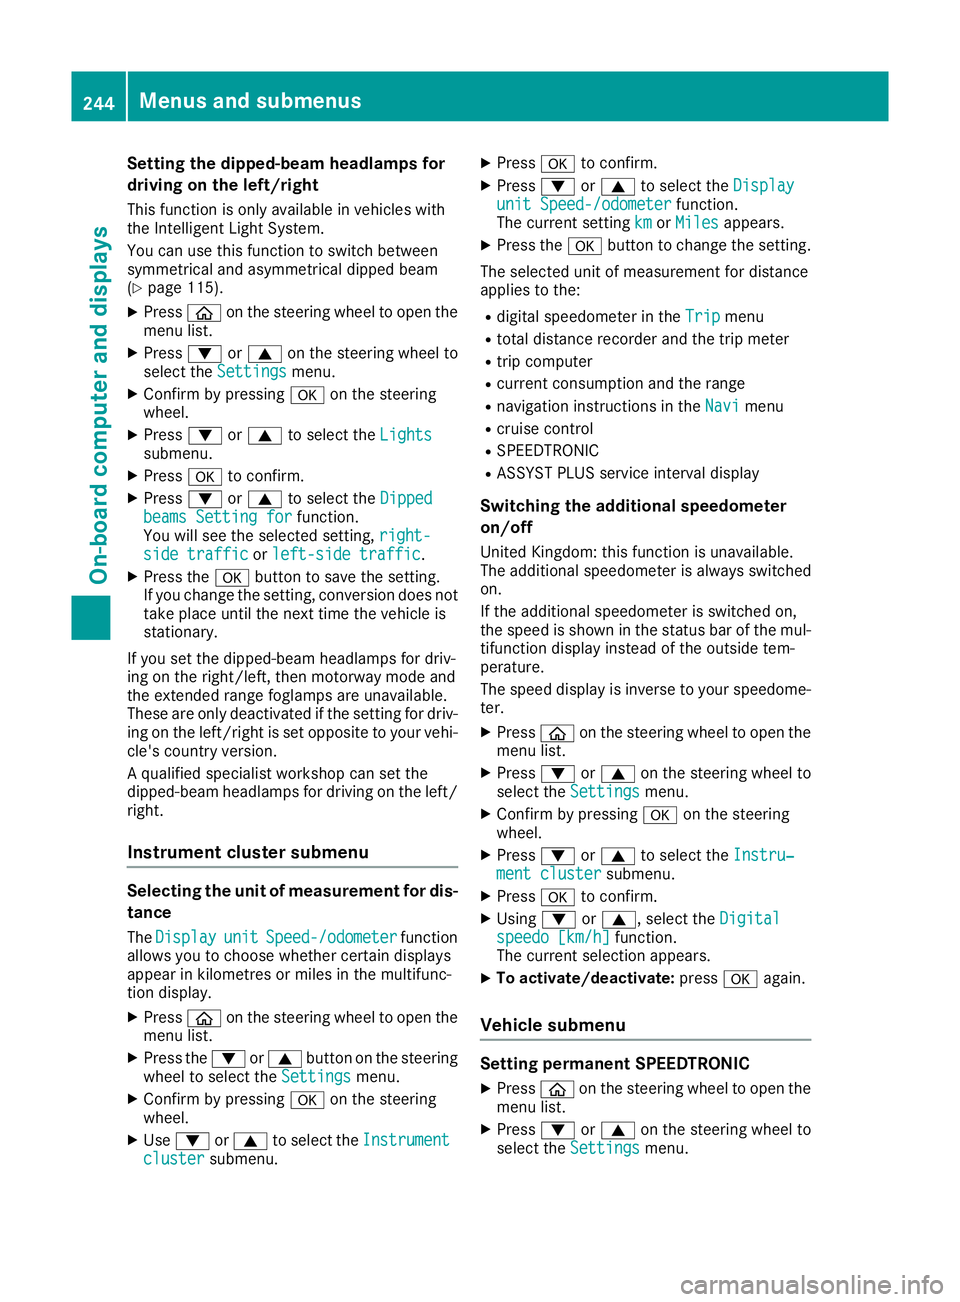
Instrument cluster submenu Selecting the unit of measurement for dis-
tance
The Display
Display unit unitSpeed-/odometer
Speed-/odometer function
allows you to choose whether certain displays
appear in kilometres or miles in the multifunc-
tion display.
X Press òon the steering wheel to open the
menu list.
X Press the :or9 button on the steering
wheel to select the Settings Settingsmenu.
X Confirm by pressing aon the steering
wheel.
X Use : or9 to select the Instrument
Instrument
cluster
cluster submenu. X
Press ato confirm.
X Press :or9 to select the Display Display
unit Speed-/odometer unit Speed-/odometer function.
The current setting km
kmorMiles
Miles appears.
X Press the abutton to change the setting.
The selected unit of measurement for distance
applies to the:
R digital speedometer in the Trip Tripmenu
R total distance recorder and the trip meter
R trip computer
R current consumption and the range
R navigation instructions in the Navi
Navimenu
R cruise control
R SPEEDTRONIC
R ASSYST PLUS service interval display
Switching the additional speedometer
on/off
United Kingdom: this function is unavailable.
The additional speedometer is always switched
on.
If the additional speedometer is switched on,
the speed is shown in the status bar of the mul- tifunction display instead of the outside tem-
perature.
The speed display is inverse to your speedome-
ter.
X Press òon the steering wheel to open the
menu list.
X Press :or9 on the steering wheel to
select the Settings
Settings menu.
X Confirm by pressing aon the steering
wheel.
X Press :or9 to select the Instru‐ Instru‐
ment cluster
ment cluster submenu.
X Press ato confirm.
X Using :or9, select the Digital
Digital
speedo [km/h]
speedo [km/h] function.
The current selection appears.
X To activate/deactivate: pressaagain.
Vehicle submenu Setting permanent SPEEDTRONIC
X Press òon the steering wheel to open the
menu list.
X Press :or9 on the steering wheel to
select the Settings
Settings menu. 244
Menus and submenusOn-board computer and displays
Page 274 of 389
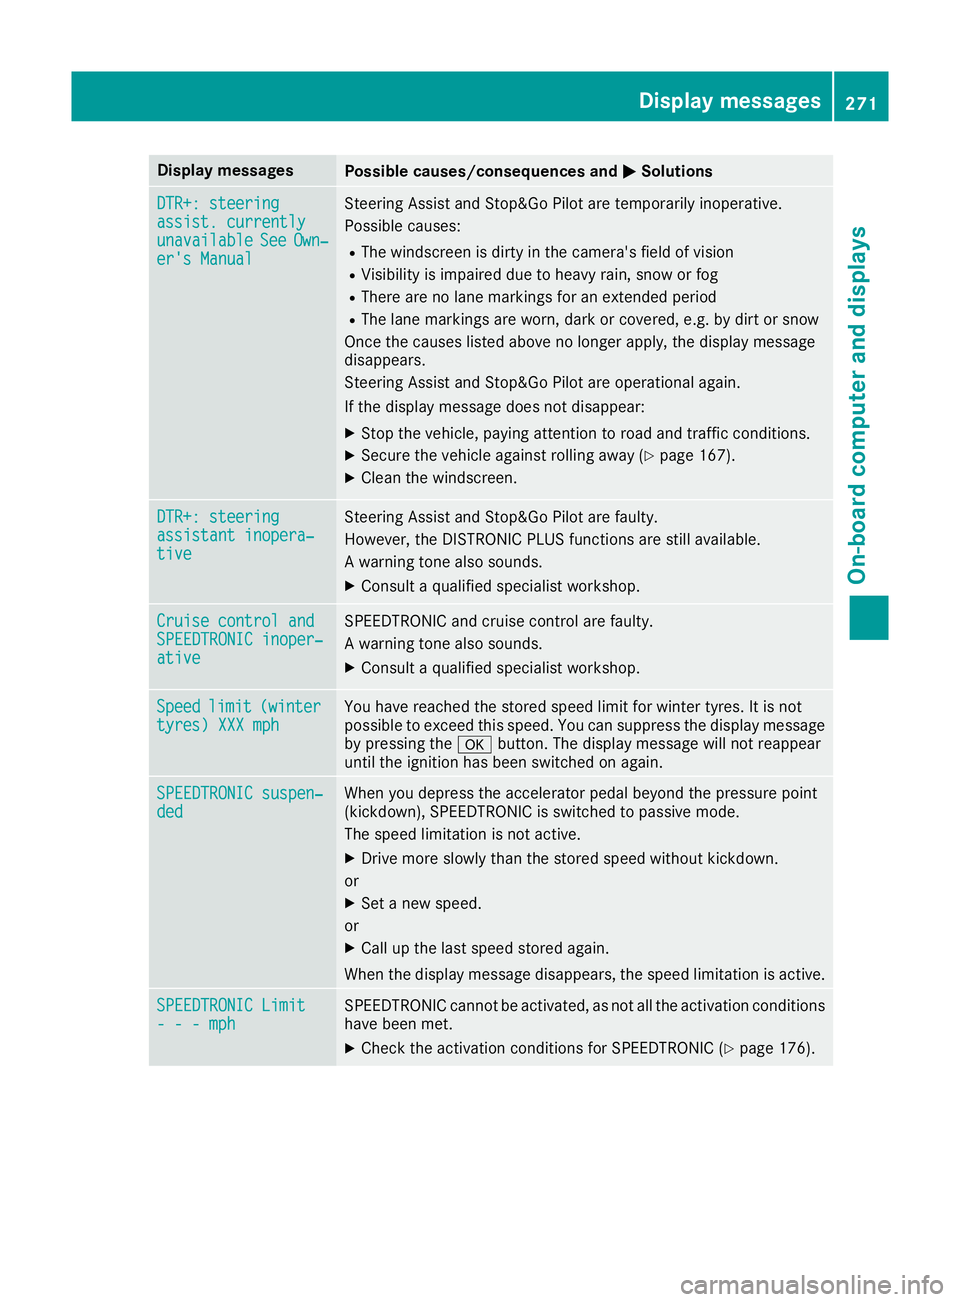
Display messages
Possible causes/consequences and
M
MSolutions DTR+: steering
DTR+: steering
assist. currently assist. currently
unavailable unavailable
See
SeeOwn‐
Own‐
er's Manual
er's Manual Steering Assist and Stop&Go Pilot are temporarily inoperative.
Possible causes:
R The windscreen is dirty in the camera's field of vision
R Visibility is impaired due to heavy rain, snow or fog
R There are no lane markings for an extended period
R The lane markings are worn, dark or covered, e.g. by dirt or snow
Once the causes listed above no longer apply, the display message
disappears.
Steering Assist and Stop&Go Pilot are operational again.
If the display message does not disappear:
X Stop the vehicle, paying attention to road and traffic conditions.
X Secure the vehicle against rolling away (Y page 167).
X Clean the windscreen. DTR+: steering DTR+: steering
assistant inopera‐ assistant inopera‐
tive tive Steering Assist and Stop&Go Pilot are faulty.
However, the DISTRONIC PLUS functions are still available.
A warning tone also sounds.
X Consult a qualified specialist workshop. Cruise control and Cruise control and
SPEEDTRONIC inoper‐ SPEEDTRONIC inoper‐
ative ative SPEEDTRONIC and cruise control are faulty.
A warning tone also sounds.
X Consult a qualified specialist workshop. Speed Speed
limit
limit(winter
(winter
tyres) XXX mph
tyres) XXX mph You have reached the stored speed limit for winter tyres. It is not
possible to exceed this speed. You can suppress the display message
by pressing the abutton. The display message will not reappear
until the ignition has been switched on again. SPEEDTRONIC suspen‐ SPEEDTRONIC suspen‐
ded ded When you depress the accelerator pedal beyond the pressure point
(kickdown), SPEEDTRONIC is switched to passive mode.
The speed limitation is not active.
X Drive more slowly than the stored speed without kickdown.
or X Set a new speed.
or X Call up the last speed stored again.
When the display message disappears, the speed limitation is active. SPEEDTRONIC Limit SPEEDTRONIC Limit
- - - mph - - - mph SPEEDTRONIC cannot be activated, as not all the activation conditions
have been met.
X Check the activation conditions for SPEEDTRONIC (Y page 176). Display
messages
271On-board computer and displays Z