2016 MERCEDES-BENZ GLC COUPE battery
[x] Cancel search: batteryPage 141 of 389
!
Operating the auxiliary heating/ventilation
draws on the vehicle battery. After you have
heated or ventilated the vehicle a maximum of two times, drive for a longer distance.
Switch the auxiliary heating on regularly – once a month – for about ten minutes.
The auxiliary heating heats the air in the vehicle
interior to the set temperature. This occurs with- out using the heat of the running engine. The
auxiliary heating is operated directly using the
vehicle's fuel. For this reason, the fuel tank level
must be above the reserve range to ensure that the auxiliary heating functions.
The auxiliary heating or auxiliary ventilation
automatically adjusts to changes in tempera-
ture and weather conditions. For this reason,
the auxiliary heating could switch from ventila-
tion mode to heating mode or from heating
mode to ventilation mode.
The auxiliary heating switches off when the
engine is switched off. The auxiliary ventilation
is not active if the engine is running.
The auxiliary heating or auxiliary ventilation
switches off automatically after 50 minutes.
This time limit can be altered. To do this, consult
a qualified specialist workshop.
You cannot use the auxiliary ventilation to cool
the vehicle interior to a temperature lower than
the outside temperature.
Before switching on X
Turn the key to position 2in the ignition lock
(Y page 144).
X Set the desired temperature using the w
rocker switch on the front control unit.
If you do not alter the temperature before
switching on the auxiliary heating or auxiliary
ventilation, the last temperature setting will be
adopted.
Auxiliary heating or auxiliary ventilation can also be switched on if the manually set climate con-
trol is activated. Optimum comfort is attained
when the system is set to automatic mode. Set
the temperature to 22 †.
You can switch the auxiliary heating or auxiliary
ventilation on or off:
R using the rocker switch on the centre console
(Y page 138)
R using the remote control (Y page 139)The remote control can be used to set up to
three departure times, one of which may be pre- selected.
Switching the auxiliary heating/venti-
lation on/off using the centre console
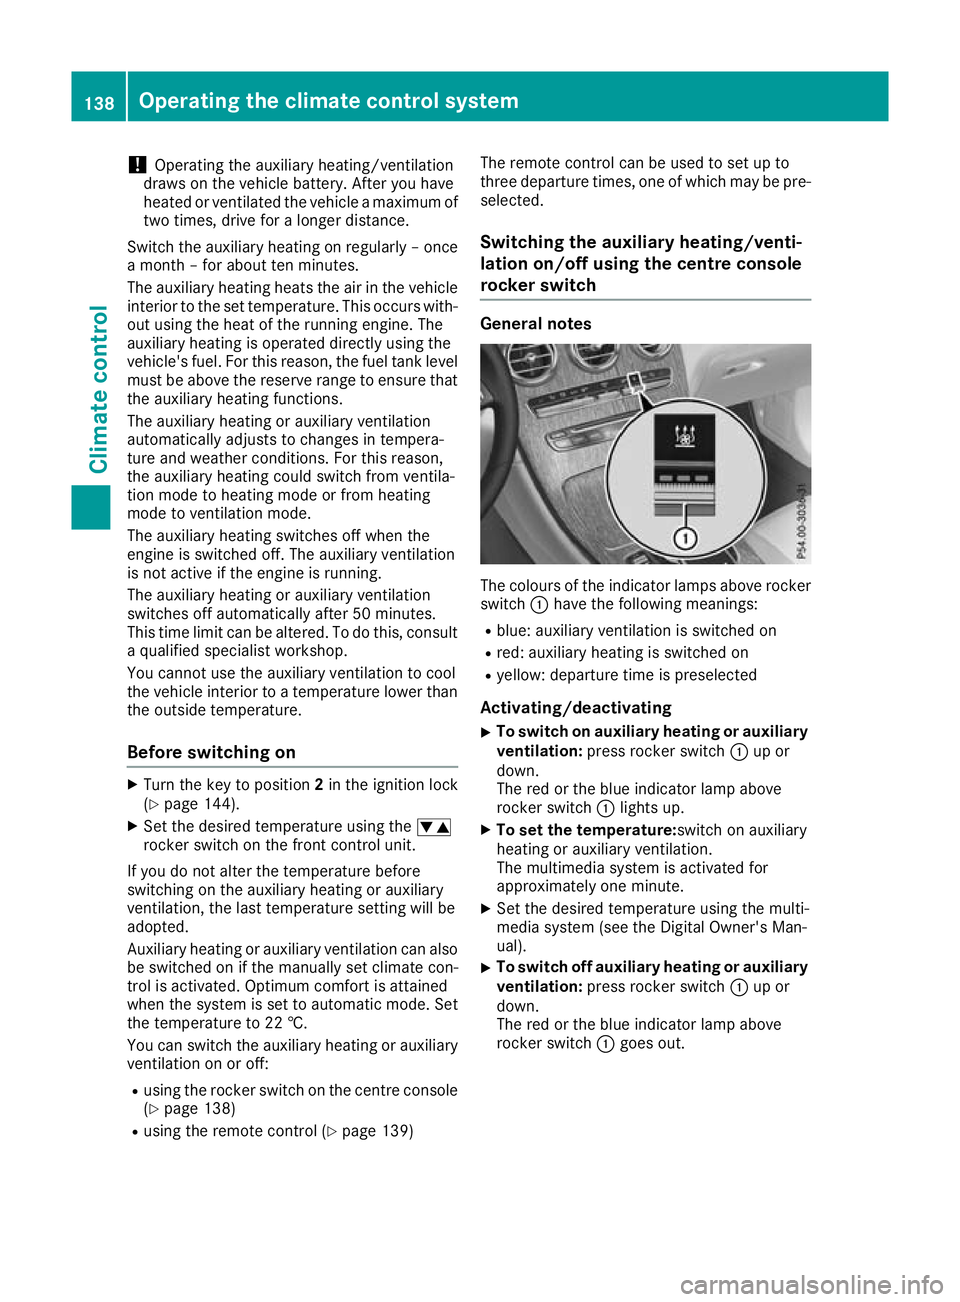
rocker switch General notes
The colours of the indicator lamps above rocker
switch :have the following meanings:
R blue: auxiliary ventilation is switched on
R red: auxiliary heating is switched on
R yellow: departure time is preselected
Activating/deactivating
X To switch on auxiliary heating or auxiliary
ventilation: press rocker switch :up or
down.
The red or the blue indicator lamp above
rocker switch :lights up.
X To set the temperature: switch on auxiliary
heating or auxiliary ventilation.
The multimedia system is activated for
approximately one minute.
X Set the desired temperature using the multi-
media system (see the Digital Owner's Man-
ual).
X To switch off auxiliary heating or auxiliary
ventilation: press rocker switch :up or
down.
The red or the blue indicator lamp above
rocker switch :goes out. 138
Operating the climate control systemClimate control
Page 142 of 389
Switching the auxiliary heating/venti-
lation on or off using the remote control
General notes
Your vehicle comes with one remote control.
You may use two additional remote controls for
your vehicle. For more information, please con-
tact a qualified specialist workshop.
Store the remote control for the auxiliary heat-
ing so that the auxiliary heating cannot be
switched on unintentionally. In particular,
ensure that the remote control for the auxiliary
heating is kept out of the reach of children.
The remote control has a range of approximately
300 metres. This range is reduced by:
R sources of radio interference
R solid objects between the remote control and
the vehicle
R the remote control being in an unfavourable
position in relation to the vehicle
R transmitting from an enclosed space
If the remote control battery is low, the battery
symbol on the left of the display is shown as
empty. Replace the remote control battery and
observe the important safety notes when doing so (Y page 140).
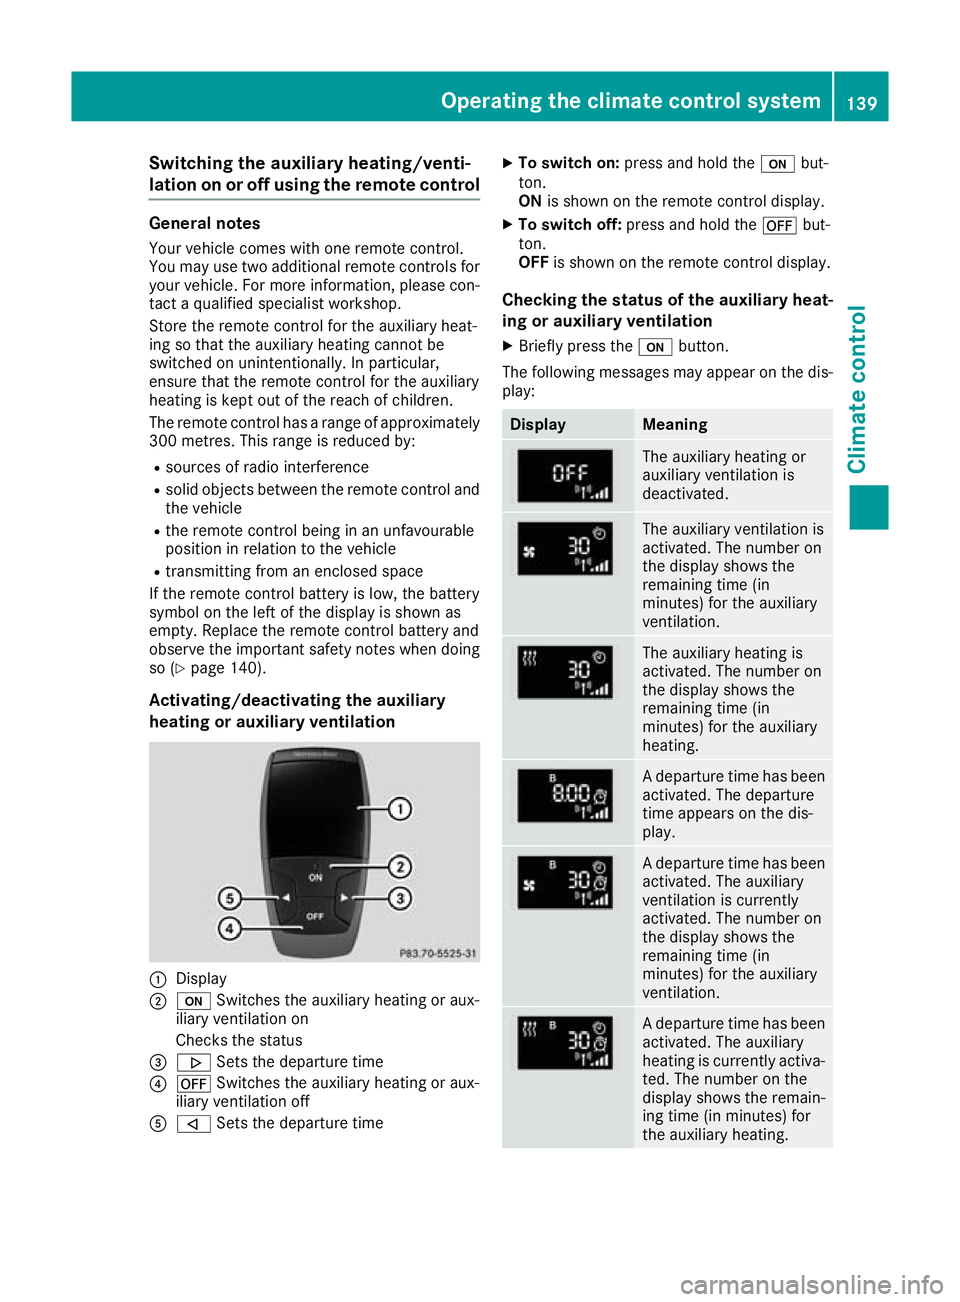
Activating/deactivating the auxiliary
heating or auxiliary ventilation :
Display
; u Switches the auxiliary heating or aux-
iliary ventilation on
Checks the status
= . Sets the departure time
? ^ Switches the auxiliary heating or aux-
iliary ventilation off
A , Sets the departure time X
To switch on: press and hold the ubut-
ton.
ON is shown on the remote control display.
X To switch off: press and hold the ^but-
ton.
OFF is shown on the remote control display.
Checking the status of the auxiliary heat-
ing or auxiliary ventilation
X Briefly press the ubutton.
The following messages may appear on the dis- play: Display Meaning
The auxiliary heating or
auxiliary ventilation is
deactivated.
The auxiliary ventilation is
activated. The number on
the display shows the
remaining time (in
minutes) for the auxiliary
ventilation.
The auxiliary heating is
activated. The number on
the display shows the
remaining time (in
minutes) for the auxiliary
heating.
A departure time has been
activated. The departure
time appears on the dis-
play. A departure time has been
activated. The auxiliary
ventilation is currently
activated. The number on
the display shows the
remaining time (in
minutes) for the auxiliary
ventilation. A departure time has been
activated. The auxiliary
heating is currently activa-
ted. The number on the
display shows the remain-
ing time (in minutes) for
the auxiliary heating. Operating the climate control system
139Climate control Z
Page 143 of 389
If the engine has not yet reached operating tem-
perature when it is started, the auxiliary heating running time is increased. The auxiliary heating
continues to run until the engine has reached its
operating temperature. If this is the case, the
y symbol appears on the remote control dis-
play and the running time is zero minutes.
Setting the departure time Make sure that the time set in the vehicle is
correct before setting the departure time (see
the Digital Owner's Manual). Otherwise, the aux- iliary heating may activate at the wrong time and
at an unsuitable location. When setting the
departure time, also observe the important
safety notes (Y page 137).
X Briefly press the ubutton.
X Press the ,or. button repeatedly
until the time to be changed appears on the
display.
X Press the uand^ buttons simultane-
ously.
The Îsymbol on the remote control display
flashes.
X Press the ,or. button to set the
desired departure time.
i The longer you press the
,or. but-
ton, the faster the time changes.
X Press the uand^ buttons simultane-
ously.
The new departure time is stored.
Activating the set departure time
X Briefly press the ubutton.
X Press the ,or. button repeatedly
until the desired departure time appears on
the display.
X Press the ubutton.
The Ísymbol, the departure time and,
depending on the selected departure time,
the letter A, BorCappears on the display.
Deactivating the set departure time
X Briefly press the ubutton.
The status of the auxiliary heating is shown on
the display.
X Press the .button.
The first departure time stored appears on the
display.
X Press the ^button.
OFF is shown on the remote control display. Replacing the remote control battery Important safety notes
G
WARNING
Batteries contain toxic and corrosive substan- ces. If batteries are swallowed, it can result in
severe health problems. There is a risk of fatal injury.
Keep batteries out of the reach of children. If
a battery is swallowed, seek medical attention immediately. H
Environmental note Batteries contain pollutants.
It is illegal to dispose of them
with the household rubbish.
They must be collected sep-
arately and disposed of in anenvironmentally responsible
recycling system. Dispose of batteries in an
environmentally responsible
manner. Take discharged
batteries to a qualified spe-
cialist workshop or to a col-
lection point for used batter-
ies.
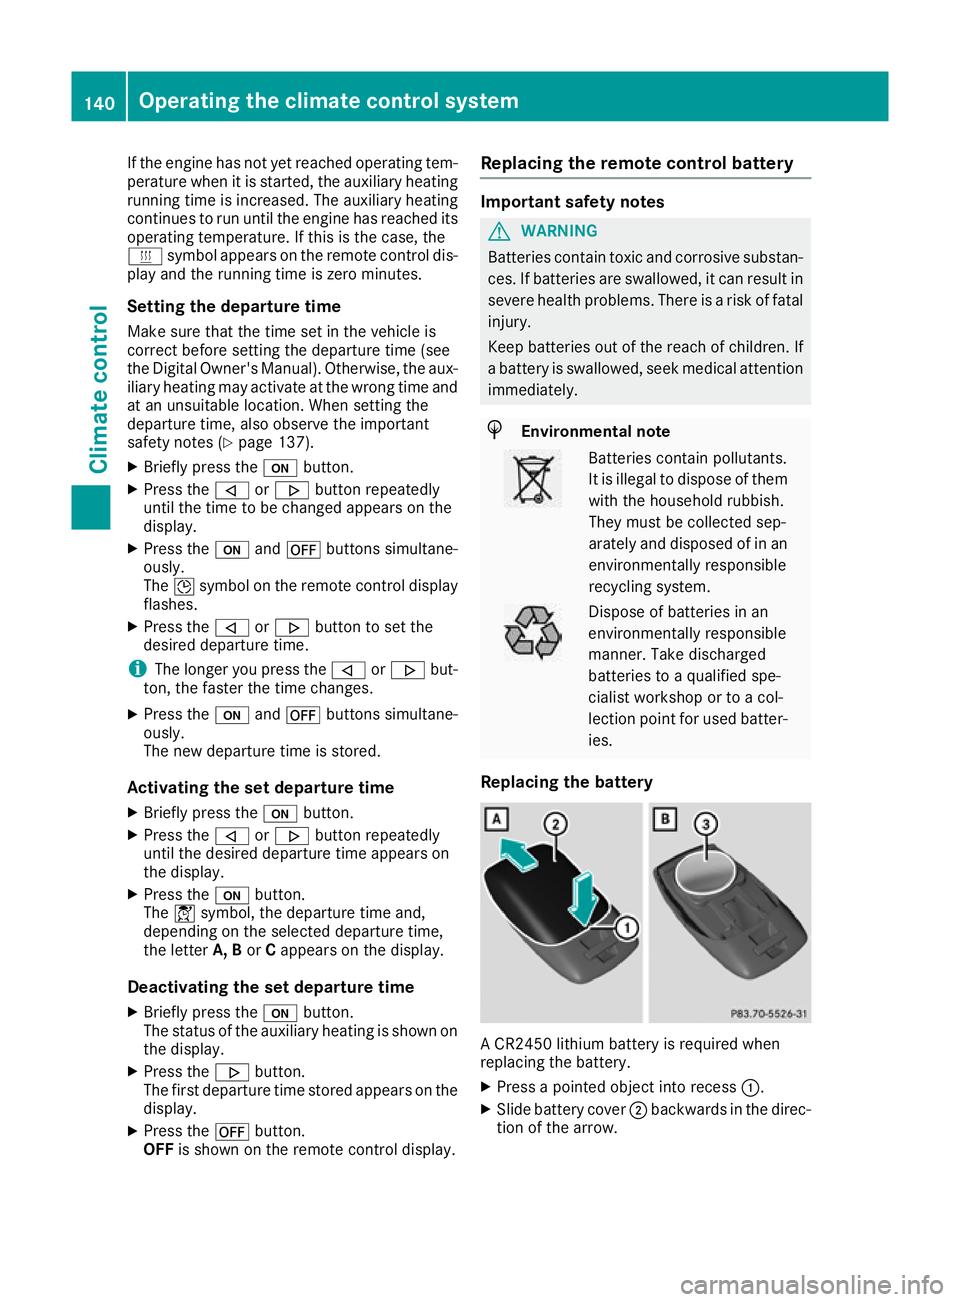
Replacing the battery A CR2450 lithium battery is required when
replacing the battery.
X Press a pointed object into recess :.
X Slide battery cover ;backwards in the direc-
tion of the arrow. 140
Operating the climate control systemClimate control
Page 144 of 389
X
Insert new battery =with the lettering facing
upwards.
X Slide battery cover ;in the opposite direc-
tion to the arrow on the remote control until it engages.
Problems with the auxiliary heating/ventilation Problem
Possible causes/consequences and
M
MSolutions FAIL
¨ The signal transmission between the transmitter and the vehicle is
faulty.
X
Change your position in relation to the vehicle, moving closer if
necessary. FAIL The auxiliary heating or auxiliary ventilation cannot be switched on or
has switched itself off.
The starter battery is not sufficiently charged.
X Charge the starter battery. The fuel level has dropped into the reserve range.
X Refuel at the nearest filling station. The auxiliary heating or auxiliary ventilation is faulty.
X Have the auxiliary heating or auxiliary ventilation checked at a
qualified specialist workshop. The battery symbol on
the left of the remote
control display is shown
as empty. The remote control battery is discharged.
X Replace the remote control battery (Y page 140).Air vents
Important safety notes
G
WARNING
Very hot or very cold air can flow from the air vents. This could result in burns or frostbite in the immediate vicinity of the air vents. There
is a risk of injury.
Make sure that all vehicle occupants always
maintain a sufficient distance to the air out-
lets. If necessary, redirect the airflow to
another area of the vehicle interior. In order to ensure the direct flow of fresh air
through the air vents into the vehicle interior,
please observe the following notes:
R keep the air inlet between the windscreen and
the bonnet free of blockages, such as ice,
snow or leaves
R never cover the vents or ventilation grilles in
the vehicle interior Adjusting the air vents
Air vents are located: R on the left and right-hand side of the dash-
board
R in the middle of the dashboard
R in the rear centre console, depending on
equipment in the vehicle Air vents
141Climate control Z
Page 151 of 389
If you wish to exit the vehicle, always turn off
the ignition and secure the vehicle against
rolling away.
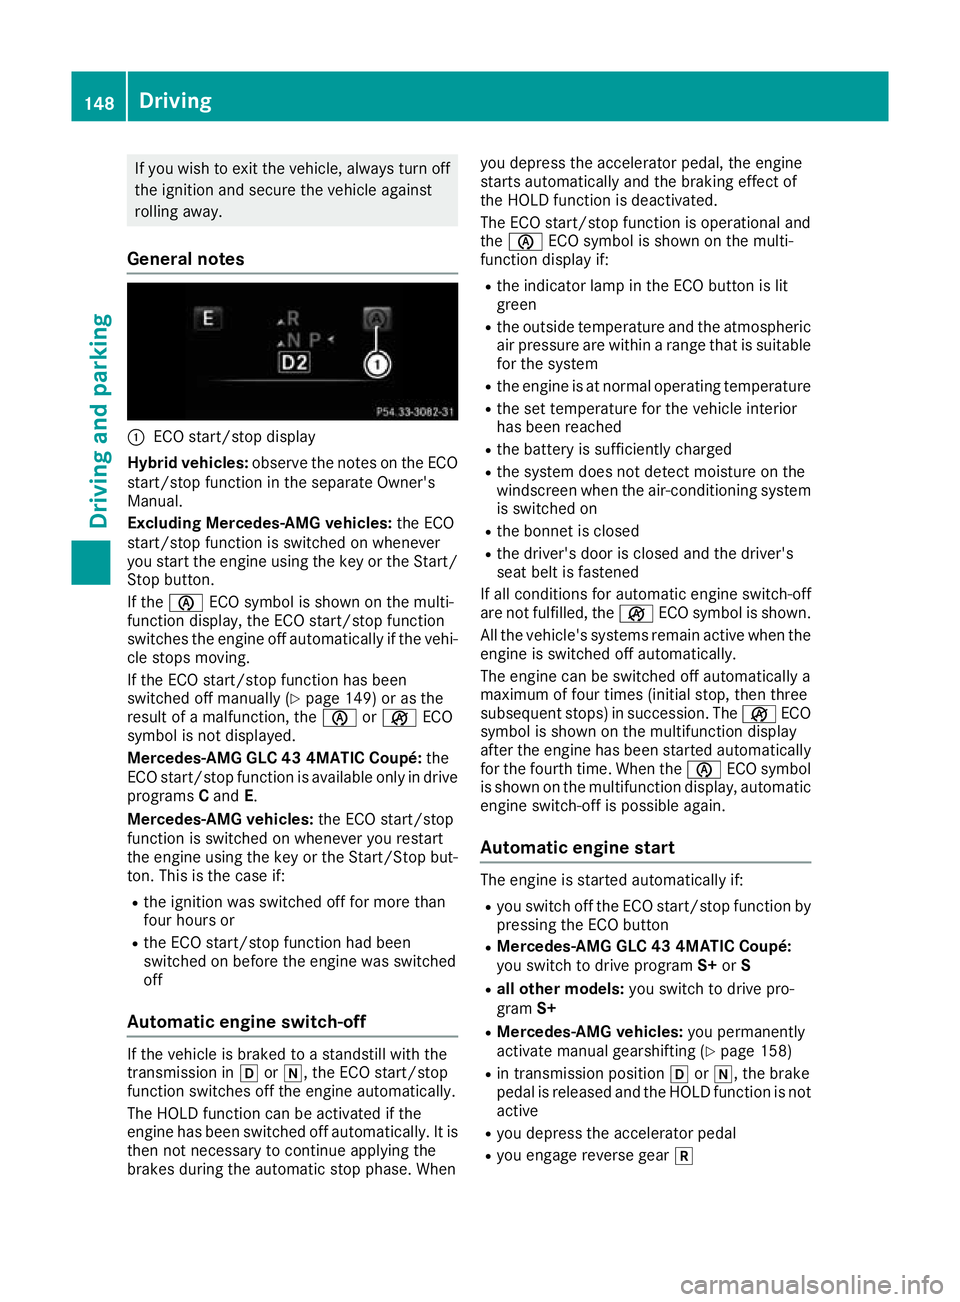
General notes :
ECO start/stop display
Hybrid vehicles: observe the notes on the ECO
start/stop function in the separate Owner's
Manual.
Excluding Mercedes-AMG vehicles: the ECO
start/stop function is switched on whenever
you start the engine using the key or the Start/ Stop button.
If the è ECO symbol is shown on the multi-
function display, the ECO start/stop function
switches the engine off automatically if the vehi-
cle stops moving.
If the ECO start/stop function has been
switched off manually (Y page 149) or as the
result of a malfunction, the èorç ECO
symbol is not displayed.
Mercedes-AMG GLC 43 4MATIC Coupé: the
ECO start/stop function is available only in drive programs Cand E.
Mercedes-AMG vehicles: the ECO start/stop
function is switched on whenever you restart
the engine using the key or the Start/Stop but-
ton. This is the case if:
R the ignition was switched off for more than
four hours or
R the ECO start/stop function had been
switched on before the engine was switched
off
Automatic engine switch-off If the vehicle is braked to a standstill with the
transmission in hori, the ECO start/stop
function switches off the engine automatically.
The HOLD function can be activated if the
engine has been switched off automatically. It is then not necessary to continue applying the
brakes during the automatic stop phase. When you depress the accelerator pedal, the engine
starts automatically and the braking effect of
the HOLD function is deactivated.
The ECO start/stop function is operational and
the
è ECO symbol is shown on the multi-
function display if:
R the indicator lamp in the ECO button is lit
green
R the outside temperature and the atmospheric
air pressure are within a range that is suitablefor the system
R the engine is at normal operating temperature
R the set temperature for the vehicle interior
has been reached
R the battery is sufficiently charged
R the system does not detect moisture on the
windscreen when the air-conditioning system
is switched on
R the bonnet is closed
R the driver's door is closed and the driver's
seat belt is fastened
If all conditions for automatic engine switch-off
are not fulfilled, the çECO symbol is shown.
All the vehicle's systems remain active when the engine is switched off automatically.
The engine can be switched off automatically a
maximum of four times (initial stop, then three
subsequent stops) in succession. The çECO
symbol is shown on the multifunction display
after the engine has been started automatically
for the fourth time. When the èECO symbol
is shown on the multifunction display, automatic engine switch-off is possible again.
Automatic engine start The engine is started automatically if:
R
you switch off the ECO start/stop function by
pressing the ECO button
R Mercedes-AMG GLC 43 4MATIC Coupé:
you switch to drive program S+orS
R all other models: you switch to drive pro-
gram S+
R Mercedes-AMG vehicles: you permanently
activate manual gearshifting (Y page 158)
R in transmission position hori, the brake
pedal is released and the HOLD function is not active
R you depress the accelerator pedal
R you engage reverse gear k148
DrivingDriving and parking
Page 152 of 389
R
you move the transmission out of position j
R you unfasten your seat belt or open the driv-
er's door
R the vehicle starts to roll
R the brake system requires this
R the temperature in the vehicle interior devi-
ates from the set range
R the system detects moisture on the wind-
screen when the air-conditioning system is
switched on
R the battery's charge status is too low
Shifting the transmission to position jdoes
not start the engine.
If you shift the transmission from ktoh, the
ECO start/stop function is available as soon as
the è ECO symbol appears on the multifunc-
tion display.
Switching the ECO start/stop function
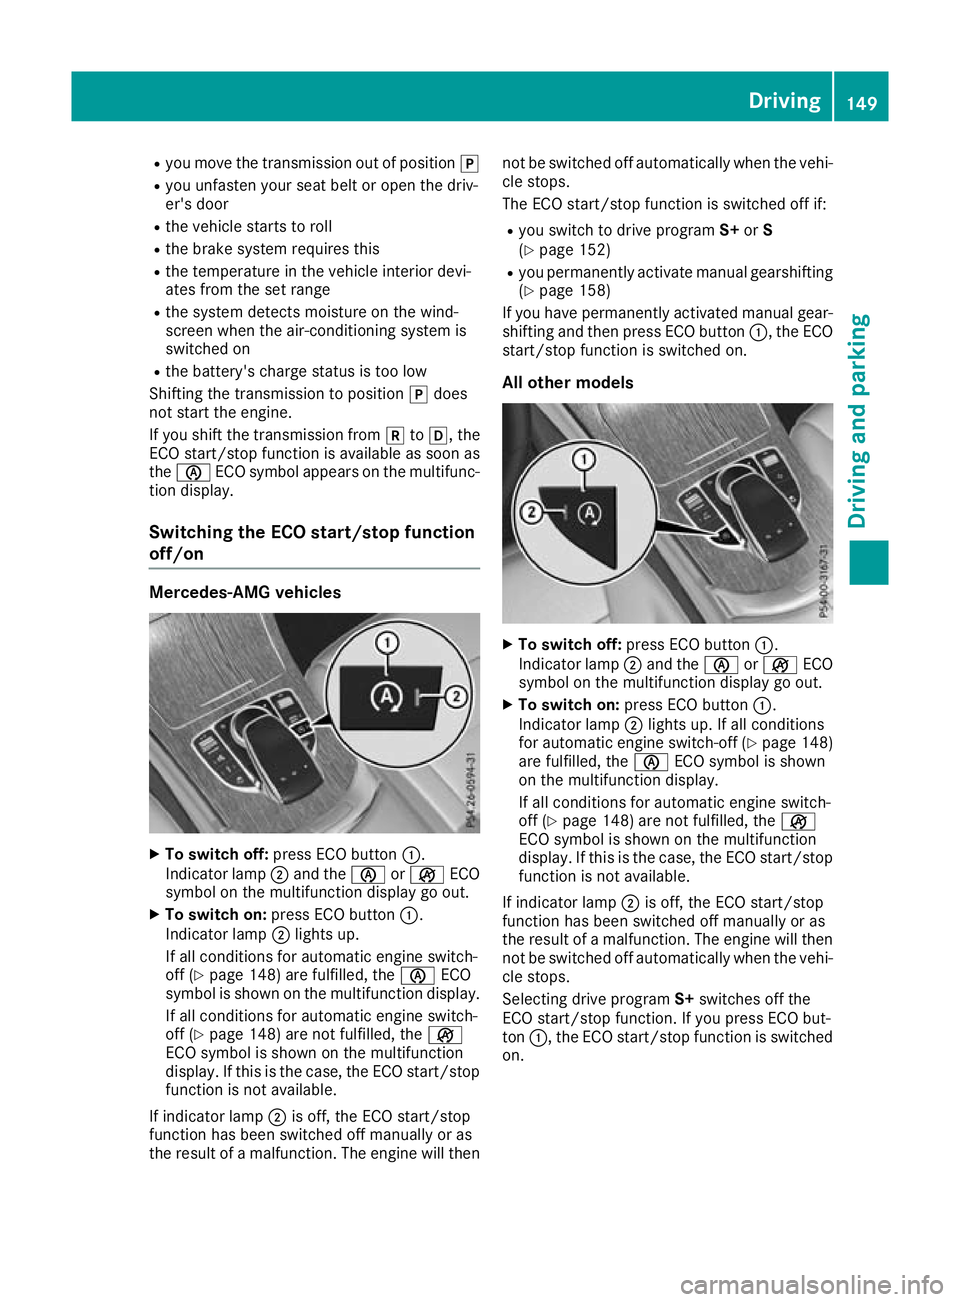
off/on Mercedes-AMG vehicles
X
To switch off: press ECO button :.
Indicator lamp ;and the èorç ECO
symbol on the multifunction display go out.
X To switch on: press ECO button :.
Indicator lamp ;lights up.
If all conditions for automatic engine switch-
off (Y page 148) are fulfilled, the èECO
symbol is shown on the multifunction display.
If all conditions for automatic engine switch-
off (Y page 148) are not fulfilled, the ç
ECO symbol is shown on the multifunction
display. If this is the case, the ECO start/stop
function is not available.
If indicator lamp ;is off, the ECO start/stop
function has been switched off manually or as
the result of a malfunction. The engine will then not be switched off automatically when the vehi-
cle stops.
The ECO start/stop function is switched off if:
R you switch to drive program S+orS
(Y page 152)
R you permanently activate manual gearshifting
(Y page 158)
If you have permanently activated manual gear- shifting and then press ECO button :, the ECO
start/stop function is switched on.
All other models X
To switch off: press ECO button :.
Indicator lamp ;and the èorç ECO
symbol on the multifunction display go out.
X To switch on: press ECO button :.
Indicator lamp ;lights up. If all conditions
for automatic engine switch-off (Y page 148)
are fulfilled, the èECO symbol is shown
on the multifunction display.
If all conditions for automatic engine switch-
off (Y page 148) are not fulfilled, the ç
ECO symbol is shown on the multifunction
display. If this is the case, the ECO start/stop
function is not available.
If indicator lamp ;is off, the ECO start/stop
function has been switched off manually or as
the result of a malfunction. The engine will then
not be switched off automatically when the vehi- cle stops.
Selecting drive program S+switches off the
ECO start/stop function. If you press ECO but-
ton :, the ECO start/stop function is switched
on. Driving
149Driving and pa rking Z
Page 153 of 389
AMG performance exhaust system
can be selected (Mercedes-AMG vehi-
cles)
You can choose between different AMG Per-
formance exhaust system volumes using the
position of the exhaust flap.
If the ignition is switched off for less than four
hours, the previously selected setting is activa-
ted when the engine is next started. If the igni-
tion is switched off for more than four hours, the quietest setting is activated when the engine is
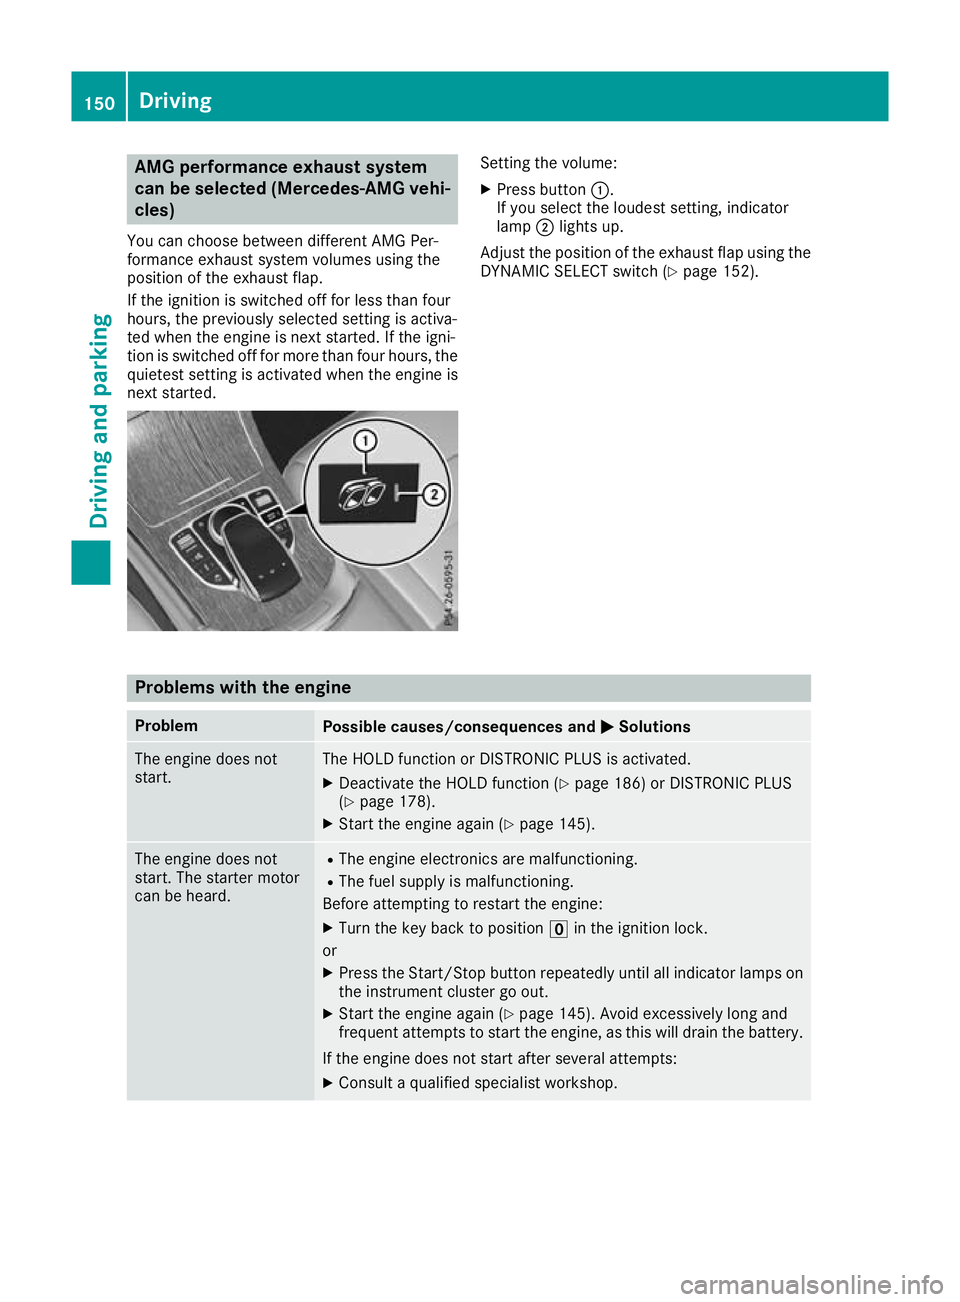
next started. Setting the volume:
X Press button :.
If you select the loudest setting, indicator
lamp ;lights up.
Adjust the position of the exhaust flap using the DYNAMIC SELECT switch (Y page 152).Problems with the engine
Problem
Possible causes/consequences and
M MSolutions The engine does not
start. The HOLD function or DISTRONIC PLUS is activated.
X Deactivate the HOLD function (Y page 186) or DISTRONIC PLUS
(Y page 178).
X Start the engine again (Y page 145).The engine does not
start. The starter motor
can be heard. R
The engine electronics are malfunctioning.
R The fuel supply is malfunctioning.
Before attempting to restart the engine:
X Turn the key back to position uin the ignition lock.
or X Press the Start/Stop button repeatedly until all indicator lamps on
the instrument cluster go out.
X Start the engine again (Y page 145). Avoid excessively long and
frequent attempts to start the engine, as this will drain the battery.
If the engine does not start after several attempts: X Consult a qualified specialist workshop. 150
DrivingDriving and pa
rking
Page 154 of 389
Problem
Possible causes/consequences and
M
MSolutions The engine does not
start. The starter motor
can be heard. The
reserve fuel warning
lamp is lit and the fuel
gauge display is at the
reserve level. The fuel tank is empty.
X Refuel the vehicle. The engine does not
start. You cannot hear
the starter motor. The on-board voltage is too low because the battery is too weak or
discharged.
X Jump-start the vehicle (Y page 348).
If the engine does not start despite attempts to jump-start it:
X Consult a qualified specialist workshop. The starter motor was exposed to excessively high thermal load.
X Start the engine again (Y page 145).
If the engine still does not start: X Consult a qualified specialist workshop. Vehicles with a petrol
engine:
The engine is not running
smoothly and is misfir-
ing. The engine electronics or a mechanical component of the engine
management system are/is malfunctioning.
X Depress the accelerator pedal only slightly.
Otherwise, non-combusted fuel may get into the catalytic converter
and damage it.
X Have the cause rectified immediately at a qualified specialist work-
shop. The coolant temperature
display is showing more
than 120 †. A display
message may also
appear on the multifunc-
tion display and a warn-
ing tone may sound. The coolant level is too low. The coolant is too hot and the engine is not
being cooled sufficiently.
X Stop as soon as possible and allow the engine and the coolant to
cool down.
X Check the coolant level (Y page 329). Observe the warning notes
as you do so and top up the coolant if necessary. If the coolant level is correct, the engine radiator fan may be faulty. The
coolant is too hot and the engine is not being cooled sufficiently.
X If the coolant temperature is below 120 †, you can continue driving
to the nearest qualified specialist workshop.
X Avoid heavy loads on the engine as you do so, e.g. driving in moun-
tainous terrain and stop-start traffic. Driving
151Driving and parking Z