2016 MERCEDES-BENZ GLC COUPE turn signal
[x] Cancel search: turn signalPage 120 of 389
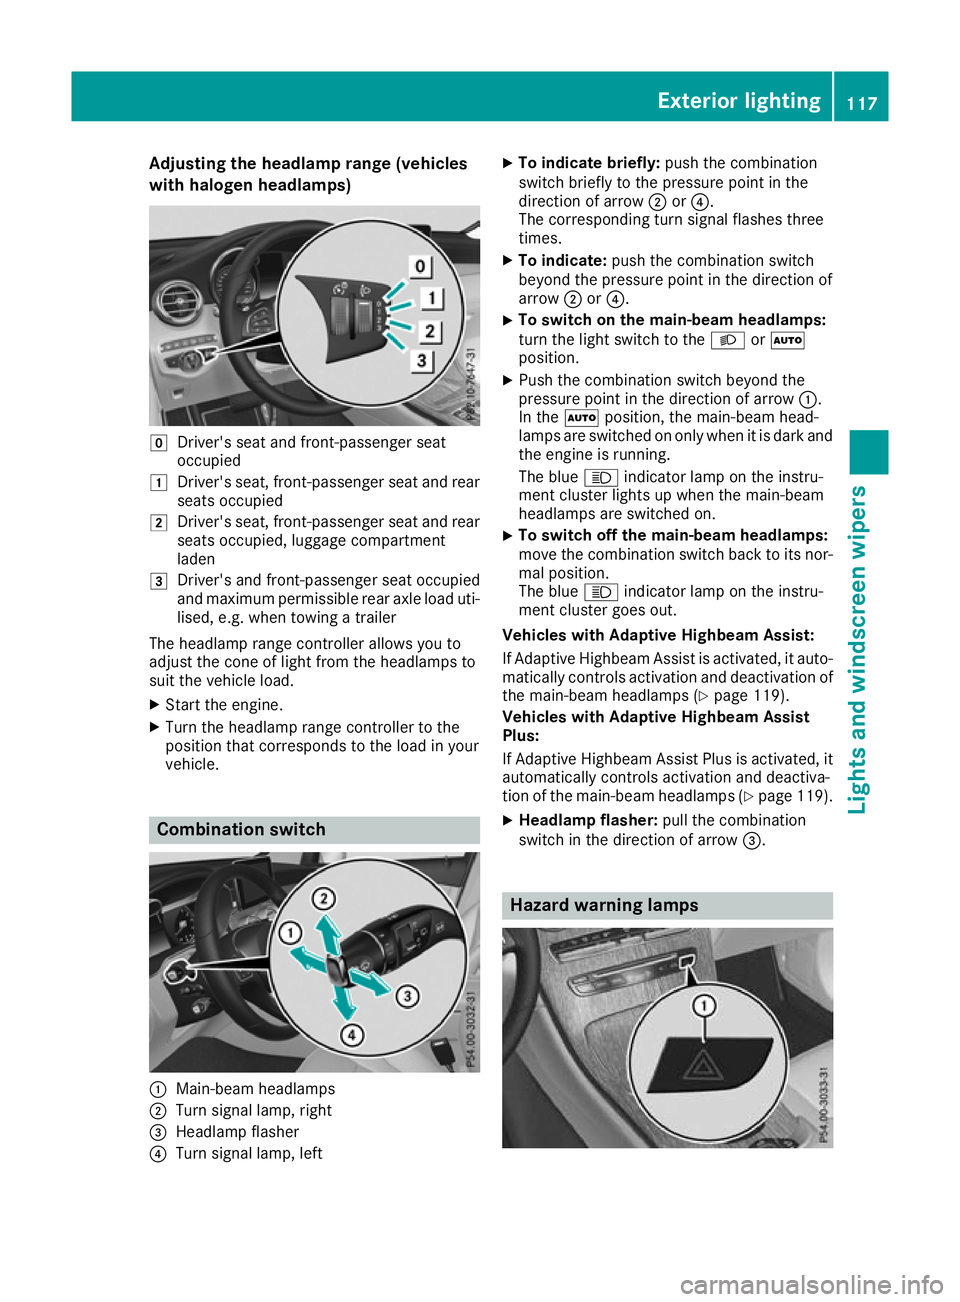
Adjusting the headlamp range (vehicles
with halogen headlamps) g
Driver's seat and front-passenger seat
occupied
1 Driver's seat, front-passenger seat and rear
seats occupied
2 Driver's seat, front-passenger seat and rear
seats occupied, luggage compartment
laden
3 Driver's and front-passenger seat occupied
and maximum permissible rear axle load uti-
lised, e.g. when towing a trailer
The headlamp range controller allows you to
adjust the cone of light from the headlamps to
suit the vehicle load.
X Start the engine.
X Turn the headlamp range controller to the
position that corresponds to the load in your
vehicle. Combination switch
:
Main-beam headlamps
; Turn signal lamp, right
= Headlamp flasher
? Turn signal lamp, left X
To indicate briefly: push the combination
switch briefly to the pressure point in the
direction of arrow ;or?.
The corresponding turn signal flashes three
times.
X To indicate: push the combination switch
beyond the pressure point in the direction of
arrow ;or?.
X To switch on the main-beam headlamps:
turn the light switch to the LorÃ
position.
X Push the combination switch beyond the
pressure point in the direction of arrow :.
In the Ãposition, the main-beam head-
lamps are switched on only when it is dark and
the engine is running.
The blue Kindicator lamp on the instru-
ment cluster lights up when the main-beam
headlamps are switched on.
X To switch off the main-beam headlamps:
move the combination switch back to its nor- mal position.
The blue Kindicator lamp on the instru-
ment cluster goes out.
Vehicles with Adaptive Highbeam Assist:
If Adaptive Highbeam Assist is activated, it auto- matically controls activation and deactivation of
the main-beam headlamps (Y page 119).
Vehicles with Adaptive Highbeam Assist
Plus:
If Adaptive Highbeam Assist Plus is activated, it
automatically controls activation and deactiva-
tion of the main-beam headlamps (Y page 119).
X Headlamp flasher: pull the combination
switch in the direction of arrow =. Hazard warning lamps Exterior lighting
117Lights and windscreen wipers Z
Page 121 of 389
X
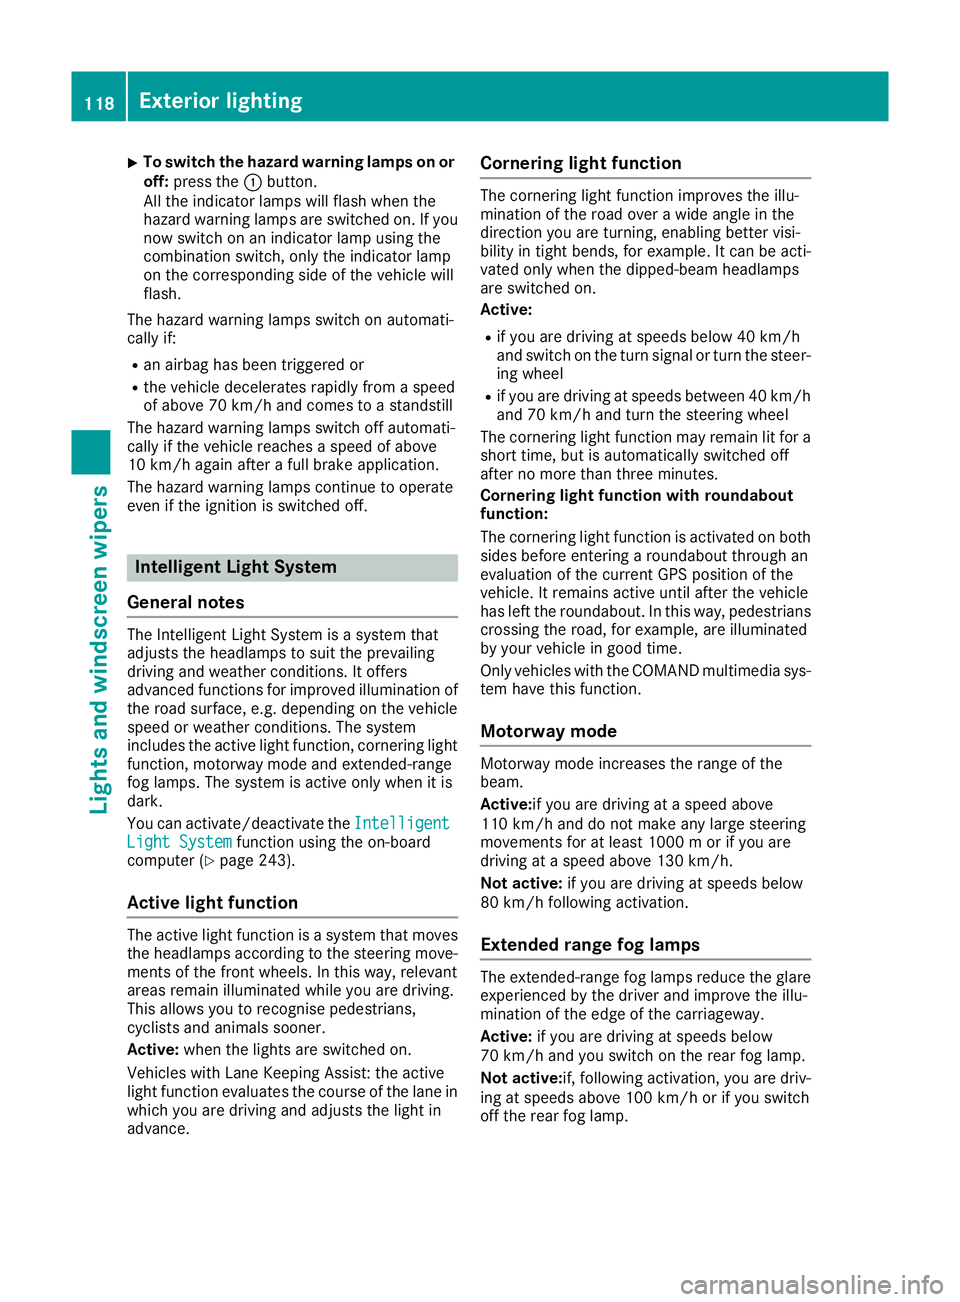
To switch the hazard warning lamps on or
off: press the :button.
All the indicator lamps will flash when the
hazard warning lamps are switched on. If you
now switch on an indicator lamp using the
combination switch, only the indicator lamp
on the corresponding side of the vehicle will
flash.
The hazard warning lamps switch on automati-
cally if:
R an airbag has been triggered or
R the vehicle decelerates rapidly from a speed
of above 70 km/h and comes to a standstill
The hazard warning lamps switch off automati-
cally if the vehicle reaches a speed of above
10 km/h again after a full brake application.
The hazard warning lamps continue to operate
even if the ignition is switched off. Intelligent Light System
General notes The Intelligent Light System is a system that
adjusts the headlamps to suit the prevailing
driving and weather conditions. It offers
advanced functions for improved illumination of the road surface, e.g. depending on the vehicle
speed or weather conditions. The system
includes the active light function, cornering light
function, motorway mode and extended-range
fog lamps. The system is active only when it is
dark.
You can activate/deactivate the Intelligent
Intelligent
Light System Light System function using the on-board
computer (Y page 243).
Active light function The active light function is a system that moves
the headlamps according to the steering move-
ments of the front wheels. In this way, relevant
areas remain illuminated while you are driving.
This allows you to recognise pedestrians,
cyclists and animals sooner.
Active: when the lights are switched on.
Vehicles with Lane Keeping Assist: the active
light function evaluates the course of the lane in which you are driving and adjusts the light in
advance. Cornering light function The cornering light function improves the illu-
mination of the road over a wide angle in the
direction you are turning, enabling better visi-
bility in tight bends, for example. It can be acti-
vated only when the dipped-beam headlamps
are switched on.
Active:
R if you are driving at speeds below 40 km/h
and switch on the turn signal or turn the steer-
ing wheel
R if you are driving at speeds between 40 km/h
and 70 km/h and turn the steering wheel
The cornering light function may remain lit for a short time, but is automatically switched off
after no more than three minutes.
Cornering light function with roundabout
function:
The cornering light function is activated on both
sides before entering a roundabout through an
evaluation of the current GPS position of the
vehicle. It remains active until after the vehicle
has left the roundabout. In this way, pedestrians crossing the road, for example, are illuminated
by your vehicle in good time.
Only vehicles with the COMAND multimedia sys-
tem have this function.
Motorway mode Motorway mode increases the range of the
beam.
Active:if you are driving at a speed above
110 km/h and do not make any large steering
movements for at least 1000 m or if you are
driving at a speed above 130 km/h.
Not active: if you are driving at speeds below
80 km/h following activation.
Extended range fog lamps The extended-range fog lamps reduce the glare
experienced by the driver and improve the illu-
mination of the edge of the carriageway.
Active: if you are driving at speeds below
70 km/h and you switch on the rear fog lamp.
Not active: if, following activation, you are driv-
ing at speeds above 100 km/h or if you switch
off the rear fog lamp. 118
Exterior lightingLights and
windscreen wipers
Page 125 of 389
Protect bulbs from moisture during operation.
Do not allow bulbs to come into contact with
liquids.
Replace only the bulbs listed (Y page 122).
Have the bulbs that you cannot change yourself replaced at a qualified specialist workshop.
If you require assistance replacing bulbs, con-
sult a qualified specialist workshop.
If the new bulb still does not light up, consult a
qualified specialist workshop.
Headlamps and lights are an important aspect of
vehicle safety. You must therefore make sure
that these function correctly at all times. Have
the headlamp setting checked regularly.
Vehicles with LED headlamps: the front and
rear lamp clusters of your vehicle are equipped
with LED bulbs. Do not replace the bulbs your-
self. Contact a qualified specialist workshop
with the necessary specialist knowledge and
tools to carry out the work required. Overview of bulb types
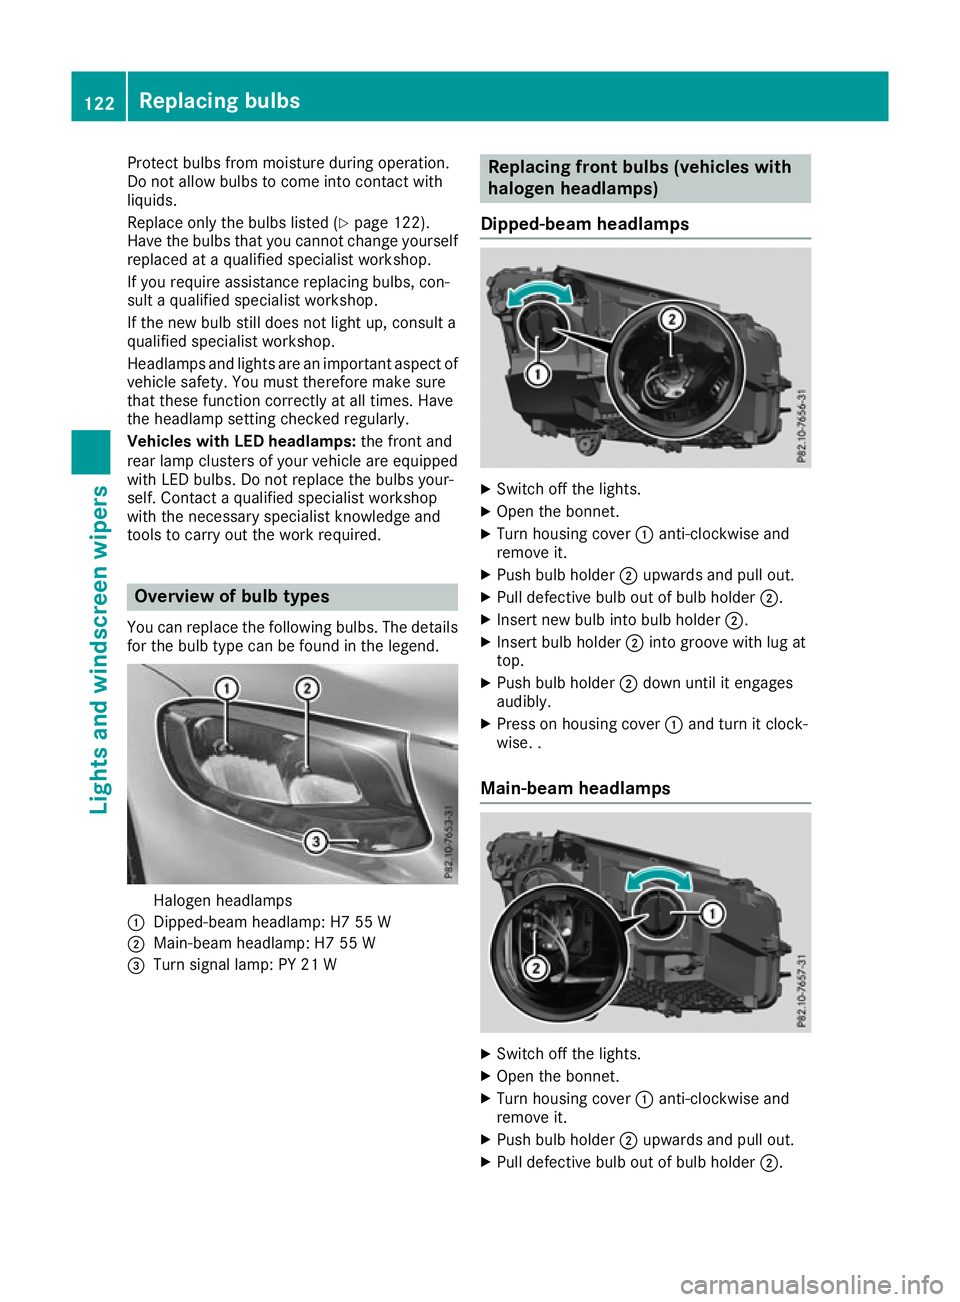
You can replace the following bulbs. The details for the bulb type can be found in the legend. Halogen headlamps
: Dipped-beam headlamp: H7 55 W
; Main-beam headlamp: H7 55 W
= Turn signal lamp: PY 21 W Replacing front bulbs (vehicles with
halogen headlamps)
Dipped-beam headlamps X
Switch off the lights.
X Open the bonnet.
X Turn housing cover :anti-clockwise and
remove it.
X Push bulb holder ;upwards and pull out.
X Pull defective bulb out of bulb holder ;.
X Insert new bulb into bulb holder ;.
X Insert bulb holder ;into groove with lug at
top.
X Push bulb holder ;down until it engages
audibly.
X Press on housing cover :and turn it clock-
wise. .
Main-beam headlamps X
Switch off the lights.
X Open the bonnet.
X Turn housing cover :anti-clockwise and
remove it.
X Push bulb holder ;upwards and pull out.
X Pull defective bulb out of bulb holder ;.122
Replacing bulbsLights and windscreen wipers
Page 126 of 389
X
Insert new bulb into bulb holder ;.
X Insert bulb holder ;into groove with lug at
top.
X Push bulb holder ;down until it engages
audibly.
X Press on housing cover :and turn it clock-
wise.
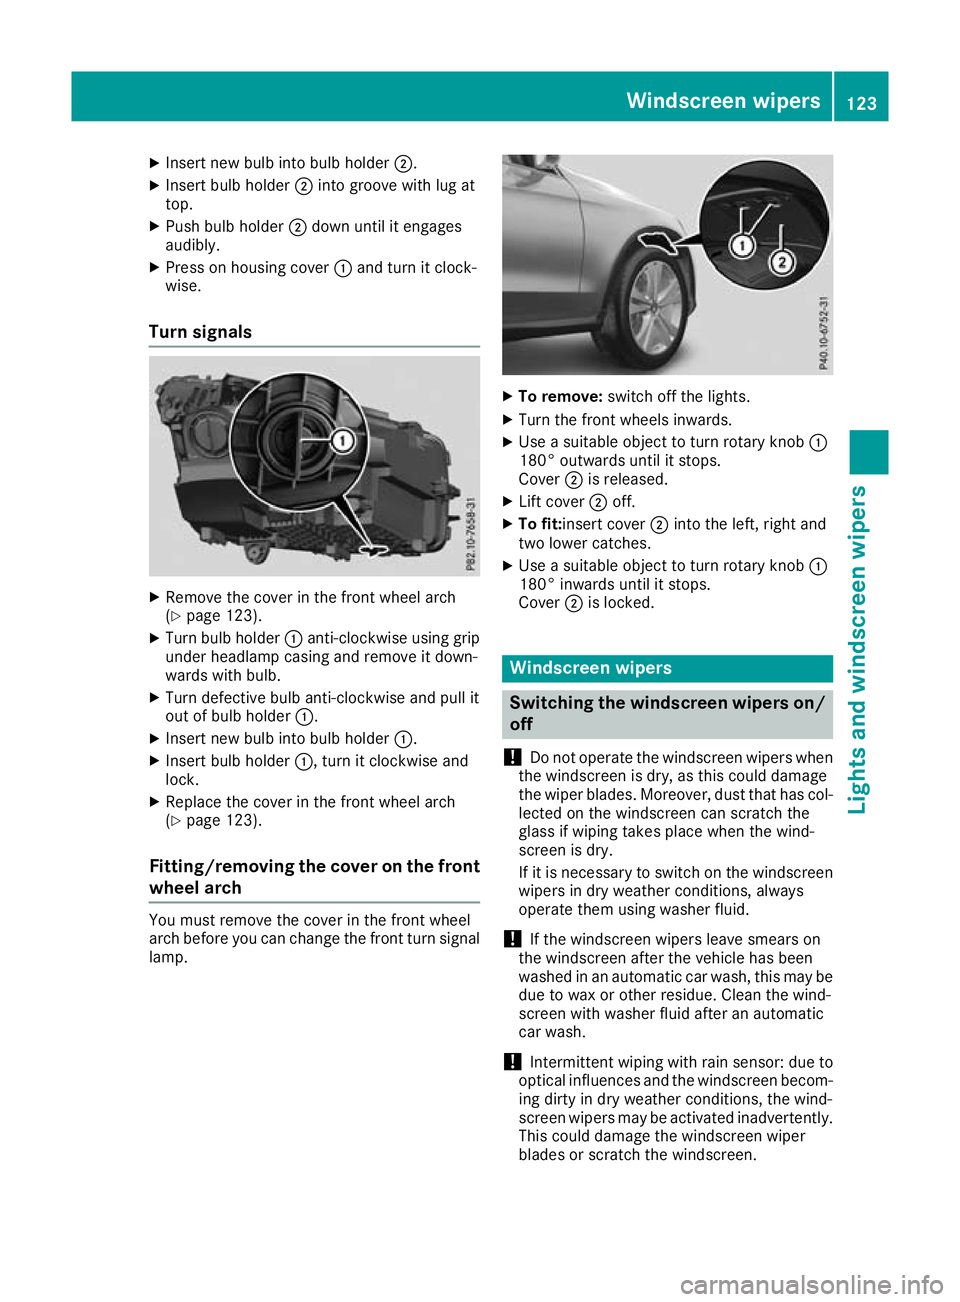
Turn signals X
Remove the cover in the front wheel arch
(Y page 123).
X Turn bulb holder :anti-clockwise using grip
under headlamp casing and remove it down-
wards with bulb.
X Turn defective bulb anti-clockwise and pull it
out of bulb holder :.
X Insert new bulb into bulb holder :.
X Insert bulb holder :, turn it clockwise and
lock.
X Replace the cover in the front wheel arch
(Y page 123).
Fitting/removing the cover on the front wheel arch You must remove the cover in the front wheel
arch before you can change the front turn signal
lamp. X
To remove: switch off the lights.
X Turn the front wheels inwards.
X Use a suitable object to turn rotary knob :
180° outwards until it stops.
Cover ;is released.
X Lift cover ;off.
X To fit:insert cover ;into the left, right and
two lower catches.
X Use a suitable object to turn rotary knob :
180° inwards until it stops.
Cover ;is locked. Windscreen wipers
Switching the windscreen wipers on/
off
! Do not operate the windscreen wipers when
the windscreen is dry, as this could damage
the wiper blades. Moreover, dust that has col-
lected on the windscreen can scratch the
glass if wiping takes place when the wind-
screen is dry.
If it is necessary to switch on the windscreen wipers in dry weather conditions, always
operate them using washer fluid.
! If the windscreen wipers leave smears on
the windscreen after the vehicle has been
washed in an automatic car wash, this may be
due to wax or other residue. Clean the wind-
screen with washer fluid after an automatic
car wash.
! Intermittent wiping with rain sensor: due to
optical influences and the windscreen becom-
ing dirty in dry weather conditions, the wind-
screen wipers may be activated inadvertently. This could damage the windscreen wiper
blades or scratch the windscreen. Windscreen wipers
123Lights and windscreen wipers Z
Page 183 of 389
Switching on
X Briefly pull the cruise control lever towards
you ?, up :or down A.
DISTRONIC PLUS is activated.
X Release the accelerator pedal.
The vehicle adapts its speed to that of the
vehicle in front, but only up to the desired
stored speed.
If you do not fully release the accelerator
pedal, the DISTRONIC DISTRONIC PLUS
PLUSsuspended
suspended mes-
sage appears on the multifunction display.
The set distance to a slower-moving vehicle in front will then not be maintained. The positionof the accelerator pedal will determine the
speed.
You can also activate DISTRONIC PLUS when
stationary. The lowest speed that can be set is
30 km/h.
X Briefly pull the cruise control lever towards
you ?, up :or down A.
DISTRONIC PLUS is activated.
To activate at the current speed/last
stored speed G
WARNING
If you call up a stored speed and this is dif-
ferent from the current speed, the vehicle
accelerates or brakes. If you do not know
what the stored speed is, the vehicle may
accelerate or brake unexpectedly. There is a
risk of an accident.
Take the traffic conditions into account
before calling up the stored speed. If you do
not know what the stored speed is, store the
desired speed again.
X Briefly pull the cruise control lever towards
you ?.
X Release the accelerator pedal.
DISTRONIC PLUS is activated. The first time it
is activated, the current speed is stored. Oth-
erwise, it sets the vehicle cruise speed to the
previously stored value. Driving with DISTRONIC PLUS Pulling away and driving
X To pull away with DISTRONIC PLUS:
remove your foot from the brake pedal.
X Briefly pull the cruise control lever towards
you ?.
or X Accelerate briefly.
The vehicle pulls away and adapts its speed to
that of the vehicle in front. If no vehicle is
detected in front, the vehicle accelerates to
the set speed.
The vehicle can also pull away when it is facing
an unidentified obstacle or is driving on a differ-
ent line from another vehicle. The vehicle then
brakes automatically.
If DISTRONIC PLUS does not detect a vehicle in
front, the system operates like cruise control.
If DISTRONIC PLUS detects that the vehicle in
front has slowed down, it brakes the vehicle. In
this way, the specified minimum distance you
have selected is maintained.
If DISTRONIC PLUS detects a faster-moving
vehicle in front, it accelerates the vehicle to the set speed.
Selecting the drive program DISTRONIC PLUS supports a sporty driving style
when you have selected the Sor S+ drive pro-
gram (Y page 157). Acceleration behind the
vehicle in front or to the set speed is then notice- ably more dynamic. If you have selected the Cor
E drive program, the vehicle accelerates more
gently. This setting is recommended in stop-
start traffic.
Changing lanes
If you change to the overtaking lane, DISTRONIC
PLUS supports you in the following situations:
R You are driving at a speed greater than
70 km/h
R you switch on the respective turn signal
R DISTRONIC PLUS does not detect a danger of
collision
If these conditions are met, your vehicle accel-
erates. Acceleration will be interrupted if chang- ing lanes takes too long or if the distance
between your vehicle and the vehicle in front
becomes too small. 180
Driving systemsDriving and parking
Page 188 of 389
towards the edge of the carriageway, your vehi-
cle could come into contact with the kerb or
other road boundaries. Be particularly aware of
other road users, e.g. cyclists, that are directly
next to your vehicle.
Obstacles such as traffic pylons on the lane or
projecting out into the lane are not detected.
An inappropriate steering intervention, e.g. after
you have intentionally driven over a lane mark-
ing, can be corrected at any time if you steer
slightly in the opposite direction.
DISTRONIC PLUS with Steering Assist and
Stop&Go Pilot cannot continuously keep your
vehicle in lane. In some cases, the steering
intervention is not sufficient to bring the vehicle back to the lane. In such cases, you must steer the vehicle yourself to ensure that it does not
leave the lane.
The system may be impaired or may not function
in the following situations:
R poor visibility, e.g. due to insufficient illumi-
nation of the road, or due to snow, rain, fog or
spray
R glare, e.g. from oncoming traffic, the sun or
reflection from other vehicles (e.g. if the road
surface is wet)
R the windscreen is dirty, misted up, damaged
or covered, for instance by a sticker, in the
vicinity of the camera
R no or several, unclear lane markings are pres-
ent for one lane, e.g. in a construction area
R the lane markings are worn away, dark or cov-
ered up, e.g. by dirt or snow
R the distance to the vehicle in front is so small
that the lane markings cannot be detected
R the lane markings change quickly, e.g. lanes
branch off, cross one another or merge
R the road is narrow and winding
R there are highly variable shade conditions on
the roadway
The system is switched to passive and no longer assists you by performing steering interventions
if:
R you actively change lane
R you switch on the turn signal
R you take your hands off the steering wheel or
do not steer for a prolonged period of time
After you have finished changing lanes, Steering Assist and Stop&Go Pilot are automatically
active again. Steering Assist and Stop&Go Pilot cannot pro-
vide assistance in the following situations:
R on very sharp corners
R when a loss of tyre pressure or a defective
tyre has been detected and displayed
Also observe the important safety notes for
DISTRONIC PLUS (Y page 178).
The steering interventions are carried out with a
limited steering moment. The system requires
the driver to keep his hands on the steering
wheel and to steer himself.
If you do not steer yourself or if you take your
hands off the steering wheel for a prolonged
period of time, the system will first alert you with a visual warning. A steering wheel symbol
appears on the multifunction display. If you have
still not started to steer and have not taken hold
of the steering wheel after five seconds at the
latest, a warning tone also sounds to remind you to take control of the vehicle. Steering Assist
and Stop&Go Pilot switch to passive mode.
DISTRONIC PLUS remains activated.
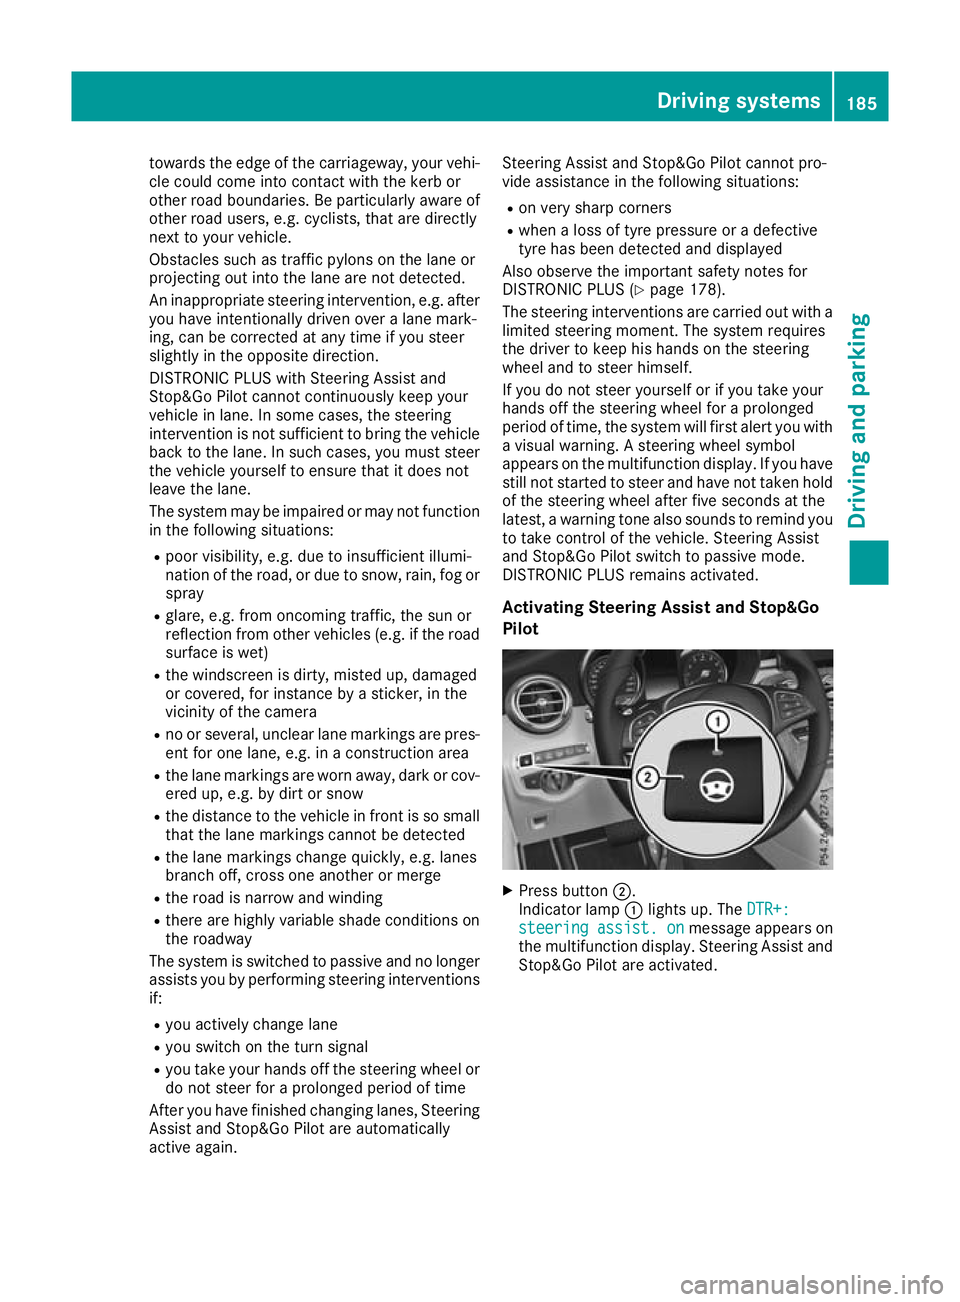
Activating Steering Assist and Stop&Go
Pilot X
Press button ;.
Indicator lamp :lights up. The DTR+: DTR+:
steering
steering assist.
assist.on
onmessage appears on
the multifunction display. Steering Assist and Stop&Go Pilot are activated. Driving systems
185Driving and parking Z
Page 198 of 389
G
WARNING
If there are objects above the detection range:
R Active Park Assist may steer too early
R the vehicle may not stop in front of these
objects
This could cause a collision. There is a risk of
an accident.
If objects are located above the detection
range, stop and deactivate Active Parking
Assist.
Further information on the detection range
(Y page 191).
Active Parking Assist does not assist you with
parking in spaces at right angles to the direction
of travel if:
R two parking spaces are located directly next
to one another
R the parking space is directly next to a low
obstacle such as a low kerb
R you forward-park
Active Parking Assist does not assist you with
parking in spaces that are parallel or at right
angles to the direction of travel if:
R the parking space is on a kerb
R the system reads the parking space as being
blocked, such as by foliage or grass paving
blocks
R the area is too small for the vehicle to
manoeuvre into
R the parking space is bordered by an obstacle,
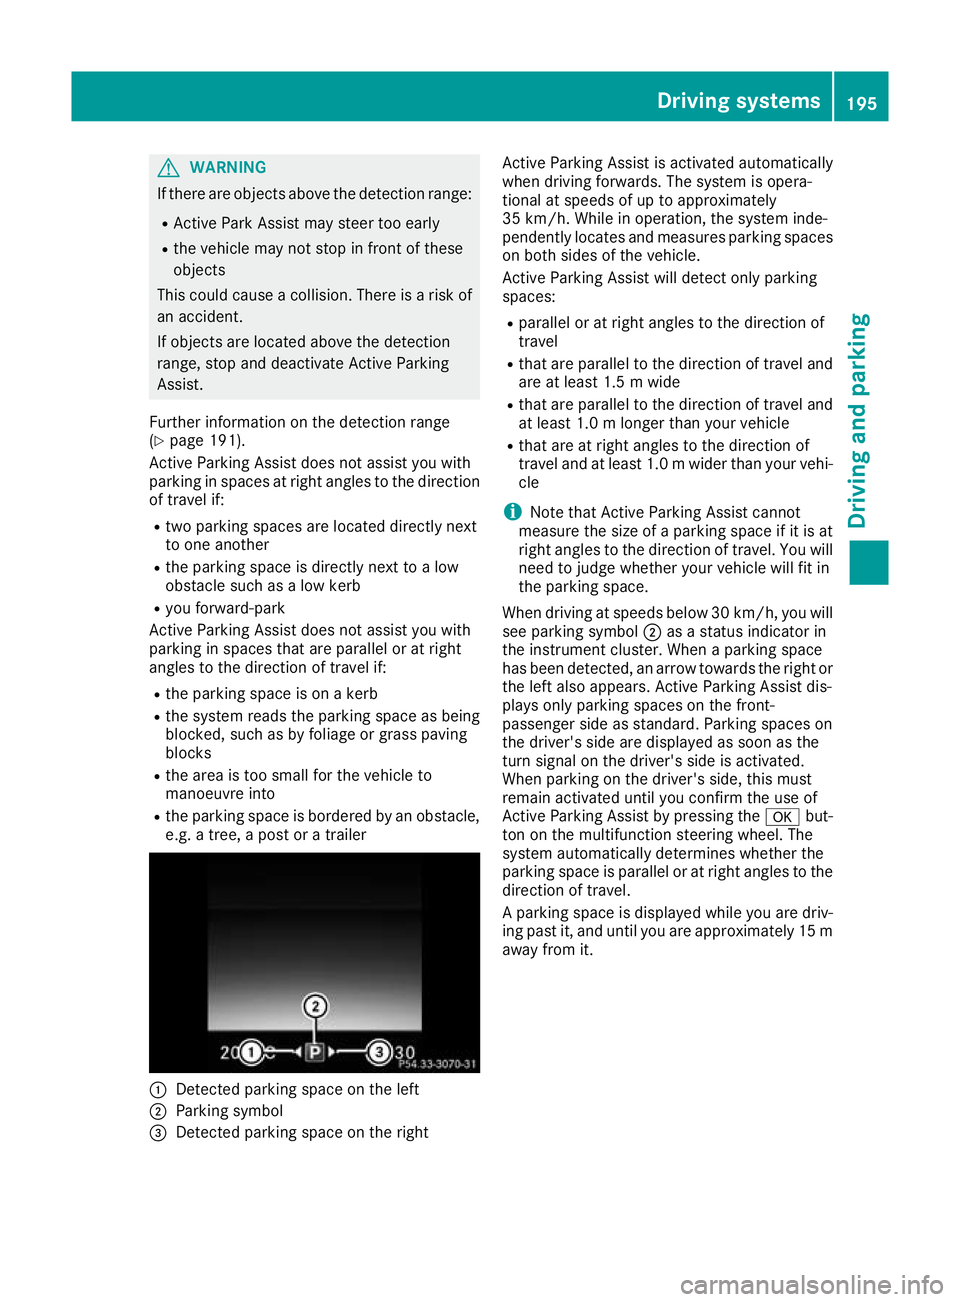
e.g. a tree, a post or a trailer :
Detected parking space on the left
; Parking symbol
= Detected parking space on the right Active Parking Assist is activated automatically
when driving forwards. The system is opera-
tional at speeds of up to approximately
35 km/h. While in operation, the system inde-
pendently locates and measures parking spaces on both sides of the vehicle.
Active Parking Assist will detect only parking
spaces:
R parallel or at right angles to the direction of
travel
R that are parallel to the direction of travel and
are at least 1.5 m wide
R that are parallel to the direction of travel and
at least 1.0 m longer than your vehicle
R that are at right angles to the direction of
travel and at least 1.0 mwider than your vehi-
cle
i Note that Active Parking Assist cannot
measure the size of a parking space if it is at
right angles to the direction of travel. You will
need to judge whether your vehicle will fit in
the parking space.
When driving at speeds below 30 km/h, you will see parking symbol ;as a status indicator in
the instrument cluster. When a parking space
has been detected, an arrow towards the right or
the left also appears. Active Parking Assist dis-
plays only parking spaces on the front-
passenger side as standard. Parking spaces on
the driver's side are displayed as soon as the
turn signal on the driver's side is activated.
When parking on the driver's side, this must
remain activated until you confirm the use of
Active Parking Assist by pressing the abut-
ton on the multifunction steering wheel. The
system automatically determines whether the
parking space is parallel or at right angles to the
direction of travel.
A parking space is displayed while you are driv-
ing past it, and until you are approximately 15 m away from it. Driving systems
195Driving and parking Z
Page 200 of 389
ing procedure will be cancelled. A sensible
parking position can no longer be achieved
from this position.
Exiting a parking space In order that Active Parking Assist can support
you when you are exiting a parking space:
R the border of the parking space must be high
enough at the front and the rear. A kerb, for
example, is too small.
R the border of the parking space must not be
too wide. Your vehicle can be manoeuvred
into the parking space at a maximum angle of
45° to the starting position.
R a manoeuvring distance of at least 1.0 mmust
be available.
Active Parking Assist can assist you with exiting
a parking space as well only if you have parked
the vehicle parallel to the direction of travel
using Active Parking Assist.
i If PARKTRONIC detects obstacles, Active
Parking Assist brakes automatically whilst the vehicle is exiting the parking space. You are
responsible for braking in good time.
X Start the engine.
X Release the electric parking brake.
X Switch on the turn signal in the direction in
which you intend to pull away.
X Shift the transmission to position Dor R.
The Start
Start Park ParkAssist?
Assist? Yes:
Yes:OK
OKNo:
No: %
message appears on the multifunction dis-
play.
X To cancel the procedure: press the%
button on the multifunction steering wheel or pull away.
or
X To exit a parking space with assistance
from Active Parking Assist: press thea
button on the multifunction steering wheel.
The Park Assist active Accelerate Park Assist active Accelerate
and brake
and brake Observe surroundings
Observe surroundings mes-
sage appears on the multifunction display.
X Release the multifunction steering wheel.
X Pull away, being ready to brake at all times. Do
not exceed a speed of approximately
10 km/h when exiting a parking space. Oth-
erwise, Active Parking Assist will be cancel-
led. X
Depending on the message or as required,
shift the transmission to position Dor R.
Active Parking Assist immediately steers in
the other direction. The Park Assist
Park Assist
active Accelerate and brake active Accelerate and brake Observe
Observe
surroundings
surroundings message appears on the mul-
tifunction display.
i You will achieve the best results in exiting a
parking space if you wait for the steering pro- cedure to complete before pulling away.
If you reverse after activation, the steering
wheel is moved to the straight-ahead posi-
tion.
X Drive forwards and reverse as prompted by
the PARKTRONIC warning displays, several
times if necessary.
Once you have exited the parking space com-
pletely, the steering wheel is moved to the
straight-ahead position. You hear a tone and the
Park Park Assist
Assist switched
switched off
offmessage appears
on the multifunction display. You will then have to steer and merge into traffic on your own.
PARKTRONIC is still available. You can take over
the steering again before the vehicle has exited the parking space completely. This is useful if
you recognise that it is already possible to pull
out of the parking space.
Cancelling Active Parking Assist X
Stop the movement of the multifunction
steering wheel or steer yourself.
Active Parking Assist will be cancelled at
once. The Park Assist cancelled Park Assist cancelled mes-
sage appears in the multifunction display.
or
X Press the PARKTRONIC button (Y page 193).
PARKTRONIC is switched off and Active Park- ing Assist is immediately cancelled. The
Park Assist cancelled Park Assist cancelled message appears
in the multifunction display.
Active Parking Assist is cancelled automatically
if:
R the electric parking brake is applied
R transmission position Pis selected
R parking using Active Parking Assist is no lon-
ger possible
R you are driving faster than 10 km/h
R a wheel spins and ESP ®
intervenes or fails.
The ÷ warning lamp lights up in the instru-
ment cluster. Driving systems
197Driving and parking Z