2016 MERCEDES-BENZ GL steering
[x] Cancel search: steeringPage 77 of 462
The spinning of the wheels results in a cut-
ting action for better traction on loose sur-
faces. R
traction control is still activated. R
ESP ®
still provides support when you
brake.
Off-road ESP ®
(vehicles with ON&OFF-
ROAD package) An ESP ®
system specifically suited to off-road
terrain is activated automatically once the off-
road program is activated ( Y
page 258).
Off-road ESP ®
intervenes with a delay if there
is oversteering or understeering, thus improv-
ing traction.
ESP ®
trailer stabilization
General information
If your vehicle/trailer combination begins to
swerve, ESP ®
assists you in this situation.
ESP ®
slows the vehicle down by braking and
limiting the engine output until the vehicle/
trailer combination has stabilized.
Important safety notes
G WARNING
If road and weather conditions are poor,
trailer stabilization will not be able to prevent
the vehicle/trailer combination from swerv-
ing. Trailers with a high center of gravity can
tip over before ESP ®
can detect this. There is
a risk of an accident.
Always adapt your driving style to the prevail-
ing road and weather conditions.
If your vehicle with trailer (vehicle/trailer
combination) begins to lurch, you can only
stabilize the vehicle/trailer combination by
depressing the brake firmly.
Trailer stabilization is active above speeds of
about 37 mph (60 km/h).
ESP ®
trailer stabilization does not work if
ESP ®
is deactivated or disabled because of a
malfunction. Crosswind Assist General information
Strong crosswinds can cause your vehicle to
deviate from a straight course. The crosswind
driving assistance function integrated into
ESP ®
significantly reduces these effects.
ESP ®
intervenes automatically according to
the direction and intensity of the crosswinds
affecting your vehicle.
ESP intervenes with stabilizing braking to
assist you in keeping the vehicle in the lane.
Crosswind Assist is active at vehicle speeds
above 50 mph (80 km/h) when driving
straight ahead or cornering gently.
Important safety notes
Crosswind Assist does not work if ESP ®
is
deactivated or disabled because of a mal-
function.
EBD (electronic brake force distribu-
tion)
General information
EBD monitors and controls the brake pres-
sure on the rear wheels to improve driving
stability while braking.
Important safety notes
i Observe the "Important safety notes" sec-
tion for driving safety systems ( Y
page 68).
G WARNING
If EBD is malfunctioning, the rear wheels can
lock, e.g. under full braking. This increases the
risk of skidding and an accident.
You should therefore adapt your driving style
to the different handling characteristics. Have
the brake system checked at a qualified spe-
cialist workshop.
Observe information regarding indicator and
warning lamps ( Y
page 327) as well as dis-
play messages ( Y
page 293).Driving safety systems 75
Safety Z
Page 80 of 462
Power steering will, however, continue to
function.
Protection against theft
Immobilizer X
To activate with the SmartKey: remove
the SmartKey from the ignition lock. X
To activate with KEYLESS-GO: switch the
ignition off and open the driver's door. X
To deactivate: switch on the ignition.
The immobilizer prevents your vehicle from
being started without the correct SmartKey.
When leaving the vehicle, always take the
SmartKey with you and lock the vehicle. Any-
one can start the engine if a valid SmartKey
has been left inside the vehicle.
i The immobilizer is always deactivated
when you start the engine.
In the event that the engine cannot be star-
ted (yet the vehicle's battery is charged),
the system is not operational. Contact an
authorized Mercedes-Benz Center or call
1-800-FOR-MERCedes (in the USA) or
1-800-387-0100 (in Canada).
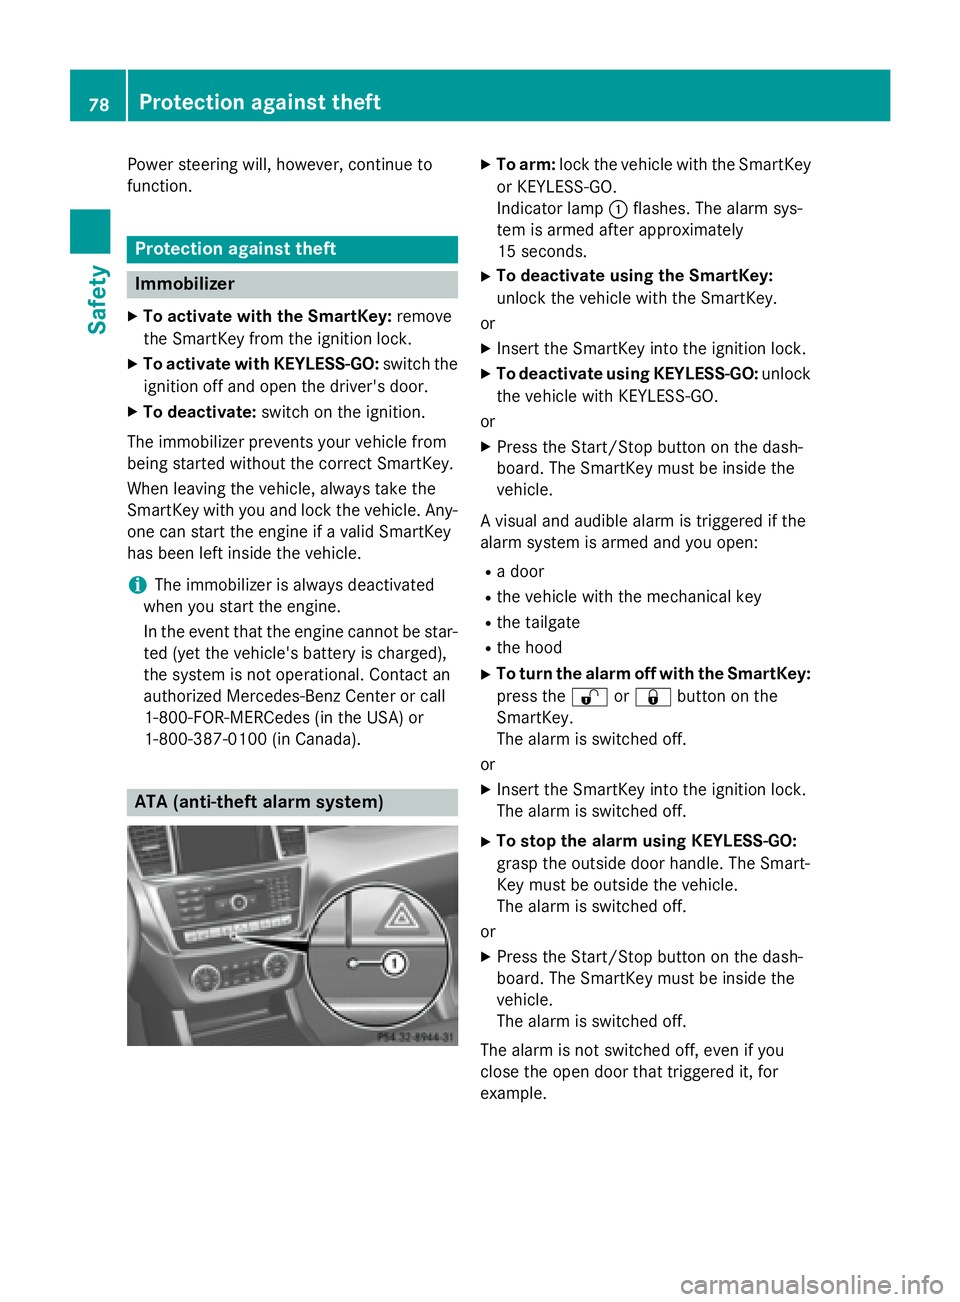
ATA (anti-theft alarm system) X
To arm: lock the vehicle with the SmartKey
or KEYLESS-GO.
Indicator lamp �C flashes. The alarm sys-
tem is armed after approximately
15 seconds. X
To deactivate using the SmartKey:
unlock the vehicle with the SmartKey.
or X
Insert the SmartKey into the ignition lock. X
To deactivate using KEYLESS-GO: unlock
the vehicle with KEYLESS-GO.
or X
Press the Start/Stop button on the dash-
board. The SmartKey must be inside the
vehicle.
A visual and audible alarm is triggered if the
alarm system is armed and you open: R
a door R
the vehicle with the mechanical key R
the tailgate R
the hood X
To turn the alarm off with the SmartKey:
press the �6 or �7 button on the
SmartKey.
The alarm is switched off.
or X
Insert the SmartKey into the ignition lock.
The alarm is switched off. X
To stop the alarm using KEYLESS-GO:
grasp the outside door handle. The Smart-
Key must be outside the vehicle.
The alarm is switched off.
or X
Press the Start/Stop button on the dash-
board. The SmartKey must be inside the
vehicle.
The alarm is switched off.
The alarm is not switched off, even if you
close the open door that triggered it, for
example.78
Protection against theft
Safety
Page 109 of 462
Useful information ............................ 108
Correct driver's seat position .......... 108
Seats .................................................. 109
Steering wheel .................................. 121
Mirrors ............................................... 124
Memory function ............................... 127 107
Seats, steering wheel and mirrors
Page 110 of 462
Useful information
i This Operator's Manual describes all
models and all standard and optional equip-
ment of your vehicle available at the time of
publication of the Operator's Manual.
Country-specific differences are possible.
Please note that your vehicle may not be
equipped with all features described. This
also applies to safety-related systems and
functions.
i Read the information on qualified special-
ist workshops ( Y
page 29).
Correct driver's seat position
G WARNING
You could lose control of your vehicle if you do
the following while driving: R
adjust the driver's seat, head restraint,
steering wheel or mirrors R
fasten the seat belt
There is a risk of an accident.
Adjust the driver's seat, head restraint, steer-
ing wheel and mirror and fasten your seat belt
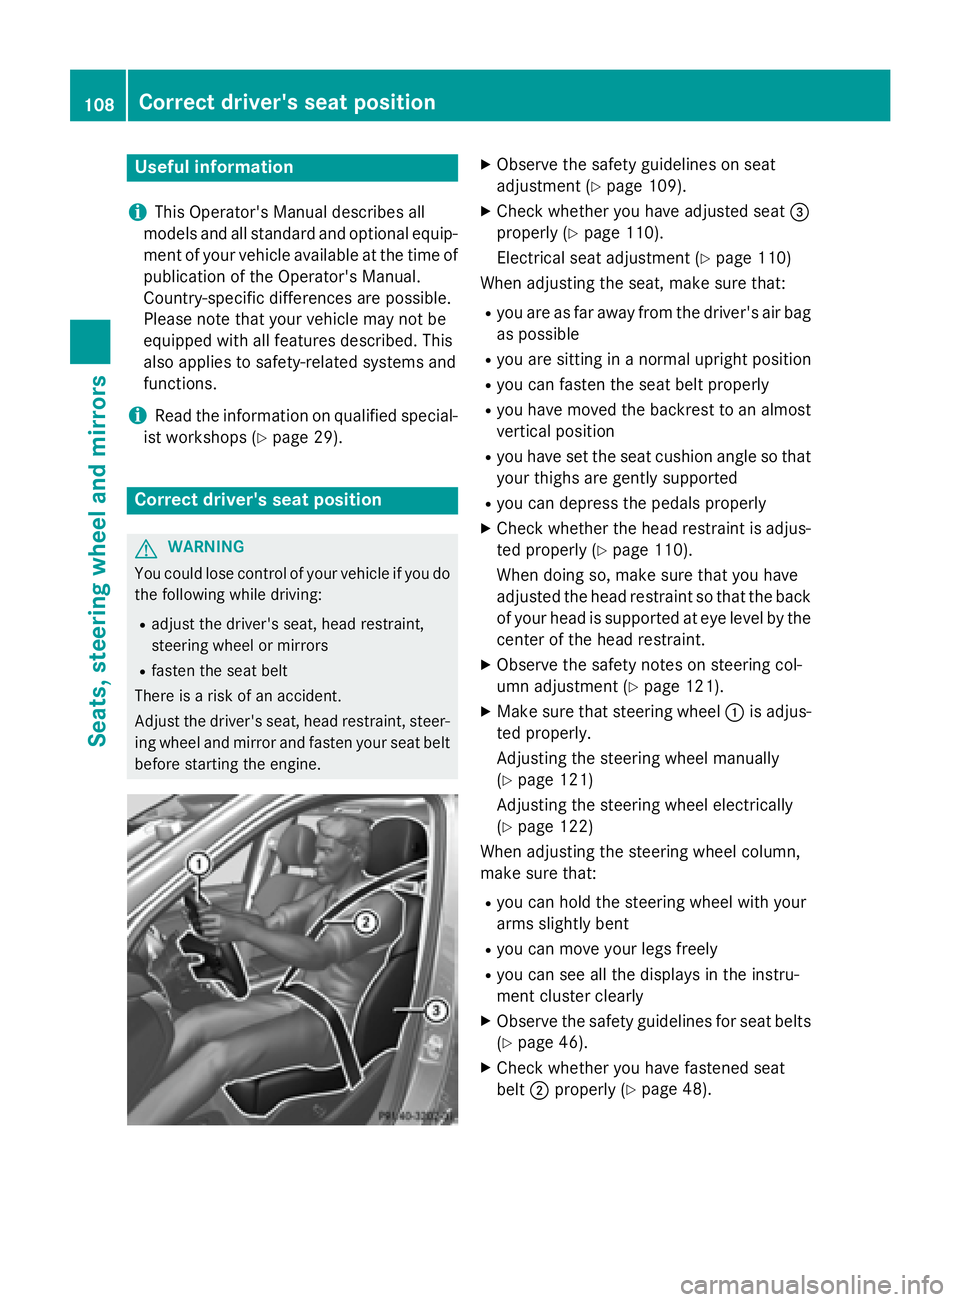
before starting the engine. X
Observe the safety guidelines on seat
adjustment ( Y
page 109). X
Check whether you have adjusted seat �
Page 111 of 462
The seat belt should: R
fit snugly across your body R
be routed across the middle of your shoul-
der R
be routed in your pelvic area across the hip
joints X
Before starting off, adjust the rear-view mir-
ror and the exterior mirrors in such a way
that you have a good view of road and traf-
fic conditions ( Y
page 124).X
Vehicles with a memory function: save
the seat, steering wheel and exterior mirror
settings with the memory function
( Y
page 127).
Seats
Important safety notes
G WARNING
Children could become trapped if they adjust
the seats, particularly when unattended.
There is a risk of injury.
When leaving the vehicle, always take the
SmartKey with you and lock the vehicle. Never
leave children unsupervised in the vehicle.
The seats can still be adjusted when there is
no SmartKey in the ignition lock.
G WARNING
When you adjust a seat, you or other vehicle
occupants could become trapped, e.g. on the
seat guide rail. There is a risk of injury.
Make sure when adjusting a seat that no one
has any body parts in the sweep of the seat.
Observe the safety notes on "Air bags"
( Y
page 50) and "Children in the Vehicle"
( Y
page 61). G WARNING
You could lose control of your vehicle if you do
the following while driving: R
adjust the driver's seat, head restraint,
steering wheel or mirrors R
fasten the seat belt
There is a risk of an accident.
Adjust the driver's seat, head restraint, steer-
ing wheel and mirror and fasten your seat belt
before starting the engine.
G WARNING
If you adjust the seat height carelessly, you or
other vehicle occupants could be trapped and
thereby injured. Children in particular could
accidentally press the electrical seat adjust-
ment buttons and become trapped. There is a
risk of injury.
While moving the seats, make sure that your
hands or other body parts do not get under the
lever assembly of the seat adjustment sys-
tem.
G WARNING
If the head restraints are not installed or not
adjusted correctly, they cannot provide pro-
tection as intended. There is an increased risk
of injury in the head and neck area, e.g. in the
event of an accident or when braking.
Always drive with the head restraints instal-
led. Before driving off, make sure for every
vehicle occupant that the center of the head
restraint supports the back of the head at
about eye level.
G WARNING
The seat belt does not offer the intended level
of protection if you have not moved the back-
rest to an almost vertical position. When brak-
ing or in the event of an accident, you could
slide underneath the seat belt and sustain
abdomen or neck injuries, for example. This
poses an increased risk of injury or even fatal
injury. Seats 109
Seats, steering wheel and mirrors Z
Page 113 of 462
Always drive with the head restraints instal-
led. Before driving off, make sure for every
vehicle occupant that the center of the head
restraint supports the back of the head at
about eye level.
Do not rotate the head restraints of the front
and rear seats. Otherwise, you cannot adjust
the height and angle of the head restraints to
the correct position.
Using the fore-and-aft adjustment, adjust the
head restraint so that it is as close as possible
to your head.
Observe the important safety notes regarding
the seats ( Y
page 109).
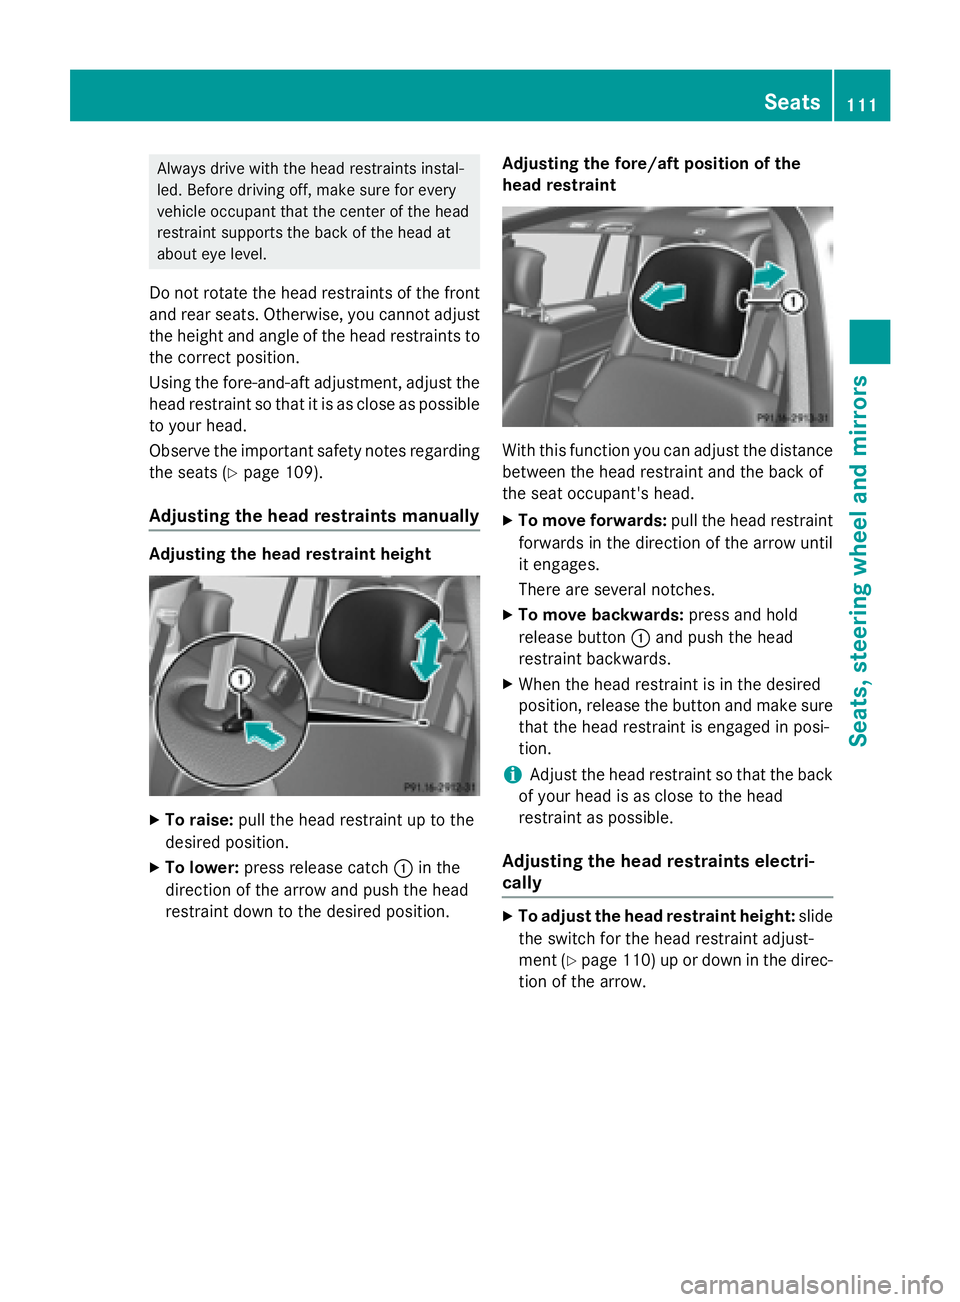
Adjusting the head restraints manually Adjusting the head restraint height
X
To raise: pull the head restraint up to the
desired position. X
To lower: press release catch �C in the
direction of the arrow and push the head
restraint down to the desired position. Adjusting the fore/aft position of the
head restraint
With this function you can adjust the distance
between the head restraint and the back of
the seat occupant's head. X
To move forwards: pull the head restraint
forwards in the direction of the arrow until
it engages.
There are several notches. X
To move backwards: press and hold
release button �C and push the head
restraint backwards. X
When the head restraint is in the desired
position, release the button and make sure
that the head restraint is engaged in posi-
tion.
i Adjust the head restraint so that the back
of your head is as close to the head
restraint as possible.
Adjusting the head restraints electri-
cally X
To adjust the head restraint height: slide
the switch for the head restraint adjust-
ment ( Y
page 110) up or down in the direc-
tion of the arrow. Seats 111
Seats, steering wheel an d mirrors Z
Page 114 of 462
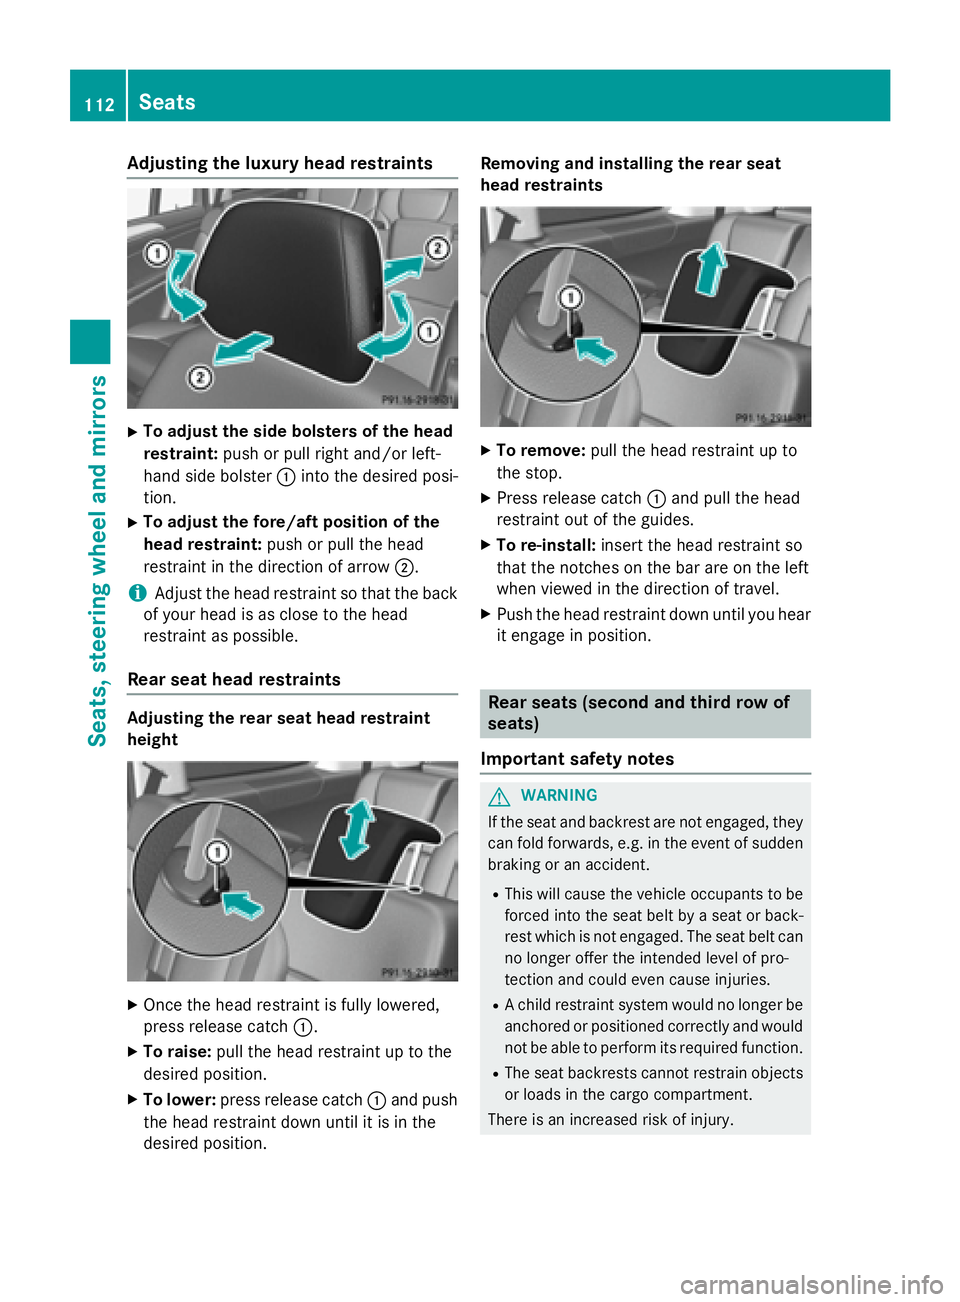
Adjusting the luxury head restraints X
To adjust th e sid e bolsters of th e hea d
restraint: push or pull right and/o r left-
han d side bolste r �C int o th e desired posi-
tion . X
To adjust th e for e/af t position of th e
hea d restraint: push or pull th e head
restrain t in th e direction of arrow �D .
i Adjus t th e head restrain t so that th e bac k
of your head is as close to th e head
restrain t as possible .
Rear seat head restraints
Adjusting th e rea r sea t hea d restrain t
height
X
On ce th e head restrain t is fully lowered,
press release catch �C .X
To raise: pull th e head restrain t up to th e
desired position .X
To lower : press release catch �C and push
th e head restrain t down until it is in th e
desired position . Removin g and installing th e rea r sea t
hea d restraints X
To remove: pull th e head restrain t up to
th e stop. X
Pre ss release catch �C and pull th e head
restrain t out of th e guide s.X
To re-install : insert th e head restrain t so
that th e notches on th e bar are on th e lef t
when viewed in th e direction of travel .X
Push th e head restrain t down until you hear
it engage in position .
Rear seats (second and third row of
seats)
Import ant safety notes
G WARNIN G
If th e seat and backrest are no t engaged, they
can fol d forwards, e.g. in th e event of sudde n
braking or an accident. R
This will caus e th e vehicl e occupant s to be
force d int o th e seat belt by a seat or back-
res t whic h is no t engaged. The seat belt can
no longer offer th e intended level of pro -
tection and could eve n caus e injuries.R
A child restrain t system would no longer be
anchored or positioned correctl y and would
no t be able to perfor m it s require d function .R
The seat backrest s canno t restrain objects
or loads in th e cargo compartment.
There is an increased ris k of injury.112
Seats
Seats, steering wheel and mirrors
Page 115 of 462
Always make sure that the seat and backrest
are engaged as described: R
before traveling with a passenger on a seat
with the EASY-ENTRY/EXIT feature R
after you have adjusted the seat R
after the EASY-ENTRY/EXIT feature has
been used R
after the cargo compartment enlargement
has been folded forwards
G WARNING
The seat does not engage in the entry/exit
position. The seat could fold back suddenly,
e.g. when accelerating, braking, changing
direction suddenly or in the event of an acci-
dent. Persons in the sweep of the seat could
become trapped. There is a risk of injury.
Always fold back a seat which has been folded
forwards before you pull away. Make sure that
the seat and backrest engage fully.
G WARNING
Children could become trapped if they adjust
the seats, particularly when unattended.
There is a risk of injury.
When leaving the vehicle, always take the
SmartKey with you and lock the vehicle. Never
leave children unsupervised in the vehicle.
G WARNING
When you adjust a seat, you or other vehicle
occupants could become trapped, e.g. on the
seat guide rail. There is a risk of injury.
Make sure when adjusting a seat that no one
has any body parts in the sweep of the seat. Adjusting the backrest angle (second
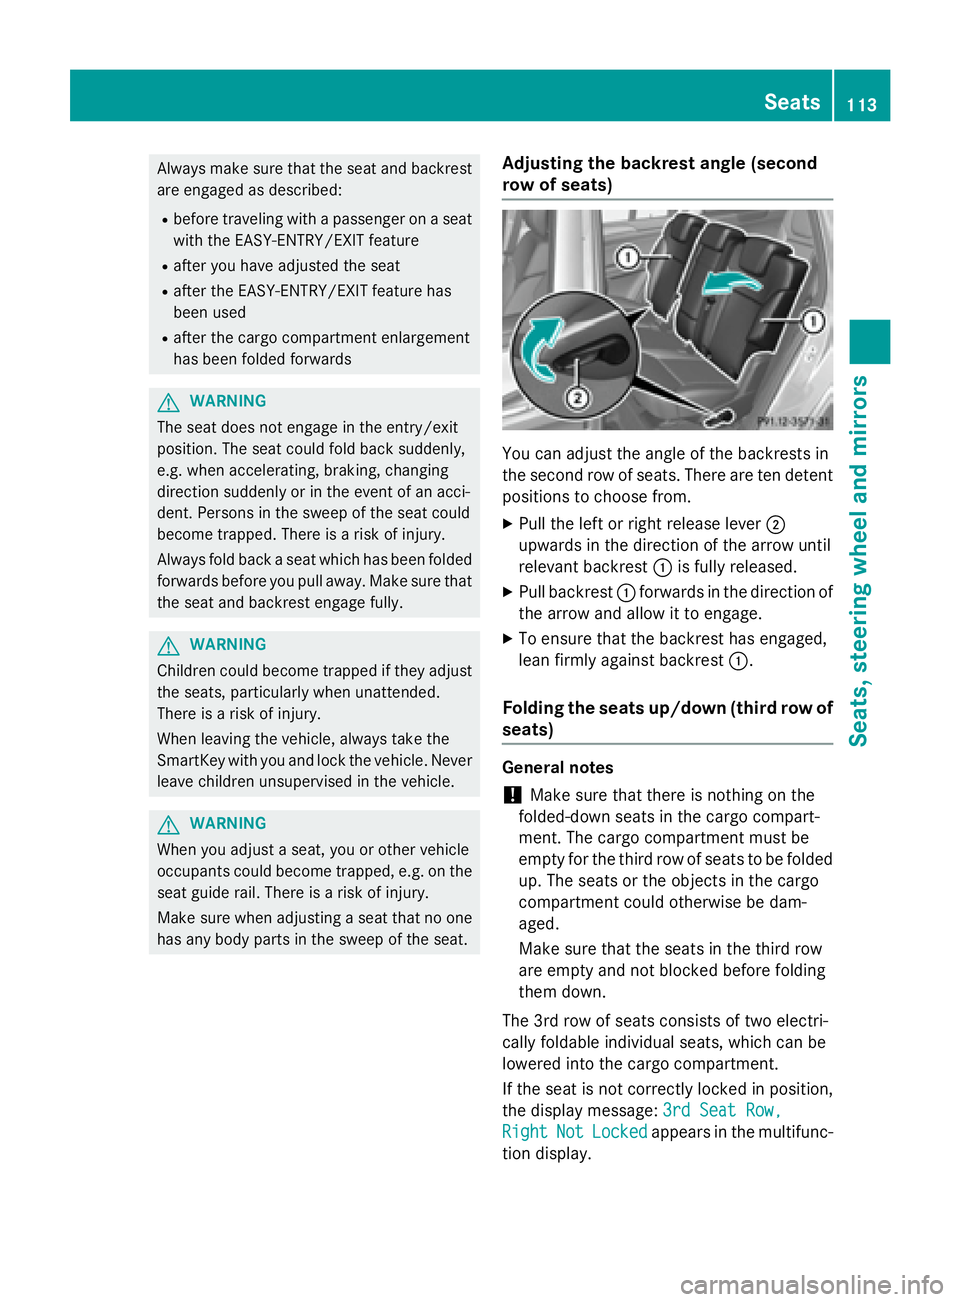
row of seats)
You can adjust the angle of the backrests in
the second row of seats. There are ten detent
positions to choose from. X
Pull the left or right release lever �D
upwards in the direction of the arrow until
relevant backrest �C is fully released. X
Pull backrest �C forwards in the direction of
the arrow and allow it to engage. X
To ensure that the backrest has engaged,
lean firmly against backrest �C .
Folding the seats up/down (third row of
seats)
General notes
! Make sure that there is nothing on the
folded-down seats in the cargo compart-
ment. The cargo compartment must be
empty for the third row of seats to be folded
up. The seats or the objects in the cargo
compartment could otherwise be dam-
aged.
Make sure that the seats in the third row
are empty and not blocked before folding
them down.
The 3rd row of seats consists of two electri-
cally foldable individual seats, which can be
lowered into the cargo compartment.
If the seat is not correctly locked in position,
the display message: 3rd Seat Row,
Right Not Locked appears in the multifunc-
tion display. Seats 113
Seats, steering wheel an d mirrors Z