2016 MERCEDES-BENZ GL recommended oil
[x] Cancel search: recommended oilPage 22 of 462

Search & Send ............................... 361
Self-test ......................................... 357
Speed alert .................................... 364
System .......................................... 357
Triggering the vehicle alarm ........... 364
Vehicle Health Check .................... 363
Vehicle remote unlocking .............. 362
Telephone
Accepting a call ............................. 280
Display message ............................ 322
Menu (on-board computer) ............ 279
Number from the phone book ........ 280
Redialing ........................................ 280
Rejecting/ending a call ................. 280
Temperature
Coolant (display in the instrument
cluster) .......................................... 273
Coolant (on-board computer,
Mercedes-AMG vehicles) ............... 287
Engine oil (on-board computer,
Mercedes-AMG vehicles) ............... 287
Outside temperature ...................... 273
Setting (climate control) ................ 155
Transmission oil (on-board com-
puter, Mercedes-AMG vehicles) ..... 287
Through-loading feature ................... 343
Time
see separate operating instructions
Timing (RACETIMER) ......................... 288
Tire pressure
Calling up (on-board computer) ..... 412
Checking manually ........................ 411
Display message ............................ 318
Maximum ....................................... 411
Not reached (TIREFIT) .................... 390
Notes ............................................. 409
Reached (TIREFIT) .......................... 390
Recommended ............................... 408
Tire pressure loss warning system
General notes ................................ 411
Important safety notes .................. 411
Restarting ...................................... 412
Tire pressure monitor
Checking the tire pressure elec-
tronically ........................................ 414
Function/notes ............................. 412
General notes ................................ 412
Important safety notes .................. 413 Radio type approval for the tire
pressure monitor ........................... 415
Restarting ...................................... 415
Warning lamp ................................. 338
Warning message .......................... 414
TIREFIT kit .......................................... 388
Tire pressure not rea ched .............. 390
Tire p ressure reached .................... 390
Tires
Aspect ratio (definition) ................. 426
Average weight of the vehicle
occupants (definition) .................... 425
Bar (definition) ............................... 424
Changing a wheel .......................... 427
Characteristics .............................. 424
Checking ........................................ 405
Curb weight (definition) ................. 426
Definition of terms ......................... 424
Direction of rotation ...................... 427
Display message ............................ 318
Distribution of the vehicle occu-
pants (definition) ............................ 427
DOT (Department of Transporta-
tion) (definition) ............................. 425
DOT, Tire Identification Number
(TIN) ............................................... 424
GAWR (Gross Axle Weight Rating)
(definition) ..................................... 425
General notes ................................ 432
GTW (Gross Trailer Weight) (defi-
nition) ............................................ 425
GVW (Gross Vehicle Weight) (def-
inition) ........................................... 425
GVWR (Gross Vehicle Weight Rat-
ing) (definition) .............................. 425
Important safety notes .................. 404
Increased vehicle weight due to
optional equipment (definition) ...... 425
Information on driving .................... 404
Kilopascal (kPa) (definition) ........... 425
Labeling (overview) ........................ 421
Load bearing index (definition) ...... 426
Load index ..................................... 423
Load index (definition) ................... 425
M+S tires ....................................... 406
Maximum load on a tire (defini-
tion) ............................................... 42620
Index
Page 380 of 462
R
battery R
connectors R
lights R
seals R
trim R
ventilation slots
Damaged seals or electrical components
can lead to leaks or failures.
Cleaning the paintwork
! Do not affix: R
stickers R
films R
magnetic plates or similar items
to painted surfaces. You could otherwise
damage the paintwork.
Scratches, corrosive deposits, areas affected
by corrosion and damage caused by inade-
quate care cannot always be completely
repaired. In such cases, visit a qualified spe-
cialist workshop. X
Remove dirt immediately, where possible,
while avoiding rubbing too hard. X
Soak insect remains with insect remover
and rinse off the treated areas afterwards. X
Soak bird droppings with water and rinse
off the treated areas afterwards. X
Remove coolant, brake fluid, tree resin,
oils, fuels and greases by rubbing gently
with a cloth soaked in petroleum ether or
lighter fluid. X
Use tar remover to remove tar stains. X
Use silicone remover to remove wax.
If water no longer forms "beads" on the paint
surface, use the paint care products recom-
mended and approved by Mercedes-Benz.
This is the case approximately every three to
five months, depending on the climate con-
ditions and the care product used.
If dirt has penetrated the paint surface or if
the paint has become dull, the paint cleaner
recommended and approved by Mercedes-
Benz should be used. Do not use these care products in the sun or
on the hood while the hood is hot. X
Use a suitable touch-up stick, e.g. MB
Touch-Up Stick, to repair slight damage to
the paintwork quickly and provisionally.
Matte finish care
! Never polish the vehicle or the light alloy
wheels. Polishing causes the finish to
shine.
! The following may cause the paint to
become shiny and thus reduce the matte
effect: R
Vigorous rubbing with unsuitable mate-
rials. R
Frequent use of car washes. R
Washing the vehicle in direct sunlight.
! Never use paint cleaner, buffing or pol-
ishing products, or gloss preserver, e.g.
wax. These products are only suitable for
high-gloss surfaces. Their use on vehicles
with matte finish leads to considerable sur-
face damage (shiny, spotted areas).
Always have paintwork repairs carried out
at a qualified specialist workshop.
! Do not use wash programs with a hot wax
treatment under any circumstances.
Observe these notes if your vehicle has a
clear matte finish. This will help you to avoid
damage to the paintwork due to incorrect
treatment.
These notes also apply to light alloy wheels
with a clear matte finish.
i The vehicle should preferably be washed
by hand using a soft sponge, car shampoo
and plenty of water.
i Use only insect remover and car shampoo
from the range of recommended and
approved Mercedes-Benz care products.378
Care
Maintenance and care
Page 384 of 462
X
Before cleaning the display, make sure that
it is switched off and has cooled down. X
Clean the display surface using a commer-
cially available microfiber cloth and
TFT/LCD display cleaner. X
Dry the display surface using a dry micro-
fiber cloth.
Cleaning Night View Assist Plus
! Never clean the camera lens. When clean-
ing the field of vision of the driving systems,
make sure that you do not spray glass
cleaner on the camera lens. If the camera
lens is dirty, visit a qualified specialist work-
shop.
X
Fold down the camera cover by recess �C .
X
Use a soft cloth to clean the windshield in
front of camera �D . Cleaning the plastic trim
G WARNING
Care products and cleaning agents containing
solvents cause surfaces in the cockpit to
become porous. As a result, plastic parts may
come loose in the event of air bag deploy-
ment. There is a risk of injury.
Do not use any care products and cleaning
agents to clean the cockpit.
! Do not affix the following to plastic surfa-
ces: R
stickers R
films R
scented oil bottles or similar items
You can otherwise damage the plastic.
! Do not allow cosmetics, insect repellent
or sunscreen to come into contact with the
plastic trim. This maintains the high-quality
look of the surfaces. X
Wipe the plastic trim with a damp, lint-free
cloth, e.g. a microfiber cloth. X
Heavy soiling: use care and cleaning prod-
ucts recommended and approved by
Mercedes-Benz.
The surface may change color temporarily.
Wait until the surface is dry again.
Cleaning the steering wheel and gear or
selector lever X
Thoroughly wipe with a damp cloth or use
leather care agents that have been recom-
mended and approved by Mercedes-Benz.
Cleaning genuine wood and trim ele-
ments
! Do not use solvent-based cleaning agents
such as tar remover, wheel cleaners, pol-
ishes or waxes. There is otherwise a risk of
damaging the surface.
! Do not use chrome polish on trim pieces.
The trim pieces have a chrome look but are
mostly made of anodized aluminum and382
Care
Maintenance and care
Page 385 of 462
can lose their shine if chrome polish is
used. Use a damp, lint-free cloth instead
when cleaning the trim pieces.
If the chrome-plated trim pieces are very
dirty, you can use a chrome polish. If you
are unsure as to whether the trim pieces
are chrome-plated or not, consult an
authorized Mercedes-Benz Center. X
Wipe the wooden trim and trim pieces with
a damp, lint-free cloth, e.g. a microfiber
cloth. X
Heavy soiling: use car care and cleaning
products recommended and approved by
Mercedes-Benz.
Cleaning the seat covers General notes
! Do not use microfiber cloths to clean gen-
uine leather, artificial leather or DINAMICA
covers. If used often, these can damage the
cover.
i Note that regular care is essential to
ensure that the appearance and comfort of
the covers is retained over time.
Genuine leather seat covers
! To retain the natural appearance of the
leather, observe the following cleaning
instructions: R
Clean genuine leather covers carefully
with a damp cloth and then wipe the cov-
ers down with a dry cloth. R
Make sure that the leather does not
become soaked. It may otherwise
become rough and cracked. R
Only use leather care agents that have
been tested and approved by Mercedes-
Benz. You can obtain these from a quali-
fied specialist workshop.
Leather is a natural product.
It exhibits natural surface characteristics, for
example: R
differences in the texture R
marks caused by growth and injury R
slight nuances of color
These are characteristics of leather and not
material defects.
Seat covers of other materials
! Observe the following when cleaning: R
clean artificial leather covers with a cloth
moistened with a solution containing 1%
detergent (e.g. dish washing liquid). R
clean cloth covers with a microfiber cloth
moistened with a solution containing 1%
detergent (e.g. dish washing liquid). Rub
care fu lly and always wipe entire seat sec-
tions to avoid leaving visible lines. Leave
the seat to dry afterwards. Cleaning
results depend on the type of dirt and
how long it has been there. R
clean DINAMICA covers with a damp
cloth. Make sure that you wipe entire
seat sections to avoid leaving visible
lines.
Cleaning the seat belts
G WARNING
Seat belts can become severely weakened if
bleached or dyed. This could cause the seat
belts to tear or fail, for instance, in the event of
an accident. This poses an increased risk of
injury or fatal injury.
Never bleach or dye the seat belts.
! Do not clean the seat belts using chemical
cleaning agents. Do not dry the seat belts
by heating at temperatures above 176 ‡
(80 †) or in direct sunlight. X
Use clean, lukewarm water and soap solu-
tion. Care 383
Maintenance and care Z
Page 451 of 462
with premium-grade unleaded gasoline
as soon as possible. R
Do not drive at the maximum speed. R
Avoid sudden acceleration and engine
speeds over 3,000 rpm.
You will usually find information about the fuel
grade on the pump. If you cannot find the
label on the pump, ask the staff for assis-
tance.
i For further information, consult a quali-
fied specialist workshop or visit
http://www.mbusa.com (USA only).
i E10 fuel contains up to 10% bioethanol.
Your vehicle is E10-compatible. You can
refuel your vehicle using E10 fuel.
As a temporary measure, if the recommended
fuel is not available, you may also use regular
unleaded gasoline with an octane rating of
87 AKI/91 RON. This may reduce engine per-
formance and increase fuel consumption.
Avoid driving at full throttle and sudden accel-
eration. Never refuel using fuel with a lower
AKI.
Information on refueling ( Y
page 183).
Additives
! Operating the engine with fuel additives
added later can lead to engine failure. Do
not mix fuel additives with fuel. This does
not include additives for the removal and
prevention of residue buildup. gasoline
must only be mixed with additives recom-
mended by Mercedes-Benz. Comply with
the instructions for use on the product
label. More information about recommen-
ded additives can be obtained from any
authorized Mercedes-Benz Center.
Mercedes-Benz recommends that you use
branded fuels that have additives.
The quality of the fuel available in some coun-
tries may not be suff icient. Residue could
build up
in the injection system as a result. In
such cases, and in consultation with an
authorized Mercedes-Benz Center, the gaso-
line may be mixed with the cleaning additive recommended by Mercedes-Benz. You must
observe the notes and mixing ratios specified
on the container.
Diesel Fuel grade
G WARNING
If you mix diesel fuel with gasoline, the flash
point is lower than that of pure diesel fuel.
When the engine is running, exhaust system
components could overheat without being
noticed. There is a risk of fire.
Never refuel with gasoline. Never mix gasoline
with diesel fuel.
! Only use Ultra Low Sulfur Diesel (ULSD),
otherwise it may lead to increased wear
and damage to the fuel system, engine and
exhaust system.
! Do not use the following: R
gasoline R
diesel with a bio-diesel content greater
than 5% (e.g. B20) R
bio-diesel R
vegetable oil R
paraffin R
kerosene R
marine diesel R
heating oil
Do not mix such fuels with diesel fuel and
do not use any special additives. Other-
wise, engine damage may occur.
! In countries outside USA and Canada,
only use sulfur-free diesel with a sulfur con-
tent under 50 ppm. Otherwise, the emis-
sion control system could be damaged.
You will usually find information about the fuel
grade on the pump. If you cannot find the
label on the pump, ask the staff for assis-
tance.
Information on refueling ( Y
page 183).Service products and filling capacities 449
Technical data Z
Page 453 of 462
The engine oils are matched to the perform-
ance of Mercedes-Benz engines and service
intervals. You should therefore only use
engine oils and oil filters that are approved for
vehicles with maintenance systems.
For a list of approved engine oils and oil filters,
consult an authorized Mercedes-Benz Cen-
ter. Or visit the website
http://bevo.mercedes-benz.com.
The table shows which engine oils have been
approved for your vehicle.
Gasoline engines MB Approval
All models
229.5
Diesel engines MB Approval
GL 350 Blue-
TEC 4MATIC 228.51,
229.31,
229.51, 229.52
Mercedes-AMG vehicles: use only
SAE 0W-40 or SAE 5W-40 engine oils.
i MB approval is indicated on the oil con-
tainers.
Filling capacities
The following values refer to an oil change
including the oil filter.
Missing values were not available at time of
going to print.
Model Capacity
GL 350 Blue-
TEC 4MATIC 8.5 US qt (8.0 l)
GL 450
GL 450 4MATIC 7.4 US qt (7.0 l)
GL 550 4MATIC
9.0 US qt (8.5 l)
Mercedes ‑ AMG
vehicles Additives
! Do not use any additives in the engine oil.
This could damage the engine.
Engine oil viscosity
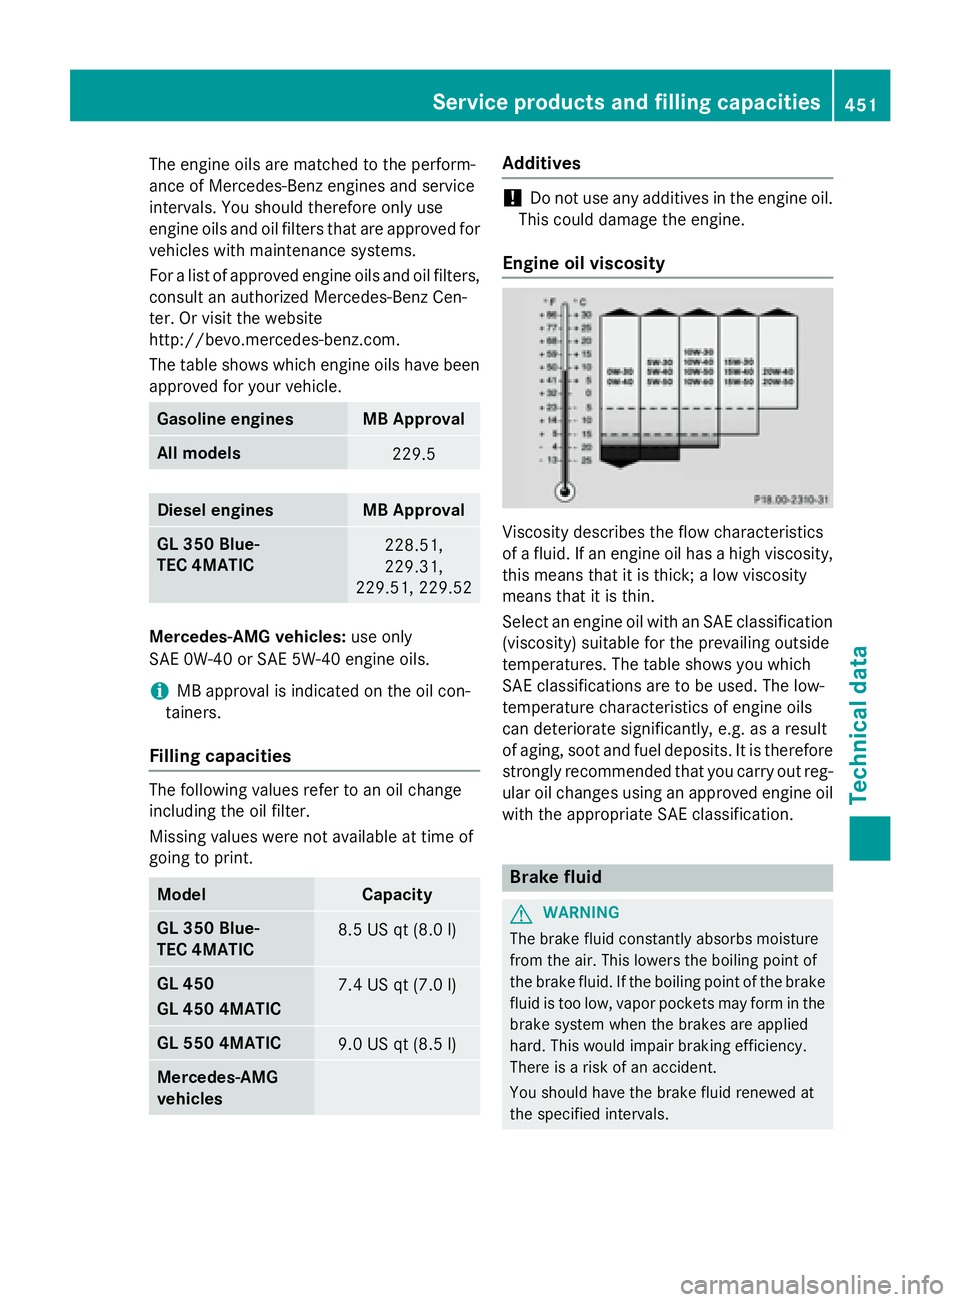
Viscosity describes the flow characteristics
of a fluid. If an engine oil has a high viscosity,
this means that it is thick; a low viscosity
means that it is thin.
Select an engine oil with an SAE classification
(viscosity) suitable for the prevailing outside
temperatures. The table shows you which
SAE classifications are to be used. The low-
temperature characteristics of engine oils
can deteriorate significantly, e.g. as a result
of aging, soot and fuel deposits. It is therefore
strongly recommended that you carry out reg-
ular oil changes using an approved engine oil
with the appropriate SAE classification.
Brake fluid
G WARNING
The brake fluid constantly absorbs moisture
from the air. This lowers the boiling point of
the brake fluid. If the boiling point of the brake
fluid is too low, vapor pockets may form in the
brake system when the brakes are applied
hard. This would impair braking efficiency.
There is a risk of an accident.
You should have the brake fluid renewed at
the specified intervals.Service products and filling capacities 451
Technical data Z