2016 MERCEDES-BENZ G-CLASS SUV brake
[x] Cancel search: brakePage 162 of 261
Warning/
indicator
lamp
N N
Signa ltype
Possible causes/consequences and M
MSolutions !
N
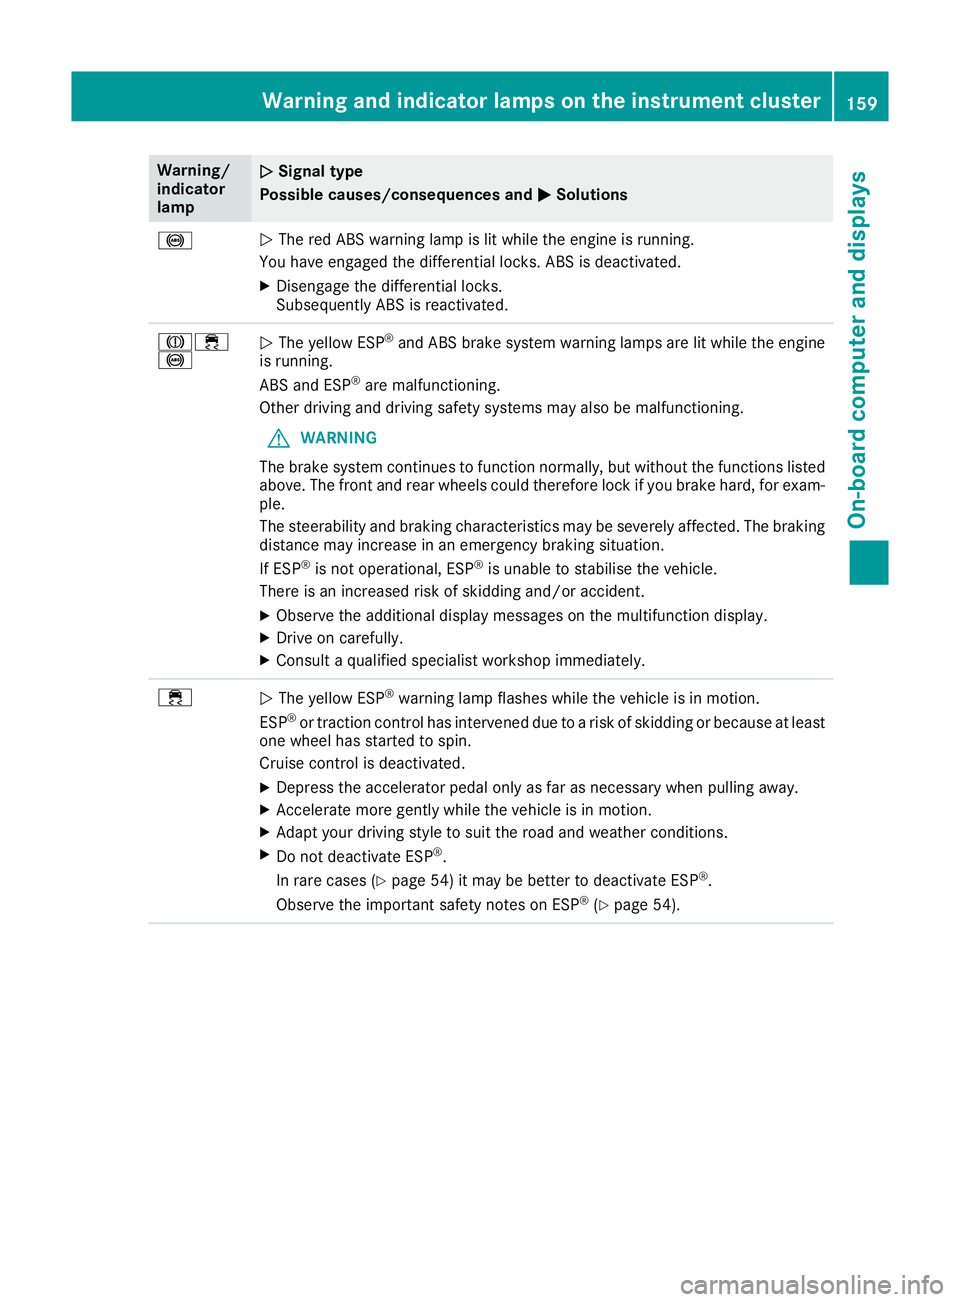
The red ABS warning lamp is lit while the engine is running.
You have engaged the differential locks. ABS is deactivated.
X Disengage the differential locks.
Subsequently ABS is reactivated. J÷
!
N
The yellow ESP ®
and ABS brake system warning lamps are lit while the engine
is running.
ABS and ESP ®
are malfunctioning.
Other driving and driving safety systems may also be malfunctioning.
G WARNING
The brake system continues to function normally, but without the functions listed above. The front and rear wheels could therefore lock if you brake hard, for exam-
ple.
The steerability and braking characteristics may be severely affected. The braking
distance may increase in an emergency braking situation.
If ESP ®
is not operational, ESP ®
is unable to stabilise the vehicle.
There is an increased risk of skidding and/or accident.
X Observe the additional display messages on the multifunction display.
X Drive on carefully.
X Consult aqualified specialist workshop immediately. ÷
N
The yellow ESP ®
warning lamp flashes while the vehicle is in motion.
ESP ®
or traction control has intervened due to arisk of skidding or because at least
one wheel has started to spin.
Cruise control is deactivated.
X Depress the accelerator pedal only as far as necessary when pulling away.
X Accelerate more gently while the vehicle is in motion.
X Adapt your driving style to suit the road and weather conditions.
X Do not deactivate ESP ®
.
In rare cases (Y page 54) it may be better to deactivate ESP ®
.
Observe the important safety notes on ESP ®
(Y page 54). Warning and indicato
rlamps on the instrument cluster
159On-boardcomputer and displays Z
Page 163 of 261
Warning/
indicator
lamp
N N
Signa ltype
Possible causes/consequences and M
MSolutions å
N
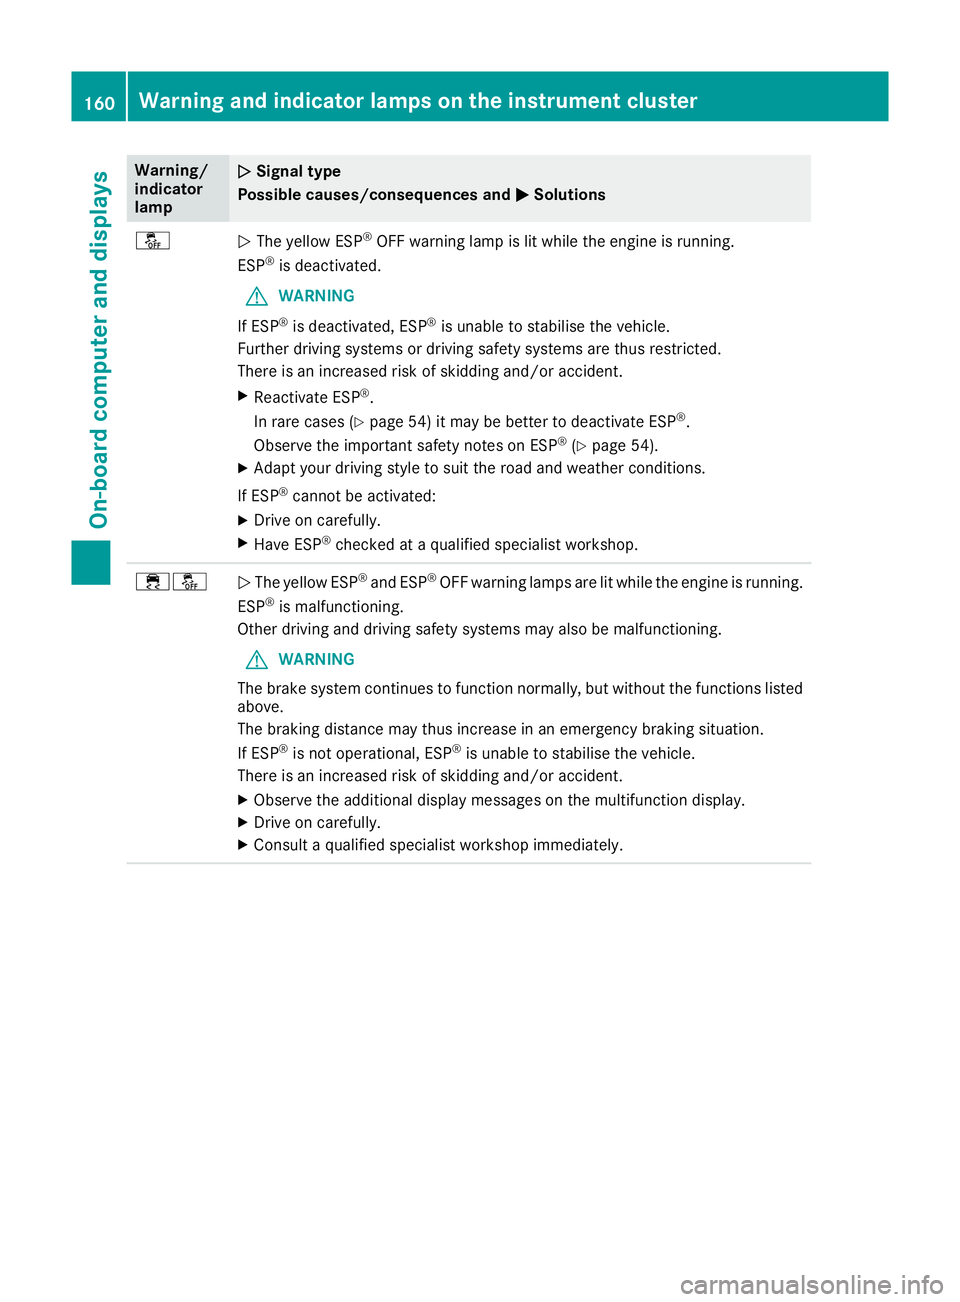
The yellow ESP ®
OFF warning lamp is lit while the engine is running.
ESP ®
is deactivated.
G WARNING
If ESP ®
is deactivated, ESP ®
is unable to stabilise the vehicle.
Further driving systems or driving safety systems are thus restricted.
There is an increased risk of skidding and/or accident.
X Reactivate ESP ®
.
In rare cases (Y page 54) it may be better to deactivate ESP ®
.
Observe the important safety notes on ESP ®
(Y page 54).
X Adapt your driving style to suit the road and weather conditions.
If ESP ®
cannot be activated:
X Drive on carefully.
X Have ESP ®
checked at aqualified specialist workshop. ֌
N
The yellow ESP ®
and ESP ®
OFF warning lamps are lit while the engine is running.
ESP ®
is malfunctioning.
Other driving and driving safety systems may also be malfunctioning.
G WARNING
The brake system continues to function normally, but without the functions listed above.
The braking distance may thus increase in an emergenc ybraking situation.
If ESP ®
is not operational, ESP ®
is unable to stabilise the vehicle.
There is an increased risk of skidding and/or accident.
X Observe the additional display messages on the multifunction display.
X Drive on carefully.
X Consult aqualified specialist workshop immediately. 160
Warning and indicator lamps on the instrument clusterOn-board computer and displays
Page 164 of 261
Warning/
indicator
lamp
N N
Signa ltype
Possible causes/consequences and M
MSolutions ֌
N
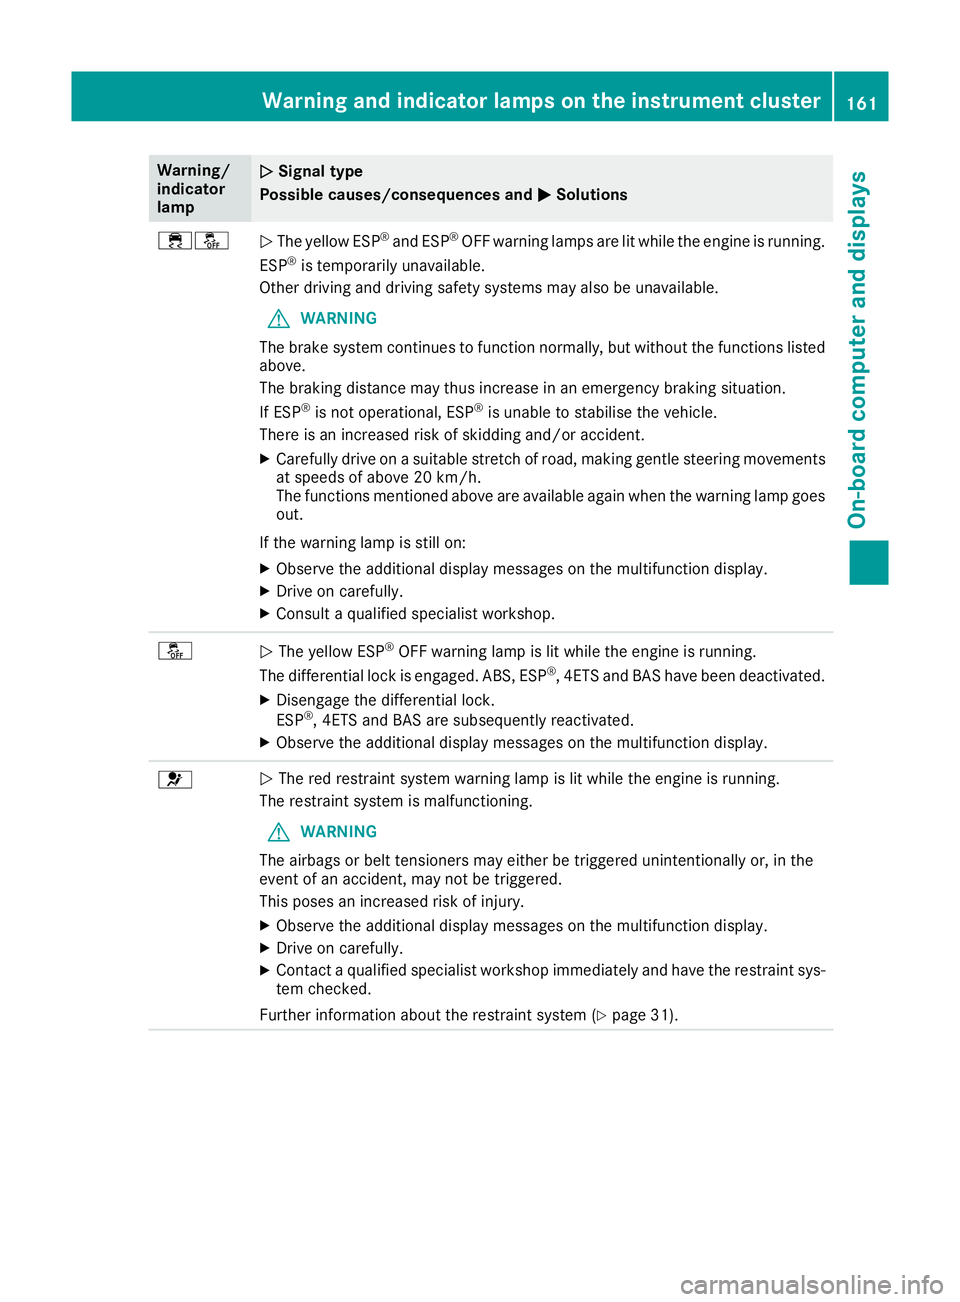
The yellow ESP ®
and ESP ®
OFF warning lamps are lit while the engine is running.
ESP ®
is temporarily unavailable.
Other driving and driving safety systems may also be unavailable.
G WARNING
The brake system continues to function normally, but without the functions listed above.
The braking distance may thus increase in an emergency braking situation.
If ESP ®
is not operational, ESP ®
is unable to stabilise the vehicle.
There is an increased risk of skidding and/or accident.
X Carefully drive on asuitable stretch of road, making gentle steerin gmovements
at speeds of above 20 km/h.
The functions mentioned above are available again when the warning lamp goes
out.
If the warning lamp is still on: X Observe the additional display messages on the multifunction display.
X Drive on carefully.
X Consult aqualified specialist workshop. å
N
The yellow ESP ®
OFF warning lamp is lit while the engine is running.
The differential lock is engaged. ABS,E SP®
,4 ETS and BAS have been deactivated.
X Disengage the differential lock.
ESP ®
,4 ETS and BAS are subsequently reactivated.
X Observe the additional display messages on the multifunction display. 6
N
The red restraint system warning lamp is lit while the engine is running.
The restraint system is malfunctioning.
G WARNING
The airbags or belt tensioners may either be triggered unintentionally or, in the
event of an accident ,may not be triggered.
This poses an increased risk of injury.
X Observe the additional display messages on the multifunction display.
X Drive on carefully.
X Contact aqualified specialist workshop immediately and have the restraint sys-
tem checked.
Further information about the restraint system (Y page 31).Warning and indicato
rlamps on the instrument cluster
161On-boardcomputer and displays Z
Page 211 of 261
Vanity mirro
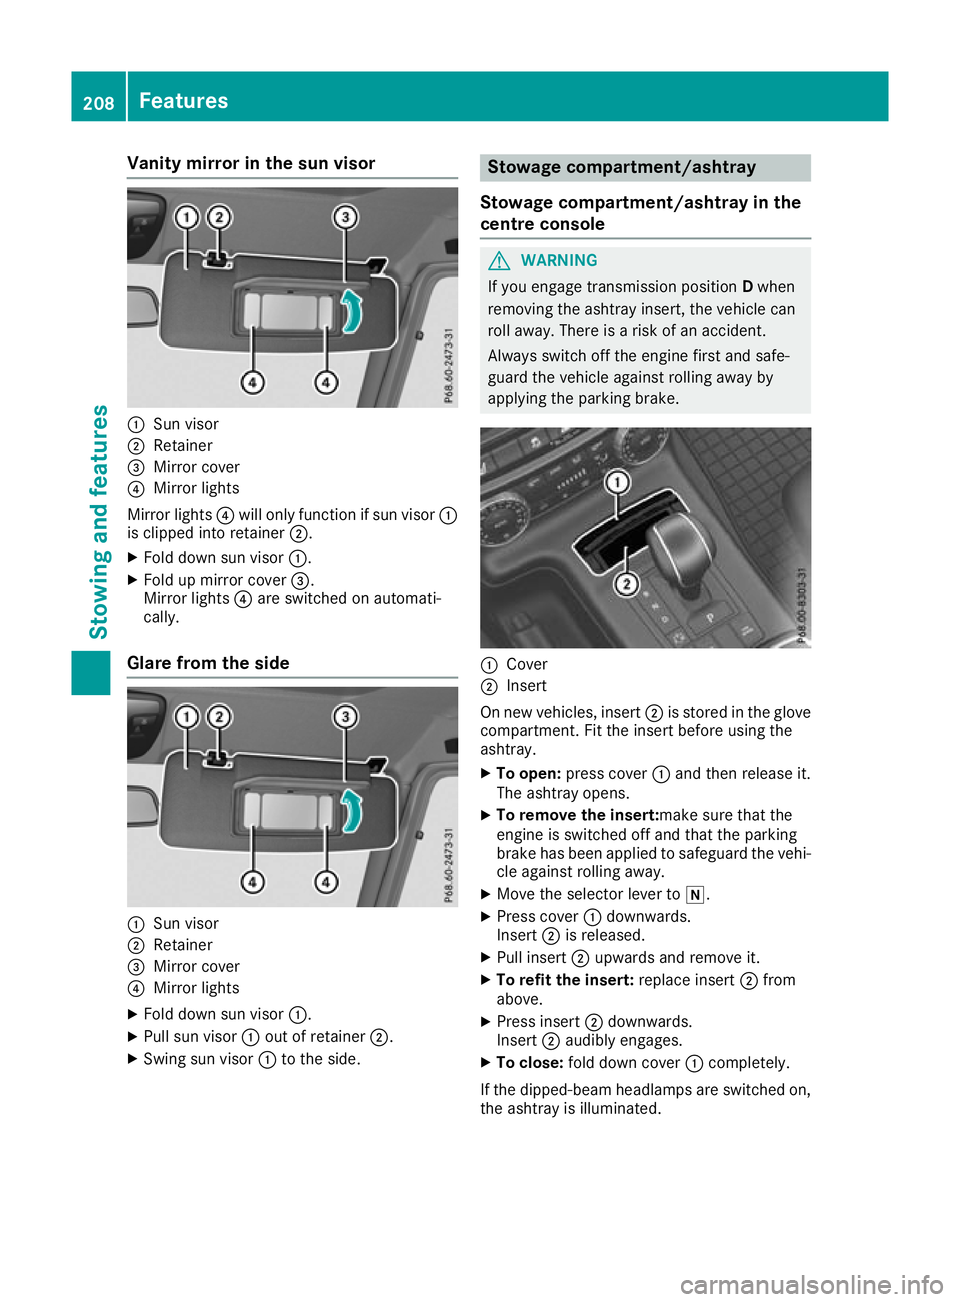
rint he sun visor :
Sun visor
; Retainer
= Mirror cover
? Mirror lights
Mirror lights ?will only function if su nvisor :
is clippe dinto retainer ;.
X Fol dd owns un visor :.
X Fol dupm irror cover =.
Mirror lights ?are switched on automati-
cally.
Glare from the side :
Sun visor
; Retainer
= Mirror cover
? Mirror lights
X Fol dd owns un visor :.
X Pull su nvisor :outofr etainer ;.
X Swing su nvisor :to the side. Stowag
ecompartment/ashtray
Stowage compartment/ashtray in the
centre console G
WARNING
If you engage transmission position Dwhen
removing the ashtray insert, the vehicle can
roll away. There is arisk of an accident.
Always switch off the engine first and safe-
guard the vehicl eagainst rolling awayby
applying the parking brake. :
Cover
; Insert
On new vehicles, insert ;is stored in the glove
compartment. Fi tthe insert before usin gthe
ashtray.
X To open: press cover :and then release it.
The ashtray opens.
X To remove th einsert:ma ke sure that the
engin eisswitched off and that th eparking
brak ehas been applied to safeguard th evehi-
cle against rolling away.
X Mov ethe selector leve rtoi.
X Press cover :downwards.
Insert ;is released.
X Pull insert ;upward sand remove it.
X To refit th einsert: replace insert ;from
above.
X Press insert ;downwards.
Insert ;audibly engages.
X To close: fold down cover :completely.
If th edipped-beam headlamps are switched on,
th ea shtray is illuminated. 208
Featu
resStowing and features
Page 220 of 261
Do not touch the surfaces or protective films
with hard objects ,e.g.ar ingori ce scraper.
Yo uc ould otherwis escratch or damage the
surfaces and protective film.
! Do not park up your vehicl
efor alon gp eriod
of time immediatel yafter cleaning, particu-
larly after cleaning the whee lrim with wheel
cleaner. Whee lcleane rmaylead to increased
corrosion of the brake discs and pads .You
shoul dtherefore drive for afew minute safter
cleaning. By heating up the brakes ,the brake
discs and pads dry .The vehicl ecan the nbe
parked up for alon gp eriodoft ime. H
Environmental note
Dispose of empty packaging an dcleaning
cloths in an environmentally responsible man- ner.
Regular car eofyour vehicle is acondition for
retainin gqualit yint helongterm.
Use car eproduct sand cleaning agents recom-
mended and approved by Mercedes-Benz. Washin
gthe vehiclea nd cleaning the
paintwork
Automatic car wash G
WARNING
Braking efficiency is reduced after the vehicle has been washed. There is arisk of an acci-
dent.
After washing the vehicle, brake carefully
while paying attention to the traffic conditions in order to restore full braking efficiency.
! When the HOLD function is activated, the
vehicl ebrakes automatically in certain situa-
tions.
To avoi ddamage to the vehicle, deactivate
the HOLD function in the following or similar
situations:
R when towing away
R in ac ar wash
! Make sure that the automatic car washis
suitable for the size of the vehicle. Fold in the exterior mirrors before the vehicl eiswashed.
The exterior mirrors coul dotherwise be dam-
aged. !
Make sure that the automatic transmission
is in position Nwhen washing your vehicle in
at ow-through car wash. The vehicle could be
damagedift he transmission is in another
position.
! Make sure:
R the side windows and sliding sunroof are
closed completely.
R the blower is switched off
R the windscreen wiper switch is at position
0
The vehicle could otherwise be damaged.
You can wash the vehicle in an automatic car
wash from the very start.
If the vehicle is very dirty, wash off excess dirt
before cleaning the vehicle in an automatic car
wash.
After using an automatic car wash, wipe off the
wax from the windscreen and the windscreen
wiper blades. This will prevent smears and
reduce wiping noises caused by residue on the
windscreen.
Washing by hand In some countries, washing by hand is only
allowed at specially equipped washing bays.
Observe the legal requirements for each indi-
vidual country.
When using the vehicle in winter, remove all
traces of road salt deposits carefully and as
soon as possible.
When washing the underside of the vehicle, also
clean the insides of the wheels.
X Do not use hot water and do not wash the
vehicle in direct sunlight.
X Use asoft sponge to clean.
X Use amild cleaning agent, such as acar
shampo oapproved by Mercedes-Benz.
X Thoroughly hose down the vehicle with agen-
tle jet of water.
X Do not point the water jet directly towards the
air inlet.
X Use plenty of water and rinse out the sponge
frequently.
X Rinse the vehicle with clean water and dry
thoroughl ywithachamois.
X Do not let the cleaning agent dry on the paint-
work. Ca
re
217Maintenance an dcare Z
Page 221 of 261
High-pressure cleaner
G
WARNING
The wate rjet of circular-jet nozzles (dirt grind-
ers) can caus edamage not visible from the
outside to tyres or chassi scomponents. Com-
ponents damaged in this way can unexpect-
edlyf ail.There is arisk of an accident.
Do not use high-pressure cleaners with circu-
lar-jet nozzles to clea nthe vehicle. Have dam-
agedt yres or chassi scomponents replaced
immediately.
! Always maintai
nadistance of at least 30 cm
between the vehicl eand the high-pressure
cleaner nozzle. Information about the correct
distance is available from the equipment
manufacturer.
Move the high-pressure cleaner nozzle
around when cleaning yourv ehicle.
Do not aim directly at any of the following:
R tyres
R door gaps, roof gaps, joints etc.
R electrica lcomponents
R battery
R plugc onnectors
R lamps
R seals
R trim elements
R ventilation slots
Damag etosealsore lectrica lcomponents
can leadtol eaks or failures.
! Vehicles with decorative film: parts of your
vehicl eare covered with adecorative film.
Maintain adistance of at least 70 cm between
the parts of the vehicl ecovered with the film
and the nozzle of the high pressure cleaner.
Information about the correct distance is
available from the equipment manufacturer.
Move the high-pressure cleaner nozzle
around whilst cleaning.
Cleaning the paintwork !
Do not affix:
R stickers
R films
R magneti cplates or similari tems to painted surfaces. You could oth
erwise
damage the paintwork.
Scratches, corrosive deposits, area saffecte dby
corrosion and damage cause dbyinadequate
car ecannot always be completel yrepaired .In
such cases ,visit aquali fied specialis tworkshop.
X Remov eimpuri ties immediately, where pos-
sible, whilst avoiding rubbing too hard.
X Soa kinsect remains with insect remove rand
rinse off the treated area safterwards.
X Soa kbirdd ropping swithw ater and rinse off
the treated area safterwards.
X Remov ecoolant, brake fluid ,tree resins ,oils,
fuel sand greases by rubbing gently with a
cloth soaked in petroleu mether or lighter
fluid.
X Use tar remove rtoremove tar stains.
X Use silicone remove rtoremove wax. Cleanin
gvehicle parts
Cleaning th ewheels G
WARNING
Th ew ater jet of circular-jet nozzles (dirt grind-
ers) can caus edamage not visible from the
outside to tyres or chassi scomponents. Com-
ponents damaged in this way can unexpect-
edlyf ail.There is arisk of an accident.
Do not use high-pressure cleaners with circu-
lar-jet nozzles to clea nthe vehicle. Have dam-
agedt yres or chassi scomponents replaced
immediately.
! Do not use acidic whee
lcleaning products
to remove brake dust. This coul ddamage
whee lbolts and brake components.
! Do not park up yourv
ehiclefor along period
of time immediatel yafter cleaning, particu-
larl yafter cleaning the whee lrim with wheel
cleaner. Whee lcleaner may leadtoi ncreased
corrosio nofthe brake discs and pads. You
should therefore drive for afew minutes after
cleaning. By heating up the brakes ,the brake
discs and padsd ry. The vehiclecan then be
parked up for along period of time. 218
CareMaintenanc
eand care
Page 231 of 261
reduced. The starting characteristics may be impaired, especially at low temperatures. Have the
thawe dbattery checked at aqualified specialist workshop.
Do not use arapidc harging device to start the vehicle. If yourv ehicle's battery is discharged, the
engine can be jump-started from another vehicl eorfromasecond battery using jump leads.
Observe the following points:
R The battery is not accessible in all vehicles. If the other vehicle's battery is not accessible, jump-
start the vehicl eusing adonor battery or ajump-starting device.
R Do not start the engine if the battery is frozen. Let the battery thaw first.
R Jump-starting may be performe donly using batterie swithanominal voltag eof12V.
R Use only jump leads that have asufficient cross-section and insulated terminal clamps.
R If the battery is full ydischarged, leave the battery that is being used to jump-start connected for
af ew minutes before attempting to start. This charge sthe empty battery alittle.
R Make sure that the two vehicles do not touch.
Make sure that:
R The jump leads are not damaged.
R Non-insulated parts of the terminal clamp sdonot come into contact with other metal parts while
the jump leads are connected to the battery.
R The jump leads cannot come into contact with parts that can move when the engine is running,
such as the V-belt pulley or the fan.
X Apply the parking brake.
X Shift the automatic transmission to position P.
X Make sure that the ignitio nisswitched off. All indicator lamp sonthe instrument cluster must be
off.
X Switch off all electrica lconsumers, e.g. rear windo wheating, lighting etc.
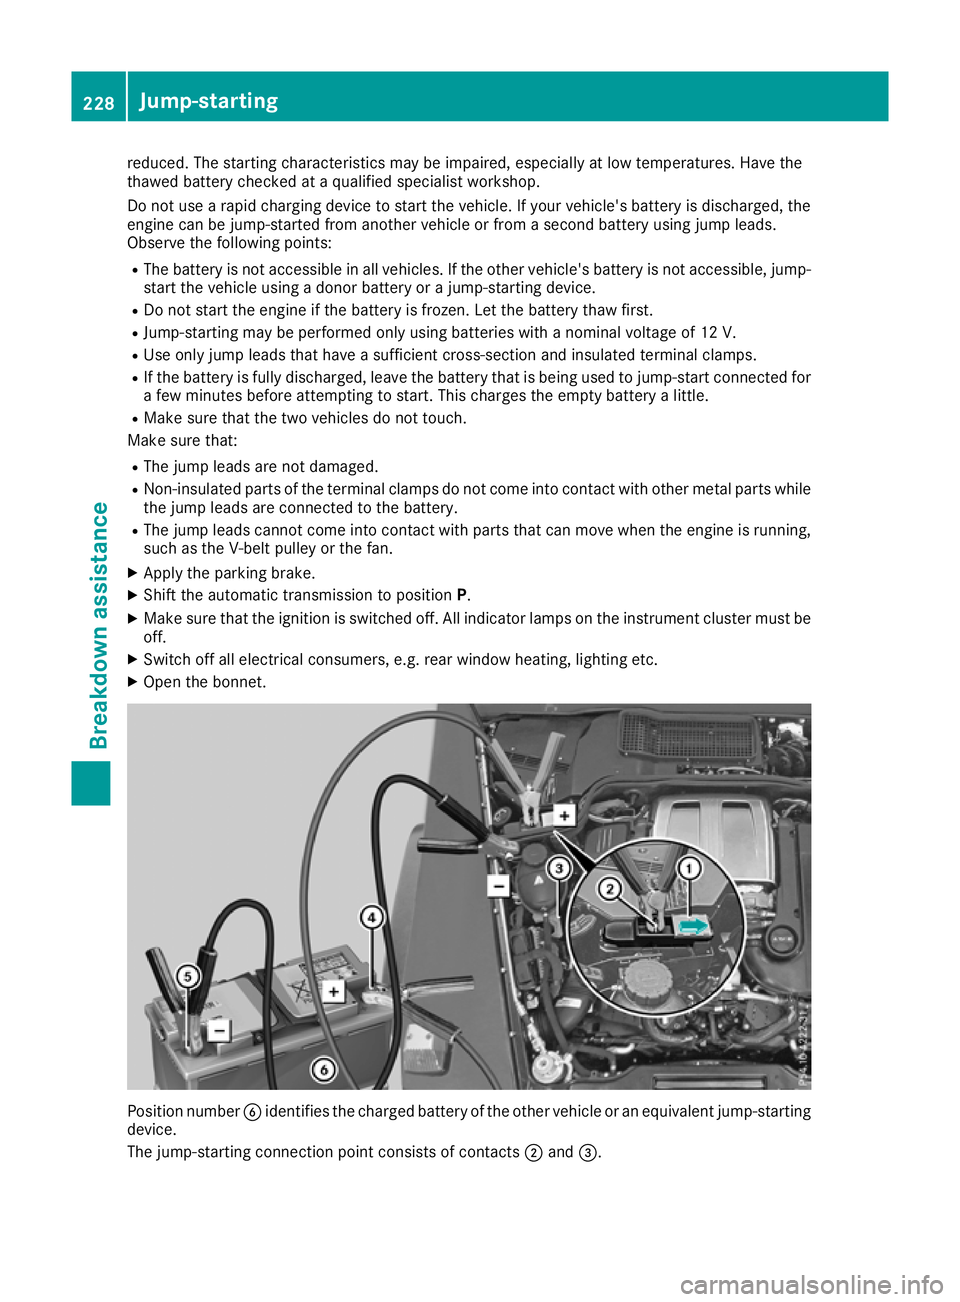
X Open the bonnet. Position number
Bidentifies the charged battery of the other vehicle or an equivalent jump-starting
device.
The jump-startin gconnection point consists of contacts ;and =. 228
Jump-startingBreakdowna
ssistan ce
Page 232 of 261

X
Lift up cover :of positive terminal ;in the direction of the arrow.
X Connect positive terminal ;on yourv ehicle to positive terminal ?of donor battery Busing the
jump lead, Alwaysb eginw ith positive terminal ;on youro wn vehicle first.
X Start the engine of the donor vehicle and run it at idling speed.
X Connect negative terminal Aof donor battery Bto earth point =of yourv ehicle using the jump
lead, connecting the jump leadtod onor batteryBfirst.
X Start the engine.
X Before disconnecting the jump leads, let the engines run for several minutes.
X First, remove the jump leads from earth point =and negative terminal A,then from positive
terminal ;and positive terminal ?.Each time, beginatt he contacts on youro wn vehicle.
X Close cover :of positive terminal ;after removing the jump leads.
X Have the battery checked at aqualifieds pecialist workshop.
Jump-starting is not considered to be anormal operating condition.
i Jump-starting cablesa
nd further information regarding jump-starting can be obtained at any
qualifieds pecialist workshop. Towinga
wayand tow-starting Importan
tsafety notes G
WARNING
Safety-relevant function sare restricted or not
available if:
R the engine is not running.
R the brake system or the power steering is
malfunctioning
R the voltag esupply or the vehicle's electrical
system is malfunctioning.
If yourv ehicleist owed,s ignificantly greater
force may be required to steer the vehicl eor
to brake. There is arisk of an accident.
In such circumstances, use atowing bar.
Make sure that the steering is moving freely
before towing. G
WARNING
If the steering whee llock is engaged, the vehi-
cle can no longer be steered .There is arisk of
an accident.
Always switch on the ignitio nwhen towing
with atow rope or atowing bar. G
WARNING
When towing or tow-starting another vehicle
and its weight is greater than the permissible gross weight of yourv ehicle, the:
R towing eye may be torn off
R car/trailer combination may swerve or
even overturn
There is arisk of an accident.
When towing or tow-starting another vehicle,
its weight should not be greater than the per- missible gross weight of yourv ehicle.
Detail sonthe permissible gross vehicl eweight
of yourv ehiclecan be found on the vehicl eiden-
tification plate (Y page249).
! You may tow the vehicl
efor am aximu mof
50km. Atowing spee dof50km/h must not
be exceeded.
For towing distances over 50 km, the entire
vehicl emust be lifted up and transported.
! Only secure the tow cabl
eortowing bar to
the towing eyes. You coul dotherwise damage
the vehicle.
! Observe the following points when towing
with atow rope:
R Secure the tow rope on the same side on
both vehicles.
R Make sure that the tow rope is not longer
than legally permitted. Mark the tow rope in the middle, e.g. with awhite cloth Towin
gawayand tow-starting
229Breakdown assis tance Z