2016 MERCEDES-BENZ G-CLASS SUV warning
[x] Cancel search: warningPage 73 of 261
Adjusting th
eangle of th ehead
restraints X
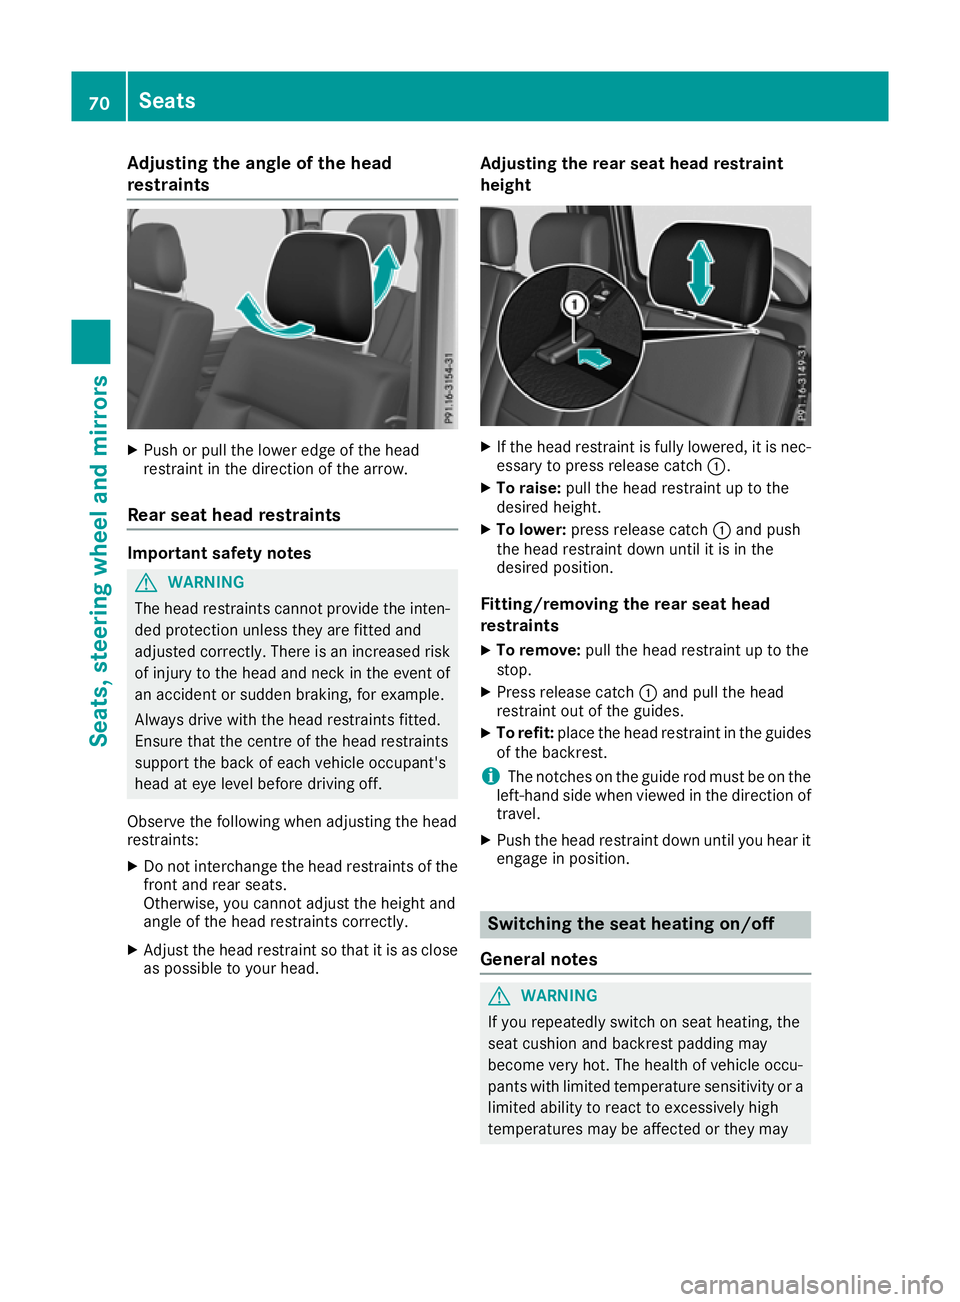
Push or pull the lowe redge of the head
restraint in the direction of the arrow.
Rear seat head restraints Important safety notes
G
WARNING
The head restraints cannot provide the inten-
ded protection unless they are fitted and
adjusted correctly. Ther eisanincreased risk
of injury to the heada nd neck in the event of
an accident or sudden braking, for example.
Always drive with the headr estraints fitted.
Ensure that the centre of the headr estraints
support the back of each vehicl eoccupant's
headate ye levelbefore driving off.
Observe the following when adjusting the head
restraints:
X Do not interchange the headr estraints of the
front and rear seats.
Otherwise, you cannot adjust the height and
angle of the headr estraints correctly.
X Adjust the headr estraint so that it is as close
as possible to yourh ead. Ad
justing th erears eat hea drestraint
height X
If th ehead restraint is fullyl owered, it is nec-
essary to press release catch :.
X To raise: pullthe head restraint up to the
desire dheight.
X To lower: press release catch :and push
the head restraint down until it is in the
desire dposition.
Fitting/removin gthe rear seat head
restraints
X To remove: pullthe head restraint up to the
stop.
X Press release catch :and pullt he head
restraint out of the guides.
X To refit: place the head restraint in the guides
of the backrest.
i The notches on the guide rod must be on the
left-hand side when viewedint he direction of
travel.
X Push the head restraint down until you hear it
engage in position. Switching the seat heating on/off
General notes G
WARNING
If you repeatedly switch on seat heating, the
seat cushion and backrest padding may
become very hot. The health of vehicle occu-
pants with limited temperature sensitivity or a limited ability to react to excessively high
temperatures may be affected or they may 70
SeatsSeats, steerin
gwheela nd mirrors
Page 74 of 261
even suffer burn-like injuries. There is
arisk of
injury.
Therefore, do not switch on the seat heating
repeatedly.
The red indicator lamps in the button indicate
the heating level you have selected.
X Make sure that the key is in position 1or2
in the ignition lock.
i If the batter
yvoltage is too low, the seat
heating may switch off.
Switching the front seat heating on/off X
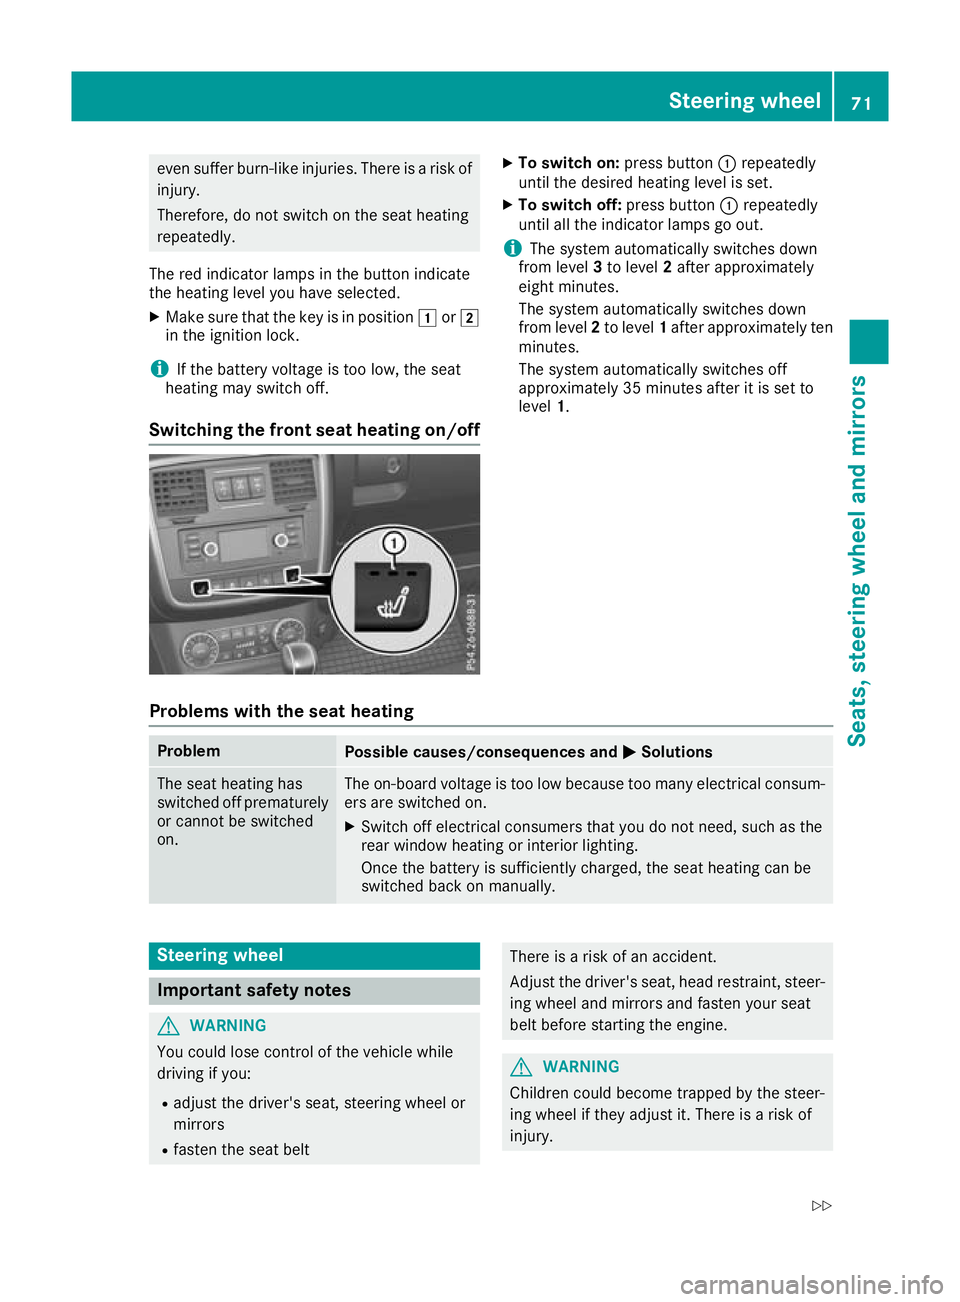
To switch on: press button:repeatedly
until th edesir ed heating level is set.
X To switc hoff:press button :repeatedly
unti lallthe indicator lamps go out.
i The system automaticall
yswitches down
from level 3to level 2afte rapproximately
eight minutes.
The system automaticall yswitches down
from level 2to level 1afte rapp roximatel yten
minutes.
The system automaticall yswitches off
approximatel y35minutes afte ritisset to
level 1.
Problems wit hthe seat heating Problem
Possible causes/consequences and
M MSolutions The seat heating has
switched off prematurely
or cannot be switched
on. The on-board voltage is too low because too many electrical consum-
ers are switched on.
X Switch off electrical consumers that you do not need, such as the
rear window heating or interior lighting.
Once the battery is sufficiently charged, the seat heating can be
switched back on manually. Steering wheel
Important safety notes
G
WARNING
You could lose control of the vehicle while
driving if you:
R adjust the driver's seat, steering wheel or
mirrors
R faste nthe seat belt There is
arisk of an accident.
Adjust the driver's seat, head restraint, steer- ing wheel and mirrors and fasten your seat
belt before starting the engine. G
WARNING
Children could becom etrappe dbythe steer-
ing whee lifthey adjust it. There is arisk of
injury. Steering wheel
71Seats,steering wheela nd mirrors
Z
Page 75 of 261
When leaving the vehicle, alway
stake the key
with you and lock the vehicle. Never leave
children unattended in the vehicle.
The electrically adjustable steerin gwheel can
still be adjusted when there is no key in the igni-
tion lock. Adjust
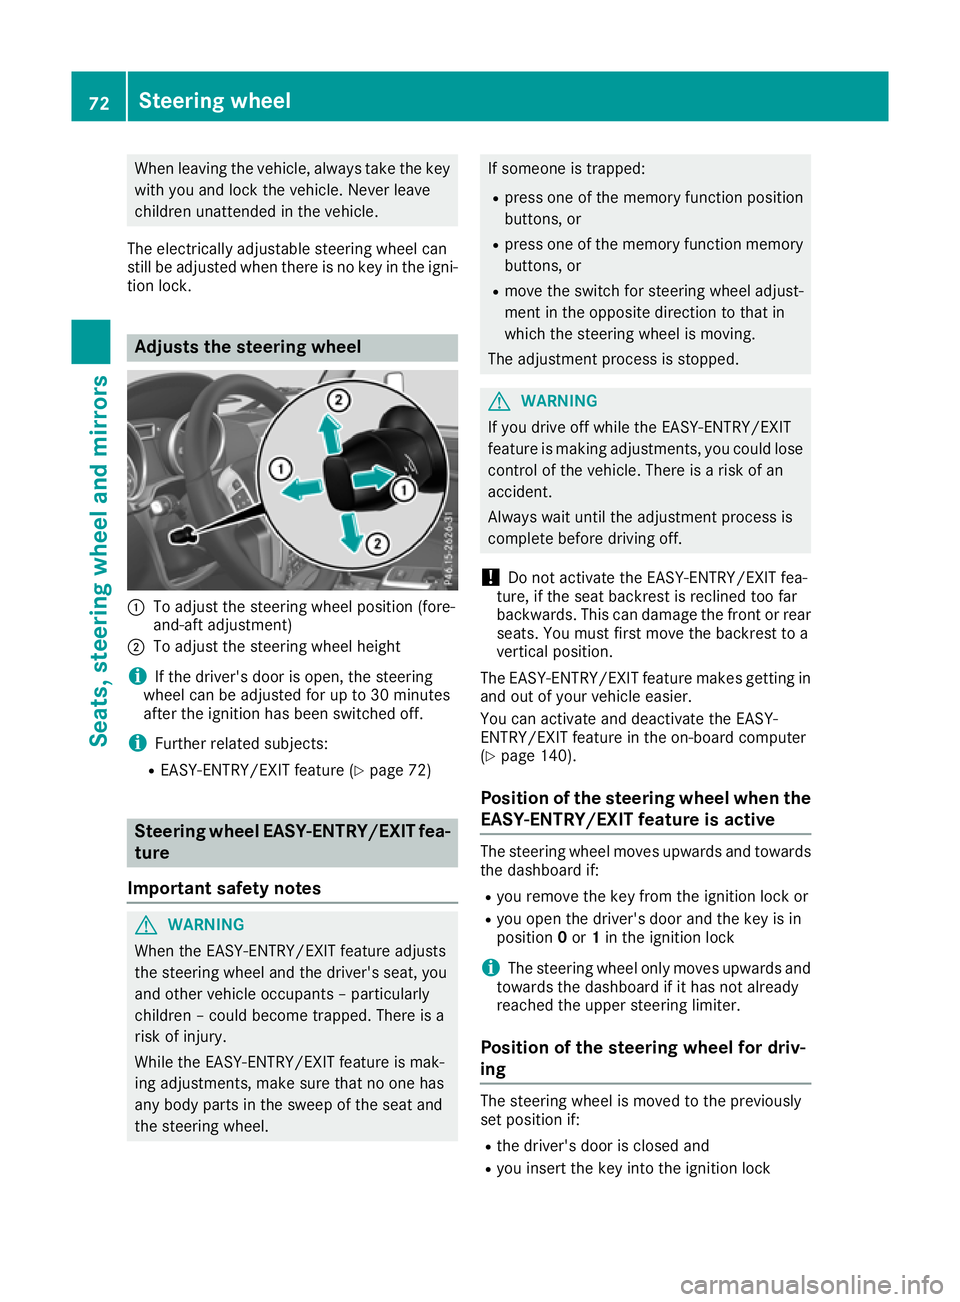
sthe steering wheel :
To adjust the steeri ngwheel position (fore-
and-aft adjustment)
; To adjust the steerin gwheel height
i If the driver's door is open, the steering
wheel can be adjusted for up to 30 minutes
after the ignition has been switched off.
i Further related subjects:
R EASY-ENTRY/EXIT feature (Y page 72)Steering wheel EASY-ENTRY/EXIT fea-
ture
Important safety notes G
WARNING
When the EASY-ENTRY/EXIT feature adjusts
the steering wheel and the driver's seat, you
and other vehicle occup ants –p articularly
children –couldb ecome trapped. There is a
risk of injury.
Whil ethe EASY-ENTRY/EXIT feature is mak-
ing adjustments, make sure that no one has
any body parts in the swee pofthe seat and
the steering wheel. If someone is trapped:
R press one of the memory function position
buttons, or
R press one of the memory function memory
buttons, or
R move the switch for steering wheel adjust-
ment in the opposite direction to that in
which the steering wheel is moving.
The adjustment process is stopped. G
WARNING
If you drive off while the EASY-ENTRY/EXIT
feature is making adjustments, you coul dlose
control of the vehicle. There is arisk of an
accident.
Always waitu ntil the adjustment process is
complete before driving off.
! Do not activate the EASY-ENTRY/EXIT fea-
ture, if the seat backrest is recline dtoo far
backwards. This can damage the front or rear seats. You must first move the backrest to a
vertical position.
The EASY-ENTRY/EXIT feature makes getting in
and out of yourv ehicleeasier.
You can activate and deactivate the EASY-
ENTRY/EXIT feature in the on-board computer
(Y page1 40).
Position of the steering wheel whent he
EASY-ENTRY/EXIT feature is active The steering wheel moves upwards and towards
the dashboard if:
R you remov ethe key from the ignition lock or
R you open the driver's door and the key is in
position 0or 1in the ignition lock
i The steerin
gwheel only moves upwards and
towards the dashboard if it has not already
reached the upper steerin glimiter.
Position of the steering wheel for driv-
ing The steerin
gwheel is moved to the previously
set position if:
R the driver's door is closed and
R you insert the key into the ignition lock 72
Steering wheelSeats, steering wheel and mirrors
Page 76 of 261
The last position of the steerin
gcolumn is stored
when you switch off the ignition. Mirrors
Rear-view mirror
G
WARNING
Electrolyte may escape if the glass in an auto- matic anti-dazzle mirro rbreaks. The electro-
lyte is harmfu land causes irritation. It must
not come into contact with yours kin, eyes,
respiratory organs or clothing or be swal-
lowed. There is arisk of injury.
If you come into contact with the electrolyte,
observe the following:
R Rinse off the electrolyte from yours kin
immediatel ywith water.
R Immediately rinse the electrolyte out of
youre yest horoughly with clea nwater.
R If the electrolyte is swallowed,i mmediately
rinse yourm outh out thoroughly.Don ot
induce vomiting.
R If electrolyte comes into contact with your
skin or hairoriss wallowed,seek medical
attention immediately.
R Immediately change out of clothing which
has come into contact with electrolyte.
R If an allergic reactio noccurs, seek medical
attention immediately.
X Adjust the rear-view mirror in such away that
you have agood view of road and traffic con-
ditions behind you.
The rear-view mirror automatically goes into
anti-dazzle mode if:
R the ignitio nisswitched on
R incident light from headlamps strikes the sen-
sor in the rear-view mirror
The rear-view mirror does not go into anti-dazzle
mode if reverse gearise ngaged or if the interior
lighting is switched on. Exterior mi
rrors
Adjusting th eexterio rmirror smanually X
Adjust th eexterio rmirrors in such awaythat
yo uc an get agoodo verview of roa dand traf-
fic conditions. Mirrors
73Seats, steering wheel and mirrors Z
Page 77 of 261

Exterio
rlighting General notes
For reasons of safety, Mercedes-Benz recom-
mends tha tyou drive with lights switched on
even during the daytime. In some countries,
operation of the headlampsv ariesdue to legal
requirements and voluntary recommendations. Driving abroad
Converting to sy mmetricald ipped
beam Whe
ndriving in countries where vehicles are
driven on the opposite side of the road to the
country in which the vehicle is registered, the
headlamps must be switched to symmetrical
dipped beam. This prevent soncoming traffic
from being dazzled. Symmetrical lights do not
illuminate as large an area of the edge of the
carriageway.
Have the headlamps switched at aqualified spe-
cialist workshop as close to the border as pos-
sible before driving in these countries.
Converting to asymmetrical dipped
beam after returning Hav
ethe headlamps switched back to asym-
metrica ldipped bea mataqualifiedspecialist
workshop as soon as possible after crossing the border again. Ligh
tswitch
Operation 1
W
Left-hand parkin glamps
2 X
Right-hand parking lamps 3
T
Side lamps,l icence plate and instru-
ment cluster lighting
4 Ã
Automati cheadlamp mode, controlled
by the light sensor
5 L
Dipped-beam/main-beam headlamps
B R
Rear foglamp
If yo uhearaw arning tone when yo uleave the
vehicle, the lights may stil lbeswitched on.
X Turn the light switch to the Ãposition.
The exterior lighting, excep tthe sid elam ps/
parking lamps ,switches off automaticall yifyou:
R remove the key from the ignition lock
R ope nthe driver' sdoorw itht he key in position
u in the ignition lock
Dipped-beam headlamps G
WARNING
When the light switch is set to Ã,the
dipped-beam headlamp smay not be switched
on automatically if there is fog, snow or other causes of poor visibility due to the weather
conditions such as spray. There is arisk of an
accident.
In such situations, turn the light switch to
L.
When the ignitio nisswitched on and the light
switch is in the Lposition, the side lamps
and dipped-beam headlamp sare switched on
even if the light sensor does not sense dark
ambient light conditions. This is advantageous
when there is fog or rain.
X To switch on the dipped-beam headlamps:
turn the key in the ignitio nlock to position 2
or start the engine.
X Turn the light switch to the Lposition.
The green Lindicator lamp on the instru-
ment cluster lights up.
Daytime driving lights You can set the
Daytime driving lights
Daytime driving lights
fun ction via the on-board computer
(Y page 138).
X To switch on th
edaytim edriving lights:
switc hont heDaytime driving lights
Daytime driving lights
function via the on-board computer. 74
Exterior lightingLights and windscreen wipers
Page 78 of 261
Automati
cheadlamp mode G
WARNING
When th elight switch is set to Ã,the
dipped-beam headlamps may not be switched on automatically if there is fog, snow or othercauses of poor visibility due to the weather
conditions such as spray. There is arisk of an
accident.
In such situations, turn the light switch to
L.
The automatic headlamp feature is only an aid.
The drive risresponsibl efor the vehicl elighting
at all times.
à is the preferre dlight switch position.
The light setting is automatically selected
according to the brightness of the ambient light,
but not in the event of poor visibility due to
weather conditions such as fog, snow or spray.
X To switch on the automatic headlamps:
turn the light switch to the Ãposition.
With the key in position 1in the ignitio nlock,
the side lamp sare switched on or off auto-
matically depending on the brightness of the
ambient light.
If you have switched on the Daytime driv‐ Daytime driv‐
ing lights
ing lights functionvia the on-board com-
puter, the daytime driving lights or the side
lamps and dipped-beam headlamps will
switch on or off automaticallyw hile the
engine is running.
When the dipped-beam headlamps are
switched on, the green Lindicator lamp in
the instrument cluster lights up. Rear foglamp
The rear fog lamp improves the visibility of your vehicle for the traffic behind in the event of
heavy fog. You must observe the legal require-
ment sfor the country in which yo uare currently
driving when operating the rea rfog lamp.
X To switc honthe rear fog lamp: turn the key
in the ignition lock to position 2or star tthe
engine.
X Turn the light switch to the Lposition.
X Press the Rbutton.
The yellow Rindicator lamp on the instru-
ment cluster lights up. Sid
elamps
! When the battery is discharged heavily,t
he
side lamps or parking lamps are automatically
switched off to facilitate an engine start.
Always park your vehicle safely and in awell lit
area, in accordance with the relevant legal
stipulations. Avoid using the Tside lamps
for periods lasting several hours. Where pos-
sible, switch on the right Xor left W
parking lamp.
X To switch on: turn the light switch to the
T position.
The green Tindicator lamp on the instru-
ment cluster lights up. Parking lamps
Switching on the parking lamps ensures that the
correspondin gside of the vehicle is illuminated.
X To switch on the parking lamp: turn the key
to position uin the ignition lock or remove
the key.
X Turn the light switch to the W(left-hand
side of the vehicle) or X(right-hand side of
the vehicle) position. Headlamp cleaning system
The headlamps are cleaned automatically if the
"Wipe with washer fluid" function is operated
ten times (Y page 81) while the lights are on
and the engin eisrunning. When you switch off
the ignition, the automatic headlamp cleaning
system is reset and counting is resumed from 0. Exterior lighting
75Lightsand windscreen wipers Z
Page 79 of 261
Combination switch
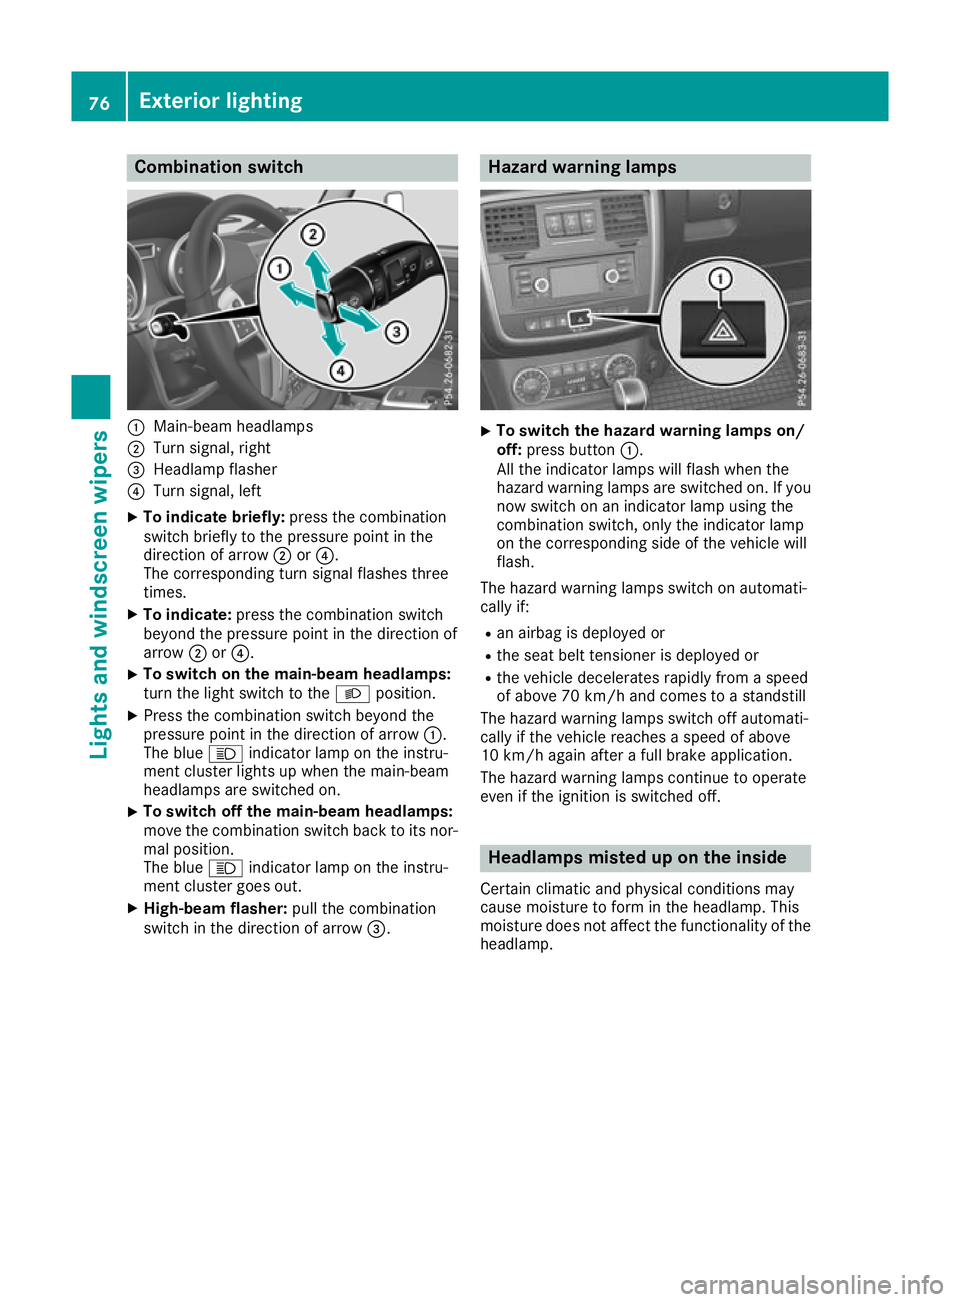
:
Main-beam headlamps
; Turnsignal, right
= Headlamp flasher
? Turn signal, left
X To indicate briefly: press the combination
switch briefly to the pressure point in the
direction of arrow ;or?.
The corresponding turn signal flashes three
times.
X To indicate: press the combination switch
beyond the pressure point in the direction of
arrow ;or?.
X To switch on the main-beam headlamps:
turn the light switch to the
Lposition.
X Press the combination switch beyond the
pressure point in the direction of arrow :.
The blue Kindicator lamp on the instru-
ment cluster lights up when the main-beam
headlamps are switched on.
X To switch off the main-beam headlamps:
move the combination switch back to its nor-
mal position.
The blue Kindicator lamp on the instru-
ment cluster goes out.
X High-beam flasher: pull the combination
switch in the direction of arrow =. Hazard warning lamps
X
To switch the hazard warning lamps on/
off: press button :.
All the indicator lamps will flash when the
hazard warnin glam ps are switched on. If you
now switch on an indicator lamp using the
combinatio nswitch ,onlyt he indicator lamp
on the corresponding side of the vehicl ewill
flash.
The hazard warning lamps switch on automati-
cally if: R an airba gisdeploye dor
R the sea tbeltt ensioner is deployed or
R the vehicl edecelerates rapidly from aspeed
of above 70 km/h and come stoastandstill
The hazard warning lamps switch off automati-
cally if the vehicl ereache saspeed of above
10 km/h agai nafteraf ullb rake application.
The hazard warning lamps continue to operate
eve nift he ignition is switched off. Headlamps miste
duponthe inside
Certain climatic and physical conditions may
caus emoisture to form in the headlamp. This
moisture does not affect the functionality of the headlamp. 76
Exterior lightingLigh
tsand windscreen wipers
Page 81 of 261
Make sure that the interior lighting does not
remain switched on too long after the engine
has been switched off.
X To switch on: press thecsymbol on
switch B(Ypage 77).
X To switch off: move switchBto the centre
position (Y page 77).
Reading lamps X To switch on/off: press the respective p
button (Y page 77).
Rear interior lighting X To switch on/off: press thetbutton
(Y page 77).
i When you open
arear side door, the rear
interior lighting switches on. Then, you cannot
switch it off using the tbutton.
If you leave the front doors open for along
time, switch the rear interior lighting off. In
this way,y ou can avoid draining the battery.
Luggage compartment lighting X To switch on/off: press thetbutton
(Y page 77).
i If you open the rear door, the luggagec
om-
partment lighting switches on. Then, you can-
not switch it off using the tbutton.
If you leave the rear door open for along time,
switch the luggagec ompartmentlighting off.
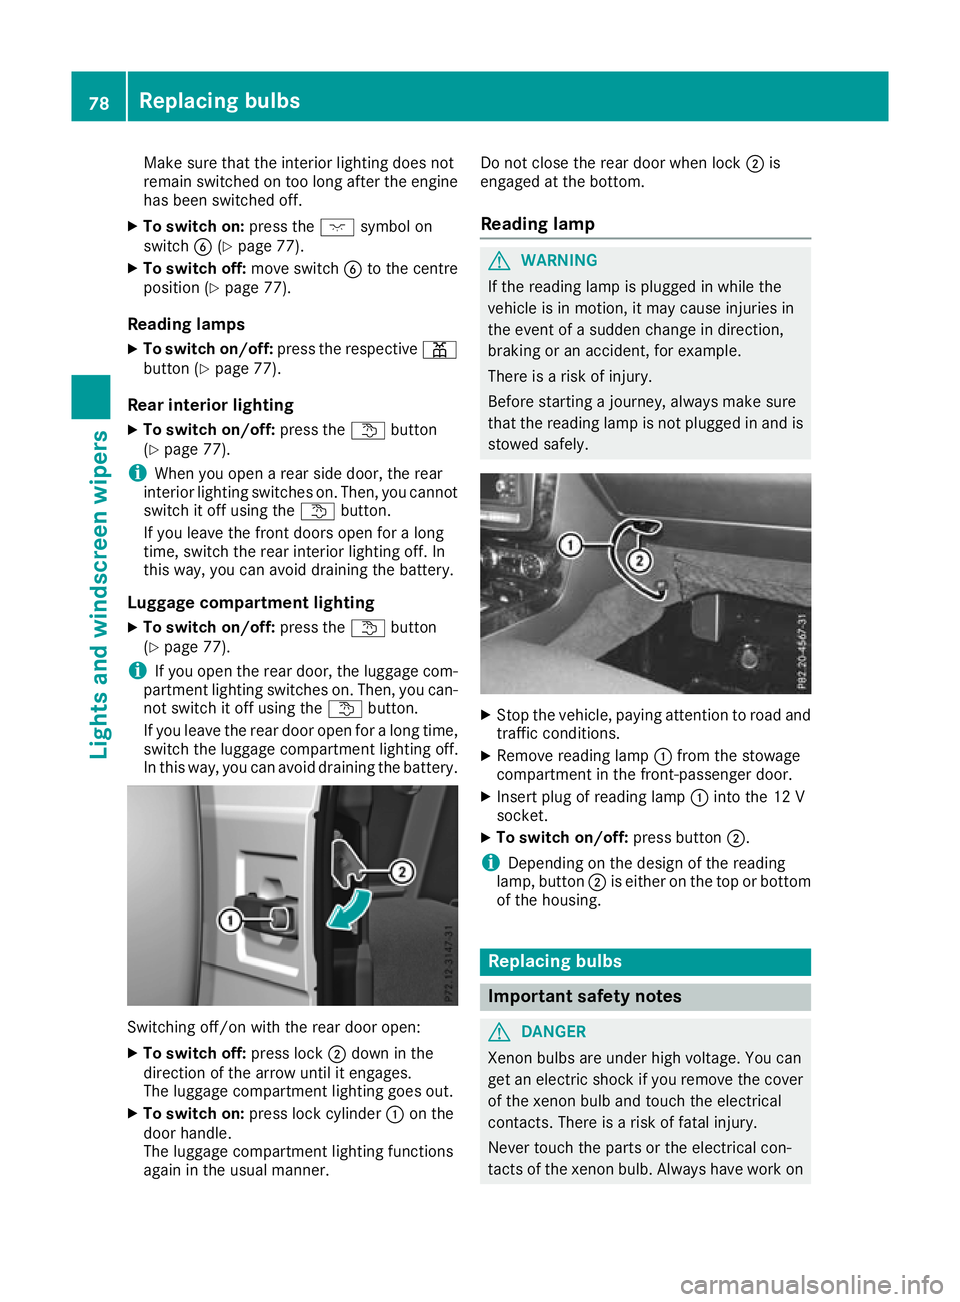
In this way,y ou can avoid draining the battery. Switching off/on with the rear door open:
X To switch off: press lock;down in the
direction of the arrow until it eng ages.
The luggage compartment lighting goe sout.
X To switc hon:press lock cylinder :on the
doo rhandle.
The luggage compartment lighting functions
agai nint he usua lmanner. Do not close the rea
rdoorw henlock ;is
engaged at the bottom.
Readin glamp G
WARNING
If the reading lamp is plugged in while the
vehicl eisinm otion, it may caus einjurie sin
the event of asudden change in direction,
braking or an accident, for example.
There is arisk of injury.
Before starting ajourney ,alwaysm ake sure
that the reading lamp is not plugged in and is stowed safely. X
Stop the vehicle, paying attentio ntoroada nd
traffic conditions.
X Remove reading lamp :from the stowage
compartment in the front-passenger door.
X Insert plug of reading lamp :into the 12 V
socket.
X To switc hon/off: press button ;.
i Depending on the desig
nofthe reading
lamp, button ;is either on the top or bottom
of the housing. Replacing bulbs
Importan
tsafety notes G
DANGER
Xenon bulbs are under high voltage. You can
get an electric shock if you remove th ecover
of th exenon bulb and touch th eelectrical
contacts. There is ariskoff atal injury.
Never touch th epartsort heelectrical con-
tacts of th exenon bulb. Always hav eworkon 78
Replacing bulbsLights
and windscreen wipers