2016 MERCEDES-BENZ G-CLASS SUV display
[x] Cancel search: displayPage 129 of 261
Engaging th
edifferential locks General notes
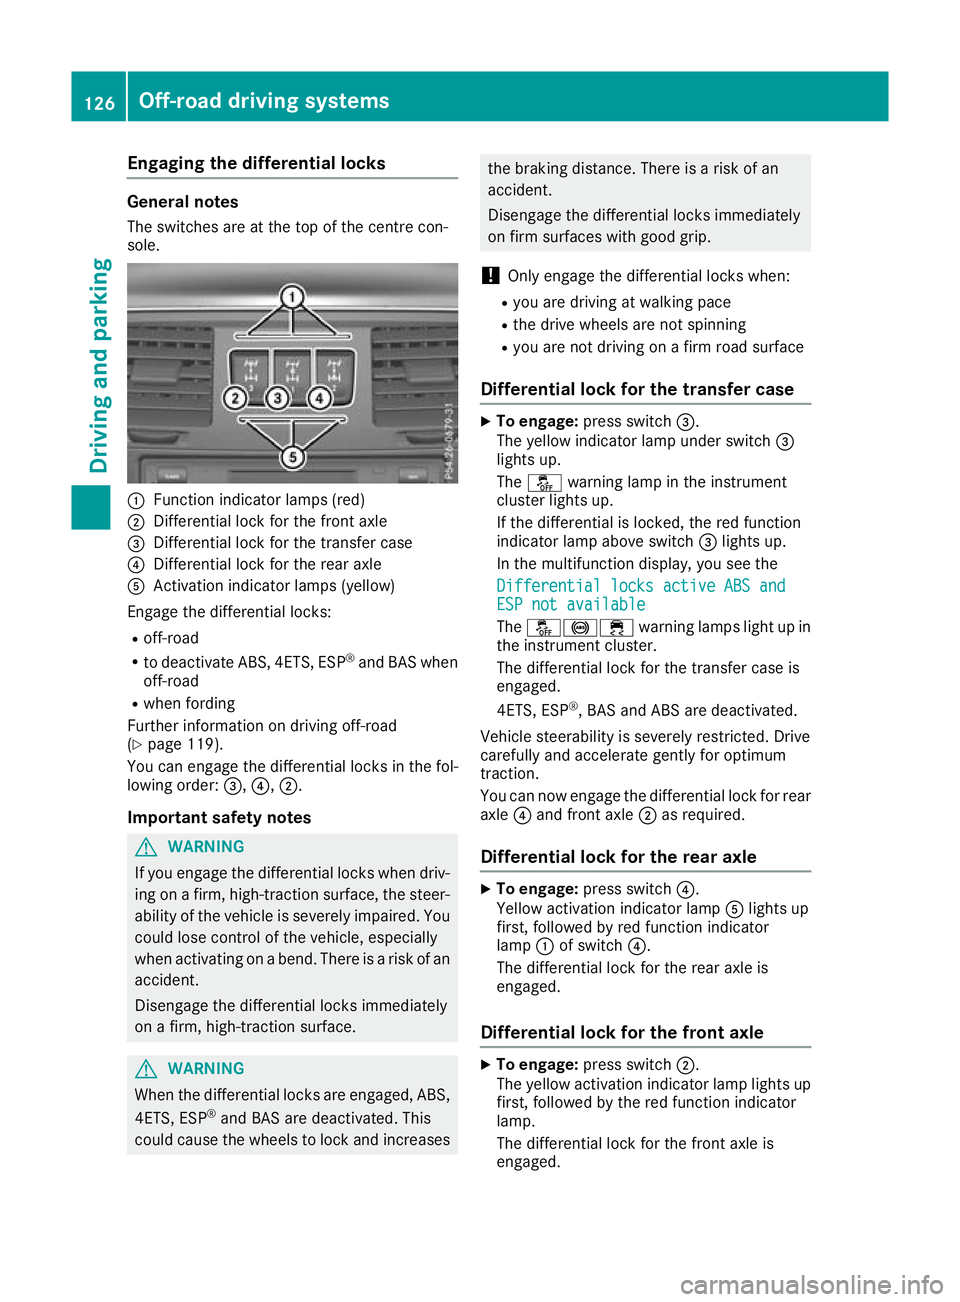
The switches are at the top of the centre con-
sole. :
Function indicato rlam ps (red)
; Differentia llock for the front axle
= Differentia llock for the transfe rcase
? Differentia llock for the rea raxle
A Activation indicator lamps (yellow)
Engag ethe differential locks:
R off-road
R to deactivate ABS, 4ETS, ESP ®
and BAS when
off-road
R whe nfording
Furthe rinformation on driving off-road
(Y page 119).
You can engage the differential locks in the fol-
lowing order: =,?,;.
Important safety notes G
WARNING
If you engag ethe differential locks when driv-
ing on afirm, high-traction surface, the steer-
ability of the vehicl eisseverely impaired .You
coul dlose control of the vehicle, especially
when activating on abend. There is arisk of an
accident.
Disengage the differential locks immediately
on afirm, high-traction surface. G
WARNING
When the differential locks are engaged, ABS, 4ETS, ESP ®
and BAS are deactivated. This
coul dcauset he wheels to lock and increases the braking distance. There is
ariskofan
accident.
Disengag ethe differential locks immediately
on fir msurfaces with good grip.
! Onl
yengag ethe differential locks when:
R youa redrivin gatw alking pace
R the drive wheels ar enot spinning
R youa renot drivin gonafirmr oads urface
Differential lock fo rthe transfe rcase X
To engage: press switch =.
The yellow indicator lamp under switch =
lights up.
The å warning lamp in the instrument
cluster lights up.
If the differential is locked ,the red function
indicator lamp above switch =lights up.
In the multifunctio ndisplay ,you see the
Differential locks active ABS and Differential locks active ABS and
ESP not available ESP not available
The å!÷ warninglamps light up in
the instrument cluster.
The differential lock for the transfer case is
engaged.
4ETS, ESP ®
,B AS and ABS are deactivated.
Vehicle steerability is severely restricted. Drive
carefully and accelerate gently for optimum
traction.
You can now engage the differential lock for rear axle ?and front axle ;as required.
Differential lockf or the rear axle X
To engage: press switch ?.
Yellow act ivation indicator lamp Alights up
first, followe dbyred functio nindicator
lamp :of switch ?.
The differential lock for the rea raxleis
engaged.
Differential lock for the fron taxle X
To engage: press switch ;.
The yellow activation indicator lamp lights up
first, followe dbythe red functio nindicator
lamp.
The differential lock for the front axl eis
engaged. 126
Off-road driving systemsDriving an
dparking
Page 130 of 261

Disengaging th
ediffere ntial locks You can disengage the differential lock
sinthe
followin gorder: ;,?, =.
X To simultaneously disengage all differen-
tia
llocks: press switch =.
Yellow activatio nindicator lamps Aand red
function indicator lamps :go out.
After approximately three seconds of normal
driving, ABS, 4ETS, ESP ®
and BA Sare activa-
ted.
The Differential lock sactive ABS
Differential lock sactive ABS
and ESP not available
and ESP not available message disap-
pear sint he multifunction displaya nd the
å!÷warnin glamps in th einstru-
men tcluster go out.
X Shif tthe transfer case to the HIGH RANGE
on-road position (Y page 124).
If red function indicator lamps :do not go out
when disengagin gthe differential locks:
X Observe th etraffic situation.
X Make slight steerin gmovements while the
vehicle is in motion.
Red function indicator lamps :go out when
th ed ifferential lock sare disengaged. Towing
atrailer Importan
tsafety notes G
WARNING
Th eb raking system can overheat if you leave
yourf oot on the brake peda lwhile driving.
This increases the braking distance and could
even caus ethe braking system to fail .There is
ar isk of an accident.
Never use the brake peda lasafootrest. Do
not simultaneously depress both the brake
peda land the accelerator peda lwhile driving. G
WARNING
You coul dlose control of the vehicle/trailer
combination if it begins to swerve .The vehi-
cle/trailer combination coul deven overturn.
There is arisk of an accident.
On no account should you attempt to
straighten out the vehicle/trailer combina-
tion by increasing speed. Decrease your speed and do not countersteer. Brake if nec-
essary.
G
WARNING
If the ballc oupling is not fitted correctly and
the bolts supplied are not tightened to the
specified tightening torque ,the trailer could
come loose. There is arisk of an accident.
Always fit the ballc oupling as described.
Observe the specified tightening torque when fitting the coupling. G
WARNING
If the maximu mpermissible loadf orac arrier
system is exceeded, the carrie rcouldc ome
loos efrom the vehicl eand endange rother
road users. There is arisk of an accident and
injury.
Never exceed the maximu mpermissible load
when using acarrier.
! If you have
atrailer tow hitch retrofitted,
changes to the engine cooling system may be necessary, depending on the vehicl etype.
If you have atrailer tow hitch retrofitted,
observe the anchorage points on the chassis.
Retrofitting atrailer tow hitch is only permissible
if at railer loadiss pecified in yourv ehicledocu-
ments. If this is not the case, then the vehicl eis
not approved for towing atrailer.
For more information, please contact aqualified
specialist workshop.
Exceeding the maximu mpermissible nose-
weight of the trailer drawbar on the ballc oupling
may caus edamage.
Damag emay be caused to the following:
R towing vehicle
R trailer
R ballc oupling
R trailer tow hitch
The vehicle/trailer combination coul dbecome
unstable.
The vehicle/trailer combination coul dalso
become unstable if the noseweight used is lower
than the minimu mpermissible noseweight. Towin
gatrailer
127Driving an dparking Z
Page 134 of 261

Important safety notes
G
WARNING
Operating th eintegrated information systems
and communications equipment in the vehicle
while driving willd istract you from traffic con-
ditions. You coul dthen lose control of the
vehicle. There is arisk of an accident.
Only operate these devices if road traffic con-
ditions permit. If you are unsure about the
surrounding conditions, pullo ver toasafe
location and make entries only while the vehi-
cle is stationary.
You must observe the lega lrequirements for the
country in which you are currently driving when operating the on-board computer. G
WARNING
If the instrument cluster has failed or mal-
functioned, you may not recognise function
restrictions relevant to safety .The operating
safety of yourv ehiclemay be impaired .There
is ar isk of an accident.
Drive on carefully.H ave the vehiclechecked
at aq ualified specialist worksho pimmedi-
ately.
If the operating safety of yourv ehicleis
impaired ,park the vehicl esafel yass oon as pos-
sible. Contact aqualified specialist workshop.
! If
ab lackout lighting setting has been selec-
ted, the instrument cluster lighting is
switched off.
The instrument cluster and the display do not show any information.
The on-board computer show sonly display mes-
sage sorw arnings from certain systems on the
multifunction display.Y ou should therefore
make sure yourv ehicleiso perating safel yatall
times.
For an overview, see the instrument cluster illus-
tration (Y page26). Displays and operation
Instrument cluste
rlighting
The brightness control knob is locate donthe
botto mleftoft heinstrumen tcluster
(Y page 26).
X Turn th ebrightness control knob clockwise or
anti-clockwise.
i The ligh
tsensor on th einstrumen tcluster
automatically control sthe brightness of the
multifunction display.
In daylight, th edisplays in th einstrument
cluste rare no tlit. Re
vc ounter
! Do not drive in the overrevving range. Doing
so will damag ethe engine.
The red band in the rev counter indicates the
engine's overrevving range.
The fue lsuppl yisi nterrupted to protect the
engine when the red band is reached. Outside temperature display
You should pay specia lattention to road condi-
tion swhen temperatures are around freezing
point.
Bear in mind that the outside temperature dis-
play indicates the measured air temperature
and not the road surface temperature.
The outside temperature display is in the multi-
function display (Y page 133).
Changes in the outside temperature are dis-
played after ashort delay. Coolant temperatur
edisplay G
WARNING
If yo uopen the bonnet while the engine is
overheating or while there is afire in the
engine compartment, you coul dcome into
contact with hot gase sorother leaking ser-
vice products. There is adange rofinjury.
Allow an overheating engine to cool down
before opening the bonnet. If there is afire in Displays and operation
131On-boardcomputer and displays
Z
Page 135 of 261
the engine compartment, leav
ethe bonnet
close dand notify the fir ebrigade.
The coolant temperatur egauge is in the instru-
ment cluste ronthe right-hand side (Y page 26).
Under normal operating conditions and with the specifie dcoolant level ,the coolant temperature
ma yriseto1 20 †.
At high outside temperatures and when driving
in mountainou sterrain, the coolant temperature
ma yrisetot he end of the scale. Operatin
gthe on-board computer
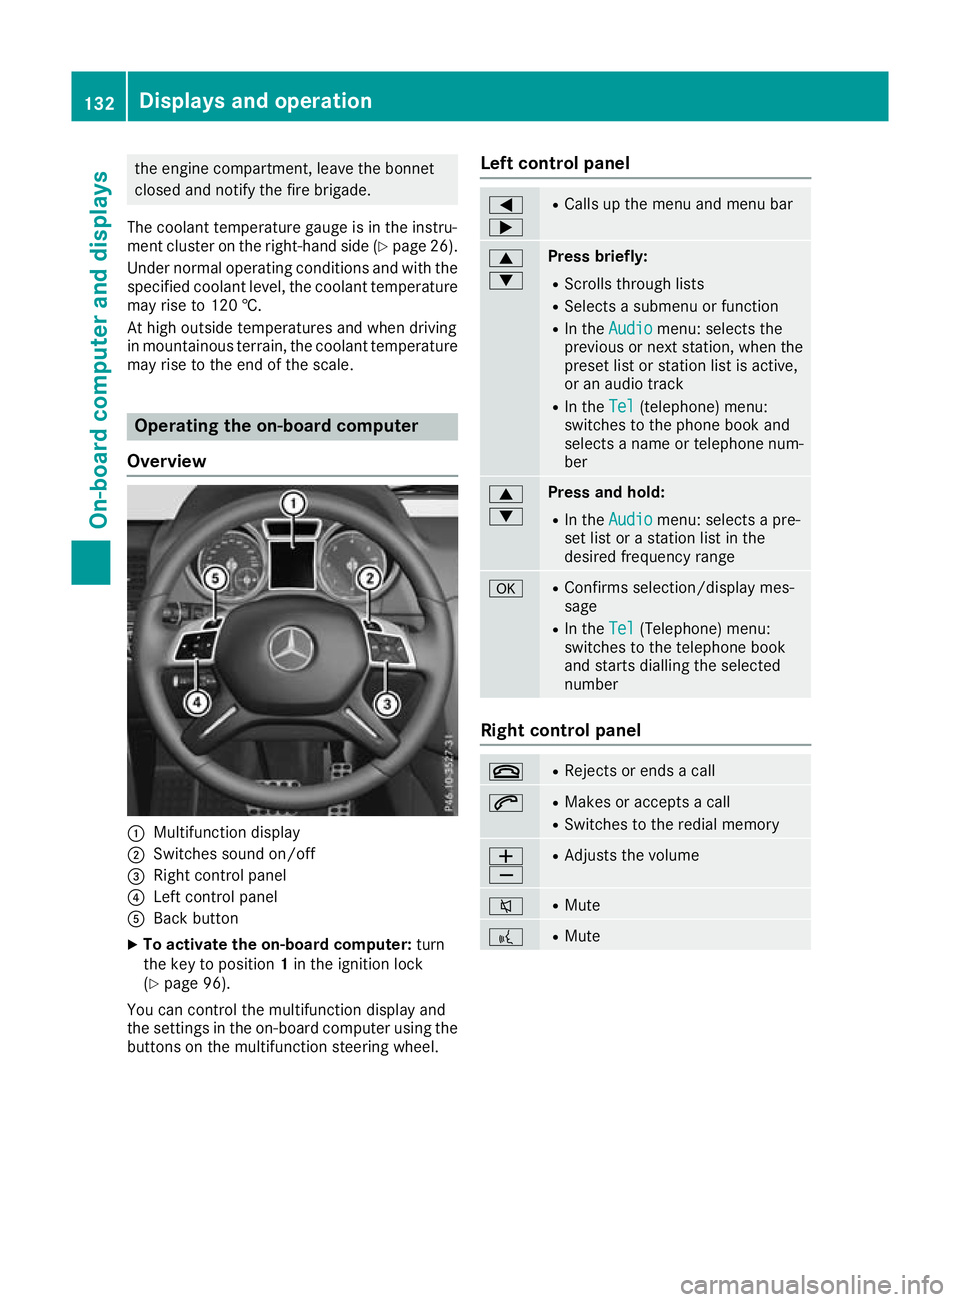
Overview :
Multifunction display
; Switches sound on/off
= Right control panel
? Left control panel
A Back button
X To activate the on-board computer: turn
the key to position 1in the ignition lock
(Y page 96).
You can control the multifunction display and
the settings in the on-board computer using the buttons on the multifunction steering wheel. Left control panel =
; R
Calls up the menu and menu bar 9
: Press briefly:
R Scrolls through lists
R Selects asubmenu or function
R In the Audio Audio menu: selects the
previous or next station, when the preset list or station list is active,
or an audio track
R In the Tel Tel(telephone) menu:
switches to the phone book and
selects aname or telephone num-
ber 9
: Press and hold:
R
In the Audio Audio menu: selects apre-
set list or astation list in the
desired frequency range a R
Confirms selection/displaym es-
sage
R In the Tel
Tel(Telephone) menu:
switches to th etelephone book
and start sdiallin gthe selected
number Right contro
lpanel ~ R
Rejects or end sacall 6 R
Makes or accept sacall
R Switches to the redial memory W
X R
Adjusts the volume 8 R
Mute ? R
Mute 132
Displays and operationOn-board computer and displays
Page 136 of 261
Back button
% Press briefly:
R Back
R Hides displa ymessages/calls up
the last Trip
Tripmenu function used
R Exitst he telephone book/redial
memory % Press and hold:
R Callsupt he standard display in the
Trip
Trip menu Multifunction display
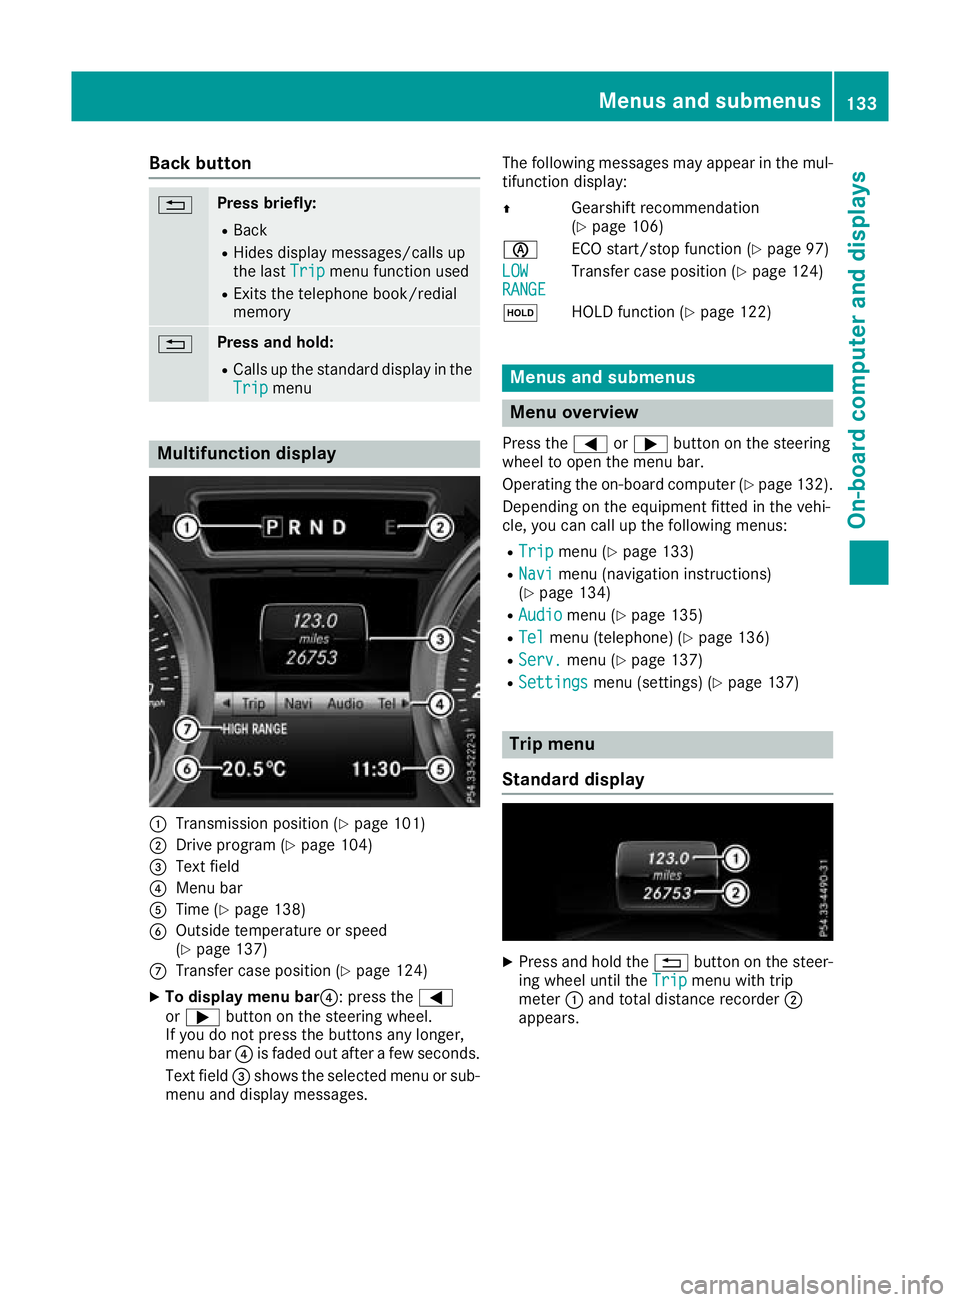
:
Transmission position (Y page 101)
; Drive program (Y page 104)
= Text field
? Menu bar
A Time (Y page 138)
B Outside temperature or speed
(Ypage 137)
C Transfer case position (Y page 124)
X To display menu bar?:p ress the=
or ; button on the steerin gwheel.
If you do not press the button sany longer,
menu bar ?is faded out after afew seconds.
Text field =shows the selected menu or sub-
menu and display messages. The following messages may appear in the mul-
tifunction display:
Z Gearshift recommendation
(Ypage 106)
è ECO start/stopf unction (Ypage 97)
LOW LOW
RANGE RANGE Transfer case position (Y
page 124)
ë HOLD function (Y page 122) Menu
sand submenus Menu overview
Press the =or; button on the steering
whee ltoopen the menu bar.
Operating the on-board compute r(Ypag e132).
Depending on the equipment fitted in the vehi-
cle, you can call up the following menus:
R Trip Trip menu (Y page133)
R Navi
Navi menu (navigatio ninstructions)
(Y pag e134)
R Audio
Audio menu (Y page135)
R Tel
Tel menu (telephone) (Y page136)
R Serv.
Serv. menu (Y page137)
R Settings
Settings menu (settings) (Y page137) Trip menu
Standard display X
Pres sand hold the %button on the steer-
ing wheel until the Trip
Tripmenu with trip
meter :and total distanc erecorder ;
appears. Menu
sand submenus
133On-boardcomputer and displays Z
Page 137 of 261
Trip compute
r"From start" or "From
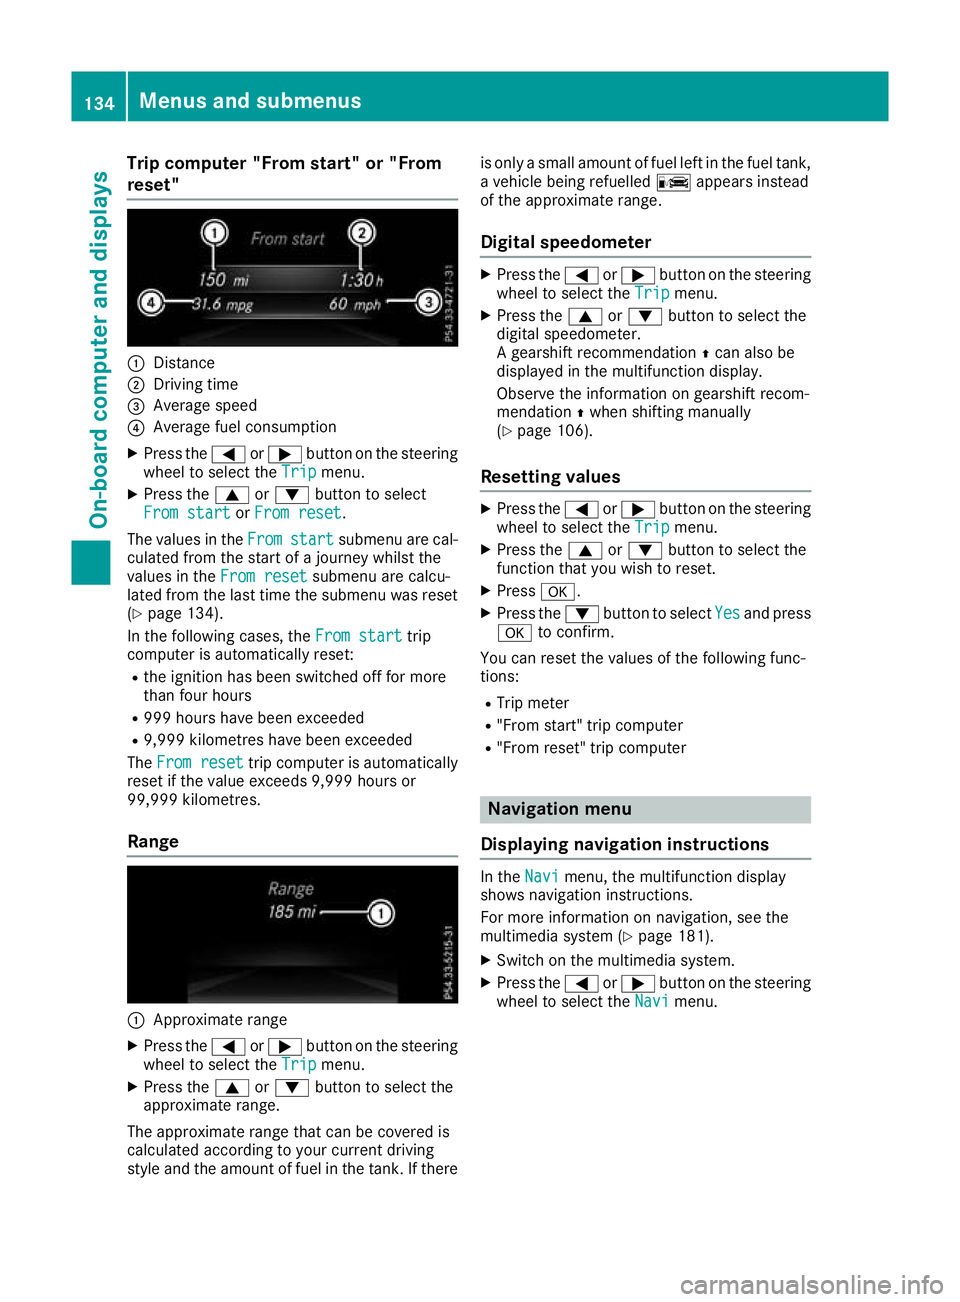
reset" :
Distance
; Driving time
= Averag espeed
? Averag efuelconsumption
X Press the =or; button on the steering
whee ltoselect the Trip
Tripmenu.
X Press the 9or: button to select
Fro mstart
From start orFrom reset
From reset.
The valuesint heFrom
From start
start submenu are cal-
culated from the start of ajourney whilst the
valuesint heFrom reset
From reset submenu are calcu-
lated from the last time the submenu was reset
(Y page 134).
In the following cases, the From start
From start trip
computer is automaticallyr eset:
R the ignition has been switched off for more
than four hours
R 999 hours have been exceeded
R 9,999 kilometres have been exceeded
The From reset From reset trip computer is automatically
reset if the value exceeds 9,999 hours or
99,999 kilometres.
Range :
Approx imaterange
X Press the =or; button on the steering
whee ltoselect the Trip
Tripmenu.
X Press the 9or: button to select the
approximate range.
The approximate range tha tcan be covered is
calculate daccording to your current driving
style and the amount of fuel in the tank. If there is only
asmall amount of fuel left in the fuel tank,
av ehicle being refuelled Cappears instead
of the approximate range.
Digita lspeedometer X
Press the =or; button on the steering
wheel to select the Trip
Tripmenu.
X Press the 9or: button to select the
digital speedometer.
Ag earshift recommendation Zcan also be
displayed in the multifunction display.
Observe the information on gearshift recom-
mendation Zwhen shiftin gmanually
(Y page 106).
Resetting values X
Press the =or; button on the steering
wheel to select the Trip Tripmenu.
X Press the 9or: button to select the
function that you wish to reset.
X Press a.
X Press the :button to select Yes Yesand press
a to confirm.
You can reset the values of the following func-
tions:
R Trip meter
R "From start "trip computer
R "From reset" trip computer Navigat
ionm enu
Displaying navigatio ninstructions In the
Navi Navimenu, the multif unction display
shows navigation instructions.
For more information on navigation, see the
multimedia system (Y page 181).
X Switch on the multimedia system.
X Press the =or; button on the steering
wheel to select the Navi Navimenu. 134
Menu
sand submenusOn-boar dcomputer and displays
Page 138 of 261
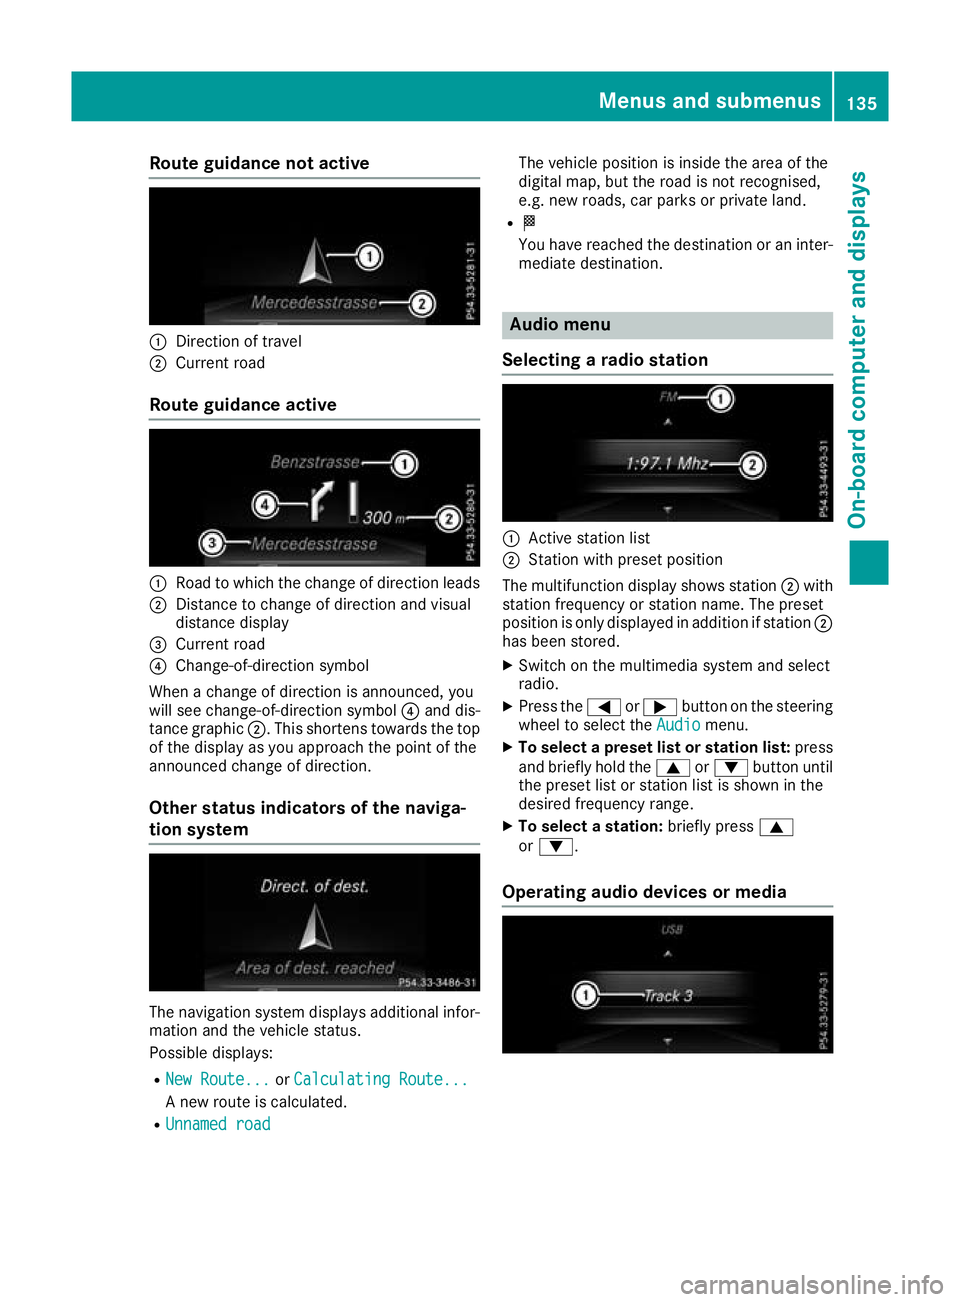
Route guidanc
enotactive :
Direction of travel
; Current road
Route guidanc eactive :
Road to which the change of direction leads
; Distance to change of direction an dvisual
distanc edisplay
= Curren troad
? Change-of-direction symbol
When achang eofd irection is announced, you
will see change-of-direction symbol ?and dis-
tance graphic ;.This shorten stow ards th etop
of th edisplay as you approac hthe poin toft he
announce dchang eofd irection.
Other status indicators of th enaviga-
tion system The navigation system displays additional infor-
mation and the vehicle status.
Possible displays:
R New Route... New Route... orCalculating Route...
Calculating Route...
An ew route is calculated.
R Unnamed road
Unnamed road The vehicle position is inside the area of the
digital map, but the road is not recognised,
e.g. new roads, car parks or private land.
R O
You have reached the destination or an inter-
mediate destination. Audio menu
Selecting aradio station :
Active station list
; Station wit hpreset position
The multifunctio ndisplay shows station ;with
statio nfrequency or statio nname. The preset
positio niso nlyd isplayed in additio nifstation ;
ha sb eens tored.
X Switch on the multimedia system and select
radio.
X Press the =or; button on the steering
whee ltoselect the Audio
Audio menu.
X To select apreset list or station list: press
and briefl yholdt he 9 or: button until
the preset list or statio nlistiss hown in the
desired frequency range.
X To select astation: brieflypress 9
or :.
Operatin gaudi odevices or media Menus and subme
nus
135On-boa rdcomputer and displays Z
Page 139 of 261
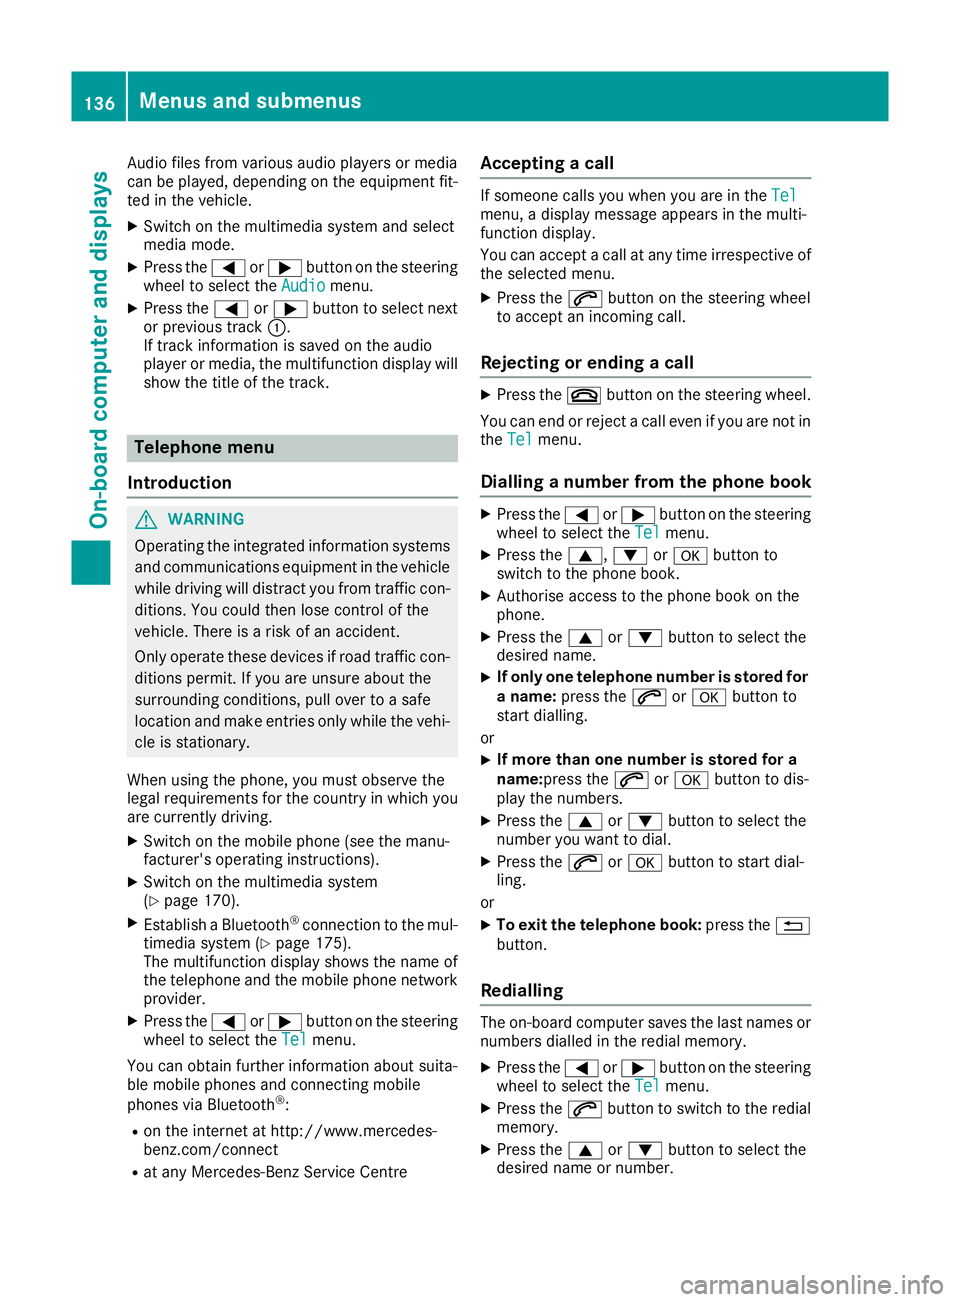
Audio files from various audi
oplayer sorm edia
can be played ,depen ding on the equipment fit-
ted in the vehicle.
X Switch on the multimedia system and select
media mode.
X Press the =or; button on the steering
whee ltoselect the Audio
Audio menu.
X Press the =or; button to select next
or previous track :.
If trac kinformatio niss aved on the audio
player or media ,the multifunctio ndisplay will
sho wthe titl eofthe track. Telephon
emenu
Introduction G
WARNING
Oper ating the integrated information systems
and communications equipment in the vehicle
while driving willd istract you from traffic con-
ditions. You coul dthen lose control of the
vehicle. There is arisk of an accident.
Only operate these devices if road traffic con-
ditions permit. If you are unsure about the
surrounding conditions, pullo ver toasafe
location and make entries only while the vehi-
cle is stationary.
When using the phone, you must observe the
lega lrequirements for the country in which you
are currently driving.
X Switch on the mobil ephone (see the manu-
facturer' soperating instructions).
X Switch on the multimedi asystem
(Y page1 70).
X Establish aBluetooth ®
connection to the mul-
timedi asystem (Y page175).
The multifunction display show sthe name of
the telephone and the mobil ephone network
provider.
X Press the =or; button on the steering
whee ltoselect the Tel Telmenu.
You can obtai nfurther information about suita-
ble mobil ephones and connecting mobile
phones via Bluetooth ®
:
R on the internet at http://www.mercedes-
benz.com/connect
R at any Mercedes-Benz Service Centre Accepting
acall If someon
ecalls you when you are in the Tel
Tel
menu, adisplay messag eappears in the multi-
function display.
You can accept acall at any time irrespective of
the selected menu.
X Press the 6button on the steering wheel
to accept an incoming call.
Rejecting or ending acall X
Press the ~button on the steering wheel.
You can end or reject acall even if you are not in
the Tel Tel menu.
Dialling anumber from the phone book X
Press the =or; button on the steering
wheel to select the Tel
Tel menu.
X Press the 9,:ora button to
switch to the phone book.
X Authorise access to the phone book on the
phone.
X Press the 9or: button to select the
desired name.
X If only one telephone number is stored for
an ame: press the 6ora button to
start dialling.
or X If more thano
ne number is stored for a
name:press the 6ora button to dis-
play the numbers.
X Press the 9or: button to select the
number you want to dial.
X Press the 6ora button to start dial-
ling.
or X To exit the telephone book: press the%
button.
Redialling The on-board computer saves the last names or
numbers dialled in the redial memory.
X Press the =or; button on the steering
wheel to select the Tel Telmenu.
X Press the 6button to switch to the redial
memory.
X Press the 9or: button to select the
desired name or number. 136
Menus and submenusOn-board computer and displays