2016 MERCEDES-BENZ G-CLASS SUV warning lights
[x] Cancel search: warning lightsPage 118 of 261

X
To apply: pull parking brake lever ;up
firmly.
Whe nthe ignition is switched on, the red J
indicator lamp in the instrument cluster lights up.
X To release: pull parking brake lever ;
slightly.
X Press release button :and guid eparking
brake ;down to the stop.
The J indicator lamp in the instrument
cluster goe sout.
The vehicl ecan also be braked during an emer-
genc ybyu sing the parking brake.
X To brake in an emergency: press and hold
release button :and carefull ypullp arking
brake lever ;upwards.
If yo udrive on we troads or dirt-covered surfa-
ces, roa dsalta nd/or dirt could get into the
parking brake.
In order to prevent corrosion and areduction in
the braking powe rofthe parking brake, observe
the following:
R pull the parking brake upwards with release
button :depresse dfrom time to time before
beginning ajourney
R drive for approximatel y100 ma tamaximum
speed of 20 km/h Parkin
gupthe vehicle
If you leave the vehicle parked up for longer than
four weeks, the battery may be damaged by
exhaustive discharging.
If you leave the vehicle parked up for longer than
six weeks, it may suffer from lack of use.
X Contact aqualified specialist workshop and
seek advice.
i You can obtain information on trickle charg-
ers from aqualified specialist workshop. Driving tips
General drivin
gtips
Important safety notes G
WARNING
If you switch off the ignition while driving,
safety-relevant functions are only available wit
hlimitations, or not at all. This could affect,
for example, th epower steerin gand th ebrake
boosting effect .You will requir econsiderably
mor eeffort to steer and brake. Ther eisarisk
of an accident.
Do not switch off th eignitio nwhile driving.
Drive sensibly –savef uel Observe the following tips to save fuel:
X The tyre sshould always be inflated to the rec-
ommended tyre pressure.
X Remove unnecessary loads.
X Remove roof carriers when they are not nee-
ded.
X Warm up the engine at low engine speeds.
X Avoid frequent acceleration or braking.
X Have all service and maintenance work car-
ried out at the specified intervals.
Fuel consumption also increases when driving in
cold weather, in stop-start traffic, on short jour- neys and in hilly terrain. Short journeys
! Vehicles with
adiesel particle filter: if the
vehicle is mostly driven for short distances, it
is possible that malfunction smay occur dur-
ing the automatic cleaning of the diesel par-
ticle filter. This may lead to fuel collecting in
the engine oil and cause engine failure. There- fore, if you frequently drive short distances,
you should take a20minute trip on amotor-
way or rural road at least every 500km. Brakes
Imp ortant safety notes G
WARNING
If you shift dow nonaslippery road surface in
an attempt to increas ethe engine's braking
effect, the drive wheels coul dlose their grip.
This increases the risk of skidding and having
an accident.
Do not shift downf or additionalengine brak-
ing on aslippery road surface. Drivingt
ips
115Driving an dparking Z
Page 127 of 261
Off-road driving systems
Transfer case
General notes The vehicle has permanent all-wheel drive. The
front and rear axles are constantly driven.
Further information on driving off-road
(Y page 119).
Shift ranges HIGH
RANGE
Position for all normal on-
road driving conditions.
LOW RANGE
Low-range position for driving
off-road.
Also for use on steep uphill or downhill gradients, especially
when towin gatrailer.
The vehicle travels around
half the speed of on-road driv-
ing range HIGH RANGE.T he
tractive powerisc orrespond-
ingly higher. Shiftin
gthe transfer case General notes
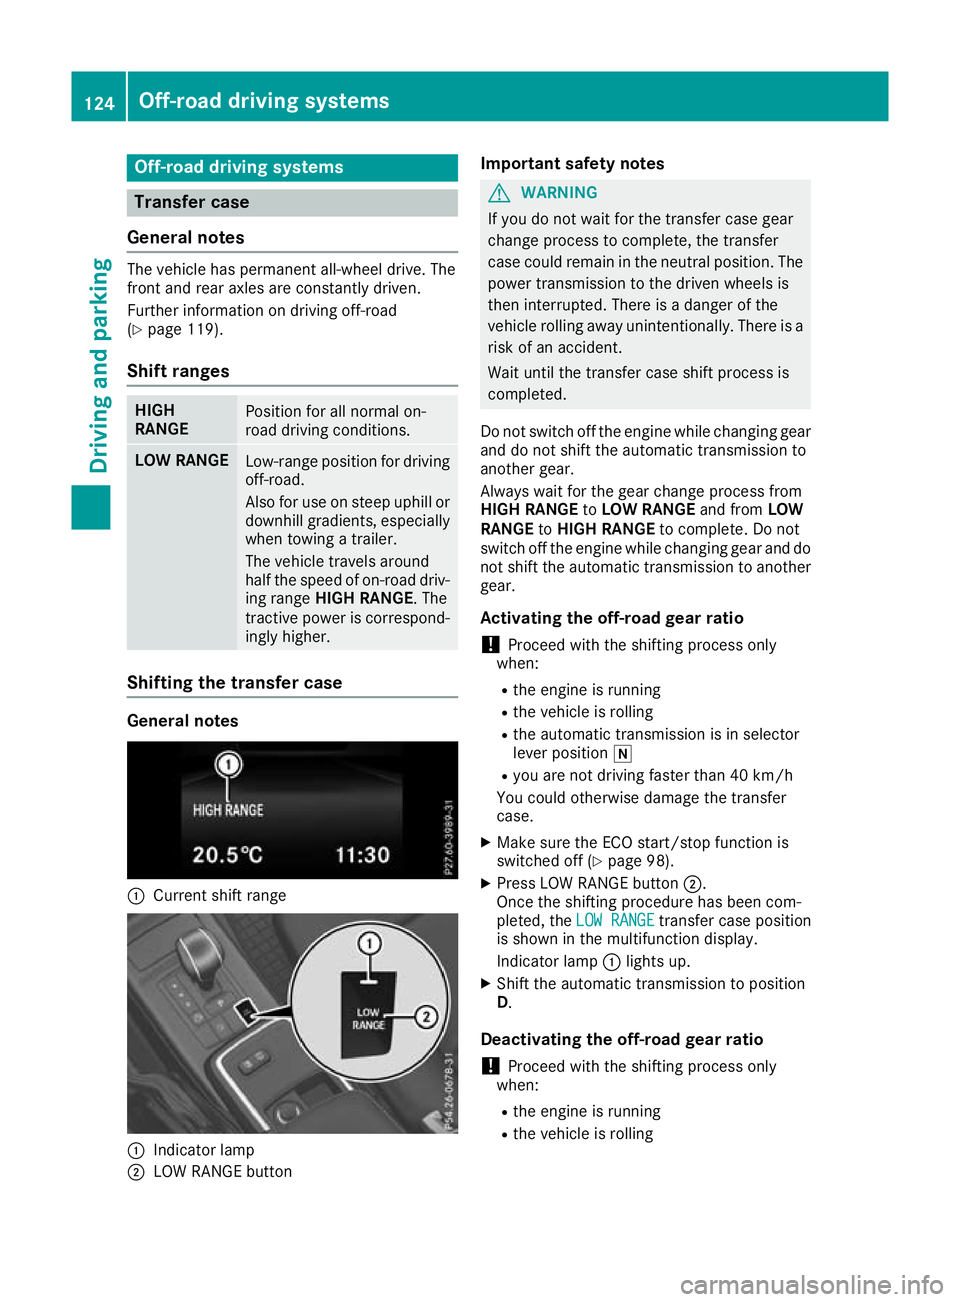
:
Curren tshif trange :
Indicator lamp
; LOW RANGE button Important safety notes G
WARNING
If yo udon ot waitf or the transfer case gear
change process to complete, the transfer
case coul dremai ninthe neutral position. The
power transmission to the drive nwheels is
then interrupted. There is adange rofthe
vehicl erolling awayu nintentionally.T here is a
risk of an accident.
Waitu ntil the transfer case shift process is
completed.
Do not switch off the engine while changing gear and do not shift the automatic transmission to
another gear.
Always waitf or the gearchange process from
HIGH RANGE toLOW RANGE and fromLOW
RANGE toHIGH RANGE to complete. Do not
switch off the engine while changing geara nd do
not shift the automatic transmission to another gear.
Activating the off-road gear ratio ! Proceed with the shifting process only
when:
R the engine is running
R the vehicl eisrolling
R the automatic transmission is in selector
leve rposition i
R you are not driving faster than 40 km/h
You coul dotherwise damage the transfer
case.
X Make sure the ECO start/stop function is
switched off (Y page98).
X Press LOW RANGE button ;.
Once the shifting procedure has been com-
pleted, the LOW RANGE LOW RANGE transfer case position
is show ninthe multifunction display.
Indicator lamp :lights up.
X Shift the automatic transmission to position
D.
Deactivatin gthe off-road gear ratio
! Proceed with the shifting process only
when:
R the engine is running
R the vehicl eisrolling 124
Off-roa
ddriving systemsDriving and parking
Page 129 of 261
Engaging th
edifferential locks General notes
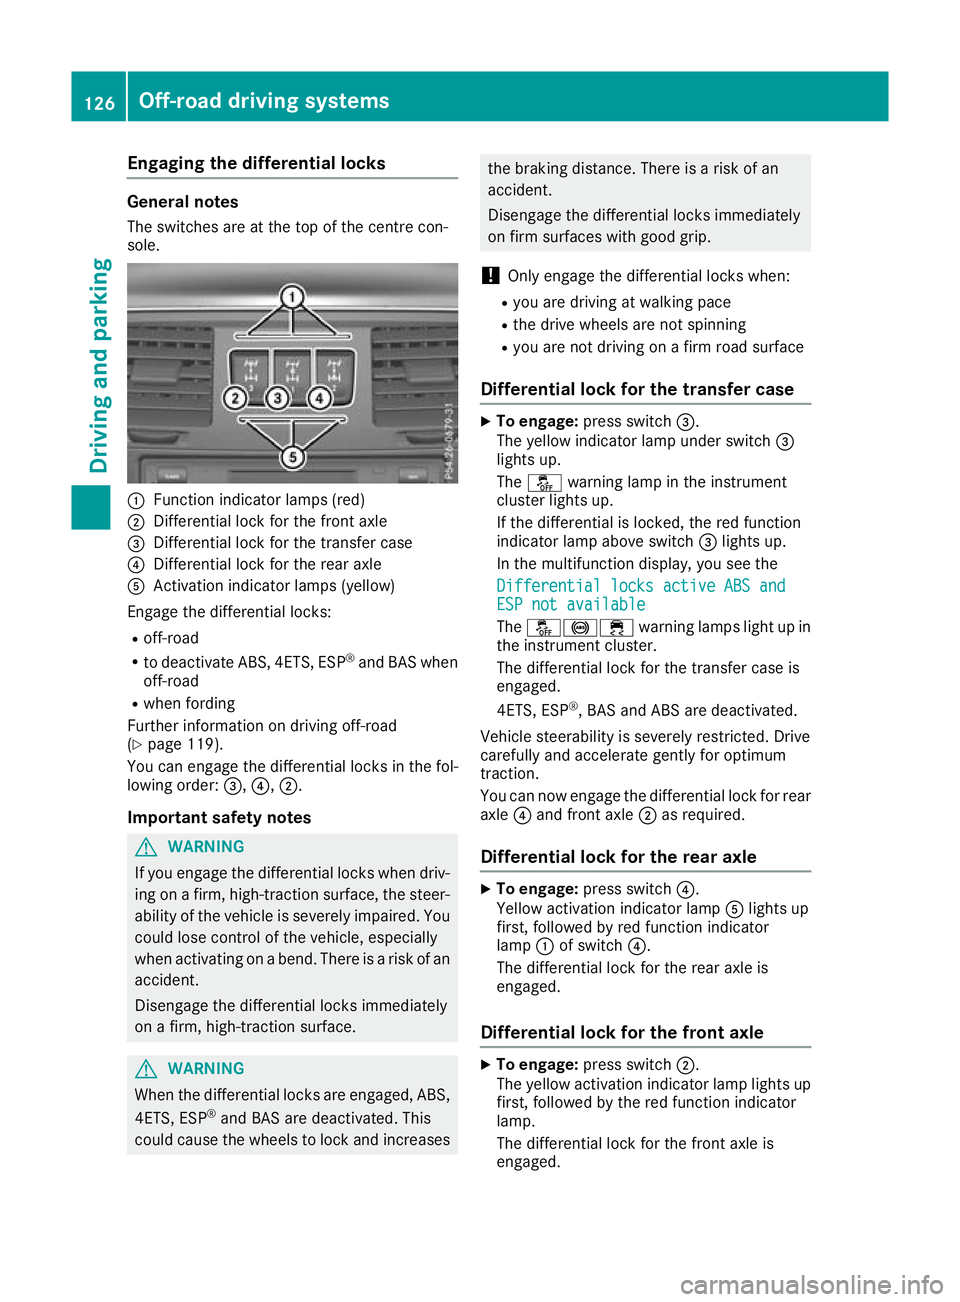
The switches are at the top of the centre con-
sole. :
Function indicato rlam ps (red)
; Differentia llock for the front axle
= Differentia llock for the transfe rcase
? Differentia llock for the rea raxle
A Activation indicator lamps (yellow)
Engag ethe differential locks:
R off-road
R to deactivate ABS, 4ETS, ESP ®
and BAS when
off-road
R whe nfording
Furthe rinformation on driving off-road
(Y page 119).
You can engage the differential locks in the fol-
lowing order: =,?,;.
Important safety notes G
WARNING
If you engag ethe differential locks when driv-
ing on afirm, high-traction surface, the steer-
ability of the vehicl eisseverely impaired .You
coul dlose control of the vehicle, especially
when activating on abend. There is arisk of an
accident.
Disengage the differential locks immediately
on afirm, high-traction surface. G
WARNING
When the differential locks are engaged, ABS, 4ETS, ESP ®
and BAS are deactivated. This
coul dcauset he wheels to lock and increases the braking distance. There is
ariskofan
accident.
Disengag ethe differential locks immediately
on fir msurfaces with good grip.
! Onl
yengag ethe differential locks when:
R youa redrivin gatw alking pace
R the drive wheels ar enot spinning
R youa renot drivin gonafirmr oads urface
Differential lock fo rthe transfe rcase X
To engage: press switch =.
The yellow indicator lamp under switch =
lights up.
The å warning lamp in the instrument
cluster lights up.
If the differential is locked ,the red function
indicator lamp above switch =lights up.
In the multifunctio ndisplay ,you see the
Differential locks active ABS and Differential locks active ABS and
ESP not available ESP not available
The å!÷ warninglamps light up in
the instrument cluster.
The differential lock for the transfer case is
engaged.
4ETS, ESP ®
,B AS and ABS are deactivated.
Vehicle steerability is severely restricted. Drive
carefully and accelerate gently for optimum
traction.
You can now engage the differential lock for rear axle ?and front axle ;as required.
Differential lockf or the rear axle X
To engage: press switch ?.
Yellow act ivation indicator lamp Alights up
first, followe dbyred functio nindicator
lamp :of switch ?.
The differential lock for the rea raxleis
engaged.
Differential lock for the fron taxle X
To engage: press switch ;.
The yellow activation indicator lamp lights up
first, followe dbythe red functio nindicator
lamp.
The differential lock for the front axl eis
engaged. 126
Off-road driving systemsDriving an
dparking
Page 142 of 261
i
Depending on your vehicle's equipment,
when the surround lighting and exterio rlight-
ing delaye dswitch-off ar eon, the following
light up:
R side lamps
R dipped-beam headlamps
Switchin gthe interior lighting delayed
switch-off on/off
If yo uactivate the Lighting
Lighting delayed
delayedsw.-off
sw.-off
function, the interio rlighting remains on for
20 second safter yo uremove the key fro mthe
ignition lock.
X Press the =or; button on the steering
whee ltoselect theSettings
Settings menu.
X Press the :or9 button to select the
Lights
Lights submenu.
X Press ato confirm.
X Press the :or9 button to select the
Lighting delaye dsw.-off
Lighting delayed sw.-off function.
If the Lighting delayed sw.-off
Lighting delayed sw.-off function
has been activated, the vehicle interior is dis-
played in red in the multifunction display.
X Press ato save the setting.
Vehicle Activating/deactivating the automatic
locking feature
If you activate the Automatic door locks Automatic door locks
function, the vehicle is centrallyl ockedabov ea
spee dofa pproximately 15 km/h.
X Press the =or; buttononthesteering
whee ltos elect the Settings
Settings menu.
X Press the :or9 buttontos elect the
Vehicle
Vehicle submenu.
X Press ato confirm.
X Press the :or9 button to select the
Automatic doo rlocks
Automatic door locks function.
When the Automatic
Automatic door
doorlocks
locks function is
activated, the vehicle doors are displayed in
red in the multifunction display.
X Press ato save the setting.
For further information on the automatic locking
feature; see (Y page 62). Activating/deactivating the acoustic
locking confirmation
If you swi tchont heAcoustic Acoustic Lock
Lockfunction ,an
acoustic signal sounds when you loc kthe vehi-
cle.
X Press the =or; buttononthesteering
whee ltos elect the Settings
Settings menu.
X Press the :or9 buttontos elect the
Vehicle
Vehicle submenu.
X Press ato confirm.
X Press the :or9 button to select the
Acoustic Lock
Acoustic Lock function.
If the Acoustic Lock
Acoustic Lock function is activated,
the & symbol in the multifunctio ndisplay
lights up red.
X Press ato save the setting.
Heating Auxiliary heating departure time
G
DAN
GER
If th eexhaust pipe is blocke dorsufficient
ventilation is no tpossible, toxic exhaust
fumes can ente rthe vehicle, especially car-
bon monoxide. This is th ecase, e.g. in
enclosed spaces, or if th evehicl eiss tuck in
snow. There is ariskoff atal injuries.
You should switch off th eauxiliary heating in
enclosed spaces whic hdonothav eane xtrac-
tion system, e.g. agarage. If th evehicl eis
stuck in snow and you mus tleav ethe auxiliary
heating running, keep th eexhaust pipe and
th ea rea around th evehicl eclear of snow. To
guarantee asufficien tsupply of fresh air, open
aw indow on th eside of th evehicl eaway from
th ew ind. G
WARNING
When th eauxiliary heating is switched on,
parts of the vehicl ecan become very hot.
Flammable materials such as leaves, grass or twigs may ignite if they come into contact
with:
R hot parts of the exhaust system
R the exhaust gas itself
There is arisk of fire. Menus and submenus
139On-boardcomputer and displays
Z
Page 143 of 261
When the auxiliary heating is switched on,
make sure that:
R no flammable materials come into contact
with hot vehicle components
R the exhaust gas can escape from the
exhaust pipe unhindered
R the exhaust gas does not come into contact
with flammable materials.
! Operatin
gthe auxiliary heating/ventilation
draws on the vehicle battery. After you have
heated or ventilated the vehicle amaximum of
two times, drive for alonger distance.
Only vehicles with auxiliary heating have this
function (Y page 89).
In the Heating Heating submenu, you can select a
stored departure time or change adeparture
time.
The auxiliary heating timer function calculates
the switch-on time accordin gtothe outside
temperature so that the vehicle is preheated by the departure time. When the departure time isreached, the auxiliary heating continues to heat for afurther five minutes and then switches off.
The auxiliary heating selects the temperature
setting of the THERMATIC automatic climate
control.
You can switch the auxiliary heating on or off by
using the &auxiliary heating button on the
centre console or the remot econtrol.
Selecting the departure time or deactivat- ing aselected departure time
X Press the =or; button on the steering
wheel to select the Settings Settingsmenu.
X Press the :or9 button to select the
Heating
Heating submenu.
X Press ato confirm.
You will see the selected setting.
X Press ato confirm.
X Press the :or9 button to select one
of the three departur etimes or Timer
Timeroff
off(no
timer active).
X Press ato confirm.
If ad eparture time is selected, the yellow
indicator lamp lights up on the &auxiliary
heating button. Changing the departure time
X
Press the =or; buttonont hesteering
wheel to selec tthe Settings Settings menu.
X Pres sthe : or9 button to selec tthe
Heating
Heating submenu.
X Press ato confirm.
Yo uw ill see the selected setting.
X Press ato confirm.
X Press the :or9 button to select
Change A Change A, Change B
Change BorChange C
Change C.
X Press ato confirm.
You can now change the departure time.
X Press the =or; button to select the
displaytobec hanged: hours, minutes.
X Press the :or9 button to set the
selected display.
X Press ato store the entry.
The yellow indicator lamp on the &auxili-
ary heating button lights up.
Comfort Activating/deactivating the EASY-
ENTRY/EXIT feature
G
WARNING
When the EASY-ENTRY/EXI Tfeature adjusts
the steering wheel, you and other vehicle
occupants –particularl ychildren –could
become trapped. There is arisk of injury.
Whil ethe EASY-ENTRY/EXIT feature is mak-
ing adjustments, make sure that no one has
any body parts in the swee pofthe steering
wheel.
If someone is trapped:
R press one of the memory function position
buttons, or
R move the switch for steering whee ladjust-
ment in the opposite direction to that in
which the steering whee lismoving.
The adjustment process is stopped.
X Press the =or; button on the steering
whee ltoselect the Settings Settings menu.
X Press the :or9 button to select the
Convenience
Convenience submenu.
X Press ato confirm. 140
Menu
sand submenusOn-boar dcomputer and displays
Page 146 of 261
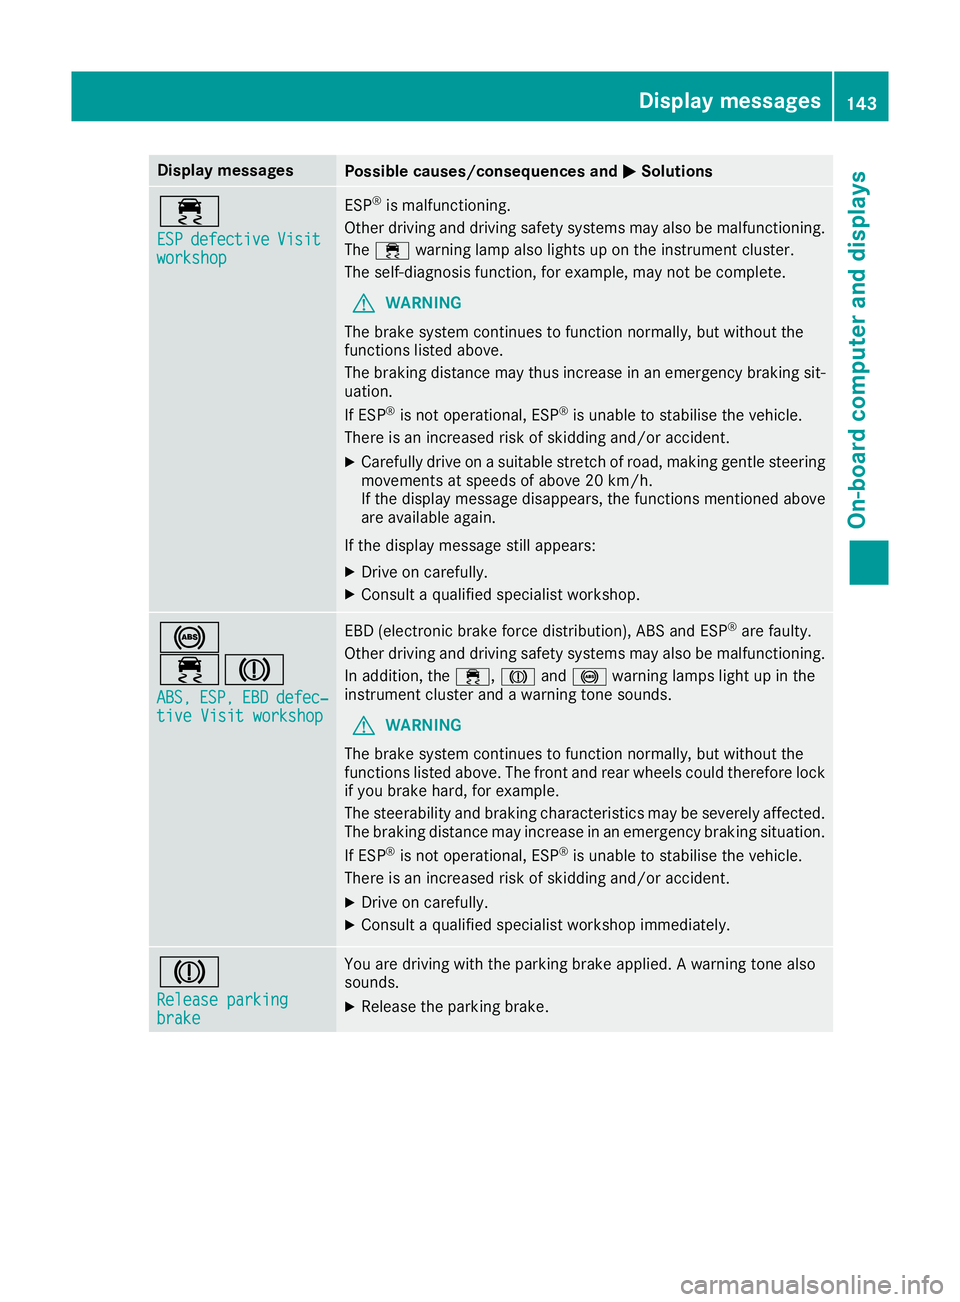
Display messages
Possible causes/consequence
sand M
MSolutions ÷
ESP ESP
defective
defective Visit
Visit
workshop
workshop ESP
®
is malfunctioning.
Other driving and driving safet ysystem smayalso be malfunctioning.
The ÷ warning lamp also lights up on the instrument cluster.
The self-diagnosi sfun ction, for example, ma ynot be complete.
G WARNING
The brake system continue stofunctio nnormally ,but withou tthe
functions listed above.
The braking distance ma ythu sincrease in an emergency braking sit-
uation.
If ESP ®
is not operational ,ESP ®
is unabl etostabilise the vehicle.
There is an increased ris kofskidding and/or accident.
X Carefully drive on asuitabl estretch of road, making gentle steering
movements at speeds of above 20 km/h.
If the displa ymessage disappears, the functions mentione dabove
ar ea vailable again.
If the displa ymessage still appears:
X Driv eonc arefully.
X Consult aquali fied specialis tworkshop. !
÷J
ABS, ABS, ESP,
ESP,EBD
EBDdefec‐
defec‐
tiv eVisit workshop
tive Visit workshop EBD (electron
icbrake force distribution), ABS and ESP ®
aref aulty.
Othe rdrivin gand drivin gsafety system smayalso be malfunctioning.
In addition, the ÷,Jand! warning lamps light up in the
instrument cluster and awarning tone sounds.
G WARNING
The brake system continue stofunctio nnormally ,but withou tthe
functions listed above .The front and rea rwheel scould therefore lock
if yo ubrake hard, for example.
The steerability and braking characteristics ma ybeseverely affected.
The braking distance ma yincrease in an emergency braking situation.
If ESP ®
is not operational ,ESP ®
is unabl etostabilise the vehicle.
There is an increased ris kofskidding and/or accident.
X Driv eonc arefully.
X Consult aquali fied specialis tworkshop immediately. J
Releas
eparking
Release parking
brake brake You are driving with the parking brake applied.
Awarnin gtonea lso
sounds.
X Release the parking brake. Display me
ssages
143On-board compute rand displays Z
Page 147 of 261
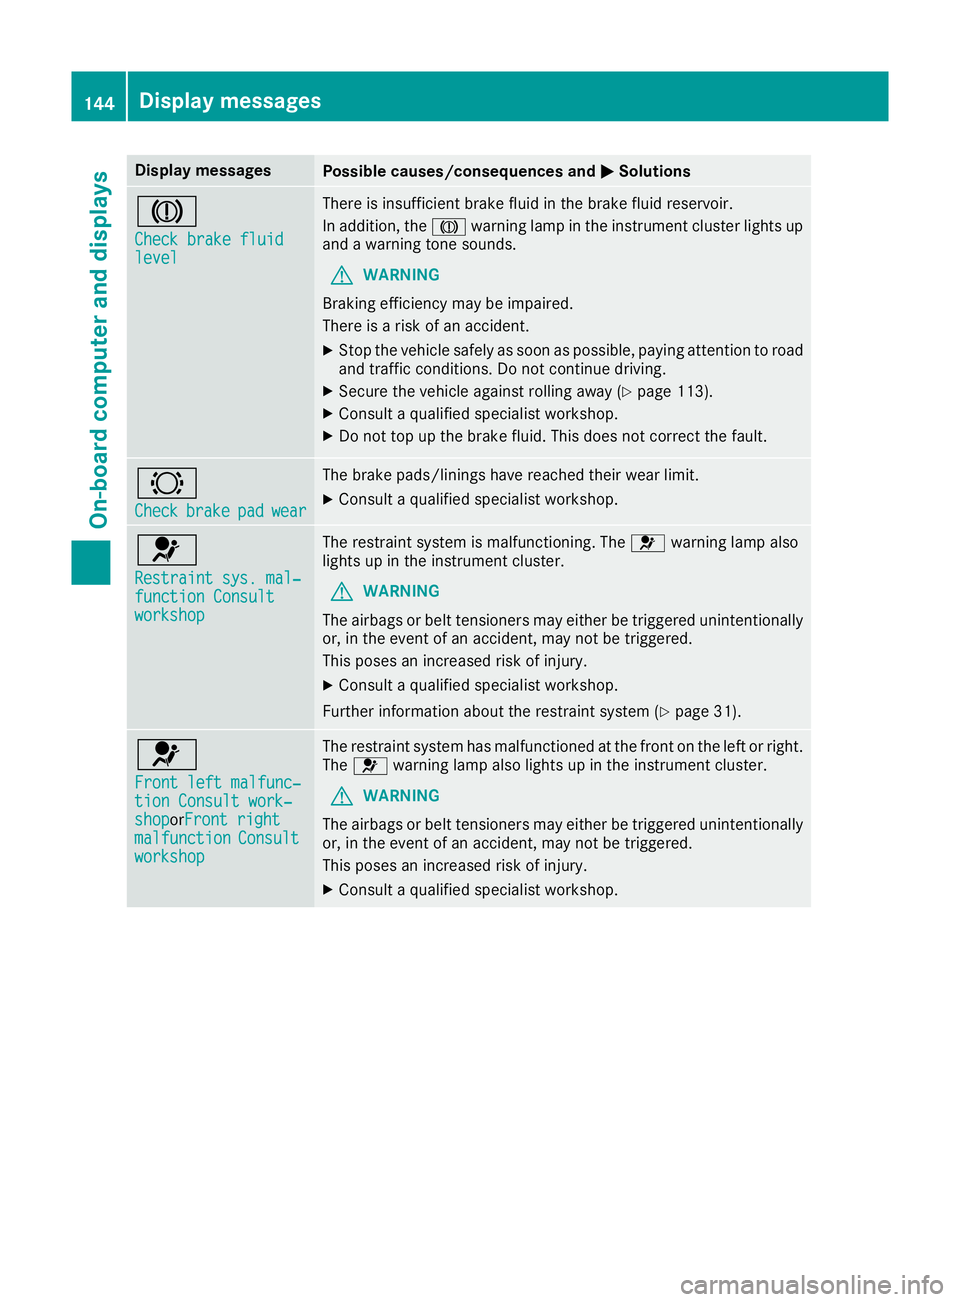
Display messages
Possible causes/consequence
sand M
MSolutions J
Check brake fluid Check brake fluid
level level There is insufficient brake fluid in the brake fluid reservoir.
In addition, the Jwarning lamp in the instrument cluster lights up
and awarning tones ounds.
G WARNING
Brakin gefficienc ymay be impaired.
There is arisk of an accident.
X Stop the vehicle safely as soon as possible, paying attention to road
and traffic conditions. Do not continue driving.
X Secure the vehicle against rolling away (Y page 113).
X Consult aqualified specialist workshop.
X Do not top up the brake fluid. This does not correc tthe fault. #
Check Check
brake
brakepad
padwear
wear The brake pads/linings have reached their wear limit.
X Consult aqualified specialist workshop. 6
Restraint sys. mal‐ Restraint sys. mal‐
function Consult function Consult
workshop workshop The restraint system is malfunctioning. The
6warning lamp also
lights up in the instrument cluster.
G WARNING
The airbags or belt tensioners may either be triggered unintentionally or, in the event of an accident ,may not be triggered.
This poses an increased risk of injury.
X Consult aqualified specialist workshop.
Further information about the restraint system (Y page 31).6
Front left malfunc‐ Front left malfunc‐
tion Consult work‐ tion Consult work‐
shop shoporFront right
Front right
malfunction
malfunction Consult
Consult
workshop
workshop The restraint system has malfunctioned at the front on the left or right.
The 6 warning lamp also lights up in the instrument cluster.
G WARNING
The airbags or belt tensioners may either be triggered unintentionally or, in the event of an accident ,may not be triggered.
This poses an increased risk of injury.
X Consult aqualified specialist workshop. 144
Display messagesOn-board computer and displays
Page 148 of 261

Display messages
Possible causes/consequence
sand M
MSolutions 6
Rear left malfunc‐ Rear left malfunc‐
tion Consult work‐ tion Consult work‐
shop shop
orRear right
Rear right
malfunction
malfunction Consult
Consult
workshop
workshop The rear left-hand or right-hand restraint system has malfunctioned.
The 6 warning lamp also lights up in the instrument cluster.
G WARNING
The airbags or belt tensioners may either be triggered unintentionally or, in the event of an accident, may not be triggered.
This poses an increased risk of injury.
X Consult aqualified specialist workshop. 6
Rear Rear
centre
centre malfunc‐
malfunc‐
tion Consult work‐
tion Consult work‐
shop shop The rear centre restraint system has malfunctioned. The
6warning
lamp also lights up in the instrument cluster.
G WARNING
The airbags or belt tensioners may either be triggered unintentionally or, in the event of an accident ,may not be triggered.
This poses an increased risk of injury.
X Consult aqualified specialist workshop. Lights
Display messages
Possible causes/consequence
sand M
MSolutions b
Left dipped beam Left dipped beam
(example) The bulb in question is faulty.
X Consult aqualified specialist workshop.
or X Check whether you are permitted to replace the bulb yourself
(Y page 78).
i LED light bulbs: the display message for the corresponding lamp
appears only when all the LEDsint he lamp have failed.b
Malfunction Malfunction
See
SeeOwn‐
Own‐
er's Manual
er's Manual The exterior lighting is faulty.
X Consult aqualified specialist workshop. b
AUTO lights inoper‐ AUTO lights inoper‐
ative ative The light sensor is faulty.
X
Consult aqualified specialist workshop. b
Remove key Remove key You have inserted the key into the ignition lock.
X Remove the key from the ignition lock. b
Switch off lights Switch off lights The lights are still switched on when you leave the vehicle.
Awarning
tonea lso sounds.
X Turn the light switch to the Ãposition. Display me
ssages
145On-board compute rand displays Z