2016 MERCEDES-BENZ G-CLASS SUV roof
[x] Cancel search: roofPage 69 of 261
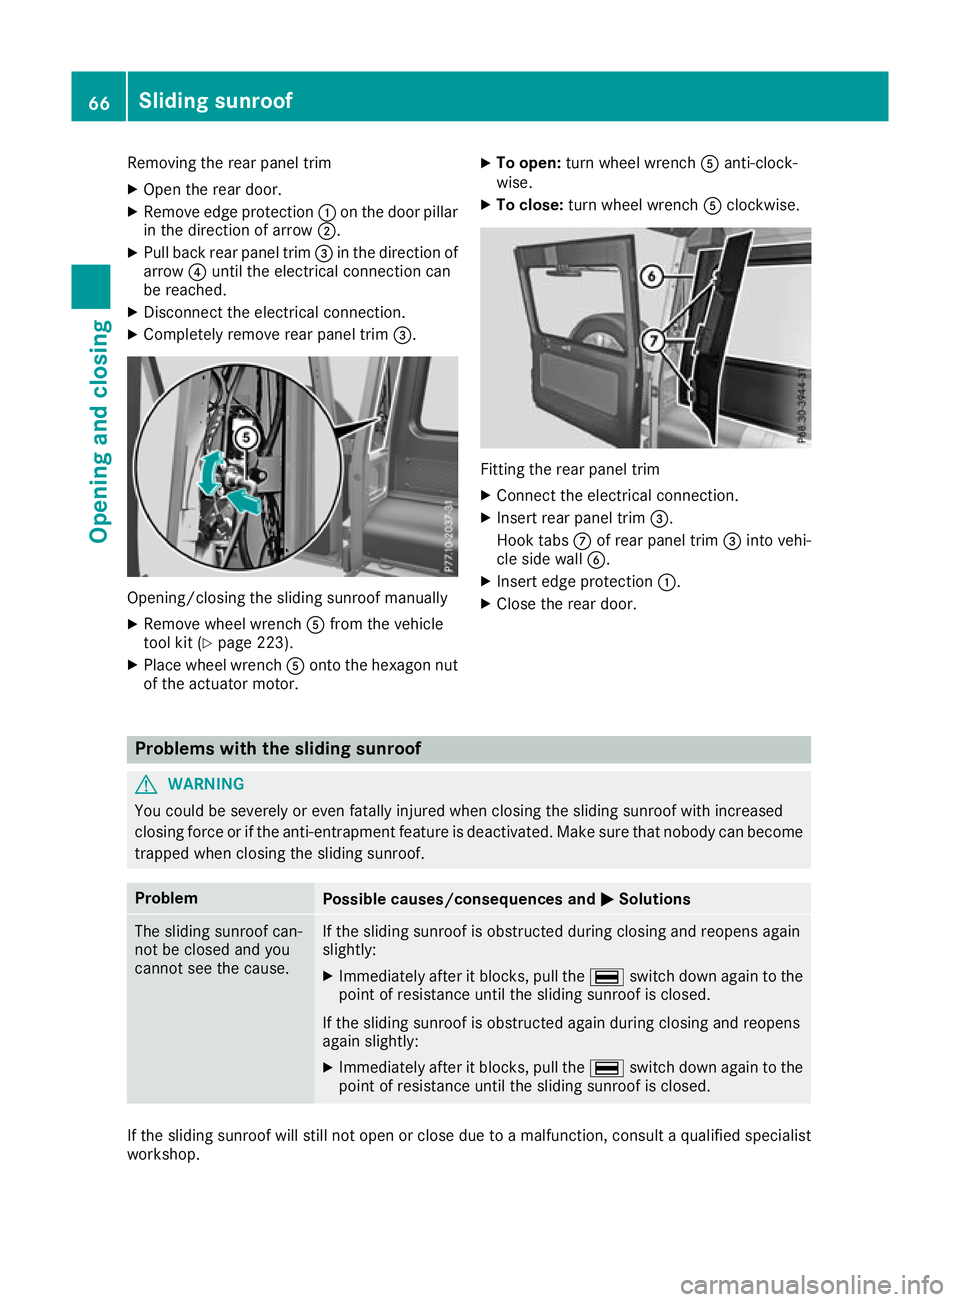
Removin
gthe rear panel trim
X Open th erear door.
X Remove edge protection :on th edoor pillar
in th edirection of arrow ;.
X Pull bac krear panel trim =in th edirection of
arrow ?until th eelectrical connection can
be reached.
X Disconnect th eelectrical connection.
X Completely remove rear panel trim =.Opening/closing the slidin
gsunroof manually
X Remove wheel wrench Afrom the vehicle
tool kit (Y page 223).
X Place wheel wrench Aonto the hexagon nut
of the actuator motor. X
To open: turnw heel wrench Aanti-clock-
wise.
X To close: turn wheelwrench Aclockwise. Fitting the rea
rpanel trim
X Connect the electrica lconnection.
X Insert rea rpanel trim =.
Hook tabs Cof rea rpanel trim =into vehi-
cle sid ewallB.
X Insert edg eprotection :.
X Close the rea rdoor. Problems wit
hthe sliding sunroof G
WARNING
You could be severely or even fatally injured when closing the sliding sunroof with increased
closing force or if the anti-entrapment feature is deactivated .Make sure that nobody can become
trappe dwhen closing the sliding sunroof. Problem
Possible causes/consequences and
M
MSolutions The sliding sunroof can-
not be close
dand you
cannot see the cause. If the sliding sunroo
fisobstructed during closing and reopens again
slightly:
X Immediately after it blocks, pullt he¡ switch down again to the
point of resistance until the sliding sunroof is closed.
If the sliding sunroof is obstructed again during closing and reopens
again slightly: X Immediately after it blocks, pullt he¡ switch down again to the
point of resistance until the sliding sunroof is closed. If the sliding sunroof wills
till not open or close due to amalfunction, consult aqualifieds pecialist
workshop. 66
Sliding sunroofOpening and closing
Page 87 of 261
Overview of the climat
econtrol sys-
tem General notes
Observe the settings recommended on the fol-
lowing pages. Otherwise, the windows could
mist up.
To prevent the windows from misting up:
R switch off climate control only briefly
R activate air-recirculation mode only briefly
R activate the "Cooling with dehumidification"
function
R activate the "Windscreen demisting" function
briefly, if required
Climate control regu lates the temperature and
the humidity in the vehicle interior and filters
undesirables ubstances out of the air. The "Cooling with air dehumidification" function
is available only when the engin eisrunning.
Optimum operation is only achieved when the
side windows and the sliding sunroof are closed.
Climate comfor tmay be adversely affected if the
sliding sunroof is open for along period of time.
Set the temperature manually if the sliding sun-
roof is open.
The "Residual heat" function can be switched on or off only when the ignition is switched off
(Y page 89).
The integrated filter can filter out most particles of dust and completely filters out pollen. Aclog-
ged filter reduces the amount of air supplied to
the vehicle interior. Dependin gonthe operating
conditions and environmental influences, the
interval for replacing the filter may be shorter
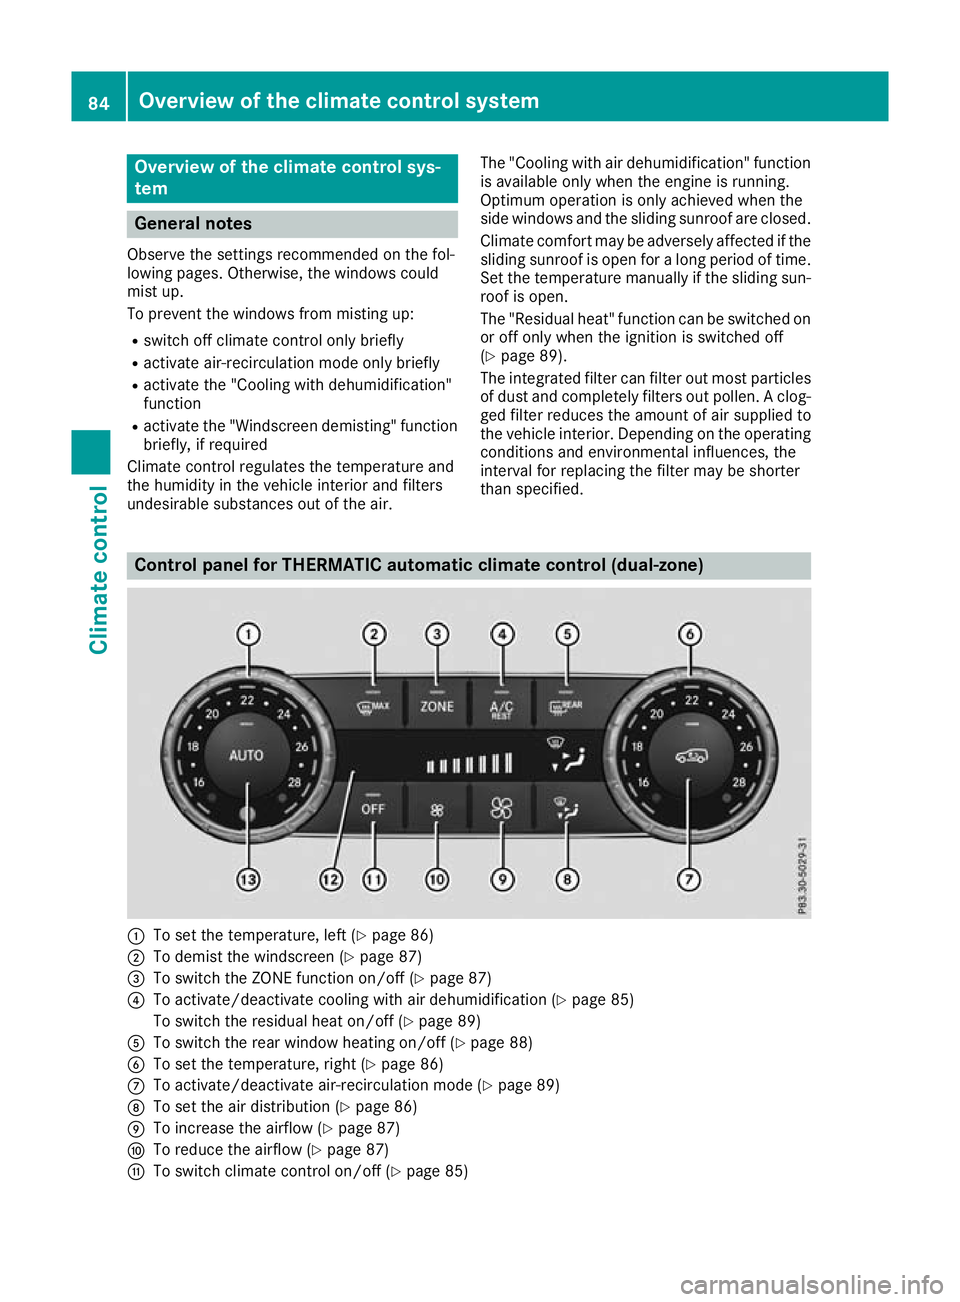
than specified. Control panel for THERMATIC automatic climate control (dual-zone)
:
To set the temperature, left (Y page 86)
; To demist the windscreen (Y page 87)
= To switch the ZONE function on/of f(Y page 87)
? To activate/deactivate cooling with air dehumidification (Y page 85)
To switch the residual heat on/of f(Ypage 89)
A To switch the rear window heating on/of f(Y page 88)
B To set the temperature, right (Y page 86)
C To activate/deactivate air-recirculation mode (Y page 89)
D To set the air distribution (Y page 86)
E To increase the airflow (Y page 87)
F To reduce the airflow (Y page 87)
G To switch climate control on/of f(Y page 85) 84
Overview of the climate control systemClimate
control
Page 118 of 261

X
To apply: pull parking brake lever ;up
firmly.
Whe nthe ignition is switched on, the red J
indicator lamp in the instrument cluster lights up.
X To release: pull parking brake lever ;
slightly.
X Press release button :and guid eparking
brake ;down to the stop.
The J indicator lamp in the instrument
cluster goe sout.
The vehicl ecan also be braked during an emer-
genc ybyu sing the parking brake.
X To brake in an emergency: press and hold
release button :and carefull ypullp arking
brake lever ;upwards.
If yo udrive on we troads or dirt-covered surfa-
ces, roa dsalta nd/or dirt could get into the
parking brake.
In order to prevent corrosion and areduction in
the braking powe rofthe parking brake, observe
the following:
R pull the parking brake upwards with release
button :depresse dfrom time to time before
beginning ajourney
R drive for approximatel y100 ma tamaximum
speed of 20 km/h Parkin
gupthe vehicle
If you leave the vehicle parked up for longer than
four weeks, the battery may be damaged by
exhaustive discharging.
If you leave the vehicle parked up for longer than
six weeks, it may suffer from lack of use.
X Contact aqualified specialist workshop and
seek advice.
i You can obtain information on trickle charg-
ers from aqualified specialist workshop. Driving tips
General drivin
gtips
Important safety notes G
WARNING
If you switch off the ignition while driving,
safety-relevant functions are only available wit
hlimitations, or not at all. This could affect,
for example, th epower steerin gand th ebrake
boosting effect .You will requir econsiderably
mor eeffort to steer and brake. Ther eisarisk
of an accident.
Do not switch off th eignitio nwhile driving.
Drive sensibly –savef uel Observe the following tips to save fuel:
X The tyre sshould always be inflated to the rec-
ommended tyre pressure.
X Remove unnecessary loads.
X Remove roof carriers when they are not nee-
ded.
X Warm up the engine at low engine speeds.
X Avoid frequent acceleration or braking.
X Have all service and maintenance work car-
ried out at the specified intervals.
Fuel consumption also increases when driving in
cold weather, in stop-start traffic, on short jour- neys and in hilly terrain. Short journeys
! Vehicles with
adiesel particle filter: if the
vehicle is mostly driven for short distances, it
is possible that malfunction smay occur dur-
ing the automatic cleaning of the diesel par-
ticle filter. This may lead to fuel collecting in
the engine oil and cause engine failure. There- fore, if you frequently drive short distances,
you should take a20minute trip on amotor-
way or rural road at least every 500km. Brakes
Imp ortant safety notes G
WARNING
If you shift dow nonaslippery road surface in
an attempt to increas ethe engine's braking
effect, the drive wheels coul dlose their grip.
This increases the risk of skidding and having
an accident.
Do not shift downf or additionalengine brak-
ing on aslippery road surface. Drivingt
ips
115Driving an dparking Z
Page 121 of 261
Alway
sobserve the fording depth values
(Y page 255). Parkin
gthe vehicle after heavy loads
on the engine
! Vehicles with
adiesel engine: your vehi-
cle's exhaust gas turbocharger may get very
hot under heavy engine load, e.g. during:
R trailer towing
R longer motorway journeys at high speed
R longer journeys through mountainous ter-
rain
X Let the engine run for approximately another
two minutes while the vehicle is stationary
before switching off the engine.
This way, the exhaust gas turbocharger can
cool down more effectively. Winte
rdriving G
WARNING
If you shift dow nonaslippery road surface in
an attempt to increas ethe engine's braking
effect, the drive wheels coul dlose their grip.
This increases the risk of skidding and having
an accident.
Do not shift downf or additionalengine brak-
ing on aslippery road surface. G
WARNING
If you select the LOW RANGE off-road gearon as lippery road surface, the wheels coul dlose
traction:
R if you release the accelerator peda lwhen
the vehicl eisinmotion
R if Off-road ABS intervenes when braking
If the wheels lose traction, it willnol onger be
possible to steer the vehicle. This increases
the risk of skidding and having an accident.
Never select the LOW RANGE off-road gear
when driving on slippery road surfaces. G
DANGER
If the exhaus tpipe is blocke doradequate
ventilation is no tpossible, poisonous gases
suc hasc arbon monoxide (CO) may ente rthe
vehicle. This is th ecase, e.g. if th evehicle
become strapped in snow. There is ariskof
fatal injury.
If you leav ethe engin eortheauxiliary heating
running, mak esuret he exhaust pipe and area
around th evehicl eare clear of snow. To
ensur eana dequate supply of fresh air, open a
window on th eside of th evehicl ethatisn ot
facing int othe wind.
Hav eyour vehicl ewinterproofed at aqualified
specialist workshop at th eonset of winter.
You should drive particularly carefully on slip-
per yroads urfaces. Avoid sudden acceleration,
steering and braking manoeuvres.
If th evehicl ethreaten stoskidorc annotbe
stoppe dwhen moving at low speed:
X Shift th eautomatic transmission to position
N.
X Try to bring th evehicl eunder control by using
corrective steering.
The outside temperature indicator is not
designed to serve as an ice-warning device and
is therefor eunsuitable for that purpose.
Changes in th eoutside temperature are dis-
played after ashort delay.
Indicate dtem peratures jus tabov ethe freezing
poin tdon otguarantee that th eroads urfac eis
free of ice .The roa dmay still be icy, especially in
wooded area soronbridges.The vehicl ecould
skid if you fail to adapt your drivin gstyle. Always
adapt your drivin gstyle and drive at aspeed to
suit th eprevailing weather conditions.
You should pay special attention to roa dcondi-
tion swhen temperatures are around freezing
point.
Further information on drivin gwiths nowc hains
(Y page 237).
Further information on drivin gwiths ummer
tyres (Y page 237).
Observ ethe note sint he"Winte roperation "sec-
tion (Y page 236). 118
Driving tipsDriving and parking
Page 123 of 261
Observe the following notes:
R stop the vehicle before you drive off-road and,
if necessary, shift the transfer case to the
LOW RANGE off-road driving position
(Y page 124)
R engage the differential locks if necessary
(Y page 126)
i ABS,4
ETS, ESP ®
and BAS are deactivated
while the differential locks are engaged. This
allowst he front wheels to lock briefly, so that
they can dig into aloose surface. However,
please note that locked wheels skid and can
no longer steer.
R Make sure that items of luggage and loads are
stowed safely and are well secured
(Y page 203).
R To avoid damaging the vehicle, make sure
there is always sufficient ground clearance.
R Alwaysk eep the engine running and in gear
when driving on adownhill gradient.
R Alwaysk eep the engine running and in gear
when driving on aslope.
R Drive slowly and evenly, if necessary at walk-
ing pace.
R Ensure that the wheels are in contact with the
ground at all times.
R Drive with extreme care on unknown off-road
routes where visibility is poor. For safety rea- sons, get out of the vehicle first and survey
the off-road route.
R Check the depth of water before fording rivers
and streams.
R Watch out for obstacles.
R Alwaysk eep the doors, the rear door, the side
windows and the sliding sunroof closed while
the vehicle is in motion.
R Do not deviate from marked routes.
R Match your speed to the terrain. The rougher,
steeper or more ruts on the terrain, the slower your speed should be.
R Do not jump with the vehicle. This will inter-
rupt the vehicle's propulsion.
R Avoid high engine speeds. Drive at appropri-
ate engine speeds.
R Alwaysc heck the vehicle for damage after off-
road driving.
Do not use the HOLD function when driving off- road, on steep uphillord ownhill gradients or on
slippery or loose surfaces. The HOLD function
cannot hold the vehicle on such surfaces. You can obtain further information aboutr
etro-
fittin gspecial all-terrain tyres from aqualified
specialis tworkshop.
Checklist before off-roa ddriving X
Engine oil level: check the engine oil and top
it up if necessary.
When driving on steep gradients, the oil level must be sufficiently high to ensure acorrect
oil supply in th evehicle.
X Hav ethe AdBlue ®
level checked at aqualified
specialist workshop (Y page 111).
X Tyre-change tool kit: check that thejackis
working and mak esure that th ewheel
wrench, arobus ttow cable and afolding
spade are in th evehicle.
X Wheels and tyres: check thetyret read
dept hand tyr epressure.
X Chec kfor damage and remove any foreign
objects, e.g .small stones, fro mthewheels/
tyres.
X Replace any missing valv ecaps.
X Replace dented or damage dwheels .Also
check th espare wheel.
X Wheels: dented or ben twheels can lead to a
loss of tyr epressure and damage to th etyre
bead. Before driving off-road, check the
wheels and replac ethemifn ecessary.
Checklist after off-roa ddriving !
If you detect damage to the vehicl
eafter
driving off-road, have the vehicle checked
immediately at aqualified specialist work-
shop.
Driving over rough terrain places greater
demands on your vehicle than driving on normal
roads. After driving off-road, check the vehicle.
This allowsy ou to detect damage promptly and
reduce the risk of an accident to yourselfa nd
other road users.
X Shift the transfer case to the on-road position
HIGH RANGE (Ypage 124).
X Disengage the differential locks
(Y page 127).
X Cleant he headlamps and rear lights and
check for damage.
X Cleant he front and rear licence plates.
X Cleant he wheels and tyres with awater jet
and remove any foreign objects. 120
Drivingt
ipsDriving and parking
Page 209 of 261
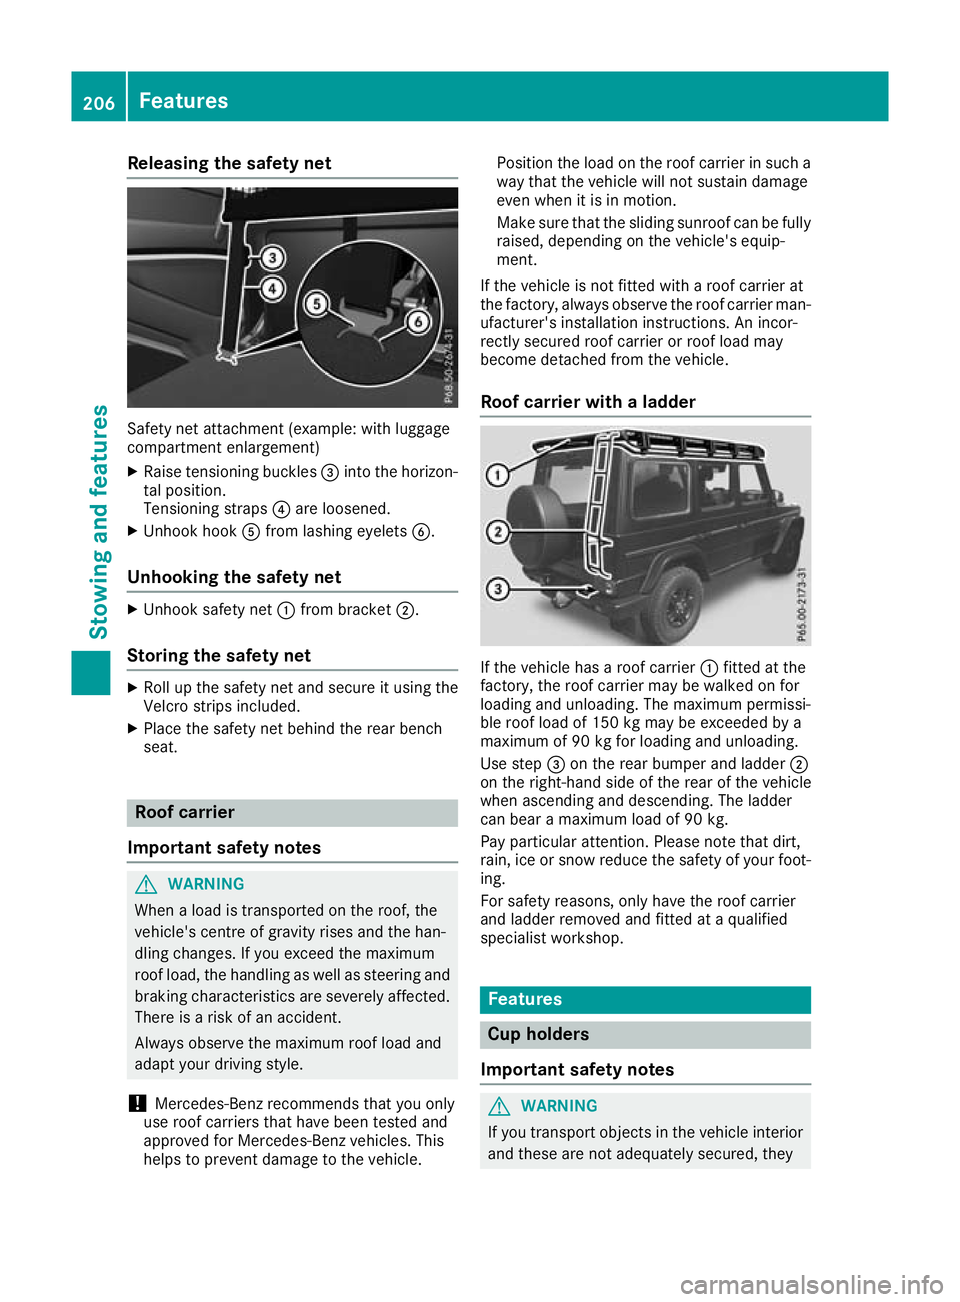
Releasin
gthe safety net Safety net attachment (example
:withl ug gage
compartment enlargement)
X Raise tensioning buckles =into the horizon-
tal position.
Tensioning straps ?are loosened.
X Unhook hook Afrom lashing eyelets B.
Unhookin gthe safety net X
Unhook safety net :from bracket ;.
Storing the safety net X
Roll up the safety net an dsecure it usin gthe
Velcro strips included.
X Plac ethe safet ynetbehind th erear bench
seat. Roof carrier
Importan tsafety notes G
WARNING
When aloa dist ransported on the roof, the
vehicle's centre of gravity rises and the han-
dling changes .Ifyou exceed the maximum
roof load, the handling as wellass teering and
braking characteristics are severely affected.
There is arisk of an accident.
Always observe the maximu mroof loada nd
adapt yourd riving style.
! Mercedes-Benz recommends that you only
use roof carriers that have been tested and
approved for Mercedes-Benz vehicles. This
help stop revent damage to the vehicle. Position the load on the roof carrier in such a
way that the vehicle will not sustain damage
even when it is in motion.
Make sure that the sliding sunroof can be fully
raised, dependin gonthe vehicle's equip-
ment.
If the vehicle is not fitted with aroof carrier at
the factory, alway sobserve the roof carrier man-
ufacturer's installation instructions. An incor-
rectly secured roof carrier or roof load may
become detached from the vehicle.
Roof carrier with aladder If the vehicl
ehasaroof carrier :fitted at the
factory, the roof carrier may be walked on for
loading and unloading. The maximum permissi-
ble roof load of 150 kg may be exceeded by a
maximum of 90 kg for loading and unloading.
Use step =on the rear bumpera nd ladder;
on the right-hand side of the rear of the vehicle
when ascending and descending. The ladder
can bear amaximum load of 90 kg.
Pay particular attention. Please note that dirt,
rain, ice or snow reduce the safety of yourf oot-
ing.
For safety reasons, only have the roof carrier
and ladder removed and fitted at aqualified
specialist workshop. Features
Cup holders
Important safety notes G
WARNING
If you transport objects in the vehicle interior and these are not adequately secured, they 206
FeaturesStowing and features
Page 220 of 261
Do not touch the surfaces or protective films
with hard objects ,e.g.ar ingori ce scraper.
Yo uc ould otherwis escratch or damage the
surfaces and protective film.
! Do not park up your vehicl
efor alon gp eriod
of time immediatel yafter cleaning, particu-
larly after cleaning the whee lrim with wheel
cleaner. Whee lcleane rmaylead to increased
corrosion of the brake discs and pads .You
shoul dtherefore drive for afew minute safter
cleaning. By heating up the brakes ,the brake
discs and pads dry .The vehicl ecan the nbe
parked up for alon gp eriodoft ime. H
Environmental note
Dispose of empty packaging an dcleaning
cloths in an environmentally responsible man- ner.
Regular car eofyour vehicle is acondition for
retainin gqualit yint helongterm.
Use car eproduct sand cleaning agents recom-
mended and approved by Mercedes-Benz. Washin
gthe vehiclea nd cleaning the
paintwork
Automatic car wash G
WARNING
Braking efficiency is reduced after the vehicle has been washed. There is arisk of an acci-
dent.
After washing the vehicle, brake carefully
while paying attention to the traffic conditions in order to restore full braking efficiency.
! When the HOLD function is activated, the
vehicl ebrakes automatically in certain situa-
tions.
To avoi ddamage to the vehicle, deactivate
the HOLD function in the following or similar
situations:
R when towing away
R in ac ar wash
! Make sure that the automatic car washis
suitable for the size of the vehicle. Fold in the exterior mirrors before the vehicl eiswashed.
The exterior mirrors coul dotherwise be dam-
aged. !
Make sure that the automatic transmission
is in position Nwhen washing your vehicle in
at ow-through car wash. The vehicle could be
damagedift he transmission is in another
position.
! Make sure:
R the side windows and sliding sunroof are
closed completely.
R the blower is switched off
R the windscreen wiper switch is at position
0
The vehicle could otherwise be damaged.
You can wash the vehicle in an automatic car
wash from the very start.
If the vehicle is very dirty, wash off excess dirt
before cleaning the vehicle in an automatic car
wash.
After using an automatic car wash, wipe off the
wax from the windscreen and the windscreen
wiper blades. This will prevent smears and
reduce wiping noises caused by residue on the
windscreen.
Washing by hand In some countries, washing by hand is only
allowed at specially equipped washing bays.
Observe the legal requirements for each indi-
vidual country.
When using the vehicle in winter, remove all
traces of road salt deposits carefully and as
soon as possible.
When washing the underside of the vehicle, also
clean the insides of the wheels.
X Do not use hot water and do not wash the
vehicle in direct sunlight.
X Use asoft sponge to clean.
X Use amild cleaning agent, such as acar
shampo oapproved by Mercedes-Benz.
X Thoroughly hose down the vehicle with agen-
tle jet of water.
X Do not point the water jet directly towards the
air inlet.
X Use plenty of water and rinse out the sponge
frequently.
X Rinse the vehicle with clean water and dry
thoroughl ywithachamois.
X Do not let the cleaning agent dry on the paint-
work. Ca
re
217Maintenance an dcare Z
Page 221 of 261
High-pressure cleaner
G
WARNING
The wate rjet of circular-jet nozzles (dirt grind-
ers) can caus edamage not visible from the
outside to tyres or chassi scomponents. Com-
ponents damaged in this way can unexpect-
edlyf ail.There is arisk of an accident.
Do not use high-pressure cleaners with circu-
lar-jet nozzles to clea nthe vehicle. Have dam-
agedt yres or chassi scomponents replaced
immediately.
! Always maintai
nadistance of at least 30 cm
between the vehicl eand the high-pressure
cleaner nozzle. Information about the correct
distance is available from the equipment
manufacturer.
Move the high-pressure cleaner nozzle
around when cleaning yourv ehicle.
Do not aim directly at any of the following:
R tyres
R door gaps, roof gaps, joints etc.
R electrica lcomponents
R battery
R plugc onnectors
R lamps
R seals
R trim elements
R ventilation slots
Damag etosealsore lectrica lcomponents
can leadtol eaks or failures.
! Vehicles with decorative film: parts of your
vehicl eare covered with adecorative film.
Maintain adistance of at least 70 cm between
the parts of the vehicl ecovered with the film
and the nozzle of the high pressure cleaner.
Information about the correct distance is
available from the equipment manufacturer.
Move the high-pressure cleaner nozzle
around whilst cleaning.
Cleaning the paintwork !
Do not affix:
R stickers
R films
R magneti cplates or similari tems to painted surfaces. You could oth
erwise
damage the paintwork.
Scratches, corrosive deposits, area saffecte dby
corrosion and damage cause dbyinadequate
car ecannot always be completel yrepaired .In
such cases ,visit aquali fied specialis tworkshop.
X Remov eimpuri ties immediately, where pos-
sible, whilst avoiding rubbing too hard.
X Soa kinsect remains with insect remove rand
rinse off the treated area safterwards.
X Soa kbirdd ropping swithw ater and rinse off
the treated area safterwards.
X Remov ecoolant, brake fluid ,tree resins ,oils,
fuel sand greases by rubbing gently with a
cloth soaked in petroleu mether or lighter
fluid.
X Use tar remove rtoremove tar stains.
X Use silicone remove rtoremove wax. Cleanin
gvehicle parts
Cleaning th ewheels G
WARNING
Th ew ater jet of circular-jet nozzles (dirt grind-
ers) can caus edamage not visible from the
outside to tyres or chassi scomponents. Com-
ponents damaged in this way can unexpect-
edlyf ail.There is arisk of an accident.
Do not use high-pressure cleaners with circu-
lar-jet nozzles to clea nthe vehicle. Have dam-
agedt yres or chassi scomponents replaced
immediately.
! Do not use acidic whee
lcleaning products
to remove brake dust. This coul ddamage
whee lbolts and brake components.
! Do not park up yourv
ehiclefor along period
of time immediatel yafter cleaning, particu-
larl yafter cleaning the whee lrim with wheel
cleaner. Whee lcleaner may leadtoi ncreased
corrosio nofthe brake discs and pads. You
should therefore drive for afew minutes after
cleaning. By heating up the brakes ,the brake
discs and padsd ry. The vehiclecan then be
parked up for along period of time. 218
CareMaintenanc
eand care