2016 MERCEDES-BENZ G-Class warning light
[x] Cancel search: warning lightPage 86 of 302

Useful information
i
This Operator's Manual describes all models
and all standard and optional equipment of
your vehicle available at the time of publica-
tion of the Operator's Manual. Country-spe-
cific differences are possible. Please note
that your vehicle may not be equipped with all
features described. This also applies to
safety-related systems and functions.
iRead the information on qualified specialist
workshops: (Ypage 23).
Exterior lighting
Important safety notes
For reasons of safety, Mercedes-Benz recom-
mends that you drive with the lights switched on
even during the daytime. In some countries,
operation of the headlamps varies due to legal
requirements and self-imposed obligations.
Light switch
Operation
!Switch off the parking lamps and low-beam
headlamps when you leave the vehicle. This
prevents the battery from discharging.
!If the battery has been excessively dis-
charged, the parking lamps or standing lamps
are automatically switched off to enable the
next engine start. Always park your vehicle
safely and sufficiently lit according to legal
standards. Avoid the continuous use of the
T parking lamps for several hours. If pos-
sible, switch on the Xright or the Wleft
standing lamp.
1 WLeft-hand standing lamps
2XRight-hand standing lamps
3TParking lamps, side marker lamps,
license plate and instrument cluster
lighting
4ÃAutomatic headlamp mode/daytime
running lamps
5LLow-beam/high-beam headlamps
If you hear a warning tone when you leave the
vehicle, the lights may still be switched on.
XTurn the light switch to Ã.
The turn signals, high-beam headlamps and the
high-beam flasher are operated using the com-
bination switch (
Ypage 88).
The exterior lighting (except the parking/stand-
ing lamps) switches off automatically if you:
Rremove the SmartKey from the ignition lock
Ropen the driver's door with the SmartKey in
position 0in the ignition lock.
Low-beam headlamps
1 WLeft-hand standing lamps
2XRight-hand standing lamps
3TParking lamps, side marker lamps,
license plate and instrument cluster
lighting
84Exterior lighting
Lights and windshield wipers
Page 87 of 302

4ÃAutomatic headlamp mode/daytime
running lamps
5LLow-beam/high-beam headlamps
XTo switch on the low-beam headlamps:
turn the SmartKey in the ignition lock to posi-
tion 2or start the engine.
XTurn the light switch to L.
The L indicator lamp in the instrument
cluster lights up.
Daytime running lamps
Daytime running lamps in Canada
1 WLeft-hand standing lamps
2XRight-hand standing lamps
3TParking lamps, side marker lamps,
license plate and instrument cluster
lighting
4ÃAutomatic headlamp mode/daytime
running lamps
5LLow-beam/high-beam headlamps
The daytime running lamps function is required
by law in Canada. It cannot therefore be deac-
tivated.
XTurn the light switch to Ã.
With the engine running: depending on the
ambient light, the daytime running lamps or
the low-beam headlamps are switched on.
When the low-beam headlamps are switched
on, the Lindicator lamp in the instrument
cluster lights up.
When the engine is running and the vehicle is
stationary: if you move the selector lever from a
drive position to P, the daytime running lamps/
low-beam headlamps go out after three
minutes.
When the engine is running, the vehicle is sta-
tionary and in bright ambient light: if you turn the light switch to
T, the daytime running lamps
and parking lamps switch on.
If the engine is running and you turn the light
switch to L, the manual settings take prec-
edence over the daytime running lamps.
Daytime running lamps in the USA
1 WLeft-hand standing lamps
2XRight-hand standing lamps
3TParking lamps, side marker lamps,
license plate and instrument cluster
lighting
4ÃAutomatic headlamp mode/daytime
running lamps
5LLow-beam/high-beam headlamps
In the USA, the daytime running lamps are deac- tivated upon delivery from the factory.
XTo activate the daytime running lamps:
activate the daytime running lamps function
in the on-board computer (
Ypage 179).
XTurn the light switch to Ã.
With the engine running: depending on the
ambient light, the daytime running lamps or
the low-beam headlamps are switched on.
When the low-beam headlamps are switched
on, the Lindicator lamp in the instrument
cluster lights up.
If the engine is running and you turn the light
switch to TorL, the manual settings
take precedence over the daytime running
lamps.
Automatic headlamp mode
GWARNING
When the light switch is set to Ã, the low-
beam headlamps may not be switched on
automatically if there is fog, snow or other
causes of poor visibility due to the weather
Exterior lighting85
Lights and windshield wiper s
Z
Page 91 of 302

Hazard warning lamps
XTo switch on the hazard warning lamps:
press button:.
All turn signals flash. If you now switch on a
turn signal using the combination switch, only
the turn signal lamp on the corresponding
side of the vehicle will flash.
XTo switch off the hazard warning lamps:
press button :.
The hazard warning lamps automatically switch
on if:
Ran air bag is deployed or
Rthe Emergency Tensioning Devices are trig-
gered, or
Rthe vehicle decelerates rapidly from a speed
of above 45 mph (70 km/h) and comes to a
standstill
The hazard warning lamps switch on automati-
cally if an air bag or the Emergency Tensioning
Devices are triggered and the SmartKey is in
position 1in the ignition lock.
The hazard warning lamps switch off automati-
cally if the vehicle reaches a speed of above
6 mph (10 km/h) again after a full brake appli-
cation.
iThe hazard warning lamps still operate if the
ignition is switched off.
Headlamps and indicator lamps fog-
ged up on the inside
The headlamps and the indicator lamps in the
exterior mirrors may fog up on the inside if there
is high atmospheric humidity.
XDrive with the headlamps switched on.
The level of moisture diminishes, depending
on the length of the journey and the weather
conditions (humidity and temperature).
If the level of moisture does not diminish:
XHave the headlamps checked at a qualified
specialist workshop.
Interior lighting
Overview of interior lighting
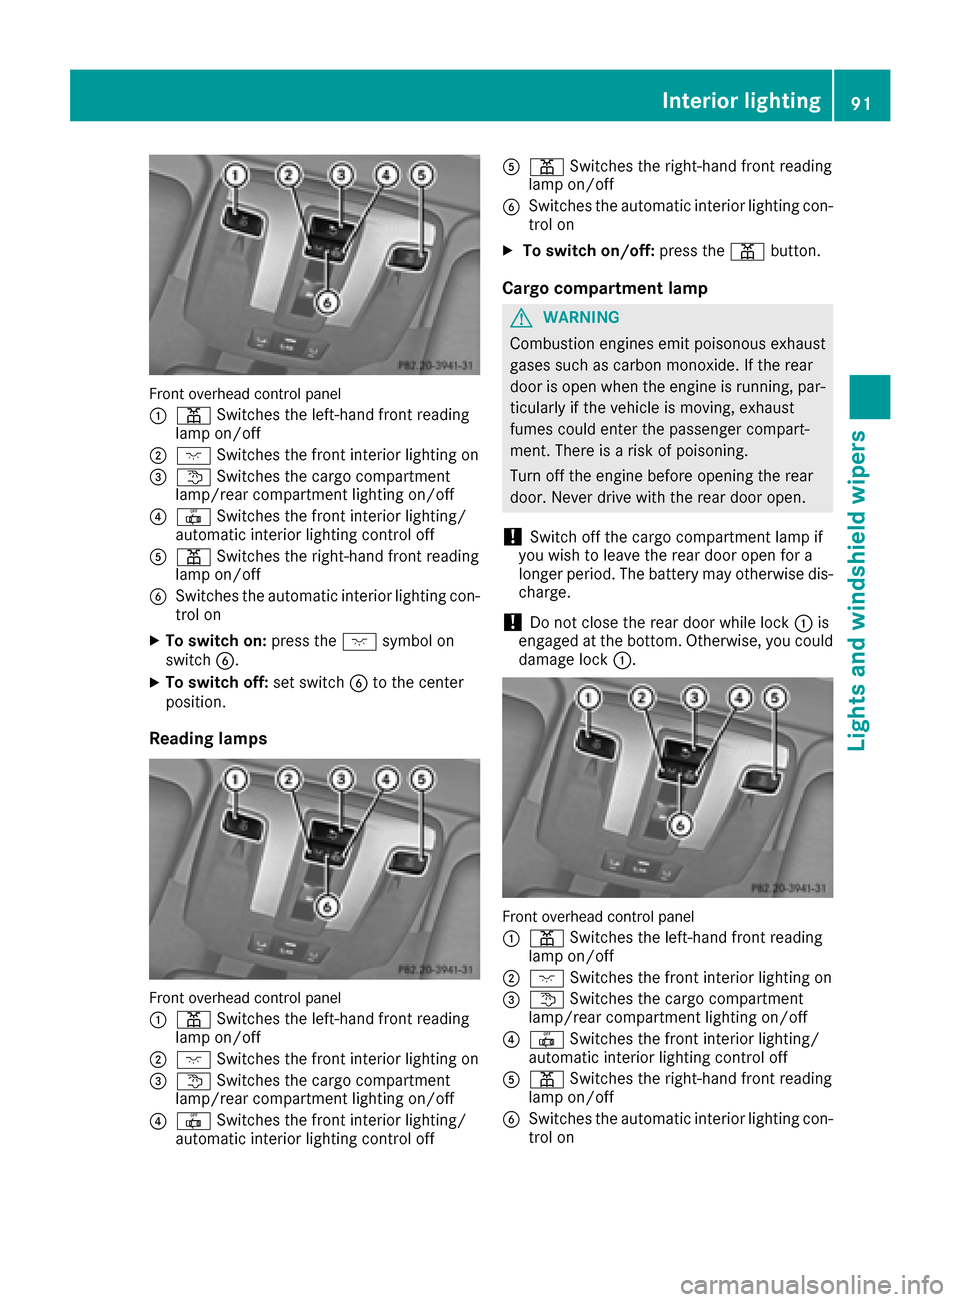
Front overhead control panel
:
p Switches the left-hand front reading
lamp on/off
;c Switches the front interior lighting on
=tSwitches the cargo compartment
lamp/rear compartment lighting on/off
?| Switches the front interior lighting/
automatic interior lighting control off
Ap Switches the right-hand reading lamp
on/off
BSwitches the automatic interior lighting con-
trol on
Interior lighting89
Lights and windshield wipers
Z
Page 93 of 302

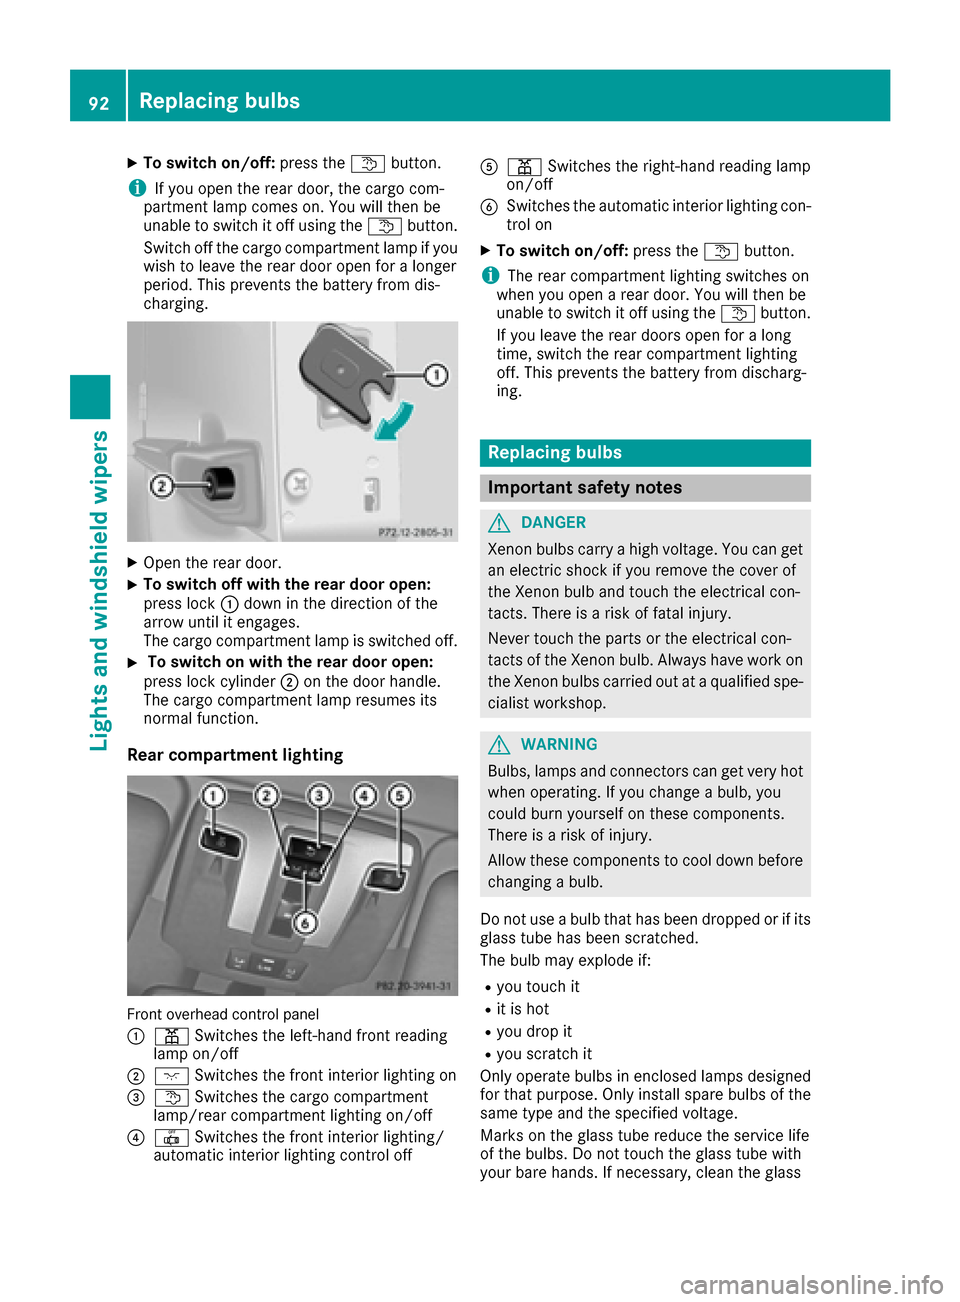
Front overhead control panel
:
pSwitches the left-hand front reading
lamp on/off
;c Switches the front interior lighting on
=tSwitches the cargo compartment
lamp/rear compartment lighting on/off
?| Switches the front interior lighting/
automatic interior lighting control off
Ap Switches the right-hand front reading
lamp on/off
BSwitches the automatic interior lighting con-
trol on
XTo switch on: press thecsymbol on
switch B.
XTo switch off: set switchBto the center
position.
Reading lamps
Front overhead control panel
:
p Switches the left-hand front reading
lamp on/off
;c Switches the front interior lighting on
=tSwitches the cargo compartment
lamp/rear compartment lighting on/off
?| Switches the front interior lighting/
automatic interior lighting control off
Ap Switches the right-hand front reading
lamp on/off
BSwitches the automatic interior lighting con-
trol on
XTo switch on/off: press thepbutton.
Cargo compartment lamp
GWARNING
Combustion engines emit poisonous exhaust
gases such as carbon monoxide. If the rear
door is open when the engine is running, par-
ticularly if the vehicle is moving, exhaust
fumes could enter the passenger compart-
ment. There is a risk of poisoning.
Turn off the engine before opening the rear
door. Never drive with the rear door open.
!Switch off the cargo compartment lamp if
you wish to leave the rear door open for a
longer period. The battery may otherwise dis-
charge.
!Do not close the rear door while lock :is
engaged at the bottom. Otherwise, you could
damage lock :.
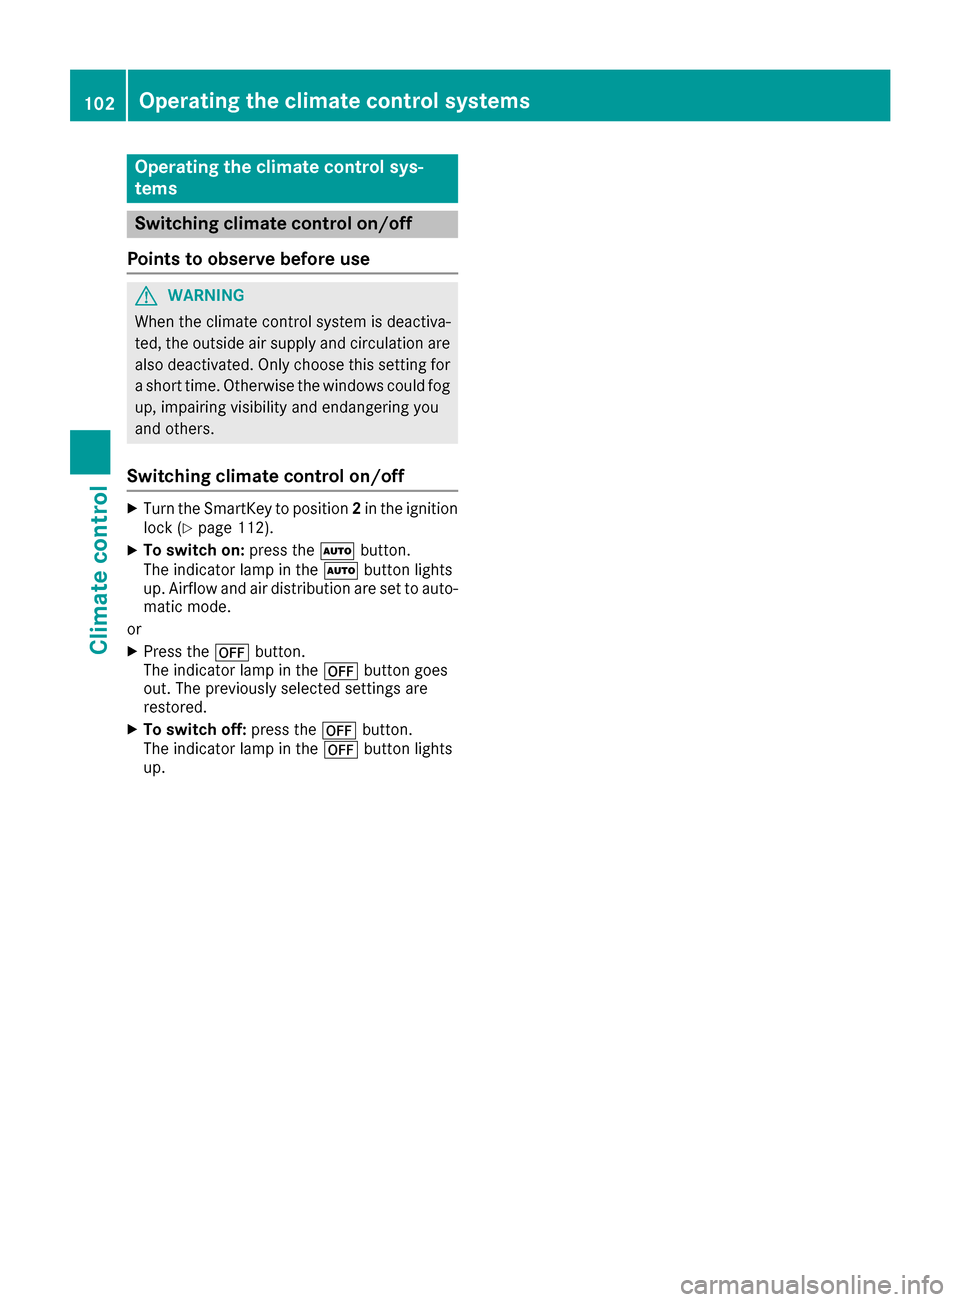
Front overhead control panel
:
pSwitches the left-hand front reading
lamp on/off
;c Switches the front interior lighting on
=tSwitches the cargo compartment
lamp/rear compartment lighting on/off
?| Switches the front interior lighting/
automatic interior lighting control off
Ap Switches the right-hand front reading
lamp on/off
BSwitches the automatic interior lighting con-
trol on
Interior lighting91
Lights and windshield wipers
Z
Page 94 of 302

XTo switch on/off:press thetbutton.
iIf you open the rear door, the cargo com-
partment lamp comes on. You will then be
unable to switch it off using the tbutton.
Switch off the cargo compartment lamp if you
wish to leave the rear door open for a longer
period. This prevents the battery from dis-
charging.
XOpen the rear door.
XTo switch off with the rear door open:
press lock :down in the direction of the
arrow until it engages.
The cargo compartment lamp is switched off.
XTo switch on with the rear door open:
press lock cylinder ;on the door handle.
The cargo compartment lamp resumes its
normal function.
Rear compartment lighting
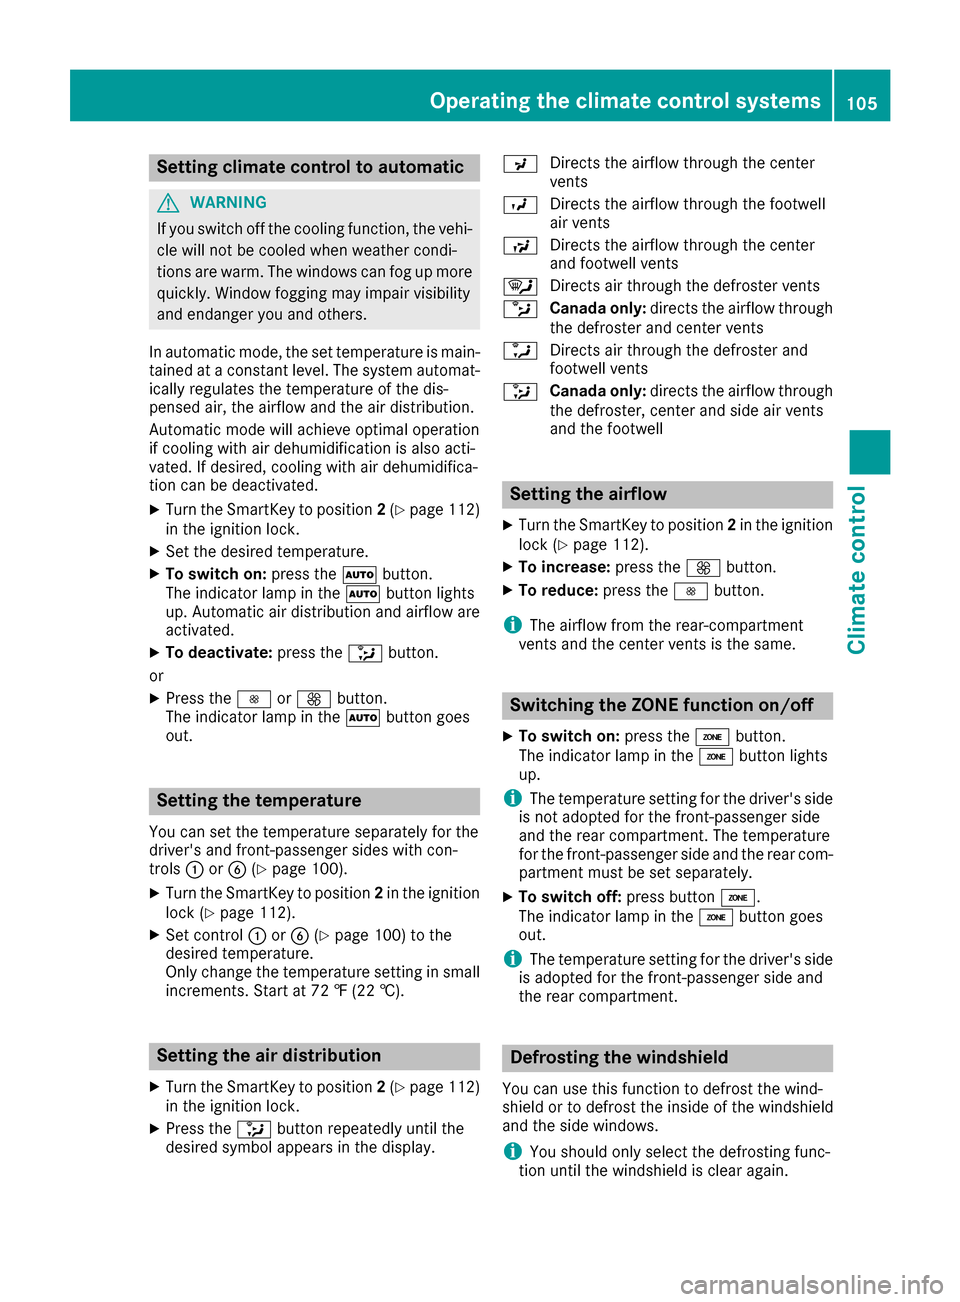
Front overhead control panel
:
p Switches the left-hand front reading
lamp on/off
;c Switches the front interior lighting on
=tSwitches the cargo compartment
lamp/rear compartment lighting on/off
?| Switches the front interior lighting/
automatic interior lighting control off
Ap Switches the right-hand reading lamp
on/off
BSwitches the automatic interior lighting con-
trol on
XTo switch on/off: press thetbutton.
iThe rear compartment lighting switches on
when you open a rear door. You will then be
unable to switch it off using the tbutton.
If you leave the rear doors open for a long
time, switch the rear compartment lighting
off. This prevents the battery from discharg-
ing.
Replacing bulbs
Important safety notes
GDANGER
Xenon bulbs carry a high voltage. You can get an electric shock if you remove the cover of
the Xenon bulb and touch the electrical con-
tacts. There is a risk of fatal injury.
Never touch the parts or the electrical con-
tacts of the Xenon bulb. Always have work on
the Xenon bulbs carried out at a qualified spe-
cialist workshop.
GWARNING
Bulbs, lamps and connectors can get very hot
when operating. If you change a bulb, you
could burn yourself on these components.
There is a risk of injury.
Allow these components to cool down before
changing a bulb.
Do not use a bulb that has been dropped or if its
glass tube has been scratched.
The bulb may explode if:
Ryou touch it
Rit is hot
Ryou drop it
Ryou scratch it
Only operate bulbs in enclosed lamps designed
for that purpose. Only install spare bulbs of the same type and the specified voltage.
Marks on the glass tube reduce the service life
of the bulbs. Do not touch the glass tube with
your bare hands. If necessary, clean the glass
92Replacing bulbs
Lights and windshield wiper s
Page 99 of 302

If the wiper blades are worn, the windshield will
no longer be wiped properly. This could prevent
you from observing the traffic conditions,
thereby causing an accident.
Combination switch
1
$Windshield wipers off
2ÄIntermittent wipe, low (rain sensor set
to low sensitivity)
3Å Intermittent wipe, high (rain sensor
set to high sensitivity)
4° Continuous wipe, slow
5¯Continuous wipe, fast
BíSingle wipe
CîTo wipe with washer fluid
XSwitch on the ignition.
XTurn the combination switch to the corre-
sponding position.
Intermittent wiping is interrupted if you stop the
vehicle and open a front door. This protects
people getting into and out of the vehicle from
being sprayed with water.
Intermittent wiping continues when all doors are
closed and:
Ryou shift the automatic transmission to drive
position Dor reverse gear R
or
Ryou change the wipe setting on the combina-
tion switch.
In the ÄorÅ position, the appropriate
wiping frequency is set automatically according
to the intensity of the rain. In the Åposition,
the rain sensor is more sensitive than in
the Ä position, causing the windshield wip-
ers to wipe more frequently.
Switching the rear window wiper on/
off
Combination switch
:
è Switch
2bWipes with washer fluid
3ISwitches on intermittent wiping
40 Switches off intermittent wiping
5b Wipes with washer fluid
XTurn the SmartKey to position 1or 2in the
ignition lock.
XTurn switch :on the combination switch to
the corresponding position.
When the rear window wiper is switched on,
the icon appears in the instrument cluster.
iThe rear window wiper comes on automati-
cally if you shift the selector lever to Rwhile
the windshield wiper are on.
Replacing the wiper blades
Important safety notes
GWARNING
If the windshield wipers begin to move while
you are changing the wiper blades, you could be trapped by the wiper arm. There is a risk of
injury.
Always switch off the windshield wipers and
ignition before changing the wiper blades.
!To avoid damaging the wiper blades, make
sure that you touch only the wiper arm of the
wiper.
!Never open the hood if a windshield wiper
arm has been folded away from the wind-
shield.
Windshield wipers97
Lights and windshield wipers
Z
Page 104 of 302

Operating the climate control sys-
tems
Switching climate control on/off
Points to observe before use
GWARNING
When the climate control system is deactiva-
ted, the outside air supply and circulation are
also deactivated. Only choose this setting for
a short time. Otherwise the windows could fog
up, impairing visibility and endangering you
and others.
Switching climate control on/off
XTurn the SmartKey to position 2in the ignition
lock (Ypage 112).
XTo switch on: press theÃbutton.
The indicator lamp in the Ãbutton lights
up. Airflow and air distribution are set to auto-
matic mode.
or
XPress the ^button.
The indicator lamp in the ^button goes
out. The previously selected settings are
restored.
XTo switch off: press the^button.
The indicator lamp in the ^button lights
up.
102Operating the climate control systems
Climate control
Page 107 of 302

Setting climate control to automatic
GWARNING
If you switch off the cooling function, the vehi- cle will not be cooled when weather condi-
tions are warm. The windows can fog up more
quickly. Window fogging may impair visibility
and endanger you and others.
In automatic mode, the set temperature is main-
tained at a constant level. The system automat-
ically regulates the temperature of the dis-
pensed air, the airflow and the air distribution.
Automatic mode will achieve optimal operation
if cooling with air dehumidification is also acti-
vated. If desired, cooling with air dehumidifica-
tion can be deactivated.
XTurn the SmartKey to position 2(Ypage 112)
in the ignition lock.
XSet the desired temperature.
XTo switch on: press theÃbutton.
The indicator lamp in the Ãbutton lights
up. Automatic air distribution and airflow are
activated.
XTo deactivate: press the_button.
or
XPress the IorK button.
The indicator lamp in the Ãbutton goes
out.
Setting the temperature
You can set the temperature separately for the
driver's and front-passenger sides with con-
trols :orB (
Ypage 100).
XTurn the SmartKey to position 2in the ignition
lock (Ypage 112).
XSet control :orB (Ypage 100) to the
desired temperature.
Only change the temperature setting in small
increments. Start at 72 ‡ (22 †).
Setting the air distribution
XTurn the SmartKey to position 2(Ypage 112)
in the ignition lock.
XPress the _button repeatedly until the
desired symbol appears in the display. P
Directs the airflow through the center
vents
O Directs the airflow through the footwell
air vents
S Directs the airflow through the center
and footwell vents
¯ Directs air through the defroster vents
b Canada only: directs the airflow through
the defroster and center vents
a Directs air through the defroster and
footwell vents
_ Canada only: directs the airflow through
the defroster, center and side air vents
and the footwell
Setting the airflow
XTurn the SmartKey to position 2in the ignition
lock (Ypage 112).
XTo increase: press theKbutton.
XTo reduce: press theIbutton.
iThe airflow from the rear-compartment
vents and the center vents is the same.
Switching the ZONE function on/off
XTo switch on: press theábutton.
The indicator lamp in the ábutton lights
up.
iThe temperature setting for the driver's side
is not adopted for the front-passenger side
and the rear compartment. The temperature
for the front-passenger side and the rear com-
partment must be set separately.
XTo switch off: press buttoná.
The indicator lamp in the ábutton goes
out.
iThe temperature setting for the driver's side
is adopted for the front-passenger side and
the rear compartment.
Defrosting the windshield
You can use this function to defrost the wind-
shield or to defrost the inside of the windshield
and the side windows.
iYou should only select the defrosting func-
tion until the windshield is clear again.
Operating the climate control systems105
Climate control
Z