2016 MERCEDES-BENZ G-Class engine
[x] Cancel search: enginePage 69 of 302
XMake sure that the doors and the tailgate are
locked.
XInsert the mechanical key into the SmartKey.
iIf you lock the vehicle as described above,
the fuel filler flap is not locked. The anti-theft
alarm system is not armed.
Rear door
Important safety notes
GWARNING
When leaving the vehicle, always remove the
SmartKey from the ignition lock. Always take
the SmartKey with you and lock the vehicle.
Do not leave children unsupervised in the
vehicle, even if they are secured in a child
restraint system, and do not give them access to an unlocked vehicle. A child's unsupervised
access to a vehicle could result in an accident
and/or serious personal injury. They could:
Rinjure themselves on vehicle parts
Rbe seriously or fatally injured by extreme
heat or cold
Rinjure themselves or have an accident with
vehicle equipment that may still be in oper-
ation even after the SmartKey has been
removed from the ignition, such as the seat
adjustment, steering wheel adjustment or
memory function.
If children open a door, they could cause
severe or even fatal injury to other persons; if they get out of the vehicle, they could injure
themselves when doing so or be seriously or
even fatally injured by any passing traffic.
Do not expose the child restraint system to
direct sunlight. The child restraint system's
metal parts, for example, could become very
hot, and a child could be burned on these
parts.
GWARNING
Do not carry heavy or hard objects in the
passenger compartment or cargo compart-
ment unless they are firmly secured in place.
Unsecured or improperly positioned cargo
increases a child's risk of injury in the event of
Rstrong braking maneuvers
Rsudden changes of direction
Ran accident
GWARNING
Combustion engines emit poisonous exhaust
gases such as carbon monoxide. If the rear
door is open when the engine is running, par-
ticularly if the vehicle is moving, exhaust
fumes could enter the passenger compart-
ment. There is a risk of poisoning.
Turn off the engine before opening the rear
door. Never drive with the rear door open.
!The tailgate swings out to the side when
opened. Therefore, make sure that there is
sufficient clearance.
iDo not leave the SmartKey in the cargo
compartment. Otherwise, you could lock
yourself out.
Opening
You can only open the rear door after unlocking
it first.
XPress the %button on the SmartKey.
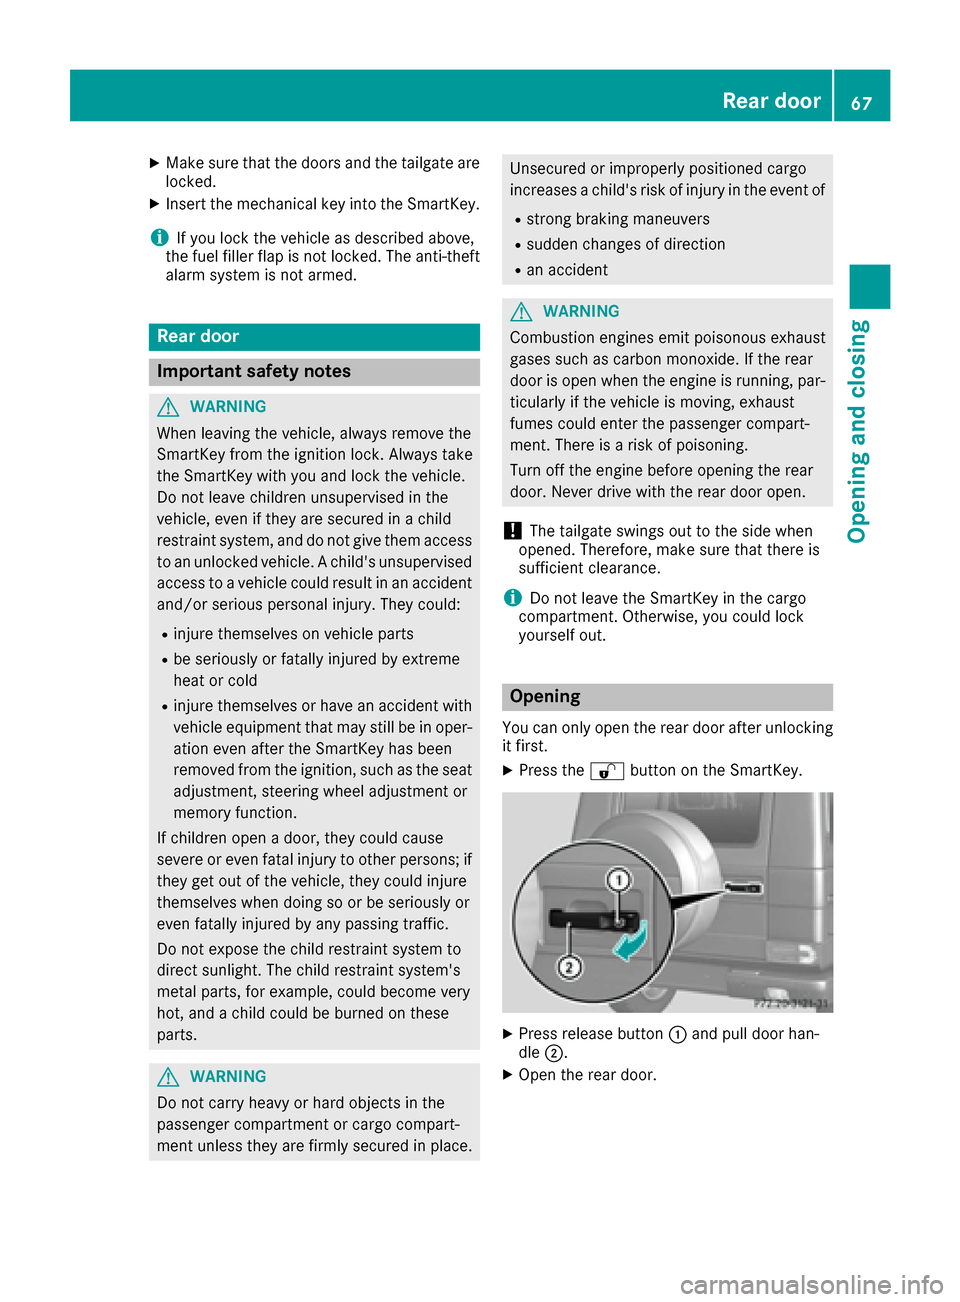
XPress release button :and pull door han-
dle ;.
XOpen the rear door.
Rear door67
Opening and closing
Z
Page 70 of 302
Closing
XPush the rear door closed from outside the
vehicle.
XIf necessary, lock the vehicle with the&
button on the SmartKey.
Side windows
Important safety notes
GWARNING
While closing the side windows, body parts in
the closing area could become trapped. There is a risk of injury.
When closing make sure that no parts of the
body are in the closing area. If somebody
becomes trapped, release the switch or press
the switch to open the side window again.
GWARNING
While opening the side windows, body parts
could become trapped between the side win-
dow and the door frame as the side window
moves. There is a risk of injury.
Make sure that nobody touches the side win-
dow during the opening procedure. If some-
body becomes trapped, release the switch or
pull the switch to close the side window again.
Opening and closing the side win-
dows
The switches for all side windows are located on
the driver's door. There is also a switch on each
door for the corresponding side window.
The switches on the driver's door take prece-
dence.
The side windows cannot be operated from the
rear when the override feature for the side win-
dows is activated (
Ypage 54).
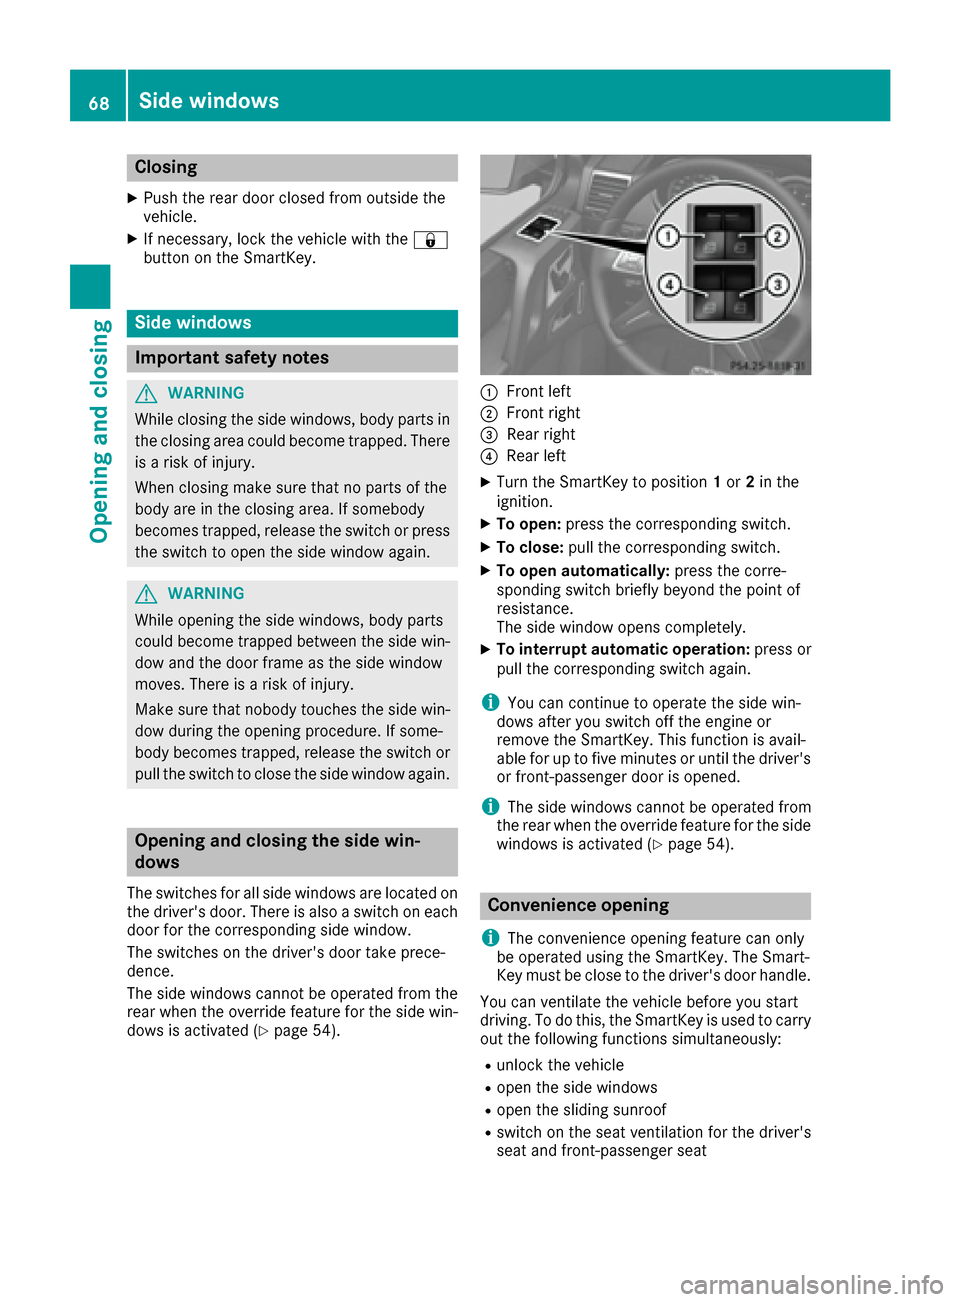
:Front left
;Front right
=Rear right
?Rear left
XTurn the SmartKey to position 1or 2in the
ignition.
XTo open: press the corresponding switch.
XTo close: pull the corresponding switch.
XTo open automatically: press the corre-
sponding switch briefly beyond the point of
resistance.
The side window opens completely.
XTo interrupt automatic operation: press or
pull the corresponding switch again.
iYou can continue to operate the side win-
dows after you switch off the engine or
remove the SmartKey. This function is avail-
able for up to five minutes or until the driver's
or front-passenger door is opened.
iThe side windows cannot be operated from
the rear when the override feature for the side windows is activated (
Ypage 54).
Convenience opening
i
The convenience opening feature can only
be operated using the SmartKey. The Smart-
Key must be close to the driver's door handle.
You can ventilate the vehicle before you start
driving. To do this, the SmartKey is used to carry
out the following functions simultaneously:
Runlock the vehicle
Ropen the side windows
Ropen the sliding sunroof
Rswitch on the seat ventilation for the driver's
seat and front-passenger seat
68Side windows
Opening and closing
Page 75 of 302
When leaving the vehicle, always take the
SmartKey with you and lock the vehicle. Never
leave children unsupervised in the vehicle.
The seats can still be adjusted when there is no
SmartKey in the ignition lock.
GWARNING
When you adjust a seat, you or other vehicle
occupants could become trapped, e.g. on the seat guide rail. There is a risk of injury.
Make sure when adjusting a seat that no one
has any body parts in the sweep of the seat.
Observe the safety notes on "Air bags"
(
Ypage 40) and "Children in the vehicle"
(Ypage 46).
GWARNING
You could lose control of your vehicle if you do the following while driving:
Radjust the driver's seat, head restraint,
steering wheel or mirrors
Rfasten the seat belt
There is a risk of an accident.
Adjust the driver's seat, head restraint, steer-
ing wheel and mirror and fasten your seat belt before starting the engine.
GWARNING
If the head restraints are not installed or not
adjusted correctly, they cannot provide pro-
tection as intended. There is an increased risk
of injury in the head and neck area, e.g. in the event of an accident or when braking.
Always drive with the head restraints instal-
led. Before driving off, make sure for every
vehicle occupant that the center of the head
restraint supports the back of the head at
about eye level.
Make sure that you do not rotate the head
restraints of the front and rear seats when
adjusting the head restraints. Otherwise, you
cannot adjust the height and angle of the head
restraints correctly.
Adjust the head restraint so that it is as close as
possible to your head.
GWARNING
According to accident statistics, children are
safer when properly restrained on the rear
seats than on the front-passenger seat. Thus,
we strongly recommend that children be
placed in the rear seat whenever possible.
Regardless of seating position, children 12
years old and under must be seated and prop-
erly secured in an appropriately sized child
restraint system or booster seat recommen-
ded for the size and weight of the child. For
additional information, see the "Children in
the vehicle" section.
A child's risk of serious or fatal injuries is sig-
nificantly increased if the child restraints are
not properly secured in the vehicle and/or the
child is not properly secured in the child
restraint.
!To avoid damage to the seats and the seat
heating, observe the following information:
Rkeep liquids from spilling on the seats. If
liquid is spilled on the seats, dry them as
soon as possible.
Rif the seat covers are damp or wet, do not
switch on the seat heating. The seat heat-
ing should also not be used to dry the seats.
Rclean the seat covers as recommended;
see the "Interior care" section.
Rdo not transport heavy loads on the seats.
Do not place sharp objects on the seat
cushions, e.g. knives, nails or tools. The
seats should only be occupied by passen-
gers, if possible.
Rwhen the seat heating is in operation, do
not cover the seats with insulating materi-
als, e.g. blankets, coats, bags, seat covers,
child seats or booster seats.
!Make sure that there are no objects in the
footwell under or behind the seats when mov-
ing the seats back. There is a risk that the
seats and/or the objects could be damaged.
!When the rear bench seat is folded for-
wards, the front seats cannot be moved to
their rearmost position. You could otherwise
damage the seats and the rear bench seat.
!Make sure that the sun visor is folded up
before adjusting the backrest and head
restraint height. The head restraint and sun
Seats73
Seats, steering wheel and mirrors
Z
Page 80 of 302
Steering wheel
Important safety notes
GWARNING
You could lose control of your vehicle if you do the following while driving:
Radjust the driver's seat, head restraint,
steering wheel or mirrors
Rfasten the seat belt
There is a risk of an accident.
Adjust the driver's seat, head restraint, steer-
ing wheel and mirror and fasten your seat belt before starting the engine.
GWARNING
Children could injure themselves if they
adjust the steering wheel. There is a risk of
injury.
When leaving the vehicle, always take the
SmartKey with you and lock the vehicle. Never
leave children unsupervised in the vehicle.
The electrically adjustable steering wheel can
still be adjusted when there is no SmartKey in
the ignition lock.
Adjusting the steering wheel
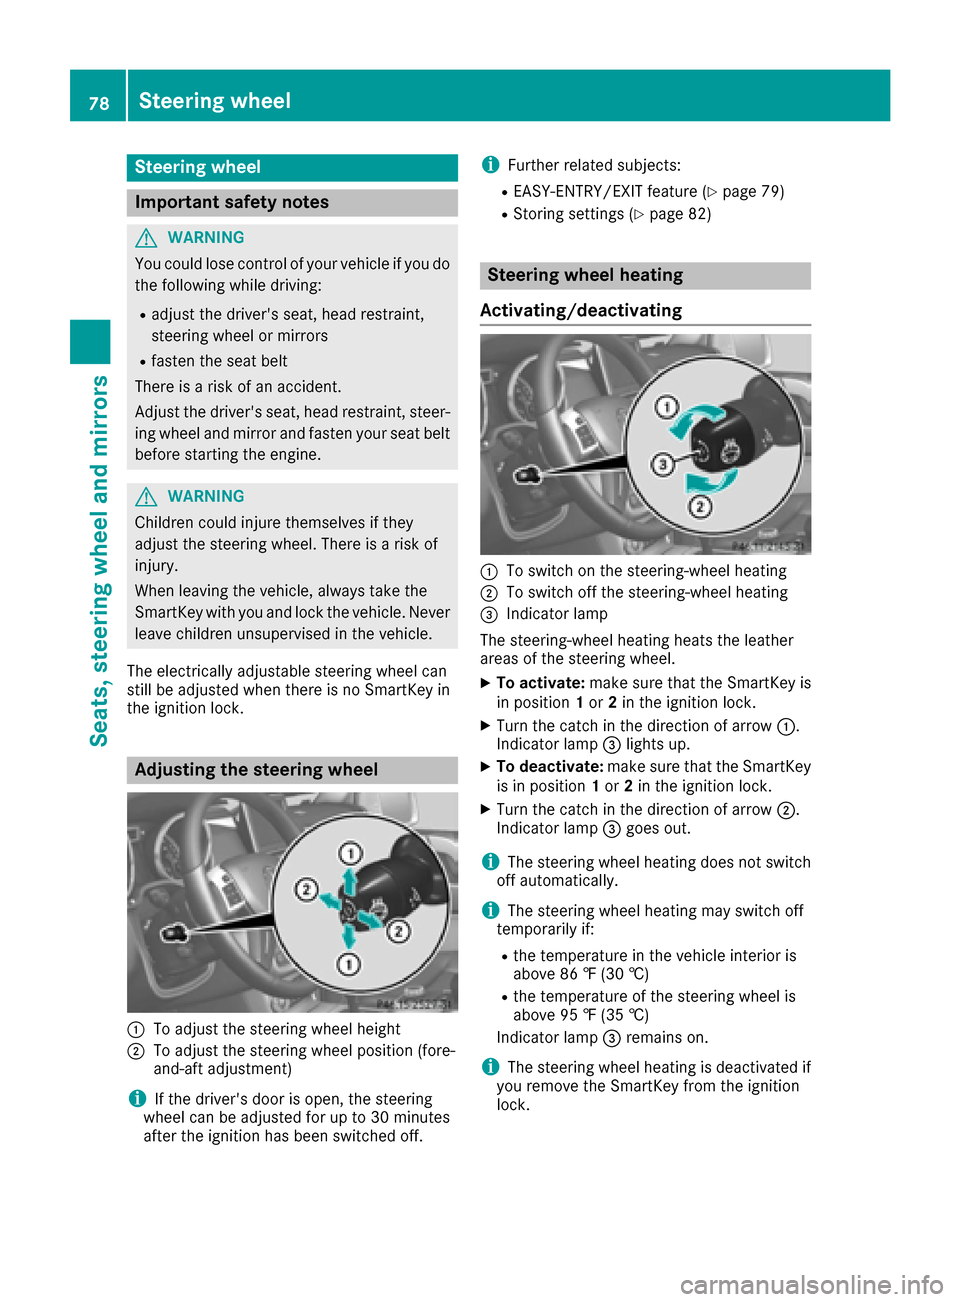
:To adjust the steering wheel height
;To adjust the steering wheel position (fore-
and-aft adjustment)
iIf the driver's door is open, the steering
wheel can be adjusted for up to 30 minutes
after the ignition has been switched off.
iFurther related subjects:
REASY-ENTRY/EXIT feature (Ypage 79)
RStoring settings (Ypage 82)
Steering wheel heating
Activating/deactivating
:To switch on the steering-wheel heating
;To switch off the steering-wheel heating
=Indicator lamp
The steering-wheel heating heats the leather
areas of the steering wheel.
XTo activate: make sure that the SmartKey is
in position 1or 2in the ignition lock.
XTurn the catch in the direction of arrow :.
Indicator lamp =lights up.
XTo deactivate: make sure that the SmartKey
is in position 1or 2in the ignition lock.
XTurn the catch in the direction of arrow ;.
Indicator lamp =goes out.
iThe steering wheel heating does not switch
off automatically.
iThe steering wheel heating may switch off
temporarily if:
Rthe temperature in the vehicle interior is
above 86 ‡ (30 †)
Rthe temperature of the steering wheel is
above 95 ‡ (35 †)
Indicator lamp =remains on.
iThe steering wheel heating is deactivated if
you remove the SmartKey from the ignition
lock.
78Steering wheel
Seats, steering wheel and mirrors
Page 86 of 302

Useful information
i
This Operator's Manual describes all models
and all standard and optional equipment of
your vehicle available at the time of publica-
tion of the Operator's Manual. Country-spe-
cific differences are possible. Please note
that your vehicle may not be equipped with all
features described. This also applies to
safety-related systems and functions.
iRead the information on qualified specialist
workshops: (Ypage 23).
Exterior lighting
Important safety notes
For reasons of safety, Mercedes-Benz recom-
mends that you drive with the lights switched on
even during the daytime. In some countries,
operation of the headlamps varies due to legal
requirements and self-imposed obligations.
Light switch
Operation
!Switch off the parking lamps and low-beam
headlamps when you leave the vehicle. This
prevents the battery from discharging.
!If the battery has been excessively dis-
charged, the parking lamps or standing lamps
are automatically switched off to enable the
next engine start. Always park your vehicle
safely and sufficiently lit according to legal
standards. Avoid the continuous use of the
T parking lamps for several hours. If pos-
sible, switch on the Xright or the Wleft
standing lamp.
1 WLeft-hand standing lamps
2XRight-hand standing lamps
3TParking lamps, side marker lamps,
license plate and instrument cluster
lighting
4ÃAutomatic headlamp mode/daytime
running lamps
5LLow-beam/high-beam headlamps
If you hear a warning tone when you leave the
vehicle, the lights may still be switched on.
XTurn the light switch to Ã.
The turn signals, high-beam headlamps and the
high-beam flasher are operated using the com-
bination switch (
Ypage 88).
The exterior lighting (except the parking/stand-
ing lamps) switches off automatically if you:
Rremove the SmartKey from the ignition lock
Ropen the driver's door with the SmartKey in
position 0in the ignition lock.
Low-beam headlamps
1 WLeft-hand standing lamps
2XRight-hand standing lamps
3TParking lamps, side marker lamps,
license plate and instrument cluster
lighting
84Exterior lighting
Lights and windshield wipers
Page 87 of 302

4ÃAutomatic headlamp mode/daytime
running lamps
5LLow-beam/high-beam headlamps
XTo switch on the low-beam headlamps:
turn the SmartKey in the ignition lock to posi-
tion 2or start the engine.
XTurn the light switch to L.
The L indicator lamp in the instrument
cluster lights up.
Daytime running lamps
Daytime running lamps in Canada
1 WLeft-hand standing lamps
2XRight-hand standing lamps
3TParking lamps, side marker lamps,
license plate and instrument cluster
lighting
4ÃAutomatic headlamp mode/daytime
running lamps
5LLow-beam/high-beam headlamps
The daytime running lamps function is required
by law in Canada. It cannot therefore be deac-
tivated.
XTurn the light switch to Ã.
With the engine running: depending on the
ambient light, the daytime running lamps or
the low-beam headlamps are switched on.
When the low-beam headlamps are switched
on, the Lindicator lamp in the instrument
cluster lights up.
When the engine is running and the vehicle is
stationary: if you move the selector lever from a
drive position to P, the daytime running lamps/
low-beam headlamps go out after three
minutes.
When the engine is running, the vehicle is sta-
tionary and in bright ambient light: if you turn the light switch to
T, the daytime running lamps
and parking lamps switch on.
If the engine is running and you turn the light
switch to L, the manual settings take prec-
edence over the daytime running lamps.
Daytime running lamps in the USA
1 WLeft-hand standing lamps
2XRight-hand standing lamps
3TParking lamps, side marker lamps,
license plate and instrument cluster
lighting
4ÃAutomatic headlamp mode/daytime
running lamps
5LLow-beam/high-beam headlamps
In the USA, the daytime running lamps are deac- tivated upon delivery from the factory.
XTo activate the daytime running lamps:
activate the daytime running lamps function
in the on-board computer (
Ypage 179).
XTurn the light switch to Ã.
With the engine running: depending on the
ambient light, the daytime running lamps or
the low-beam headlamps are switched on.
When the low-beam headlamps are switched
on, the Lindicator lamp in the instrument
cluster lights up.
If the engine is running and you turn the light
switch to TorL, the manual settings
take precedence over the daytime running
lamps.
Automatic headlamp mode
GWARNING
When the light switch is set to Ã, the low-
beam headlamps may not be switched on
automatically if there is fog, snow or other
causes of poor visibility due to the weather
Exterior lighting85
Lights and windshield wiper s
Z
Page 88 of 302
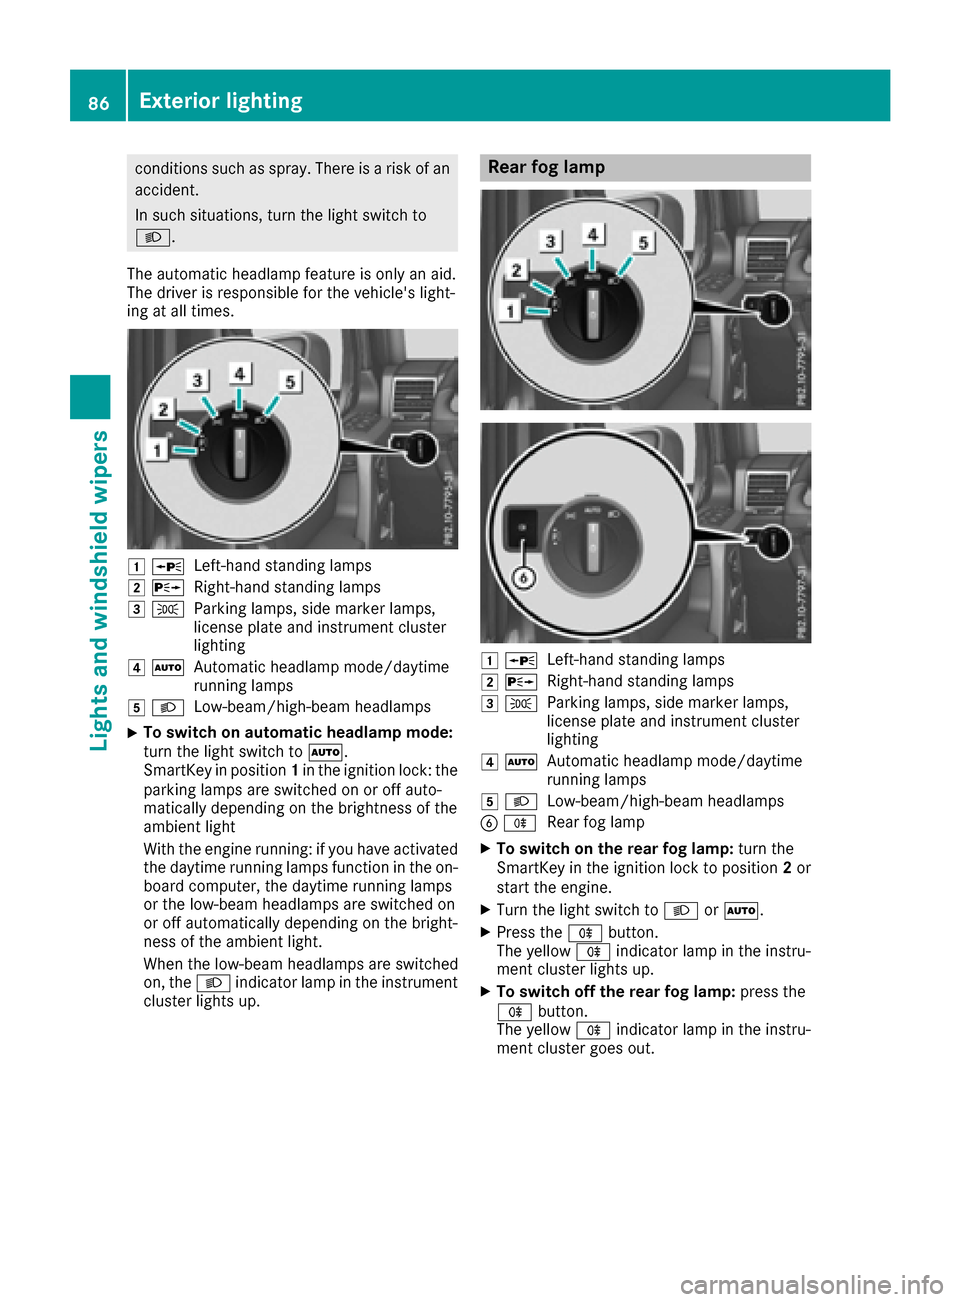
conditions such as spray. There is a risk of an
accident.
In such situations, turn the light switch to
L.
The automatic headlamp feature is only an aid.
The driver is responsible for the vehicle's light-
ing at all times.
1 WLeft-hand standing lamps
2XRight-hand standing lamps
3TParking lamps, side marker lamps,
license plate and instrument cluster
lighting
4ÃAutomatic headlamp mode/daytime
running lamps
5LLow-beam/high-beam headlamps
XTo switch on automatic headlamp mode:
turn the light switch to Ã.
SmartKey in position 1in the ignition lock: the
parking lamps are switched on or off auto-
matically depending on the brightness of the
ambient light
With the engine running: if you have activated
the daytime running lamps function in the on-
board computer, the daytime running lamps
or the low-beam headlamps are switched on
or off automatically depending on the bright-
ness of the ambient light.
When the low-beam headlamps are switched
on, the Lindicator lamp in the instrument
cluster lights up.
Rear fog lamp
1 WLeft-hand standing lamps
2XRight-hand standing lamps
3TParking lamps, side marker lamps,
license plate and instrument cluster
lighting
4ÃAutomatic headlamp mode/daytime
running lamps
5LLow-beam/high-beam headlamps
BRRear fog lamp
XTo switch on the rear fog lamp: turn the
SmartKey in the ignition lock to position 2or
start the engine.
XTurn the light switch to LorÃ.
XPress the Rbutton.
The yellow Rindicator lamp in the instru-
ment cluster lights up.
XTo switch off the rear fog lamp: press the
R button.
The yellow Rindicator lamp in the instru-
ment cluster goes out.
86Exterior lighting
Lights and windshield wipers
Page 89 of 302

Parking lamps
1WLeft-hand standing lamps
2XRight-hand standing lamps
3TParking lamps, side marker lamps,
license plate and instrument cluster
lighting
4ÃAutomatic headlamp mode/daytime
running lamps
5LLow-beam/high-beam headlamps
BRRear fog lamp
XTo switch on: turn the light switch to T.
Standing lamps
1WLeft-hand standing lamps
2XRight-hand standing lamps
3TParking lamps, side marker lamps,
license plate and instrument cluster
lighting
4ÃAutomatic headlamp mode/daytime
running lamps
5LLow-beam/high-beam headlamps
BRRear fog lamp
Switching on the standing lamps ensures the
corresponding side of the vehicle is illuminated.
XTo switch on the standing lamps: the
SmartKey should not be in the ignition lock or
it should be in position 0(
Ypage 112).
XTurn the light switch to W(left-hand side of
the vehicle) or X(right-hand side of the
vehicle).
Headlamp cleaning system
The headlamps are cleaned automatically if the
"Wipe with washer fluid" function is operated
ten times while the lights are on and the engine
is running (
Ypage 96). When you switch off
Exterior lighting87
Lights and windshield wipers
Z