2016 MERCEDES-BENZ G-Class display
[x] Cancel search: displayPage 74 of 302
Useful information
i
This Operator's Manual describes all models
and all standard and optional equipment of
your vehicle available at the time of publica-
tion of the Operator's Manual. Country-spe-
cific differences are possible. Please note
that your vehicle may not be equipped with all
features described. This also applies to
safety-related systems and functions.
iRead the information on qualified specialist
workshops: (Ypage 23).
Correct driver's seat position
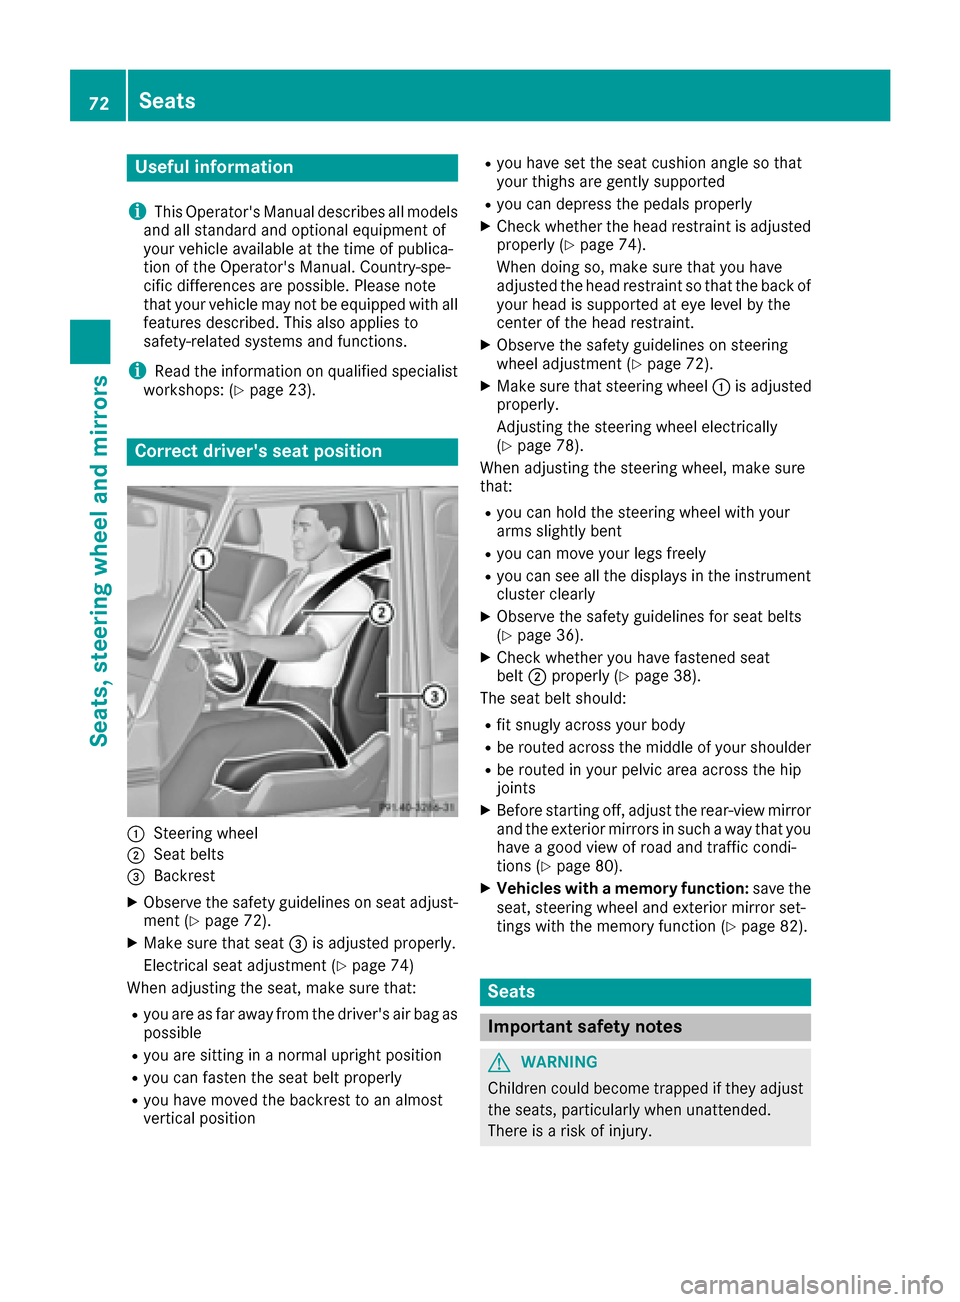
:Steering wheel
;Seat belts
=Backrest
XObserve the safety guidelines on seat adjust-
ment (Ypage 72).
XMake sure that seat =is adjusted properly.
Electrical seat adjustment (
Ypage 74)
When adjusting the seat, make sure that:
Ryou are as far away from the driver's air bag as
possible
Ryou are sitting in a normal upright position
Ryou can fasten the seat belt properly
Ryou have moved the backrest to an almost
vertical position
Ryou have set the seat cushion angle so that
your thighs are gently supported
Ryou can depress the pedals properly
XCheck whether the head restraint is adjusted
properly (Ypage 74).
When doing so, make sure that you have
adjusted the head restraint so that the back of
your head is supported at eye level by the
center of the head restraint.
XObserve the safety guidelines on steering
wheel adjustment (Ypage 72).
XMake sure that steering wheel :is adjusted
properly.
Adjusting the steering wheel electrically
(
Ypage 78).
When adjusting the steering wheel, make sure
that:
Ryou can hold the steering wheel with your
arms slightly bent
Ryou can move your legs freely
Ryou can see all the displays in the instrument
cluster clearly
XObserve the safety guidelines for seat belts
(Ypage 36).
XCheck whether you have fastened seat
belt ;properly (Ypage 38).
The seat belt should:
Rfit snugly across your body
Rbe routed across the middle of your shoulder
Rbe routed in your pelvic area across the hip
joints
XBefore starting off, adjust the rear-view mirror
and the exterior mirrors in such a way that you
have a good view of road and traffic condi-
tions (
Ypage 80).
XVehicles with a memory function: save the
seat, steering wheel and exterior mirror set-
tings with the memory function (
Ypage 82).
Seats
Important safety notes
GWARNING
Children could become trapped if they adjust
the seats, particularly when unattended.
There is a risk of injury.
72Seats
Seats, steering wheel and mirrors
Page 95 of 302

tube when cold with alcohol or spirit and rub it
off with a lint-free cloth.
Protect bulbs from moisture during operation.
Do not allow bulbs to come into contact with
liquids.
Xenon bulbs
Bulbs and lamps are an important aspect of
vehicle safety. You must therefore make sure
that these function correctly at all times. Have
the headlamp setting checked regularly.
LED modules
You can replace neither Xenon bulbs nor LED
bulbs. Have LED modules replaced at a qualified
specialist workshop.
Bulbs and lamps are an important aspect of
vehicle safety. You must therefore make sure
that these function correctly at all times. Have
the headlamp setting checked regularly.
Before changing bulbs
Have the following bulbs replaced at a qualified
specialist workshop:
RAdditional turn signals in the exterior mirrors
RHigh-mounted brake lamp
RHigh-beam/low-beam headlamps (Xenon
bulbs)
RDaytime running lamps
RParking lamps/standing lamps
RLicense plate lamp
iIndividual segments of the license plate
lamp LEDs may fail without a display message
appearing in the multifunction di splay
. Regu-
larly check the license plate lamp. If neces-
sary, visit a qualified specialist workshop.
You can replace the following bulbs:
RTurn signal lamp (front)
RBrake/tail lamp
RTurn signal lamp (rear)
RTail lamps/standing lamps
RBackup Light
RRear fog lamp
RSide marker lamps
Other bulbs
There are bulbs other than the Xenon bulbs that you cannot replace yourself. Only replace the
bulbs listed (
Ypage 93). Have the bulbs that
you cannot replace yourself replaced at a quali-
fied specialist workshop.
If you require assistance replacing bulbs, con-
sult a qualified specialist workshop. Do not touch the glass tube of new bulbs with
your bare hands. Even minor contamination can
burn into the glass surface and reduce the ser-
vice life of the bulbs. Always use a lint-free cloth
or only touch the base of the bulb when instal-
ling.
Only use bulbs of the correct type.
If the new bulb still does not light up, consult a
qualified specialist workshop.
Bulbs and lamps are an important aspect of
vehicle safety. You must therefore make sure
that these
function co
rrectly at all times. Have
the headlamp setting checked regularly.
Overview: changing bulbs/bulb types
Front bulbs
You can replace the following bulbs. The bulb
type can be found in the legend.
:Turn signal lamp: 1156 NA
;Side marker lamp: T 4 W
Rear bulbs
You can replace the following bulbs. The bulb
type can be found in the legend.
Replacing bulbs93
Lights and windshield wiper s
Z
Page 102 of 302
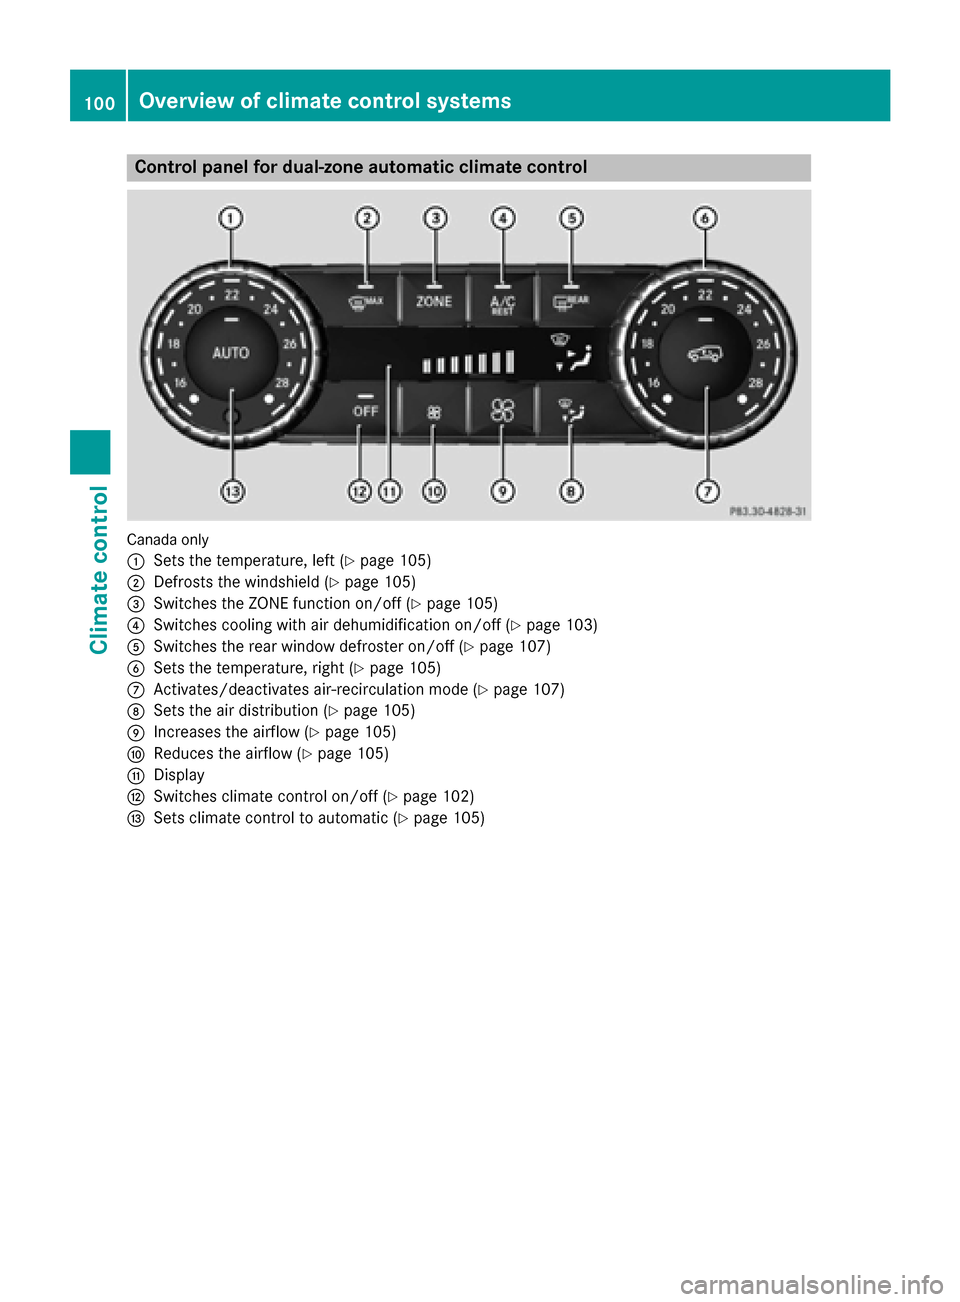
Control panel for dual-zone automatic climate control
Canadaonly
:
Sets the temperature, left (Ypage 105)
;Defrosts the windshield (Ypage 105)
=Switches the ZONE function on/off (Ypage 105)
?Switches cooling with air dehumidification on/off (Ypage 103)
ASwitches the rear window defroster on/off (Ypage 107)
BSets the temperature, right (Ypage 105)
CActivates/deactivates air-recirculation mode (Ypage 107)
DSets the air distribution (Ypage 105)
EIncreases the airflow (Ypage 105)
FReduces the airflow (Ypage 105)
GDisplay
HSwitches climate control on/off (Ypage 102)
ISets climate control to automatic (Ypage 105)
100Overview of climate control systems
Climate control
Page 103 of 302
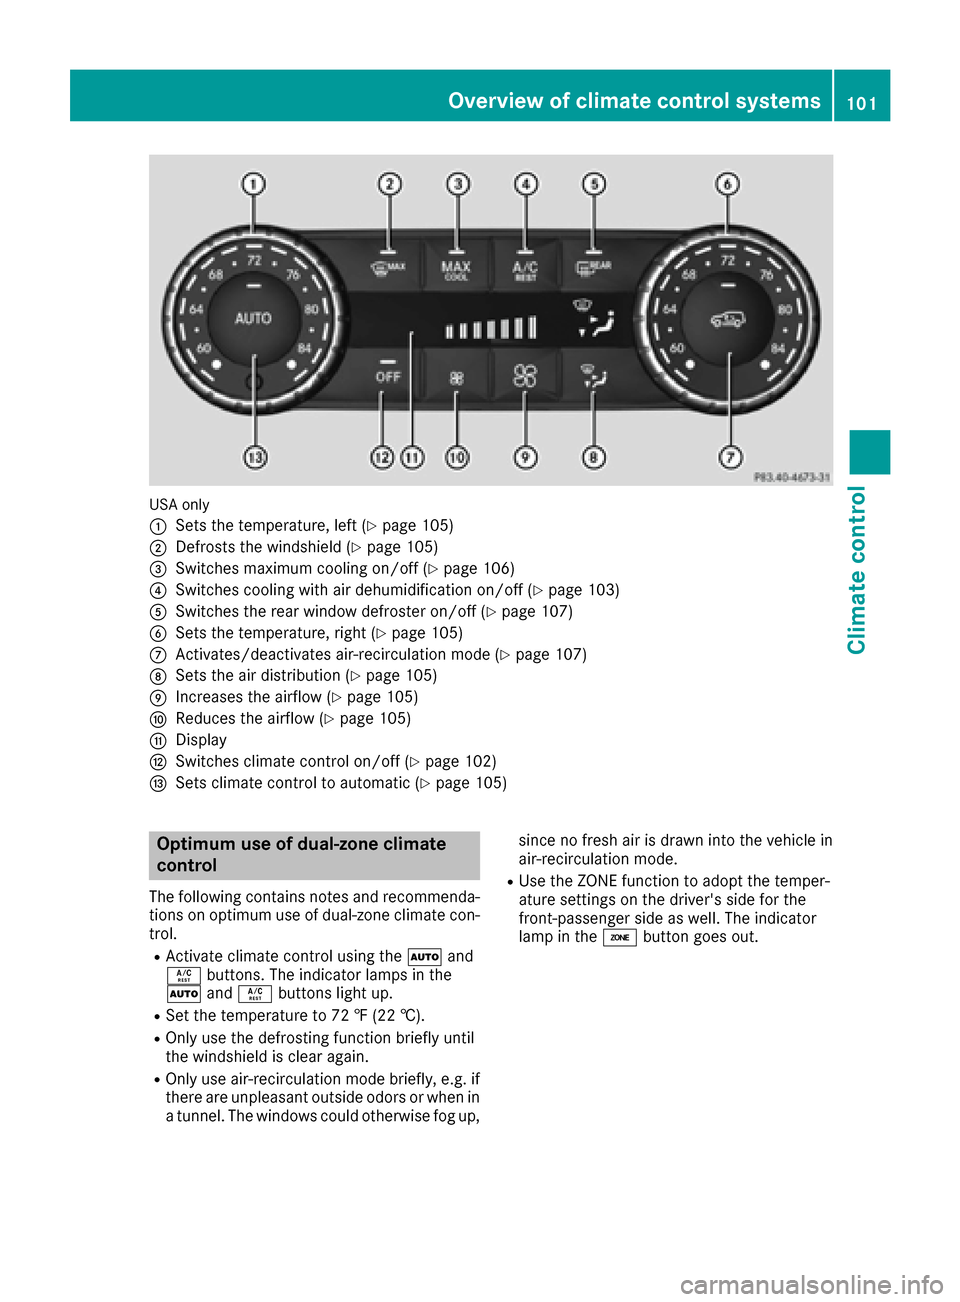
USA only
:
Sets the temperature, left (Ypage 105)
;Defrosts the windshield (Ypage 105)
=Switches maximum cooling on/off (Ypage 106)
?Switches cooling with air dehumidification on/off (Ypage 103)
ASwitches the rear window defroster on/off (Ypage 107)
BSets the temperature, right (Ypage 105)
CActivates/deactivates air-recirculation mode (Ypage 107)
DSets the air distribution (Ypage 105)
EIncreases the airflow (Ypage 105)
FReduces the airflow (Ypage 105)
GDisplay
HSwitches climate control on/off (Ypage 102)
ISets climate control to automatic (Ypage 105)
Optimum use of dual-zone climate
control
The following contains notes and recommenda-
tions on optimum use of dual-zone climate con-
trol.
RActivate climate control using theÃand
Á buttons. The indicator lamps in the
à andÁ buttons light up.
RSet the temperature to 72 ‡ (22 †).
ROnly use the defrosting function briefly until
the windshield is clear again.
ROnly use air-recirculation mode briefly, e.g. if
there are unpleasant outside odors or when in
a tunnel. The windows could otherwise fog up, since no fresh air is drawn into the vehicle in
air-recirculation mode.
RUse the ZONE function to adopt the temper-
ature settings on the driver's side for the
front-passenger side as well. The indicator
lamp in the
ábutton goes out.
Overview of climate control systems101
Climate control
Page 105 of 302

Activating/deactivating cooling with air dehumidification
Gene ral notes
If you deactivat eth e"Cooling wit hair-dehumidification "function ,th eair inside th evehicl ewill no t
be cooled .The air inside th evehicl ewill also no tbe dehumidified. The windows can fog up mor e
quickly. Therefore ,only deactivat eth e"Cooling wit hair-dehumidification "function briefly.
The "Cooling wit hair dehumidification "function is only available when th eengin eis running.
The air inside th evehicl eis cooled and dehumidified according to th etemperature selected.
Condensation may dri pfrom th eunderside of th evehicl ewhen it is in coolin gmode. This is normal
and no t asign that there is amalfunction .
Switching cooling with air dehumidificati onon/off
!If th ecoolin gwit hair dehumidification does no tswitch on ,it is possibl ethat th eclimat econtrol
system has lost coolant.
Hav eth ecoolin gwit hair dehumidification checke dat aqualified specialist workshop .
Canada only
:
Sets thetemperature, lef t (Ypage 105)
;Defroststh ewindshield (Ypage 105)
=Switches th eZON Efunction on/off (Ypage 105)
?Switches coolingwit hair dehumidification on/off (Ypage 103)
ASwitches therear window defroste ron/off (Ypage 107)
BSets thetemperature, right (Ypage 105)
CActivates/deactivates air-recirculation mod e (Ypage 107)
DSets theair distribution (Ypage 105)
EIncreasesth eairflow (Ypage 105)
FReduces th eairflow (Ypage 105)
GDisplay
HSwitches climat econtrol on/off (Ypage 102)
ISets climatecontrol to automatic (Ypage 105)
Operating the climate control systems103
Climate control
Z
Page 106 of 302
XTo activate:press theÁbutton.
The indicator lamp in the Ábutton lights up.
XTo deactivate: press theÁbutton.
The indicator lamp in the Ábutton goes out. The "Cooling with air dehumidification" function
has a delayed switch-off feature.
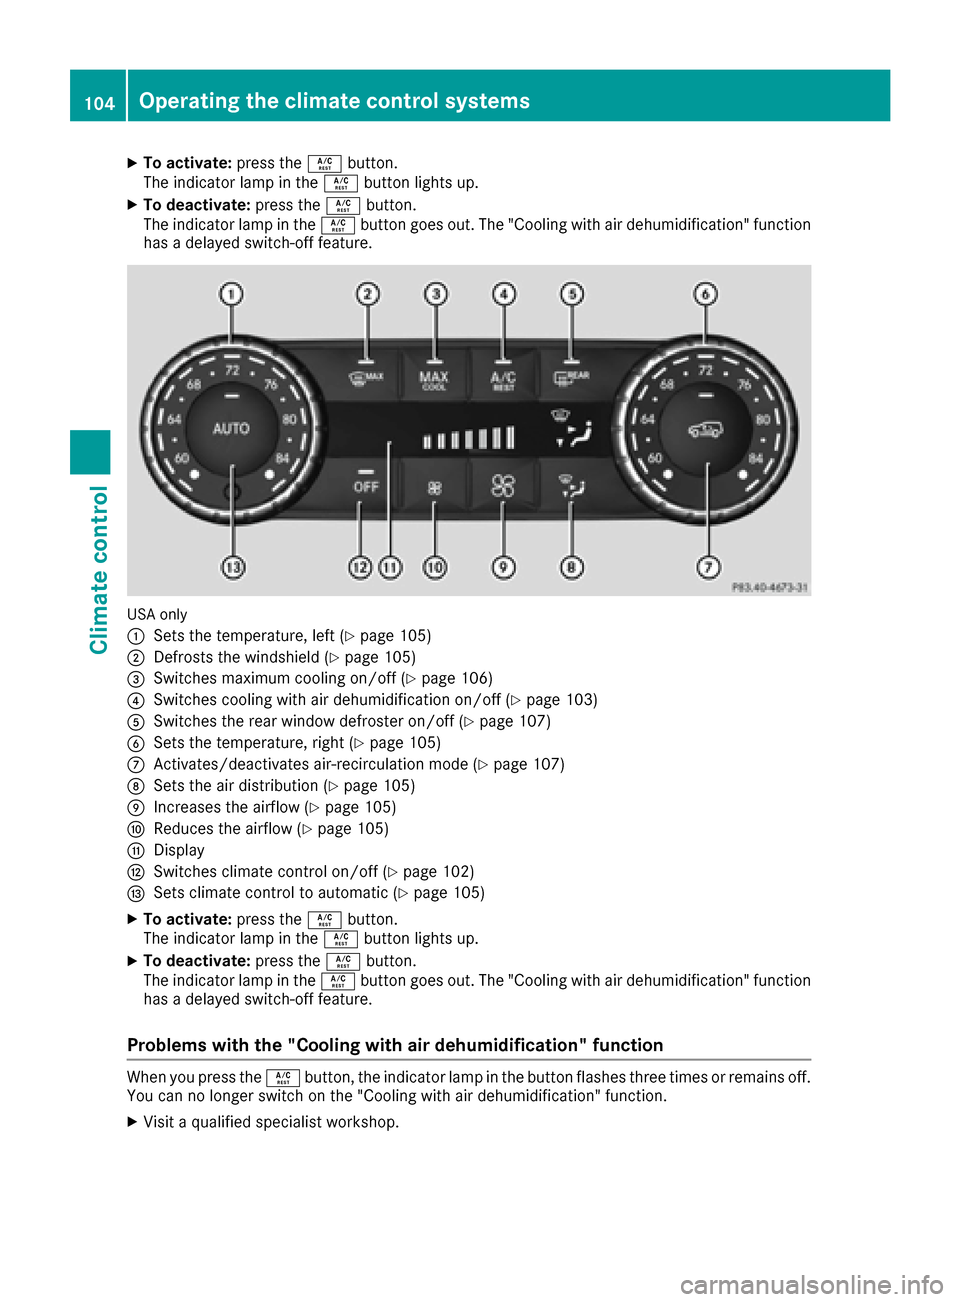
USA only
:
Sets the temperature, left (Ypage 105)
;Defrosts the windshield (Ypage 105)
=Switches maximum cooling on/off (Ypage 106)
?Switches cooling with air dehumidification on/off (Ypage 103)
ASwitches the rear window defroster on/off (Ypage 107)
BSets the temperature, right (Ypage 105)
CActivates/deactivates air-recirculation mode (Ypage 107)
DSets the air distribution (Ypage 105)
EIncreases the airflow (Ypage 105)
FReduces the airflow (Ypage 105)
GDisplay
HSwitches climate control on/off (Ypage 102)
ISets climate control to automatic (Ypage 105)
XTo activate: press theÁbutton.
The indicator lamp in the Ábutton lights up.
XTo deactivate: press theÁbutton.
The indicator lamp in the Ábutton goes out. The "Cooling with air dehumidification" function
has a delayed switch-off feature.
Problems with the "Cooling with air dehumidification" function
When you press the Ábutton, the indicator lamp in the button flashes three times or remains off.
You can no longer switch on the "Cooling with air dehumidification" function.
XVisit a qualified specialist workshop.
104Operating the climate control systems
Climate control
Page 107 of 302
Setting climate control to automatic
GWARNING
If you switch off the cooling function, the vehi- cle will not be cooled when weather condi-
tions are warm. The windows can fog up more
quickly. Window fogging may impair visibility
and endanger you and others.
In automatic mode, the set temperature is main-
tained at a constant level. The system automat-
ically regulates the temperature of the dis-
pensed air, the airflow and the air distribution.
Automatic mode will achieve optimal operation
if cooling with air dehumidification is also acti-
vated. If desired, cooling with air dehumidifica-
tion can be deactivated.
XTurn the SmartKey to position 2(Ypage 112)
in the ignition lock.
XSet the desired temperature.
XTo switch on: press theÃbutton.
The indicator lamp in the Ãbutton lights
up. Automatic air distribution and airflow are
activated.
XTo deactivate: press the_button.
or
XPress the IorK button.
The indicator lamp in the Ãbutton goes
out.
Setting the temperature
You can set the temperature separately for the
driver's and front-passenger sides with con-
trols :orB (
Ypage 100).
XTurn the SmartKey to position 2in the ignition
lock (Ypage 112).
XSet control :orB (Ypage 100) to the
desired temperature.
Only change the temperature setting in small
increments. Start at 72 ‡ (22 †).
Setting the air distribution
XTurn the SmartKey to position 2(Ypage 112)
in the ignition lock.
XPress the _button repeatedly until the
desired symbol appears in the display. P
Directs the airflow through the center
vents
O Directs the airflow through the footwell
air vents
S Directs the airflow through the center
and footwell vents
¯ Directs air through the defroster vents
b Canada only: directs the airflow through
the defroster and center vents
a Directs air through the defroster and
footwell vents
_ Canada only: directs the airflow through
the defroster, center and side air vents
and the footwell
Setting the airflow
XTurn the SmartKey to position 2in the ignition
lock (Ypage 112).
XTo increase: press theKbutton.
XTo reduce: press theIbutton.
iThe airflow from the rear-compartment
vents and the center vents is the same.
Switching the ZONE function on/off
XTo switch on: press theábutton.
The indicator lamp in the ábutton lights
up.
iThe temperature setting for the driver's side
is not adopted for the front-passenger side
and the rear compartment. The temperature
for the front-passenger side and the rear com-
partment must be set separately.
XTo switch off: press buttoná.
The indicator lamp in the ábutton goes
out.
iThe temperature setting for the driver's side
is adopted for the front-passenger side and
the rear compartment.
Defrosting the windshield
You can use this function to defrost the wind-
shield or to defrost the inside of the windshield
and the side windows.
iYou should only select the defrosting func-
tion until the windshield is clear again.
Operating the climate control systems105
Climate control
Z
Page 108 of 302
XTurn the SmartKey to position2(Ypage 112)
in the ignition lock.
XTo activate: press the¬button.
The indicator lamp in the ¬button lights
up.
The climate control system switches to the
following functions:
Rcooling with air dehumidification (only with
engine running)
Rhigh airflow (depending on the outside tem-
perature)
Rhigh temperature (depending on the out-
side temperature)
Rair distribution to the windshield and front
side windows
Rair-recirculation mode off
XTo deactivate: press the¬button.
The indicator lamp in the ¬button goes
out. The previously selected settings are
restored. The cooling with air dehumidifica-
tion function remains on. Air-recirculation
mode remains deactivated.
or
XPress the Ãbutton.
The indicator lamp in the ¬button goes
out. Airflow and air distribution are set to
automatic mode.
or
XTurn controls :orB clockwise or counter-
clockwise (Ypage 100).
or
XPress the KorI button.
Activating/deactivating MAX COOL
maximum cooling
The MAX COOL function is only available in vehi-
cles for the USA.
MAX COOL is only operational when the engine
is running.
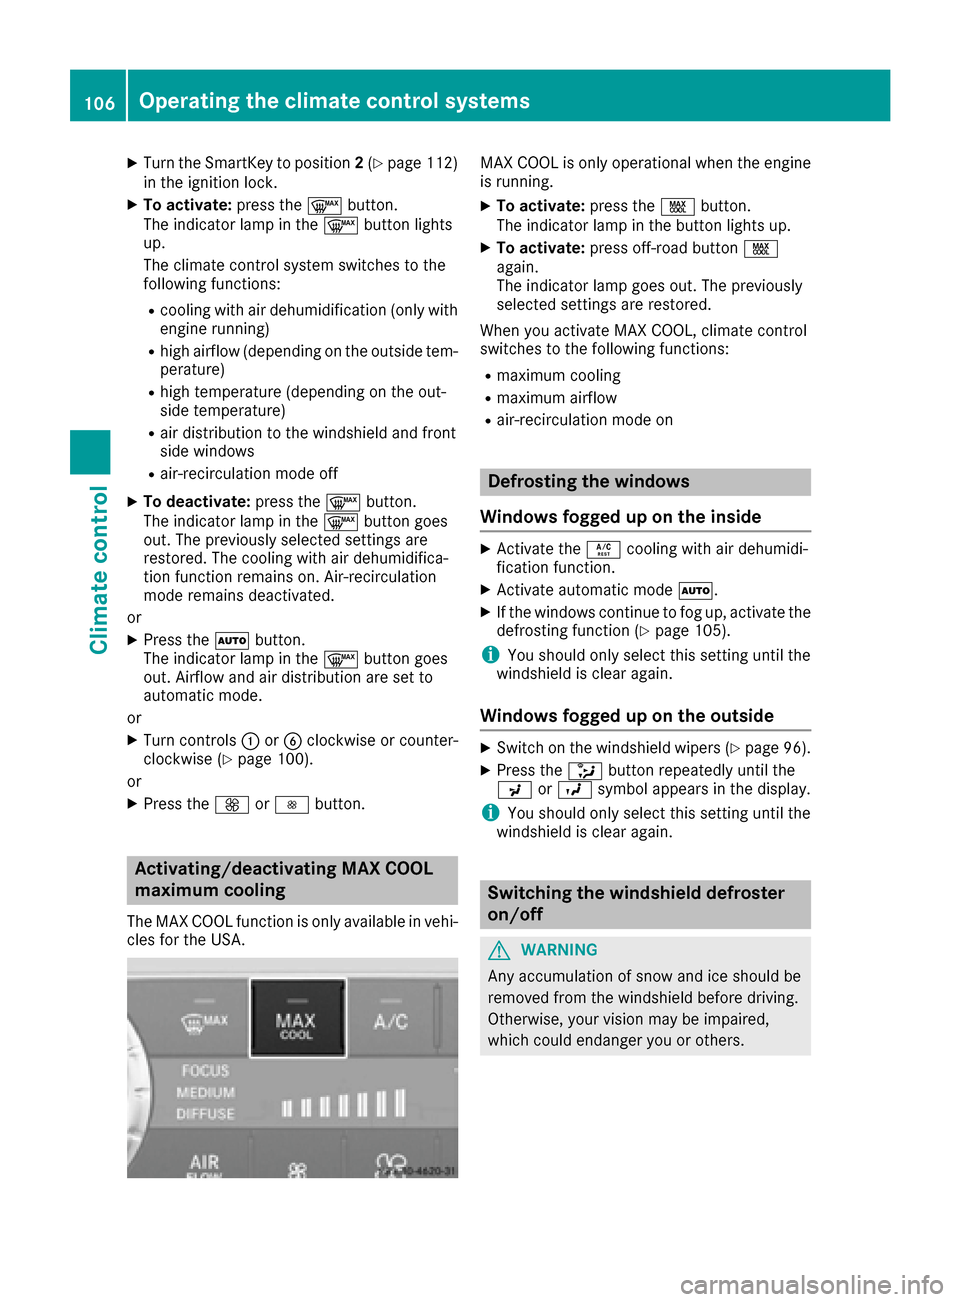
XTo activate: press theÙbutton.
The indicator lamp in the button lights up.
XTo activate: press off-road button Ù
again.
The indicator lamp goes out. The previously
selected settings are restored.
When you activate MAX COOL, climate control
switches to the following functions:
Rmaximum cooling
Rmaximum airflow
Rair-recirculation mode on
Defrosting the windows
Windows fogged up on the inside
XActivate the Ácooling with air dehumidi-
fication function.
XActivate automatic mode Ã.
XIf the windows continue to fog up, activate the
defrosting function (Ypage 105).
iYou should only select this setting until the
windshield is clear again.
Windows fogged up on the outside
XSwitch on the windshield wipers (Ypage 96).
XPress the _button repeatedly until the
P orO symbol appears in the display.
iYou should only select this setting until the
windshield is clear again.
Switching the windshield defroster
on/off
GWARNING
Any accumulation of snow and ice should be
removed from the windshield before driving.
Otherwise, your vision may be impaired,
which could endanger you or others.
106Operating the climate control systems
Climate control