2016 MERCEDES-BENZ G-Class glove box
[x] Cancel search: glove boxPage 11 of 302

Front-passenger footwell ............... 260
Transmission tunnel ....................... 260
Fuse extractor ................................... 259
Fuses
Allocation chart ............................. 259
Before changing ............................. 259
Dashboard fuse box ....................... 259
Fuse allocation chart ..................... 259
Fuse box in the front-passenger
footwell .......................................... 260
Fuse box in the transmission tun-
nel ................................................. 260
Important safety notes .................. 259
In the battery case ......................... 260
G
Garage door openerClearing the memory ..................... 234
General notes ................................ 231
Important safety notes .................. 231
Opening/closing the garage doo r..2 34
Programming the remote control ... 231
Gasoline ............................................. 290
Gear indicator (on-board com-
puter) ..................................................1 82
Gear or selector lever (cleaning
guidelines) ......................................... 246
Genuine parts ...................................... 19
Genuine wood trim and trim strips
(cleaning instructions) ......................246
Glove box ...........................................2 15
Gradient-climbing capability (max-
imum) ................................................. 140
GTW (Gross Trailer Weight) (defini-
tion) .................................................... 279
H
Hazard warning lamps ........................ 89
Head restraints
Adjusting ......................................... 74
Adjusting (rear) ................................ 75
Installing/removing (rear) ................ 75
Luxury .............................................. 75
Resetting (front) ............................... 75
see NECK-PRO head restraints
see NECK-PRO luxury head restraints Headlamps
Adding fluid to cleaning system ..... 239
Cleaning ......................................... 244
Cleaning system (function) .............. 87
Cleaning system (notes) ................ 295
Fogging up ....................................... 89
Protective grille ................................ 95
see Automatic headlamp mode
Heating
see Climate control
High-beam headlamps
Display message ............................ 190
Switching on/off .............................. 88
Hill start assist .................................. 114
HOLD function
Function/notes .............................1 57
Hood
Closing ...........................................2 36
Display message ............................ 201
Important safety notes .................. 235
Opening ......................................... 236
Horn ...................................................... 26
Hydroplaning ..................................... 135
I
Immobilizer.......................................... 59
Instrument cluster
Overview ........................................ 171
Warning and indicator lamps ......... 202
Instrument cluster lighting .............. 171
Interior lighting
Automatic control ............................ 90
Cargo compartment lamp ................ 91
Delayed switch-off (on-board
computer) ...................................... 180
Manual control ................................. 90
Overview .......................................... 89
Reading lamp ................................... 89
Rear interior lighting ........................ 92
J
JackPump lever ..................................... 283
Storage location ............................ 248
Using ............................................. 282
Jump starting (engine) ......................254
Index9
Page 17 of 302

Steering wheel heating .................... 78
Storing settings (memory func-
tion) ................................................. 82
Steering wheel heating
Indicator lamp (malfunction) ............ 79
Steering wheel paddle shifters ........ 123
Stopwatch (RACETIMER) ................... 182
Stowage areas ................................... 215
Stowage compartment
Door stowage compartment .......... 216
Stowage compartments
Armrest (under) ............................. 216
Cup holders ................................... 220
Glove box ....................................... 215
Important safety information ......... 215
Stowage pockets ........................... 216
Summer tires ..................................... 264
Sun visor ............................................ 221
Surround lighting (on-board com-
puter) .................................................. 179
SUV
(Sport Utility Vehicle) ....................... 22
Switching air-recirculation mode
on/off ................................................. 107
Switching off the alarm (ATA) ............ 59
T
Tachometer........................................ 171
Tail lamps
Display message ............................ 191
see Lights
Tank content
Fuel gauge ..................................... 171
Technical data
Capacities ...................................... 289
Tires ............................................... 284
Tires/wheels ................................. 284
Trailer loads ................................... 298
Vehicle data ................................... 295
Wheels ........................................... 284
TELEAID
Call priority .................................... 228
Downloading destinations
(COMAND) ..................................... 228
Downloading routes ....................... 230
Emergency call .............................. 225
Geo fencing ................................... 230 Important safety notes .................. 224
Locating a stolen vehicle ............... 229
MB info call button ........................ 227
Remote vehicle locking .................. 229
Roadside Assistance button .......... 226
Self-test ......................................... 225
Speed alert .................................... 230
System .......................................... 225
Triggering the vehicle alarm ........... 231
Vehicle remote malfunction diag-
nosis .............................................. 229
Vehicle remote unlocking .............. 228
Telephone
Accepting a call ............................. 177
Display message ............................ 202
Menu (on-board computer) ............ 177
Number from the phone book ........ 177
Redialing ........................................ 178
Rejecting/ending a call ................. 177
Telephone compartment .................. 216
Temperature
Coolant .......................................... 171
Coolant (on-board computer) ......... 182
Engine oil (on-board computer) ...... 182
Outside temperature ...................... 171
Setting (climate control) ................ 105
Theft deterrent systems
ATA (Anti-Theft Alarm system) ......... 59
Immobilizer ...................................... 59
Tilt/sliding sunroof
see Sliding sunroof
Time
see separate operating instructions
Timing (RACETIMER) ......................... 182
Tire pressure
Calling up (on-board computer) ..... 268
Checking manually ........................ 268
Display messa ge ............................ 198
Ma
ximum ....................................... 268
Notes ............................................. 266
Recommended ............................... 265
Table (single tires) ......................... 266
Tire pressure monitor
Checking the tire pressure elec-
tronically ........................................ 270
Function/notes ............................. 268
Restarting ...................................... 270
Warning lamp ................................. 213
Index15
Page 217 of 302

Observe the following notes when transporting
a load:
RPosition heavy loads as far forwards as pos-
sible and as low down in the cargo compart-
ment as possible.
iTransport loads when possible in the cargo
compartment. You should only use the cargo
compartment enlargement if the load does
not fit in the cargo compartment.
RAlways place the load against the backrests of
the front seats or rear seats.
RUse the cargo tie-down rings and the parcel
nets to transport loads and luggage.
RUse cargo tie-down rings and fastening mate-
rials appropriate for the weight and size of the load.
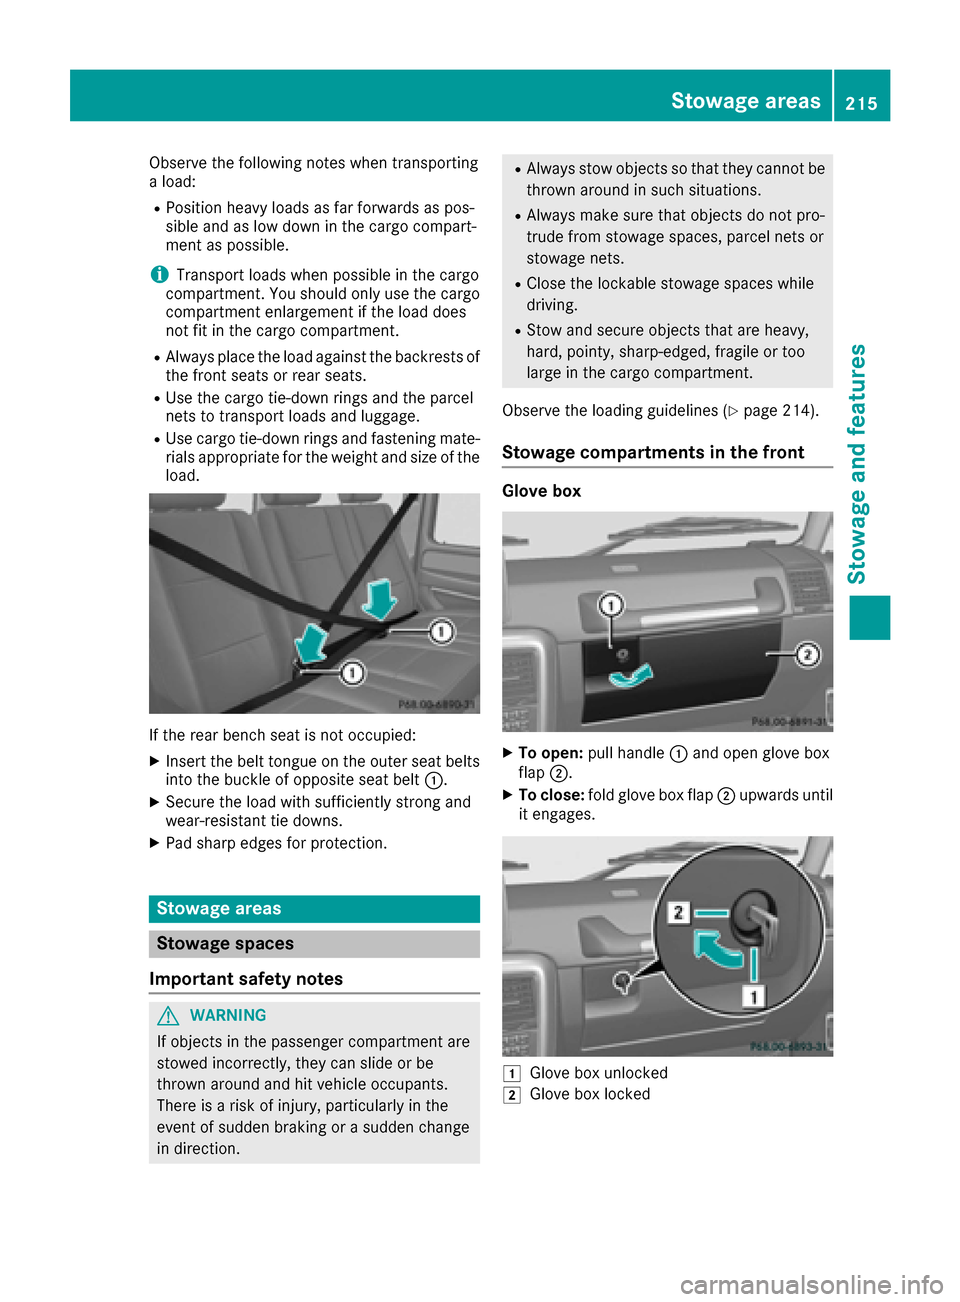
If the rear bench seat is not occupied:
XInsert the belt tongue on the outer seat belts
into the buckle of opposite seat belt :.
XSecure the load with sufficiently strong and
wear-resistant tie downs.
XPad sharp edges for protection.
Stowage areas
Stowage spaces
Important safety notes
GWARNING
If objects in the passenger compartment are
stowed incorrectly, they can slide or be
thrown around and hit vehicle occupants.
There is a risk of injury, particularly in the
event of sudden braking or a sudden change
in direction.
RAlways stow objects so that they cannot be
thrown around in such situations.
RAlways make sure that objects do not pro-
trude from stowage spaces, parcel nets or
stowage nets.
RClose the lockable stowage spaces while
driving.
RStow and secure objects that are heavy,
hard, pointy, sharp-edged, fragile or too
large in the cargo compartment.
Observe the loading guidelines (
Ypage 214).
Stowage compartments in the front
Glove box
XTo open: pull handle :and open glove box
flap ;.
XTo close: fold glove box flap ;upwards until
it engages.
1Glove box unlocked
2Glove box locked
Stowage areas215
Stowage and features
Z
Page 218 of 302

XTo lock:insert the mechanical key into the
lock (Ypage 61) and turn it 90° clockwise to
position 2.
XTo unlock: insert the mechanical key into the
lock (Ypage 61) and turn it 90° counter-
clockwise to position 1.
iThe glove box can only be locked and
unlocked using the mechanical key.
Door stowage compartment
There is an additional compartment located on
the driver's door paneling, which can be used to
store a mini tablet PC, for example.
Stowage compartment/telephone com-
partment under the armrest/in the center
console
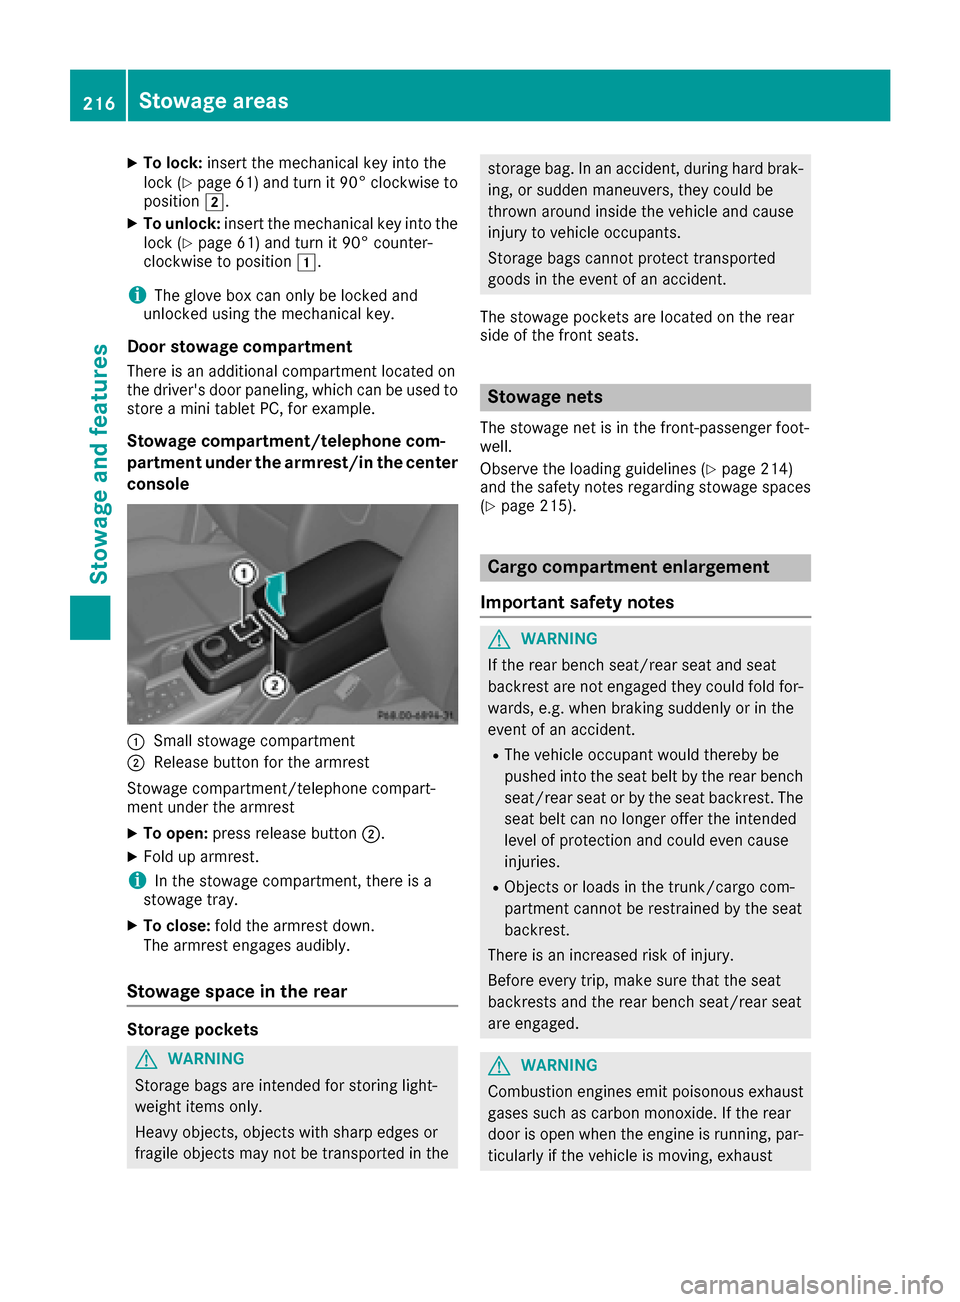
:Small stowage compartment
;Release button for the armrest
Stowage compartment/telephone compart-
ment under the armrest
XTo open: press release button ;.
XFold up armrest.
iIn the stowage compartment, there is a
stowage tray.
XTo close: fold the armrest down.
The armrest engages audibly.
Stowage space in the rear
Storage pockets
GWARNING
Storage bags are intended for storing light-
weight items only.
Heavy objects, objects with sharp edges or
fragile objects may not be transported in the
storage bag. In an accident, during hard brak-
ing, or sudden maneuvers, they could be
thrown around inside the vehicle and cause
injury to vehicle occupants.
Storage bags cannot protect transported
goods in the event of an accident.
The stowage pockets are located on the rear
side of the front seats.
Stowage nets
The stowage net is in the front-passenger foot-
well.
Observe the loading guidelines (
Ypage 214)
and the safety notes regarding stowage spaces
(
Ypage 215).
Cargo compartment enlargement
Important safety notes
GWARNING
If the rear bench seat/rear seat and seat
backrest are not engaged they could fold for-
wards, e.g. when braking suddenly or in the
event of an accident.
RThe vehicle occupant would thereby be
pushed into the seat belt by the rear bench
seat/rear seat or by the seat backrest. The
seat belt can no longer offer the intended
level of protection and could even cause
injuries.
RObjects or loads in the trunk/cargo com-
partment cannot be restrained by the seat
backrest.
There is an increased risk of injury.
Before every trip, make sure that the seat
backrests and the rear bench seat/rear seat
are engaged.
GWARNING
Combustion engines emit poisonous exhaust
gases such as carbon monoxide. If the rear
door is open when the engine is running, par-
ticularly if the vehicle is moving, exhaust
216Stowage areas
Stowag ean d features
Page 224 of 302

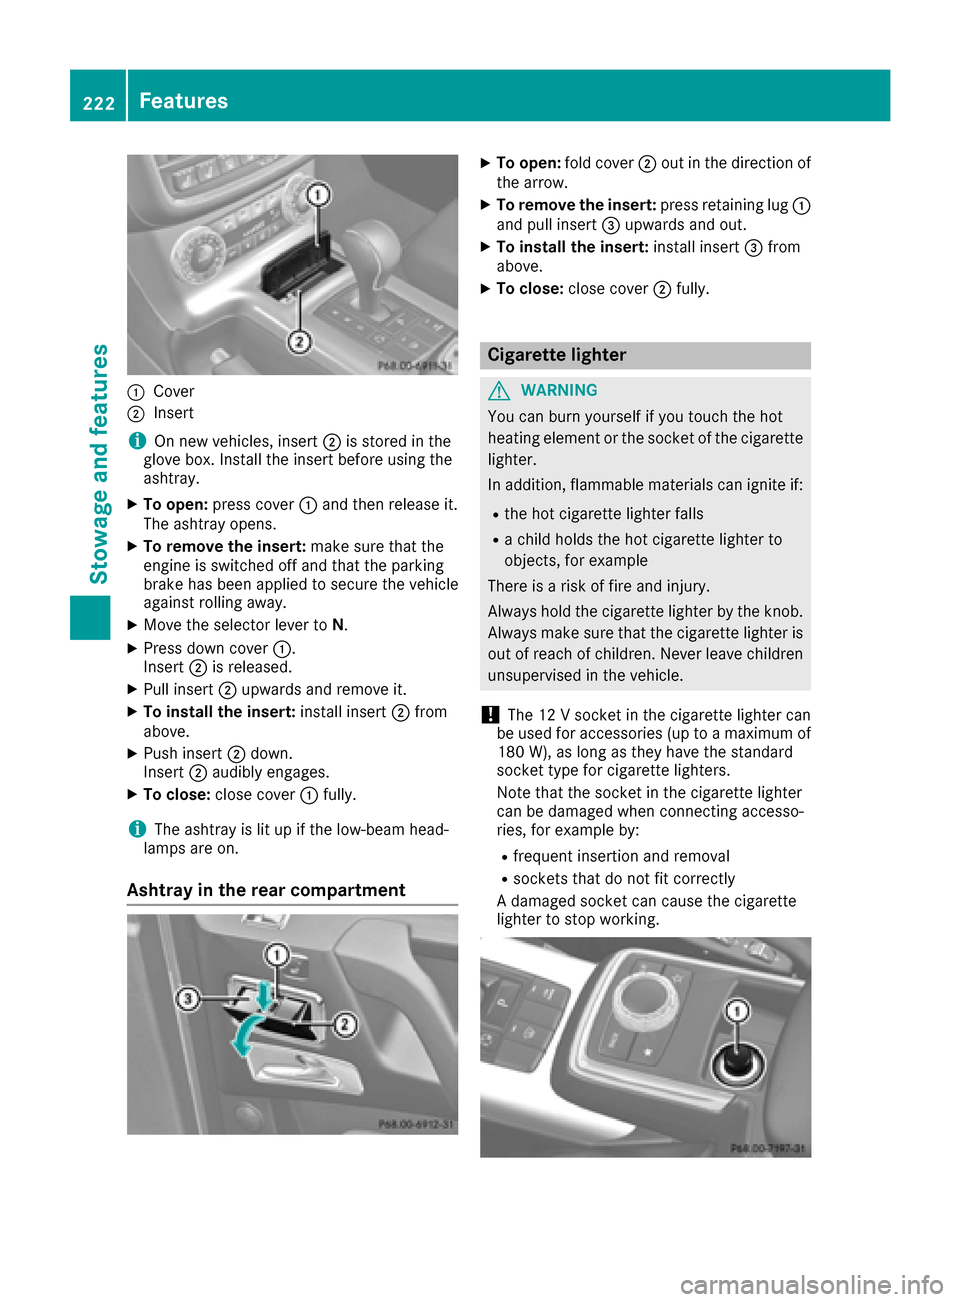
:Cover
;Insert
iOn new veh icles, insert ;isstored inthe
glove box. Install the insert before using the
ashtray.
XTo open: press cover :and then release it.
The ashtray opens.
XTo remove the insert: make sure that the
engine is switched off and that the parking
brake has been appliedto secure the veh icle
against rolling away.
XMove the selector lever to N.
XPress downcover :.
In sert ;isreleased.
XPull insert ;upwards and remove it.
XTo install the insert: install insert;from
above.
XPush insert ;down .
In sert ;audibly engages.
XTo close: close cover :fully.
iThe ashtray is litupifthe low- beam head-
lamps are on.
Ashtray in the rear compartment
XTo open: fold cover ;out in the direction of
the arrow.
XTo remove the insert: press retaining lug :
and pull insert =upwards and out.
XTo install the insert: install insert =from
above.
XTo close: close cover ;fully.
Cigarette lighter
GWARNING
You can burn yourself ifyou touch the hot
heating element or the socket of the cigarette lighter.
In addition, flammable materials can ignite if:
Rthe hot cigarette lighter falls
Ra child holds the hot cigarette lighter to
objects, for example
There isa risk of fire and injury.
Alwa ys hold the cigarette lighter bythe knob.
Alwa ys make sure that the cigarette lighter is
out of reach of children. Never leave ch ildren
unsupervised in the vehicle.
!The 12 V socket inthe cigarette lighter can
be used for accessories (up to a maximum of
180 W), as long as they have the standard
socket type for cigarette lighters.
Note that the socket in the cigarette lighter
can bedamaged when connecting accesso-
ries, for example by:
Rfrequent insertion and removal
Rsockets that do not fit correctly
A damaged socket can cause the cigarette
lighter to stop working.
222Features
Stowage and features