2016 MERCEDES-BENZ G-Class automatic transmission
[x] Cancel search: automatic transmissionPage 127 of 302
When the engine limiting speed is reached,
the fuel supply is cut to prevent the engine
from overrevving. Always make sure that the
engine speed does not reach the red area of
the tachometer. There is otherwise a risk of
engine damage.
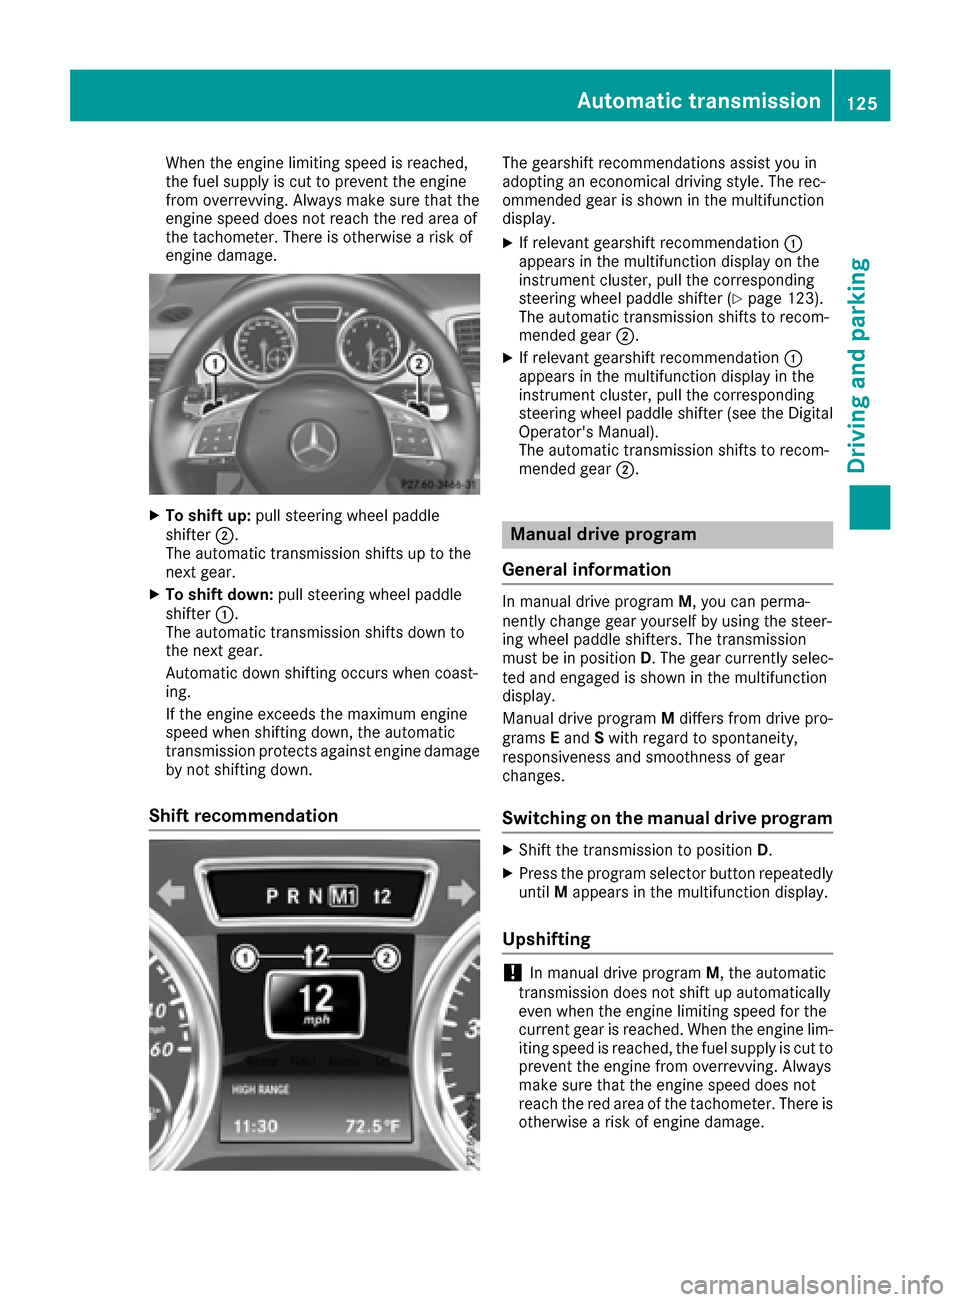
XTo shift up:pull steering wheel paddle
shifter ;.
The automatic transmission shifts up to the
next gear.
XTo shift down: pull steering wheel paddle
shifter :.
The automatic transmission shifts down to
the next gear.
Automatic down shifting occurs when coast-
ing.
If the engine exceeds the maximum engine
speed when shifting down, the automatic
transmission protects against engine damage by not shifting down.
Shift recommendation
The gearshift recommendations assist you in
adopting an economical driving style. The rec-
ommended gear is shown in the multifunction
display.
XIf relevant gearshift recommendation :
appears in the multifunction display on the
instrument cluster, pull the corresponding
steering wheel paddle shifter (
Ypage 123).
The automatic transmission shifts to recom-
mended gear ;.
XIf relevant gearshift recommendation :
appears in the multifunction display in the
instrument cluster, pull the corresponding
steering wheel paddle shifter (see the Digital
Operator's Manual).
The automatic transmission shifts to recom-
mended gear ;.
Manual drive program
General information
In manual drive program M, you can perma-
nently change gear yourself by using the steer-
ing wheel paddle shifters. The transmission
must be in position D. The gear currently selec-
ted and engaged is shown in the multifunction
display.
Manual drive program Mdiffers from drive pro-
grams Eand Swith regard to spontaneity,
responsiveness and smoothness of gear
changes.
Switching on the manual drive program
XShift the transmission to position D.
XPress the program selector button repeatedly
untilMappears in the multifunction display.
Upshifting
!In manual drive program M, the automatic
transmission does not shift up automatically
even when the engine limiting speed for the
current gear is reached. When the engine lim-
iting speed is reached, the fuel supply is cut to
prevent the engine from overrevving. Always
make sure that the engine speed does not
reach the red area of the tachometer. There is
otherwise a risk of engine damage.
Automatic transmission125
Driving and parking
Z
Page 128 of 302
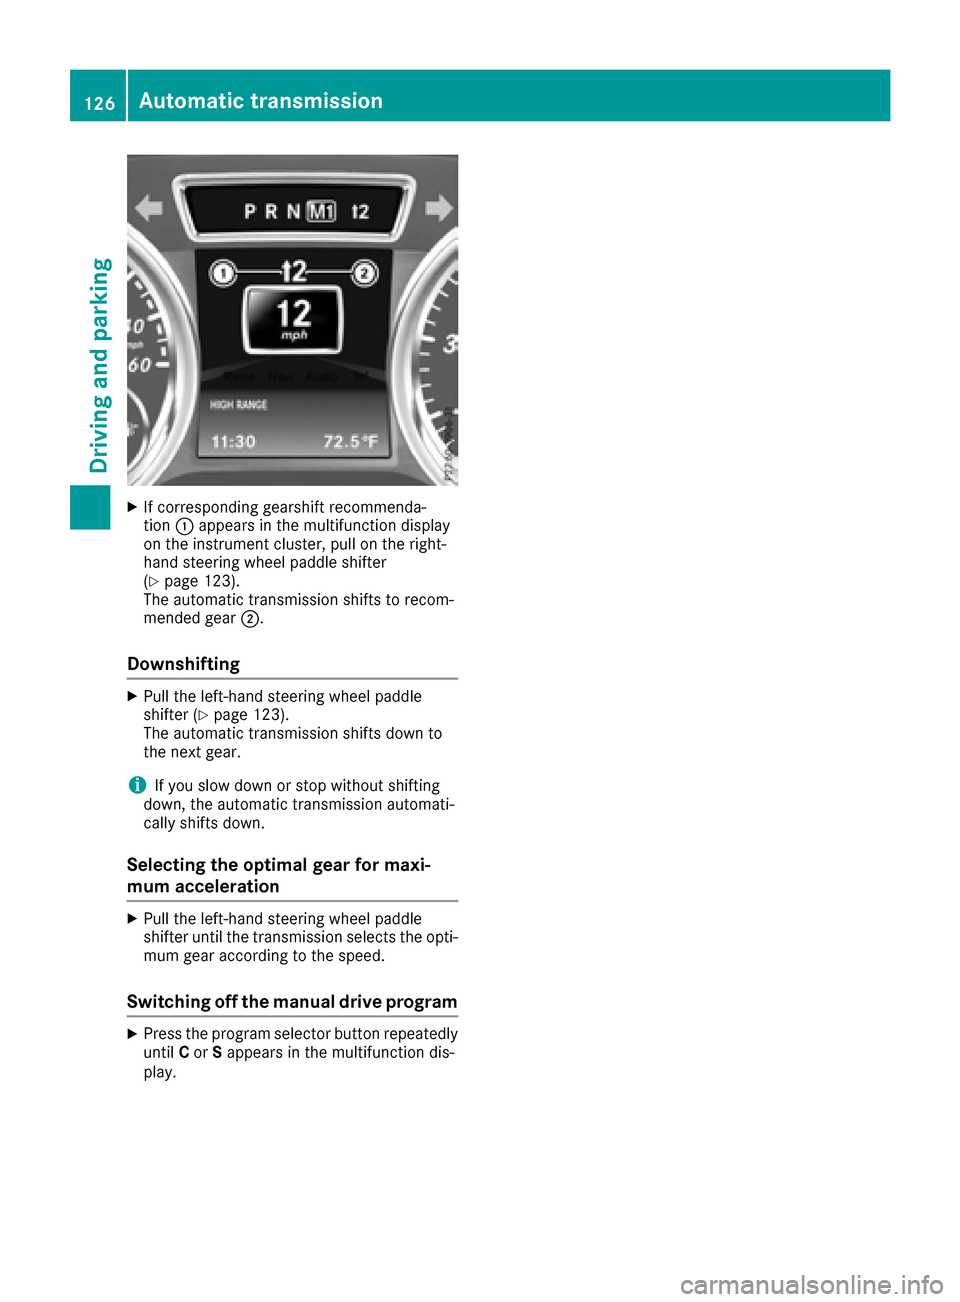
XIf corresponding gearshift recommenda-
tion:appears in the multifunction display
on the instrument cluster, pull on the right-
hand steering wheel paddle shifter
(
Ypage 123).
The automatic transmission shifts to recom-
mended gear ;.
Downshifting
XPull the left-hand steering wheel paddle
shifter (Ypage 123).
The automatic transmission shifts down to
the next gear.
iIf you slow down or stop without shifting
down, the automatic transmission automati-
cally shifts down.
Selecting the optimal gear for maxi-
mum acceleration
XPull the left-hand steering wheel paddle
shifter until the transmission selects the opti-
mum gear according to the speed.
Switching off the manual drive program
XPress the program selector button repeatedly until Cor Sappears in the multifunction dis-
play.
126Automatic transmission
Driving and parking
Page 129 of 302

Problems with the automatic transmission
ProblemPossible causes/consequences andMSolutions
The acceleration ability
is deteriorating.
The transmission no lon-
ger changes gear.The transmission is in emergency mode.
It is only possible to shift intosecondgear and reverse gear.
XStop the vehicle.
XShift the transmission to position P.
XTurn the SmartKey to position0in the ignition lock.
XWait at least ten seconds before restarting the engine.
XShift the transmission to position Dor R.
If D is selected, the transmission shifts into secondgear; ifRis
selected, the transmission shifts into reverse gear.
XHave the transmission checked at a qualified specialist workshop
immediately.
You hear a warning tone.You have:
Rswitched off the engine
Ropened the driver's door
Rnot shifted the selector lever to position P
XShift the selector lever to positionP.
Refueling
Important safety notes
GWARNING
Fuel is highly flammable. If you handle fuel
incorrectly, there is a risk of fire and explo-
sion.
You must avoid fire, open flames, creating
sparks and smoking. Switch off the engine
and, if applicable, the auxiliary heating before refueling.
GWARNING
Fuel is poisonous and hazardous to health.
There is a risk of injury.
You must make sure that fuel does not come into contact with your skin, eyes or clothing
and that it is not swallowed. Do not inhale fuel
vapors. Keep fuel away from children.
If you or others come into contact with fuel,
observe the following:
RWash away fuel from skin immediately
using soap and water.
RIf fuel comes into contact with your eyes,
immediately rinse them thoroughly with
clean water. Seek medical assistance with-
out delay.
RIf fuel is swallowed, seek medical assis-
tance without delay. Do not induce vomit-
ing.
RImmediately change out of clothing which
has come into contact with fuel.
!Do not use diesel to refuel vehicles with a
gasoline engine. Even small amounts of the
wrong fuel result in damage to the fuel system
and engine.
!Do not switch on the ignition if you acciden-
tally refuel with the wrong fuel. Otherwise, the
fuel will enter the fuel lines. Notify a qualified
specialist workshop and have the fuel tank
and fuel lines drained completely.
Refueling127
Driving and parking
Z
Page 132 of 302
Problems with the fuel and fuel tank
ProblemPossible causes/consequences andMSolutions
Fuel is leaking from the
vehicle.The fuel line or the fuel tank is defective.
GWARNING
Risk of explosion or fire.
XTurn the SmartKey to position 0(Ypage 112) immediately and
remove it.
XDo not restart the engine under any circumstances.
XConsult a qualified specialist workshop.
The fuel filler flap cannot
be opened.The fuel filler flap is not unlocked.
or
The SmartKey batteries are discharged.
XUnlock the vehicle (Ypage 60).
or
XUnlock the vehicle using the mechanical key (Ypage 61).
XOpen the rear door.
XManually unlock the fuel filler flap using the emergency release
(Ypage 129).
The fuel filler flap is unlocked, but the opening mechanism is jammed.
XManually unlock the fuel filler flap using the emergency release
(Ypage 129).
XConsult a qualified specialist workshop.
Parking
Important safety notes
GWARNING
If you leave children unsupervised in the vehi-
cle, they could set it in motion by, for example:
Rrelease the parking brake.
Rshift the automatic transmission out of the
parking position P.
Rstart the engine.
In addition, they may operate vehicle equip-
ment and become trapped. There is a risk of
an accident and injury.
When leaving the vehicle, always take the
SmartKey with you and lock the vehicle. Never
leave children unsupervised in the vehicle.
GWARNING
Flammable material such as leaves, grass or
twigs may ignite if they come into contact with
hot parts of the exhaust system or exhaust
gas flow. There is a risk of fire.
Park the vehicle so that no flammable mate-
rials come into contact with parts of the vehi-
cle which are hot. Take particular care not to
park on dry grassland or harvested grain
fields.
GWARNING
If you switch off the ignition while driving,
safety-relevant functions are only available
with limitations, or not at all. This could affect, for example, the power steering and the brake
boosting effect. You will require considerably
more effort to steer and brake. There is a risk
of an accident.
130Parking
Driving and parking
Page 133 of 302
Do not switch off the ignition while driving.
Switching off the engine
Important safety notes
GWARNING
If you switch off the ignition while driving,
safety-relevant functions are only available
with limitations, or not at all. This could affect, for example, the power steering and the brake
boosting effect. You will require considerably
more effort to steer and brake. There is a risk
of an accident.
Do not switch off the ignition while driving.
GWARNING
The automatic transmission switches to neu-
tral position Nwhen you switch off the engine.
The vehicle may roll away. There is a risk of an
accident.
After switching off the engine, always switch
to parking position P. Prevent the parked vehi-
cle from rolling away by applying the parking
brake.
Vehicles with automatic transmission
XShift the transmission to position P.
XTurn the SmartKey to position 0in the ignition
lock and remove it (Ypage 112).
The immobilizer is activated.
XApply the parking brake firmly.
XTurn the steering wheel until the steering
wheel lock engages.
iIf you switch off the engine using the Smart-
Key and then remove the SmartKey from the
ignition lock or open one of the front doors,
the automatic transmission automatically
shifts to park position P.
iThe SmartKey can only be removed if the
automatic transmission is in position P.
Parking brake
GWARNING
If you must brake the vehicle with the parking brake, the braking distance is considerably
longer and the wheels could lock. There is an
increased danger of skidding and accidents.
Only use the parking brake to brake the vehi-
cle when the service brake is faulty. Do not
apply the parking brake too firmly. If the
wheels lock, release the parking brake until
the wheels begin turning again.
GWARNING
If you leave children unsupervised in the vehi-
cle, they could set it in motion by, for example:
Rrelease the parking brake.
Rshift the automatic transmission out of the
parking position P.
Rstart the engine.
In addition, they may operate vehicle equip-
ment and become trapped. There is a risk of
an accident and injury.
When leaving the vehicle, always take the
SmartKey with you and lock the vehicle. Never
leave children unsupervised in the vehicle.
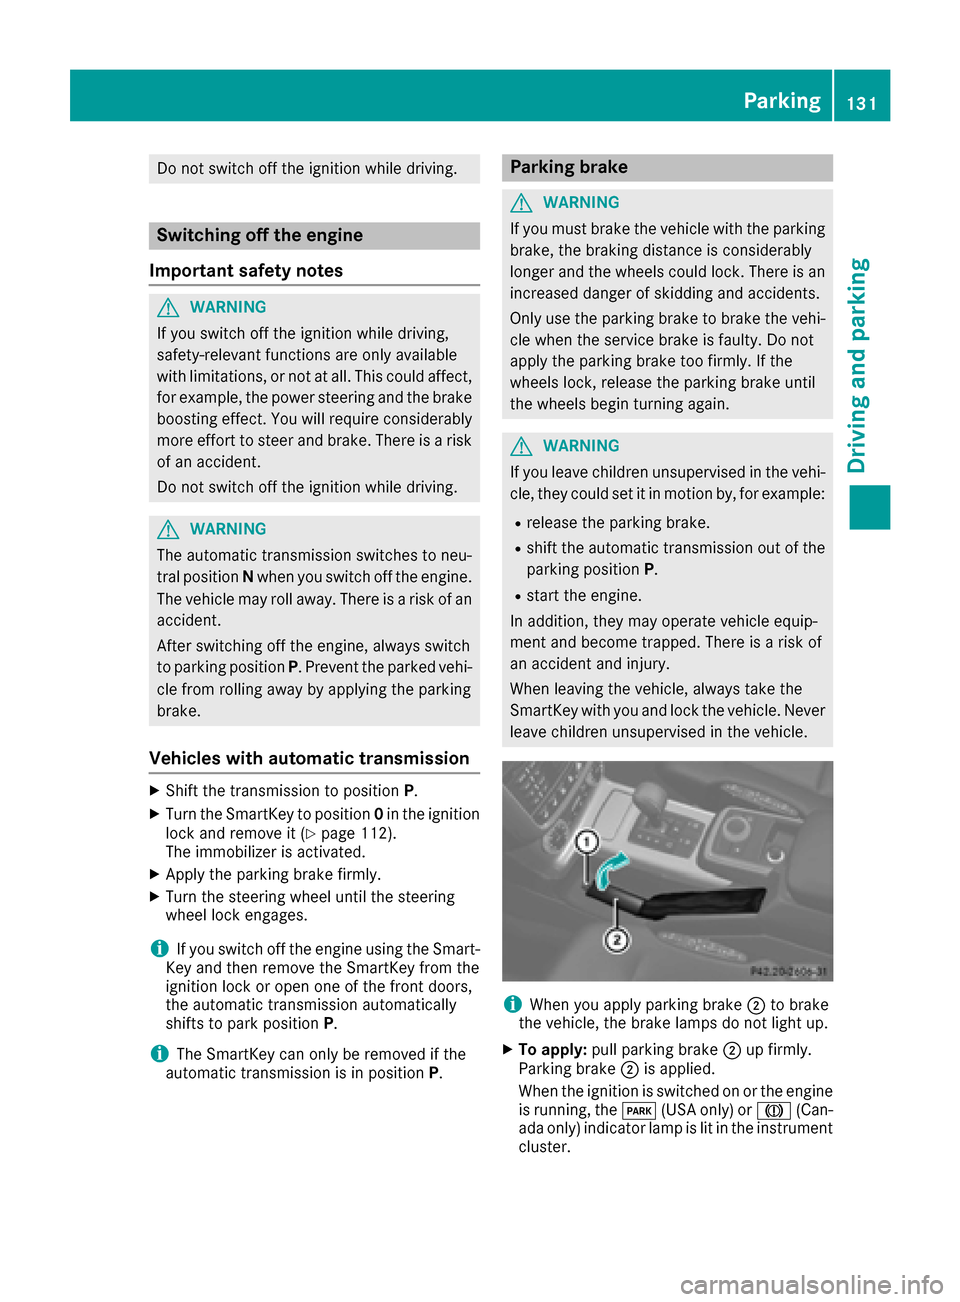
iWhen you apply parking brake ;to brake
the vehicle, the brake lamps do not light up.
XTo apply: pull parking brake ;up firmly.
Parking brake ;is applied.
When the ignition is switched on or the engine
is running, the F(USA only) or J(Can-
ada only) indicator lamp is lit in the instrument
cluster.
Parking131
Driving an d parking
Z
Page 137 of 302

High-performance brake system for
AMG vehicles
The high-performance brake system is only
installed on the G 63 AMG and the G 65 AMG.
The high-performance brake system is designed
for heavy loads. This may lead to noise when
braking. This will depend on:
RSpeed
RBraking force
REnvironmental conditions, such as tempera-
ture and humidity
The wear of individual components of the brake
system, such as the brake pads/linings or brake
discs, depends on the individual driving style
and operating conditions.
For this reason, it is impossible to state a mile-
age that will be valid under all circumstances. An aggressive driving style will lead to high wear.
You can obtain further information about this
from your authorized Mercedes-Benz Center.
New and replaced brake pads and discs only
reach their optimum braking effect after several
hundred kilometers of driving. Compensate for
this by applying greater force to the brake pedal.
Keep this in mind, and adapt your driving and
braking accordingly during this break-in period.
Excessive heavy braking results in correspond-
ingly high brake wear. Observe the brake system
warning lamp in the instrument cluster and noteany brake status messages in the multifunction
display. For high-performance driving in partic-
ular, it is important to maintain and have the
brake system checked regularly.
Parking brake
GWARNING
If you must brake the vehicle with the parking brake, the braking distance is considerably
longer and the wheels could lock. There is an
increased danger of skidding and accidents.
Only use the parking brake to brake the vehi-
cle when the service brake is faulty. Do not
apply the parking brake too firmly. If the
wheels lock, release the parking brake until
the wheels begin turning again.
If you brake the vehicle with the parking brake,
the brake lamps will not light up. If you drive on wet roads or dirt-covered surfa-
ces, road salt and/or dirt could get into the
parking brake.
In order to prevent corrosion and a reduction in
the braking power of the parking brake, observe
the following:
Rpull the parking brake upwards with the
release button depressed from time to time
before beginning the journey (
Ypage 131).
Rdrive for approximately 110 yds (100 m) at a
maximum speed of 12 mph (20 km/h)
Driving on wet roads
Hydroplaning
If water has accumulated to a certain depth on
the road surface, there is a danger of hydro-
planing occurring, even if:
Ryou drive at low speeds.
Rthe tires have adequate tread depth.
For this reason, in the event of heavy rain or in
conditions in which hydroplaning may occur,
you must drive in the following manner:
Rlower your speed.
Ravoid ruts.
Rbrake carefully.
Driving on flooded roads
!Do not drive through flooded areas. Check
the depth of any water before driving through
it. Drive slowly through standing water. Oth-
erwise, water may enter the vehicle interior or
the engine compartment. This can damage
the electronic components in the engine or
the automatic transmission. Water can also
be drawn in by the engine's air suction nozzles
and this can cause engine damage.
If you have to drive on stretches of road on which
water has collected, please bear in mind that:
Rthe maximum permissible still water depth
depends on the vehicle equipment
Ryou should drive no faster than at a walking
pace
Off-road fording
!Under no circumstances should you accel-
erate before entering the water. The bow
Driving tips135
Driving and parking
Z
Page 140 of 302

The following driving systems are specially
adapted to off-road driving:
R4ETS (Ypage 57)
RTransfer case (Ypage 162)
RDifferential locks (Ypage 162)
Observe the following notes:
Rstop your vehicle and, if necessary, shift the
transfer case to LOW RANGE(Ypage 162)
before driving off-road.
Rin transfer case position LOW RANGEthe
ECO start/stop function is not available
(
Ypage 114).
Rengage the differential locks, if necessary
(Ypage 165).
iABS, 4ETS, ESP®and BAS are deactivated
while the differential locks are engaged. This
allows the front wheels to lock briefly, so that
these can dig into a loose surface. However,
please note that locked wheels skid and can
no longer steer.
RCheck that items of luggage and loads are
stowed safely and are well secured
(
Ypage 219).
RTo avoid damaging the vehicle, make sure
there is always sufficient ground clearance.
RAlways keep the engine running and in gear
when driving on a downhill gradient.
RAlways keep the engine running and in gear
when driving on a slope.
RDrive slowly and evenly, if necessary at a
walking pace.
REnsure that the wheels are in contact with the
ground at all times.
RDrive with extreme care on unfamiliar off-road routes where visibility is poor. For safety rea-
sons, get out of the vehicle first and survey
the off-road route.
RCheck the depth of water before fording rivers
and streams.
RWhen fording, do not stop and do not switch
off the engine.
RLook out for obstacles, such as rocks, holes,
tree stumps and furrows.
RAlways keep the doors, rear door, side win-
dows and the sliding sunroof closed while the
vehicle is in motion.
RSwitch off cruise control.
RDo not stray from marked routes or paths.
RAdapt your speed to the terrain. The rougher,
steeper or more ruts on the terrain, the slower
your speed should be.
RDrive slowly and at an even speed through the
water. Ensure that a bow wave does not form
as you drive.
ROn sand, drive quickly to overcome the rolling resistance. Otherwise the vehicle's wheels
could become st
uck in loose ground.
RDo not jump with the vehicle as this will inter-
rupt the vehicle's propulsion.
RAvoid high engine speeds. Drive at appropri-
ate engine speeds (maximum 3,000 rpm).
RDo not shift the automatic transmission to
transmission position N.
RAlways check the vehicle for damage after off-
road driving.
iInformation about retrofitting special all-ter-
rain tires is available from any qualified spe-
cialist workshop.
iDo not use the HOLD function when driving
off-road, on steep uphill or downhill gradients
or on slippery or loose surfaces. The HOLD
function cannot hold the vehicle on such sur-
faces.
Checklist before driving off-road
!If the engine oil warning lamp lights up while
the vehicle is in motion, stop the vehicle in a
safe place as soon as possible. Check the
engine oil level. The engine oil warning lamp
warning must not be ignored. Continuing the
journey while the symbol is displayed could
lead to engine damage.
XOil level: check the engine oil level and add oil
if necessary.
Only then does the engine receive enough oil when the vehicle is on a steep incline.
XTire-changing tool kit: check that the jack is
working and make sure you have the lug
wrench, a robust tow cable and a folding
spade in the vehicle.
XWheels and tires: check the tire tread depth
and tire pressure.
XCheck for damage and remove any foreign
objects, e.g. small stones, from the wheels/
tires.
XReplace any missing valve caps.
138Driving tips
Driving and parking
Page 141 of 302

XReplacedente dor damaged wheels.
XCarr y asoun dspar ewheel.
Checklist after driving off-road
Drivin gove rroug hterrain places greate r
demand son your vehicl ethan driving on normal
roads. Afte rdriving off-road, chec kth evehicle.
This allows you to detec tdamag epromptly and
reduce th eris kof an acciden tto yourself and
other road users.
XShift th etransfer cas eto HIG H
RANGE (Ypage 162).
XDisengage th edifferential locks
(Ypage 166).
XClean th eheadlamps and rear lights and
chec kfor damage.
XClean th efron tand rear license plates.
XClean th ewheels and tires wit h awater je t
and remove any foreign objects .
XClean thewheels, tires ,whee lhousing sand
th evehicl eunderside wit h awater jet; chec k
for any foreign objects and damage.
XChec kwhether twigs or other part sof plants
hav ebecome trapped .These increas eth eris k
of fir eand can damag efuel pipes ,brak e
hoses or th erubber bellows of th eaxl ejoint s
and propelle rshafts .
XAfterth etrip, examin ewithout fail th eentire
undercarriage, wheels, tires ,brakes, body-
wor kstructure, steering ,chassi sand exhaust
system for damage.
XAfte rdriving for extended periods across
sand, mud, gravel, water or in similarl ydirt y
conditions, hav eth ebrak ediscs, wheels,
brak epads/lining sand axl ejoint schecke d
and clea
ned.
XIf you notice stron
gvibration safter off-road
driving ,chec kfor foreign objects in th e
wheels and driv etrain and ,if necessary,
remove them.
Foreign objects can disturb th ebalance and
caus evibrations.
XTes tth ebrakes.
Driving on sand
Observ eth efollowin grule swhen driving on
sand:
RShift th etransfer cas eto LOW
RANGE (Ypage 162).
RAvoid high engin espeeds.
RLimit th eshif trange of th eautomatic trans -
mission according to th eoff-road conditions.
RDrive quickly to overcome th erollin gresist -
ance. Otherwise th evehicle's wheels could
become stuck in loos eground .
RDrive in th etrack sof other vehicles if possi-
ble. When doin gso, mak esur ethat:
-th etire rut sare no tto odeep .
-thesan dis sufficientl yfirm.
-your vehicl ehas sufficien tground clear-
anc e
Tire ruts and gravel roads
!Chec kthat th erut sare no tto odeep and
that your vehicl ehas sufficien tclearance .
Otherwise, your vehicl ecould be damaged or
botto mout and get stuck .
Observ eth efollowin grule swhen driving alon g
rut sin off-road terrain or on road swit hloos e
gravel:
RShift th etransfer cas eto LOW
RANGE (Ypage 162).
RAvoid high engin espeeds.
RObserv eth esafet ynote s (Ypage 137) and
th egeneral note s (Ypage 137) on off-road
driving .
RRestric tth eshif trange of th eautomatic
transmission to 1(Ypage 123).
RDrive slowly.
RWhererut sare to odeep ,driv ewit hth e
wheels of on eside on th ecenter grassy area,
if possible.
Driving over obstacles
!Obstacles could damag eth efloor of th e
vehicl eor component sof th echassis. As k
passenger sfor guidance when driving ove r
larg eobstacles. The passenger should always
keep asaf edistanc efrom th evehicl ewhen
doin gso in order to avoi dinjury as aresult of
unexpecte dvehicl emovements. Afte rdriving
off-road or ove robstacles, chec kth evehicl e
Driving tips139
Driving and parking
Z