2016 MERCEDES-BENZ G-Class ESP
[x] Cancel search: ESPPage 58 of 302

GWARNING
If the ABS malfunctions, other driving systems such as the BAS or the ESP
®are also switched
off. Observe indicator and warning lamps that may come on as well as messages in the mul-
tifunction display that may appear.
If the ABS malfunctions, the wheels may lock
during hard braking, reducing the steering
capability and extending the braking distance.
GWARNING
If ABS is faulty, the wheels could lock when
braking. The steerability and braking charac-
teristics may be severely impaired. Addition-
ally, further driving safety systems are deac-
tivated. There is an increased danger of skid-
ding and accidents.
Drive on carefully. Have ABS checked imme-
diately at a qualified specialist workshop.
ABS regulates brake pressure in such a way that
the wheels do not lock when you brake. This
allows you to continue steering the vehicle when
braking.
Provided that the differential locks are not
active, ABS works from a speed of approx-
imately 5 mph (8 km/h) upwards, regardless of
road-surface conditions. ABS works on slippery
surfaces, even if you only brake gently.
The yellow !ABS warning lamp in the instru-
ment cluster lights up when the ignition is
switched on. It goes out when the engine is run-
ning.
Braking
If ABS intervenes when braking, you will feel a
pulsing in the brake pedal.
XIf ABS intervenes: continue to depress the
brake pedal vigorously until the braking sit-
uation is over.
XTo make a full brake application: depress
the brake pedal with full force.
The pulsating brake pedal can be an indication
of hazardous road conditions, and functions as a
reminder to take extra care while driving.
Off-road ABS
An ESP®system specifically suited to off-road
terrain is activated automatically once the off-
road program is activated.
At speeds below 37 mph (60 km/h), the front
wheels lock cyclically during braking. The dig-
ging-in effect achieved in the process reduces
the stopping distance on off-road terrain. This
limits steering capability.
BAS (Brake Assist System)
i
Observe the "Important safety notes" sec-
tion (Ypage 55).
GWARNING
If BAS is malfunctioning, the braking distance
in an emergency braking situation is
increased. There is a risk of an accident.
In an emergency braking situation, depress
the brake pedal with full force. ABS prevents
the wheels from locking.
BAS operates in emergency braking situations.
If you depress the brake pedal quickly, BAS
automatically boosts the braking force, thus
shortening the stopping distance.
XKeep the brake pedal firmly depressed until
the emergency braking situation is over.
ABS prevents the wheels from locking.
The brakes will function as usual once you
release the brake pedal. BAS is deactivated.
Adaptive brake lights
If you brake sharply from a speed of more than
30 mph (50 km/h) or if braking is assisted by
BAS, the brake lamps flash rapidly. In this way,
traffic traveling behind you is warned in an even
more noticeable manner.
If you brake sharply from a speed of more than
45 mph (70 km/h) to a standstill, the hazard
warning lamps are activated automatically. If
the brakes are applied again, the brake lamps
light up continuously. The hazard warning lamps
are deactivated automatically if you drive faster
than 6 mph (10 km/h). You can also switch off
the hazard warning lamps using the hazard
warning button (
Ypage 89).
56Driving safety systems
Safety
Page 59 of 302

ESP®(Electronic Stability Program)
Important safety notes
iObserve the "Important safety notes" sec-
tion (Ypage 55).
GWARNING
If ESP
®is malfunctioning, ESP®is unable to
stabilize the vehicle. Additionally, further driv-
ing safety systems are deactivated. This
increases the risk of skidding and an accident.
Drive on carefully. Have ESP
®checked at a
qualified specialist workshop.
!Only operate the vehicle for a maximum of
ten seconds on a brake test dynamometer.
Switch off the ignition.
Application of the brakes by ESP
®may oth-
erwise destroy the brake system.
!A function or performance test should only
be carried out on a two-axle dynamometer.
Before you operate the vehicle on such a
dynamometer, please consult a qualified
workshop. You could otherwise damage the
drive train or the brake system.
ESP
®monitors the driving stability and the trac-
tion. Traction is the power transmission
between the tires and the road surface.
ESP
®is deactivated if the åwarning lamp in
the instrument cluster lights up continuously
when the engine is running.
If the ÷ warning lamp and the åwarning
lamp are lit continuously, ESP
®is not available
due to a malfunction.
Observe the information on warning lamps
(
Ypage 207) and display messages which may
be displayed in the instrument cluster
(
Ypage 185).
If ESP®detects that the vehicle is deviating from
the direction desired by the driver, one or more
wheels are braked to stabilize the vehicle. If
necessary, the engine output is also modified to keep the vehicle on the desired course within
physical limits. ESP
®assists the driver when
pulling away on wet or slippery roads. ESP®can
also stabilize the vehicle during braking.
If ESP
®intervenes, the ÷warning lamp
flashes in the instrument cluster. If ESP
®intervenes:
XDo not deactivate ESP®under any circum-
stances.
XOnly depress the accelerator pedal as far as
necessary when pulling away.
XAdapt your driving style to suit the prevailing
road and weather conditions.
iOnly use wheels with the recommended tire
sizes. Only then will ESP®function properly.
iIf differential locks are switched on, ABS,
BAS and ESP®switch off automatically.
4ETS (Electronic Traction System)
Traction control remains active, even if you
deactivate ESP®.
XIf appropriate for the driving conditions,
engage the LOW RANGE off-road gear
(
Ypage 162).
Traction control is part of ESP
®.
Traction control brakes the drive wheels indi-
vidually if they spin. This enables you to pull
away and accelerate on slippery surfaces, for
example if the road surface is slippery on one
side. In addition, more drive torque is transfer-
red to the wheel or wheels with traction.
Traction control remains active, even if you
deactivate ESP
®.
Traction control is no longer active above a
speed of approximately 37 mph (60 km/h).
Traction control brakes the drive wheels indi-
vidually if they spin. This enables you to pull
away and accelerate on slippery surfaces, for
example if the road surface is slippery on one
side. In addition, more drive torque is transfer-
red to the wheel or wheels with traction.
Deactivating/activating ESP®
GWARNING
If you deactivate ESP
®, ESP®no longer sta-
bilizes the vehicle. There is an increased risk
of skidding and an accident.
Only deactivate ESP
®in the situations descri-
bed in the following.
!Avoid spinning the driven wheels for an
extended period with ESP®deactivated. You
could otherwise damage the drivetrain.
Driving safety systems57
Safety
Z
Page 60 of 302

XTo deactivate:press button:until the
å warning lamp lights up in the instrument
cluster.
XTo activate: press button :until the å
warning lamp goes out in the instrument clus-
ter.
ESP
®is activated automatically when the engine
is started.
iVehicles with the ECO start/stop func-
tion: the ECO start/stop function automati-
cally switches the engine off when the vehicle comes to a stop. The engine starts automati-
cally when the driver wants to pull away again.
ESP
®remains in its previously selected sta-
tus. For example, if ESP®was deactivated
before the engine was switched off, ESP®
remains deactivated when the engine is
switched on again.
It may be best to deactivate ESP
®in the follow-
ing situations:
Rwhen using snow chains
Rin deep snow
Ron sand or gravel
If you deactivate ESP®:
RESP®no longer improves driving stability.
Rthe engine's torque is no longer limited and
the drive wheels can spin. The spinning of the wheels results in a cutting action, which pro-
vides better grip.
Rtraction control is still activated.
RESP®still provides support when you brake.
Rand are driving at above 37 mph (60 km/h)
(on AMG vehicles above 62 mph (100 km/h)),
ESP
®still intervenes when one wheel reaches
its grip limit even though it is deactivated.
iIf ESP®is deactivated and one or more
wheels start to spin, the ÷warning lamp in the instrument cluster flashes. In such situa-
tions, ESP
®will not stabilize the vehicle.
iIf ESP®is deactivated, it is reactivated auto-
matically if you are driving at above 37 mph
(60 km/h) (on AMG vehicles above 62 mph
(100 km/h)) or you exceed a certain lateral
acceleration.
Trailer stabilization
GWARNING
If road and weather conditions are poor,
trailer stabilization will not be able to prevent
the vehicle/trailer combination from swerv-
ing. Trailers with a high center of gravity can
tip over before ESP
®can detect this. There is
a risk of an accident.
Always adapt your driving style to the prevail-
ing road and weather conditions.
Trailer stabilization does not work if ESP
®is
deactivated because of a malfunction.
If your vehicle with trailer (vehicle/trailer com-
bination) begins to lurch, you can only stabilize
the vehicle/trailer combination by depressing
the brake firmly.
In this situation, ESP
®assists you and can
detect if the vehicle/trailer combination begins
to lurch. ESP
®slows the vehicle down by brak-
ing and limiting the engine output until the vehi-
cle/trailer combination has stabilized.
Trailer stabilization is active above speeds of
about 37 mph (60 km/h).
EBD (electronic brake force distribu-
tion)
i
Observe the "Important safety notes" sec-
tion (Ypage 55).
GWARNING
If EBD is malfunctioning, the rear wheels can
lock, e.g. under full braking. This increases the
risk of skidding and an accident.
You should therefore adapt your driving style
to the different handling characteristics. Have
the brake system checked at a qualified spe-
cialist workshop.
58Driving safety systems
Safety
Page 70 of 302

Closing
XPush the rear door closed from outside the
vehicle.
XIf necessary, lock the vehicle with the&
button on the SmartKey.
Side windows
Important safety notes
GWARNING
While closing the side windows, body parts in
the closing area could become trapped. There is a risk of injury.
When closing make sure that no parts of the
body are in the closing area. If somebody
becomes trapped, release the switch or press
the switch to open the side window again.
GWARNING
While opening the side windows, body parts
could become trapped between the side win-
dow and the door frame as the side window
moves. There is a risk of injury.
Make sure that nobody touches the side win-
dow during the opening procedure. If some-
body becomes trapped, release the switch or
pull the switch to close the side window again.
Opening and closing the side win-
dows
The switches for all side windows are located on
the driver's door. There is also a switch on each
door for the corresponding side window.
The switches on the driver's door take prece-
dence.
The side windows cannot be operated from the
rear when the override feature for the side win-
dows is activated (
Ypage 54).
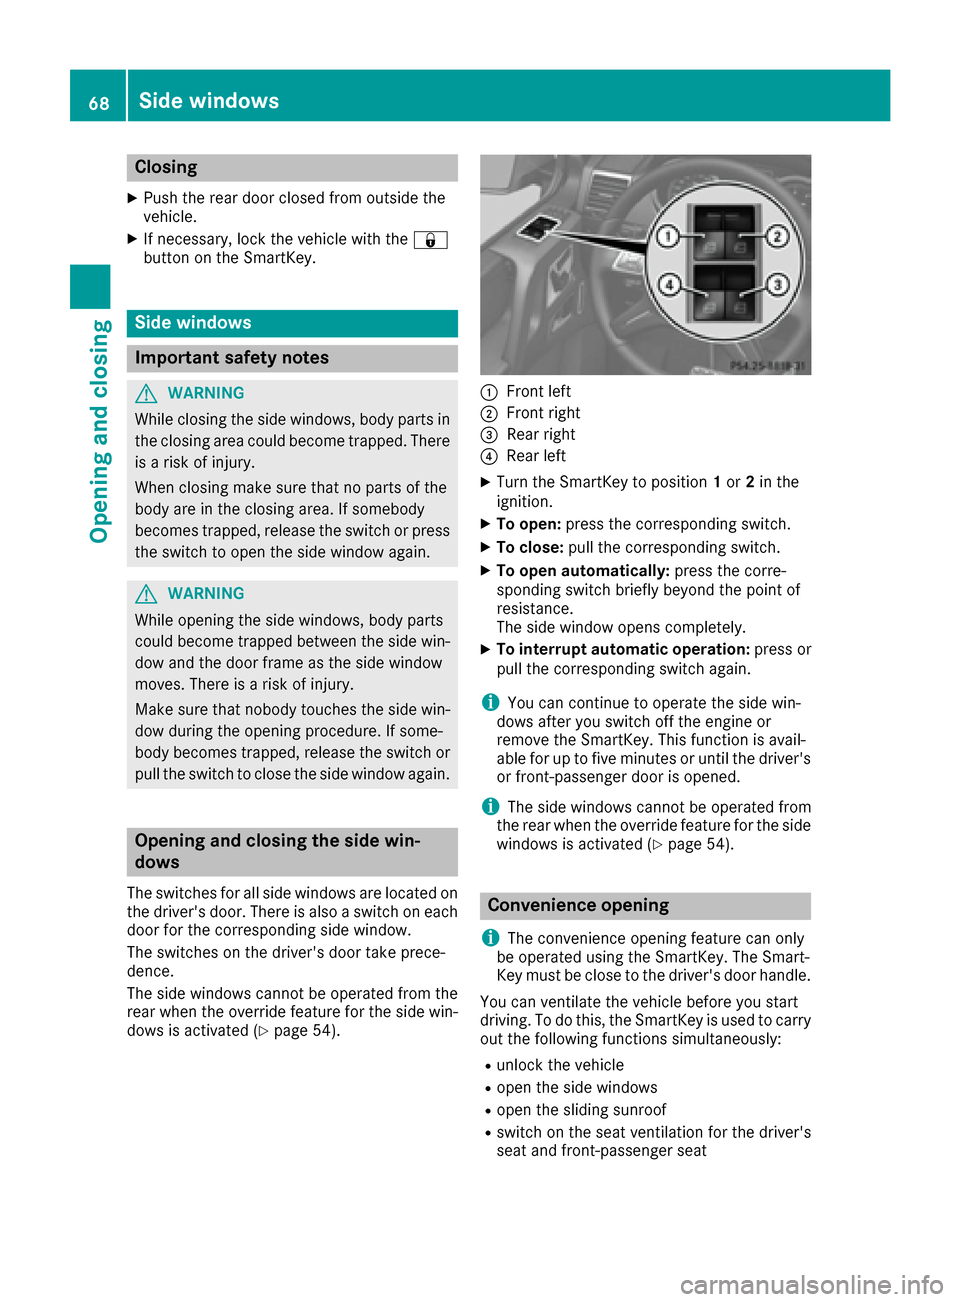
:Front left
;Front right
=Rear right
?Rear left
XTurn the SmartKey to position 1or 2in the
ignition.
XTo open: press the corresponding switch.
XTo close: pull the corresponding switch.
XTo open automatically: press the corre-
sponding switch briefly beyond the point of
resistance.
The side window opens completely.
XTo interrupt automatic operation: press or
pull the corresponding switch again.
iYou can continue to operate the side win-
dows after you switch off the engine or
remove the SmartKey. This function is avail-
able for up to five minutes or until the driver's
or front-passenger door is opened.
iThe side windows cannot be operated from
the rear when the override feature for the side windows is activated (
Ypage 54).
Convenience opening
i
The convenience opening feature can only
be operated using the SmartKey. The Smart-
Key must be close to the driver's door handle.
You can ventilate the vehicle before you start
driving. To do this, the SmartKey is used to carry
out the following functions simultaneously:
Runlock the vehicle
Ropen the side windows
Ropen the sliding sunroof
Rswitch on the seat ventilation for the driver's
seat and front-passenger seat
68Side windows
Opening and closing
Page 71 of 302

XPoint the tip of the SmartKey at the driver's
door handle.
XPress and hold the%button until the side
windows and the sliding sunroof are in the
desired position.
XTo interrupt convenience opening: release
the % button.
Convenience closing feature
Important safety notes
GWARNING
When the convenience closing feature is oper- ating, parts of the body could become trapped
in the closing area of the side window and the
sliding sunroof. There is a risk of injury.
Observe the complete closing procedure
when the convenience closing feature is oper-
ating. Make sure that no body parts are in
close proximity during the closing procedure.
Operation
iThe "convenience closing feature" can only
be operated using the key. The SmartKey
must be close to the driver's door handle.
When you lock the vehicle, you can simultane-
ously:
Rclose the side windows
Rclose the sliding sunroof
XPoint the tip of the SmartKey at the driver's
door handle.
XPress and hold the &button until the side
windows and the sliding sunroof are fully
closed.
XMake sure that all the side windows and the
sliding sunroof are closed.
XTo interrupt convenience closing: release
the & button.
Problems with the side windows
GWARNING
Closing the side windows with increased force
or without the anti-entrapment feature could
lead to serious or even fatal injury. Make sure
that nobody can become trapped when clos-
ing the side windows.
Problem: a side window cannot be closed
because objects are trapped between the
side window and the door frame.
XRemove the objects.
XClose the side window.
Problem: a side window cannot be closed
and you cannot see the cause.
If a side window is obstructed during closing and
reopens again slightly:
XImmediately after the window blocks, pull the
corresponding switch again until the side win-
dow has closed.
If a side window is obstructed again during clos-
ing and reopens again slightly:
XImmediately after the window blocks, pull the
corresponding switch again until the side win-
dow has closed.
iIf a side window no longer opens or closes
due to a malfunction, contact a qualified spe-
cialist workshop.
Sliding sunroof
Important safety notes
!
Only open the sliding sunroof if it is free of
snow and ice. Otherwise, malfunctions may
occur.
Do not allow anything to protrude from the
sliding sunroof. Otherwise, the seals could be
damaged.
!If the sliding sunroof still cannot be opened
or closed as a result of a malfunction, contact
a qualified specialist workshop.
!The weather can change abruptly. It could
start to rain or snow. Make sure that the slid- ing sunroof is closed when you leave the vehi-
cle. The vehicle electronics can be damaged if
water enters the vehicle interior.
iResonance noises can occur in addition to
the usual airflow noises when the sliding sun- roof is open. They are caused by minor pres-
sure fluctuations in the vehicle interior.
Change the position of the sliding sunroof or
open a side window slightly to reduce or elim-
inate these noises.
Sliding sunroof69
Opening and closing
Z
Page 85 of 302

pants – particularly children – could become
trapped. There is a risk of injury.
While the memory function is making adjust-
ments, make sure that no one has any body
parts in the sweep of the seat or steering
wheel. If somebody becomes trapped, imme-diately release the memory function position
button. The adjustment process is stopped.
GWARNING
Children could become trapped if they acti-
vate the memory function, particularly when
unattended. There is a risk of injury.
When leaving the vehicle, always take the
SmartKey with you and lock the vehicle. Never
leave children unsupervised in the vehicle.
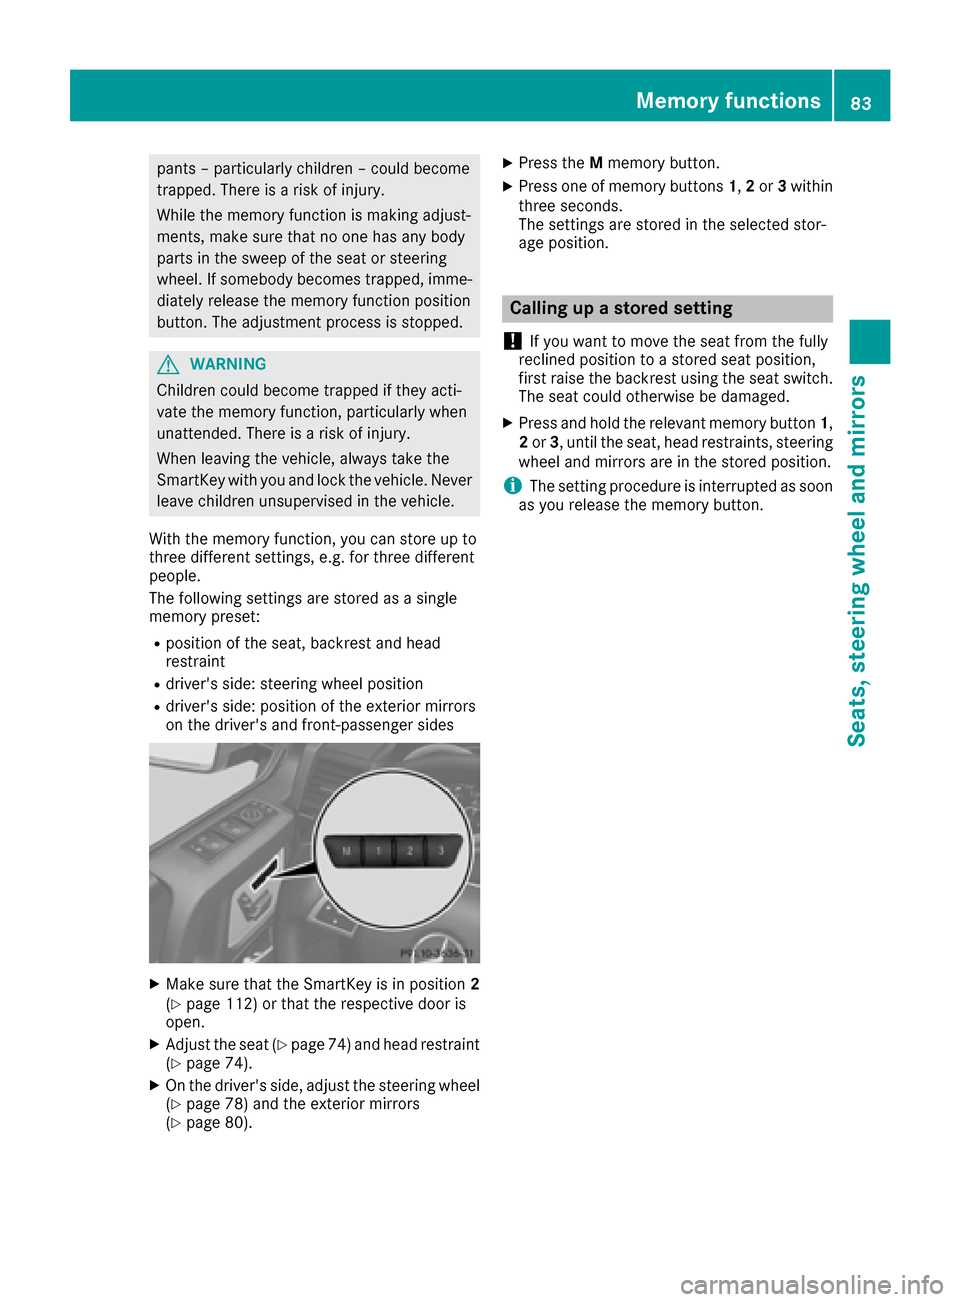
With the memory function, you can store up to
three different settings, e.g. for three different
people.
The following settings are stored as a single
memory preset:
Rposition of the seat, backrest and head
restraint
Rdriver's side: steering wheel position
Rdriver's side: position of the exterior mirrors
on the driver's and front-passenger sides
XMake sure that the SmartKey is in position 2
(Ypage 112) or that the respective door is
open.
XAdjust the seat (Ypage 74) and head restraint
(Ypage 74).
XOn the driver's side, adjust the steering wheel (Ypage 78) and the exterior mirrors
(Ypage 80).
XPress the Mmemory button.
XPress one of memory buttons 1,2or 3within
three seconds.
The settings are stored in the selected stor-
age position.
Calling up a stored setting
!
If you want to move the seat from the fully
reclined position to a stored seat position,
first raise the backrest using the seat switch.
The seat could otherwise be damaged.
XPress and hold the relevant memory button 1,
2 or 3, until the seat, head restraints, steering
wheel and mirrors are in the stored position.
iThe setting procedure is interrupted as soon
as you release the memory button.
Memory functions83
Seats, steering wheel and mirrors
Z
Page 88 of 302

conditions such as spray. There is a risk of an
accident.
In such situations, turn the light switch to
L.
The automatic headlamp feature is only an aid.
The driver is responsible for the vehicle's light-
ing at all times.
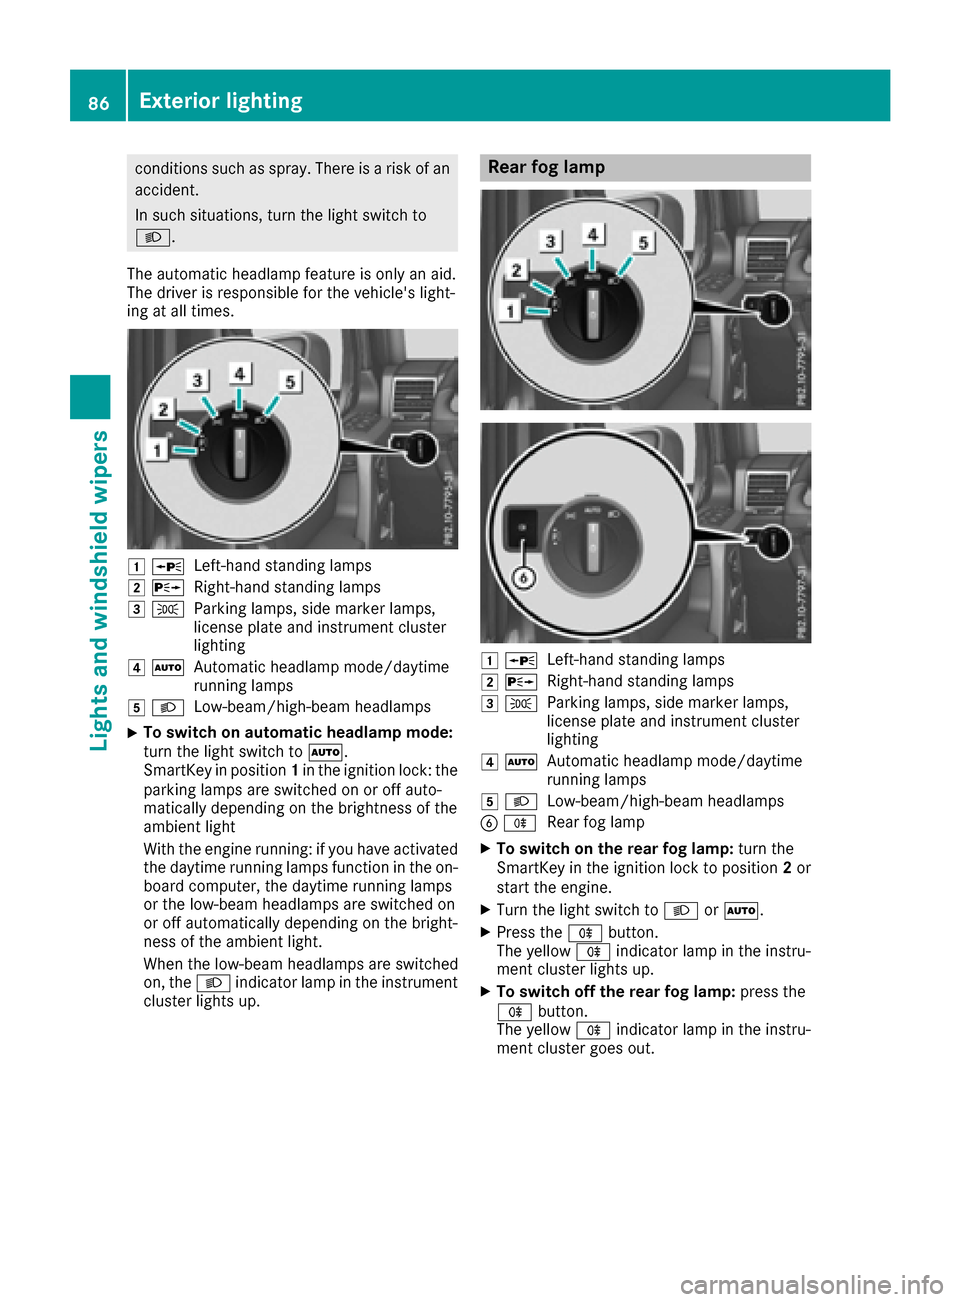
1 WLeft-hand standing lamps
2XRight-hand standing lamps
3TParking lamps, side marker lamps,
license plate and instrument cluster
lighting
4ÃAutomatic headlamp mode/daytime
running lamps
5LLow-beam/high-beam headlamps
XTo switch on automatic headlamp mode:
turn the light switch to Ã.
SmartKey in position 1in the ignition lock: the
parking lamps are switched on or off auto-
matically depending on the brightness of the
ambient light
With the engine running: if you have activated
the daytime running lamps function in the on-
board computer, the daytime running lamps
or the low-beam headlamps are switched on
or off automatically depending on the bright-
ness of the ambient light.
When the low-beam headlamps are switched
on, the Lindicator lamp in the instrument
cluster lights up.
Rear fog lamp
1 WLeft-hand standing lamps
2XRight-hand standing lamps
3TParking lamps, side marker lamps,
license plate and instrument cluster
lighting
4ÃAutomatic headlamp mode/daytime
running lamps
5LLow-beam/high-beam headlamps
BRRear fog lamp
XTo switch on the rear fog lamp: turn the
SmartKey in the ignition lock to position 2or
start the engine.
XTurn the light switch to LorÃ.
XPress the Rbutton.
The yellow Rindicator lamp in the instru-
ment cluster lights up.
XTo switch off the rear fog lamp: press the
R button.
The yellow Rindicator lamp in the instru-
ment cluster goes out.
86Exterior lighting
Lights and windshield wipers
Page 89 of 302

Parking lamps
1WLeft-hand standing lamps
2XRight-hand standing lamps
3TParking lamps, side marker lamps,
license plate and instrument cluster
lighting
4ÃAutomatic headlamp mode/daytime
running lamps
5LLow-beam/high-beam headlamps
BRRear fog lamp
XTo switch on: turn the light switch to T.
Standing lamps
1WLeft-hand standing lamps
2XRight-hand standing lamps
3TParking lamps, side marker lamps,
license plate and instrument cluster
lighting
4ÃAutomatic headlamp mode/daytime
running lamps
5LLow-beam/high-beam headlamps
BRRear fog lamp
Switching on the standing lamps ensures the
corresponding side of the vehicle is illuminated.
XTo switch on the standing lamps: the
SmartKey should not be in the ignition lock or
it should be in position 0(
Ypage 112).
XTurn the light switch to W(left-hand side of
the vehicle) or X(right-hand side of the
vehicle).
Headlamp cleaning system
The headlamps are cleaned automatically if the
"Wipe with washer fluid" function is operated
ten times while the lights are on and the engine
is running (
Ypage 96). When you switch off
Exterior lighting87
Lights and windshield wipers
Z