2016 MERCEDES-BENZ G-Class warning
[x] Cancel search: warningPage 217 of 302
Observe the following notes when transporting
a load:
RPosition heavy loads as far forwards as pos-
sible and as low down in the cargo compart-
ment as possible.
iTransport loads when possible in the cargo
compartment. You should only use the cargo
compartment enlargement if the load does
not fit in the cargo compartment.
RAlways place the load against the backrests of
the front seats or rear seats.
RUse the cargo tie-down rings and the parcel
nets to transport loads and luggage.
RUse cargo tie-down rings and fastening mate-
rials appropriate for the weight and size of the load.
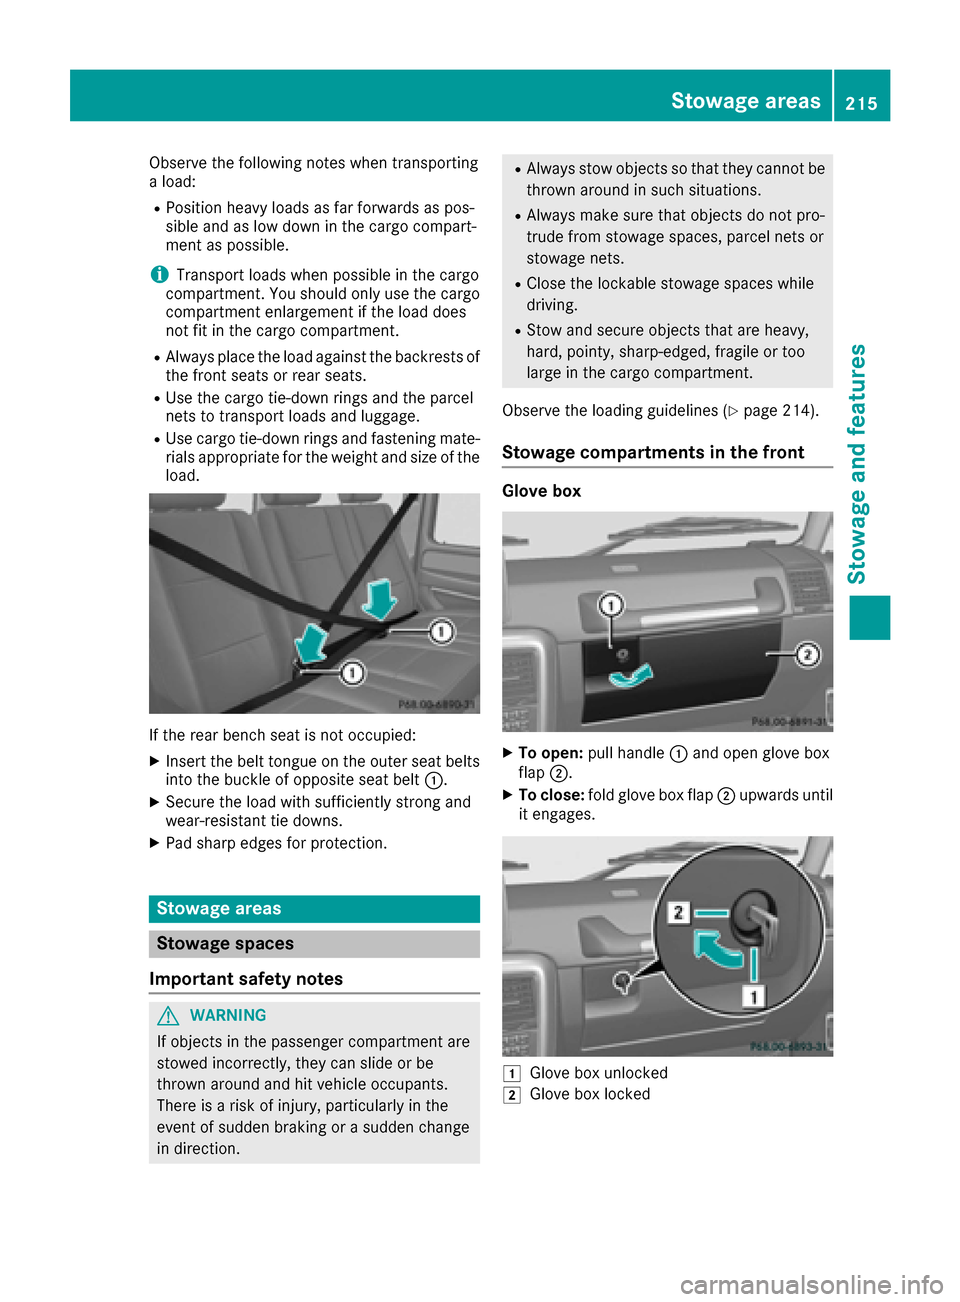
If the rear bench seat is not occupied:
XInsert the belt tongue on the outer seat belts
into the buckle of opposite seat belt :.
XSecure the load with sufficiently strong and
wear-resistant tie downs.
XPad sharp edges for protection.
Stowage areas
Stowage spaces
Important safety notes
GWARNING
If objects in the passenger compartment are
stowed incorrectly, they can slide or be
thrown around and hit vehicle occupants.
There is a risk of injury, particularly in the
event of sudden braking or a sudden change
in direction.
RAlways stow objects so that they cannot be
thrown around in such situations.
RAlways make sure that objects do not pro-
trude from stowage spaces, parcel nets or
stowage nets.
RClose the lockable stowage spaces while
driving.
RStow and secure objects that are heavy,
hard, pointy, sharp-edged, fragile or too
large in the cargo compartment.
Observe the loading guidelines (
Ypage 214).
Stowage compartments in the front
Glove box
XTo open: pull handle :and open glove box
flap ;.
XTo close: fold glove box flap ;upwards until
it engages.
1Glove box unlocked
2Glove box locked
Stowage areas215
Stowage and features
Z
Page 218 of 302
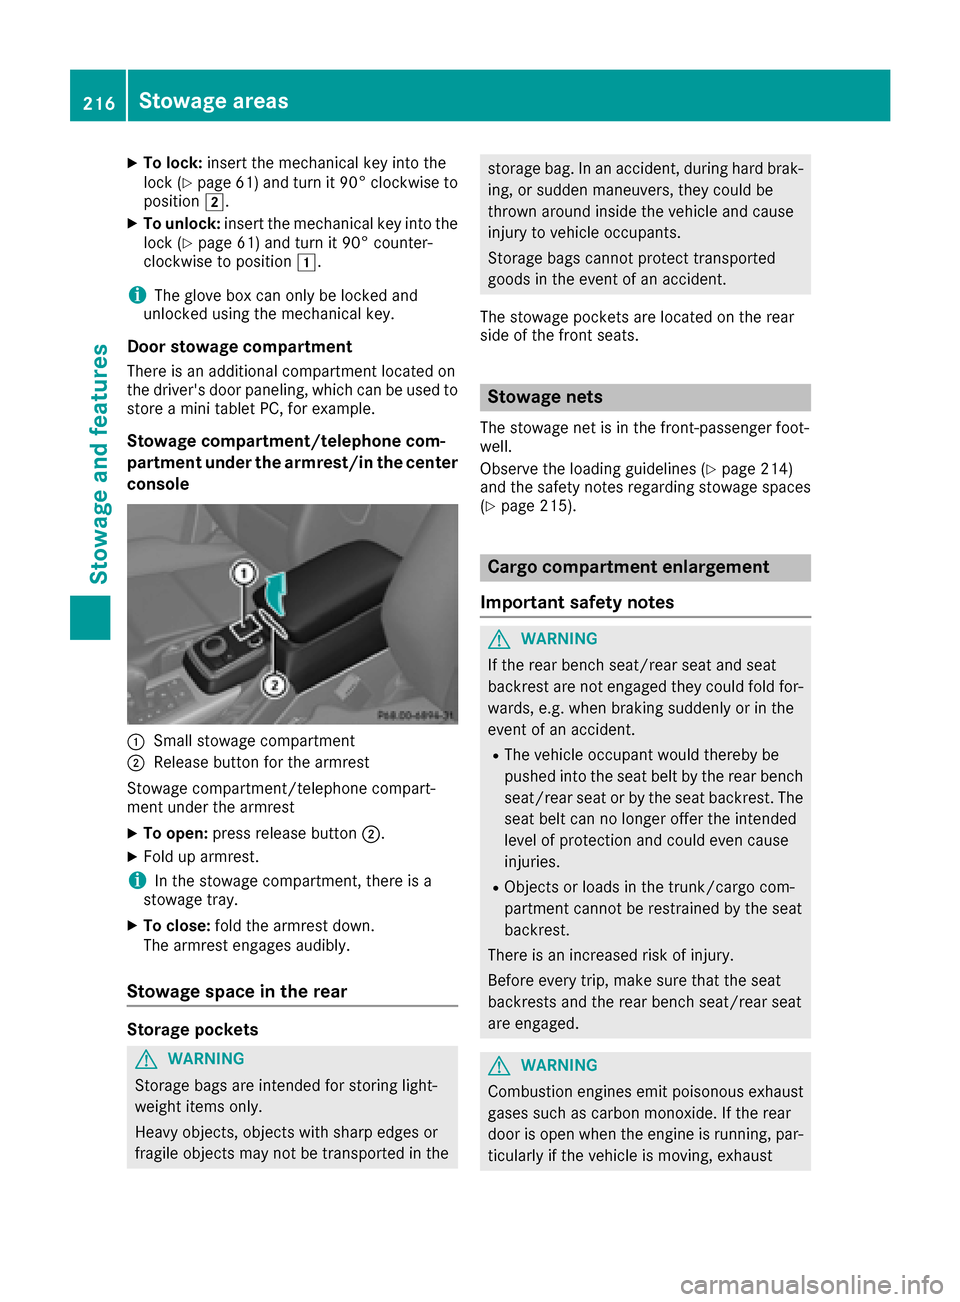
XTo lock:insert the mechanical key into the
lock (Ypage 61) and turn it 90° clockwise to
position 2.
XTo unlock: insert the mechanical key into the
lock (Ypage 61) and turn it 90° counter-
clockwise to position 1.
iThe glove box can only be locked and
unlocked using the mechanical key.
Door stowage compartment
There is an additional compartment located on
the driver's door paneling, which can be used to
store a mini tablet PC, for example.
Stowage compartment/telephone com-
partment under the armrest/in the center
console
:Small stowage compartment
;Release button for the armrest
Stowage compartment/telephone compart-
ment under the armrest
XTo open: press release button ;.
XFold up armrest.
iIn the stowage compartment, there is a
stowage tray.
XTo close: fold the armrest down.
The armrest engages audibly.
Stowage space in the rear
Storage pockets
GWARNING
Storage bags are intended for storing light-
weight items only.
Heavy objects, objects with sharp edges or
fragile objects may not be transported in the
storage bag. In an accident, during hard brak-
ing, or sudden maneuvers, they could be
thrown around inside the vehicle and cause
injury to vehicle occupants.
Storage bags cannot protect transported
goods in the event of an accident.
The stowage pockets are located on the rear
side of the front seats.
Stowage nets
The stowage net is in the front-passenger foot-
well.
Observe the loading guidelines (
Ypage 214)
and the safety notes regarding stowage spaces
(
Ypage 215).
Cargo compartment enlargement
Important safety notes
GWARNING
If the rear bench seat/rear seat and seat
backrest are not engaged they could fold for-
wards, e.g. when braking suddenly or in the
event of an accident.
RThe vehicle occupant would thereby be
pushed into the seat belt by the rear bench
seat/rear seat or by the seat backrest. The
seat belt can no longer offer the intended
level of protection and could even cause
injuries.
RObjects or loads in the trunk/cargo com-
partment cannot be restrained by the seat
backrest.
There is an increased risk of injury.
Before every trip, make sure that the seat
backrests and the rear bench seat/rear seat
are engaged.
GWARNING
Combustion engines emit poisonous exhaust
gases such as carbon monoxide. If the rear
door is open when the engine is running, par-
ticularly if the vehicle is moving, exhaust
216Stowage areas
Stowag ean d features
Page 220 of 302
Rear bench seat
Folding the rear bench seat forward
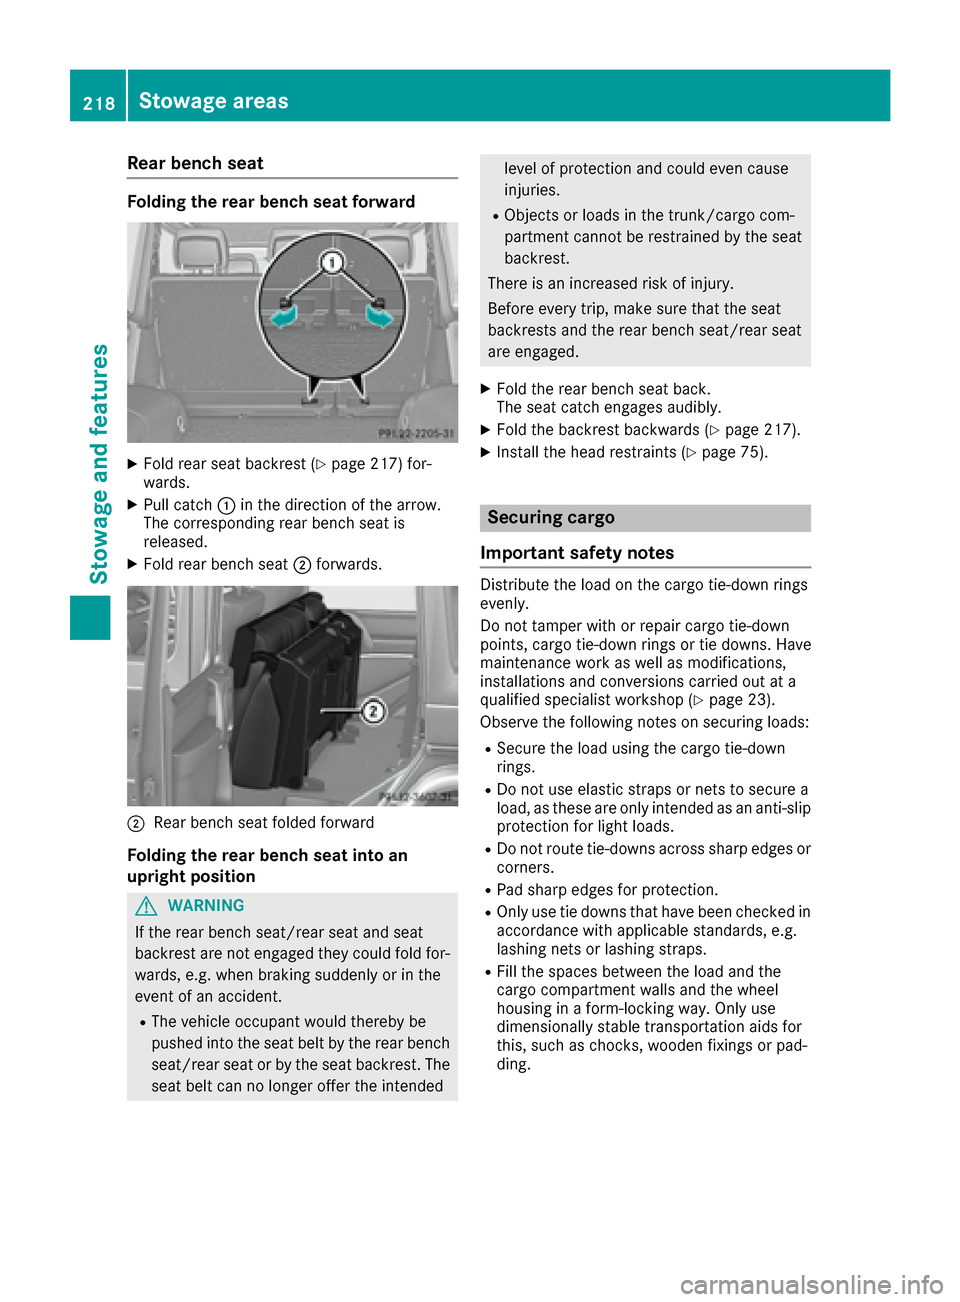
XFold rear seat backrest (Ypage 217) for-
wards.
XPull catch :in the direction of the arrow.
The corresponding rear bench seat is
released.
XFold rear bench seat ;forwards.
;Rear bench seat folded forward
Folding the rear bench seat into an
upright position
GWARNING
If the rear bench seat/rear seat and seat
backrest are not engaged they could fold for-
wards, e.g. when braking suddenly or in the
event of an accident.
RThe vehicle occupant would thereby be
pushed into the seat belt by the rear bench
seat/rear seat or by the seat backrest. The
seat belt can no longer offer the intended
level of protection and could even cause
injuries.
RObjects or loads in the trunk/cargo com-
partment cannot be restrained by the seat
backrest.
There is an increased risk of injury.
Before every trip, make sure that the seat
backrests and the rear bench seat/rear seat
are engaged.
XFold the rear bench seat back.
The seat catch engages audibly.
XFold the backrest backwards (Ypage 217).
XInstall the head restraints (Ypage 75).
Securing cargo
Important safety notes
Distribute the load on the cargo tie-down rings
evenly.
Do not tamper with or repair cargo tie-down
points, cargo tie-down rings or tie downs. Have
maintenance work as well as modifications,
installations and conversions carried out at a
qualified specialist workshop (
Ypage 23).
Observe the following notes on securing loads:
RSecure the load using the cargo tie-down
rings.
RDo not use elastic straps or nets to secure a
load, as these are only intended as an anti-slip
protection for light loads.
RDo not route tie-downs across sharp edges or
corners.
RPad sharp edges for protection.
ROnly use tie downs that have been checked in
accordance with applicable standards, e.g.
lashing nets or lashing straps.
RFill the spaces between the load and the
cargo compartment walls and the wheel
housing in a form-locking way. Only use
dimensionally stable transportation aids for
this, such as chocks, wooden fixings or pad-
ding.
218Stowage areas
Stowage and features
Page 221 of 302
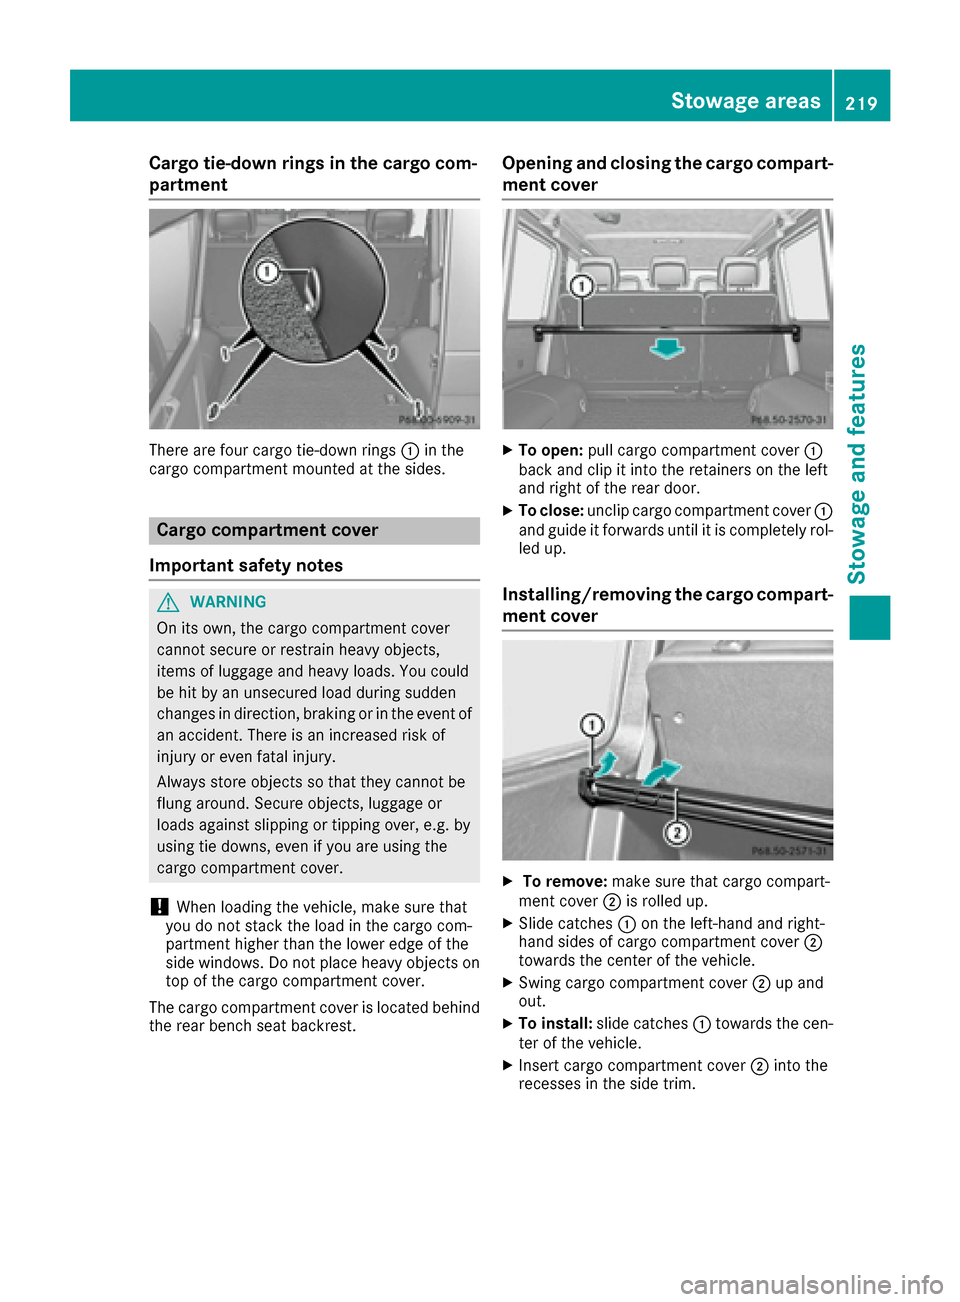
Cargo tie-down rings in the cargo com-
partment
There are four cargo tie-down rings:in the
cargo compartment mounted at the sides.
Cargo compartment cover
Important safety notes
GWARNING
On its own, the cargo compartment cover
cannot secure or restrain heavy objects,
items of luggage and heavy loads. You could
be hit by an unsecured load during sudden
changes in direction, braking or in the event of
an accident. There is an increased risk of
injury or even fatal injury.
Always store objects so that they cannot be
flung around. Secure objects, luggage or
loads against slipping or tipping over, e.g. by
using tie downs, even if you are using the
cargo compartment cover.
!When loading the vehicle, make sure that
you do not stack the load in the cargo com-
partment higher than the lower edge of the
side windows. Do not place heavy objects on
top of the cargo compartment cover.
The cargo compartment cover is located behind
the rear bench seat backrest.
Opening and closing the cargo compart- ment cover
XTo open: pull cargo compartment cover :
back and clip it into the retainers on the left
and right of the rear door.
XTo close: unclip cargo compartment cover :
and guide it forwards until it is completely rol-
led up.
Installing/removing the cargo compart-
ment cover
XTo remove: make sure that cargo compart-
ment cover ;is rolled up.
XSlide catches :on the left-hand and right-
hand sides of cargo compartment cover ;
towards the center of the vehicle.
XSwing cargo compartment cover ;up and
out.
XTo install: slide catches :towards the cen-
ter of the vehicle.
XInsert cargo compartment cover ;into the
recesses in the side trim.
Stowage areas219
Stowage and features
Z
Page 222 of 302
XPush down the right-hand and left-hand sides
of cargo compartment cover;until it
engages.
XSlide catches :in the direction of the side
trim.
Roof carrier
GWARNING
When you load the roof, the center of gravity
of the vehicle rises and the driving character-
istics change. If you exceed the maximum roof
load, the driving characteristics, as well as
steering and braking, will be greatly impaired.
There is a risk of an accident.
Never exceed the maximum roof load and
adjust your driving style.
The roof is not suited for transporting loads. Do
not use the roof rails or other accessories which
are mounted on the roof.
Features
Cup holder
Important safety notes
GWARNING
If you transport objects in the vehicle interior
and these are not adequately secured, they
could slip or be flung around and thereby
strike vehicle occupants. In addition, cup
holders, open stowage spaces and mobile
phone brackets may not always be able to
hold the objects placed in them in the event of
an accident. There is a risk of injury, particu-
larly in the event of sharp braking or sudden
changes of direction.
RAlways stow objects in such a way that they cannot be tossed about in these or similar
situations.
RAlways make sure that objects do not pro-
trude out of the stowage spaces, luggage
nets or stowage nets.
REnsure that closable stowage spaces are
shut before beginning your journey.
RAlways stow and secure heavy, hard, poin-
ted, sharp-edged, fragile or large objects in
the cargo compartment.
!Only use the cup holders for containers of
the right size and which have lids. The drinks could otherwise spill.
Observe the loading guidelines (
Ypage 214).
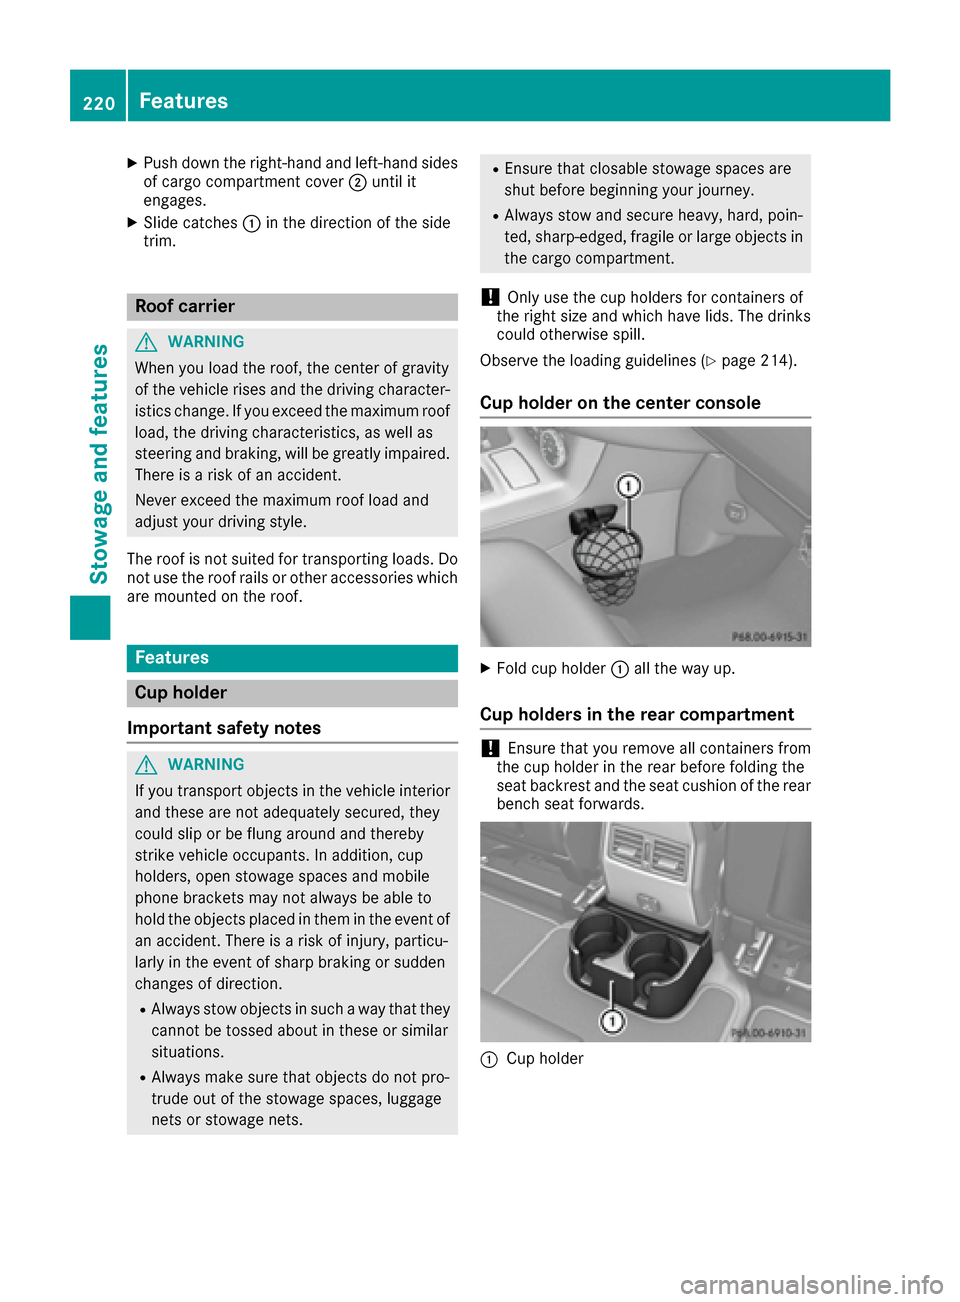
Cup holder on the center console
XFold cup holder :all the way up.
Cup holders in the rear compartment
!Ensure that you remove all containers from
the cup holder in the rear before folding the
seat backrest and the seat cushion of the rear
bench seat forwards.
:Cup holder
220Features
Stowage and features
Page 223 of 302
Sun visors
Overview
GWARNING
If the mirror cover of the vanity mirror is folded
up when the vehicle is in motion, you could be
blinded by incident light. There is a risk of an
accident.
Always keep the mirror cover folded down
while driving.
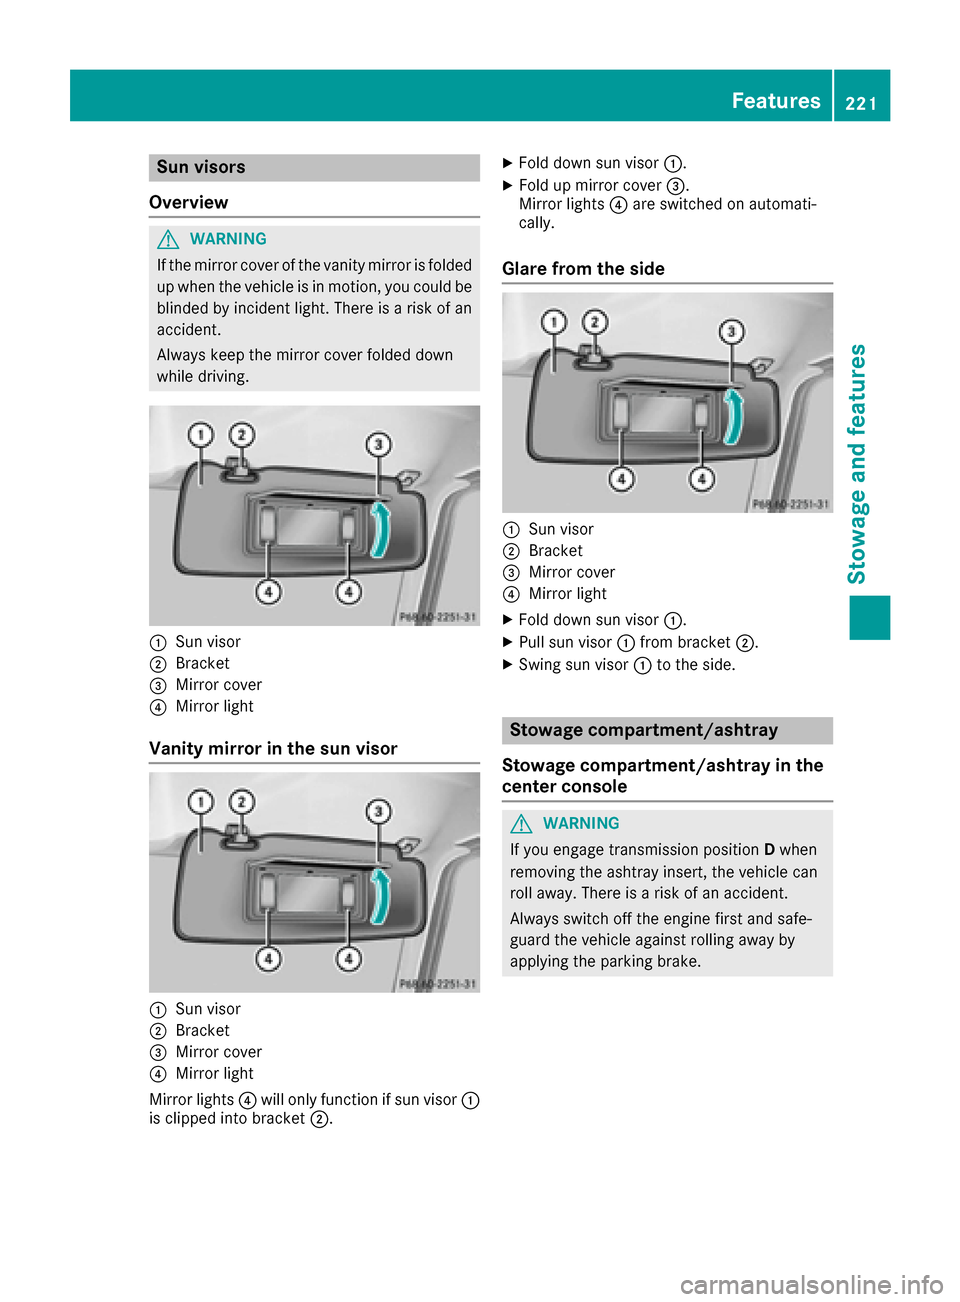
:Sun visor
;Bracket
=Mirror cover
?Mirror light
Vanity mirror in the sun visor
:Sun visor
;Bracket
=Mirror cover
?Mirror light
Mirror lights ?will only function if sun visor :
is clipped into bracket ;.
XFold down sun visor:.
XFold up mirror cover =.
Mirror lights ?are switched on automati-
cally.
Glare from the side
:Sun visor
;Bracket
=Mirror cover
?Mirror light
XFold down sun visor :.
XPull sun visor:from bracket ;.
XSwing sun visor :to the side.
Stowage compartment/ashtray
Stowage compartment/ashtray in the
center console
GWARNING
If you engage transmission position Dwhen
removing the ashtray insert, the vehicle can
roll away. There is a risk of an accident.
Always switch off the engine first and safe-
guard the vehicle against rolling away by
applying the parking brake.
Features221
Stowage and features
Z
Page 224 of 302
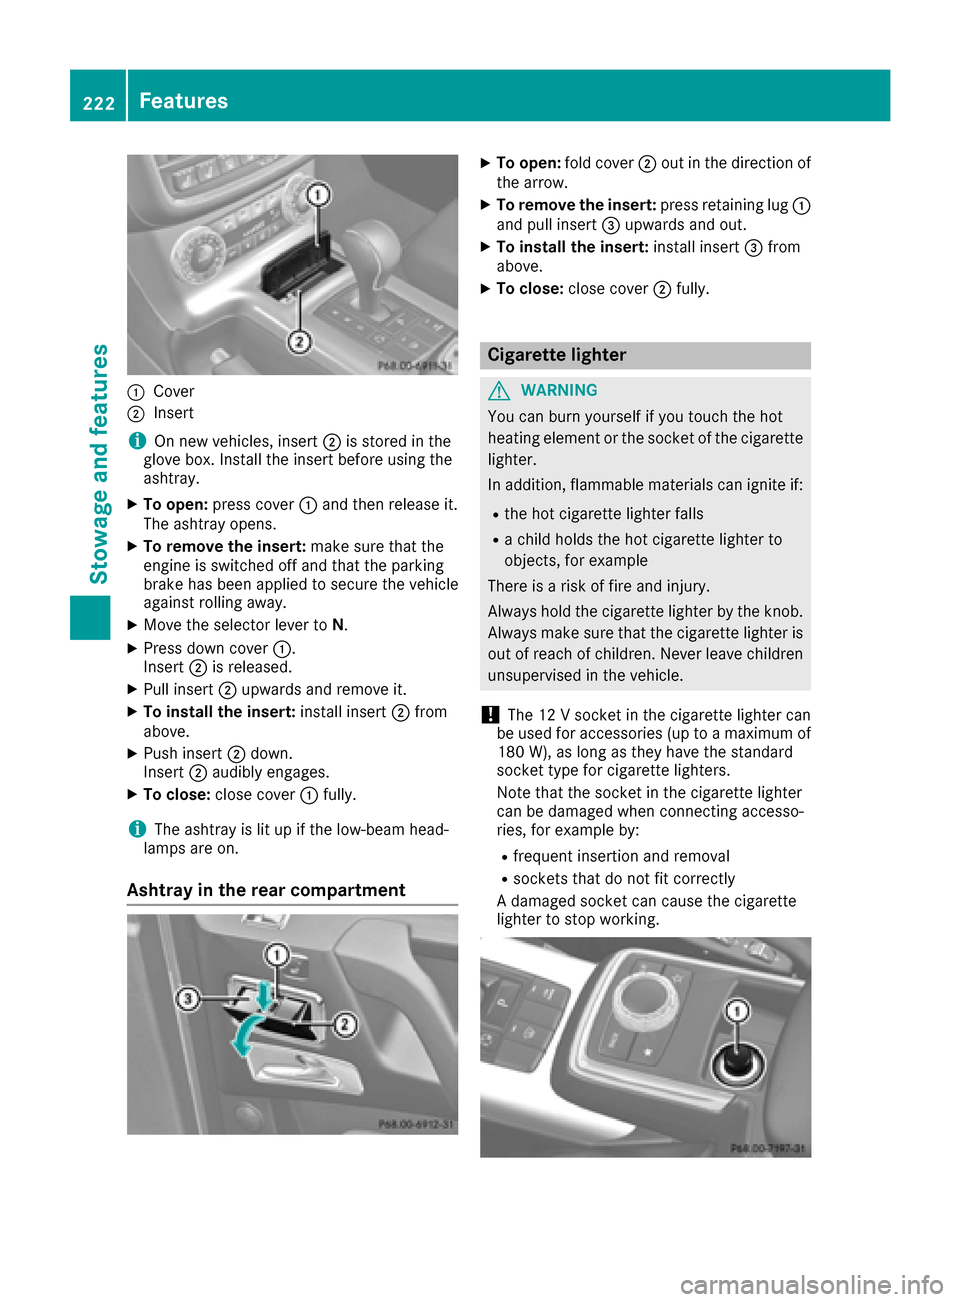
:Cover
;Insert
iOn new veh icles, insert ;isstored inthe
glove box. Install the insert before using the
ashtray.
XTo open: press cover :and then release it.
The ashtray opens.
XTo remove the insert: make sure that the
engine is switched off and that the parking
brake has been appliedto secure the veh icle
against rolling away.
XMove the selector lever to N.
XPress downcover :.
In sert ;isreleased.
XPull insert ;upwards and remove it.
XTo install the insert: install insert;from
above.
XPush insert ;down .
In sert ;audibly engages.
XTo close: close cover :fully.
iThe ashtray is litupifthe low- beam head-
lamps are on.
Ashtray in the rear compartment
XTo open: fold cover ;out in the direction of
the arrow.
XTo remove the insert: press retaining lug :
and pull insert =upwards and out.
XTo install the insert: install insert =from
above.
XTo close: close cover ;fully.
Cigarette lighter
GWARNING
You can burn yourself ifyou touch the hot
heating element or the socket of the cigarette lighter.
In addition, flammable materials can ignite if:
Rthe hot cigarette lighter falls
Ra child holds the hot cigarette lighter to
objects, for example
There isa risk of fire and injury.
Alwa ys hold the cigarette lighter bythe knob.
Alwa ys make sure that the cigarette lighter is
out of reach of children. Never leave ch ildren
unsupervised in the vehicle.
!The 12 V socket inthe cigarette lighter can
be used for accessories (up to a maximum of
180 W), as long as they have the standard
socket type for cigarette lighters.
Note that the socket in the cigarette lighter
can bedamaged when connecting accesso-
ries, for example by:
Rfrequent insertion and removal
Rsockets that do not fit correctly
A damaged socket can cause the cigarette
lighter to stop working.
222Features
Stowage and features
Page 225 of 302
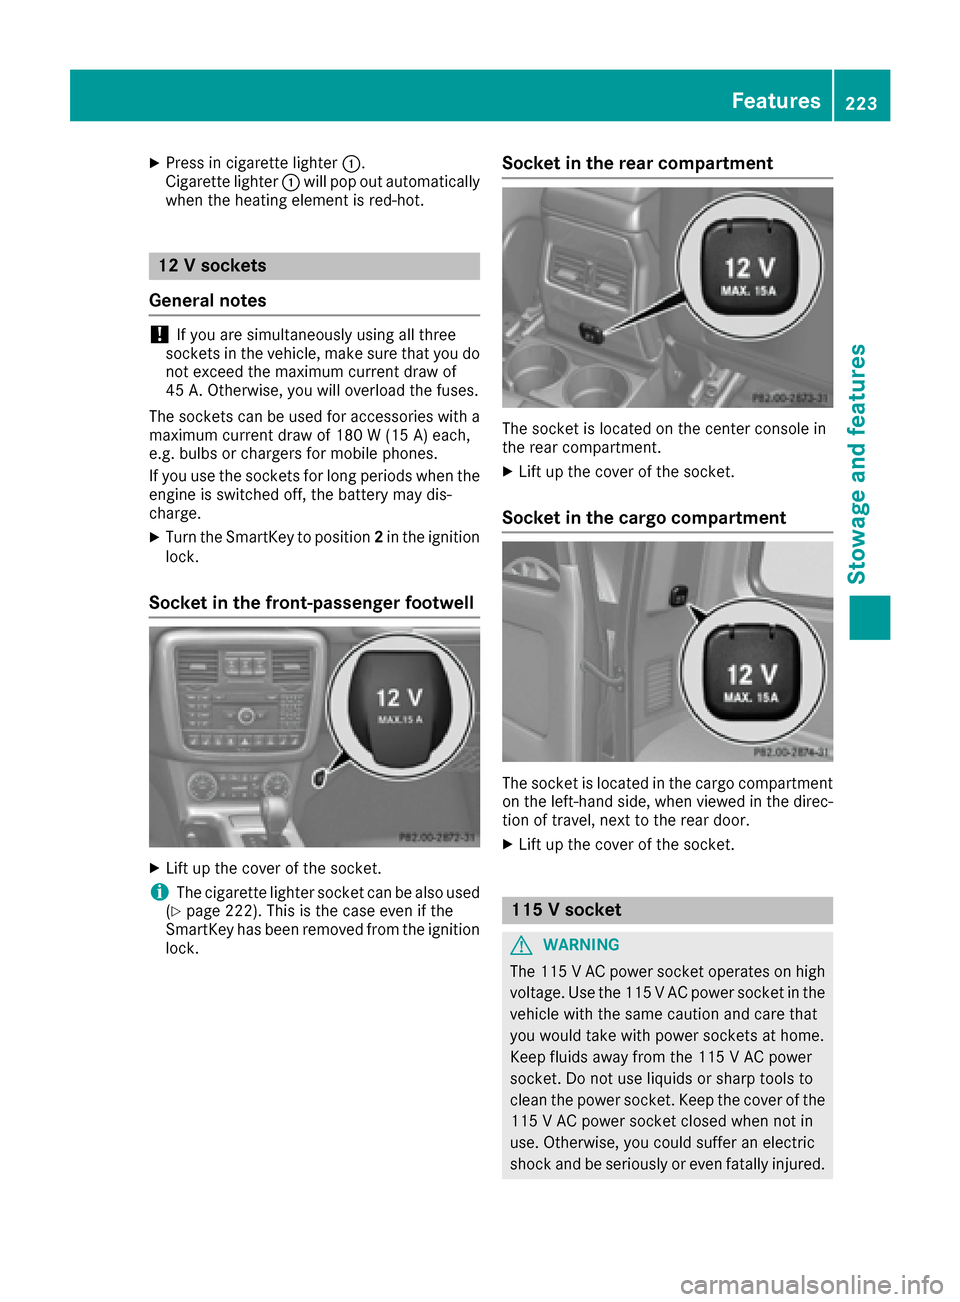
XPress in cigarette lighter:.
Cigarette lighter :will pop out automatically
when the heating element is red-hot.
12 V sockets
General notes
!If you are simultaneously using all three
sockets in the vehicle, make sure that you do
not exceed the maximum current draw of
45 A. Otherwise, you will overload the fuses.
The sockets can be used for accessories with a
maximum current draw of 180 W (15 A) each,
e.g. bulbs or chargers for mobile phones.
If you use the sockets for long periods when the
engine is switched off, the battery may dis-
charge.
XTurn the SmartKey to position 2in the ignition
lock.
Socket in the front-passenger footwell
XLift up the cover of the socket.
iThe cigarette lighter socket can be also used
(Ypage 222). This is the case even if the
SmartKey has been removed from the ignition
lock.
Socket in the rear compartment
The socket is located on the center console in
the rear compartment.
XLift up the cover of the socket.
Socket in the cargo compartment
The socket is located in the cargo compartment
on the left-hand side, when viewed in the direc-
tion of travel, next to the rear door.
XLift up the cover of the socket.
115 V socket
GWARNING
The 115 VAC power socket operates on high
voltage. Use the 115 V AC power socket in the
vehicle with the same caution and care that
you would take with power sockets at home.
Keep fluids away from the 115 V AC power
socket. Do not use liquids or sharp tools to
clean the power socket. Keep the cover of the
115 V AC power socket closed when not in
use. Otherwise, you could suffer an electric
shock and beseriously or even fat allyinjured.
Features223
Stowage and features
Z