2016 MERCEDES-BENZ G-Class brake
[x] Cancel search: brakePage 223 of 302

Sun visors
Overview
GWARNING
If the mirror cover of the vanity mirror is folded
up when the vehicle is in motion, you could be
blinded by incident light. There is a risk of an
accident.
Always keep the mirror cover folded down
while driving.
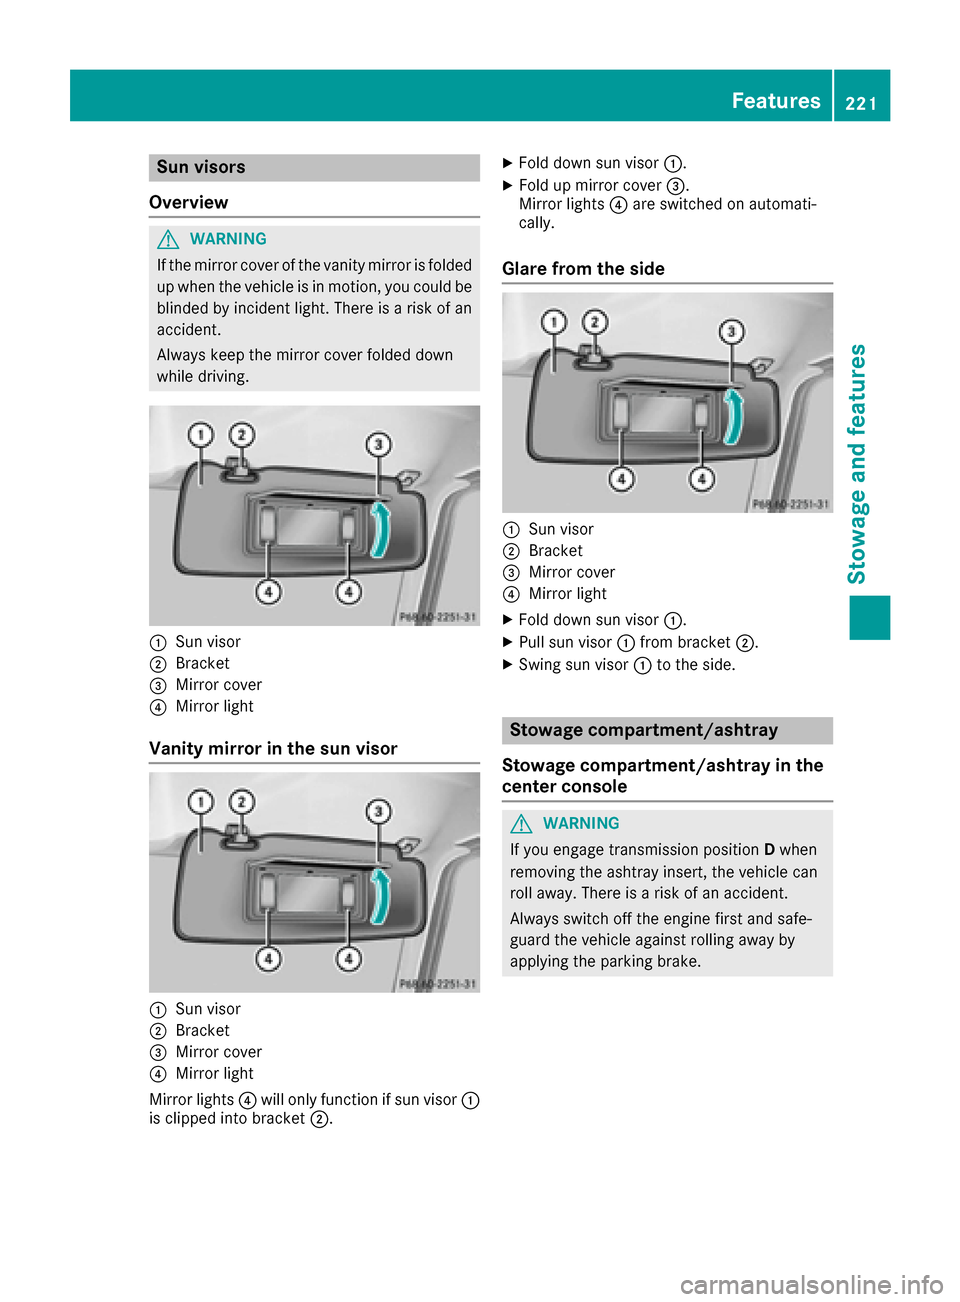
:Sun visor
;Bracket
=Mirror cover
?Mirror light
Vanity mirror in the sun visor
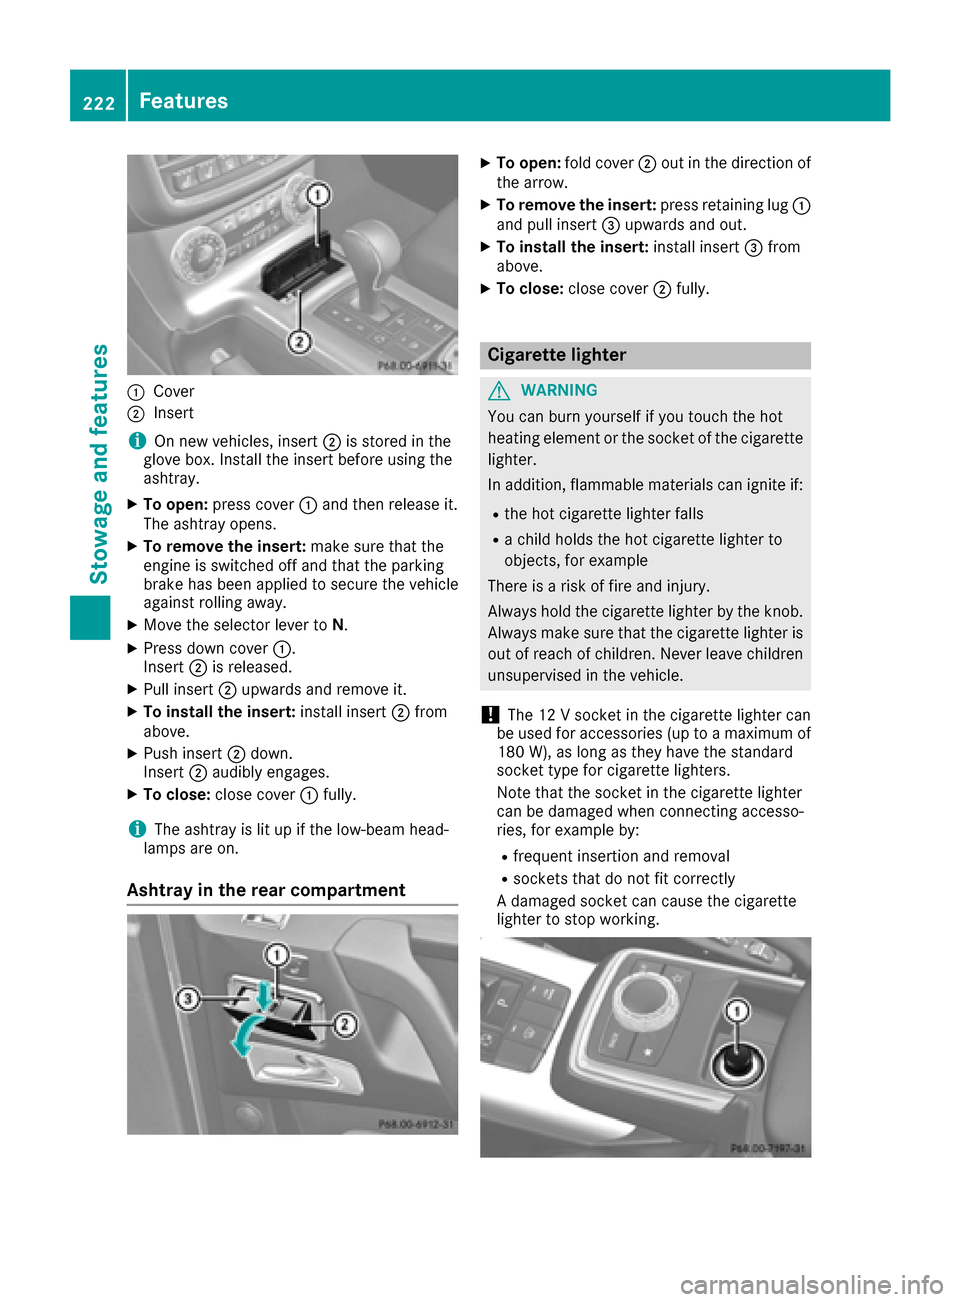
:Sun visor
;Bracket
=Mirror cover
?Mirror light
Mirror lights ?will only function if sun visor :
is clipped into bracket ;.
XFold down sun visor:.
XFold up mirror cover =.
Mirror lights ?are switched on automati-
cally.
Glare from the side
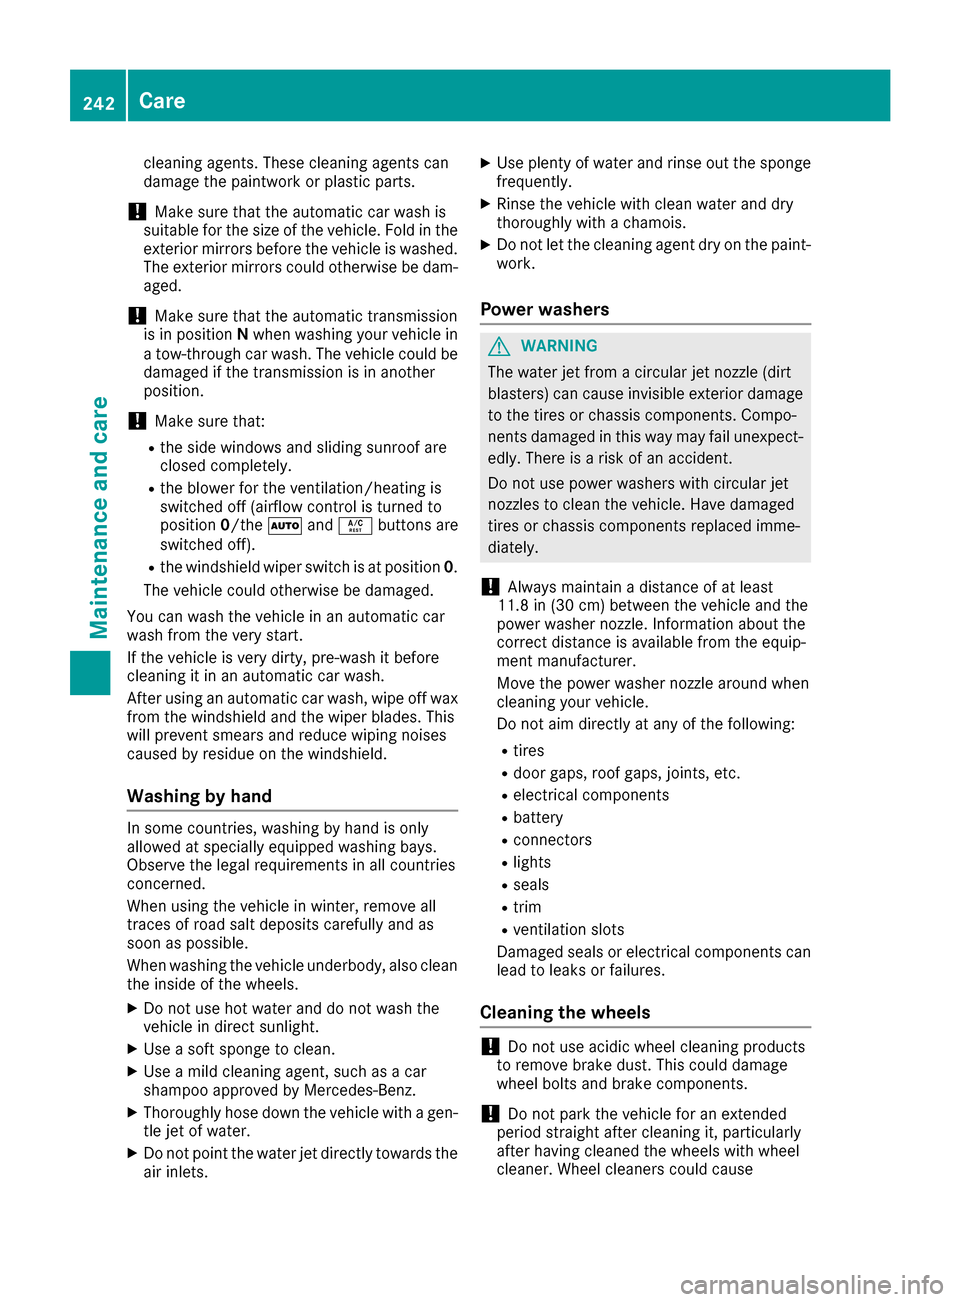
:Sun visor
;Bracket
=Mirror cover
?Mirror light
XFold down sun visor :.
XPull sun visor:from bracket ;.
XSwing sun visor :to the side.
Stowage compartment/ashtray
Stowage compartment/ashtray in the
center console
GWARNING
If you engage transmission position Dwhen
removing the ashtray insert, the vehicle can
roll away. There is a risk of an accident.
Always switch off the engine first and safe-
guard the vehicle against rolling away by
applying the parking brake.
Features221
Stowage and features
Z
Page 224 of 302

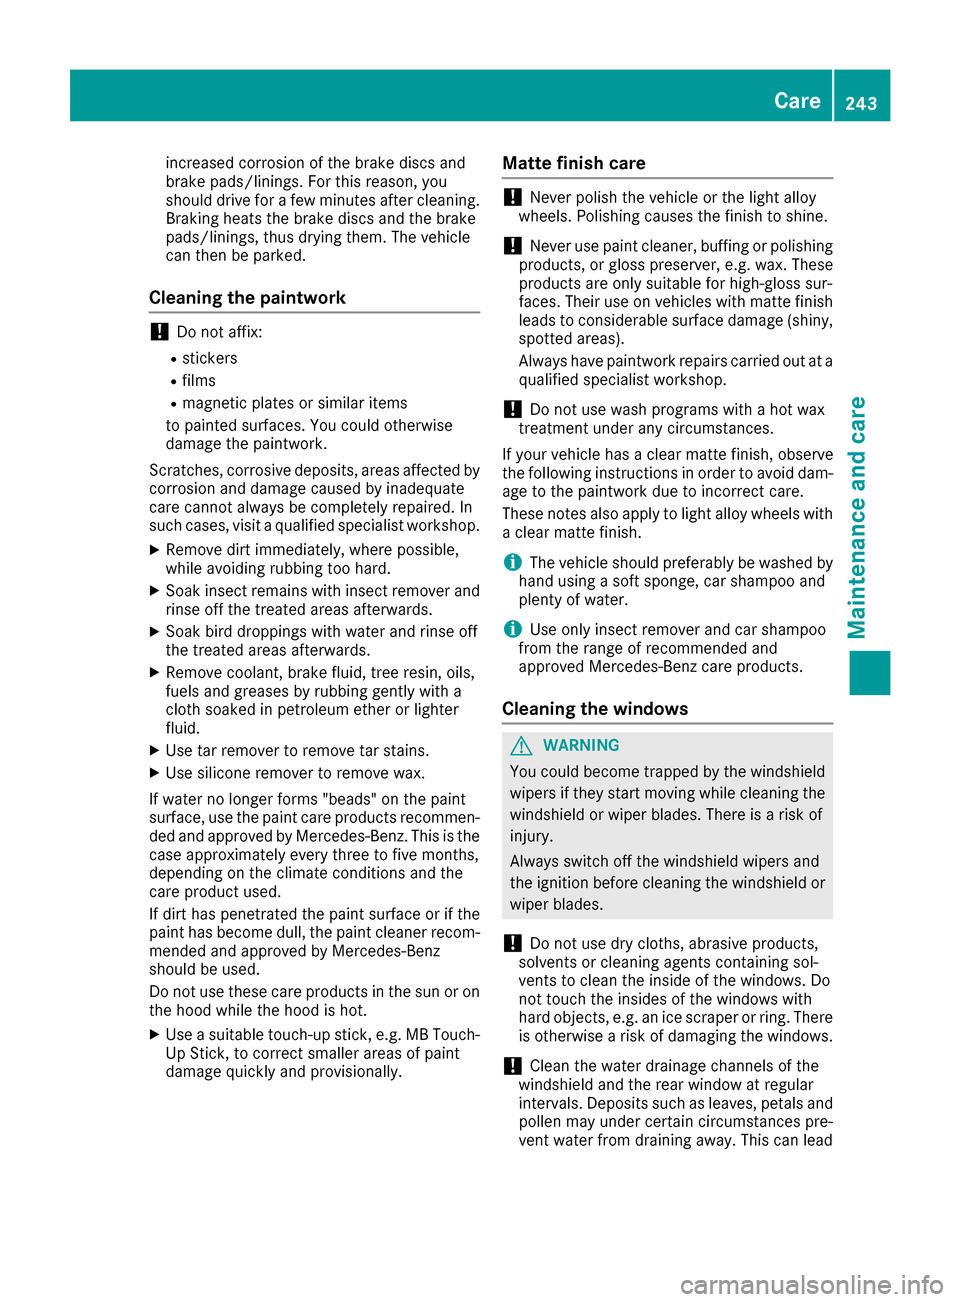
:Cover
;Insert
iOn new veh icles, insert ;isstored inthe
glove box. Install the insert before using the
ashtray.
XTo open: press cover :and then release it.
The ashtray opens.
XTo remove the insert: make sure that the
engine is switched off and that the parking
brake has been appliedto secure the veh icle
against rolling away.
XMove the selector lever to N.
XPress downcover :.
In sert ;isreleased.
XPull insert ;upwards and remove it.
XTo install the insert: install insert;from
above.
XPush insert ;down .
In sert ;audibly engages.
XTo close: close cover :fully.
iThe ashtray is litupifthe low- beam head-
lamps are on.
Ashtray in the rear compartment
XTo open: fold cover ;out in the direction of
the arrow.
XTo remove the insert: press retaining lug :
and pull insert =upwards and out.
XTo install the insert: install insert =from
above.
XTo close: close cover ;fully.
Cigarette lighter
GWARNING
You can burn yourself ifyou touch the hot
heating element or the socket of the cigarette lighter.
In addition, flammable materials can ignite if:
Rthe hot cigarette lighter falls
Ra child holds the hot cigarette lighter to
objects, for example
There isa risk of fire and injury.
Alwa ys hold the cigarette lighter bythe knob.
Alwa ys make sure that the cigarette lighter is
out of reach of children. Never leave ch ildren
unsupervised in the vehicle.
!The 12 V socket inthe cigarette lighter can
be used for accessories (up to a maximum of
180 W), as long as they have the standard
socket type for cigarette lighters.
Note that the socket in the cigarette lighter
can bedamaged when connecting accesso-
ries, for example by:
Rfrequent insertion and removal
Rsockets that do not fit correctly
A damaged socket can cause the cigarette
lighter to stop working.
222Features
Stowage and features
Page 232 of 302

If you selectCancel, the vehicle remote mal-
function diagnosis is canceled completely.
The vehicle operating state check begins.
Meanwhile, the Vehicle diagnosis acti‐
vatedmessage appears.
When the check is finished, the Sending
vehi‐cle diagnosis data... (Voice connec‐tion may be interrupted during datatransfer)message appears. The vehicle data
can now be sent to the Customer Assistance
center.
XPress OKto confirm the message.
The voice connection with the Customer
Assistance center is terminated.
The Vehicle Diagnosis: Transferring
data...message appears.
The vehicle data is sent to the Customer
Assistance center.
Depending on what the customer service rep-
resentative agreed with you, the voice connec-
tion is re-established after the transfer is com-
plete. If necessary, you will be contacted at a
later time by another means, e.g. by e-mail or
phone.
Further functions of the vehicle remote mal-
function diagnosis include, for example:
Rtransfer of service data to the Customer
Assistance center. If a service is overdue, the COMAND display shows a message about
various special offers at your workshop.
Rmonthly status information e-mail on oil level,
air pressure, maintenance, brakes, etc. If
applicable, you will receive information on
special offers in the e-mail.
USA only: this information can also be called
up under "Owners Online" at http://
www.mbusa.com.
Information on the data stored in the vehicle
(
Ypage 24).
Information on Roadside Assistance
(
Ypage 21).
Downloading routes
Downloading routes allows you to transfer and
save predefined routes in the navigation sys-
tem. To do this, an SD memory card must be
inserted into the COMAND system. If no SD
memory card is inserted, you must insert the
card into the card slot on the COMAND system
before saving. A route can be prepared and sent either by a
customer service representative or via the
mbrace portal on the Internet. Each route can
include up to 20 way points. When a route has
been received by the navigation system, the
'Route
name'hasbeensavedtomemorycard.Doyouwanttostartrouteguid‐ance?message appears on the COMAND dis-
play. The route is saved to the SD memory card.
XTo start route guidance: selectYes.
An overview of the route is shown in the dis-
play.
iIf you select No, the saved route can be
called up later in the navigation menu.
XSelect Start.
Route guidance is started.
iDownloaded and saved data can be called
up again in COMAND. Further information can
be found in the "COMAND", "Online and Inter-
net services" and "Download destination/
route" sections.
Speed alert
You can define the upper speed limit, which
must not be exceeded by the vehicle. If this
selected speed is exceeded by the vehicle, a
message will be sent to the Customer Assis-
tance center. The Customer Assistance center
then forwards this information to you. You can
select the way in which you receive this infor-
mation beforehand. Possible options include
text message, e-mail or an automated call.
The data which is sent to the Customer Assis-
tance center contains the following information:
Rthe location where the speed limit was excee-
ded
Rthe time at which the speed limit was excee-
ded
Rthe selected speed limit which was exceeded
Geo fencing
Geo fencing allows you to select areas which the
vehicle should not enter or leave. You will be
informed if the vehicle crosses the boundaries
of the selected areas. You can select the way in
which you receive this information beforehand.
Possible options include text message, e-mail or an automated call.
The area can be determined as either a circle or
a polygon with a maximum of ten corners. You
230Features
Stowage and features
Page 242 of 302

Further information on windshield washer fluid/
antifreeze (Ypage 295).
Brake fluid level
!If you notice that the brake fluid level in the
brake fluid reservoir has fallen to the MIN
mark or less, check the brake system imme-
diately for leaks. Also check the thickness of
the brake linings. Visit a qualified specialist
workshop immediately.
Do not add brake fluid. This does not correct
the error.
Only check the brake fluid level when the vehicle
is on a level surface.
If the brake fluid level is between MIN mark :
and MAX mark ;on the brake fluid reservoir, it
is correct.
Maintenance
Service interval display
Service messages
Information on the type of service and service
intervals (see the separate Maintenance Book-
let).
You can obtain further information from an
authorized Mercedes-Benz Center or at
http://www.mbusa.com (USA only).
The ASSYST service interval display informs you
of the next service due date.
If a service due date has been exceeded, you
also hear a warning tone.
The multifunction display shows a service mes-
sage for several seconds, e.g.:
Service A in 99999 Miles
Service A Due Now
Service A Exceeded By 99999 Miles
Maintaining the time-dependent service sched-
ule:
XBefore disconnecting the battery, note down
the service due date displayed.
or
XAfter reconnecting the battery, subtract the
battery disconnection periods from the ser-
vice date shown on the display.
iThe service interval display should not be
confused with the 4engine oil level dis-
play.
The symbol and the letter indicate which type of
service is due:
¯ Minor service A
±
Major service B
The ASSYST service interval display does not
take into account any periods of time during
which the battery is disconnected.
Hiding a service message
XTo hide the service message, press the %
back button on the multifunction steering
wheel (
Ypage 29)(Ypage 172).
Displaying service messages
Use the buttons on the multifunction steering
wheel.
XSwitch on the ignition.
XPress =or; to select the standard
display menu on the steering wheel
(
Ypage 173).
XPress 9or: to select the service
interval display.
The ¯ or± service symbol and the ser-
vice due date are displayed.
Points to remember
The specified maintenance interval takes only
the normal operation of the vehicle into
account. Under arduous operating conditions or
increased load on the vehicle, maintenance
work must be carried out more frequently, for
example:
Rregular city driving with frequent intermediate
stops
Rif the vehicle is primarily used to travel short
distances
240Maintenance
Maintenance and care
Page 243 of 302

Ruseinmountainous terrain or on poor road
surfaces
Rif the engine isoften left idling for long periods
Under these or similar conditions, have, for
example, the air filter, engine oil and oil filter
replaced or changed more frequently. Under
arduous operating conditions, the tires must be
checked more often. Further information can be
obtained at a qualified specialist workshop,e.g.
an authorized Mercedes-Benz Center.
Fuel/water separator
HEnvironmental note
Dispose of service products inan environ-
mentally responsible manner.
!Ifyou continue drivingwithout having the
fuel/water separator serviced, th iscould
cause damage to the engine. Any resulting
damage isnot covered bythe warranty.
If the fuel/water separator needs servicing, the
fol lowin g message appears inthe multifunction
displ ay:
Youwillalso hear a brief warning tone.
XVisit a qualified specialist workshop as soon
as possible.
Care
General notes
GWAR NING
Many cleaning products can behazardous.
So me are poisonous, others are flammable.
Alwa ys follow the instructions on the particu-
lar container. Always open your veh icle's
doors or windows when cleaning the ins ide.
Never use fluids or solvents that are not
designed for cleaning your veh icle.
Always lock away cleaning products and keep
them out of reach of children.
!For cleaning your vehicle, donot use any of
the following:
Rdry, rough or hard cloths
Rabrasive cleaning agents
Rsolvents
Rcleaning agents containing solvents
Do not scrub.
Do not touch the surfaces or protective films
wit h hard objects, e.g. a ring or ice scraper.
You could otherwise scratch or damage the
surfaces and protective film.
!Do not park the vehicle for an extended
period straight after cleaning it, particularly
after having cleaned the wheels with wheel
cleaner. Wheel cleaners could cause
increased corrosion of the brake discs and
brake pads/linings. For this reason, you
should drive for a few minutes after cleaning.
Braking heats the brake discs and the brake
pads/linings, thus drying them. The vehicle
can then beparked.
HEnvironmental note
Dispose of empty packaging and cleaning
cloths in an environmentally responsible man-
ner.
Regular care of your vehicle isa condition for
retaining the quality in the long term.
Use care products and cleaning agents recom-
mended and approved by Mercedes-Benz.
Exterior care
Automatic car wash
GWARNING
Braking efficiency is reduced after washing
the vehicle. There is a risk of an accident.
After the vehicle has been washed, brake
carefully while paying attention to the traffic
conditions until full braking power is restored.
!Never clean your vehicle ina Touchless
Automat icCar Wash as these use special
Care241
Maintenance and care
Z
Page 244 of 302

cleaning agents. These cleaning agents can
damage the paintwork or plastic parts.
!Make sure that the automatic car wash is
suitable for the size of the vehicle. Fold in the
exterior mirrors before the vehicle is washed.
The exterior mirrors could otherwise be dam-
aged.
!Make sure that the automatic transmission
is in position Nwhen washing your vehicle in
a tow-through car wash. The vehicle could be
damaged if the transmission is in another
position.
!Make sure that:
Rthe side windows and sliding sunroof are
closed completely.
Rthe blower for the ventilation/heating is
switched off (airflow control is turned to
position 0/the à andÁ buttons are
switched off).
Rthe windshield wiper switch is at position 0.
The vehicle could otherwise be damaged.
You can wash the vehicle in an automatic car
wash from the very start.
If the vehicle is very dirty, pre-wash it before
cleaning it in an automatic car wash.
After using an automatic car wash, wipe off wax
from the windshield and the wiper blades. This
will prevent smears and reduce wiping noises
caused by residue on the windshield.
Washing by hand
In some countries, washing by hand is only
allowed at specially equipped washing bays.
Observe the legal requirements in all countries
concerned.
When using the vehicle in winter, remove all
traces of road salt deposits carefully and as
soon as possible.
When washing the vehicle underbody, also clean the inside of the wheels.
XDo not use hot water and do not wash the
vehicle in direct sunlight.
XUse a soft sponge to clean.
XUse a mild cleaning agent, such as a car
shampoo approved by Mercedes-Benz.
XThoroughly hose down the vehicle with a gen-
tle jet of water.
XDo not point the water jet directly towards the
air inlets.
XUse plenty of water and rinse out the sponge
frequently.
XRinse the vehicle with clean water and dry
thoroughly with a chamois.
XDo not let the cleaning agent dry on the paint-
work.
Power washers
GWARNING
The water jet from a circular jet nozzle (dirt
blasters) can cause invisible exterior damage
to the tires or chassis components. Compo-
nents damaged in this way may fail unexpect-
edly. There is a risk of an accident.
Do not use power washers with circular jet
nozzles to clean the vehicle. Have damaged
tires or chassis components replaced imme-
diately.
!Always maintain a distance of at least
11.8 in (30 cm) between the vehicle and the
power washer nozzle. Information about the
correct distance is available from the equip-
ment manufacturer.
Move the power washer nozzle around when
cleaning your vehicle.
Do not aim directly at any of the following:
Rtires
Rdoor gaps, roof gaps, joints, etc.
Relectrical components
Rbattery
Rconnectors
Rlights
Rseals
Rtrim
Rventilation slots
Damaged seals or electrical components can
lead to leaks or failures.
Cleaning the wheels
!Do not use acidic wheel cleaning products
to remove brake dust. This could damage
wheel bolts and brake components.
!Do not park the vehicle for an extended
period straight after cleaning it, particularly
after having cleaned the wheels with wheel
cleaner. Wheel cleaners could cause
242Care
Maintenance and care
Page 245 of 302

increased corrosion of the brake discs and
brake pads/linings. For this reason, you
should drive for a few minutes after cleaning.
Braking heats the brake discs and the brake
pads/linings, thus drying them. The vehicle
can then be parked.
Cleaning the paintwork
!Do not affix:
Rstickers
Rfilms
Rmagnetic plates or similar items
to painted surfaces. You could otherwise
damage the paintwork.
Scratches, corrosive deposits, areas affected by corrosion and damage caused by inadequate
care cannot always be completely repaired. In
such cases, visit a qualified specialist workshop.
XRemove dirt immediately, where possible,
while avoiding rubbing too hard.
XSoak insect remains with insect remover and
rinse off the treated areas afterwards.
XSoak bird droppings with water and rinse off
the treated areas afterwards.
XRemove coolant, brake fluid, tree resin, oils,
fuels and greases by rubbing gently with a
cloth soaked in petroleum ether or lighter
fluid.
XUse tar remover to remove tar stains.
XUse silicone remover to remove wax.
If water no longer forms "beads" on the paint
surface, use the paint care products recommen-
ded and approved by Mercedes-Benz. This is the
case approximately every three to five months,
depending on the climate conditions and the
care product used.
If dirt has penetrated the paint surface or if the
paint has become dull, the paint cleaner recom-
mended and approved by Mercedes-Benz
should be used.
Do not use these care products in the sun or on
the hood while the hood is hot.
XUse a suitable touch-up stick, e.g. MB Touch-
Up Stick, to correct smaller areas of paint
damage quickly and provisionally.
Matte finish care
!Never polish the vehicle or the light alloy
wheels. Polishing causes the finish to shine.
!Never use paint cleaner, buffing or polishing
products, or gloss preserver, e.g. wax. These
products are only suitable for high-gloss sur-
faces. Their use on vehicles with matte finish
leads to considerable surface damage (shiny,
spotted areas).
Always have paintwork repairs carried out at a qualified specialist workshop.
!Do not use wash programs with a hot wax
treatment under any circumstances.
If your vehicle has a clear matte finish, observe
the following instructions in order to avoid dam-
age to the paintwork due to incorrect care.
These notes also apply to light alloy wheels with a clear matte finish.
iThe vehicle should preferably be washed by
hand using a soft sponge, car shampoo and
plenty of water.
iUse only insect remover and car shampoo
from the range of recommended and
approved Mercedes-Benz care products.
Cleaning the windows
GWARNING
You could become trapped by the windshield wipers if they start moving while cleaning the
windshield or wiper blades. There is a risk of
injury.
Always switch off the windshield wipers and
the ignition before cleaning the windshield or
wiper blades.
!Do not use dry cloths, abrasive products,
solvents or cleaning agents containing sol-
vents to clean the inside of the windows. Do
not touch the insides of the windows with
hard objects, e.g. an ice scraper or ring. There
is otherwise a risk of damaging the windows.
!Clean the water drainage channels of the
windshield and the rear window at regular
intervals. Deposits such as leaves, petals and pollen may under certain circumstances pre-
vent water from draining away. This can lead
Care243
Maintenance and care
Z
Page 252 of 302

iWhen re-installing trim panel?, make sure
that retainer Aengages in recess B.
Removing the spare wheel
The spare wheel is heavy. Take particular note of
this when removing the spare wheel.
XRemove wheel nuts :.
XRemove the spare wheel.
Mounting the wheel
After changing a wheel:
XRepair or replace the damaged wheel as soon
as possible and secure the spare wheel in
place again.
XSecure the damaged wheel on the spare
wheel bracket with wheel nuts :. When
doing so, make sure that the wheel cannot
come loose.
XWhen re-installing trim panel ?, make sure
that retainer Bengages in recess A
(
Ypage 249).
XMake sure that tab ;is below when re-
installing cover ring :(Ypage 249).
XFor safety reasons, regularly check to ensure
that the wheel is securely fastened.
Flat tire
Preparing the vehicle
XStop the vehicle on solid, non-slippery and
level ground, as far away as possible from
traffic.
XSwitch on the hazard warning lamps
(Ypage 89).
XApply the parking brake.
XBring the front wheels into the straight-ahead
position.
XMove the selector lever to position P.
XSwitch off the engine.
XRemove the SmartKey from the ignition lock.
The steering wheel lock stays active for as
long as the SmartKey is removed.
XAll occupants must get out of the vehicle.
Make sure that they are not endangered as
they do so.
XMake sure that no one is near the danger area
while a wheel is being changed. Anyone who
is not directly assisting in the wheel change
should, for example, stand behind the barrier.
XGet out of the vehicle. Pay attention to traffic
conditions when doing so.
XClose the driver's door.
Battery (vehicle)
Important safety notes
Special tools and expert knowledge are required
when working on the battery, e.g. removal and
installation. You should therefore have all work
involving the battery carried out at a qualified
specialist workshop.
GWARNING
Work carried out incorrectly on the battery
can lead, for example, to a short circuit and
thus damage the vehicle electronics. This can
lead to function restrictions applying to
safety-relevant systems, e.g the lighting sys-
tem, the ABS (anti-lock braking system) or the
ESP
®(Electronic Stability Program). The oper-
ating safety of your vehicle may be restricted.
You could lose control of the vehicle, for
example:
Rwhen braking
Rin the event of abrupt steering maneuvers
and/or when the vehicle's speed is not
adapted to the road conditions
There is a risk of an accident.
In the event of a short circuit or a similar inci-
dent, contact a qualified specialist workshop
immediately. Do not drive any further. You
250Battery (vehicle)
Breakdown assistance