Page 265 of 350

GWARNING
When the hood is open and the windshield
wipers are set in motion, you can be injured by
the wiper linkage. There is a risk of injury.
Always switch off the windshield wipers and
the ignition before opening the hood.
!Make sure that the windshield wipers are
not folded away from the windshield. You
could otherwise damage the windshield
wipers or the hood.
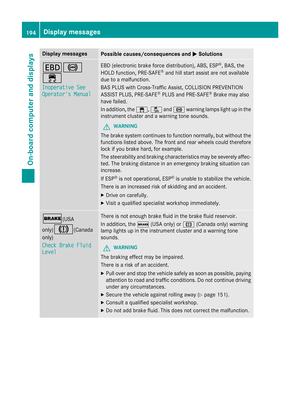
XMake sure that the windshield wipers are
turned off.
XPull release lever :on the hood.
The hood is released.
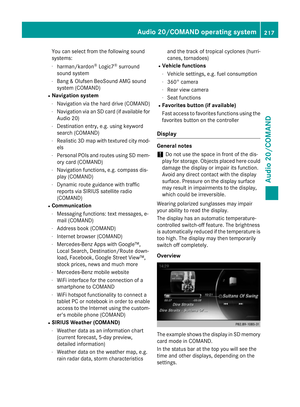
XReach into the gap, pull hood catch han-
dle ;up and lift the hood.
If you lift the hood by approximately 15 in
(40 cm), the hood is opened and held open automatically by the gas-filled strut.
Closing the hood
XLower the hood and let it fall from a height
of approximately 8 in (20 cm).
XCheck that the hood has engaged properly.
If the hood can be raised slightly, it is not
properly engaged. Open it again and close
it with a little more force.
Radiator
Vehicles with a diesel engine: do not cover
the radiator, for example with a winter front or
bug cover. The readings of the on-board-diag-
nostic system may otherwise be inaccurate.
Some of these readings are required by law
and must be accurate at all times.
Engine oil
General notes
GWARNING
Hybrid vehicles: be sure to read the "HYBRID" supplement. Otherwise, you could fail to rec-
ognize dangers.
Depending on your driving style, the vehicle
consumes up to 0.9 US qt (0.8 liters) of oil per600 miles (1,000 km). The oil consumption
may be higher than this when the vehicle is
new or if you frequently drive at high engine
speeds.
Depending on the engine, the oil dipstick may
be in a different location.
When checking the oil level:
Rpark the vehicle on a level surface.
Rthe engine should be switched off for
approximately five minutes if the engine is
at normal operating temperature.
Rif the engine is not at normal operating
temperature, e.g. if the engine was only
started briefly, wait about 30 minutes
before carrying out the measurement.
Engine compartment263
Maintenance and care
Z
Page 266 of 350

Checking the oil level using the oil dip-
stick
GWARNING
Certain components in the engine compart-
ment, such as the engine, radiator and parts
of the exhaust system, can become very hot.
Working in the engine compartment poses a
risk of injury.
Where possible, let the engine cool down and touch only the components described in the
following.
Example :vehicle swit h a gasolin eengin e
Example :vehicle swit h a diesel engin e
XPull oil dipstick :out of the dipstick guide
tube.
XWipe off oil dipstick :.
XSlowly slide oil dipstick :into the guide
tube to the stop, and take it out again.
If the level is between MIN mark =and
MAX mark ;, the oil level is correct.
XIf the oil level has dropped to MIN mark =
or below, add 1.1 US qt (1.0 liter) engine oil.
Adding engine oil
GWARNING
Certain components in the engine compart-
ment, such as the engine, radiator and parts
of the exhaust system, can become very hot.
Working in the engine compartment poses a
risk of injury.
Where possible, let the engine cool down and touch only the components described in the
following.
GWARNING
If engine oil comes into contact with hot com- ponents in the engine compartment, it may
ignite. There is a risk of fire and injury.
Make sure that engine oil is not spilled next to
the filler neck. Let the engine cool down and
thoroughly clean the engine oil off the com-
ponents before starting the engine.
HEnvironmental note
When adding oil, take care not to spill any. If
oil enters the soil or waterways, it is harmful to
the environment.
!Only use engine oils and oil filters that
have been approved for vehicles with a ser-
vice system. You can obtain a list of the
engine oils and oil filters tested and
approved in accordance with the
Mercedes-Benz Specifications for Service
Products at any Mercedes-Benz Service
center.
Damage to the engine or exhaust system is
caused by the following:
Rusing engine oils and oil filters that have
not been specifically approved for the
service system
Rreplacing engine oil and oil filters after
the interval for replacement specified by the service system has been exceeded
Rusing engine oil additives.
!Do not add too much oil. adding too much
engine oil can result in damage to the
264Engine compartment
Maintenance and care
Page 267 of 350

engine or to the catalytic converter. Have
excess engine oil siphoned off.
Example
XTurn cap:counter-clockwise and remove
it.
XAdd engine oil.
If the oil level is at or below the MIN mark on
the oil dipstick, add 1.1 US qt (1.0 l)of
engine oil.
XReplace cap :on the filler neck and turn
clockwise.
Ensure that the cap locks into place
securely.
XCheck the oil level again with the oil dip-
stick (
Ypage 264).
Further information on engine oil
(
Ypage 341).
Additional service products
Checking coolant level
GWARNING
Certain components in the engine compart-
ment, such as the engine, radiator and parts
of the exhaust system, can become very hot.
Working in the engine compartment poses a
risk of injury.
Where possible, let the engine cool down and touch only the components described in the
following.
GWARNING
The engine cooling system is pressurized, par-
ticularly when the engine is warm. When
opening the cap, you could be scalded by hot
coolant spraying out. There is a risk of injury.
Let the engine cool down before opening the
cap. Wear eye and hand protection when
opening the cap. Open the cap slowly half a
turn to allow pressure to escape.
XPark the vehicle on a level surface.
Only check the coolant level when the vehi-
cle is on a level surface and the engine has
cooled down.
XTurn the SmartKey to position 2in the igni-
tion lock (
Ypage 137).
On vehicles with KEYLESS-GO, press the
Start/Stop button twice (
Ypage 138).
XCheck the coolant temperature display in
the instrument cluster.
The coolant temperature must be below
158 ‡ (70 †).
XTurn the SmartKey to position 0in the igni-
tion lock (
Ypage 137).
XSlowly turn cap :half a turn counter-
clockwise to allow excess pressure to
escape.
XTurn cap :further counter-clockwise and
remove it.
If the coolant is at the level of marker bar =
in the filler neck when cold, there is enough
coolant in coolant expansion tank ;.
If the coolant level is approximately 0.6 in
(1.5 cm) above marker bar =in the filler
Engine compartment265
Maintenance and care
Z
Page 268 of 350

neck when warm, there is enough coolant
in expansion tank;.
XIf necessary, add coolant that has been tes-
ted and approved by Mercedes-Benz.
XReplace cap:and turn it clockwise as far
as it will go.
For further information on coolant, see
(
Ypage 342).
Adding washer fluid to the windshield
washer system
GWARNING
Certain components in the engine compart-
ment, such as the engine, radiator and parts
of the exhaust system, can become very hot.
Working in the engine compartment poses a
risk of injury.
Where possible, let the engine cool down and touch only the components described in the
following.
GWARNING
Windshield washer concentrate could ignite if it comes into contact with hot engine compo-
nents or the exhaust system. There is a risk of
fire and injury.
Make sure that no windshield washer con-
centrate is spilled next to the filler neck.
XTo open: pull cap:upwards by the tab.
XAdd the premixed washer fluid.
XTo close: press cap :onto the filler neck
until it engages. If the washer fluid level drops below the rec-
ommended minimum of 1 liter, a message
appears in the multifunction display prompt-
ing you to add washer fluid.
Further information on windshield washer
fluid/antifreeze (
Ypage 343).
Maintenance
ASSYST PLUS
The Digital Operator's Manual contains more
information on the ASSYST PLUS service
interval display.
Care
General notes
HEnvironmental note
Dispose of empty packaging and cleaning
cloths in an environmentally responsible man-
ner.
!For cleaning your vehicle, do not use any
of the following:
Rdry, rough or hard cloths
Rabrasive cleaning agents
Rsolvents
Rcleaning agents containing solvents
Do not scrub.
Do not touch the surfaces or protective
films with hard objects, e.g. a ring or ice
scraper. You could otherwise scratch or
damage the surfaces and protective film.
!Do not park the vehicle for an extended
period straight after cleaning it, particularly
after having cleaned the wheels with wheel
cleaner. Wheel cleaners could cause
increased corrosion of the brake discs and
brake pads/linings. For this reason, you
should drive for a few minutes after clean-
ing. Braking heats the brake discs and the
brake pads/linings, thus drying them. The
vehicle can then be parked.
266Care
Maintenance and care
Page 269 of 350

Regular careof your vehicl eis acondition for
retainin gth equalit yin th elon gterm .
Use car eproducts and cleaning agents rec -
ommended and approve dby Mercedes-Benz.
Exterior car e
Automatic car wash
GWARNIN G
Braking efficiency is reduce dafter washin g
th evehicle. There is aris kof an accident.
Afte rth evehicl ehas been washed, brak e
carefully while payin gattention to th etraffic
condition suntil full brakin gpowe ris restored .
!If DISTRONI CPLU Sor th eHOLD function
is activated, th evehicl ebrakes automati-
call yin certain situations.
To preven tdamag eto th evehicle, deacti -
vat eDISTRONI CPLU Sand th eHOLD func-
tion in th efollowin gor other similar situa-
tions:
Rwhen towin gth evehicl e
Rin thecar wash
!Never clean your vehicl ein aTouchles s
Automati cCar Wash as these use special
cleaning agents .These cleaning agents can
damag eth epaintwork or plastic parts.
!Mak esur ethat:
Rth eside windows and th eslidin gsunroo f
are fully closed .
Rtheventilation/heatin gis switched off
(the OF Fbutto nhas been pressed).
Rth ewindshield wiper switch is in position
0 .
Otherwise ,th evehicl emight be damaged.
!In car washes wit h atowin gmechanism ,
mak esur ethat th eautomatic transmission
is in transmission position N,otherwise th e
vehicl ecould be damaged.
RVehicles wit h aSmartKey:
Do no tremove th eSmartKey fr om the
i
gnition lock. Do no topen th edriver's doo
ror front-passenger door when th e
engin eis switched off .Otherwise ,th e
automatic transmission select spark
position Pautomatically and locks th e
wheels. You can preven tthis by shiftin g
th eautomatic transmission to Nbefore -
hand.
RVehicles wit hKEYLESS-GO :
Do no topen th edriver's doo ror front-
passenger doo rwhen th eengin eis
switched off .Otherwise ,th eautomatic
transmission select spark position P
automatically and locks th ewheels.
!If th eke yis within th erear detection
range of KEYLESS-GO ,situation ssuc has
th efollowin gcould lead to th euninten -
tional openin gof th etrunk lid/tailgate:
Rusin g acar wash
Rusin g apowe rwasher
Mak esur ethat th eSmartKey is at least
10 ft (3 m) away from th evehicle.
Observ eth efollowin gto mak esur ethat th e
automatic transmission stays in position N:
XMak esur eth evehicl eis stationary and th e
ignition is switched off .
XTurn theSmartKey to position 2in th eigni-
tion loc k (
Ypage 137).
Use th eSmartKey instead of th eStart /
Stop butto non vehicles wit hKEYLESS-GO .
XDepress and hold th ebrak epedal .
XShift theautomatic transmission to posi-
tion N.
XReleas eth ebrak epedal .
XReleas eth eparkin gbrake.
XSwitc hoff th eignition and leav eth eSmart -
Key in th eignition lock.
You can wash th evehicl ein an automatic car
wash from th ever ystart .
If th evehicl eis ver ydirty, pre-wash it before
cleaning it in an automatic car wash .
Afte rusin gan automatic car wash ,wipe off
wax from th ewindshield and th ewiper
blades. This will preven tsmears and reduce
Care267
Maintenance and care
Z
Page 270 of 350
wiping noises caused by residue on the wind-
shield.
Information in the Digital Operator's
Manual
In the Digital Operator's Manual you will find
information on the following topics:
RWashing by hand
RPower washers
RCleaning the paintwork
RMatte finish care
RCleaning the wheels
RCleaning the windows
RCleaning wiper blades
RCleaning the exterior lighting
RCleaning the mirror turn signals
RCleaning the sensors
RCleaning the rear view camera
RCleaning the 360° camera
RCleaning the exhaust pipes
Interior care
In the Digital Operator's Manual you will find
information on the following topics:
RCleaning the display
RCleaning the plastic trim
RCleaning the steering wheel and gear or
selector lever
RCleaning genuine wood and trim strips
RCleaning the seat covers
RCleaning the seat belts
RCleaning the headliner and carpets
268Care
Maintenance and care
Page 271 of 350
Useful information............................270
Where will I find...? ...........................270
Flat tire .............................................. 271
Battery (vehicle) ................................ 275
Jump-starting .................................... 279
Towing and tow-starting ..................281
Fuses .................................................. 284
269
Roadside Assistance
Page 272 of 350

Useful information
i
This Operator's Manual describes all
models and all standard and optional equip-
ment of your vehicle available at the time of
publication of the Operator's Manual.
Country-specific differences are possible.
Please note that your vehicle may not be
equipped with all features described. This
also applies to safety-related systems and
functions.
iRead the information on qualified special-
ist workshops (
Ypage 31).
Where will I find...?
Vehicle tool kit
General notes
The vehicle tool kit can be found in the stow- age well under the trunk floor (
Ypage 248) or
cargo compartment floor (
Ypage 249).
Depending on the vehicle equipment, the
vehicle tool kit is on the left-hand side or the
right-hand side in the stowage well under the trunk floor/cargo compartment floor.
Vehicles with a TIREFIT kit
Vehicle tool kit in the left-hand stowage well (exam-
ple: equipment and country-specific variations
possible)
:
Tire sealant filler bottle
;Folding wheel chock
=One pair of gloves (under jack)
?Tire inflation compressor
ATowing eye
BJack
CAlignment bolt
DFuse allocation chart
ELug wrench
XOpen the trunk lid/tailgate.
XSedan: lift up the floor of the trunk
(
Ypage 248).
XWagon: remove the seat cushions of the
folding bench seat; see the Digital Opera-
tor's Manual, keyword "Folding bench seat
(cargo compartment)".
Vehicles with a spare
wheel/"Minispare" emergency spare
wheel
(Example: equipment and country-specific varia-
tions possible)
:
Vehicle tool kit tray
;Stowage well
=Spare wheel/"Minispare" emergency
spare wheel
XOpen the trunk lid/tailgate.
XSedan: lift up the floor of the trunk
(
Ypage 248).
XWagon: remove the seat cushions of the
folding bench seat; see the Digital Opera-
tor's Manual, keyword "Folding bench seat
(cargo compartment)".
The vehicle tool kit contains:
RFolding wheel chock
RFuse allocation chart
RJack
270Where will I find...?
Roadside Assistance