2016 MERCEDES-BENZ E-CLASS SALOON engine
[x] Cancel search: enginePage 168 of 557
Manual
gearshifting &
WARNING Risk of skidding and of an
accident due toshifting down on slippery
ro ad sur faces
If yo u shift down on slippery road sur faces to
inc rease the engine braking ef fect, the drive
wheels may lose traction. #
Do not shift down on slippery road sur‐
fa ces toinc rease the engine braking
ef fect. #
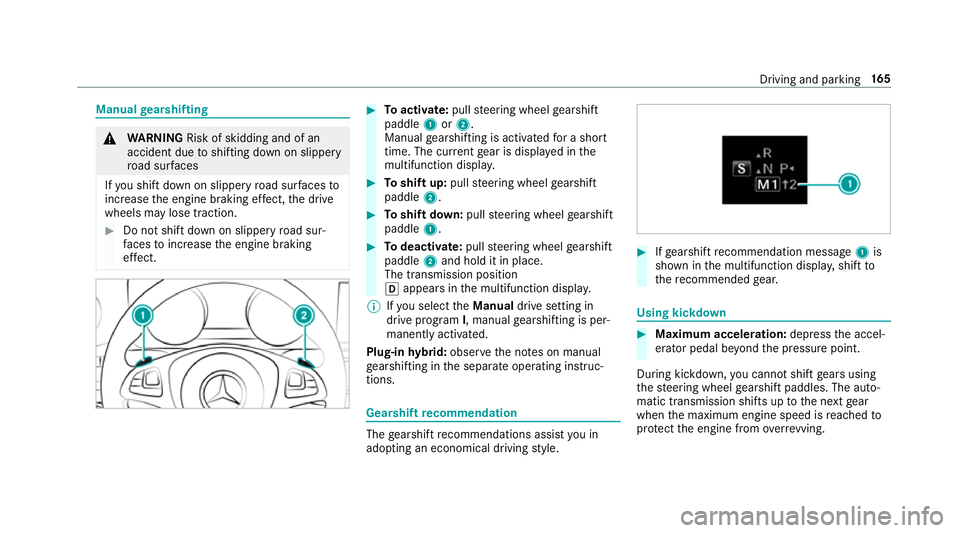
Toactivate: pullsteering wheel gearshift
paddle 1or2.
Manual gearshifting is activated for a short
time. The cur rent gear is displa yed in the
multifunction displa y. #
Toshift up: pullsteering wheel gearshift
paddle 2. #
Toshift down: pullsteering wheel gearshift
paddle 1. #
Todeactivate: pullsteering wheel gearshift
paddle 2and hold it in place.
The transmission position
h appears in the multifunction displa y.
% Ifyo u select theManual drive setting in
drive prog ram I, manual gearshifting is per‐
manent lyactivated.
Plug-in hybrid: obser vethe no tes on manual
ge arshifting in the separate operating instruc‐
tions. Gearshift
recommendation The
gearshift recommendations assist you in
adopting an economical driving style. #
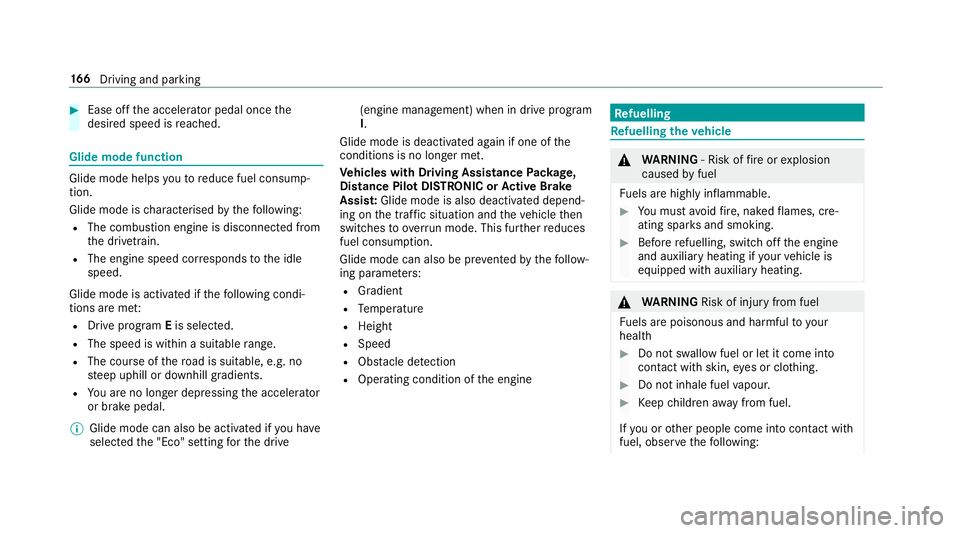
Ifge arshift recommendation message 1is
shown in the multifunction displa y,shift to
th ere commended gear. Using kickd
own #
Maximum acceleration: depressthe accel‐
erator pedal be yond the pressure point.
During kickdown, you cannot shift gears using
th esteering wheel gearshift paddles. The auto‐
matic transmission shifts up tothe next gear
when the maximum engine speed is reached to
pr otect the engine from overrev ving. Driving and parking
16 5
Page 169 of 557
#
Ease off the accelera tor pedal once the
desired speed is reached. Glide mode function
Glide mode helps
youto reduce fuel consump‐
tion.
Glide mode is characterised bythefo llowing:
R The combustion engine is disconnected from
th e driv etra in.
R The engine speed cor responds tothe idle
speed.
Glide mode is activated if thefo llowing condi‐
tions are me t:
R Drive program Eis selected.
R The speed is wi thin a suitable range.
R The cou rse of thero ad is suitable, e.g. no
st eep uphill or downhill gradients.
R You are no lon ger depressing the accelerator
or brake pedal.
% Glide mode can also be activated if you ha ve
selected the "Eco" setting forth e drive (engine management) when in drive program
I.
Glide mode is deactivated again if one of the
conditions is no longer met.
Ve hicles with Driving Assistance Package,
Dist ance Pil otDISTRONIC or Active Brake
Assi st:Glide mode is also deacti vated depend‐
ing on the traf fic situation and theve hicle then
switches toove rrun mode. This fur ther reduces
fuel consum ption.
Glide mode can also be pr evented bythefo llow‐
ing parame ters:
R Gradient
R Temp erature
R Height
R Speed
R Obs tacle de tection
R Ope rating condition of the engine Re
fuelling Re
fuelling theve hicle &
WARNING ‑ Risk of fire or explosion
caused byfuel
Fu els are highly inflammable. #
You must avoidfire , naked flames, cre‐
ating spar ksand smoking. #
Before refuelling, switch off the engine
and auxiliary heating if your vehicle is
equipped with auxiliary heating. &
WARNING Risk of inju ryfrom fuel
Fu els are poisonous and harmful to your
health #
Do not swallow fuel or let it come into
contact with skin, eyes or clo thing. #
Do not inhale fuel vapour. #
Keep children away from fuel.
If yo u or other people come into contact with
fuel, obser vethefo llowing: 16 6
Driving and pa rking
Page 170 of 557
#
Immedia tely rinse fuel off your skin with
soap and water. #
If fuel comes into contact with your
ey es, immediately rinse them thor‐
oughly with clean water.Seek medical
attention immediately. #
Ifyo u swallow fuel, seek medical atten‐
tion immediatel y.Do not induce vomit‐
ing. #
Change immediately out of clo thing that
has come into con tact wi thfuel. &
WARNING Risk offire and explosion due
to electros tatic charge
Electros taticch arge can cause spa rks and
th ereby ignite fuel vapours. #
Touch the me talvehicle body before
opening the fuel filler cap or touching
th e pump nozzle.
This dischar ges any electros tatic charge that
may ha vebuilt up. &
WARNING Risk offire from fuel mixture
Ve hicles with a diesel engine:
If yo u mix diesel fuel with petrol, theflash
point of the fuel mixture is lo werth an that of
pure diesel fuel.
While the engine is running, component
pa rts in theex haust sy stem may overheat
without warning. #
Neverre fuel using petrol. #
Never mix petrol with diesel fuel. *
NO
TEDama gecaused bythe wrong fuel Fu
elthat does not con form totherequ ired
qu ality can lead toinc reased wear as well as
damage tothe engine and exhaust sy stem. #
Only use the fuel recommended. *
NO
TEDama gecaused bythe wrong fuel Ve
hicles with a petrol engine: Even small amounts of
the wrong fuel could
re sult in damage tothe fuel sy stem, the
engine and the emission control sy stem. #
Only refuel using premium-grade unlea‐
ded fuel that con form sto EN 228, or an
equi valent specification.
Fu el of this specification may con tain up to
10 %ethanol. Your vehicle is suitable for use
with E10 fuel.
Do not refuel using:
R Diesel
R E85, E100
R Petrol containing me thanol (M15, M30,
M85, M100)
R Petrol wi thadditives con taining me tal
If yo u accidentally refuel with the wrong fuel: #
Do not switch the ignition on. #
Consult a qualified specialist workshop. Driving and parking
167
Page 171 of 557
*
NO
TEDama gecaused bythe wrong fuel Ve
hicles with a diesel engine:
Even small amounts of the wrong fuel could
re sult in damage tothe fuel sy stem, the
engine and the emission control sy stem. #
Only refuel using diesel fuel that con‐
fo rm sto European standard EN 590, or
an equivalent specification. #
Vehicles with diesel particulate fil‐
ters: in countries outside the EU, only
use lo w-sulphur Euro diesel with a sul‐
phur content of under 50 ppm.
Do not use thefo llowing:
R Petrol
R Marine diesel
R Heating oil
R Bio-diesel
R Vegetable oil
R Paraffin
R Kerosene *
NO
TEDo not use diesel torefuel vehi‐
cles with a petrol engine. #
Do not switch on the ignition if you
acciden tally refuel with the wrong fuel.
Otherwise, fuel can enter the fuel sys‐
te m. Even small amounts of the wrong
fuel could result in damage tothe fuel
sy stem and the engine. Notify a quali‐
fi ed specialist workshop and ha vethe
fuel tank and fuel lines drained com‐
pl et ely. *
NO
TEDo not use petrol torefuel vehi‐
cles with a diesel engine. #
Do not switch on the ignition if you
acciden tally refuel with the wrong fuel.
Otherwise, fuel can enter the fuel sys‐
te m. Even small amounts of the wrong
fuel could result in damage tothe fuel
sy stem and the engine. The repair costs
are high. Notifyaqu alified specialist
wo rkshop and ha vethe fuel tank and
fuel lines drained compl etely. *
NO
TEDo not overfill the fuel tank, other‐
wise the fuel sy stem may be damaged. #
Only fill th e fuel tank until the pump
nozzle switches off. *
NO
TEDo not overfill the fuel tank, other‐
wise fuel may spay out when youre mo ve
th e pump nozzle. #
Only fill th e fuel tank until the pump
nozzle switches off. Re
quirement:
The vehicle must be unloc ked.
% Do not get into theve hicle again during the
re fuelling process. Otherwise, electros tatic
ch arge could build up again.
Obser vethe no tes on operating fluids
(→ page 425). 16 8
Driving and pa rking
Page 172 of 557
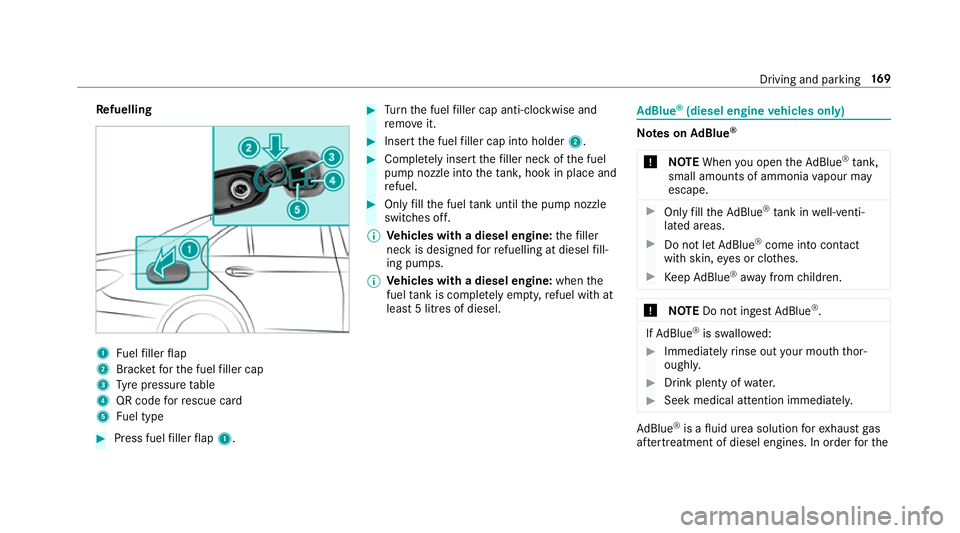
Re
fuelling 1
Fuelfiller flap
2 Brac ketfo rth e fuel filler cap
3 Tyre pressure table
4 QR code forre scue card
5 Fuel type #
Press fuel filler flap 1. #
Turn the fuel filler cap anti-clockwise and
re mo veit. #
Insert the fuel filler cap into holder 2. #
Comple tely inse rtthefiller neck of the fuel
pump nozzle into theta nk, hook in place and
re fuel. #
Only fill th e fuel tank until the pump nozzle
switches off.
% Vehicles with a diesel engine: thefiller
neck is designed forre fuelling at diesel fill‐
ing pumps.
% Vehicles with a diesel engine: whenthe
fuel tank is compl etely em pty, refuel with at
lea st5 litres of diesel. Ad
Blue ®
(diesel engine vehicles only) Note
s onAdBlue ®
* NOTEWhen you open theAd Blue ®
tank,
small amounts of ammonia vapour may
escape. #
Only fill th eAd Blue ®
tank in well-venti‐
lated areas. #
Do not let AdBlue ®
come into contact
wi th skin, eyes or clo thes. #
Keep AdBlue ®
aw ay from children. *
NOTEDo not ingest AdBlue ®
. If
Ad Blue ®
is swallo wed: #
Immediately rinse out your mouth thor‐
oughl y. #
Drink plenty of water. #
Seek medical attention immediately. Ad
Blue ®
is a fluid urea solution forex haust gas
af te rtre atment of diesel engines. In order forthe Driving and pa
rking 16 9
Page 173 of 557

ex
haust gas af tertre atment tofunction properly,
only use AdBlue ®
in accordance wi thISO 222 41 .
Ad Blue ®
is ch aracterised bythefo llowing:
R non-t oxic
R colourless and odourless
R non-flammable
Ad Blue ®
may be topped up byfast service at a
qu alified specialist workshop, e.g. a Mercedes-
Benz Service Centre.
Ad Blue ®
is available at many filling stations from
Ad Blue ®
filling pumps.
Alternativel y,Ad Blue ®
is available at qualified
specialist workshops, e.g. Mercedes-Benz
Service Centres, and at many filling stations in
Ad Blue ®
re fill canis ters or AdBlue ®
re fill bottles.
% Ensure the connection between there fill
con tainer and vehicle filler neck does not
drip. To
pping up AdBlue ®
* NOTEEngine dama gedue toAd Blue ®
in
th e fuel #
AdBlue ®
must not be used tofill the
fuel tank. #
Only use AdBlue ®
to fill th eAd Blue ®
ta nk. #
Do not overfill theAd Blue ®
tank. *
NO
TEContamination of theve hicle inte‐
ri or due toAd Blue ®
lea kage #
Afterto pping up, carefully close the
Ad Blue ®
re fill con tainer. #
Avoid car rying AdBlue ®
re fill con tainers
permanently in theve hicle. Re
quirements:
The following announcements appear succes‐
sively in the multifunction display when the
Ad Blue ®
tan krequ iresrefuelling.
R Refill AdBlue See Owner's Manual . The
Ad Blue ®
in theta nk is at reser veleve l.
R Refill AdBlue No start in XXX mi. You can still
drive theve hicle over the dis tance shown.
To p up AdBlue ®
as soon as possible.
R Refill AdBlue Start not possible. The vehicle
can no longer be star ted.
The vehicle must be unloc ked. 17 0
Driving and pa rking
Page 175 of 557

#
Start theve hicle.
The display message in the instrument clus‐
te r goes out.
% Avoid storing AdBlue ®
re fill con tainers per‐
manently in theve hicle. Pa
rking Switching off
theve hicle with thest art/s top
button &
WARNING Risk offire caused byhot
ex haust sy stem parts
Flammable material such as lea ves, grass or
twigs may ignite if they come into contact
wi th hot parts of theex haust sy stem or
ex haust gasflow. #
Park theve hicle so that no flammable
material can come into con tact wi thhot
ve hicle components. #
In particular, do not park on dry grass‐
land or har vested grain fields. &
WARNING Risk of accident and inju ry
due tochildren left unat tended in the
ve hicle
If yo u lea vechildren unat tended in theve hi‐
cle, they may be able toset theve hicle in
motion, forex ample by:
R Releasing the parking brake.
R Shifting the automatic transmission out
of park position jor shifting the manual
transmission into neutral.
R Starting the engine.
In addition, they may operate vehicle equip‐
ment. #
Never lea vechildren and animals unat‐
te nded in theve hicle. #
When leaving theve hicle, alw aysta ke
th eke y with you and lock theve hicle.
This also applies tomobile phones if the
"Digital Car Key in the smartphone"
function is activated via the Mercedes
connect me web app. *
NO
TEDama getotheve hicle or the driv‐
et ra in caused bytheve hicle rolling away #
Alw ays proper lysecure theve hicle
against rolling away. #
On uphill or downhill inclines, turn the front
wheels towa rdsth eke rb. 17 2
Driving and pa rking
Page 176 of 557
#
Vehicles with manual transmission:
Engage firs t1 orreve rsege ar k. #
App lythe electric parking brake. #
Press button 1once.
% When you swit choff theve hicle, you can still
opera tethe side windo wsand the panoramic
sliding sunroof forfive minutes. Garage door opener
Prog
ramming buttons for the garage door
opener &
WARNING Risk ofexhaust gas poisoning
Combustion engines emit poisonous exhaust
ga ses such as carbon monoxide. Inhaling
th ese exhaust gases causes poisoning. #
Never lea vethe engine running in an
enclosed space wi thout suf ficient venti‐
lation. &
WARNING Risk of inju ryand ent rapment
when opening thega rage door using the
ga rage door opener
When you operate or program thega rage
door with the integrated garage door opener,
persons in thera nge of mo vement of the
ga rage door can become trapped or stru ck
by thega rage door. #
When using the integrated garage door
opener, alw ays make sure that nobody
is within the sweep of thega rage door. Prior
toprog ramming a garage door opener, park
th eve hicle outside thega rage and swit choff the
engine. #
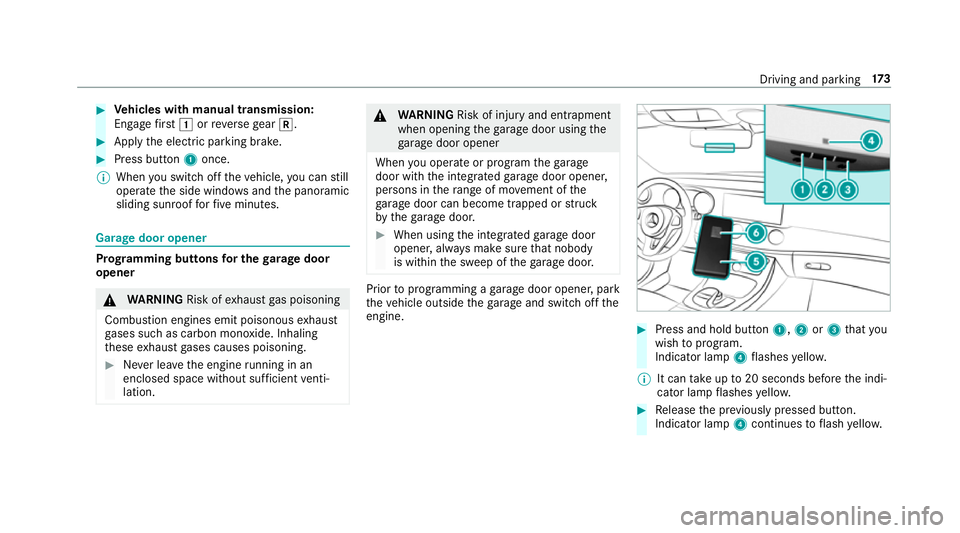
Press and hold button 1,2or3 that you
wish toprog ram.
Indicator lamp 4flashes yello w.
% It can take up to20 seconds before the indi‐
cator lamp flashes yello w. #
Release the pr eviously pressed button.
Indicator lamp 4continues toflash yello w. Driving and pa
rking 17 3