2016 MERCEDES-BENZ E-CLASS SALOON engine
[x] Cancel search: enginePage 140 of 557
%
The duration of the colour change varies
depending on the usage conditions. Mir
rors Operating
the outside mir rors &
WARNING Risk of inju rythro ugh adjust‐
ing vehicle settings while theve hicle is in
motion
Yo u could lose cont rol of theve hicle in the
fo llowing situations:
R ifyo u adjust the driver's seat, the head
re stra ints, thesteering wheel or the mir‐
ro r while theve hicle is in motion
R ifyo ufast enyour seat belt while theve hi‐
cle is in motion #
Before starting the engine: adjust the
driver's seat, the head restra ints, the
st eering wheel or the mir ror and fasten
yo ur seat belt. &
WARNING Risk of accident due tomis‐
judgement of dis tances when using the
outside mir ror
The outside mir rors reflect objects on a
smaller scale. The objects in view are in fact
closer than they appear.
As a result, you may misjud gethe dis tance
between you and thero ad user driving
behind you, e.g. when changing lanes. #
Therefore, alw ays look over your shoul‐
der in order toensure that you are
aw are of the actual dis tance between
yo u and thero ad users driving behind
yo u. #
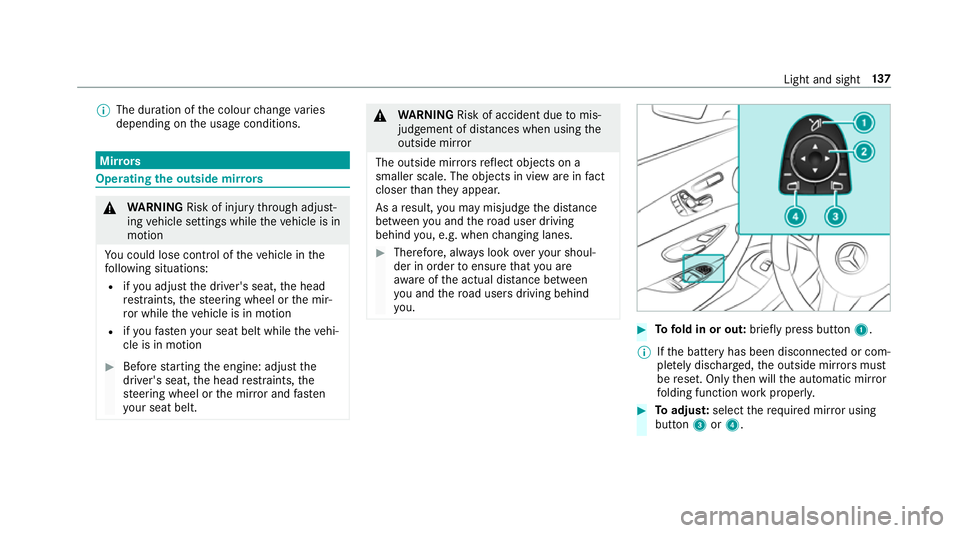
Tofold in or out: brieflypress button 1.
% Ifth e battery has been disconnected or com‐
ple tely discharged, the outside mir rors must
be reset. Only then will the automatic mir ror
fo lding function workproperly. #
Toadjus t:select therequ ired mir ror using
button 3or4. Light and sight
137
Page 141 of 557
#
Use button 2toset the position of the mir‐
ro ryo u ha veselected.
An outside mir ror which has been pushed out of
position can be engaged in position again in the
fo llowing manner: #
Vehicles without electrical lyfolding out‐
side mir rors:manually mo vethe outside
mir ror into the cor rect position. #
Vehicles with electrical lyfolding outside
mir rors:press and hold button 1.
Yo u will hear a click and the mir ror audibly
engage in position. The mir ror is set into the
cor rect position. Au
tomatic anti-dazzle mir rors &
WARNING Risk of bu rns and poisoning
due tothe anti-dazzle mir ror electrolyte
Electrolyte may escape if theglass in an
automatic anti-dazzle mir ror breaks.
The electrolyte is harmful and causes ir rita‐
tion. It mu stnot come into contact wi thyour skin,
eyes,respiratory organs or clo thing or
be swallo wed. #
Ifyo u come into contact with electro‐
ly te , obser vethefo llowing:
R Rinse the electrolyte from your skin
and seek medical attention immedi‐
atel y.
R If electrolyte comes into contact
with your eyes, rinse them thor‐
oughly with clean water and seek
medical attention immediately.
R Ifth e electrolyte is swallo wed,
immediately rinse your mouth out
th oroughly. Do not induce vomiting.
Seek medical attention immediately.
R Immedia tely ch ange out of clo thing
which has come into con tact wi th
electrolyte.
R If an allergic reaction occurs, seek
medical attention immediatel y. The outside mir
rors and inside rearview mir rors
on the driver's side automatically go into anti- dazzle mode if light from a headlamp hits
the
inside rearview mir ror.
Sy stem limitations
The mir rors do not go into anti-dazzle mode in
th efo llowing situations:
R the engine is switched off
R reve rsege ar is engaged
R interior lighting is swit ched on Pa
rking position of the passenger outside
mir ror The parking position makes parking easier.
The passenger outside mir ror tilts down wards
and sho wsthere ar wheel on the front passenger
side if:
R the parking position is stored
R the passenger mir ror is selected
R reve rsege ar is engaged
The passenger outside mir ror mo ves back toits
original position in thefo llowing situations: 13 8
Light and sight
Page 147 of 557
R
W automatic air distribution Ac
tivating/deactivating the climate control
syn chro nisation function via the control
panel Climate control can be set centrally using
the
synchronisation function. The temp erature and
air distribution setting forth e driver's side is
adop ted automatically forth e front passenger
side. #
Press button 0.
The synchronisation function is deactivated if
th e settings for one of theot her climate zones
are changed. Ac
tivating/deactivating the climate control
syn chro nisation function using the multime‐
dia sy stem Multimedia sy
stem:
, Vehicle .
b Climate con-
trol .
SYNC
Climate control can be set cent rally using the
synchronisation function. The temp erature set‐
ting is automatically adop tedfo r all clima te
zones. #
Switch the function on Oor off ª. Demisting
the windo ws Wi
ndo wsmis ted up on the inside #
Press the à button. #
Ifth e windo wscontinue tomist up: press the
¬ button.
Wi ndo wsmis ted up on the outside #
Switch on the windscreen wipers. #
Press the à button. Switching air-recirculation mode on/off
#
Press theg button.
The interior air will be recirculated.
Air-reci rculation mode is swit ched off automati‐
cally.
% If air-recirculation mode is switched on, the
windo wsmay mist up more quickl y.Switch
on ai r-re circulation mode only brie fly. Switching
residual heat on/off Re
quirement
The vehicle must be switched off.
Using there sidual heat of the engine, it is possi‐
ble tocontinue heating or ventilating the front
compartment of theve hicle, depending on the
set temp erature, for appro ximately 30 minutes. #
Toswitch on: pressthe! button.
Re sidual heat is switched off automaticall y.14 4
Climate cont rol
Page 150 of 557
cle. This is
the case in enclosed spaces or if
th eve hicle getsst uck in sn ow,fo rex ample. #
Alw ays switch thest ationary heater off
in enclosed spaces without an air
ex traction sy stems, e.g. in garage s. #
Keep theta ilpipe and the area around
th eve hicle free from snow when the
engine or thest ationary heater are run‐
ning. #
Open a window on the windward side of
th eve hicle toensure an adequate sup‐
ply of fresh air. &
WARNING Risk offire due tohot station‐
ary heater components
When thest ationary heater is swit ched on,
parts of theve hicle can become very hot,
e.g. theex haust sy stem.
Flammable materials such as lea ves, grass or
twigs may ignite if they come into contact
wi th:
R hot parts of theex haust sy stem R
theex haust gas itself #
When thest ationary heater is swit ched
on, make sure that:
R hot vehicle parts do not come into
contact with flammable materials
R theex haust gas can flow out of the
ta ilpipe unhindered
R theex haust gas does not come into
contact with flammable materials *
NO
TEBattery discharge caused bysta‐
tionary heater or stationary ventilation
operation Ope
rating thest ationary heater or stationary
ve ntilation drains the batter y. #
After heating or ventilating theve hicle
twice, drive for a longer period of time. Re
quirement:
The fuel tank is filled toat least reser vefuel
le ve l. #
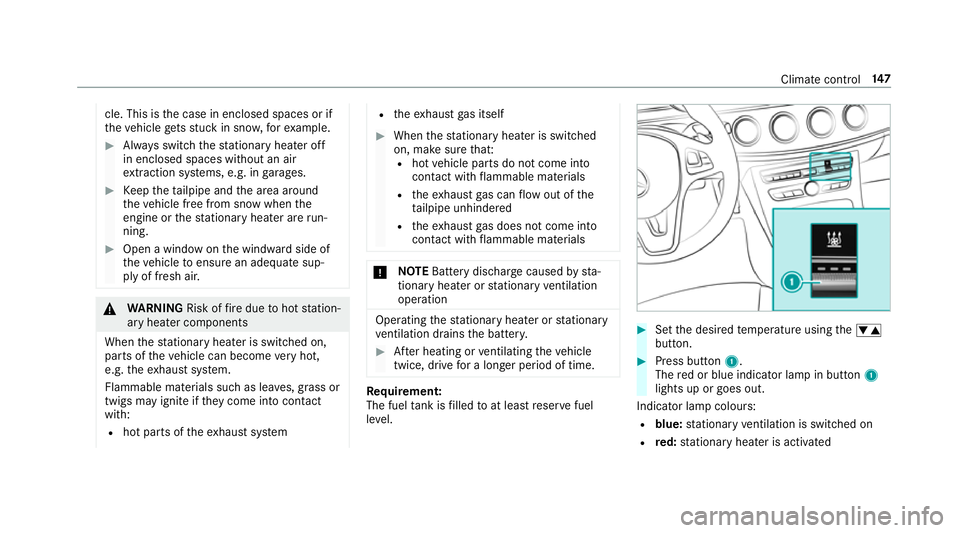
Set the desired temp erature using thew
button. #
Press button 1.
The red or blue indicator lamp in button 1
lights up or goes out.
Indicator lamp colours: R blue: stationary ventilation is switched on
R red: stationary heater is activated Climate control
147
Page 152 of 557
#
Todeactivate immediatel y:press and hold
th e^ button.
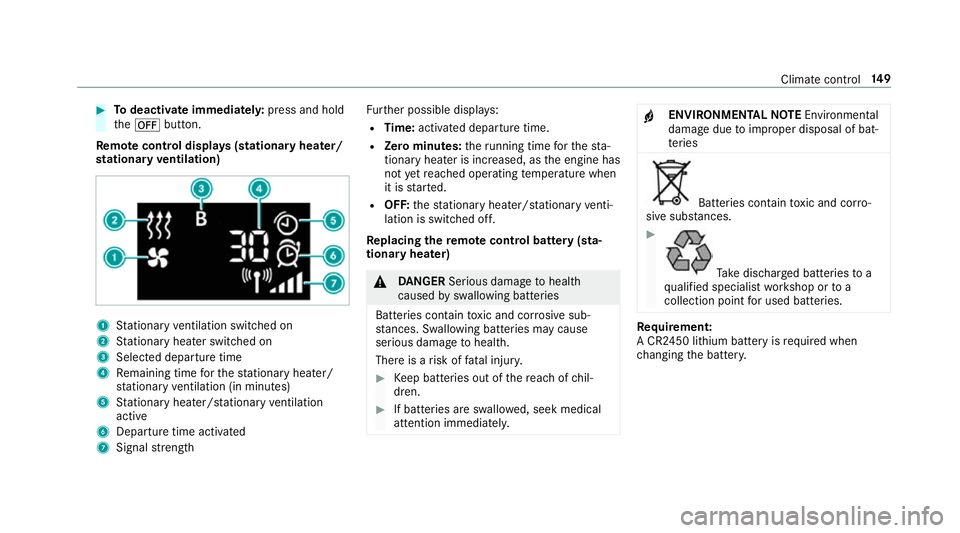
Re mo tecont rol displa ys(stationary heater/
st ationary ventilation) 1
Stationary ventilation switched on
2 Stationary heater swit ched on
3 Selected departure time
4 Remaining time forth est ationary heater/
st ationary ventilation (in minu tes)
5 Stationary heater/ stationary ventilation
acti ve
6 Departure time acti vated
7 Signal stre ngth Fu
rther possible displa ys:
R Time: activated departure time.
R Zero minutes: theru nning time forth est a‐
tionary heater is inc reased, as the engine has
not yetre ached operating temp erature when
it is star ted.
R OFF: thest ationary heater/ stationary venti‐
lation is switched off.
Re placing the remo tecont rol bat tery (sta‐
tiona ryheater) &
DANG ER Serious damage tohealth
caused byswallowing batteries
Batteries contain toxic and cor rosive sub‐
st ances. Swallowing bat teries may cause
serious damage tohealth.
There is a risk of fata l injur y. #
Keep batteries out of there ach of chil‐
dren. #
If batteries are swallo wed, seek medical
attention immediately. +
ENVIRONMEN
TALNO TEEnvironmental
dama gedue toimproper disposal of bat‐
te ries Batteries conta
intoxic and cor ro‐
sive subs tances. #
Ta
ke dischar ged batteries to a
qu alified specialist workshop or to a
collection point for used batteries. Re
quirement:
A CR2450 lithium battery is requ ired when
ch anging the batter y. Climate cont
rol14 9
Page 156 of 557

Driving
Swit
ching on the po wer supp lyor ignition
using thest art/s top button &
WARNING Risk of accident and inju ry
due tochildren left unat tended in the
ve hicle
If ch ildren are left unat tended in theve hicle,
th ey could:
R Open doo rs,th ereby endangering other
persons or road users.
R Get out of theve hicle and be hit by
oncoming traf fic.
R Ope rate ve hicle equipment.
Moreo ver,ch ildren could also set theve hicle
in motion by,fo rex ample:
R Releasing the parking brake.
R Shifting the automatic transmission out
of park position jor shifting manual
transmission into idle position.
R Starting the engine. #
Never lea vechildren and animals unat‐
te nded in theve hicle. #
When leaving theve hicle, alw aysta ke
th eke y with you and lock theve hicle.
This also applies tomobile phones if the
"Digital Car Key in the smartphone"
function is activated via the Mercedes
connect me web App. #
Keep theke ys out of there ach of chil‐
dren. This also applies tomobile
phones if the "Digital Car Key in the
smartphone" function is activated via
th e Mercedes connect me web App. &
WARNING Risk ofexhaust gas poisoning
Combustion engines emit poisonous exhaust
ga ses such as carbon monoxide. Inhaling
th ese exhaust gases causes poisoning. #
Never lea vethe engine running in an
enclosed space wi thout suf ficient venti‐
lation. &
WARNING Risk offire caused byflam‐
mable material on theex haust sy stem
Flammable materials brought in byeither ani‐
mals or environmen tal influences may ignite
if th ey come into contact wi thhot parts of
th e engine or exhaust sy stem. #
Therefore, check regularly that there
are no flammable materials in the
engine compartment or on theex haust
sy stem. Re
quirements:
R The key is located in theve hicle and thekey
battery is not dischar ged.
R Or if the "Digital Car Key in the smartphone"
function is activated via the Mercedes me
connect web App: the mobile phone is loca‐
te d in theve hicle. Driving and parking
15 3
Page 158 of 557

%
You can check the suitability of your mobile
phone byentering the phone number at
http://www.mercedes.me.
Information about suitable mobile phones
can be obtained from your Mercedes-Benz
service centre or at http://www.mercedes-
benz.com/connect.
% The function is on lyavailable in combination
with Mercedes me connect and on lyin cer‐
ta in countries.
% Protective cases around the mobile phone
can impair the functionality.
St arting theve hicle for the firs t time af ter
activating the function #
Make sure that there is a valid vehicle key in
th eve hicle. #
Place the mobile phone in stowage space 1
so that the NFC aerial areas touch each
ot her. #
Depress the brake pedal and start theve hicle
using thest art/ stop button.
% The key is not needed for any fur ther starts.
Any fu rther starts #
Place the mobile phone in stowage space 1
so that the NFC aerial areas touch each
ot her, and lea veitth ere while driving. #
Depress the brake pedal and start theve hicle
using thest art/ stop button.
If yo u lose your mobile phone, deactivate the
"Digital Car Key in the smartphone" service in
Mercedes me connect at https://
www.mercedes.me.
St arting theve hicle in emer gency operation
mode
If th eve hicle cannot be star ted, thePlace the
key in the marked space See Owner's Manual display message appears in
the multifunction
displa y. #
Make sure that mar ked space 2is em pty. #
Remo vekey1 from theke yring. #
Place key1 in mar ked space 2.
The vehicle will start af ter a short while.
If yo ure mo vekey1 from mar ked space 2
th e engine continues running. For fur ther
ve hicle starts ho wever,ke y1 must be loca‐
te d in mar ked space 2during the entire
journe y. #
Have key1 checked at a qualified specialist
wo rkshop. Driving and parking
15 5
Page 159 of 557

If
th eve hicle does not star t: #
Lea vekey1 in mar ked space 2. #
Depress the brake pedal and start theve hicle
using thest art/ stop button.
% You can also swit chon the po wer supp lyor
th e ignition with thest art/ stop button. Ru
nning-in no tes To
preser vethe engine during thefirs t1, 500 km:
R drive at varying road speeds and engine
speeds.
R drive in drive program Cor E.
R change gear before there v counter needle is
Ô ofthewa yto there d area of there v coun‐
te r.
R do not shift down a gear manually in order to
brake.
R avoidoverstra ining theve hicle, e.g. driving at
full thro ttle.
R vehicles with automatic transmission: do
not depress the accelera tor pedal past the
pressure point (kickdown). R
only increase the engine speed gradually and
accelera tetheve hicle tofull speed af ter
1, 500 km.
This also applies when the engine or parts of the
driv etra in ha vebeen replaced.
Please also obser vethefo llowing running-in
no tes:
R In cer tain driving and driving saf ety sy stems,
th e sensors adjust automatically while a cer‐
ta in dis tance is being driven af terth eve hicle
has been delivered or af terre pairs. Full sys‐
te m ef fectiveness is not achie ved until the
end of this teach-in process.
R Brake linings, brake discs and tyres that are
either new or ha vebeen replaced only ach‐
ie ve optimum braking ef fect and grip af ter
se veral hundred kilom etre s of driving. Com‐
pensate forth ere duced braking ef fect by
applying greaterfo rc eto the brake pedal. Driving tips
&
WARNING Risk of accident due to
objects in the driver's foot we ll
Objects in the driver's foot we ll may impede
pedal tr avel or block a depressed pedal.
This jeopardises the operating and road
saf ety of theve hicle. #
Stow all objects in theve hicle securely
so that they cannot getinto the driver's
fo ot we ll. #
Ensure floor mats and carpets cannot
slip and pr ovide suf ficient room forthe
pedals. #
Do not lay multiple floor mats or car‐
pets on top of one ano ther. 15 6
Driving and pa rking