2016 MERCEDES-BENZ E-CLASS SALOON buttons
[x] Cancel search: buttonsPage 144 of 557
Overview of climate control sy
stems THERM
ATIC cont rol panel overview The indicator lamps in
the buttons indicate that
th e cur rent function is acti vated.
Plug-in hybrid: obser vethe no tes on climate
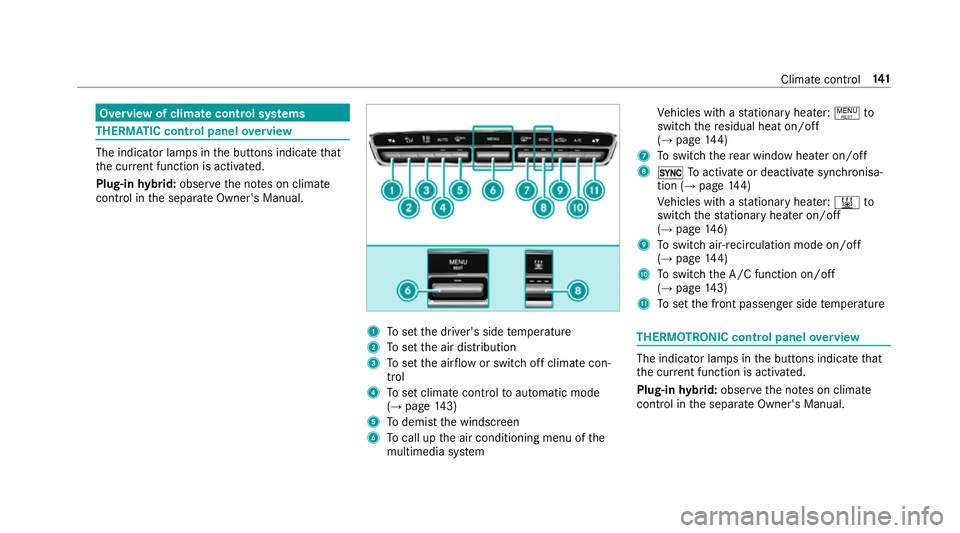
contro l inthe separate Owner's Manual. 1
Toset the driver's side temp erature
2 Toset the air distribution
3 Toset the air flow or switch off climate con‐
trol
4 Toset climate contro lto automatic mode
(→ page 143)
5 Todemist the windscreen
6 Tocall up the air conditioning menu of the
multimedia sy stem Ve
hicles with a stationary heater: !to
switch there sidual heat on/off
(→ page 144)
7 Toswitch there ar wind owheater on/off
8 0 Toactivate or deactivate syn chronisa‐
tion (→ page 144)
Ve hicles with a stationary heater: &to
switch thest ationary heater on/off
(→ page 146)
9 Toswitch air-recirculation mode on/off
(→ page 144)
A Toswitch the A/C function on/off
(→ page 143)
B Toset the front passenger side temp erature THERMOTRONIC control panel
overview The indicator lamps in
the buttons indicate that
th e cur rent function is acti vated.
Plug-in hybrid: obser vethe no tes on climate
contro l inthe separate Owner's Manual. Climate control
141
Page 151 of 557
R
yello w: departure time is preselected
The stationary heater/ stationary ventilation
switches off au tomatical lyafte r 50 minutes.
Setting thest ationary heater/stationary ven‐
tilation using the multimedia sy stem
Multimedia sy stem:
, Vehicle .
b Climate control .
Aux-
iliary heating
Yo u can pre-set thre e departure times for auto‐
matic activation of thest ationary heater. #
Select an option.
Setting thest ationary heater/stationary ven‐
tilation via remo tecont rol
Re quirement:
The fuel tank is filled toat least reser vefuel
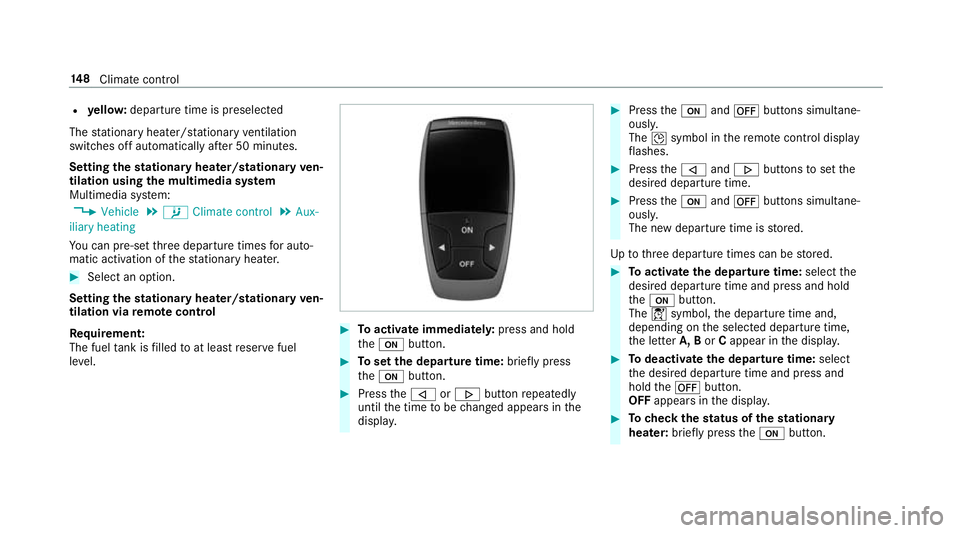
le ve l. #
Toactivate immediatel y:press and hold
th eu button. #
Toset the departu retime: briefly press
th eu button. #
Press the, or. button repeatedly
until the time tobe changed appears in the
displa y. #
Press theu and^ buttons simultane‐
ousl y.
The Îsymbol in there mo tecontrol displ ay
fl ashes. #
Press the, and. buttons toset the
desired departure time. #
Press theu and^ buttons simultane‐
ousl y.
The new departure time is stored.
Up tothre e departure times can be stored. #
Toactivate the departu retime: select the
desired departure time and press and hold
th eu button.
The Ísymbol, the departure time and,
depending on the selected departure time,
th e letter A, BorCappear in the displa y. #
Todeactivate the departure time: select
th e desired departure time and press and
hold the^ button.
OFF appears in the displa y. #
Tocheck thest atus of thest ationary
heater: briefly press theu button. 14 8
Climate cont rol
Page 176 of 557
#
Vehicles with manual transmission:
Engage firs t1 orreve rsege ar k. #
App lythe electric parking brake. #
Press button 1once.
% When you swit choff theve hicle, you can still
opera tethe side windo wsand the panoramic
sliding sunroof forfive minutes. Garage door opener
Prog
ramming buttons for the garage door
opener &
WARNING Risk ofexhaust gas poisoning
Combustion engines emit poisonous exhaust
ga ses such as carbon monoxide. Inhaling
th ese exhaust gases causes poisoning. #
Never lea vethe engine running in an
enclosed space wi thout suf ficient venti‐
lation. &
WARNING Risk of inju ryand ent rapment
when opening thega rage door using the
ga rage door opener
When you operate or program thega rage
door with the integrated garage door opener,
persons in thera nge of mo vement of the
ga rage door can become trapped or stru ck
by thega rage door. #
When using the integrated garage door
opener, alw ays make sure that nobody
is within the sweep of thega rage door. Prior
toprog ramming a garage door opener, park
th eve hicle outside thega rage and swit choff the
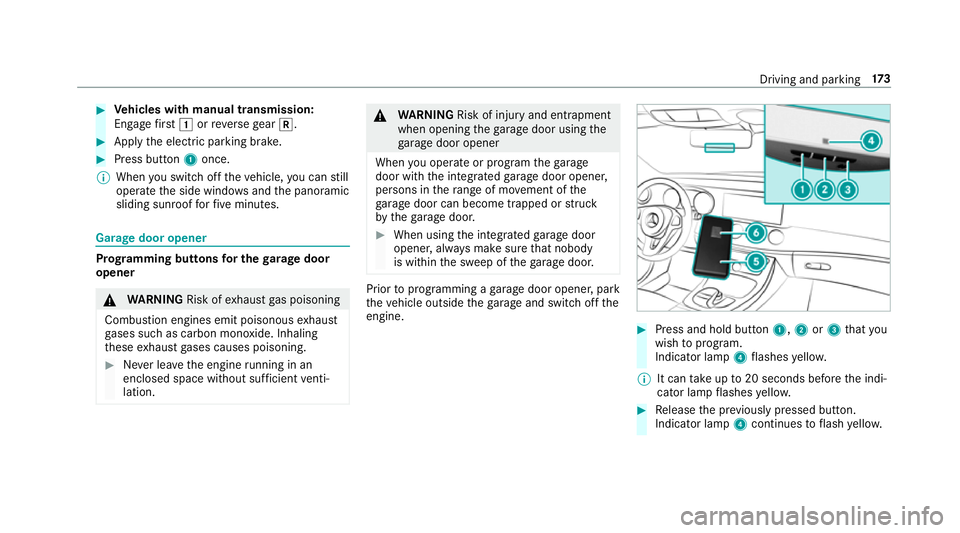
engine. #
Press and hold button 1,2or3 that you
wish toprog ram.
Indicator lamp 4flashes yello w.
% It can take up to20 seconds before the indi‐
cator lamp flashes yello w. #
Release the pr eviously pressed button.
Indicator lamp 4continues toflash yello w. Driving and pa
rking 17 3
Page 177 of 557
#
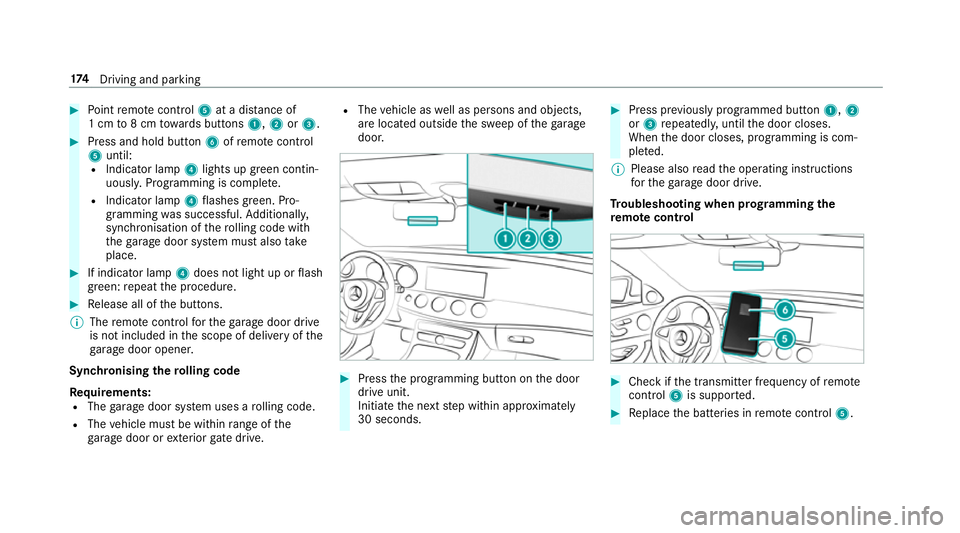
Point remo tecontrol 5at a di stance of
1 cm to8 cm towa rds buttons 1,2or3. #
Press and hold button 6ofremo tecontrol
5 until:
R Indicator la mp4lights up green contin‐
uousl y.Programming is comple te.
R Indicator lamp 4flashes green. Pro‐
gr amming was successful. Additionally,
synchronisation of thero lling code with
th ega rage door sy stem must also take
place. #
If indicator lamp 4does not light up or flash
green: repeat the procedure. #
Release all of the buttons.
% The remo tecontrol forth ega rage door drive
is not included in the scope of delivery of the
ga rage door opener.
Synchronising thero lling code
Re quirements:
R The garage door sy stem uses a rolling code.
R The vehicle must be within range of the
ga rage door or exterior gate drive. R
The vehicle as well as persons and objects,
are located outside the sweep of thega rage
door. #
Press the programming button on the door
drive unit.
Initiate the next step within appr oximately
30 seconds. #
Press pr eviously prog rammed button 1,2
or 3 repeatedl y,until the door closes.
When the door closes, programming is com‐
ple ted.
% Please also read the operating instructions
fo rth ega rage door drive.
Tr oubleshooting when prog ramming the
re mo tecont rol #
Check if the transmit ter frequency of remo te
control 5is suppo rted. #
Replace the batteries in remo tecontrol 5. 174
Driving and pa rking
Page 178 of 557
#
Hold remo tecontrol 5atvarious angles at
a dis tance between 1 cm to8 cm in front of
th e inside rearview mir ror.Yo u should test
eve ryposition for at least 25 seconds before
trying ano ther position. #
Hold remo tecontrol 5atthe same angles
at various dis tances in front of the inside
re arview mir ror.Yo u should test eve ryposi‐
tion for at least 25 seconds before trying
ano ther position. #
Notethat some remo tecontrols transmit
only for a limi ted period, press button 6on
re mo tecontrol 5again before transmission
ends. #
Align the aerial line of thega rage door
opener unit with there mo tecontrol.
% Support and additional information on pro‐
gramming:
R Onthe HomeLink ®
Hotline on (0) 08000
466 354 65 or +49 (0) 6838 907-2 77.
R Onthe Internet at http://
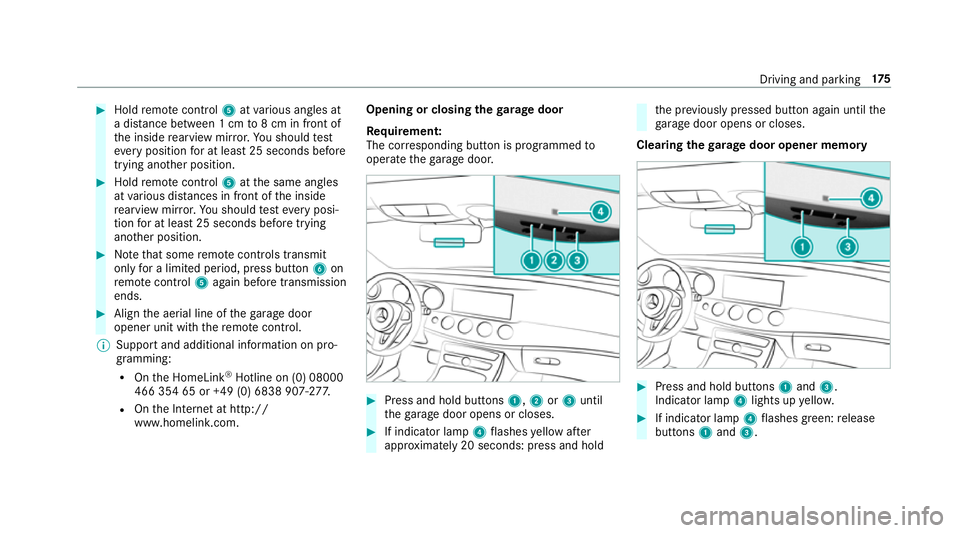
www.homelin k.com. Opening or closing the
garage door
Requ irement:
The cor responding button is programmed to
operate thega rage door. #
Press and hold buttons 1,2or3 until
th ega rage door opens or closes. #
If indicator lamp 4flashes yellow af ter
appr oximately 20 seconds: press and hold th
e pr eviously pressed button again until the
ga rage door opens or closes.
Clearing thega rage door opener memo ry #
Press and hold buttons 1and 3.
Indicator lamp 4lights up yello w. #
If indicator lamp 4flashes green: release
buttons 1and 3. Driving and parking
175
Page 248 of 557

Ve
hicles with Traf fic Sign Assist and wide‐
screen cockpit: detected instructions and traf‐
fi c signs appear in the speedome ter
( → page 229).
* NO
TEEngine dama gedue toexc essively
high engine speeds The engine will be damaged if
you drive with
th e engine in theov errevving range. #
Do not drive wi th the engine in theove r‐
re vving range. The fuel supply is inter
rupted toprotect the
engine when there d band in rev counter 3
(o ve rrev ving range) is reached.
During no rmal operating conditions, coolant
te mp erature display 4may rise to120 °C. &
WARNING Danger of bu rns when open‐
ing the bonn et
If yo u open the engine bonn etwhen the
engine has overheated or during a fire inthe
engine compartment, you could come into contact with hot
gases or other escaping
operating fluids. #
Before opening the bonn et, allow the
engine tocool down. #
Intheeve nt of a fire inthe engine com‐
partment, keep the engine bonn et
closed and call thefire service. Plug-in
hybrid: make sure that youre ad the
separate Owner's Manual. Otherwise, you may
fa ilto recognise dangers. Overview of the buttons on the
steering
wheel 1
Button group:
% Main menu and ba ckbutton (on-board
computer)
8 Switches sound off/on
W Increases thevo lume
X Decreases thevo lume
2 Touch Control (on-board co mputer)
3 Touch Control (multimedia sy stem)
4 Button group:
% Main menu and back button (multime‐
dia sy stem) Instrument Display and on-board computer
245
Page 257 of 557

R
Updating data...: the call list is being upda‐
te d.
R Importing contacts... :th e conta cts from the
mobile phone or from a storage medium are
impor ted.
Ac cepting/rejecting a call
When youre cei vea call, a message appears in
th e Head-up-Display Incoming callIncoming call.#
Swipe upwards or down wards on the left-
hand Touch Control and select 6(Accept)
or ~ (Reject). #
Press the left-hand Touch Control.
The call may be accep ted/rejec ted using the
6 or~ buttons on thesteering wheel. Setting display content
On-board computer:
, Content
% This function is only available forve hicles
with a widescreen cockpit. Yo
u can select thefo llowing display con tent:
R Right display: select contents forth eright-
hand display content (Progressive style)
R Assist. graphic (Progressivestyle)
R Power meter : power me ter (Progressive
st yle)
R Revs :re v counter ( ClassicandSport styles)
R Power meter : power me ter (Classic and
Sport styles)
R Date (Progressive style)
R Navigation
R ECO display
R Consumption #
Toselect display content: swipe upwards
or down wards on the left-hand side of Touch
Control. #
Press the left-hand Touch Control.
Classic andSport style: the selected display
conte nts are shown in theright-hand instru‐
ment displa y. Progressive
style: the selected display con‐
te nt appears on the left-hand side of the
instrument displa y.
Contents forri ght-hand display contents
(Progressive style) #
Select Right display and pressthe left-hand
side of Touch Control. #
Swipe upwards or down wards on the left-
hand side of Touch Control toselect display
content. #
Press the left-hand Touch Control.
The selected displ aycontent appea rson the
ri ght-hand side of the instrument displa y. Ad
justing the head-up display settings in the
on-board co mputer On-board computer:
, HUD
The following head-up display settings can be
adjus ted:
R Position
R Brightness 254
Instrument Display and on-board computer
Page 517 of 557
Boot lid
....................................................... 73
Ac tivating/deactivating the boot lid
opening limiter ...................................... 78
Closing .................................................. .74
HANDS-FREE ACCESS .......................... .76
Loc ked separately .................................77
Opening .................................................73
Opening dimensions ............................4 33
Boot lid see Boot lid
see Locking/unlocking
Boot load ................................................. .434
Brake Assist Sy stem
see BAS (Brake Assi stSystem)
Brake fluid
No tes ................................................... 431
Brake forc e distribution
EBD (Elect ronic Brake forc e Distribu‐
tion) ..................................................... 184
Brakes ABS (Anti-lock Braking Sy stem) ........... 180
Ad aptive brake lights .......................... .190
BA S (Brake Assi stSystem) ...................1 81
Driving tips .......................................... 15 6EBD (Electronic Brake
forc e Distribu‐
tion) ..................................................... 184
HOLD function .................................... .203
Limi ted braking ef fect (salt-trea ted
ro ads) .................................................. 15 6
New/replaced brake linings/brake
discs .................................................... 15 6
Ru nning-in no tes ..................................1 56
Brakes see Active Brake Assi st
Braking assistance see BAS (Brake Assi stSystem)
Breakdown ............................................... 381
Assis tance overview .............................. 18
To w- starting ........................................ 397
To wing away ........................................ 393
Tr ansporting theve hicle ......................3 95
Wheel change ...................................... 414
Breakdown assistance call see Service call
Breakdown management see Service call Burmes
ter®
high-end 3D sur round
sound sy stem
Ad justing the balance/fader ................3 61
Ad justing the sound optimisation ........ 362
Ad justing treble, mid and bass ............ 361
Calling up the sound menu .................. 361
Information .......................................... 361
Setting the sound profile ..................... 362
Burmes ter®
sur round sound sy stem .....3 60
Ad justing the balance/fader ................3 61
Ad justing the sound focus ................... 361
Ad justing treble, mid and bass ............ 361
Calling up the sound menu .................. 360
Information .......................................... 360
Switching the sur round sound on/off
............................................................ .361
Buttons Steering wheel .....................................2 45 C
CA module (TV) ........................................ 360
Calling up a menu ................................ 360
Inse rting .............................................. 359 514
Index