2016 MERCEDES-BENZ E-CLASS SALOON width
[x] Cancel search: widthPage 215 of 557

R
Ifth e light conditions are poor, e.g. at night.
R Ifth e camera lens is obstructed, dirty or mis‐
te d up. Obser vethe no tes on cleaning the
re ve rsing camera (→ page374).
R Ifth ere ar of your vehicle is damaged. In this
case, ha vethe camera position and setting
ch ecked at a qualified specialist workshop.
The field of vision and other functions of the
re ve rsing camera may be restricted due toaddi‐
tional accesso ries on there ar of theve hicle (e.g.
licence plate brac ket or bicycle rack ).
Ve hicles without Parking Pilot
The following camera vie wsare available in the
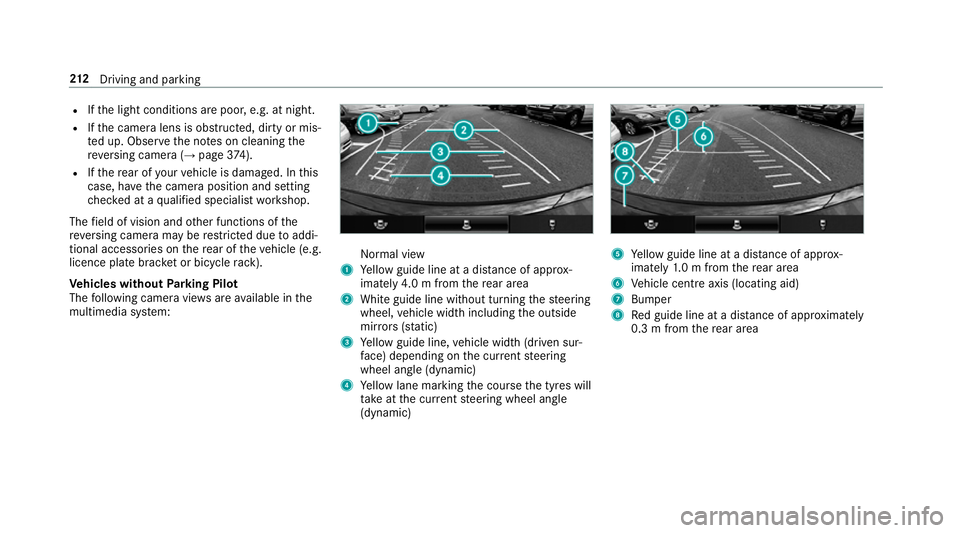
multimedia sy stem: Normal view
1 Yellow guide line at a dis tance of appr ox‐
imately 4.0 m from there ar area
2 White guide line without turning thesteering
wheel, vehicle width including the outside
mir rors (sta tic)
3 Yellow guide line, vehicle width (driven sur‐
fa ce) depending on the cur rent steering
wheel angle (dynamic)
4 Yellow lane marking the course the tyres will
ta ke atthe cur rent steering wheel angle
(dynamic) 5
Yellow guide line at a dis tance of appr ox‐
imately 1.0 m from there ar area
6 Vehicle centre axis (locating aid)
7 Bumper
8 Red guide line at a dis tance of appr oximately
0.3 m from there ar area 212
Driving and pa rking
Page 216 of 557

Wi
de-angle view Tr
ailer view
1 Yellow guide line, locating aid 2
Red guide line at a dis tance of appr oximately
0.3 m tothe ball head of the trailer hitch
3 Ball head of the trailer hitch
Ve hicles with Parking Pilot
The following camera vie wsare available in the
multimedia sy stem: Normal view
1 Yellow lane marking the course the tyres will
ta ke atthe cur rent steering wheel angle
(dynamic)
2 Yellow guide line, vehicle width (driven sur‐
fa ce) depending on the cur rent steering
wheel angle (dynamic) 3
Red guide line at a dis tance of appr oximately
0.3 m from there ar area
4 Yellow warning display of Parking Assist
PA RKTRONIC: obstacles are at a dis tance of
between appr oximately 0.6 m and 1.0 m
5 Redwa rning display of Parking Assist
PA RKTRONIC: obstacles are very close
(appr oximately 0.3 m or less)
6 Orange warning display of Parking Assist
PA RKTRONIC: obstacles are a medium dis‐
ta nce away (between appr oximately 0.3 m
and 0.6 m)
% Ifth e entire sy stem fails, the inner segments
of thewa rning display are shown in red. The
indicator lamp on thePA RKTRONIC but ton
lights up and theé symbol appears in
th e multifunction displa y.
If th e sy stem fails at there ar:
R there ar segments are shown in red when
re ve rsing.
R there ar segments are hidden when driv‐
ing forw ards. Driving and parking
213
Page 219 of 557

Guide lines
1
Yellow lane marking the course the tyres will
ta ke atthe cur rent steering wheel angle
(dynamic)
2 Yellow guide line, vehicle width (driven sur‐
fa ce) depending on the cur rent steering
wheel angle (dynamic)
3 Red guide line at a dis tance of appr oximately
0.3 m from there ar area
4 Mark at a distance of appr ox.1. 0 m
% When Parking Pilot is active, the lanes are
displa yed in green. The guide lines in
the multimedia sy stem dis‐
play show the dis tances toyour vehicle. The
dis tances only apply toroad le vel. In trailer
mode, the guide lines are shown at the le vel
of the trailer hitch.
Sy stem limitations
The 360° Camera will not function or will only
partially function in thefo llowing situations:
R Ifth e doors are open.
R The side mir rors are folded in.
R Ifth e boot lid or tailgate is open.
R Ifth ere is heavy rain, snow or fog.
R Ifth e light conditions are poor, e.g. at night.
R Ifth e camera lens is obstructed, dirty or mis‐
te d up.
R Ifth eve hicle components in which the cam‐
eras are fitted are dama ged. In this event,
ha ve the camera position and setting
ch ecked at a qualified specialist workshop.
Do not use the 360° Camera under such circum‐
st ances. You could otherwise injure others or
collide with objects when parking theve hicle. On
vehicles with height-adjus table suspension or
if th eve hicle is car rying a heavy load, leaving the
st andard height can result in inaccuracies in the
guide lines and in the display of thege nerated
ima ges, depending on tech nical conditions.
The field of vision and other functions of the
came rasystem may be restricted due toaddi‐
tional accesso ries on there ar of theve hicle (e.g.
licence plate brac ket, bicycle rack ).
See the no tes on cleaning the 360° Camera
(→ page 374).
Selecting a view for the 360° Camera
The Auto reversing camera function is selected
in the multimedia sy stem. #
Enga gereve rsege ar. #
Inthe multimedia sy stem, select the desired
vie w.
Switching reve rsing camera automatic mode
on/off
The reve rsing camera is only an aid. It is not a
substitute foryo ur attention tothe sur roundings.
The responsibility for safe manoeuvring and
parking remains with you. Make sure that no 216
Driving and pa rking
Page 404 of 557

No
ise or unusual handling characteristics
While driving, pay attention tovibrations, noises
and unusual handling characteristics, e.g. pulling
to one side. This may indicate that the wheels or
tyres are damaged. If you suspect that a tyre is
defective, reduce your speed immediatel y.Stop
th eve hicle as soon as possible tocheck the
wheels and tyres for dama ge. Hidden tyre dam‐
age could also be causing the unusual handling
ch aracteristics. If youfind no signs of damage,
ha ve the tyres and wheels checked at a qualified
specialist workshop. Re
gular checking of wheels and ty res&
WARNING Risk of accident from dam‐
aged tyres
Dama ged tyres can cause tyre pressure loss.
As a result, you could lose cont rol of your
ve hicle. #
Check the tyres regularly for signs of
dama geand replace any damaged tyres
immediatel y. &
WARNING Risk of aquaplaning due to
insuf ficient tyre tread
Insu fficient tyre tread will result in reduced
tyre grip. The tyre tread is no longer able to
dissipate water.
This means that in heavy rain or slush the
ri sk of aquaplaning is increased, in particular
where speed is not adap tedto suit the condi‐
tions.
If th e tyre pressure is too high or too lo w,
tyres may exhibit dif fere nt le vels of wear at
dif fere nt locations on the tyre tread. #
Thus, you should regularly check the
tread de pth and the condition of the
tread across the entire width of all
tyres.
Minimum tread dep thfor:
R Summer tyres: 3 mm
R M+S tyres: 4 mm #
For saf etyre asons, replace the tyres
before the legally prescribed limit for
th e minimum tread dep thisreached. Car
ryout thefo llowing checks on all wheels reg‐
ularly, at least once a month or as requ ired, e.g.
prior toa long journey or driving off- road:
R Check the tyre pressure (→ page 402).
R Visual inspection of wheels and tyres for
damage.
R Check theva lve caps.
The valves must be pr otected against mois‐
ture and dirt bytheva lve caps appr oved
especially foryo ur vehicle byMercedes-Benz.
R Visual check of the tread dep thand the tyre
contac t surface across the entire width.
The minimum tread dep thfor summer tyres
is 3 mm and for winter tyres 4 mm. Note
s on snow chains &
WARNING Risk of accident due toincor‐
re ct snow chain fitting
If yo u ha vefitted snow chains tothe front
wheels, the snow chains may drag against
th eve hicle body or chassis components. Wheels and tyres
401
Page 414 of 557

*
NO
TERisk todriving saf ety from retrea‐
ded tyres Re
treaded tyres are nei ther tested nor rec‐
ommended byMercedes-Benz, since pr evi‐
ous damage cannot alw ays be de tected on
re treaded tyres.
Fo rth is reason driving saf ety cannot be guar‐
anteed. #
Do not use used tyres if you ha veno
information about their pr evious usage. *
NO
TEPossible damage towheels or
tyres when driving over obs tacles Lar
gewheels ha vea lo wer tyre section width.
The lo werth e tyre section width, the greater
is therisk of damage towheels or tyres when
driving over obs tacles. #
Avoid obs tacles or drive pa rticular ly
carefully. *
NO
TEDama getoelectronic component
parts from the use of tyre-fitting tools Ve
hicles with a tyre pressure monitoring
sy stem: electronic component parts are
located in the wheel. Tyre-fitting tools should
not be applied in the area of theva lve.
The tools could damage the electronic com‐
ponent parts. #
Have the tyres changed at a qualified
specialist workshop onl y. *
NO
TEDama getosummer tyres at low
ambient temp eratures Using summer tyres at
very low ambient
te mp eratures can cause crac kstoform,
th ereby damaging the tyres permanentl y. #
Attemp eratures below 7 °C use M+S-
tyres. Ac
cessory pa rts th at are not appr ovedfo ryo ur
ve hicle byMercedes-Benz or that are not being
used cor rectly can impair ope rating sa fety. Before pu
rchasing and using non-appr oved
accesso ries, visit a qualified specialist workshop
and enquire about:
R Suitability
R Legal stipulations
R Factory recommendations &
WARNING Risk of accident wi thhigh
per form ance tyres
The special tyre tread in combination with
th e optimised tyre compound, means that
th erisk of skidding or hydroplaning on wet
ro ads is inc reased.
In addition, the tyre grip is greatly reduced at
a low outside temp erature and tyre running
te mp erature. #
Switch on the ESP ®
and adapt your
driving style accordingly. #
Use M+S tyres at outside temp eratures
of less than 50 °F. Wheels and tyres
411
Page 437 of 557

Opening height
Model
1
1Opening
height
E 250
E 350 d 18
39 mm
E 300 1826 mm Model
1 1Opening
height
E 200 4MATIC
E 220 d 4MATIC 18
45 mm
All other models 1833 mm Ve
hicle dimensions All models
Ve
hicle lengt h4 923 mm
Ve hicle width including out‐
side mir rors 2065 mm
Ve hicle width excluding out‐
side mir rors 18
52 mm
Wheelbase 2939 mm Model
Vehicle
height
E 200 4MATIC
E 220 d 4MATIC 14
80 mm
E 250
E 350 d 14
74 mm
E 300 1460 mm
E 400 4MATIC 14 67mm
All other models 1468 mm We
ights and loads Please no
tethat forth e specified vehicle data:
R items of optional equipment increase the
unladen weight and reduce the maximum
pa yload.
R vehicle-specific weight information can be
fo und on theve hicle identification plate . 434
Tech nical da ta
Page 549 of 557

No
tes on fitting ................................... 409
Re moving ............................................. 417
Re placing ............................................ 409
Re starting the tyre pressure loss
wa rning sy stem ................................... 409
Re starting the tyre pressure monitor‐
ing sy stem ...........................................4 05
Selection ............................................. 409
Snow chains ........................................ 401
St oring .................................................4 13
TIREFIT kit ...........................................3 83
Ty re pressure (N otes) .......................... 402
Ty re pressure loss warning sy stem
(function) ............................................. 408
Ty re pressure monitoring sy stem
(function) ............................................. 404
Ty re pressure table .............................. 403
Ty re(s) .................................................. 401
Un usual handling characteristics ........ .401 U
Un its of measurement
Setting ................................................ .281
Un locking setting ...................................... 65 USB devices
Connecting .......................................... 341
User profile .............................................. 282
Creating .............................................. 282
Importing/exporting .......................... .283
Options ................................................ 283
Selecting ............................................. 282 V
Ve hicle .............................................. 154, 15 5
Ac tivating/deactivating standby
mode .................................................. .179
Commands (LING UATRONIC) .............. 266
Cor rect use ........................................... 27
Data acquisition .................................... 27
Diagno stics connection ........................ .26
Equipment ............................................. 23
Implied warranty .................................... 27
Locking (auto matically) ......................... .71
Locking (emergency key) ...................... .71
Locking (from inside) ............................. 69
Locking (KEYLESS-GO) ..........................70
Locking (mobile phone) ......................... 69
Lo we ring .............................................. 41 8
Pa rking up .......................................... .178 QR code
rescue card ............................. 27
Qualified specialist workshop ................26
Ra ising ................................................ .415
Re gistration ...........................................27
St arting (eme rgency operation
mode) .................................................. 15 5
St arting (mobile phone) ...................... .154
St arting (s tart/s top button) .................1 54
Switching off (s tart/s top button) .........1 72
Un locking (from inside) ........................ .69
Un locking (KEYLESS-GO) ...................... .70
Un locking (mobile phone) ...................... 69
Ve ntilating (co nvenience opening) ......... 80
Ve hicle
see Locking/unlo cking
Ve hicle battery ........................................ 387
Ve hicle data
Boot load ............................................. 434
Displ aying ............................................ 161
Ro of load ............................................. 434
Ve hicle height ...................................... 433
Ve hicle length ...................................... 433
Ve hicle width ....................................... 433
Wheelbase ...........................................4 33546
Index