2016 MERCEDES-BENZ E-CLASS SALOON ad blue
[x] Cancel search: ad bluePage 150 of 557

cle. This is
the case in enclosed spaces or if
th eve hicle getsst uck in sn ow,fo rex ample. #
Alw ays switch thest ationary heater off
in enclosed spaces without an air
ex traction sy stems, e.g. in garage s. #
Keep theta ilpipe and the area around
th eve hicle free from snow when the
engine or thest ationary heater are run‐
ning. #
Open a window on the windward side of
th eve hicle toensure an adequate sup‐
ply of fresh air. &
WARNING Risk offire due tohot station‐
ary heater components
When thest ationary heater is swit ched on,
parts of theve hicle can become very hot,
e.g. theex haust sy stem.
Flammable materials such as lea ves, grass or
twigs may ignite if they come into contact
wi th:
R hot parts of theex haust sy stem R
theex haust gas itself #
When thest ationary heater is swit ched
on, make sure that:
R hot vehicle parts do not come into
contact with flammable materials
R theex haust gas can flow out of the
ta ilpipe unhindered
R theex haust gas does not come into
contact with flammable materials *
NO
TEBattery discharge caused bysta‐
tionary heater or stationary ventilation
operation Ope
rating thest ationary heater or stationary
ve ntilation drains the batter y. #
After heating or ventilating theve hicle
twice, drive for a longer period of time. Re
quirement:
The fuel tank is filled toat least reser vefuel
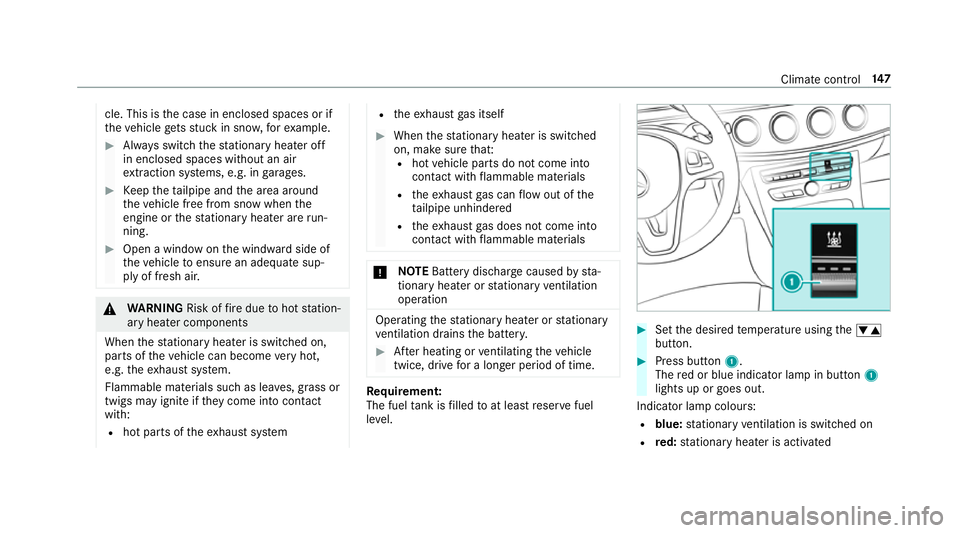
le ve l. #
Set the desired temp erature using thew
button. #
Press button 1.
The red or blue indicator lamp in button 1
lights up or goes out.
Indicator lamp colours: R blue: stationary ventilation is switched on
R red: stationary heater is activated Climate control
147
Page 172 of 557

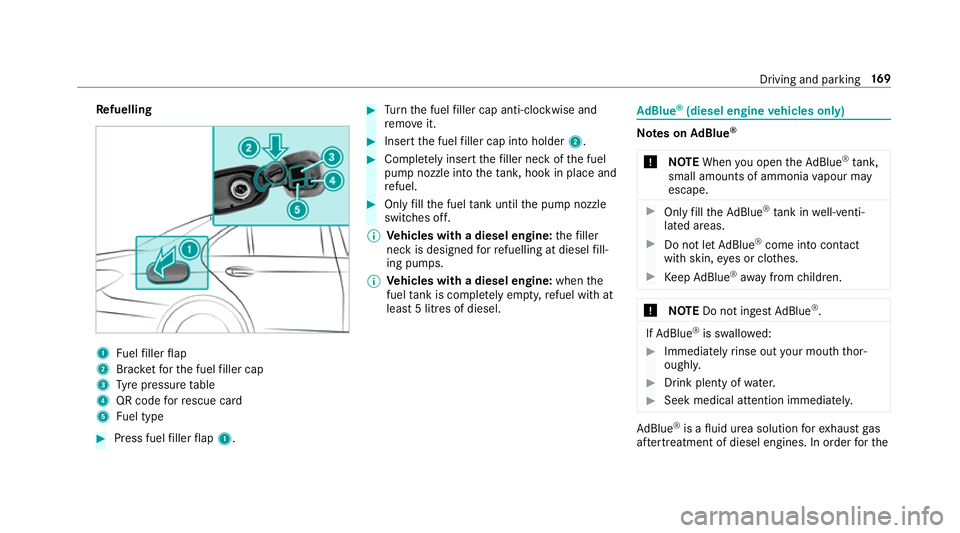
Re
fuelling 1
Fuelfiller flap
2 Brac ketfo rth e fuel filler cap
3 Tyre pressure table
4 QR code forre scue card
5 Fuel type #
Press fuel filler flap 1. #
Turn the fuel filler cap anti-clockwise and
re mo veit. #
Insert the fuel filler cap into holder 2. #
Comple tely inse rtthefiller neck of the fuel
pump nozzle into theta nk, hook in place and
re fuel. #
Only fill th e fuel tank until the pump nozzle
switches off.
% Vehicles with a diesel engine: thefiller
neck is designed forre fuelling at diesel fill‐
ing pumps.
% Vehicles with a diesel engine: whenthe
fuel tank is compl etely em pty, refuel with at
lea st5 litres of diesel. Ad
Blue ®
(diesel engine vehicles only) Note
s onAdBlue ®
* NOTEWhen you open theAd Blue ®
tank,
small amounts of ammonia vapour may
escape. #
Only fill th eAd Blue ®
tank in well-venti‐
lated areas. #
Do not let AdBlue ®
come into contact
wi th skin, eyes or clo thes. #
Keep AdBlue ®
aw ay from children. *
NOTEDo not ingest AdBlue ®
. If
Ad Blue ®
is swallo wed: #
Immediately rinse out your mouth thor‐
oughl y. #
Drink plenty of water. #
Seek medical attention immediately. Ad
Blue ®
is a fluid urea solution forex haust gas
af te rtre atment of diesel engines. In order forthe Driving and pa
rking 16 9
Page 173 of 557

ex
haust gas af tertre atment tofunction properly,
only use AdBlue ®
in accordance wi thISO 222 41 .
Ad Blue ®
is ch aracterised bythefo llowing:
R non-t oxic
R colourless and odourless
R non-flammable
Ad Blue ®
may be topped up byfast service at a
qu alified specialist workshop, e.g. a Mercedes-
Benz Service Centre.
Ad Blue ®
is available at many filling stations from
Ad Blue ®
filling pumps.
Alternativel y,Ad Blue ®
is available at qualified
specialist workshops, e.g. Mercedes-Benz
Service Centres, and at many filling stations in
Ad Blue ®
re fill canis ters or AdBlue ®
re fill bottles.
% Ensure the connection between there fill
con tainer and vehicle filler neck does not
drip. To
pping up AdBlue ®
* NOTEEngine dama gedue toAd Blue ®
in
th e fuel #
AdBlue ®
must not be used tofill the
fuel tank. #
Only use AdBlue ®
to fill th eAd Blue ®
ta nk. #
Do not overfill theAd Blue ®
tank. *
NO
TEContamination of theve hicle inte‐
ri or due toAd Blue ®
lea kage #
Afterto pping up, carefully close the
Ad Blue ®
re fill con tainer. #
Avoid car rying AdBlue ®
re fill con tainers
permanently in theve hicle. Re
quirements:
The following announcements appear succes‐
sively in the multifunction display when the
Ad Blue ®
tan krequ iresrefuelling.
R Refill AdBlue See Owner's Manual . The
Ad Blue ®
in theta nk is at reser veleve l.
R Refill AdBlue No start in XXX mi. You can still
drive theve hicle over the dis tance shown.
To p up AdBlue ®
as soon as possible.
R Refill AdBlue Start not possible. The vehicle
can no longer be star ted.
The vehicle must be unloc ked. 17 0
Driving and pa rking
Page 174 of 557

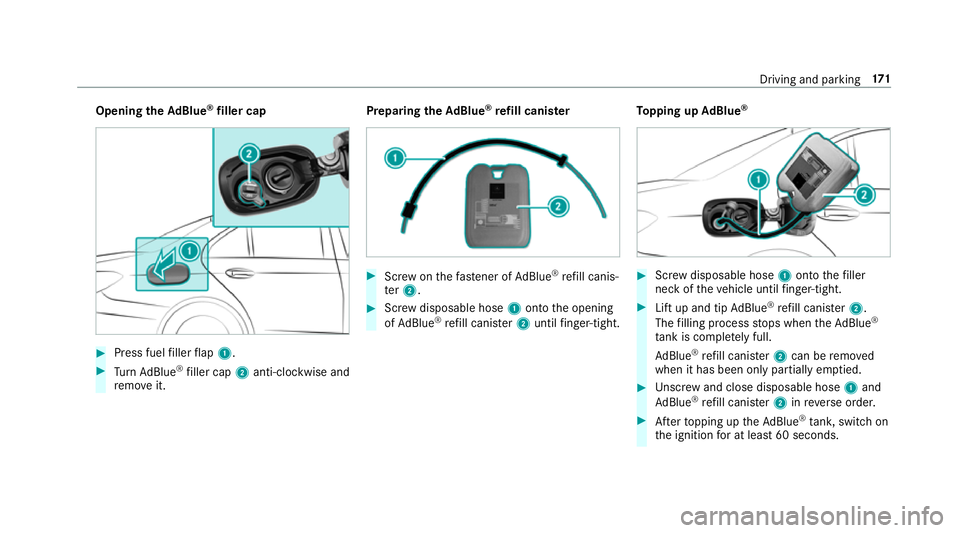
Opening
theAd Blue ®
filler cap #
Press fuel filler flap 1. #
Turn AdBlue ®
filler cap 2anti-clockwise and
re mo veit. Preparing
theAd Blue ®
re fill canis ter #
Screw onthefast ener of AdBlue ®
re fill canis‐
te r2. #
Screw disposable hose 1onto the opening
of Ad Blue ®
re fill canis ter2 until finger-tight. To
pping up AdBlue ® #
Screw disposable hose 1onto thefiller
neck of theve hicle until finger-tight. #
Lift up and tip AdBlue ®
re fill canis ter2.
The filling process stops when theAd Blue ®
ta nk is compl etely full.
Ad Blue ®
re fill canis ter2 can be remo ved
when it has been only partially em ptied. #
Unscr ew and close disposable hose 1and
Ad Blue ®
re fill canis ter2 inreve rse order. #
Afterto pping up theAd Blue ®
tank, switch on
th e ignition for at least 60 seconds. Driving and parking
171
Page 175 of 557

#
Start theve hicle.
The display message in the instrument clus‐
te r goes out.
% Avoid storing AdBlue ®
re fill con tainers per‐
manently in theve hicle. Pa
rking Switching off
theve hicle with thest art/s top
button &
WARNING Risk offire caused byhot
ex haust sy stem parts
Flammable material such as lea ves, grass or
twigs may ignite if they come into contact
wi th hot parts of theex haust sy stem or
ex haust gasflow. #
Park theve hicle so that no flammable
material can come into con tact wi thhot
ve hicle components. #
In particular, do not park on dry grass‐
land or har vested grain fields. &
WARNING Risk of accident and inju ry
due tochildren left unat tended in the
ve hicle
If yo u lea vechildren unat tended in theve hi‐
cle, they may be able toset theve hicle in
motion, forex ample by:
R Releasing the parking brake.
R Shifting the automatic transmission out
of park position jor shifting the manual
transmission into neutral.
R Starting the engine.
In addition, they may operate vehicle equip‐
ment. #
Never lea vechildren and animals unat‐
te nded in theve hicle. #
When leaving theve hicle, alw aysta ke
th eke y with you and lock theve hicle.
This also applies tomobile phones if the
"Digital Car Key in the smartphone"
function is activated via the Mercedes
connect me web app. *
NO
TEDama getotheve hicle or the driv‐
et ra in caused bytheve hicle rolling away #
Alw ays proper lysecure theve hicle
against rolling away. #
On uphill or downhill inclines, turn the front
wheels towa rdsth eke rb. 17 2
Driving and pa rking
Page 251 of 557

Ad
justing the in stru ment lighting #
Turn brightness control 1up or down.
The lighting of the instrument display and in
th e controls in theve hicle interior is adjus‐
te d. Menus and submenus
Fu
nctions in the Service menu of the on-
board compu ter On-board computer:
, Service #
Toselect the function: swipe upwards or
down wards on the left-hand side of Touch
Control. #
Press the left-hand Touch Control.
Fu nctions in theService menu:
R Message memory (→ page 437)
R AdBlue: Adblue ®
ra nge
R Tyre pressure :
- Restarting the tyre pressure loss warning
sy stem (→ page 409)
- Checking the tyre pressure with the tyre
pressure monitoring sy stem
(→ page 405)
- Restarting the tyre pressure monitoring
sy stem (→ page 405) R
ASSYST PLUS: call up the service due date
(→ page 363)
R Engine oil le vel Calling up
the Assistance graphic display On-board computer:
, Assistance
% Ve
hicles with the instrument display in
th e widescreen cockpit: whenyou ha ve
th e design set toProgressive ,yo u can view
th e assis tance graphic in the left-hand por‐
tion of the instrument displa y.
The following displa ysare available from the
Assi stance graphic menu:
R Assis tance graphic
R Attention le vel (→ page 228) #
Toswitch between the displa ys:swipe
up wa rds or down wards on the left-hand side
of Touch Control. 248
Instrument Display and on-board computer
Page 256 of 557

%
This is how tochange thech annel on the
media source TV.
Changing the media source #
Press the left-hand Touch Control. #
Toselect a media source: swipe upwards
or down wards on the left-hand side of Touch
Control. #
Press the left-hand Touch Control. Dialling
telephone numbers using the on-
board compu ter Re
quirements:
R Mobile phone connec tedto the multimedia
sy stem On-board computer:
, Telephone &
WARNING Risk of di stra ction from infor‐
mation sy stems and communications
equipment
If yo u operate information and communica‐
tions equipment integ rated in theve hicle
when driving, you will be distracted from the
traf fic situation. This could also cause youto
lose control of theve hicle. #
Only operate this equipment when the
traf fic situation permits. #
Ifyo u cannot be sure of this, stop the
ve hicle whilst paying attention toroad
and traf fic conditions and ope rate the
equipment with theve hicle stationar y. When
telephoning, you must obse rveth e legal
re qu irements forth e count ryin which you are
cur rently driving.
Ve hicles with the COMAND Online multime‐
dia sy stem: the most recent telephone connec‐ tions (dialled,
recei ved and missed calls) are dis‐
pla yed in theTelephone menu. #
Toselect thete lephone number: swipe
upwards or down wards on the left-hand
To uch Control. #
Press the left-hand Touch Control.
If th ere is only one telephone number
sa ve dto an entr y:thete lephone number is
selec ted. #
Ifth ere are multiple telephone numbers
sa ve dto an entr y:swipe upwards or down‐
wa rds on the left-hand Touch Control to
select the desired telephone number. #
Press the left-hand Touch Control.
The telephone number is dialled.
The following displa ysmay appear ins tead of the
te lephone numbers dialled:
R Please wait... :th e application is starting.
When a Blue tooth®
connection tothe mobile
phone is not es tablished, the menu for
authorising and connecting a mobile phone is
displa yed in the multimedia sy stem
(→ page 308). Instrument Display and on-board computer
253
Page 280 of 557

Time
and date Setting
the time and da teautomatically
Multimedia sy stem:
, System .
Time and date .
Automatic
time setting
The cor rect time is requ ired forth efo llowing
functions:
R route guidance with time-dependent traf fic
guidance
R calculation of expected time of ar rival #
Activate Oor deacti vate ª the function.
Setting the time zone
Multimedia sy stem:
, System .
Time and date .
Time zone:
A list of count ries is displa yed. #
Select a count ry#.
Depending on the count ry, time zones are
displa yed. #
Select a time zone.
The time zone set is displa yed af terTime
zone:. Setting summer time
The
Automatic Summer Time andSummer Time
options cannot be selected in all countries.
Multimedia sy stem:
, System .
Time and date
Au tomatically #
Switch Automatic Summer Time onO or off
ª.
Manual ly #
Deactivate ªAutomatic Summer Time . #
Select Summer Time. #
Select OnorOff.
Setting the time and date form at
Multimedia sy stem:
, System .
Time and date .
Set format #
Set the date and time form at#.
Setting the time manually
Re quirement:
The Automatic time setting function is deactiva‐
te d or is not suppor ted in a time zone. Multimedia sy
stem:
, System .
Time and date .
Time set-
ting #
Set the hours. #
Navigate totheright toset the minutes. #
Set the minutes. #
Confirm changes when exiting the menu.
The date is set automatically via GPS. Blue
tooth ® Blue
tooth ®
settings
Blue tooth ®
tech nology is a standard for short-
ra nge wi reless data transfer up toappr oximately
10 m.You can use Blue tooth®
to connect your
mobile phone tothe multimedia sy stem and use
th efo llowing functions, forex ample:
R hands-free sy stem with access tothefo llow‐
ing options:
- con tacts (→ page 312)
- call lists (→ page314)
- text messa ges (→ page 314) Multimedia sy
stem 277