2016 MERCEDES-BENZ CLA COUPE key
[x] Cancel search: keyPage 114 of 345
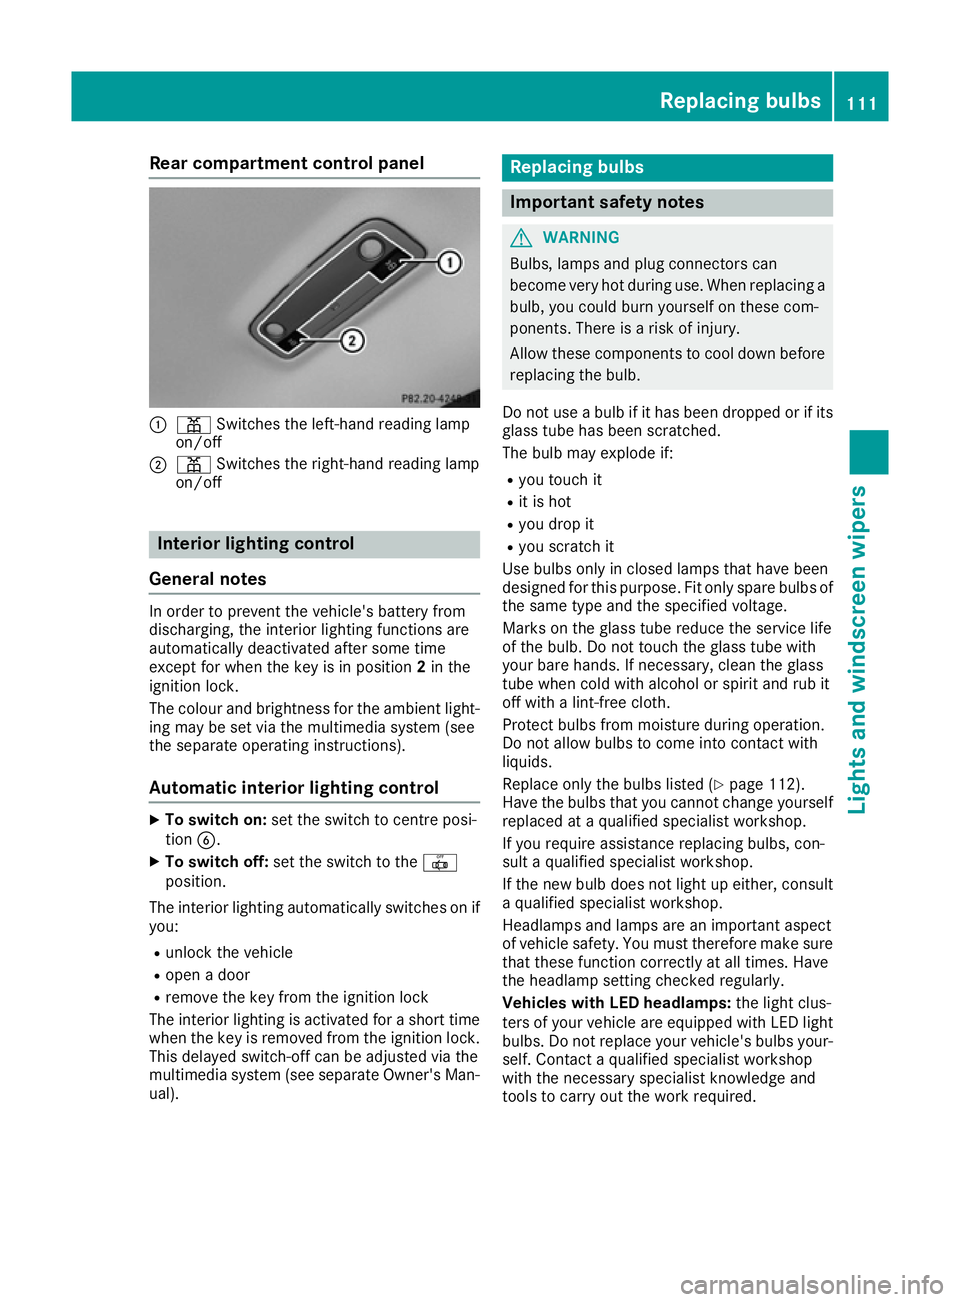
Rear compartment control panel
:
p Switches the left-hand reading lamp
on/off
; p Switches the right-hand reading lamp
on/off Interior lighting control
General notes In order to prevent the vehicle's battery from
discharging, the interior lighting functions are
automatically deactivated after some time
except for when the key is in position 2in the
ignition lock.
The colour and brightness for the ambient light-
ing may be set via the multimedia system (see
the separate operating instructions).
Automatic interior lighting control X
To switch on: set the switch to centre posi-
tion B.
X To switch off: set the switch to the |
position.
The interior lighting automatically switches on if you:
R unlock the vehicle
R open a door
R remove the key from the ignition lock
The interior lighting is activated for a short time
when the key is removed from the ignition lock.
This delayed switch-off can be adjusted via the
multimedia system (see separate Owner's Man-
ual). Replacing bulbs
Important safety notes
G
WARNING
Bulbs, lamps and plug connectors can
become very hot during use. When replacing a bulb, you could burn yourself on these com-
ponents. There is a risk of injury.
Allow these components to cool down beforereplacing the bulb.
Do not use a bulb if it has been dropped or if its
glass tube has been scratched.
The bulb may explode if:
R you touch it
R it is hot
R you drop it
R you scratch it
Use bulbs only in closed lamps that have been
designed for this purpose. Fit only spare bulbs of the same type and the specified voltage.
Marks on the glass tube reduce the service life
of the bulb. Do not touch the glass tube with
your bare hands. If necessary, clean the glass
tube when cold with alcohol or spirit and rub it
off with a lint-free cloth.
Protect bulbs from moisture during operation.
Do not allow bulbs to come into contact with
liquids.
Replace only the bulbs listed (Y page 112).
Have the bulbs that you cannot change yourself
replaced at a qualified specialist workshop.
If you require assistance replacing bulbs, con-
sult a qualified specialist workshop.
If the new bulb does not light up either, consult a qualified specialist workshop.
Headlamps and lamps are an important aspect
of vehicle safety. You must therefore make sure
that these function correctly at all times. Have
the headlamp setting checked regularly.
Vehicles with LED headlamps: the light clus-
ters of your vehicle are equipped with LED light bulbs. Do not replace your vehicle's bulbs your-
self. Contact a qualified specialist workshop
with the necessary specialist knowledge and
tools to carry out the work required. Replacing bulbs
111Lights and windscreen wipers Z
Page 117 of 345

X
Press retaining clips :at the same time in
the direction of the arrows.
X Carefully remove the bulb holder together
with the connected plug and the bulbs. Bulb holder
;
Brake lamp
= Brake lamp
? Rear fog lamp
A Reversing light
B Turn signal
X Brake lamp and reversing lamp: remove
the corresponding bulb from the bulb holder.
X Insert the new bulb into the bulb holder.
X Rear foglamp and turn signal: press the
bulb gently into the bulb holder, turn it anti-
clockwise and remove it from the bulb holder.
X Insert the new bulb into the bulb holder and
turn it clockwise.
X Reinsert the bulb holder and engage on
retaining clips :.
X Close the side trim panel (Y page 113).Windscreen wipers
Switching the windscreen wipers on/
off
! Do not operate the windscreen wipers when
the windscreen is dry, as this could damage
the wiper blades. Moreover, dust that has col-
lected on the windscreen can scratch the
glass if wiping takes place when the wind-
screen is dry.
If it is necessary to switch on the windscreen wipers in dry weather conditions, always
operate them using washer fluid. !
If the windscreen wipers leave smears on
the windscreen after the vehicle has been
washed in an automatic car wash, this may be
due to wax or other residue. Clean the wind-
screen with washer fluid after an automatic
car wash. Combination switch
1
$ Windscreen wipers off
2 Ä Intermittent wipe, low (rain sensor set
to low sensitivity)
3 Å Intermittent wipe, high (rain sensor
set to high sensitivity)
4 ° Continuous wipe, slow
5 ¯ Continuous wipe, fast
B í Single wipe/î wipes the wind-
screen using washer fluid
X Turn the key to position 1or 2in the ignition
lock (Y page 133).
X Turn the combination switch to the corre-
sponding position.
! Vehicles with a rain sensor: if the wind-
screen becomes dirty in dry weather condi-
tions, the windscreen wipers may be activa-
ted inadvertently. This could damage the
windscreen wiper blades or scratch the wind- screen.
For this reason, you should always switch off
the windscreen wipers in dry weather.
Vehicles with a rain sensor: in the ÄorÅ
position, the appropriate wiping frequency is
automatically set according to the intensity of
the rain. In the Åposition, the rain sensor is
more sensitive than in the Äposition, caus-
ing the windscreen wiper to wipe more fre-
quently.
If the wiper blades are worn, the windscreen will
no longer be wiped properly. This could mean
you are unable to observe the traffic conditions. 114
Windscreen wipersLights and windscreen wipers
Page 118 of 345

Replacing the wiper blades
Important safety notes G
WARNING
If the windscreen wipers begin to move while
you are changing the wiper blades, you can be trapped by the wiper arm. There is a risk of
injury.
Always switch off the windscreen wipers and
ignition before changing the wiper blades.
! To avoid damaging the windscreen wiper
blades, make sure that you touch only the
wiper arm of the windscreen wiper.
! Never open the bonnet if a windscreen
wiper arm has been folded away from the
windscreen.
Never fold a windscreen wiper arm without a
wiper blade back onto the windscreen.
Hold the windscreen wiper arm firmly when
you change the wiper blade. If you release the
windscreen wiper arm without a wiper blade
and it falls onto the windscreen, the wind-
screen may be damaged by the force of the
impact.
Mercedes-Benz recommends that you have
the wiper blades changed at a qualified spe-
cialist workshop.
Replacing the windscreen wiper blades Removing the wiper blades
X Vehicles without KEYLESS-GO or KEY-
LESS-GO start function:
remove the key
from the ignition lock.
X Vehicles with KEYLESS-GO or KEYLESS-
GO start function:
switch off the engine.
X Fold the wiper arm away from the windscreen. X
Hold on to the wiper arm with one hand. With
the other hand, turn the wiper blade in the
direction of arrow :away from the wiper arm
as far as it will go.
X Slide catch ;in the direction of arrow =
until it engages in the removal position with a noticeable click. X
Remove the wiper blade in the direction of
arrow ?away from the wiper arm.
Fitting the wiper blades X
Insert the new wiper blade into the wiper arm
in the direction of arrow :. Windscreen wipers
115Lights and windscreen wipers Z
Page 119 of 345

X
Slide catch ;in the direction of arrow =
until it engages in the locking position with a
noticeable click.
X Make sure that the wiper blade sits correctly.
X Fold the wiper arm back onto the windscreen. X
Remove protective film :of the service indi-
cator on the tip of the wiper blade.
If the colour of the service indicator changes
from black to yellow, the wiper blades should be replaced.
i The duration of the colour change varies
depending on the usage conditions. Problems with the windscreen wipers
Problem
Possible causes/consequences and
M MSolutions The windscreen wipers
are jammed. Leaves or snow, for example, may be obstructing windscreen wiper
movement. The wiper motor has been deactivated.
X For safety reasons, you should remove the key from the ignition
lock.
X Remove the cause of the obstruction.
X Switch the windscreen wipers back on. The windscreen wipers
fail completely. The windscreen wiper drive is malfunctioning.
X Select another wiper speed on the combination switch.
X Have the windscreen wipers checked at a qualified specialist work-
shop. The windscreen washer
fluid from the spray noz-
zles no longer hits the
centre of the wind-
screen. The spray nozzles are misaligned.
X Have the spray nozzles adjusted at a qualified specialist workshop. 116
Windscreen wipersLights and windscreen wipers
Page 120 of 345

Overview of climate control systems
General notes
Observe the settings recommended on the fol-
lowing pages. Otherwise, the windows could
mist up.
To prevent the windows from misting up:
R switch off climate control only briefly
R activate air-recirculation mode only briefly
R switch on "Cooling with air dehumidification"
R activate the "Windscreen demisting" function
briefly, if required
The air-conditioning system or THERMOTRONIC
automatic climate control regulates the temper- ature and the humidity of the vehicle interior andfilters undesirable substances from the air.
The air-conditioning system or THERMOTRONIC automatic climate control can only be operatedwhen the engine is running. Optimum operationis only achieved with the side windows and pan-
orama sliding sunroof closed.
The residual heat function can only be activated or deactivated with the ignition switched off
(Y page 126).
Always keep the ventilation flaps behind the
side panelling clear (Y page 113). Otherwise the
vehicle will not be ventilated correctly.
i Ventilate the vehicle for a brief period during
warm weather, e.g. using the convenience
opening feature (Y page 90). This will speed up the cooling process and the desired inte-
rior temperature will be reached more
quickly.
i The integrated filter filters out most parti-
cles of dust and soot and completely filters
out pollen. With THERMOTRONIC automatic
climate control, gaseous pollutants and
odours will also be reduced. A clogged filter
reduces the amount of air supplied to the
vehicle interior. For this reason, you should
always observe the interval for replacing the
filter, which is specified in the Service Book-
let. As this depends on environmental condi-
tions, e.g. heavy air pollution, the interval may be shorter than stated in the Service Booklet.
i Vehicles with auxiliary heating:
Under
certain environmental conditions, the resid-
ual heat function may be activated automati-
cally an hour after the ignition key has been
removed in order to dry the automatic climate
control. The blue LED on the rocker switch in the centre console lights up when the active
function to dry the automatic climate control is on. The vehicle is then ventilated for
30 minutes.
Vehicles without auxiliary heating: Under
certain environmental conditions, the resid-
ual heat function may be activated automati-
cally an hour after the ignition key has been
removed in order to dry the automatic climate control. The vehicle is then ventilated for
30 minutes. Overview of climate control systems
117Climate control
Page 123 of 345

J To switch the ZONE function on/off (Y page 123)Information on using THERMOTRONIC
automatic climate control
Automatic climate control The follo")
I
To switch the rear window heating on/off (Y page 124)
J To switch the ZONE function on/off (Y page 123)Information on using THERMOTRONIC
automatic climate control
Automatic climate control The following contains instructions and recom-
mendations to enable you to get the most out of
your THERMOTRONIC automatic climate con-
trol.
R Activate climate control using the Ãand
¿ buttons. The indicator lamps in the
à and¿ buttons light up.
R Set the temperature to 22 †.
R Use the "Windscreen demisting" function only
briefly until the windscreen is clear again.
R Use air-recirculation mode only briefly, e.g. if
there are unpleasant outside odours or when
in a tunnel. The windows could otherwise mist up as no fresh air is drawn into the vehicle in
air-recirculation mode.
R Use the ZONE function to adopt the temper-
ature settings on the driver's side for the
front-passenger side as well. The indicator
lamp in the ábutton goes out.
R Use the residual heat function if you want to
heat or ventilate the vehicle interior when the
ignition is switched off. The residual heat
function can be activated or deactivated only
with the ignition switched off.
R If you change the settings of the climate con-
trol system, the climate status display
appears for approximately three seconds at
the bottom of the screen in the multimedia
system display (see separate operating
instructions). You will see the current settings
of the various climate control functions.
DYNAMIC SELECT button (except
Mercedes-AMG vehicles) You can choose between various drive programs
with the DYNAMIC SELECT button
(Y page 141). If you have selected drive program
E:
R when heating, the electrical heater booster is
deactivated and in the warming-up phase
heat output is reduced
R the rear window heating running time is
reduced
Depending on the configuration, the climate set-
tings can also be influenced in drive program I.
If you have selected drive program Cor S, the
climate settings are not affected.
ECO start/stop function During automatic engine switch-off, the climate
control operates only at a reduced capacity. If
you require the full climate control output, you
can switch off the ECO start/stop function by
pressing the ECO button (Y page 138). Operating the climate control system
Switching the climate control on/off
General notes When climate control is switched off, the air
supply and air circulation are also switched off.
The windows could mist up. Therefore, switch
off climate control only briefly.
Air-conditioning system X
Turn the key to position 2in the ignition lock
(Y page 133).
X To switch on: turn controlAclockwise to
the desired position (except position 0)
(Y page 118).
X To switch off: turn controlAanti-clockwise
to position 0(Y page 118). 120
Operating the climate control systemClimate control
Page 124 of 345
.
X To activate: press theÃbutton.
The indicator lamp in the Ãbutton lights
up. Airflow and air di")
THERMOTRONIC automatic climate
control X
Turn the key to position 2in the ignition lock
(Y page 133).
X To activate: press theÃbutton.
The indicator lamp in the Ãbutton lights
up. Airflow and air distribution are set to auto-
matic mode.
or X Press the ^button.
The indicator lamp in the ^button goes
out. The previous settings are reactivated.
X To deactivate: press the^button.
The indicator lamp in the ^button lights
up.
i THERMOTRONIC automatic climate control:
switch on climate control primarily using the
à button. Activating/deactivating cooling with
dehumidification
General notes If you deactivate the "Cooling with air dehumid-
ification" function, the air inside the vehicle will not be cooled during warm weather. The air
inside the vehicle will also not be dehumidified.
The windows can mist up more quickly. There-
fore, only deactivate the "Cooling with air dehu- midification" function briefly.
The "Cooling with air dehumidification" function
is available only when the engine is running. The air inside the vehicle is cooled and dehumidified
according to the temperature selected.
Condensation may drip from the underside of
the vehicle when cooling mode is active. This is
normal and not a sign that there is a malfunc-
tion.
Activating/deactivating X
Press the ¿button.
The indicator lamp in the ¿button lights
up or goes out.
The indicator lamp in the button indicates that the respective function is activated. The cool- ing with air dehumidification function has a
delayed switch-off feature.
Problems with the "Cooling with air dehumidification" function Problem
Possible causes/consequences and
M MSolutions The indicator lamp in the
¿ button flashes
three times or remains
off. The cooling with air
dehumidification func-
tion cannot be activated. The cooling with air dehumidification function has been deactivated
due to a malfunction.
X Consult a qualified specialist workshop. Setting climate control to automatic
mode
General notes Only THERMOTRONIC automatic climate con-
trol features the "Control climate control auto-
matically" function.
In automatic mode, the set temperature is main-
tained automatically at a constant level. The
system automatically regulates the temperature of the dispensed air, the airflow and the air dis-
tribution.
The "Cooling with air dehumidification" function
is activated automatically in automatic mode. Operating the climate control system
121Climate control
Page 125 of 345
.
X Set the desired temperature.
X To activate: press theÃbutton.
The indicator lamp in the Ãbu")
Setting climate control to automatic
mode X
Turn the key to position 2in the ignition lock
(Y page 133).
X Set the desired temperature.
X To activate: press theÃbutton.
The indicator lamp in the Ãbutton lights
up. Automatic air distribution and airflow are
activated.
X To switch to manual mode: press theÉ
or Ë button.
or
X Press the KorI button.
The indicator lamp in the Ãbutton goes
out. Automatic air distribution and airflow are deactivated. Setting the temperature
Air-conditioning system You can set the temperature for the entire vehi-
cle. The set temperature is automatically main-
tained at a constant level.
X Turn the key to position 2in the ignition lock
(Y page 133).
X To increase or reduce: turn control:anti-
clockwise or clockwise (Y page 118). Change
the temperature setting only in small incre-
ments. Start at 22 †.
THERMOTRONIC automatic climate
control Different temperatures can be set for the driv-
er's and front-passenger sides. The set temper- ature is automatically maintained at a constant
level.
X Turn the key to position 2in the ignition lock
(Y page 133).
X To increase or decrease: turn control:or
E anti-clockwise or clockwise (Y page 119).
Change the temperature setting only in small
increments. Start at 22 †. Setting the air distribution
Air-conditioning system Air distribution settings
¯ Directs the airflow through the demister
vents
P Directs the airflow through the centre
and side air vents
O Directs the airflow through the footwell
air vents
i You can also activate several of the air dis-
tribution settings simultaneously. In order to
do this, press several of the air distribution
buttons. The air is then routed through differ-
ent air vents.
i Regardless of the air distribution setting,
airflow is always directed through the side air vents. The side air vents can only be closed if
the adjusters are turned clockwise until they
engage.
Setting the air distribution X Turn the key to position 2in the ignition lock
(Y page 133).
X Press one or more of the P,O,¯
buttons.
The corresponding indicator lamp comes on.
THERMOTRONIC automatic climate
control Air distribution settings
¯ Directs the airflow through the demister
vents
P Directs the airflow through the centre
and side air vents
O Directs the airflow through the footwell
air vents
S Directs the airflow through the centre
and side air vents as well as the footwell
air vents
b Directs the airflow through the centre
and side air vents as well as the demister
vents
a Directs the airflow through the footwell
and demister vents
_ Directs the airflow through the demister
vents, the centre and side air vents as
well as the footwell air vents 122
Operating the climate control systemClimate control