2016 MERCEDES-BENZ CLA COUPE ECU
[x] Cancel search: ECUPage 176 of 345
The vehicle is kept stationary without the driver
having to depress the brake pedal.
The braking effect is cancelled and the HOLD
function deactivated when you depress the
accelerator pedal to pull away.
Important safety notes G
WARNING
When leaving the vehicle, it can still roll away despite being braked by the HOLD function if:
R there is a malfunction in the system or in
the voltage supply
R the HOLD function is deactivated by the
accelerator pedal being depressed, e.g. by
a vehicle occupant
R the electrical system in the engine com-
partment, the battery or the fuses are tam-
pered with
R the battery is disconnected
There is a risk of an accident.
Before leaving the vehicle, always deactivate
the HOLD function and secure the vehicle
from rolling away.
! When Distance Pilot DISTRONIC or the
HOLD function is activated, the vehicle
brakes automatically in certain situations.
To avoid damage to the vehicle, deactivate
Distance Pilot DISTRONIC and the HOLD
function in the following or similar situations:
R when towing away
R in a car wash
Deactivating the HOLD function (Y page 173).
Activation conditions You can activate the HOLD function if:
R the vehicle is stationary
R the engine is running or if it has been auto-
matically switched off by the ECO start/stop
function
R the driver's door is closed or if your seat belt
is fastened
R the electric parking brake is released
R Distance Pilot DISTRONIC is deactivated
R the transmission is in position D,Ror Non
vehicles with automatic transmission Activating the HOLD function
X
Make sure that the activation conditions are
met.
X Depress the brake pedal.
X Quickly depress the brake pedal further
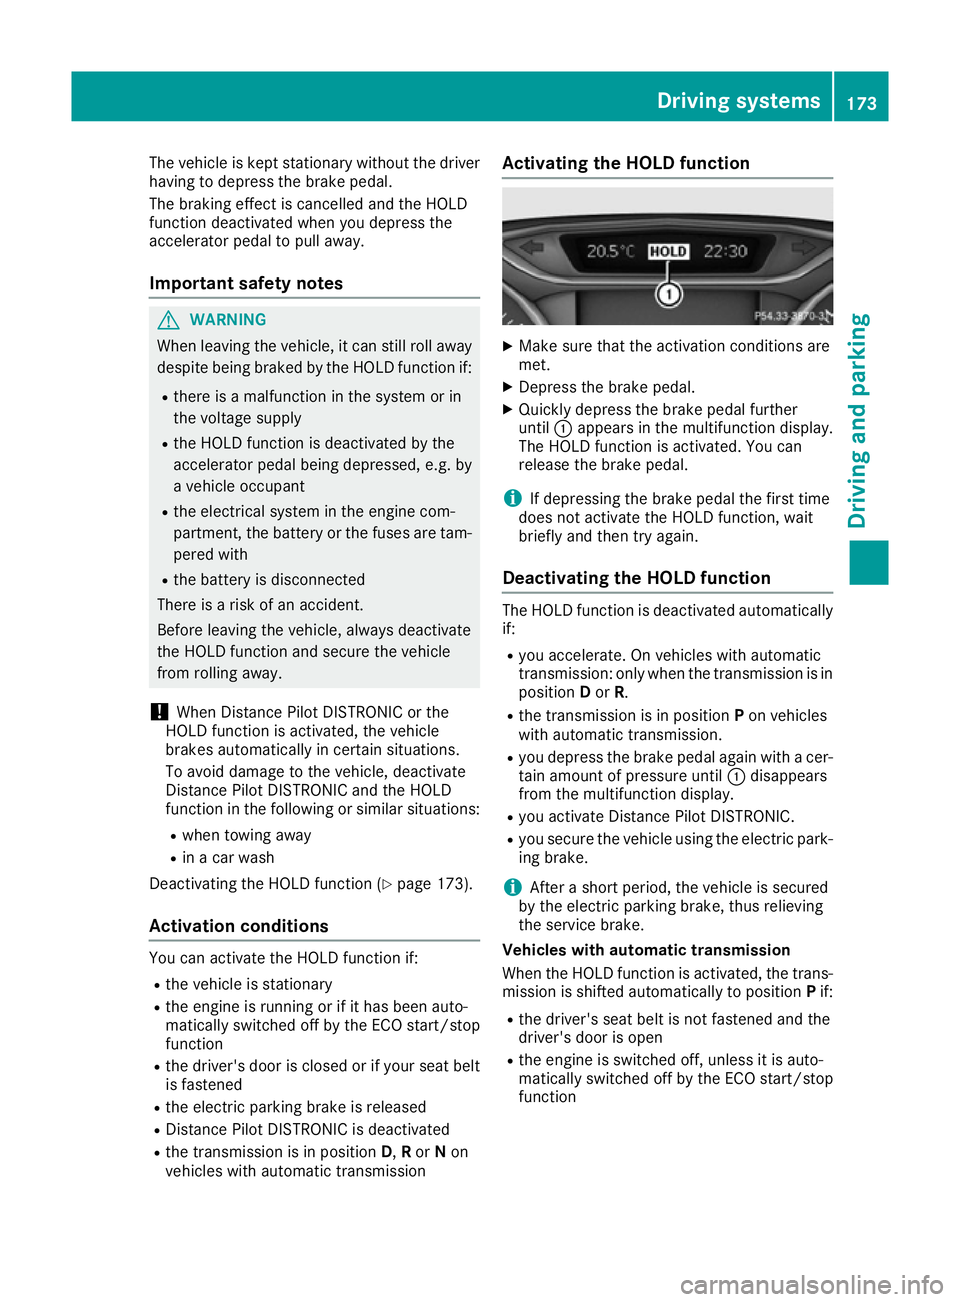
until :appears in the multifunction display.
The HOLD function is activated. You can
release the brake pedal.
i If depressing the brake pedal the first time
does not activate the HOLD function, wait
briefly and then try again.
Deactivating the HOLD function The HOLD function is deactivated automatically
if:
R you accelerate. On vehicles with automatic
transmission: only when the transmission is in
position Dor R.
R the transmission is in position Pon vehicles
with automatic transmission.
R you depress the brake pedal again with a cer-
tain amount of pressure until :disappears
from the multifunction display.
R you activate Distance Pilot DISTRONIC.
R you secure the vehicle using the electric park-
ing brake.
i After a short period, the vehicle is secured
by the electric parking brake, thus relieving
the service brake.
Vehicles with automatic transmission
When the HOLD function is activated, the trans-
mission is shifted automatically to position Pif:
R the driver's seat belt is not fastened and the
driver's door is open
R the engine is switched off, unless it is auto-
matically switched off by the ECO start/stop
function Driving systems
173Driving and parking Z
Page 177 of 345
The electric parking brake secures the vehicle
automatically if the HOLD function is activated,
the vehicle is stationary and:
R a system fault occurs
R the power supply is insufficient
Vehicles with manual transmission The electric parking brake secures the vehicle
automatically if the HOLD function is activated
and:
R the driver's seat belt is not fastened and the
driver's door is open
R the engine is switched off, unless it is auto-
matically switched off by the ECO start/stop
function
R a system fault occurs
R the power supply is insufficient
The Brake immediately
Brake immediately message may also
appear on the multifunction display.
X Immediately depress the brake pedal firmly
until the warning message on the multifunc-
tion display goes out.
The HOLD function is deactivated.
A horn will sound at regular intervals if you turn
off the engine, take off your seat belt or open the
driver's door when the HOLD function is activa- ted. The horn alerts you to the fact that the
HOLD function is still activated. If you attempt to
lock the vehicle, the tone becomes louder. The
vehicle cannot be locked until you have deacti-
vated the HOLD function.
i Once you have switched off the engine, you
cannot restart it until you have deactivated
the HOLD function. Start-off assist (except Mercedes-
AMG vehicles)
Important safety notes G
WARNING
If you use start-off assist, individual wheels
may start to spin and the vehicle may skid. If
ESP ®
is deactivated, there is a greater danger
of skidding and having an accident. Make sure that no persons or obstacles are in the area
around the vehicle. Start-off assist enables optimum acceleration
from a standstill. For this, a suitably high-grip
road surface is required; the tyres and vehicle
must also be in good condition.
Do not activate start-off assist on public roads.
Observe the safety notes on driving safety sys-
tems (Y page 66).
Be sure to read the safety notes and information
on ESP ®
(Y page 69).
Activating start-off assist X
Deactivate ESP ®
(Y page 209).
X Turn the steering wheel to the straight-ahead
position.
X Depress the brake pedal hard with your left
foot and keep it depressed.
X Shift the transmission to position D.
X Use the DYNAMIC SELECT button to select
the Sdrive program (Y page 141).
X Quickly depress the accelerator pedal fully.
X Take your foot off the brake, but keep the
accelerator pedal depressed.
The vehicle pulls away at maximum acceler-
ation.
i Activate ESP ®
as soon as the acceleration
process has ended. ESP ®
will otherwise not
be able to stabilise the vehicle if the vehicle
starts to skid or a wheel starts to spin.
Cancelling start-off assist
X Remove your foot from the accelerator pedal.
X Reactivate ESP ®
. RACE START (Mercedes-AMG vehi-
cles)
Important safety notes i
RACE START must not be used on normal
roads. RACE START must be activated and
used only on dedicated race circuits, not on
public roads.
i RACE START is only available in
Mercedes‑ AMG vehicles. G
WARNING
If you use RACE START, individual tyres may
get into a spin and the vehicle could skid.
Depending on the selected ESP ®
mode, there 174
Driving systemsDriving and parking
Page 185 of 345

Parking Pilot will detect only parking spaces
which are:
R parallel or at right angles to the direction of
travel
R that are parallel to the direction of travel and
are at least 1.5 m wide
R that are parallel to the direction of travel and
at least 1.0 m longer than your vehicle
R that are at right angles to the direction of
travel and at least 1.0 mwider than your vehi-
cle
i Note that Parking Pilot cannot measure the
length of a parking space if it is at right angles to the direction of travel. You will need to
judge whether your vehicle will fit in the park-
ing space.
When driving at speeds below 30 km/h, you will
see parking symbol ;as a status indicator in
the instrument cluster. When a parking space
has been detected, an arrow towards the right or the left also appears. Parking Pilot displays only
parking spaces on the front-passenger side as
standard. Parking spaces on the driver's side
are displayed as soon as the turn signal on the
driver's side is activated. When parking on the
driver's side, this must remain activated until
you confirm the use of Parking Pilot by pressing the a button on the multifunction steering
wheel. The system automatically determines
whether the parking space is parallel or at right
angles to the direction of travel.
A parking space is displayed while you are driv- ing past it, and until you are approximately 15 m
away from it.
Parking G
WARNING
If you leave the vehicle when it is only being
braked by Parking Pilot, it could roll away if:
R there is a malfunction in the system or in
the voltage supply.
R the electrical system in the engine com-
partment, the battery or the fuses are tam-
pered with.
R the battery is disconnected
R the vehicle is accelerated, e.g. by a vehicle
occupant.
There is a risk of an accident. Before leaving the vehicle, always secure it
against rolling away.
i Vehicles with automatic transmission:
If Parking Assist PARKTRONIC detects obsta-
cles, Parking Pilot brakes automatically whilst
the vehicle is parking. You are responsible for
braking in good time.
X Stop the vehicle when the parking symbol
shows the desired parking space in the instru-
ment cluster.
X Vehicles with automatic transmission:
shift the transmission to position
R.
Vehicles with manual transmission: shift
to reverse gear.
The Start Parking Pilot?
Start Parking Pilot? Yes: OK Yes: OKNo:
No:
% message appears in the multifunction
display.
X To cancel the procedure: press the%
button on the multifunction steering wheel or
pull away.
or X To park using Parking Pilot: press thea
button on the multifunction steering wheel.
The Parking Pilot active Accelerate Parking Pilot active Accelerate
and brake
and brake Observe surroundings
Observe surroundings mes-
sage appears in the multifunction display.
X Release the multifunction steering wheel.
X Reverse the vehicle, being ready to brake at
all times. When reversing, drive at a speed
below 10 km/h. Otherwise Parking Pilot is
cancelled.
Vehicles with automatic transmission:
Parking Pilot brakes the vehicle to a standstill
when the vehicle approaches the rear border
of the parking space.
Manoeuvring may be required in tight parking spaces.
X Vehicles with manual transmission: stop
when Parking Assist PARKTRONIC sounds the continuous warning tone, if not before.
Manoeuvring may be required in tight parking
spaces.
Vehicles with automatic transmission: the
Parking Pilot active Select D Parking Pilot active Select D Observe
Observe
surroundings
surroundings message appears in the multi-
function display.
Vehicles with manual transmission: the
Parking Pilot active Engage forward Parking Pilot active Engage forward
gear gear Observe surroundings
Observe surroundings message
appears in the multifunction display. 182
Driving systemsDriving and parking
Page 193 of 345
corresponds to the last selection activated
(standard/sensitive).
Warning on the multifunction display If fatigue or increasing lapses in concentration
are detected, a warning appears in the multi-
function display: ATTENTION ASSIST
ATTENTION ASSIST Take a
Take a
break!
break!
In addition to the message shown on the multi-
function display, you will then hear a warning
tone.
X If necessary, take a break.
X Confirm the message by pressing the a
button on the steering wheel.
On long journeys, take regular breaks that allow
for adequate recuperation. If you do not take a
break and ATTENTION ASSIST still detects
increasing lapses in concentration, you will be
warned again after 15 minutes at the earliest.
This will happen only if ATTENTION ASSIST still
detects typical indicators of fatigue or increas-
ing lapses in concentration.
Vehicles with multimedia system COMAND
Online: if a warning is output in the multifunc-
tion display, a service station search is per-
formed in the multimedia system. You can
select a service station and you will then be
navigated to this service station. This function
can be activated and deactivated in the multi-
media system; see Digital Owner's Manual. Traffic Sign Assist
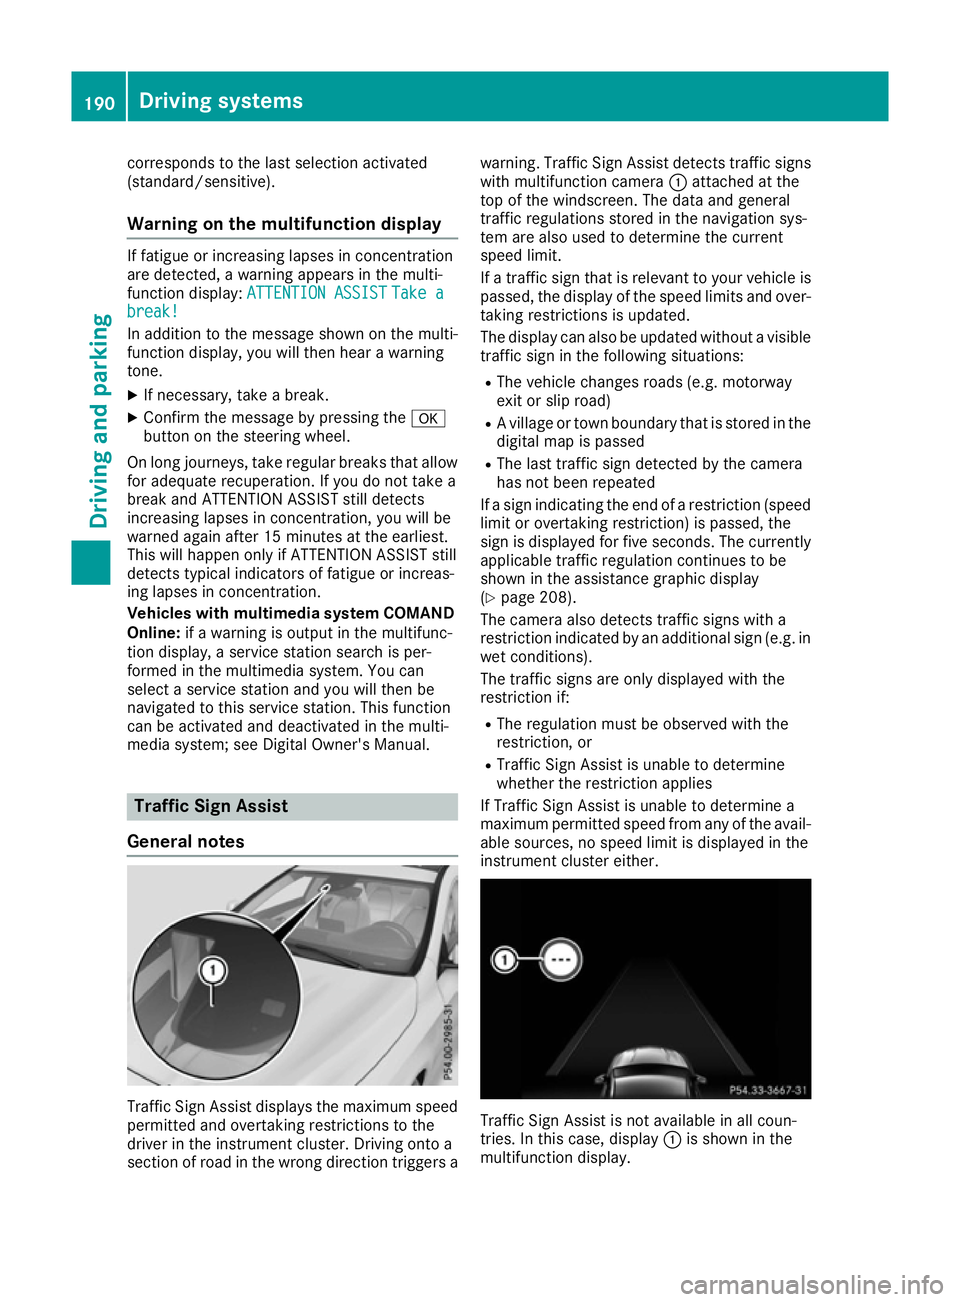
General notes Traffic Sign Assist displays the maximum speed
permitted and overtaking restrictions to the
driver in the instrument cluster. Driving onto a
section of road in the wrong direction triggers a warning. Traffic Sign Assist detects traffic signs
with multifunction camera :attached at the
top of the windscreen. The data and general
traffic regulations stored in the navigation sys-
tem are also used to determine the current
speed limit.
If a traffic sign that is relevant to your vehicle is
passed, the display of the speed limits and over- taking restrictions is updated.
The display can also be updated without a visible
traffic sign in the following situations:
R The vehicle changes roads (e.g. motorway
exit or slip road)
R A village or town boundary that is stored in the
digital map is passed
R The last traffic sign detected by the camera
has not been repeated
If a sign indicating the end of a restriction (speed limit or overtaking restriction) is passed, the
sign is displayed for five seconds. The currently
applicable traffic regulation continues to be
shown in the assistance graphic display
(Y page 208).
The camera also detects traffic signs with a
restriction indicated by an additional sign (e.g. in
wet conditions).
The traffic signs are only displayed with the
restriction if:
R The regulation must be observed with the
restriction, or
R Traffic Sign Assist is unable to determine
whether the restriction applies
If Traffic Sign Assist is unable to determine a
maximum permitted speed from any of the avail- able sources, no speed limit is displayed in the
instrument cluster either. Traffic Sign Assist is not available in all coun-
tries. In this case, display
:is shown in the
multifunction display. 190
Driving systemsDriving and parking
Page 201 of 345
there is an increased risk of an accident and
injury.
Only release the ball coupling if the pivoting
range is unobstructed. Always make sure that the ball coupling engages when folding in.
i Fold the ball coupling in if you are not using
the trailer tow hitch.
X Make sure that the vehicle is stationary and
the trailer cables are disconnected.
X Place the protective cap on the ball coupling.
i The release wheel is located behind the left-
hand side trim panel in the luggage compart- ment.
X To open the cover: turn handle:anti-
clockwise, then fold down and remove
cover ;.
X Pull out release wheel =.
X Turn release wheel =anti-clockwise as far as
it will go.
The ball coupling disengages and folds out
behind the rear bumper. Indicator lamp ?
flashes.
X Press the ball coupling until it engages audibly
behind the bumper.
The indicator lamp on the release knob and
the message in the multifunction display go
out. Coupling up a trailer
X Make sure that the transmission is in position
P.
X Apply the electric parking brake.
X Position the trailer horizontally behind the
vehicle.
X Couple up the trailer.
X Establish the electric connection between the
vehicle and the trailer.
X Check that the trailer lighting system is work-
ing.
A connected trailer is only recognised when
the electrical connection is established cor-
rectly and when the lighting system is working
properly. The function of other systems, such
as ESP ®
or PARKTRONIC also depends on
this. Uncoupling a trailer
G
WARNING
If you uncouple a trailer with an engaged over- run brake, you could trap your hand between
the vehicle and the trailer drawbar. This poses a risk of injury.
Do not uncouple a trailer with an engaged
overrun brake.
! Do not disconnect a trailer with an engaged
overrun brake. Otherwise, your vehicle could
be damaged by the rebounding of the overrun brake.
! Remove the installed adapter cable before
folding in the ball coupling. Otherwise, dam-
age may occur to the rear bumper and the
adapter cable.
X Make sure that the transmission is in position
P.
X Apply the electric parking brake.
X Secure the trailer against rolling away.
X Remove the trailer cable and decouple the
trailer. Trailer power supply
! You can connect accessories to the perma-
nent power supply up to a maximum of 240 W.
You cannot charge a trailer battery using the
power supply.
When it leaves the factory, your vehicle's trailer
socket is equipped with a permanent power
supply and a power supply that is switched on
via the ignition lock.
The permanent power supply is supplied via
trailer socket pin 9.
The power supply that is switched on via the
ignition lock is supplied via trailer socket pin 10.
The trailer's permanent power supply is
switched off in the event of low vehicle supply
voltage and after six hours at the latest.
You can find more information about fitting the
trailer electrics at a qualified specialist work-
shop.
X To switch the connected power supply on
or off: turn the key to position 2or0respec-
tively (Y page 133). 198
Towing a trailerDriving an
d parking
Page 202 of 345
Failure check for LEDs
If LED lamps are fitted in the trailer, a malfunc-
tion message may appear in the multifunction
display even if there is no fault. The reason for
the error message may be that the current has
fallen below the minimum of 50 mA.
To ensure reliable operation of the failure indi-
cator, each LED chain in the trailer lighting must
be guaranteed a minimum current of 50 mA. Trailer with 7-pin connector
General notes Trailer with 7-pin connector:
you can connect
to the 13-pin socket on the ball coupling using
an adapter or, if necessary, an adapter cable.
Both can be obtained at a qualified specialist
workshop.
Fitting the adapter !
Make sure that there is sufficient cable play
so that the cable cannot become detached
when cornering.
! Remove the installed adapter cable before
folding in the ball coupling. Otherwise, dam-
age may occur to the rear bumper and the
adapter cable. X
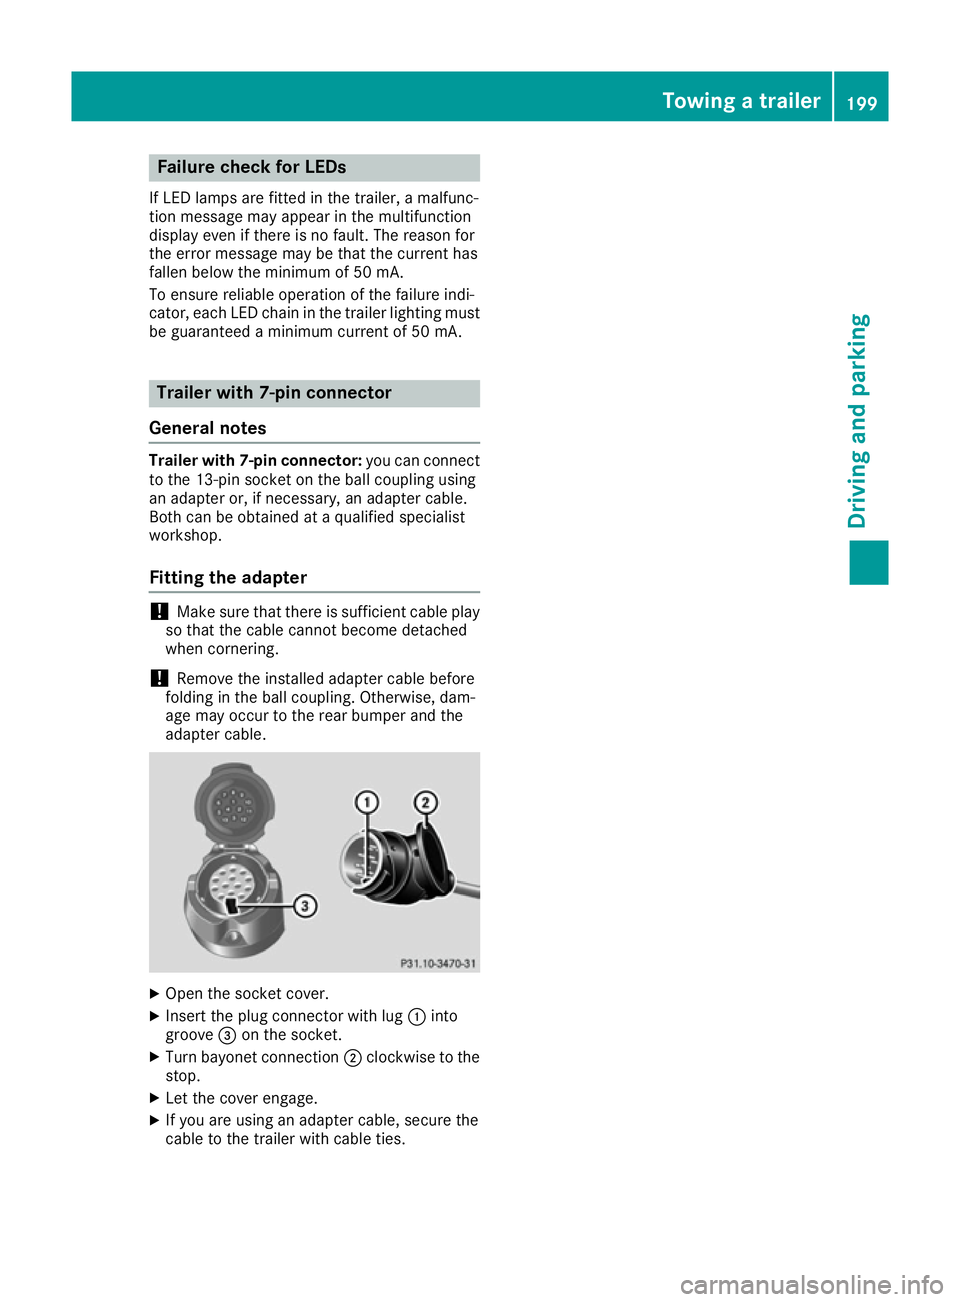
Open the socket cover.
X Insert the plug connector with lug :into
groove =on the socket.
X Turn bayonet connection ;clockwise to the
stop.
X Let the cover engage.
X If you are using an adapter cable, secure the
cable to the trailer with cable ties. Towing a trailer
199Driving and parking Z
Page 207 of 345
ECO display
The ECO display is not available in Mercedes-
AMG vehicles.
X Press the =or; button on the steering
wheel to select the Trip
Tripmenu.
X Press the 9or: button to select ECO
ECO
DISPLAY
DISPLAY.
If the ignition remains switched off for longer
than four hours, the ECO display will be auto-
matically reset.
Further information on the ECO display
(Y page 159).
Displaying the range and current fuel
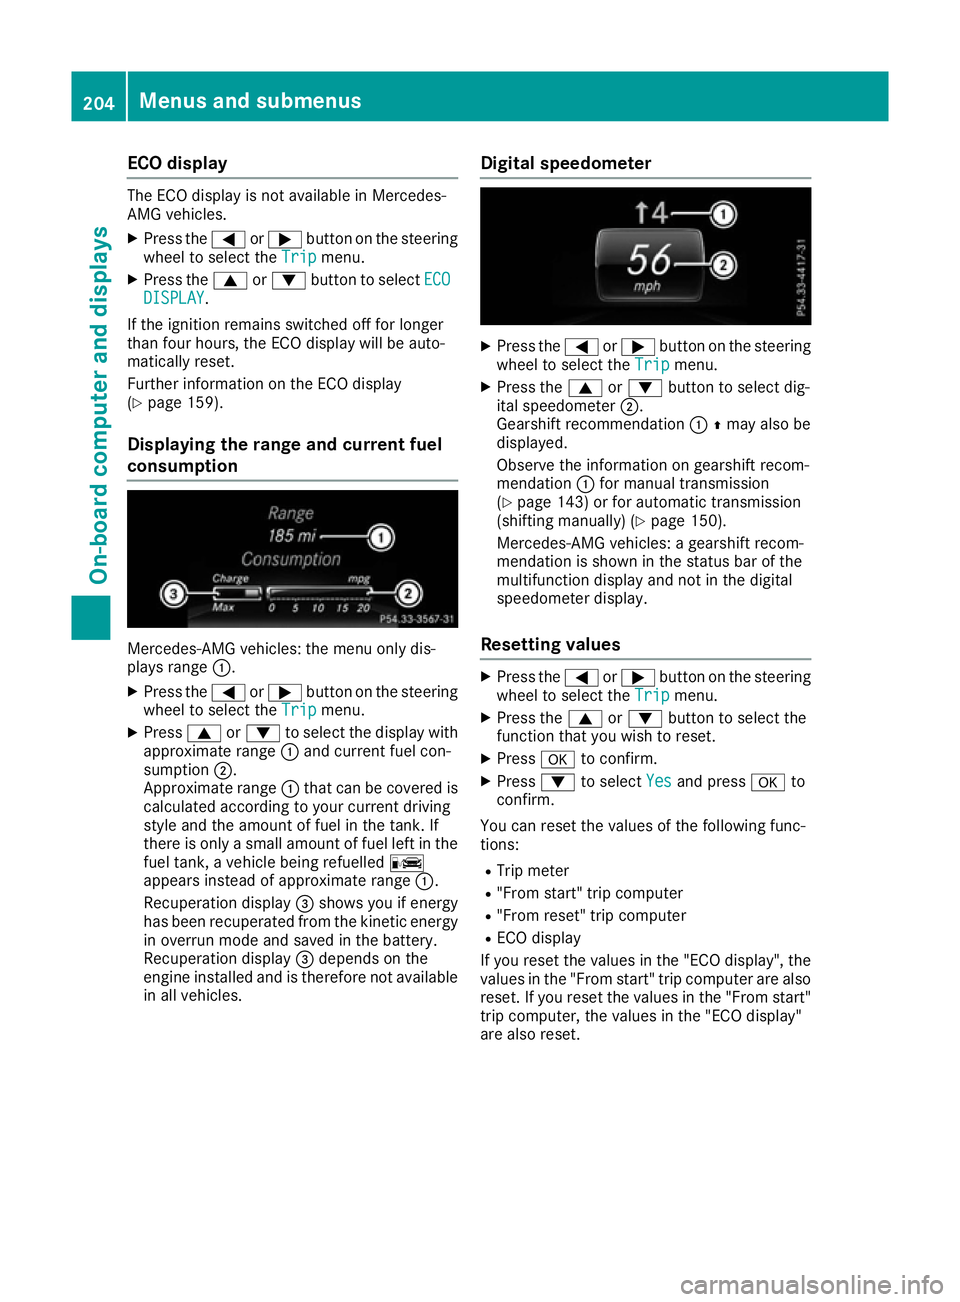
consumption Mercedes-AMG vehicles: the menu only dis-
plays range :.
X Press the =or; button on the steering
wheel to select the Trip Tripmenu.
X Press 9or: to select the display with
approximate range :and current fuel con-
sumption ;.
Approximate range :that can be covered is
calculated according to your current driving
style and the amount of fuel in the tank. If
there is only a small amount of fuel left in the
fuel tank, a vehicle being refuelled C
appears instead of approximate range :.
Recuperation display =shows you if energy
has been recuperated from the kinetic energy in overrun mode and saved in the battery.
Recuperation display =depends on the
engine installed and is therefore not available in all vehicles. Digital speedometer X
Press the =or; button on the steering
wheel to select the Trip Tripmenu.
X Press the 9or: button to select dig-
ital speedometer ;.
Gearshift recommendation :Zmay also be
displayed.
Observe the information on gearshift recom-
mendation :for manual transmission
(Y page 143) or for automatic transmission
(shifting manually) (Y page 150).
Mercedes-AMG vehicles: a gearshift recom-
mendation is shown in the status bar of the
multifunction display and not in the digital
speedometer display.
Resetting values X
Press the =or; button on the steering
wheel to select the Trip Tripmenu.
X Press the 9or: button to select the
function that you wish to reset.
X Press ato confirm.
X Press :to select Yes
Yesand press ato
confirm.
You can reset the values of the following func-
tions:
R Trip meter
R "From start" trip computer
R "From reset" trip computer
R ECO display
If you reset the values in the "ECO display", the
values in the "From start" trip computer are also
reset. If you reset the values in the "From start" trip computer, the values in the "ECO display"
are also reset. 204
Menus and submenusOn-board computer and displays
Page 223 of 345
Display messages
Possible causes/consequences and
M
MSolutions The yellow
!warning lamp and the red !indicator lamp are lit.
The electric parking brake is malfunctioning.
To release:
X Turn the ignition off and then back on.
X Release the electric parking brake manually.
or
X Vehicles with manual transmission (automatic emergency
release):
insert the seat belt in the belt buckle and accelerate
slightly more when pulling away.
X Vehicles with automatic transmission: release the electric park-
ing brake automatically (Y page 157).
If the electric parking brake still cannot be released:
X Do not drive on.
X Consult a qualified specialist workshop. The red
!indicator lamp flashes and the yellow !warning lamp
is lit.
The electric parking brake is malfunctioning.
To release:
X Turn the ignition off and then back on.
X Release the electric parking brake manually.
To apply: X Turn the ignition off and then back on.
X Apply the electric parking brake manually.
If the red !indicator lamp continues to flash:
X Do not drive on.
X Secure the vehicle against rolling away (Y page 319).
X Vehicles with manual transmission: engage first gear.
X Vehicles with automatic transmission: shift the transmission to
position P.
X Turn the front wheels towards the kerb.
X Consult a qualified specialist workshop. 220
Display
messagesOn-board computer and displays