2016 MERCEDES-BENZ CLA COUPE turn signal
[x] Cancel search: turn signalPage 112 of 345
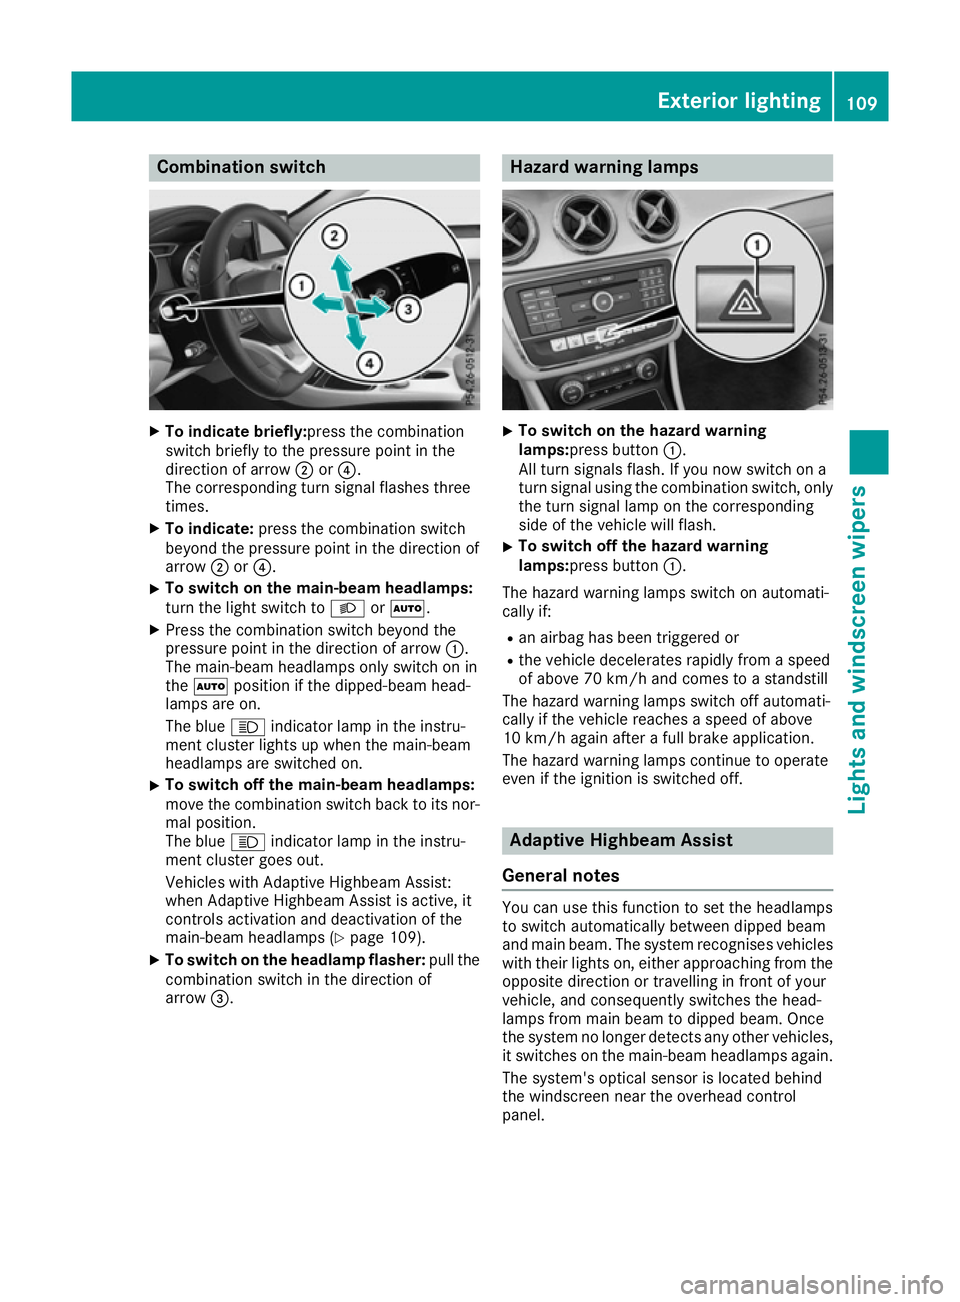
Combination switch
X
To indicate briefly:press the combination
switch briefly to the pressure point in the
direction of arrow ;or?.
The corresponding turn signal flashes three
times.
X To indicate: press the combination switch
beyond the pressure point in the direction of
arrow ;or?.
X To switch on the main-beam headlamps:
turn the light switch to LorÃ.
X Press the combination switch beyond the
pressure point in the direction of arrow :.
The main-beam headlamps only switch on in
the à position if the dipped-beam head-
lamps are on.
The blue Kindicator lamp in the instru-
ment cluster lights up when the main-beam
headlamps are switched on.
X To switch off the main-beam headlamps:
move the combination switch back to its nor-
mal position.
The blue Kindicator lamp in the instru-
ment cluster goes out.
Vehicles with Adaptive Highbeam Assist:
when Adaptive Highbeam Assist is active, it
controls activation and deactivation of the
main-beam headlamps (Y page 109).
X To switch on the headlamp flasher: pull the
combination switch in the direction of
arrow =. Hazard warning lamps
X
To switch on the hazard warning
lamps:press button
:.
All turn signals flash. If you now switch on a
turn signal using the combination switch, only the turn signal lamp on the corresponding
side of the vehicle will flash.
X To switch off the hazard warning
lamps:press button
:.
The hazard warning lamps switch on automati-
cally if:
R an airbag has been triggered or
R the vehicle decelerates rapidly from a speed
of above 70 km/h and comes to a standstill
The hazard warning lamps switch off automati-
cally if the vehicle reaches a speed of above
10 km/h again after a full brake application.
The hazard warning lamps continue to operate
even if the ignition is switched off. Adaptive Highbeam Assist
General notes You can use this function to set the headlamps
to switch automatically between dipped beam
and main beam. The system recognises vehicles
with their lights on, either approaching from the opposite direction or travelling in front of your
vehicle, and consequently switches the head-
lamps from main beam to dipped beam. Once
the system no longer detects any other vehicles, it switches on the main-beam headlamps again.
The system's optical sensor is located behind
the windscreen near the overhead control
panel. Exterior lighting
109Lights and windscreen wipers Z
Page 115 of 345
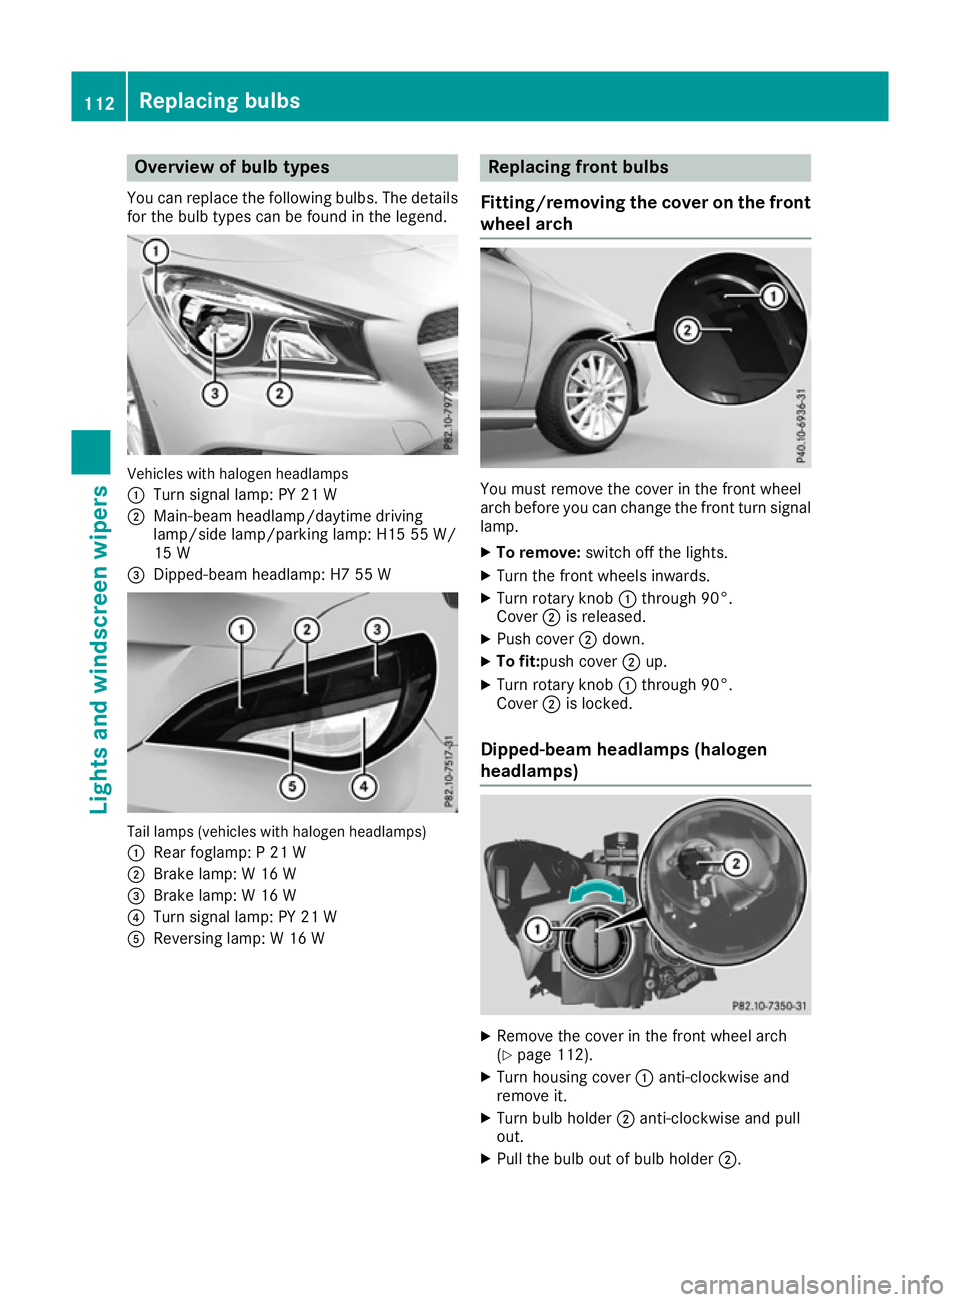
Overview of bulb types
You can replace the following bulbs. The details
for the bulb types can be found in the legend. Vehicles with halogen headlamps
:
Turn signal lamp: PY 21 W
; Main-beam headlamp/daytime driving
lamp/side lamp/parking lamp: H15 55 W/
15 W
= Dipped-beam headlamp: H7 55 W Tail lamps (vehicles with halogen headlamps)
: Rear foglamp: P 21 W
; Brake lamp: W 16 W
= Brake lamp: W 16 W
? Turn signal lamp: PY 21 W
A Reversing lamp: W 16 W Replacing front bulbs
Fitting/removing the cover on the front wheel arch You must remove the cover in the front wheel
arch before you can change the front turn signal
lamp.
X To remove: switch off the lights.
X Turn the front wheels inwards.
X Turn rotary knob :through 90°.
Cover ;is released.
X Push cover ;down.
X To fit:push cover ;up.
X Turn rotary knob :through 90°.
Cover ;is locked.
Dipped-beam headlamps (halogen
headlamps) X
Remove the cover in the front wheel arch
(Y page 112).
X Turn housing cover :anti-clockwise and
remove it.
X Turn bulb holder ;anti-clockwise and pull
out.
X Pull the bulb out of bulb holder ;.112
Replacing bulbsLights and windscreen wipers
Page 116 of 345
X
Insert the new bulb into bulb holder ;.
X Insert bulb holder ;and turn it clockwise.
X Press on housing cover :and turn it to the
right.
X Replace the cover in the front wheel arch
(Y page 112).
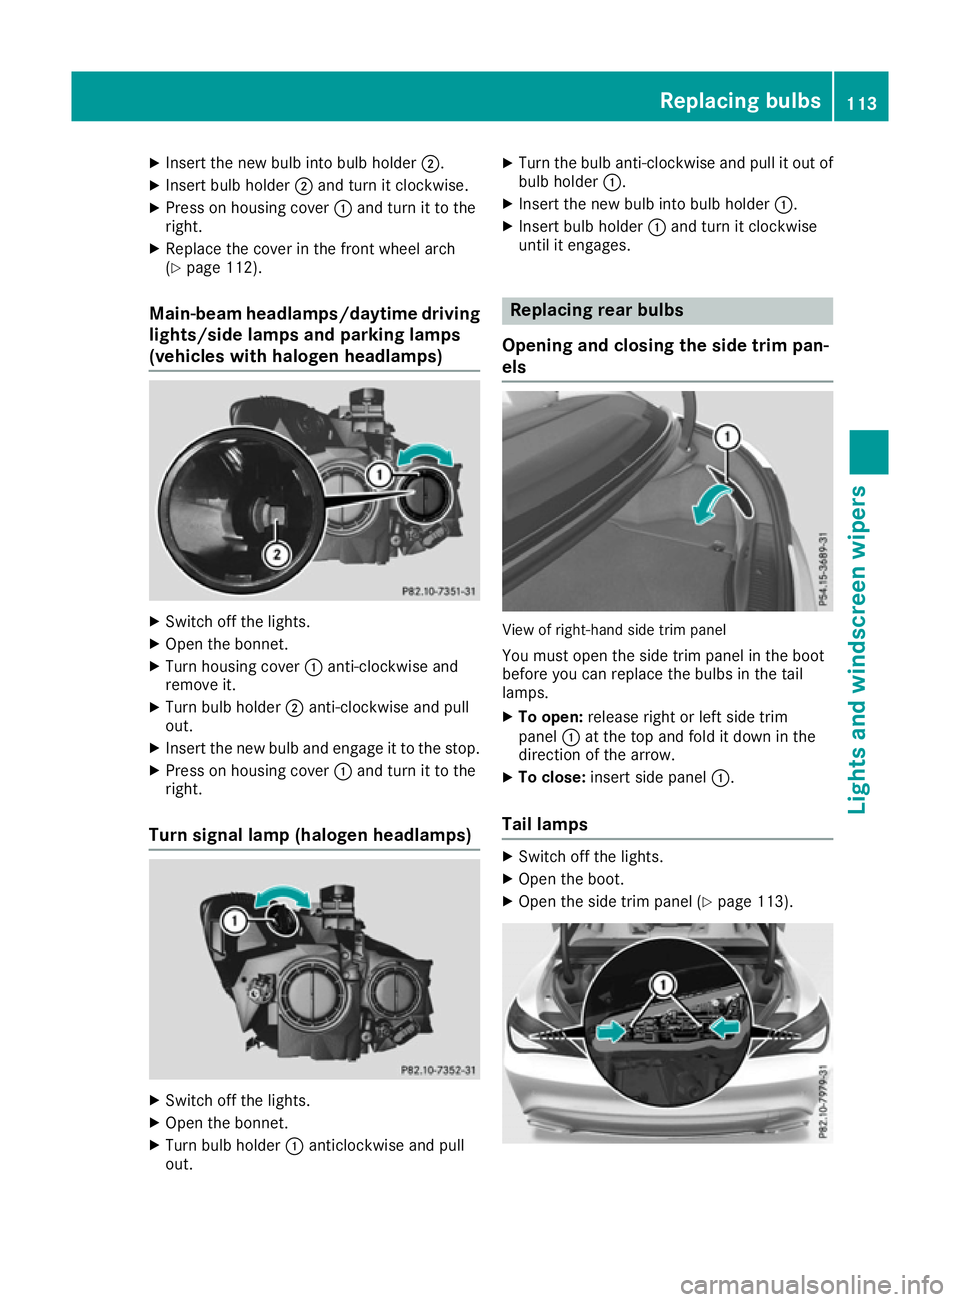
Main-beam headlamps/daytime driving
lights/side lamps and parking lamps
(vehicles with halogen headlamps) X
Switch off the lights.
X Open the bonnet.
X Turn housing cover :anti-clockwise and
remove it.
X Turn bulb holder ;anti-clockwise and pull
out.
X Insert the new bulb and engage it to the stop.
X Press on housing cover :and turn it to the
right.
Turn signal lamp (halogen headlamps) X
Switch off the lights.
X Open the bonnet.
X Turn bulb holder :anticlockwise and pull
out. X
Turn the bulb anti-clockwise and pull it out of
bulb holder :.
X Insert the new bulb into bulb holder :.
X Insert bulb holder :and turn it clockwise
until it engages. Replacing rear bulbs
Opening and closing the side trim pan-
els View of right-hand side trim panel
You must open the side trim panel in the boot
before you can replace the bulbs in the tail
lamps.
X To open: release right or left side trim
panel :at the top and fold it down in the
direction of the arrow.
X To close: insert side panel :.
Tail lamps X
Switch off the lights.
X Open the boot.
X Open the side trim panel (Y page 113). Replacing bulbs
113Lights and windscreen wipers Z
Page 117 of 345
X
Press retaining clips :at the same time in
the direction of the arrows.
X Carefully remove the bulb holder together
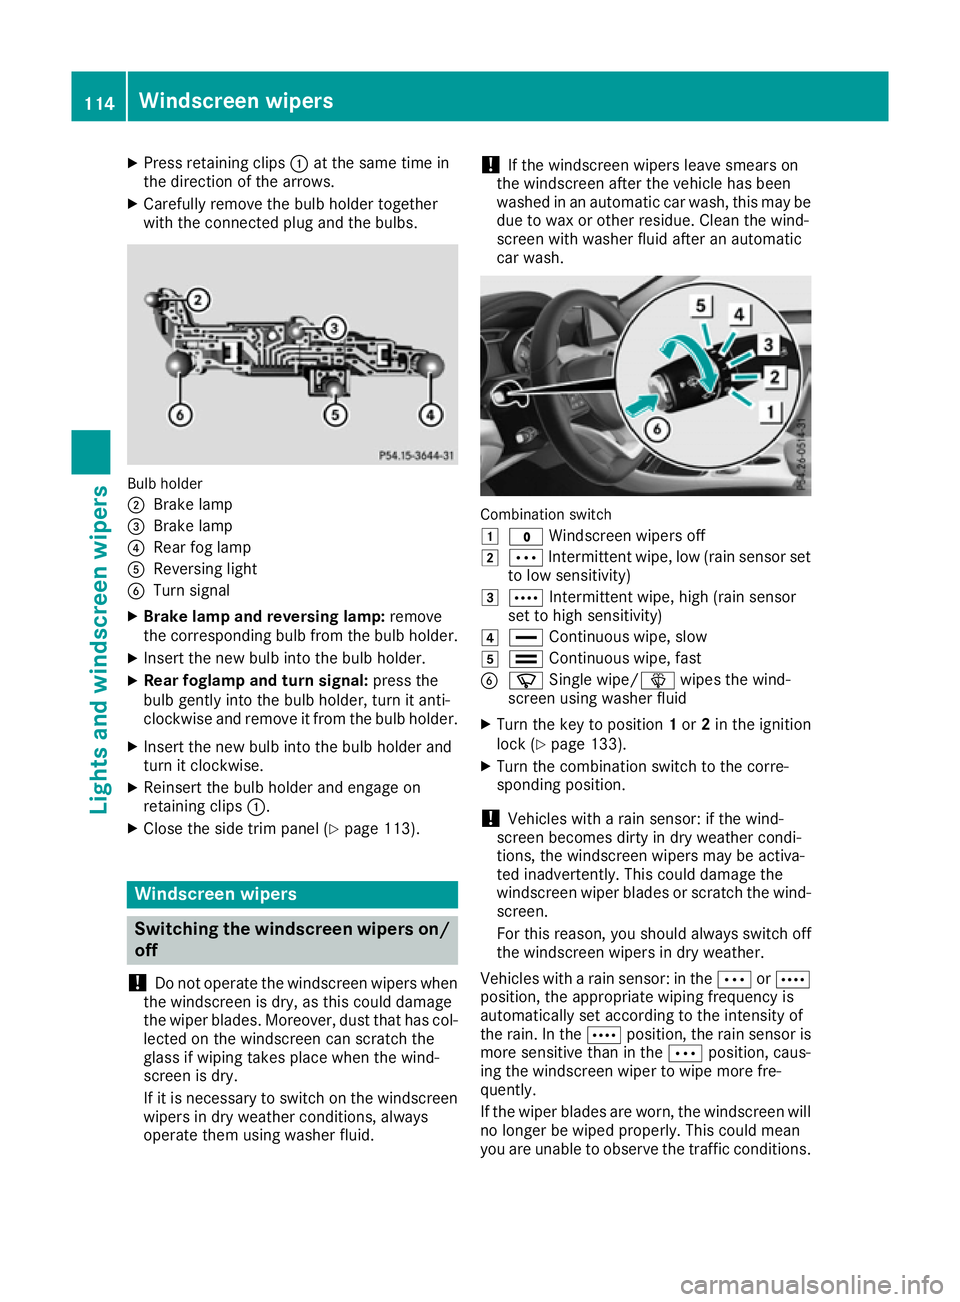
with the connected plug and the bulbs. Bulb holder
;
Brake lamp
= Brake lamp
? Rear fog lamp
A Reversing light
B Turn signal
X Brake lamp and reversing lamp: remove
the corresponding bulb from the bulb holder.
X Insert the new bulb into the bulb holder.
X Rear foglamp and turn signal: press the
bulb gently into the bulb holder, turn it anti-
clockwise and remove it from the bulb holder.
X Insert the new bulb into the bulb holder and
turn it clockwise.
X Reinsert the bulb holder and engage on
retaining clips :.
X Close the side trim panel (Y page 113).Windscreen wipers
Switching the windscreen wipers on/
off
! Do not operate the windscreen wipers when
the windscreen is dry, as this could damage
the wiper blades. Moreover, dust that has col-
lected on the windscreen can scratch the
glass if wiping takes place when the wind-
screen is dry.
If it is necessary to switch on the windscreen wipers in dry weather conditions, always
operate them using washer fluid. !
If the windscreen wipers leave smears on
the windscreen after the vehicle has been
washed in an automatic car wash, this may be
due to wax or other residue. Clean the wind-
screen with washer fluid after an automatic
car wash. Combination switch
1
$ Windscreen wipers off
2 Ä Intermittent wipe, low (rain sensor set
to low sensitivity)
3 Å Intermittent wipe, high (rain sensor
set to high sensitivity)
4 ° Continuous wipe, slow
5 ¯ Continuous wipe, fast
B í Single wipe/î wipes the wind-
screen using washer fluid
X Turn the key to position 1or 2in the ignition
lock (Y page 133).
X Turn the combination switch to the corre-
sponding position.
! Vehicles with a rain sensor: if the wind-
screen becomes dirty in dry weather condi-
tions, the windscreen wipers may be activa-
ted inadvertently. This could damage the
windscreen wiper blades or scratch the wind- screen.
For this reason, you should always switch off
the windscreen wipers in dry weather.
Vehicles with a rain sensor: in the ÄorÅ
position, the appropriate wiping frequency is
automatically set according to the intensity of
the rain. In the Åposition, the rain sensor is
more sensitive than in the Äposition, caus-
ing the windscreen wiper to wipe more fre-
quently.
If the wiper blades are worn, the windscreen will
no longer be wiped properly. This could mean
you are unable to observe the traffic conditions. 114
Windscreen wipersLights and windscreen wipers
Page 173 of 345
R
You switch on the respective turn signal
R Distance Pilot DISTRONIC does not currently
detect a danger of collision
If these conditions are met, your vehicle accel-
erates. Acceleration will be interrupted if chang-
ing lanes takes too long or if the distance
between your vehicle and the vehicle in front
becomes too small.
Stopping If Distance Pilot DISTRONIC detects that the
vehicle in front is stopping, it brakes your vehicle
until it is stationary.
Once your vehicle is stationary, it remains sta-
tionary and you do not need to depress the
brake.
i After a short period, the vehicle is secured
by the electric parking brake, thus relieving
the service brake.
i Depending on the specified minimum dis-
tance, your vehicle will come to a standstill at
a sufficient distance behind the vehicle in
front. The specified minimum distance is set
using the control on the cruise control lever.
When Distance Pilot DISTRONIC is activated,
the transmission is shifted automatically to
position Pif:
R the driver's seat belt is not fastened and the
driver's door is open
R the engine is switched off, unless it is auto-
matically switched off by the ECO start/stop
function
The electric parking brake is applied automati-
cally if Distance Pilot DISTRONIC is active when
the vehicle is stationary and:
R a system fault occurs
R the power supply is insufficient
If a fault occurs, the transmission may also shift
to position Pautomatically.
Setting a speed Bear in mind that it may take a brief moment
until the vehicle has accelerated or braked to
the set speed.
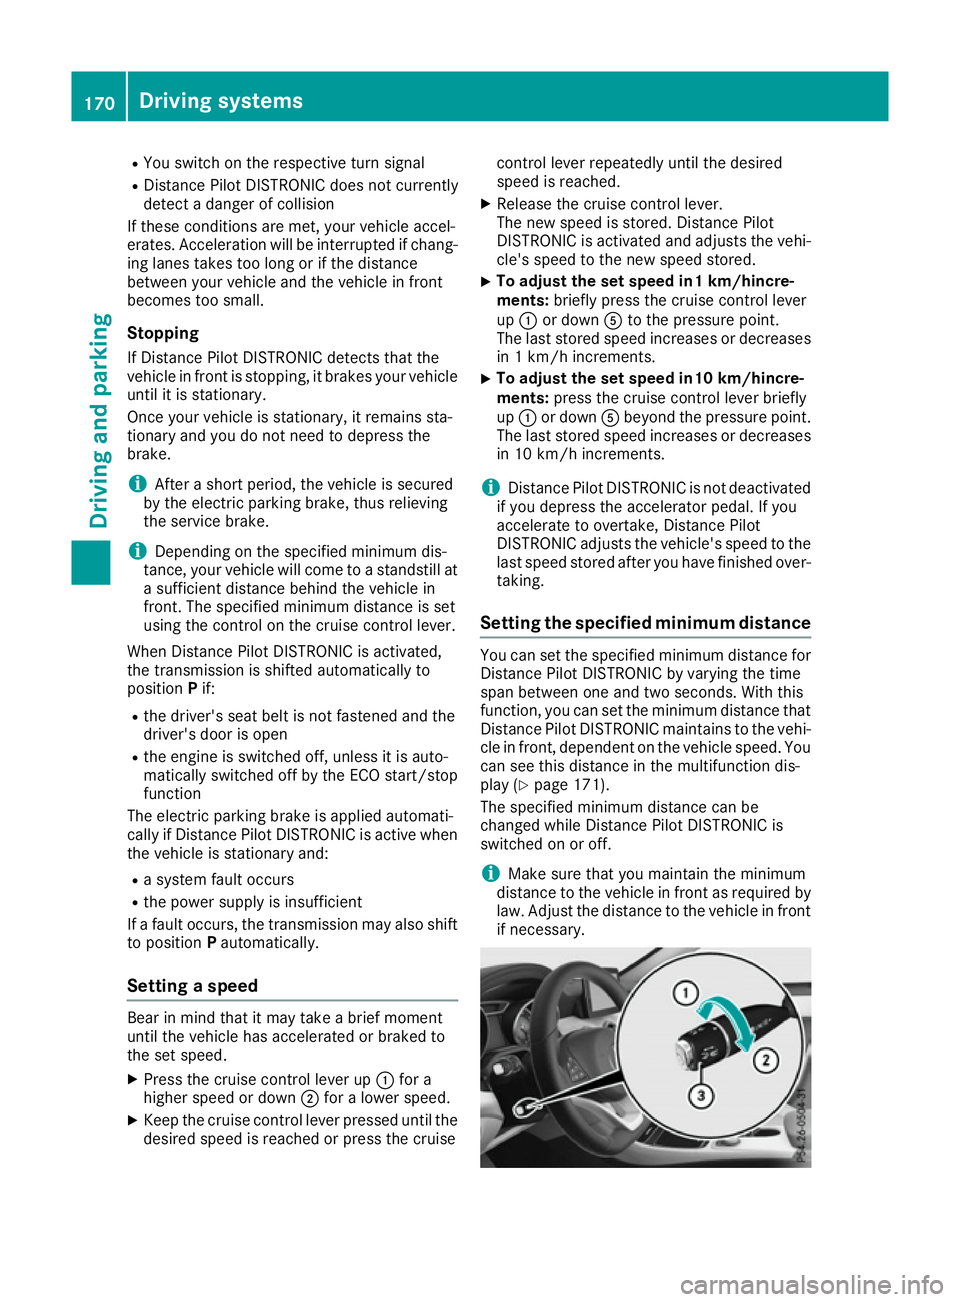
X
Press the cruise control lever up :for a
higher speed or down ;for a lower speed.
X Keep the cruise control lever pressed until the
desired speed is reached or press the cruise control lever repeatedly until the desired
speed is reached.
X Release the cruise control lever.
The new speed is stored. Distance Pilot
DISTRONIC is activated and adjusts the vehi-
cle's speed to the new speed stored.
X To adjust the set speed in1 km/hincre-
ments:
briefly press the cruise control lever
up : or down Ato the pressure point.
The last stored speed increases or decreases in 1 km/h increments.
X To adjust the set speed in10 km/hincre-
ments:
press the cruise control lever briefly
up : or down Abeyond the pressure point.
The last stored speed increases or decreases
in 10 km/h increments.
i Distance Pilot DISTRONIC is not deactivated
if you depress the accelerator pedal. If you
accelerate to overtake, Distance Pilot
DISTRONIC adjusts the vehicle's speed to the last speed stored after you have finished over- taking.
Setting the specified minimum distance You can set the specified minimum distance for
Distance Pilot DISTRONIC by varying the time
span between one and two seconds. With this
function, you can set the minimum distance that Distance Pilot DISTRONIC maintains to the vehi-
cle in front, dependent on the vehicle speed. You can see this distance in the multifunction dis-
play (Y page 171).
The specified minimum distance can be
changed while Distance Pilot DISTRONIC is
switched on or off.
i Make sure that you maintain the minimum
distance to the vehicle in front as required by
law. Adjust the distance to the vehicle in front
if necessary. 170
Driving systemsDriving and parking
Page 185 of 345

Parking Pilot will detect only parking spaces
which are:
R parallel or at right angles to the direction of
travel
R that are parallel to the direction of travel and
are at least 1.5 m wide
R that are parallel to the direction of travel and
at least 1.0 m longer than your vehicle
R that are at right angles to the direction of
travel and at least 1.0 mwider than your vehi-
cle
i Note that Parking Pilot cannot measure the
length of a parking space if it is at right angles to the direction of travel. You will need to
judge whether your vehicle will fit in the park-
ing space.
When driving at speeds below 30 km/h, you will
see parking symbol ;as a status indicator in
the instrument cluster. When a parking space
has been detected, an arrow towards the right or the left also appears. Parking Pilot displays only
parking spaces on the front-passenger side as
standard. Parking spaces on the driver's side
are displayed as soon as the turn signal on the
driver's side is activated. When parking on the
driver's side, this must remain activated until
you confirm the use of Parking Pilot by pressing the a button on the multifunction steering
wheel. The system automatically determines
whether the parking space is parallel or at right
angles to the direction of travel.
A parking space is displayed while you are driv- ing past it, and until you are approximately 15 m
away from it.
Parking G
WARNING
If you leave the vehicle when it is only being
braked by Parking Pilot, it could roll away if:
R there is a malfunction in the system or in
the voltage supply.
R the electrical system in the engine com-
partment, the battery or the fuses are tam-
pered with.
R the battery is disconnected
R the vehicle is accelerated, e.g. by a vehicle
occupant.
There is a risk of an accident. Before leaving the vehicle, always secure it
against rolling away.
i Vehicles with automatic transmission:
If Parking Assist PARKTRONIC detects obsta-
cles, Parking Pilot brakes automatically whilst
the vehicle is parking. You are responsible for
braking in good time.
X Stop the vehicle when the parking symbol
shows the desired parking space in the instru-
ment cluster.
X Vehicles with automatic transmission:
shift the transmission to position
R.
Vehicles with manual transmission: shift
to reverse gear.
The Start Parking Pilot?
Start Parking Pilot? Yes: OK Yes: OKNo:
No:
% message appears in the multifunction
display.
X To cancel the procedure: press the%
button on the multifunction steering wheel or
pull away.
or X To park using Parking Pilot: press thea
button on the multifunction steering wheel.
The Parking Pilot active Accelerate Parking Pilot active Accelerate
and brake
and brake Observe surroundings
Observe surroundings mes-
sage appears in the multifunction display.
X Release the multifunction steering wheel.
X Reverse the vehicle, being ready to brake at
all times. When reversing, drive at a speed
below 10 km/h. Otherwise Parking Pilot is
cancelled.
Vehicles with automatic transmission:
Parking Pilot brakes the vehicle to a standstill
when the vehicle approaches the rear border
of the parking space.
Manoeuvring may be required in tight parking spaces.
X Vehicles with manual transmission: stop
when Parking Assist PARKTRONIC sounds the continuous warning tone, if not before.
Manoeuvring may be required in tight parking
spaces.
Vehicles with automatic transmission: the
Parking Pilot active Select D Parking Pilot active Select D Observe
Observe
surroundings
surroundings message appears in the multi-
function display.
Vehicles with manual transmission: the
Parking Pilot active Engage forward Parking Pilot active Engage forward
gear gear Observe surroundings
Observe surroundings message
appears in the multifunction display. 182
Driving systemsDriving and parking
Page 186 of 345

X
Vehicles with automatic transmission:
select transmission position
Dwhile the vehi-
cle is stationary.
Vehicles with manual transmission: shift
to first gear while the vehicle is stationary.
Parking Pilot immediately steers in the other
direction.
The Parking Pilot active Accelerate Parking Pilot active Accelerate
and brake
and brake Observe surroundings
Observe surroundings mes-
sage appears in the multifunction display.
i You will achieve the best results by waiting
for the steering procedure to complete before
pulling away.
X Drive forwards and be ready to brake at all
times.
Vehicles with automatic transmission:
Parking Pilot brakes the vehicle to a standstill
when the vehicle approaches the front border
of the parking space.
Manoeuvring may be required in tight parking spaces.
X Vehicles with manual transmission: stop
when Parking Assist PARKTRONIC sounds the continuous warning tone, if not before.
Vehicles with automatic transmission: the
Parking Pilot active Select R
Parking Pilot active Select R Observe Observe
surroundings
surroundings message appears in the multi-
function display.
Vehicles with manual transmission: the
Parking Pilot active Engage reverse Parking Pilot active Engage reverse
gearObserve surroundings gearObserve surroundings message
appears in the multifunction display.
As soon as the parking procedure is complete,
the Parking Parking Pilot
Pilotended
endedmessage appears in
the multifunction display and a warning tone
sounds. The vehicle is now parked.
Vehicles with automatic transmission: the
vehicle is kept stationary without the driver hav-
ing to depress the brake pedal. The braking
effect is cancelled when you depress the accel- erator pedal.
Parking Pilot no longer supports you with steer-
ing interventions and brake applications. When
Parking Pilot is ended, you must steer and brake again yourself. Parking Assist PARKTRONIC is
still available.
Parking tips:
R The way your vehicle is positioned in the park-
ing space after parking is dependent on vari-
ous factors. These include the position and
shape of the vehicles parked in front of and behind it and the conditions of the location. It
may be the case that Parking Pilot guides you
too far into a parking space, or not far enough
into it. In some cases, it may also lead you
across or onto the kerb. If necessary, you
should abort the parking procedure with Park-
ing Pilot.
R You can also preselect transmission position
D. The vehicle redirects and does not drive as
far into the parking space. Should the trans-
mission change take place too early, the park-
ing procedure will be cancelled. A sensible
parking position can no longer be achieved
from this position.
Exiting a parking space In order that Parking Pilot can support you when
exiting the parking space:
R you need to have parked using Parking Pilot
R the border of the parking space must be high
enough at the front and the rear. A kerb stoneis too small, for example.
R the border of the parking space must not be
too wide, as the position of the vehicle must
not exceed an angle of 45° to the starting
position as it is manoeuvred into the parking
space.
R a manoeuvring distance of at least 1.0 mmust
be available.
Parking Pilot can assist you with exiting a park-
ing space only if you have parked the vehicle
parallel to the direction of travel using the Park-
ing Pilot
i Vehicles with automatic transmission:
If Parking Assist PARKTRONIC detects obsta-
cles, Parking Pilot brakes automatically whilst the vehicle is exiting the parking space. You
are responsible for braking in good time.
X Start the engine.
X Release the electric parking brake.
X Switch on the turn signal in the direction you
will drive out of the parking space.
X Vehicles with automatic transmission:
shift the transmission to position
Dor R.
Vehicles with manual transmission: shift
to forward or reverse gear.
The Start Parking Pilot?
Start Parking Pilot? Yes: OK Yes: OKNo:
No:
% message appears in the multifunction
display. Driving systems
183Driving and parking Z
Page 195 of 345
Blind Spot Assist
General notes
Blind Spot Assist monitors the areas on either
side of the vehicle that are not visible to the
driver with two lateral, rear-facing radar sen-
sors. A warning display in the exterior mirrors
draws your attention to vehicles detected in the
monitored area. If you then switch on the cor-
responding turn signal to change lanes, you will also receive a visual and audible warning.
Blind Spot Assist supports you from a speed of
approximately 30 km/h.
Important safety notes G
WARNING
Blind Spot Assist does not react to vehicles:
R overtaken too closely on the side, placing
them in the blind spot area
R when the difference in the speed of
approach and overtaking is too great
As a result, Blind Spot Assist cannot warn
drivers in these situations. There is a risk of an accident.
Always pay careful attention to the traffic sit- uation and maintain a safe distance at the side
of the vehicle.
Blind Spot Assist is only an aid. It may fail to
detect some vehicles and is not a substitute for
attentive driving. Always ensure that there is
sufficient distance to the side for other road
users and obstacles.
Radar sensors The radar sensors for Blind Spot Assist are inte-
grated into the rear bumper. Make sure that the
bumpers are free from dirt, ice or slush. The
sensors must not be covered, e.g. by cycle racks
or overhanging loads. Following a severe impact or in the event of damage to the bumpers, havethe function of the radar sensors checked at a
qualified specialist workshop. Blind Spot Assist
may no longer work properly in such cases. Monitoring range of the sensors
In particular, the detection of obstacles can be
impaired in the following situations:
R dirt on the sensors or obscured sensors
R poor visibility, e.g. due to fog, heavy rain or
snow
R a narrow vehicle travelling in front, e.g. a
motorcycle or a bicycle
R very wide lanes
R narrow lanes
R vehicles not driving in the middle of their lane
R barriers or other road boundaries
Vehicles in the monitoring range are then not
indicated.
Blind Spot Assist monitors an area up to 3.0 m
behind your vehicle and directly next to your
vehicle.
If the lanes are narrow, vehicles driving in the
lane beyond the lane next to your vehicle may be
indicated, especially if the vehicles are not driv-
ing in the middle of their lane. This may be the
case if the vehicles are driving on the inner side of their lane.
Due to the nature of the system:
R warnings may be issued in error when driving
close to crash barriers or similar solid boun-
daries
R warnings may be interrupted when you are
driving alongside particularly long vehicles,
for example lorries, for a prolonged time
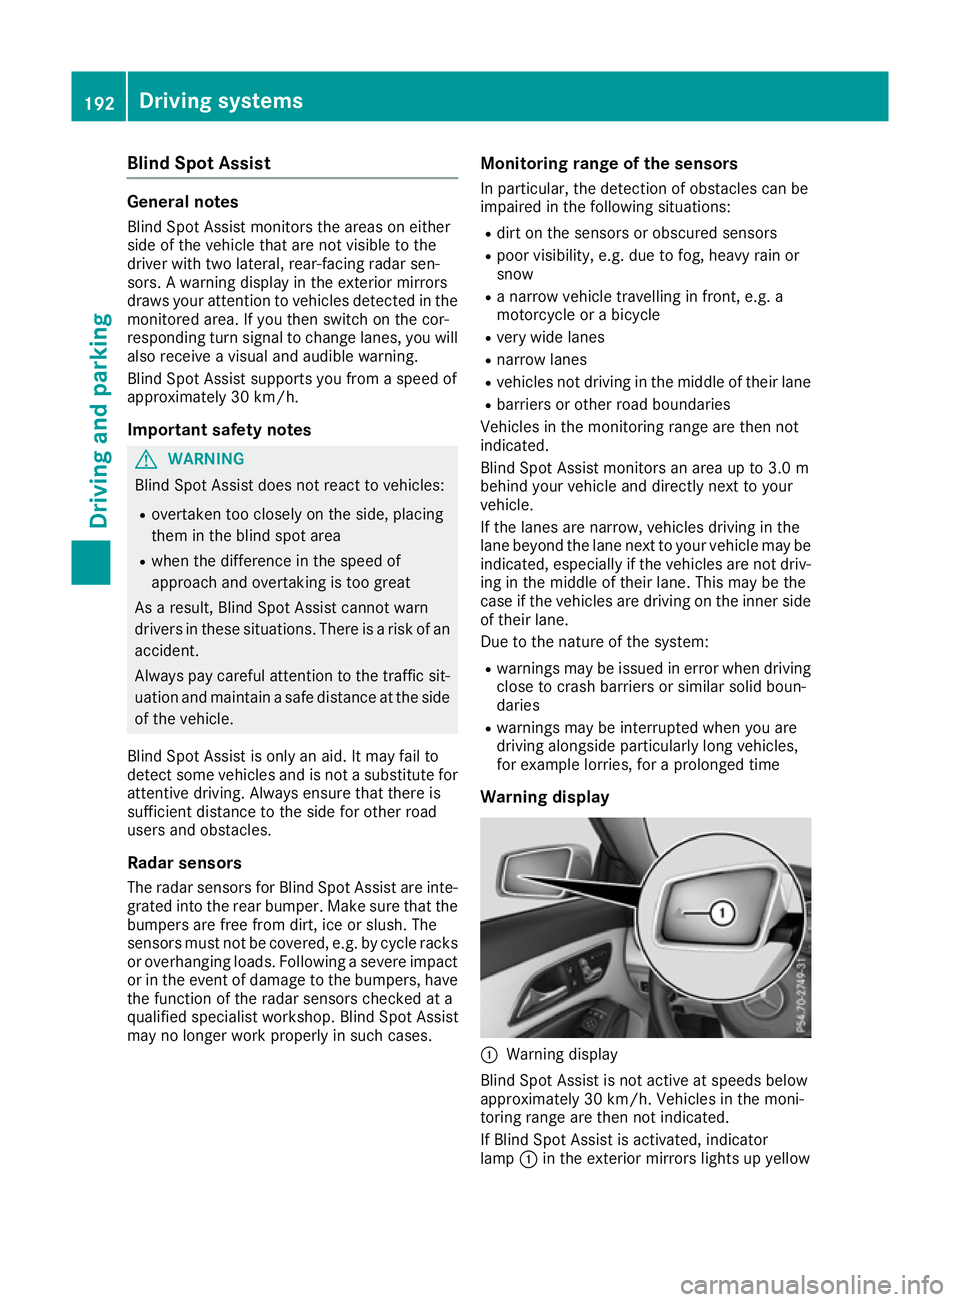
Warning display :
Warning display
Blind Spot Assist is not active at speeds below
approximately 30 km/h. Vehicles in the moni-
toring range are then not indicated.
If Blind Spot Assist is activated, indicator
lamp :in the exterior mirrors lights up yellow 192
Driving systemsDriving an
d parking