2016 MERCEDES-BENZ CLA COUPE key battery
[x] Cancel search: key batteryPage 86 of 345

Doors
Important safety notes
G
WARNING
If children are left unsupervised in the vehicle, they could:
R open doors, thereby endangering other per-
sons or road users
R get out and be struck by oncoming traffic
R operate vehicle equipment and become
trapped, for example
In addition, the children could also set the
vehicle in motion, for example, if they:
R release the parking brake
R shift the automatic transmission out of park
position P or shift manual transmission into
neutral
R start the engine
There is a risk of an accident and injury.
When leaving the vehicle, always take the key with you and lock the vehicle. Never leave
children and animals unattended in the vehi-
cle. Keep the keys out of the reach of children.
Stow luggage or loads preferably in the luggage compartment. Observe the loading guidelines
(Y page 268).
United Kingdom only: G
WARNING
When the double locks are activated, the
doors can no longer be opened from the
inside. People in the vehicle can no longer get out, e.g. in hazardous situations. There is a
risk of injury.
Therefore, do not leave any people unsuper-
vised in the vehicle, particularly children, eld-
erly people or people in need of special assis-
tance. Do not activate the double lock when
people are in the vehicle.
If the vehicle has been locked with the key, the
double lock function is activated as standard. It
is then not possible to open the doors from
inside the vehicle. You can deactivate the dou-
ble lock function by deactivating the interior
motion sensor (Y page 75). The doors can then be opened from the inside after the vehicle has
been locked from the outside. You can open the
rear doors from inside the vehicle if they are not secured by the child-proof locks (Y page 65).
The anti-theft alarm system is triggered if the
door is opened from the inside. Switch off the
alarm (Y page 73). Unlocking and opening the doors
from the inside
! The side windows will not open/close if the
battery is discharged or if the side windows
have iced up. It will then not be possible to
close the door. Do not attempt to force the
door to close. You could otherwise damage
the door or the side window.
When a door is opened, the side window on that side opens slightly. When the door is closed, the
side window is raised again. X
Pull door handle ;.
If the door is locked, locking knob :pops up.
The door is unlocked and opens.
For all countries except the United Kingdom:
You can open a door from inside the vehicle
even if it has been locked. You can only open the rear doors from inside the vehicle if they are not secured by the child-proof locks (Y page 65).
If the vehicle has previously been locked with
the key from the outside, opening a door from
the inside will trigger the anti-theft alarm sys-
tem. Switch off the alarm (Y page 73).
United Kingdom only: G
WARNING
When the double locks are activated, the
doors can no longer be opened from the
inside. People in the vehicle can no longer get Doors
83Opening and closing
Z
Page 105 of 345

The three red indicator lamps in the button indi-
cate the heating level you have selected.
The system automatically switches down from
level 3to level 2after approximately eight
minutes. The system automatically switches down from
level 2to level 1after approximately ten
minutes.
The system automatically switches off approx-
imately 20 minutes after it is set to level 1.
X Turn the key to position 1or 2in the ignition
lock (Y page 133).
X To switch on: press button:repeatedly
until the desired heating level is set.
X To switch off: press button:repeatedly
until all the indicator lamps go out.
i If the vehicle battery voltage is too low, the
seat heating may switch off.
Problems with the seat heating Problem
Possible causes/consequences and
M MSolutions The seat heating has
switched off prematurely
or cannot be switched
on. The on-board voltage is too low because too many electrical consum-
ers are switched on.
X Switch off electrical consumers that you do not need, such as the
rear window heating or interior lighting.
Once the battery is sufficiently charged, the seat heating will switch
back on automatically. Steering wheel
Important safety notes
G
WARNING
You could lose control of the vehicle while
driving if you:
R adjust the driver's seat, steering wheel or
mirrors
R fasten the seat belt
There is a risk of an accident.
Adjust the driver's seat, head restraint, steer-
ing wheel and mirrors and fasten your seat
belt before starting the engine. G
WARNING
Children could become trapped by the steer-
ing wheel if they adjust it. There is a risk of
injury. When leaving the vehicle, always take the key
with you and lock the vehicle. Never leave
children unattended in the vehicle. Adjusting the steering wheel
G
WARNING
The steering wheel may move unexpectedly if you adjust it while driving. This could cause
you to lose control of the vehicle. There is a
risk of an accident.
Make sure that the steering wheel is locked
before driving off. Never unlock the steering
wheel when the vehicle is in motion. 102
Steering wheelSeats, steering wheel and mirrors
Page 107 of 345

mirror using button
=as long as the indicator
lamp is lit.
X Press button =up, down, or to the right or
left until you have adjusted the exterior mirror
to the correct position. You should have a
good overview of traffic conditions.
The convex exterior mirrors provide a larger field of vision.
After the engine has been started, the exterior
mirrors are automatically heated at low outside
temperatures. Heating takes a maximum of ten
minutes.
i The exterior mirrors can also be heated
manually by switching on the rear window
heating.
Folding the exterior mirrors in/out elec- trically X
Turn the key to position 1or 2in the ignition
lock (Y page 133).
X Briefly press button :.
Both exterior mirrors fold in or out.
i Make sure that the exterior mirrors are
always folded out fully while driving. Other-
wise, they could vibrate.
i If you are driving faster than 47 km/h, you
can no longer fold in the exterior mirrors.
Resetting the exterior mirrors If the battery has been disconnected or com-
pletely discharged, the exterior mirrors must be
reset. The exterior mirrors will otherwise not
fold in when you select the "Fold in mirrors when locking" function in the on-board computer
(Y page 213). X
Turn the key to position 1in the ignition lock
(Y page 133).
X Briefly press button :.
Folding the exterior mirrors in/out
automatically If the "Fold in mirrors when locking" function is
activated in the on-board computer
(Y page 213):
R the exterior mirrors fold in automatically as
soon as you lock the vehicle from the outside
R the exterior mirrors fold out again automati-
cally as soon as you unlock the vehicle and
then open the driver's or front-passenger
door
i If the exterior mirrors have been folded in
manually, they do not fold out.
Exterior mirror pushed out of position If an exterior mirror has been pushed out of
position (forwards or backwards), proceed as
follows:
X Vehicles without electrically folding exte-
rior mirrors: manually move the exterior mir-
ror into the correct position.
X Vehicles with electrically folding exterior
mirrors: press and hold mirror-folding button
(Y page 104) until you hear a click and the
mirror engages audibly into position.
The mirror housing is engaged again and you
can adjust the exterior mirrors as usual
(Y page 103). Automatic anti-dazzle mirrors
G
WARNING
Electrolyte may escape if the glass of an auto- matic anti-dazzle mirror breaks. Electrolyte is
harmful and causes irritation. It must not
come into contact with your skin, eyes, res-
piratory organs or clothing or be swallowed.
There is a risk of injury. 104
MirrorsSeats, steering wheel and mirrors
Page 111 of 345
 and
L(dipped-beam head-
lamps) in the instrument cluster light up.
Dipped-beam headlamps When the ignition is switched on and the light
switch is in the Lposition, the side lamps
and dipp")
(side lamps) and
L(dipped-beam head-
lamps) in the instrument cluster light up.
Dipped-beam headlamps When the ignition is switched on and the light
switch is in the Lposition, the side lamps
and dipped-beam headlamps are switched on
even if the light sensor does not sense dark
ambient light conditions. This is advantageous
when there is fog or rain.
X To switch on the dipped-beam headlamps:
turn the key in the ignition lock to position 2
or start the engine.
X Turn the light switch to L.
The green Lindicator lamp on the instru-
ment cluster lights up.
Rear foglamp The rear foglamp improves the visibility of your
vehicle in heavy fog for the following traffic.
Please observe the country-specific laws on the
use of rear foglamps.
X To switch on the rear foglamp: turn the key
in the ignition lock to position 2or start the
engine.
X Turn the light switch to LorÃ.
X Press the Rbutton.
The yellow Rindicator lamp in the instru-
ment cluster lights up.
X To switch off the rear foglamp:press the
R button.
The yellow Rindicator lamp in the instru-
ment cluster goes out.
i When the rear foglamp is switched on, the
centre brake lamp in the tail lamp switches off
due to a legal requirement.
Side lamps ! When the battery is discharged heavily, the
side lamps or parking lamps are automatically
switched off to facilitate an engine start.
Always park your vehicle safely and in a well lit area, in accordance with the relevant legal
stipulations. Avoid using the Tside lamps
for periods lasting several hours. Where pos-
sible, switch on the right Xor left W
parking lamp.
X To switch on: turn the light switch to T.
The green Tindicator lamp in the instru-
ment cluster lights up. Parking lamps
Switching on the parking lamps ensures that the
corresponding side of the vehicle is illuminated.
X To switch on the parking lamps: the key
should not be in the ignition lock or it should
be in position 0.
X Turn the light switch to W(left-hand side of
the vehicle) or X(right-hand side of the
vehicle).
Adjusting the headlamp range (halogen
headlamps) g
Driver's seat and front-passenger seat
occupied
1 Driver's seat, front-passenger seat and rear
seats occupied
2 Driver's seat, front-passenger seat and rear
seats occupied, luggage compartment
laden
3 Driver's and front-passenger seat occupied
and maximum permissible rear axle load uti-
lised, e.g. when towing a trailer
The headlamp range controller allows you to
adjust the cone of light from the headlamps to
suit the vehicle load.
X Start the engine.
X Turn the headlamp range controller to the
position that corresponds to the load in your
vehicle. 108
Exterior lightingLights and windscreen wipers
Page 114 of 345
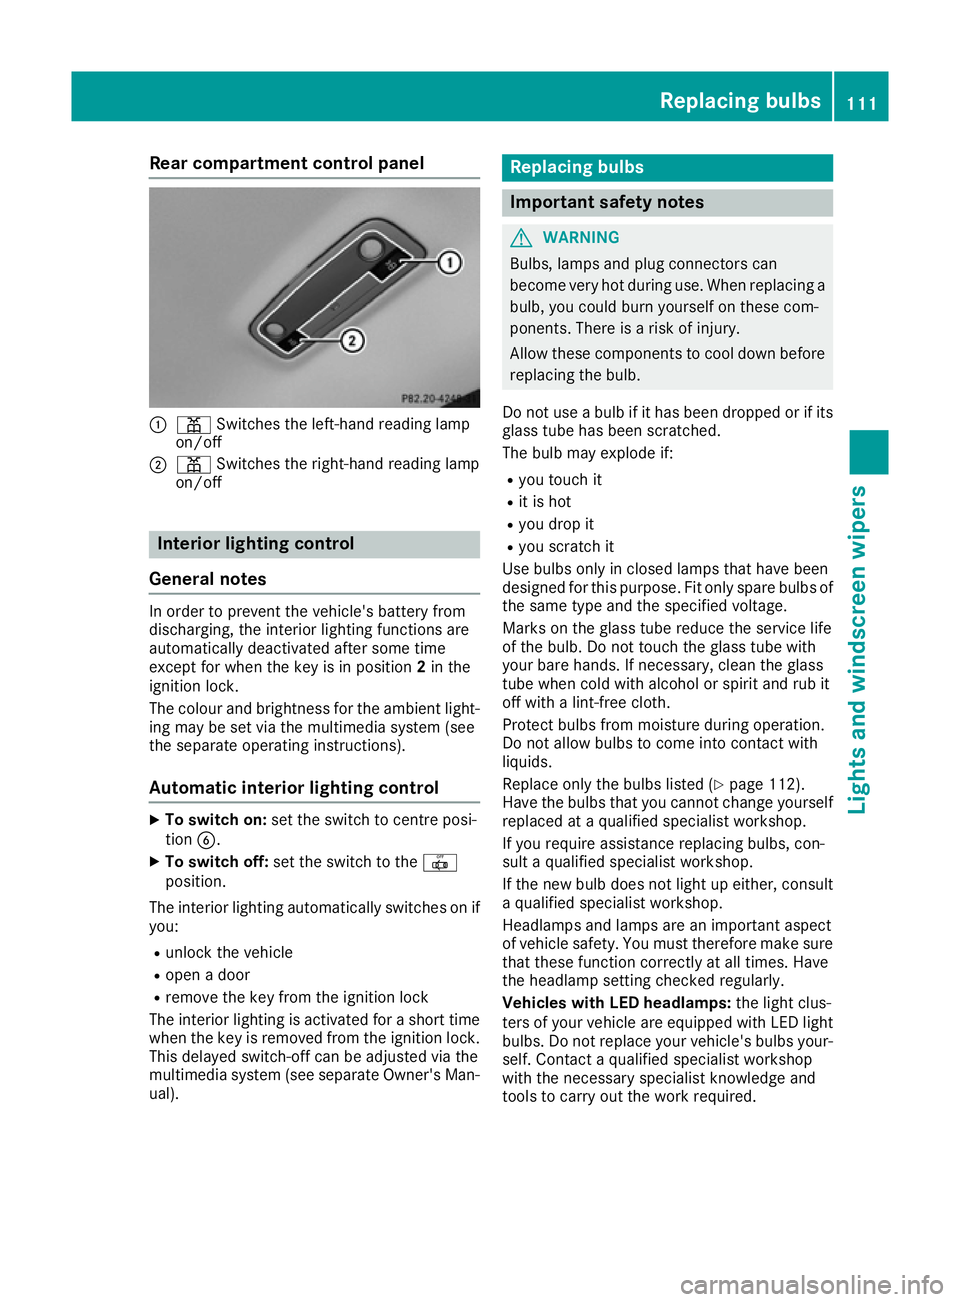
Rear compartment control panel
:
p Switches the left-hand reading lamp
on/off
; p Switches the right-hand reading lamp
on/off Interior lighting control
General notes In order to prevent the vehicle's battery from
discharging, the interior lighting functions are
automatically deactivated after some time
except for when the key is in position 2in the
ignition lock.
The colour and brightness for the ambient light-
ing may be set via the multimedia system (see
the separate operating instructions).
Automatic interior lighting control X
To switch on: set the switch to centre posi-
tion B.
X To switch off: set the switch to the |
position.
The interior lighting automatically switches on if you:
R unlock the vehicle
R open a door
R remove the key from the ignition lock
The interior lighting is activated for a short time
when the key is removed from the ignition lock.
This delayed switch-off can be adjusted via the
multimedia system (see separate Owner's Man-
ual). Replacing bulbs
Important safety notes
G
WARNING
Bulbs, lamps and plug connectors can
become very hot during use. When replacing a bulb, you could burn yourself on these com-
ponents. There is a risk of injury.
Allow these components to cool down beforereplacing the bulb.
Do not use a bulb if it has been dropped or if its
glass tube has been scratched.
The bulb may explode if:
R you touch it
R it is hot
R you drop it
R you scratch it
Use bulbs only in closed lamps that have been
designed for this purpose. Fit only spare bulbs of the same type and the specified voltage.
Marks on the glass tube reduce the service life
of the bulb. Do not touch the glass tube with
your bare hands. If necessary, clean the glass
tube when cold with alcohol or spirit and rub it
off with a lint-free cloth.
Protect bulbs from moisture during operation.
Do not allow bulbs to come into contact with
liquids.
Replace only the bulbs listed (Y page 112).
Have the bulbs that you cannot change yourself
replaced at a qualified specialist workshop.
If you require assistance replacing bulbs, con-
sult a qualified specialist workshop.
If the new bulb does not light up either, consult a qualified specialist workshop.
Headlamps and lamps are an important aspect
of vehicle safety. You must therefore make sure
that these function correctly at all times. Have
the headlamp setting checked regularly.
Vehicles with LED headlamps: the light clus-
ters of your vehicle are equipped with LED light bulbs. Do not replace your vehicle's bulbs your-
self. Contact a qualified specialist workshop
with the necessary specialist knowledge and
tools to carry out the work required. Replacing bulbs
111Lights and windscreen wipers Z
Page 127 of 345
.
THERMOTRONIC automatic climate control:
turn temperature control :orE anti-clock-
wise or clockwise (Y")
or
X Air-conditioning system: turn temperature
control :anti-clockwise or clockwise
(Y page 118).
THERMOTRONIC automatic climate control:
turn temperature control :orE anti-clock-
wise or clockwise (Y page 119).Demisting the windows
Windows misted up on the inside Air-conditioning system
X Activate the ¿"Cooling with air dehumid-
ification" function.
X If the windows continue to mist up, activate
the ¬ "Windscreen demisting" function.
i You should only select this setting until the
windscreen is clear again.
THERMOTRONIC automatic climate con-
trol
X Activate the ¿"Cooling with air dehumid-
ification" function.
X Activate automatic mode Ã.
X If the windows continue to mist up, activate
the ¬ "Windscreen demisting" function.
i You should only select this setting until the
windscreen is clear again. Windows misted up on the outside X
Activate the windscreen wipers.
X Set the air distribution to PorO.
i You should only select this setting until the
windscreen is clear again. Rear window heating
General notes The rear window heating has a high current
draw. You should therefore switch it off as soon
as the window is clear. The rear window heating otherwise switches off automatically after sev-
eral minutes.
If the battery voltage is too low, the rear window
heating may switch off.
Activating/deactivating X
Turn the key to position 2in the ignition lock
(Y page 133).
X Press the ¤button.
The indicator lamp in the ¤button lights
up or goes out.
Problems with the rear window heating Problem
Possible causes/consequences and
M MSolutions The rear window heating
has switched off prema-
turely or cannot be
switched on. The battery has not been sufficiently charged.
X Switch off any consumers that are not required, e.g. reading lamps,
interior lighting or the seat heating.
When the battery is sufficiently charged, the rear window heating
can be switched on again. Activating/deactivating air-recircula-
tion mode
General notes You can deactivate the flow of fresh air tempo-
rarily if unpleasant odours are entering the vehi-
cle from outside. The air already inside the vehi- cle will then be recirculated. If you activate air-recirculation mode, the win-
dows can mist up more quickly, particularly at
low temperatures. Use air-recirculation mode
only briefly to prevent the windows from misting
up.
The operation of air-recirculation mode is the
same for all control panels. 124
Operating the climate control systemClimate control
Page 129 of 345

with the convenience closing feature, they
will remain in this position when opened using
the convenience opening feature. Switching the residual heat on/off
General notes The residual heat function is only available with
THERMOTRONIC automatic climate control.
It is possible to make use of the residual heat of the engine to continue heating the vehicle for
approximately 30 minutes after the engine has
been switched off. The heating time depends on
the set interior temperature.
i The blower will run at a low speed regardless
of the airflow setting.
i If you switch on the residual heat function at
high temperatures, only the ventilation will be
activated. The blower runs at medium speed.
i You cannot use the ventilation to cool the
vehicle interior to a temperature lower than
the outside temperature.
Activating/deactivating X
Turn the key to position 0in the ignition lock
or remove it (Y page 133).
X Press the Ìbutton.
The indicator lamp in the Ìbutton lights
up or goes out.
The indicator lamp in the button indicates that the respective function is activated.
i Residual heat is switched off automatically:
R after approximately 30 minutes
R when the ignition is switched on
R if the battery voltage drops
R when the auxiliary heating is switched on Auxiliary heating
Important safety notes G
DANGER
If the exhaust pipe is blocked or sufficient
ventilation is not possible, toxic exhaust
fumes can enter the vehicle, especially car- bon monoxide. This is the case, e.g. in
enclosed spaces, or if the vehicle is stuck in
snow. There is a risk of fatal injuries.
You should switch off the auxiliary heating in
enclosed spaces which do not have an extrac- tion system, e.g. a garage. If the vehicle is
stuck in snow and you must leave the auxiliary
heating running, keep the exhaust pipe and
the area around the vehicle clear of snow. To guarantee a sufficient supply of fresh air, open
a window on the side of the vehicle away from the wind. G
WARNING
When the auxiliary heating is switched on,
parts of the vehicle can become very hot.
Flammable materials such as leaves, grass or twigs may ignite if they come into contact
with:
R hot parts of the exhaust system
R the exhaust gas itself
There is a risk of fire.
When the auxiliary heating is switched on,
make sure that:
R no flammable materials come into contact
with hot vehicle components
R the exhaust gas can escape from the
exhaust pipe unhindered
R the exhaust gas does not come into contact
with flammable materials.
The auxiliary heating and the exhaust gas outlet are situated in front of the right-hand front
wheel.
! Operating the auxiliary heating/ventilation
draws on the vehicle battery. After you have
heated or ventilated the vehicle a maximum of two times, drive for a longer distance.
Switch the auxiliary heating on regularly once a
month for about ten minutes.
The auxiliary heating timer function calculates
the switch-on time according to the outside
temperature so that the vehicle is preheated by the departure time. When the departure time isreached, the auxiliary heating continues to heat
for a further five minutes and then switches off. 126
Operating the climate control systemClimate control
Page 140 of 345

Hill start assist is not active if:
R you are pulling away on a level road or a
downhill gradient
R on vehicles with automatic transmission, the
transmission is in position N
R the electric parking brake is applied
R ESP ®
is malfunctioning
Further information on holding the vehicle sta-
tionary on uphill gradients (Y page 148).ECO start/stop function
Introduction The ECO start/stop function switches the
engine off automatically if the vehicle is stopped
under certain conditions.
When pulling away again, the engine starts auto-
matically. The ECO start/stop function thereby
helps you to reduce the fuel consumption and
emissions of your vehicle.
Important safety notes G
WARNING
If the engine is switched off automatically and you exit the vehicle, the engine is restarted
automatically. The vehicle may begin moving. There is a risk of accident and injury.
If you wish to exit the vehicle, always turn off
the ignition and secure the vehicle against
rolling away.
General notes :
ECO start/stop display
The ECO start/stop function is activated when-
ever you start the engine using the key or the
Start/Stop button.
If the è symbol is shown on the multifunction
display, the ECO start/stop function switches the engine off automatically if the vehicle stops
moving.
If the ECO start/stop function has been man-
ually deactivated (Y page 138) or a malfunction
has caused the system to be deactivated, the
è orç ECO symbol is not displayed.
Mercedes-AMG vehicles: the ECO start/stop
function is only available in drive program C.
Automatic engine switch-off General notes
The ECO start/stop function is operational and
the è ECO symbol is displayed on the mul-
tifunction display if:
R the indicator lamp in the ECO button is lit
green
R the outside temperature is within the range
that is suitable for the system
R the engine is at normal operating temperature
R the set temperature for the vehicle interior
has been reached
R the battery is sufficiently charged
R the system does not detect moisture on the
windscreen when the air-conditioning system
is switched on
R the bonnet is closed
R the driver's door is closed and the driver's
seat belt is fastened
If all conditions for automatic engine switch-off
are not fulfilled, the çECO symbol is shown.
All the vehicle's systems remain active when the engine is switched off automatically.
The engine can be switched off automatically a
maximum of four times (initial stop, then three
subsequent stops) in succession. The çECO
symbol is shown on the multifunction display
after the engine has been started automatically
for the fourth time. When the èECO symbol
is shown on the multifunction display, automatic
engine switch-off is possible again.
Vehicles with manual transmission Driving
137Driving and parking Z