2016 MERCEDES-BENZ CLA COUPE interior lights
[x] Cancel search: interior lightsPage 5 of 345

Index
....................................................... 4Digital Owner's Manual
......................23
Introduction .......................................... .23
Operation ............................................... 23 Introduction
......................................... 24
Environmental protection ......................24
Genuine Mercedes-Benz parts .............. .24
Owner's Manual .....................................25
Operating safety .................................... 25
QR code for rescue card ........................ 28
Data stored in the vehicle ......................28
Copyright information ............................ 29 At a glance
........................................... 30
Cockpit .................................................. 30
Instrument cluster ................................ .32
Multifunction steering wheel ................. 33
Centre console ...................................... 34
Door control panel ................................. 37
Overhead control panel .........................38 Safety
................................................... 39
Panic alarm ............................................ 39
Occupant safety .................................... 39
Children in the vehicle ........................... 54
Pets in the vehicle ................................. 65
Driving safety systems ........................... 65
Protection against theft .........................73 Opening and closing
...........................76
Key ........................................................ 76
Doors ..................................................... 83
Boot .......................................................86
Side windows ......................................... 89
Panorama sliding sunroof ...................... 92 Seats, steering wheel and mirrors
....97
Correct driver's seat position ................ 97
Seats ..................................................... 97
Steering wheel ..................................... 102
Mirrors ................................................. 103
Memory function ................................. 106 Lights and windscreen wipers
.........107
Exterior lighting ................................... 107
Interior lighting .................................... 110
Replacing bulbs ................................... 111
Windscreen wipers .............................. 114 Climate control
................................. 117
Overview of climate control systems ... 117
Operating the climate control system .. 120 Air vents .............................................. 130 Driving and parking
..........................132
Running-in notes .................................. 132
Driving ................................................. 132
DYNAMIC SELECT button (all vehicles except Mercedes-AMG vehicles) ......... 141
DYNAMIC SELECT controller
(Mercedes-AMG vehicles) .................... 141
Manual transmission ........................... 142
Automatic transmission ....................... 143
Refuelling ............................................. 152
Parking ................................................ 155
Driving tips .......................................... 159
Driving systems ................................... 162
Towing a trailer .................................... 194 On-board computer and displays
....200
Important safety notes ........................ 200
Displays and operation ........................ 200
Menus and submenus ......................... 203
Display messages ................................ 216
Warning and indicator lamps in the
instrument cluster ............................... 247 Multimedia system
...........................259
General notes ...................................... 259
Important safety notes ........................ 259
Function restrictions ............................ 259
Operating system ................................ 259 Stowing and features
.......................268
Loading guidelines ............................... 268
Stowage areas ..................................... 268
Features .............................................. 273 2
Contents
Page 19 of 345

Applying or releasing manuall
y...... 157
Display message ............................ 219
Electric parking brake .................... 157
Emergency braking ........................ 158
General information ....................... 157
Releasing automaticall y................. 158
Warning lamp ................................. 254
Parking lamps
Display message ............................ 229
Switching on/of f........................... 108
Parking Pilot
Cancelling ...................................... 184
Detecting parking spaces .............. 181
Display Message ............................ 235
Exiting a parking space .................. 183
Function/note s............................. 180
Important safety notes .................. 180
Parking .......................................... 182
Towing a trailer .............................. 180
PASSENGER AIR BAG
Display message ............................ 226
Indicator lamps ................................ 40
Problems (malfunctions) ................ 226
Petrol .................................................. 328
Pets in the vehicle ............................... 65
Phone book
See also Digital Owner's Manua l... 259
Plastic trim (cleaning instruc-
tions) .................................................. 290
Power socket
Boot ............................................... 276
Power windows
see Side windows
Pre-Crash Safety System
see PRE-SAFE ®
(anticipatory
occupant protection)
PRE-SAFE ®
(anticipatory occupant
protection)
Operation ......................................... 53
PRE-SAFE ®
(preventive occupant
safety system)
Display message ............................ 223
Protection against theft
ATA (Anti-Theft Alarm system) ......... 73
Immobiliser ...................................... 73
Interior motion sensor ..................... 75
Tow-away protection ........................ 74 Protection of the environment
General notes .................................. 24
Pulling away
Automatic transmission ................. 135
General notes ................................ 135
Hill start assist ............................... 136
Manual transmission ...................... 135
Trailer ............................................ 136 Q
QR code Mercedes-Benz Guide App ................. 1
Rescue card ..................................... 28
Qualified specialist workshop ........... 27 R
RACE START important safety notes ................... 174
RACE START (Mercedes-AMG vehi-
cles) .................................................... 174
RACETIMER (on-board computer) .... 214
Radio
Selecting a station ......................... 206
see separate operating instructions
Radio mode
See also Digital Owner's Manua l... 259
Radio-based vehicle components
Declaration of conformity ................ 26
Rain closing feature (panorama
sliding sunroof) ................................... 94
Reading lamp ..................................... 110
Rear bench seat
Folding the backrest forwards/
back ............................................... 271
Rear compartment
Setting the air vents ...................... 131
Rear foglamp
Changing the bulb .......................... 113
Display message ............................ 229
Switching on/of f........................... 108
Rear lamps
see Lights
Rear window heating
Problem (fault) ............................... 124
Switching on/of f........................... 124 16
Index
Page 51 of 345

If a person sits in the passenger seat, he/she
must be:
R seated with the seat belt fastened correctly
R in an almost upright position with his/her
back against the seat backrest
R with his/her feet resting on the floor, if pos-
sible
If the front passenger does not observe these
conditions, the automatic front-passenger front
airbag deactivation system may be influenced,
e.g. because the front passenger:
R transfers his/her weight by supporting him-
self/herself on a vehicle armrest
R sits in such a way that his/her weight is raised
from the seat cushion
The front-passenger front airbag may be disa-
bled by mistake as a result of these or similar
actions. In this case, the PASSENGER AIR BAG
OFF indicator lamp lights up permanently. The
front-passenger front airbag then does not
deploy during an accident. G
WARNING
If the PASSENGER AIRBAG OFF indicator lamp is lit, the front-passenger front airbag is disa-
bled. It will not be deployed in the event of an
accident and cannot perform its intended pro-
tective function. A person in the front-
passenger seat could then, for example, come
into contact with the vehicle's interior, espe-
cially if the person is sitting too close to the
dashboard. This poses an increased risk of
injury or even fatal injury.
When the front-passenger seat is occupied,
always make sure that:
R the classification of the person in the front-
passenger seat is correct and that the front-
passenger front airbag is enabled or disa-
bled in accordance with the person in the
front-passenger seat.
R the front-passenger seat has been moved
back as far back as possible.
R the person is seated correctly.
Make sure, both before and during the jour-
ney, that the status of the front-passenger
front airbag is correct. G
WARNING
If you secure a child in a rearward-facing child
restraint system on the co-driver's seat and
the PASSENGER AIR BAG OFF indicator lamp
is off, the co-driver's front airbag can deploy in the event of an accident. The child could be
struck by the airbag. There is an increased risk
of injury, possibly even fatal.
In this case, always make sure that the co-
driver's front airbag has been disabled. The
PASSENGER AIR BAG OFF indicator lamp
must be lit.
If the PASSENGER AIR BAG OFF indicator lamp
stays off, do not install a rearward-facing child
restraint system on the front-passenger seat.
Further information can be found under "Prob-
lems with the automatic front-passenger front
airbag deactivation system" (Y page 50). G
WARNING
If you secure a child in a forward-facing child
restraint system on the front-passenger seat
and you position the front-passenger seat too close to the dashboard, in the event of an
accident, the child could:
R come into contact with the vehicle's inte-
rior if the PASSENGER AIR BAG OFF indi-
cator lamp is lit, for example
R be struck by the airbag if the PASSENGER
AIR BAG OFF indicator lamp is off
This poses an increased risk of injury or even fatal injury.
Always move the front-passenger seat as far
back as possible and fully retract the seat
cushion length. Always make sure that the
shoulder belt strap is correctly routed from
the vehicle belt outlet to the shoulder belt
guide on the child restraint system. The shoul-
der belt strap must be routed forwards and
downwards from the vehicle belt outlet. If
necessary, adjust the vehicle belt outlet and
the front-passenger seat accordingly. Always
observe the information about suitable posi-
tioning of the child restraint system in this
Owner's Manual as well as the child restraint 48
Occupant safetySafety
Page 53 of 345

ation. This poses an increased risk of injury or
even fatal injury.
In this case the front-passenger seat may notbe used. Do not install a child restraint system
on the front-passenger seat. Have the auto-
matic front-passenger front airbag deactiva-
tion system checked and repaired immedi-
ately at a qualified specialist workshop. G
WARNING
If the PASSENGER AIRBAG OFF indicator lamp remains lit after the system self-test, the
front-passenger front airbag is disabled. It will not be deployed in the event of an accident. In
this case, the front-passenger front airbag
cannot perform its intended protective func-
tion, e.g. when a person is seated in the front- passenger seat.
That person could, for example, come into
contact with the vehicle's interior, especially
if the person is sitting too close to the dash-
board. This poses an increased risk of injury or even fatal injury.
When the front-passenger seat is occupied,
always ensure that:
R the classification of the person in the front-
passenger seat is correct and the front-
passenger front airbag is enabled or disa-
bled in accordance with the person in the
front-passenger seat.
R the person is seated properly with a cor-
rectly fastened seat belt.
R the front-passenger seat has been moved
as far back as possible.
If the PASSENGER AIR BAG OFF indicator
lamp remains lit when it should not, the front- passenger seat may not be used. Do not
install a child restraint system on the front- passenger seat. Have the automatic front-
passenger front airbag deactivation system
checked and repaired immediately at a quali- fied specialist workshop. G
WARNING
Objects between the seat surface and the
child restraint system could affect the func-
tion of the automatic front-passenger front
airbag deactivation system. This could result
in the front-passenger front airbag not func-
tioning as intended during an accident. This
poses an increased risk of injury or even fatal injury.
Do not place any objects between the seat
surface and the child restraint system. The
entire base of the child restraint system must always rest on the seat cushion of the front-
passenger seat. The backrest of the forwards-
facing child restraint system must, as far as
possible, be resting on the backrest of the
rear reclining seat. Always comply with the
child restraint system manufacturer's instal-
lation instructions.
After the system self-test, the PASSENGER AIR
BAG OFF or PASSENGER AIR BAG ON indicator
lamp shows the status of the front-passenger
front airbag (Y page 47). If the front-passenger
front airbag is enabled, the PASSENGER AIR
BAG ON indicator lamp lights up for 60 seconds
and then goes out.
If the PASSENGER AIR BAG ON indicator lamp is
off, only the PASSENGER AIR BAG OFF indicator lamp shows the status of the front-passenger
front airbag. The PASSENGER AIR BAG OFF indi-
cator lamp may be lit continuously or be off.
Further information can be found under "Prob-
lems with the automatic front-passenger front
airbag deactivation system" (Y page 50).
Problems with automatic front-passenger front airbag deactivation Be sure to observe the notes on "System self-test" (Y
page 49).50
Occupant safetySafety
Page 113 of 345

Important safety notes
G
WARNING
Adaptive Highbeam Assist does not recognise road users:
R who have no lights, e.g. pedestrians
R who have poor lighting, e.g. cyclists
R whose lighting is blocked, e.g. by a barrier
On very rare occasions, Adaptive Highbeam
Assist may fail to recognise other road users
that have lights, or may recognise them too
late. In this, or in similar situations, the auto-
matic main-beam headlamps will not be deac-
tivated or will be activated despite the pres-
ence of other road users. There is a risk of an accident.
Always carefully observe the traffic conditionsand switch off the main-beam headlamps in
good time.
Adaptive Highbeam Assist cannot take into
account road, weather or traffic conditions.
Adaptive Highbeam Assist is only an aid. You are
responsible for adjusting the vehicle's lighting
to the prevailing light, visibility and traffic con-
ditions.
In particular, the detection of obstacles can be
restricted if there is:
R poor visibility, e.g. due to fog, heavy rain or
snow
R dirt on the sensors or if the sensors are
obscured
Switching Adaptive Highbeam Assist
on/off X
To switch on: turn the light switch to Ã.
X Press the combination switch beyond the
pressure point in the direction of arrow :.
The _ indicator lamp in the multifunction
display lights up when it is dark and the light
sensor switches on the dipped-beam head-
lamps.
If you are driving at speeds above approx-
imately 30 km/h and no other road users are recognised:
The main-beam headlamps are switched on
automatically. The Kindicator lamp in the
instrument cluster also lights up. If you are driving at speeds below 25 km/h or
other road users are recognised or the roads
are adequately lit:
the main-beam headlamps are switched off
automatically The Kindicator lamp in the
instrument cluster goes out. The _indi-
cator lamp in the multifunction display
remains lit.
X To deactivate:move the combination switch
back to its normal position.
The _ indicator lamp in the multifunction
display goes out. Headlamps misted up on the inside
Certain climatic and physical conditions may
cause moisture to form in the headlamp. This
moisture does not affect the functionality of the headlamp. Interior lighting
Overview of interior lighting
Front overhead control panel :
p Switches the left-hand front reading
lamp on or off
; c Switches the front interior lighting on
= v Switches the rear interior lighting on/
off
? | Switches the front interior lighting/
automatic interior lighting control off
A p Switches the right-hand front reading
lamp on or off
B Switches the automatic interior lighting con-
trol on 110
Interior lightingLights and windscreen wipers
Page 114 of 345
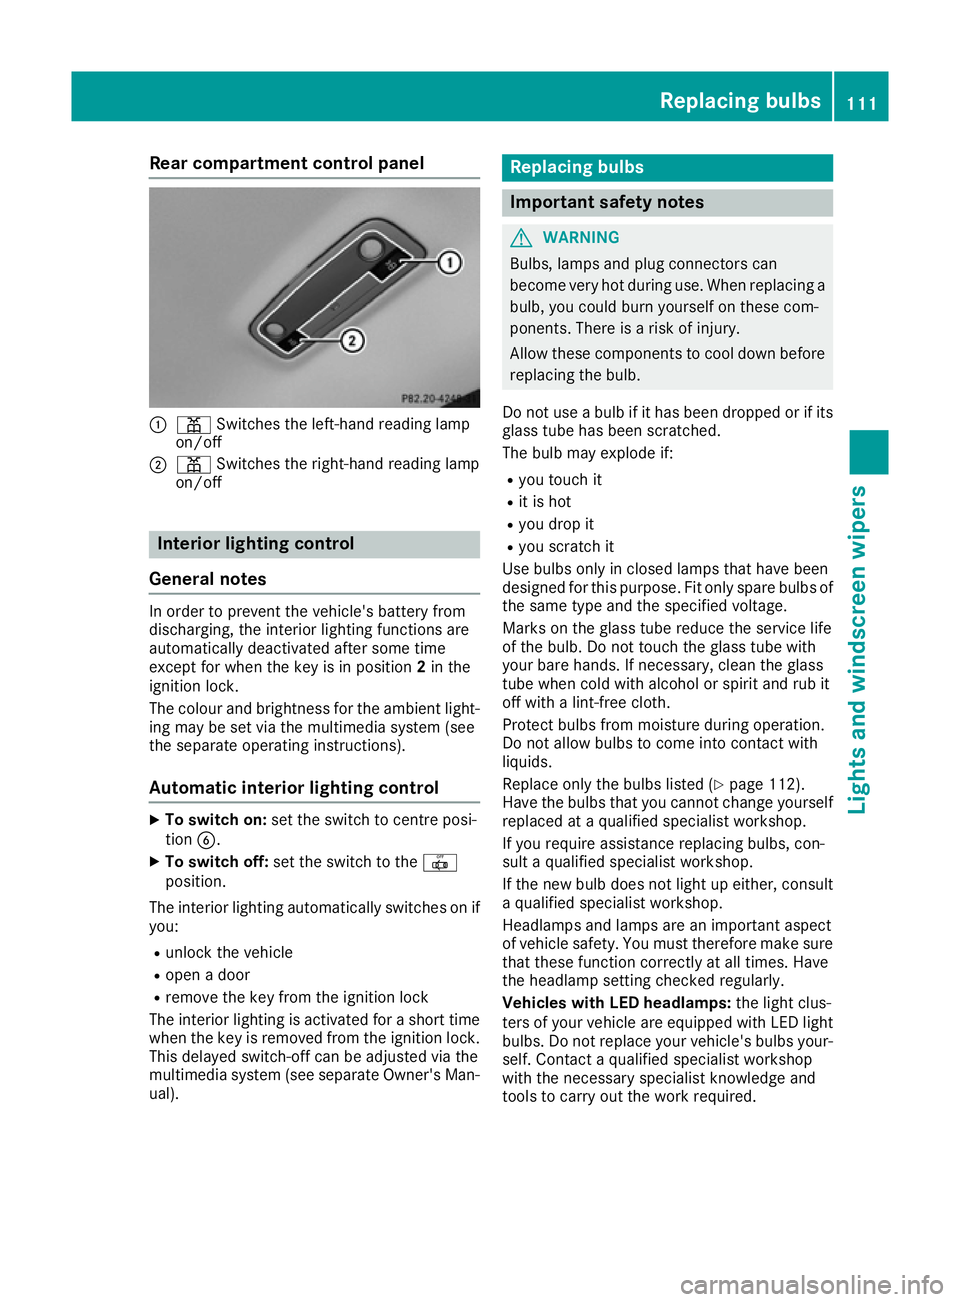
Rear compartment control panel
:
p Switches the left-hand reading lamp
on/off
; p Switches the right-hand reading lamp
on/off Interior lighting control
General notes In order to prevent the vehicle's battery from
discharging, the interior lighting functions are
automatically deactivated after some time
except for when the key is in position 2in the
ignition lock.
The colour and brightness for the ambient light-
ing may be set via the multimedia system (see
the separate operating instructions).
Automatic interior lighting control X
To switch on: set the switch to centre posi-
tion B.
X To switch off: set the switch to the |
position.
The interior lighting automatically switches on if you:
R unlock the vehicle
R open a door
R remove the key from the ignition lock
The interior lighting is activated for a short time
when the key is removed from the ignition lock.
This delayed switch-off can be adjusted via the
multimedia system (see separate Owner's Man-
ual). Replacing bulbs
Important safety notes
G
WARNING
Bulbs, lamps and plug connectors can
become very hot during use. When replacing a bulb, you could burn yourself on these com-
ponents. There is a risk of injury.
Allow these components to cool down beforereplacing the bulb.
Do not use a bulb if it has been dropped or if its
glass tube has been scratched.
The bulb may explode if:
R you touch it
R it is hot
R you drop it
R you scratch it
Use bulbs only in closed lamps that have been
designed for this purpose. Fit only spare bulbs of the same type and the specified voltage.
Marks on the glass tube reduce the service life
of the bulb. Do not touch the glass tube with
your bare hands. If necessary, clean the glass
tube when cold with alcohol or spirit and rub it
off with a lint-free cloth.
Protect bulbs from moisture during operation.
Do not allow bulbs to come into contact with
liquids.
Replace only the bulbs listed (Y page 112).
Have the bulbs that you cannot change yourself
replaced at a qualified specialist workshop.
If you require assistance replacing bulbs, con-
sult a qualified specialist workshop.
If the new bulb does not light up either, consult a qualified specialist workshop.
Headlamps and lamps are an important aspect
of vehicle safety. You must therefore make sure
that these function correctly at all times. Have
the headlamp setting checked regularly.
Vehicles with LED headlamps: the light clus-
ters of your vehicle are equipped with LED light bulbs. Do not replace your vehicle's bulbs your-
self. Contact a qualified specialist workshop
with the necessary specialist knowledge and
tools to carry out the work required. Replacing bulbs
111Lights and windscreen wipers Z
Page 120 of 345

Overview of climate control systems
General notes
Observe the settings recommended on the fol-
lowing pages. Otherwise, the windows could
mist up.
To prevent the windows from misting up:
R switch off climate control only briefly
R activate air-recirculation mode only briefly
R switch on "Cooling with air dehumidification"
R activate the "Windscreen demisting" function
briefly, if required
The air-conditioning system or THERMOTRONIC
automatic climate control regulates the temper- ature and the humidity of the vehicle interior andfilters undesirable substances from the air.
The air-conditioning system or THERMOTRONIC automatic climate control can only be operatedwhen the engine is running. Optimum operationis only achieved with the side windows and pan-
orama sliding sunroof closed.
The residual heat function can only be activated or deactivated with the ignition switched off
(Y page 126).
Always keep the ventilation flaps behind the
side panelling clear (Y page 113). Otherwise the
vehicle will not be ventilated correctly.
i Ventilate the vehicle for a brief period during
warm weather, e.g. using the convenience
opening feature (Y page 90). This will speed up the cooling process and the desired inte-
rior temperature will be reached more
quickly.
i The integrated filter filters out most parti-
cles of dust and soot and completely filters
out pollen. With THERMOTRONIC automatic
climate control, gaseous pollutants and
odours will also be reduced. A clogged filter
reduces the amount of air supplied to the
vehicle interior. For this reason, you should
always observe the interval for replacing the
filter, which is specified in the Service Book-
let. As this depends on environmental condi-
tions, e.g. heavy air pollution, the interval may be shorter than stated in the Service Booklet.
i Vehicles with auxiliary heating:
Under
certain environmental conditions, the resid-
ual heat function may be activated automati-
cally an hour after the ignition key has been
removed in order to dry the automatic climate
control. The blue LED on the rocker switch in the centre console lights up when the active
function to dry the automatic climate control is on. The vehicle is then ventilated for
30 minutes.
Vehicles without auxiliary heating: Under
certain environmental conditions, the resid-
ual heat function may be activated automati-
cally an hour after the ignition key has been
removed in order to dry the automatic climate control. The vehicle is then ventilated for
30 minutes. Overview of climate control systems
117Climate control
Page 127 of 345
.
THERMOTRONIC automatic climate control:
turn temperature control :orE anti-clock-
wise or clockwise (Y")
or
X Air-conditioning system: turn temperature
control :anti-clockwise or clockwise
(Y page 118).
THERMOTRONIC automatic climate control:
turn temperature control :orE anti-clock-
wise or clockwise (Y page 119).Demisting the windows
Windows misted up on the inside Air-conditioning system
X Activate the ¿"Cooling with air dehumid-
ification" function.
X If the windows continue to mist up, activate
the ¬ "Windscreen demisting" function.
i You should only select this setting until the
windscreen is clear again.
THERMOTRONIC automatic climate con-
trol
X Activate the ¿"Cooling with air dehumid-
ification" function.
X Activate automatic mode Ã.
X If the windows continue to mist up, activate
the ¬ "Windscreen demisting" function.
i You should only select this setting until the
windscreen is clear again. Windows misted up on the outside X
Activate the windscreen wipers.
X Set the air distribution to PorO.
i You should only select this setting until the
windscreen is clear again. Rear window heating
General notes The rear window heating has a high current
draw. You should therefore switch it off as soon
as the window is clear. The rear window heating otherwise switches off automatically after sev-
eral minutes.
If the battery voltage is too low, the rear window
heating may switch off.
Activating/deactivating X
Turn the key to position 2in the ignition lock
(Y page 133).
X Press the ¤button.
The indicator lamp in the ¤button lights
up or goes out.
Problems with the rear window heating Problem
Possible causes/consequences and
M MSolutions The rear window heating
has switched off prema-
turely or cannot be
switched on. The battery has not been sufficiently charged.
X Switch off any consumers that are not required, e.g. reading lamps,
interior lighting or the seat heating.
When the battery is sufficiently charged, the rear window heating
can be switched on again. Activating/deactivating air-recircula-
tion mode
General notes You can deactivate the flow of fresh air tempo-
rarily if unpleasant odours are entering the vehi-
cle from outside. The air already inside the vehi- cle will then be recirculated. If you activate air-recirculation mode, the win-
dows can mist up more quickly, particularly at
low temperatures. Use air-recirculation mode
only briefly to prevent the windows from misting
up.
The operation of air-recirculation mode is the
same for all control panels. 124
Operating the climate control systemClimate control