2016 MERCEDES-BENZ CLA COUPE oil reset
[x] Cancel search: oil resetPage 8 of 345

Anti-Theft Alarm system
see ATA (Anti-Theft Alarm system)
Aquaplaning ...................................... .161
Ashtray ............................................... 275
Assistance display (on-board com-
puter) ................................................. .208
Assistance menu (on-board com-
puter) ................................................. .208
ASSYST PLUS
Displaying a service message ....... .285
Driving abroad ............................... 285
Hiding a service message .............. 285
Information about Service ............. 285
Resetting the service interval dis-
play ................................................ 285
Service message ............................ 284
Special service requirements ......... 285
ATA (Anti-Theft Alarm system)
Activating/deactivating ................... 73
Function .......................................... .73
Switching off the alarm .................... 73
ATTENTION ASSIST
Activating/deactivating ................. 209
Display message ............................ 234
Function/note s............................. 189
Audio 20
Switching on/of f........................... 259
Audio menu (on-board computer) .... 206
Authorised workshop
see Qualified specialist workshop
AUTO lights
Display message ............................ 230
see Lights
Automatic engine start (ECO start/
stop function) .................................... 138
Automatic engine switch-off (ECO
start/stop function) .......................... 137
Automatic front-passenger front
airbag deactivation
Display message ............................ 226
Automatic front-passenger front
airbag deactivation system
Operation ......................................... 47
Problems ......................................... 50
System self-test ............................... 49
Automatic headlamp mode .............. 107Automatic transmission
Accelerator pedal position ............. 147
Changing gear ............................... 147
DIRECT SELECT lever ..................... 144
Drive program display .................... 144
Drive programs .............................. 148
Driving tips .................................... 147
DYNAMIC SELECT button (all vehi-
cles except Mercedes-AMG vehi-
cles) ............................................... 141
DYNAMIC SELECT controller
(Mercedes-AMG vehicles) .............. 141
Emergency running mod e.............. 152
Engaging drive position .................. 145
Engaging neutral ............................ 145
Engaging park position
(Mercedes-AMG vehicles) .............. 146
Engaging park position automati-
cally ............................................... 144
Engaging reverse gear ................... 145
Engaging the park position ............ 144
Holding the vehicle stationary on
uphill gradients .............................. 148
Kickdown ....................................... 148
Manual shifting .............................. 150
Oil temperature (on-board com-
puter, Mercedes-AMG vehicles) ..... 213
Overview ........................................ 143
Problem (fault) ............................... 152
Pulling away ................................... 135
Selector lever ................................ 146
Starting the engine ........................ 135
Steering wheel gearshift paddle s... 150
Trailer towing ................................. 148
Transmission position display ........ 146
Transmission position display
(DIRECT SELECT lever) ................... 144
Transmission positions .................. 147
Automatic transmission emer-
gency running mode ......................... 152
Auxiliary heating
Activating/deactivating ................. 127
Activating/deactivating (on the
centre console ).............................. 127
Remote control .............................. 127
Setting ........................................... 211
Auxiliary heating/ventilation
Display message ............................ 245 Index
5
Page 21 of 345

Display message ............................ 224
Fastening ......................................... 43
Important safety guidelines ............ .41
Introduction .....................................41
Rear seat belt status indicato r .........44
Releasin g......................................... 43
Warning lamp ................................. 248
Warning lamp (function) ................... 44
Seats
Adjusting (electrically) ..................... 99
Adjusting (manually) ........................ 98
Adjusting the 4-way lumbar sup-
port ................................................ 101
Adjusting the head restraint ............ 99
Cleaning the cover ......................... 291
Correct driver's seat position ........... 97
Important safety notes .................... 97
Seat heating problem .................... 102
Storing settings (memory func-
tion) ............................................... 106
Switching seat heating on/of f....... 101
Securing luggage ............................... 272
Selector lever
Cleaning ......................................... 291
Sensors (cleaning instructions) ....... 289
Service
see ASSYST PLUS
Service Centre
see Qualified specialist workshop
Service menu (on-board com-
puter) .................................................. 210
Service message
see ASSYST PLUS
Service products
Brake fluid ..................................... 331
Coolant (engine) ............................ 332
Engine oil ....................................... 330
Fuel ................................................ 327
Important safety notes .................. 327
Washer fluid ................................... 332
Setting the air distribution ............... 122
Setting the airflow ............................ 123
Setting the date/time format
See also Digital Owner's Manua l... 259
Setting the language
See also Digital Owner's Manua l... 259 Setting the time
See also Digital Owner's Manua l... 259
Settings
Factory (on-board computer) ......... 213
On-board computer ....................... 210
SETUP (on-board computer) ............. 214
Shifting to neutral (manual trans-
mission) ............................................. 142
Side lamps
Switching on/of f........................... 108
Side windows
Convenience closing ........................ 90
Convenience opening ...................... 90
Important safety notes .................... 89
Opening/closing .............................. 89
Problem (malfunction) ..................... 92
Resetting ......................................... 91
Reversing feature ............................. 89
Sidebag ................................................ 46
SIM card
Inserting ........................................ 265
Sliding sunroof
see Panorama sliding sunroof
SMS
See also Digital Owner's Manua l... 259
Snow chains ...................................... 313
Sockets
Centre console .............................. 276
General notes ................................ 276
Rear compartment ......................... 276
Sound
Switching on/of f........................... 260
Specialist workshop ............................ 27
Spectacles compartment ................. 269
Speed limiter
Display message ............................ 237
Important safety notes .................. 165
Selecting ........................................ 165
Speed, controlling
see Cruise control
Speedometer
Activating/deactivating the addi-
tional speedometer ........................ 210
Digital ............................................ 204
In the Instrument cluster ................. 32
Segments ...................................... 200
Selecting a display uni t.................. 210 18
Index
Page 216 of 345

X
Press the :or9 button to select the
Belt adjustment
Belt adjustment function.
When the Belt adjustment
Belt adjustment function is acti-
vated, the seat belt is displayed in orange in
the multifunction display.
X Press the abutton to save the setting.
For further information on belt adjustment, see
(Y page 43).
Switching the fold mirrors in when lock-
ing function on/off This function is only available when the vehicle is
equipped with the electrical fold-in function.
When you activate the Auto. fold-in mir‐ Auto. fold-in mir‐
rors
rors function, the exterior mirrors are folded in
when the vehicle is locked. When you unlock the vehicle and then open the driver's or front-
passenger door, the exterior mirrors fold out
again.
If you have switched on the Auto. fold-in Auto. fold-in
mirrors
mirrors function and you fold in the exterior
mirrors using the button on the door
(Y page 104), they will not fold out automati-
cally. The exterior mirrors can then only be fol-
ded out using the button on the door.
X Press the =or; button on the steering
wheel to select the Settings
Settings menu.
X Press the :or9 button to select the
Convenience
Convenience submenu.
X Press ato confirm.
X Press the :or9 button to select the
Auto. fold-in mirrors
Auto. fold-in mirrors function.
If the Auto. fold-in mirrors Auto. fold-in mirrors function is
switched on, the multifunction display shows the exterior mirror in orange.
X Press the abutton to save the setting.
Resetting to factory settings X
Press the =or; button on the steering
wheel to select the Settings
Settings menu.
X Press the :or9 button to select the
Factory setting
Factory setting submenu.
X Press ato confirm.
The Reset all settings?
Reset all settings? function
appears. X
Press the :or9 button to select No
No or
Yes
Yes.
X Press the abutton to confirm the selec-
tion.
If you have selected Yes Yes, the multifunction
display shows a confirmation message.
For safety reasons, not all functions are reset:
the Limit Limit speed
speed(winter
(winter tyres)
tyres)function of
the permanent speed limiter can only be set in
the Vehicle
Vehicle submenu. AMG menu (Mercedes-AMG vehicles)
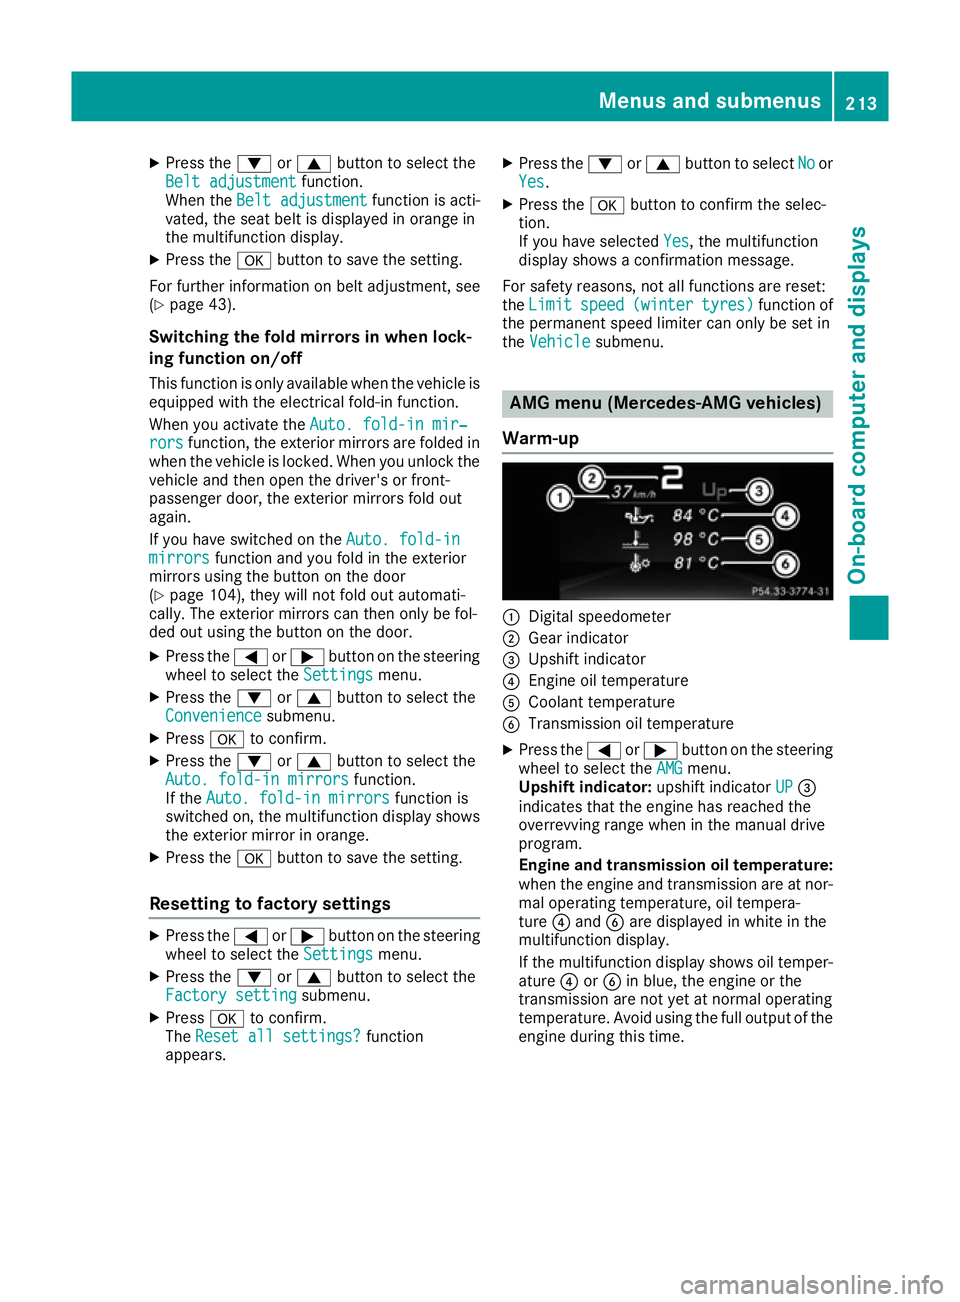
Warm-up :
Digital speedometer
; Gear indicator
= Upshift indicator
? Engine oil temperature
A Coolant temperature
B Transmission oil temperature
X Press the =or; button on the steering
wheel to select the AMG AMGmenu.
Upshift indicator: upshift indicatorUP
UP=
indicates that the engine has reached the
overrevving range when in the manual drive
program.
Engine and transmission oil temperature:
when the engine and transmission are at nor- mal operating temperature, oil tempera-
ture ?and Bare displayed in white in the
multifunction display.
If the multifunction display shows oil temper-
ature ?orB in blue, the engine or the
transmission are not yet at normal operating
temperature. Avoid using the full output of the engine during this time. Menus and submenus
213On-board computer and displays Z
Page 288 of 345

The multifunction display shows a service mes-
sage for a few seconds, e.g.:
R Service A in .. days
Service A in .. days
R Service A due
Service A due
R Service A overdue by .. days
Service A overdue by .. days
Depending on the operating conditions of the
vehicle, the remaining time or distance until the
next service due date is displayed.
The letter indicates which service is due. A
A
stands for a minor service and B Bfor a major ser-
vice. A number or another letter may be dis-
played after the letter.
For certain countries only: the position after the
letter A
A or B Bindicates any necessary additional
maintenance work. If you notify a qualified spe- cialist workshop of this display, you will receive
a statement on the associated costs.
The ASSYST PLUS service interval display does
not take into account any periods of time during
which the battery is disconnected.
Maintaining the time-dependent service sched-
ule:
X Note down the service due date displayed in
the multifunction display before disconnect-
ing the battery.
or
X After reconnecting the battery, subtract the
battery disconnection periods from the ser-
vice date shown on the display. Hiding service messages
X Press the aor% button on the steering
wheel. Displaying service messages
X Switch the ignition on.
X Press the =or; button to select the
Serv. Serv. menu.
X Press the 9or: button to select the
ASSYST
ASSYST PLUS
PLUSsubmenu and confirm by press-
ing the abutton.
The service due date appears in the multi-
function display. Information about service
Resetting the ASSYST PLUS service
interval display !
If the ASSYST PLUS service interval display
has been inadvertently reset, this setting can
be corrected at a qualified specialist work-
shop.
Have service work carried out as described in the Service Booklet. This may otherwise lead
to increased wear and damage to the major
assemblies or the vehicle.
A qualified specialist workshop, e.g. a
Mercedes-Benz Service Centre, will reset the
ASSYST PLUS service interval display after the
service work has been carried out. You can also
obtain further information on maintenance
work, for example.
Special service requirements The prescribed service interval is based on nor-
mal operation of the vehicle. Service work will
need to be performed more often if the vehicle is
operated under arduous conditions or increased loads, for example:
R Regular city driving with frequent intermedi-
ate stops
R If the vehicle is primarily used to travel short
distances
R For frequent use in mountainous terrain or on
poor road surfaces
R If the engine is often left idling for long periods
R In particularly dusty conditions, or if air-recir-
culation mode is frequently used.
In these or similar operating conditions, have
the interior filter, engine air cleaner, engine oil
and oil filter, for example, changed more fre-
quently. The tyres must be checked more fre-
quently if the vehicle is operated under
increased loads. Further information can be
obtained at a qualified specialist workshop, e.g.
a Mercedes-Benz Service Centre.
Driving abroad An extensive Mercedes-Benz Service network is
also available in other countries. You can obtain further information from any Mercedes-Benz
Service Centre. ASSYST PLUS
285Maintenance and care Z