2016 MERCEDES-BENZ C-Class SEDAN Vehicle level
[x] Cancel search: Vehicle levelPage 152 of 398

Hill start assist
Hill start assist helps you when pulling away for-
wards or in reverse on an uphill gradient. It holds
the vehicle for a short time after you have
removed your foot from the brake pedal. This
gives you enough time to move your foot from
the brake pedal to the accelerator pedal and to
depress it before the vehicle begins to roll.
GWARNING
After a short time, hill start assist will no lon-
ger brake your vehicle and it could roll away.
There is a risk of an accident and injury.
Therefore, quickly move your foot from the
brake pedal to the accelerator pedal. Never
leave the vehicle when it is held by hill start
assist.
Hill start assist is not active if:
Ryou are pulling away on a level road or on a
downhill gradient.
Rthe transmission is in position N.
Rthe electric parking brake is applied.
RESP®is malfunctioning.
ECO start/stop function (all vehicles
except PLUG‑IN HYBRID)
Introduction
This section describes the ECO start/stop func- tion for all vehicles except PLUG-IN HYBRID
vehicles. Information on the ECO start/stop
function on PLUG-IN HYBRID vehicles
(
Ypage 231).
The ECO start/stop function switches the
engine off automatically if the vehicle is stopped
under certain conditions.
The engine starts automatically when the driver
wants to pull away again. The ECO start/stop
function thereby helps you to reduce the fuel
consumption and emissions of your vehicle.
Important safety notes
GWARNING
If the engine is switched off automatically and
you exit the vehicle, the engine is restarted
automatically. The vehicle may begin moving.
There is a risk of accident and injury.
If you wish to exit the vehicle, always turn off
the ignition and secure the vehicle against
rolling away.
General notes
:ECO start/stop display
The ECO start/stop function is activated when- ever you start the engine using the SmartKey or
the Start/Stop button.
If the engine has been switched off automati-
cally by the ECO start/stop function, the è
ECO symbol is shown in the multifunction dis-
play.
Mercedes-AMG vehicles: the ECO start/stop
function is only available in drive program C.
Automatic engine switch-off
If the vehicle is braked to a standstill in Dor N,
the ECO start/stop function switches off the
engine automatically.
The ECO start/stop function is operational
when:
Rthe indicator lamp in the ECO button is lit
green.
Rthe outside temperature is within the range
that is suitable for the system.
Rthe engine is at normal operating tempera-
ture.
Rthe set temperature for the vehicle interior
has been reached.
Rthe battery is sufficiently charged.
Rthe system detects that the windshield is not
fogged up when the air-conditioning system is switched on.
Rthe hood is closed.
Rthe driver's door is closed and the driver's
seat belt is fastened.
All of the vehicle's systems remain active when
the engine is stopped automatically.
150Driving
Driving and parking
Page 155 of 398

Problems with the engine
ProblemPossible causes/consequences andMSolutions
The engine does not
start. The starter motor
can be heard.RThere is a malfunction in the engine electronics.
RThere is a malfunction in the fuel supply.
Before attempting to start the engine again:
XTurn the SmartKey back to position 0in the ignition lock.
or
XPress the Start/Stop button repeatedly until all indicator lamps in
the instrument cluster go out.
XTry to start the engine again (Ypage 148). Avoid excessively long
and frequent attempts to start the engine as these will drain the
battery.
If the engine does not start after several attempts:
XConsult a qualified specialist workshop.
The engine does not
start. You cannot hear
the starter motor.The on-board voltage is too low because the battery is too weak or
discharged.
XJump-start the vehicle (Ypage 352).
If the engine does not start despite attempts to jump-start it:
XConsult a qualified specialist workshop.
The starter motor was exposed to a thermal load that was too high.
XTry to start the engine again (Ypage 148).
If the engine still does not start:
XConsult a qualified specialist workshop.
The engine is not running
smoothly and is misfir-
ing.There is a malfunction in the engine electronics or in a mechanical
component of the engine management system.
XOnly depress the accelerator pedal slightly.
Otherwise, non-combusted fuel may get into the catalytic converter
and damage it.
XHave the cause rectified immediately at a qualified specialist work-
shop.
The coolant temperature
gauge shows a value
above 248 ‡ (120 †).The coolant level is too low. The coolant is too hot and the engine is no
longer being cooled sufficiently.
XStop as soon as possible and allow the engine and the coolant to
cool down.
XCheck the coolant level (Ypage 333). Observe the warning notes
as you do so and add coolant if necessary.
Driving153
Driving and parking
Z
Page 173 of 398

on again, the charging process resumes auto-
matically. Following an interruption in the
power supply or tripping of the building's fuse,
it may take up to 10 minutes for charging to
resume automatically.
Switch on the building protection system again
after it has been triggered. Otherwise, the
charging process cannot be continued.
General information about the charging
procedure
Pay attention to the "Important safety notes"
(Ypage 168).
The vehicle socket is located in the rear bumper
on the right below the tail lamp.
The charge socket flap and the vehicle are cen-
trally locked or unlocked simultaneously.
Charging the high-voltage battery via
the electrical outlet
Charging cable for electrical outlets
Important safety notes
!Only use the charging cable to charge the
high-voltage battery. Do not use the charging
cable for other purposes. It may otherwise be
damaged.
A charging cable for connection to the electrical outlet is included with the vehicle. Only use the
charging cable included with the vehicle or
charging cables that have been approved for the
vehicle.
iIf you use the supplied 12 A charging cable
to charge a high-voltage battery:
Rthe charge time increases considerably
Relectrical consumption increases consider-
ably
Where possible, charge the high-voltage bat-
tery at a charging station (
Ypage 174). Only
then can certified electrical energy consump-
tion levels be reached.
iThe charging process can vary depending on
the power supply. Therefore, always observe
the local information.
Information about charging from a wallbox
(
Ypage 173). Information on charging at a charging station
(
Ypage 174).
Stowing the charging cable
The charging cable can be stowed in the bag
supplied in the trunk/cargo compartment of the
vehicle and held in place with the Velcro fas-
tener.
Controls on the charging cable
:Alternating current status indicator
;Control/protection system indicator
=Charge current indicator
?Charge current setting button
When displays :and ;on the charging cable
light up, this means the following:
Display :
Lights up
greenThe external power supply
connection is working prop-
erly. The high-voltage battery
can be charged.
Flashes redA malfunction has been
detected in the external
power supply. The high-volt-
age battery is recharged as
soon as the electricity signal
registers normal values.
Lights up redThere is a malfunction. The
charging cable must be
removed from the mains
socket and then reinserted.
Charging the high-voltage battery (PLUG-IN HYBRID vehicles)171
Driving and parking
Z
Page 175 of 398

Indicator
lamp
Lights up
orangeA charging break for the high-
voltage battery is taking
place.
The indicator lamp goes out
after approximately
90 seconds.
Lights up
greenThe high-voltage battery is
fully charged.
The indicator lamp goes out
after approximately
90 seconds.
iIf the indicator lamp is off, lock or unlock the
vehicle. The indicator lamp then displays the
current status of the charging process again.
Connecting the charging cable
XShift the transmission to position P.
XSwitch the ignition off.
XPress the charge socket flap in the direction
of arrow:.
The charge socket flap swings up.
XPress fastener ;to the left.
Socket cap =is open.
XInsert the power supply plug into the electri-
cal outlet to the stop.
XInsert the charging cable connector into vehi-
cle socket ?to the stop.
Indicator lamp Afirst flashes orange and
then green.
The high-voltage battery is being charged.
iIf the charging cable is plugged in, you can-
not start the engine or move the vehicle.
iDepending on the temperature, the fan and
battery cooling system may audibly switch on
during the charging process.
Removing the charging cable
The high-voltage battery is fully charged when:
Rthe charge level display reaches 100% in the
multifunction display (Ypage 227)
Rthe indicator lamp in the vehicle socket lights up green after unlocking or locking the vehicle
XUnlock the vehicle.
XPress and hold button Bon the charging
cable connector and remove the charging
cable connector from the vehicle socket.
XClose socket cap =.
XClose charge socket flap :.
XRemove the mains plug from the mains
socket and safely stow away the charging
cable inside the vehicle (
Ypage 171).
Charging the high-voltage battery
from the wallbox
General notes
It is recommended that you charge your vehicle
using a wallbox or at a charging station.
Only use charging cables that have been tested
and approved by the manufacturer for charging
the high-voltage battery in an electric vehicle.
Pay attention to the "Important safety notes"
(
Ypage 168).
Charging the high-voltage battery (PLUG-IN HYBRID vehicles)173
Driving and parking
Z
Page 176 of 398
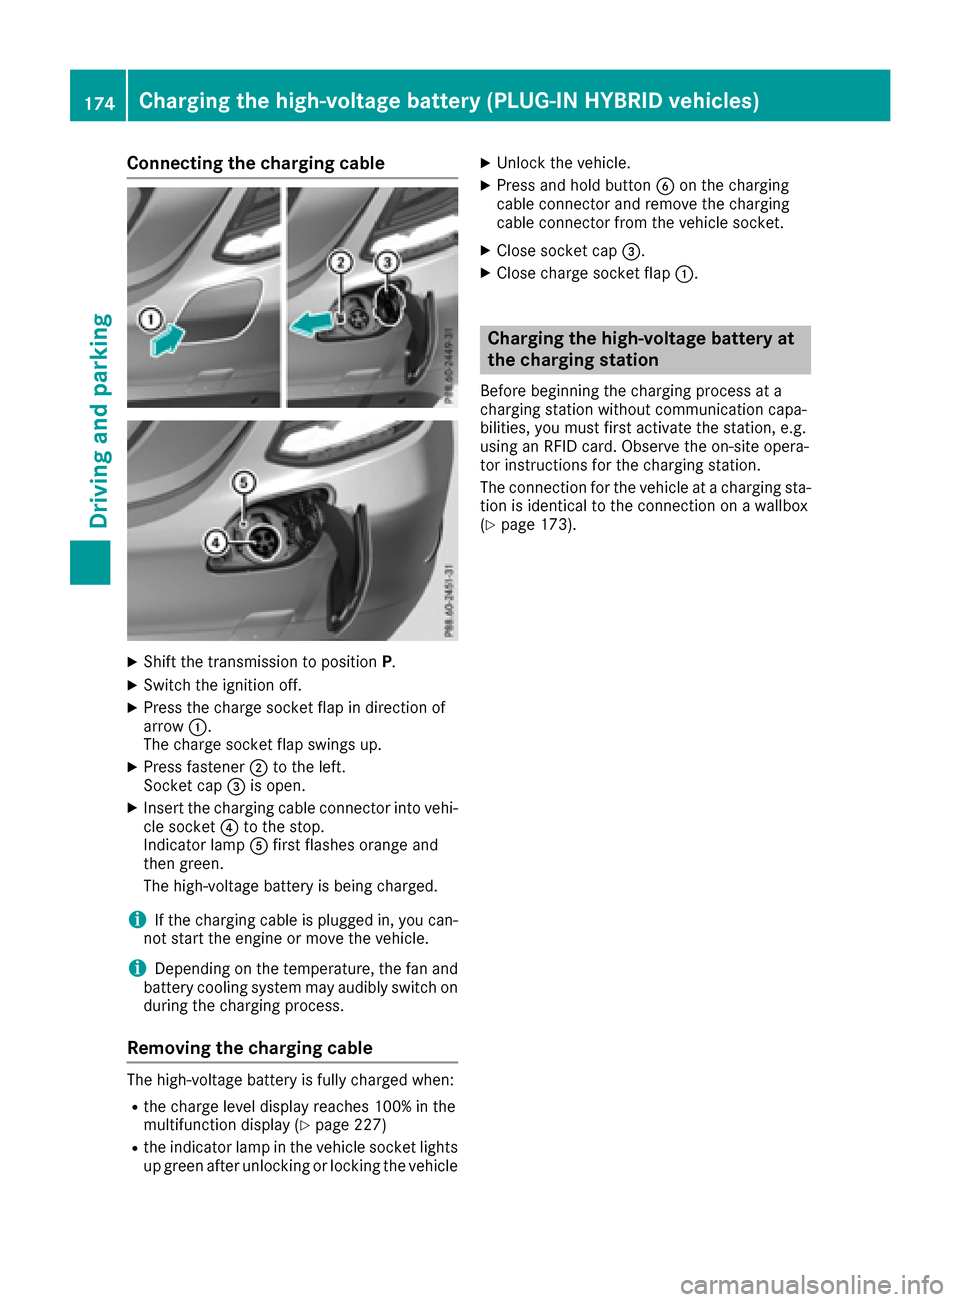
Connecting the charging cable
XShift the transmission to positionP.
XSwitch the ignition off.
XPress the charge socket flap in direction of
arrow:.
The charge socket flap swings up.
XPress fastener ;to the left.
Socket cap =is open.
XInsert the charging cable connector into vehi-
cle socket ?to the stop.
Indicator lamp Afirst flashes orange and
then green.
The high-voltage battery is being charged.
iIf the charging cable is plugged in, you can-
not start the engine or move the vehicle.
iDepending on the temperature, the fan and
battery cooling system may audibly switch on
during the charging process.
Removing the charging cable
The high-voltage battery is fully charged when:
Rthe charge level display reaches 100% in the
multifunction display (Ypage 227)
Rthe indicator lamp in the vehicle socket lights up green after unlocking or locking the vehicle
XUnlock the vehicle.
XPress and hold button Bon the charging
cable connector and remove the charging
cable connector from the vehicle socket.
XClose socket cap =.
XClose charge socket flap :.
Charging the high-voltage battery at
the charging station
Before beginning the charging process at a
charging station without communication capa-
bilities, you must first activate the station, e.g.
using an RFID card. Observe the on-site opera-
tor instructions for the charging station.
The connection for the vehicle at a charging sta-
tion is identical to the connection on a wallbox
(
Ypage 173).
174Charging the high-voltage battery (PLUG-IN HYBRID vehicles)
Driving and parking
Page 180 of 398

XDepress the brake pedal and keep it
depressed.
XShift to neutralN.
XRelease the brake pedal.
XRelease the electric parking brake.
XSwitch off the ignition and leave the SmartKey
in the ignition lock.
The engine can be switched off in an emergency
while the vehicle is in motion by pressing and
holding the Start/Stop button for three sec-
onds. This function operates independently of
the ECO start/stop automatic engine switch-off
function.
Electric parking brake
General notes
GWARNING
If you leave children unsupervised in the vehi-
cle, they could set it in motion by, for example:
Rrelease the parking brake.
Rshift the automatic transmission out of the
parking position P.
Rstart the engine.
In addition, they may operate vehicle equip-
ment and become trapped. There is a risk of
an accident and injury.
When leaving the vehicle, always take the
SmartKey with you and lock the vehicle. Never
leave children unsupervised in the vehicle.
The function of the electric parking brake is
dependent on the on-board voltage. If the on-
board voltage is low or there is a malfunction in
the system, it may not be possible to apply the
released parking brake.
XIf this is the case, only park the vehicle on
level ground and secure it to prevent it rolling
away.
XShift the automatic transmission to position
P .
It may not be possible to release an applied
parking brake if the on-board voltage is low or
there is a malfunction in the system. Contact a
qualified specialist workshop.
The electric parking brake performs a function
test at regular intervals while the engine is switched off. The sounds that
can b
e heard while
this is occurring are normal.
Applying or releasing manually
XTo apply: push handle :.
When the electric parking brake is applied,
the red F(USA only) or !(Canada
only) indicator lamp lights up in the instru-
ment cluster.
The electric parking brake can also be applied
when the SmartKey is removed.
XTo release: pull handle:.
The red F(USA only) or !(Canada
only) indicator lamp in the instrument cluster
goes out.
The electric parking brake can only be released:
Rwhen the SmartKey is in position 1or 2in the
ignition lock (Ypage 146) or
Rif the ignition was switched on using the
Start/Stop button
Applying automatically
The electric parking brake is automatically
applied when the transmission is in position P
and:
Rthe engine is switched off or
Rthe driver is not wearing a seat belt and the
driver's door is opened.
To prevent the electric parking brake from being
automatically applied, pull handle :.
178Parking
Driving and parking
Page 182 of 398

for example, the power steering and the brakeboosting effect. You will require considerably
more effort to steer and brake. There is a risk
of an accident.
Do not switch off the ignition while driving.
GWARNING
If you operate mobile communication equip-
ment while driving, you will be distracted from traffic conditions. You could also lose control
of the vehicle. There is a risk of an accident.
Only operate this equipment when the vehicle
is stationary.
Observe the legal requirements for the country
in which you are driving. Some jurisdictions pro-
hibit the driver from using a mobile phone while
driving a vehicle.
If you make a call while driving, always use
hands-free mode. Only operate the telephone
when the traffic situation permits. If you are
unsure, pull over to a safe location and stop
before operating the telephone.
Bear in mind that at a speed of only 30 mph
(approximately 50 km/h), the vehicle covers a
distance of 44 ft (approximately 14 m)per sec-
ond.
Drive sensibly – save fuel
Observe the following tips to save fuel:
XThe tires should always be inflated to the rec-
ommended tire pressure.
XRemove unnecessary loads.
XRemove roof racks when they are not needed.
XWarm up the engine at low engine speeds.
XAvoid frequent acceleration or braking.
XHave all maintenance work carried out as
indicated by the service intervals in the Main-
tenance Booklet or by the service interval dis-
play.
Fuel consumption also increases when driving in cold weather, in stop-start traffic and in hilly ter-
rain.
Drinking and driving
GWARNING
Drinking and driving and/or taking drugs and driving are very dangerous combinations.
Even a small amount of alcohol or drugs can
affect your reflexes, perceptions and judg-
ment.
The possibility of a serious or even fatal acci-
dent is greatly increased when you drink or
take drugs and drive.
Do not drink or take drugs and drive or allow
anyone to drive who has been drinking or tak-
ing drugs.
Emission control
GWARNING
Combustion engines emit poisonous exhaust
gases such as carbon monoxide. Inhaling
these exhaust gases leads to poisoning. There
is a risk of fatal injury. Therefore never leave
the engine running in enclosed spaces with-
out sufficient ventilation.
Certain engine systems are designed to keep
the level of poisonous components in exhaust
fumes within legal limits.
These systems only work at peak efficiency if
they are serviced exactly in accordance with the
manufacturer's specifications. Always have
work on the engine carried out at a qualified
specialist workshop. Mercedes-Benz recom-
mends that you use an authorized Mercedes-
Benz Center for this purpose. In particular, work
relevant to safety or on safety-related systems
must be carried out at a qualified specialist
workshop.
The engine settings must not be changed under any circumstances. Furthermore, all specific
service work must be carried out at regular
intervals and in accordance with the Mercedes-
Benz service requirements. Details can be found in the Maintenance Booklet.
ECO display
The ECO display shows you how economical
your driving style is. The ECO display assists you
in achieving the most economical driving style
180Driving tips
Driving and parking
Page 183 of 398

for the selected settings and prevailing condi-
tions. Your driving style can significantly influ-
ence the vehicle's consumption.
:Acceleration
;Coasting
=Constant
?Additional range achieved
Range ?is shown under Bonus
fr.Startand
represents the additional range achieved since
the beginning of the journey as a result of an
adapted driving style.
If the fuel level has dropped into the reserve
range, the Reserve Fuel
display message is
shown instead of range ?in the multifunction
display. The 8warning lamp in the instru-
ment cluster also lights up (
Ypage 293). The ECO display consists of three sections, with
an inner and outer area. The sections corre-
spond to the following three categories:
:Acceleration (evaluation of all accel-
eration processes):
Rthe outer area fills up and the inner area lights up green: moderate
acceleration, especially at higher
speeds
Rthe outer area empties and the
inner area is gray: sporty acceler-
ation
;Coasting (evaluation of all decelera-
tion processes):
Rthe outer area fills up and the inner area lights up green: anticipatory
driving, keeping your distance and
early release of the accelerator.
The vehicle can coast without use
of the brakes.
Rthe outer area empties and the
inner area is gray: frequent heavy
braking
=Constant (continuous evaluation
over the entire journey):
Rthe outer area fills up and the inner area lights up green: constant
speed and avoidance of unneces-
sary acceleration and deceleration
Rthe outer area empties and the
inner area is gray: fluctuations in
speed
The three inner areas display the current driving
style and light up green as a result of a particu-
larly economical driving style. Depending on thedriving situation, up to two areas may light up
simultaneously.
At the beginning of the journey, the three outer
areas are empty and fill up as a result of eco-
nomical driving. A higher level indicates a more
economical driving style. If the three outer areas
are completely filled at the same time, the driver
has adopted the most economical driving style
for the selected settings and prevailing condi-
tions. The ECO display border lights up.
The ECO display does not indicate the actual fuel consumption. The additionally achieved range
displayed under Bonus fr. Start
does not
indicate a fixed consumption reduction.
Driving tips181
Driving and parking
Z