2016 MERCEDES-BENZ C-Class SEDAN Vehicle level
[x] Cancel search: Vehicle levelPage 185 of 398

RIn order to prevent any salt build-up, apply the
brakes occasionally while paying attention to
the traffic conditions.
RCarefully depress the brake pedal and the
beginning and end of a journey.
RMaintain a greater distance to the vehicle
ahead.
Servicing the brakes
!The brake fluid level may be too low, if:
Rif the red brake warning lamp lights up in
the instrument cluster and
Ryou hear a warning tone while the engine is
running
Observe additional warning messages in the
multifunction display.
The brake fluid level may be too low due to
brake pad wear or leaking brake lines.
Have the brake system checked immediately. Consult a qualified specialist workshop to
arrange this.
!A function or performance test should only
be carried out on a 2-axle dynamometer. If
you wish to operate the vehicle on such a
dynamometer, please consult a qualified spe- cialist workshop in advance. You could oth-
erwise damage the drive train or the brake
system.
!The ESP®system operates automatically.
The engine and the ignition must therefore be
switched off (the SmartKey must be in posi-
tion 0or 1in the ignition lock or the Start/
Stop button must be in position 0or 1) if the
electric parking brake is tested on a brake
dynamometer.
Braking triggered automatically by ESP
®may
cause severe damage to the brake system.
All checks and maintenance work on the brake
system must be carried out at a qualified spe-
cialist workshop.
Have brake pads installed and brake fluid
replaced at a qualified specialist workshop.
If the brake system has only been subject to
moderate loads, you should test the functional-
ity of your brakes at regular intervals.
Information on BAS (Brake Assist) (
Ypage 68)
and BAS PLUS (Brake Assist PLUS) (Ypage 69). For safety reasons, Mercedes-Benz recom-
mends only installing the following brake disks
and brake pads/linings:
Rbrake disks that have been approved by
Mercedes-Benz
Rbrake pads/linings that have been approved
by Mercedes-Benz or that are of an equivalent
standard of quality
Other brake disks or brake pads/linings can
compromise the safety of your vehicle.
Always replace all brake disks and brake pads/ linings on an axle at the same time. Always
install new brake pa
ds/linings when replacing
brake disks.
The vehicle is equipped with lightweight brake
disks to which the wheel assembly with rim and
threaded connection is matched.
The use of brake disks other than those
approved by Mercedes-Benz can change the
track width and is subject to approval, if appli-
cable.
Shock-type loads when handling the brake
disks, such as when changing wheels, can lead
to a reduction in comfort when driving with light-
weight brake disks. Avoid shock-type loads on
the lightweight brake disks, particularly on the
brake plate.
Mercedes-Benz recommends that you only use
brake fluid that has been specially approved for
your vehicle by Mercedes-Benz, or which corre-
sponds to an equivalent quality standard. Brake
fluid which has not been approved for
Mercedes-Benz vehicles or which is not of an
equivalent quality could affect your vehicle's
operating safety.
High-performance and ceramic brakes
(Mercedes AMG vehicles)
The AMG brake systems are designed for heavy
loads. This may lead to noise when braking. This
will depend on:
RSpeed
RBraking force
REnvironmental conditions, such as tempera-
ture and humidity
The wear of individual components of the brake
system, such as the brake pads/linings or brake
discs, depends on the individual driving style
and operating conditions.
For this reason, it is impossible to state a mile-
age that will be valid under all circumstances. An
Driving tips183
Driving and parking
Z
Page 186 of 398

aggressive driving style will lead to high wear.
You can obtain more information on this from a
qualified specialist workshop.
New and replaced brake pads and discs only
reach their optimum braking effect after several
hundred kilometers of driving. Compensate for
this by applying greater force to the brake pedal.
Keep this in mind, and adapt your driving and
braking accordingly during this break-in period.Excessive heavy braking results in correspond-
ingly high brake wear. Observe the brake wear
warning lamp in the instrument cluster and note
any brake status messages in the multifunction
display. Especially for high performance driving,
it is important to maintain and have the brake
system checked regularly.
Driving on wet roads
Hydroplaning
If water has accumulated to a certain depth on
the road surface, there is a danger of hydro-
planing occurring, even if:
Ryou drive at low speeds.
Rthe tires have adequate tread depth.
For this reason, in the event of heavy rain or in
conditions in which hydroplaning may occur,
you must drive in the following manner:
Rlower your speed.
Ravoid ruts.
Ravoid sudden steering movements.
Rbrake carefully.
Driving on flooded roads
!Bear in mind that vehicles traveling in front
or in the opposite direction create waves. This
may cause the maximum permissible water
depth to be exceeded.
Failure to observe these notes may result in
damage to the engine, electrical systems and
transmission.
If you have to drive on stretches of road on which
water has collected, please bear in mind that:
Rin the case of standing water, the water level
may be no higher than the lower edge of the
vehicle body
Ryou should drive no faster than at a walking
pace
Winter driving
GWARNING
If you shift down on a slippery road surface in an attempt to increase the engine's braking
effect, the drive wheels could lose their grip.
There is an increased danger of skidding and
accidents.
Do not shift down for additional engine brak-
ing on a slippery road surface.
GDANGER
If the exhaust pipe is blocked or adequate
ventilation is not possible, poisonous gases
such as carbon monoxide (CO) may enter the vehicle. This is the case, e.g. if the vehicle
becomes trapped in snow. There is a risk of
fatal injury.
If you leave the engine or the auxiliary heating
running, make sure the exhaust pipe and area
around the vehicle are clear of snow. To
ensure an adequate supply of fresh air, open a
window on the side of the vehicle that is not
facing into the wind.
Have your vehicle winter-proofed at a qualified
specialist workshop at the onset of winter.
Drive particularly carefully on slippery road sur-
faces. Avoid sudden acceleration, steering and
braking maneuvers. Do not use the cruise con-
trol or DISTRONIC PLUS.
If the vehicle threatens to skid or cannot be
stopped when moving at low speed:
XShift the transmission to position N.
The outside temperature indicator is not
designed to serve as an ice-warning device and
is therefore unsuitable for that purpose.
Changes in the outside temperature are dis-
played after a short delay.
Indicated temperatures just above the freezing
point do not guarantee that the road surface is
free of ice. The road may still be icy, especially in
wooded areas or on bridges. The vehicle could
skid if you fail to adapt your driving style. Always
adapt your driving style an
d drive at a speed to
suit the prevailing weather conditions.
You should pay special attention to road condi-
tions when temperatures are around freezing
point.
184Driving tips
Driving and parking
Page 198 of 398

Rthe vehicle is stationary and the brake pedal is
depressed (left foot).
Rthe transmission is in positionD.
Activating RACE START
iWhen manual mode (Ypage 161) is active,
the transmission automatically shifts up to
RACE START in the drive program. This func-
tion supports maximum acceleration with
RACE START. After going through an acceler-
ating process once from a stationary position, this function is automatically deactivated.
XDepress the brake pedal with your left foot
and keep it depressed.
XPull and hold both steering wheel paddle shift-
ers (Ypage 161).
The RACE START Confirm: Paddle UP
Cancel: Paddle DOWNmessage appears in
the multifunction display.
XRelease both steering wheel paddle shifters
(Ypage 161).
iIf the activation conditions are no longer ful-
filled, RACE START is canceled. The RACE
START Canceledmessage appears in the
multifunction display.
XTo cancel: pull the left steering wheel paddle
shifter (Ypage 161).
or
XTo confirm: pull the right steering wheel pad- dle shifter (Ypage 161).
The RACESTARTAvailableDepressgaspedal.message appears in the multifunction
display.
iIf you do not depress the accelerator pedal
fully within two seconds, RACE START is can-
celed. The RACE
STARTNotPossibleSeeOperator'sManualmessage appears in the
multifunction display.
XFully depress the accelerator pedal.
The engine speed rises to approximately
3,500 rpm.
The RACE
STARTReleasebraketostartmessage appears in the multifunction display.
iIf you do not release the brake pedal within
five seconds, RACE START is canceled. The RACE START Canceled
message appears in
the multifunction display.
XTake your foot off the brake, but keep the
accelerator pedal depressed.
The vehicle pulls away at maximum acceler-
ation.
The RACE
STARTActivemessage appears in
the multifunction display.
RACE START is deactivated when the vehicle
reaches a speed of approximately 30 mph (Can-
ada: 50 km/h).
RACE START is deactivated immediately if you
release the accelerator pedal during RACE
START or if any of the activation conditions are
no longer fulfilled. The RACE START Not Pos‐
sible See Operator's ManualorRACESTART Canceledmessage appears in the mul-
tifunction display.
iIf RACE START is used repeatedly within a
short period of time, it is only available again
after the vehicle has been driven a certain
distance.
AIRMATIC
General notes
AIRMATIC is an air suspension with variable
damping for improved driving comfort. All-round
level control ensures the best possible suspen-
sion and constant ground clearance, even with a
laden vehicle. When you drive fast, the vehicle is
lowered automatically to improve driving safety
and to reduce fuel consumption. There is also
the option to manually adjust the vehicle level.
AIRMATIC consists of level setting, level control
and the Adaptive Damping System ADS.
Important safety notes
GWARNING
When the vehicle is being lowered, people
could become trapped if their limbs are
between the vehicle body and the wheels or
underneath the vehicle. There is a risk of
injury.
Make sure no one is underneath the vehicle or
in the immediate vicinity of the wheel arches
when the vehicle is being lowered.
196Driving system s
Driving an d parking
Page 199 of 398
iIf one of the doors is open, the vehicle is not
lowered.
Vehicle level
Setting the raised vehicle level
It is possible to choose between the "Normal"
and "Raised" vehicle levels below a speed of
50 mph (80 km/h). Select the "Normal" setting
for normal road surfaces and "Raised" for driving
with snow chains or on particularly poor road
surfaces. Your selection remains stored even if
you remove the SmartKey from the ignition lock.
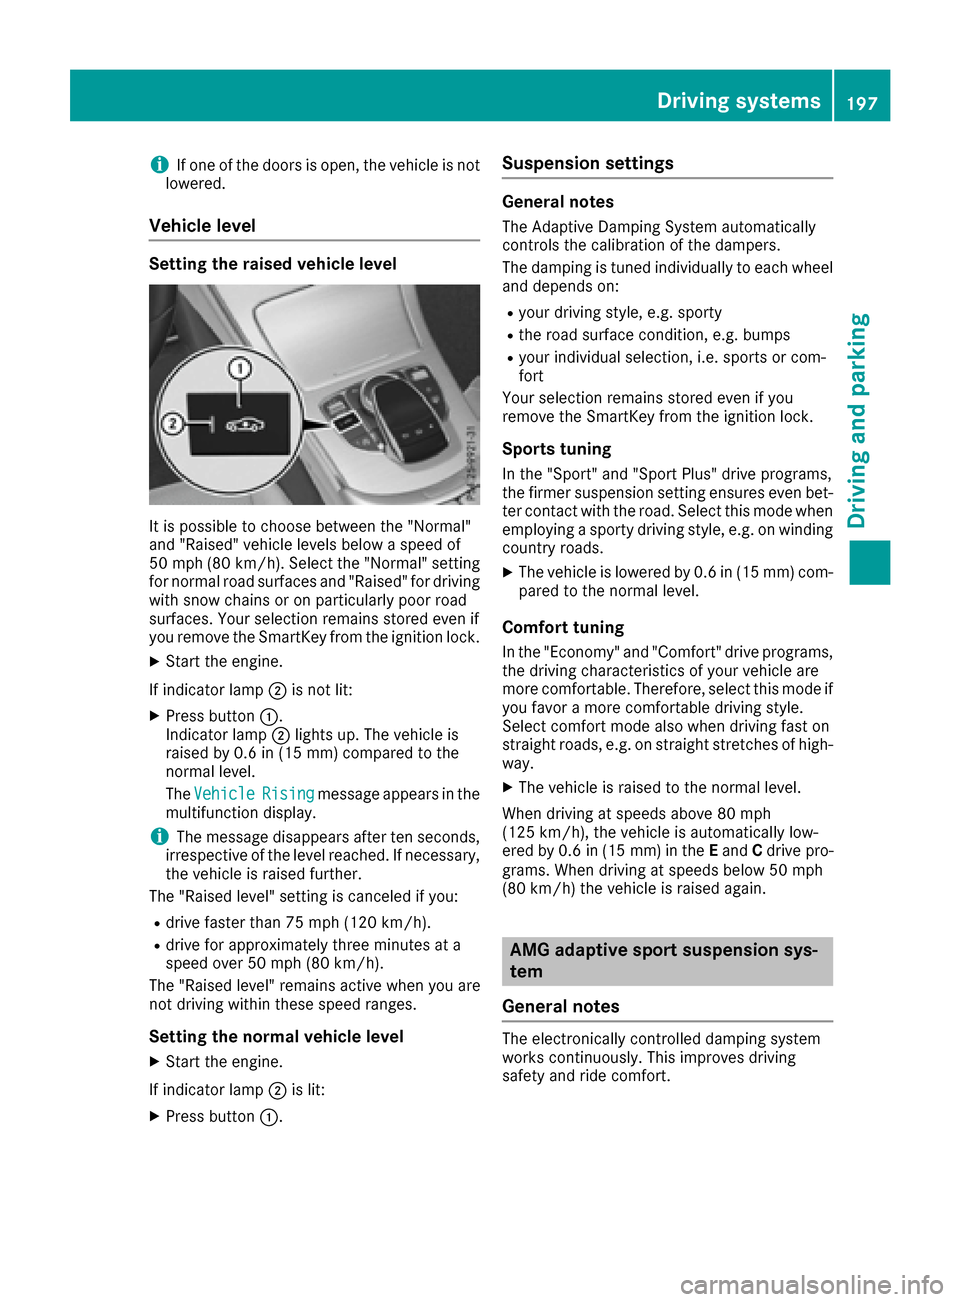
XStart the engine.
If indicator lamp ;is not lit:
XPress button :.
Indicator lamp ;lights up. The vehicle is
raised by 0.6 in (15 mm) compared to the
normal level.
The Vehicle
Risingmessage appears in the
multifunction display.
iThe message disappears after ten seconds,
irrespective of the level reached. If necessary,
the vehicle is raised further.
The "Raised level" setting is canceled if you:
Rdrive faster than 75 mph (120 km/h).
Rdrive for approximately three minutes at a
speed over 50 mph (80 km/h).
The "Raised level" remains active when you are
not driving within these speed ranges.
Setting the normal vehicle level
XStart the engine.
If indicator lamp ;is lit:
XPress button :.
Suspension settings
General notes
The Adaptive Damping System automatically
controls the calibration of the dampers.
The damping is tuned individually to each wheel
and depends on:
Ryour driving style, e.g. sporty
Rthe road surface condition, e.g. bumps
Ryour individual selection, i.e. sports or com-
fort
Your selection remains stored even if you
remove the SmartKey from the ignition lock.
Sports tuning
In the "Sport" and "Sport Plus" drive programs,
the firmer suspension setting ensures even bet-
ter contact with the road. Select this mode when
employing a sporty driving style, e.g. on winding country roads.
XThe vehicle is lowered by 0.6 in (15 mm) com-
pared to the normal level.
Comfort tuning
In the "Economy" and "Comfort" drive programs,
the driving characteristics of your vehicle are
more comfortable. Therefore, select this mode if
you favor a more comfortable driving style.
Select comfort mode also when driving fast on
straight roads, e.g. on straight stretches of high-
way.
XThe vehicle is raised to the normal level.
When driving at speeds above 80 mph
(125 km/h), the vehicle is automatically low-
ered by 0.6 in (15 mm) in the Eand Cdrive pro-
grams. When driving at speeds below 50 mph
(80 km/h) the vehicle is raised again.
AMG adaptive sport suspension sys-
tem
General notes
The electronically controlled damping system
works continuously. This improves driving
safety and ride comfort.
Driving systems197
Driving and parking
Z
Page 205 of 398
RPay attention to the PARKTRONIC
(Ypage 200) warning messages during the
parking procedure.
RYou can intervene in the steering procedure
to correct it at any time. Active Parking Assist
will then be canceled.
RWhen transporting a load which protrudes
from your vehicle, you should not use Active
Parking Assist.
RNever use Active Parking Assist when snow
chains are installed.
RMake sure that the tire pressures are always
correct. This has a direct influence on the
parking characteristics of the vehicle.
Use Active Parking Assist for parking spaces:
Rparallel or at right angles to the direction of
travel
Rthat are on straight roads, not bends
Rthat are on the same level as the road, e.g. not on the pavement
Detecting parking spaces
Objects located above the height range of Active
Parking Assist will not be detected when the
parking space is measured. These are not taken
into account when the parking procedure is cal-
culated, e.g. overhanging loads, tail sections or
loading ramps of goods vehicles.
GWARNING
If there are objects above the detection range:
RActive Park Assist may steer too early
Rthe vehicle may not stop in front of these
objects
You may cause a collision as a result. There is
a risk of an accident.
If objects are located above the detection
range, stop and deactivate Active Parking
Assist.
For further information on the detection range
(
Ypage 199). Active Parking Assist does not assist you park-
ing in spaces at right angles to the direction of
travel if:
Rtwo parking spaces are located directly next
to one another
Rthe parking space is directly next to a low
obstacle such as a low curb
Ryou park forwards
Active Parking Assist does not assist you park-
ing in spaces that are parallel or at right angles
to the direction of travel if:
Rthe parking space is on a curb
Rthe system reads the parking space as being
blocked, for example by foliage or grass pav-
ing blocks
Rthe area is too small for the vehicle to maneu-
ver into
Rthe parking space is bordered by an obstacle,
e.g. a tree, a post or a trailer
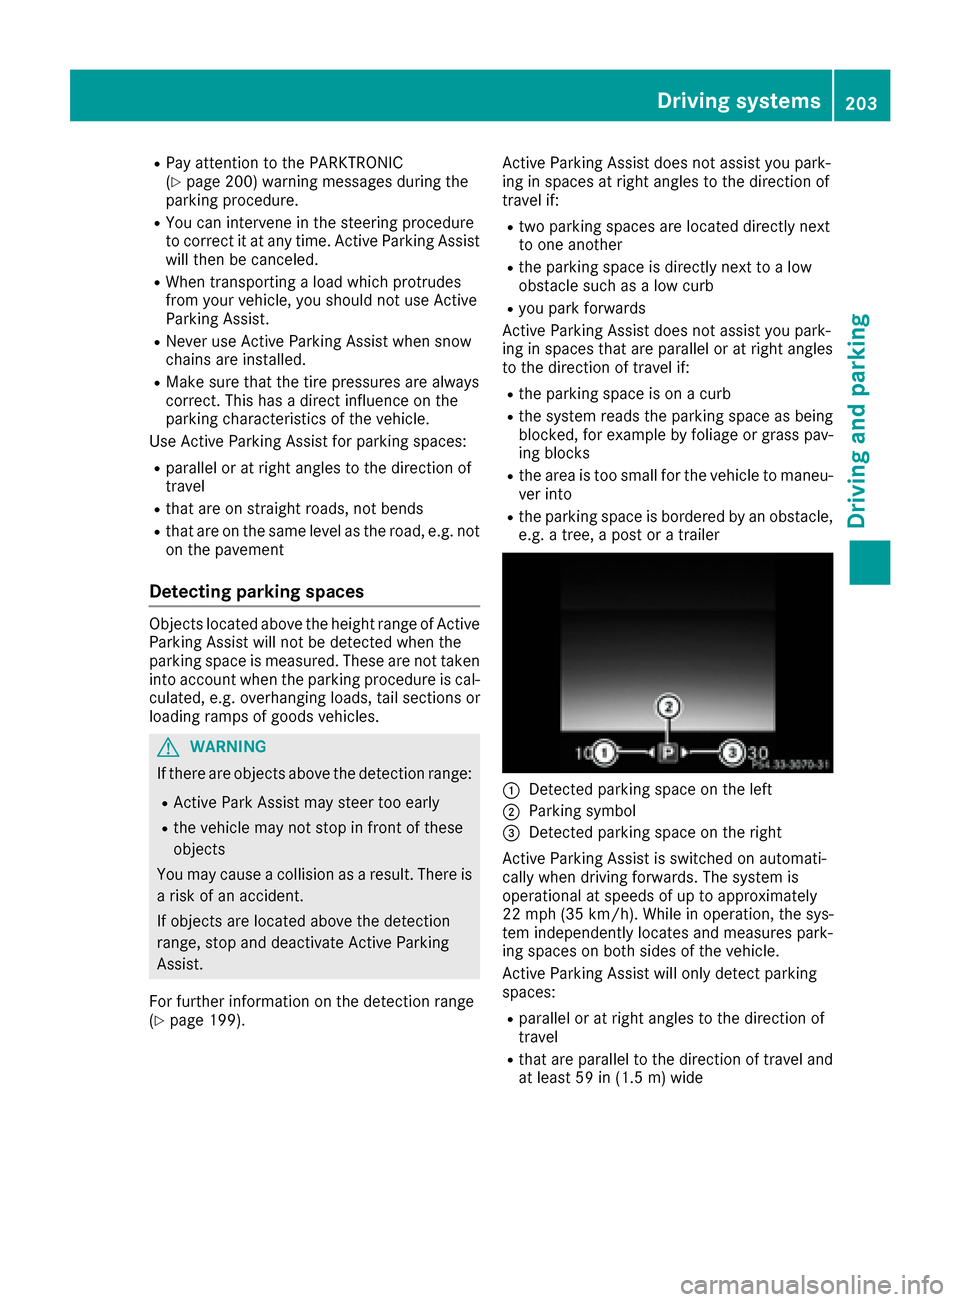
:Detected parking space on the left
;Parking symbol
=Detected parking space on the right
Active Parking Assist is switched on automati-
cally when driving forwards. The system is
operational at speeds of up to approximately
22 mph (35 km/ h). While in operation, the sys-
tem independently locates and measures park-
ing spaces on both sides of the vehicle.
Active Parking Assist will only detect parking
spaces:
Rparallel or at right angles to the direction of
travel
Rthat are parallel to the direction of travel and
at least 59 in (1.5 m) wide
Drivingsystem s203
Drivin g and parking
Z
Page 209 of 398

Rif the camera lens is dirty or obstructed
Observe the notes on cleaning
(
Ypage 339)
Rif the rear of your vehicle is damaged. In this
event, have the camera position and setting
checked at a qualified specialist workshop
The field of vision and other functions of the rear
view camera may be restricted due to additional
accessories on the rear of the vehicle (e.g.
license plate holder, bicycle rack).
iThe rear view camera is protected from rain-
drops and dust by means of a flap. When the
rear view camera is activated, this flap opens.
The flap closes again when:
Ryou have finished the maneuvering process
Ryou switch off the engine
Ryou open the trunk
Observe the notes on cleaning (
Ypage 339).
For technical reasons, the flap may remain
open briefly after the rear view camera has
been deactivated.
Activating/deactivating the rear view
camera
XTo activate: make sure that the SmartKey is
in position 2in the ignition lock.
XMake sure that the Activation by R gearfunction is selected in the multimedia system
(see the separate operating instructions).
XEngage reverse gear.
The rear view camera flap opens. The multi-
media system shows the area behind the vehi-
cle with guide lines.
The image from the rear view camera is avail-
able throughout the maneuvering process.
To deactivate: the rear view camera deacti-
vates if you shift the transmission to Por after
driving forwards a short distance.
Multimedia display
The rear view camera may show a distorted view
of obstacles, show them incorrectly or not at all.
The rear view camera does not show objects in
the following positions:
Rvery close to the rear bumper
Runder the rear bumper
Rin close range above the handle on the trunk
lid
!Objects not at ground level may appear to
be further away than they actually are, e.g.:
Rthe bumper of a parked vehicle
Rthe drawbar of a trailer
Rthe ball coupling of a trailer tow hitch
Rthe rear section of an HGV
Ra slanted post
Use the guidelines only for orientation.
Approach objects no further than the bottom-
most guideline.
:Yellow guide line at a distance of approx-
imately 13 ft (4.0 m) from the rear of the
vehicle
;White guide line without turning the steering
wheel, vehicle width including the exterior
mirrors (static)
=Yellow guide line for the vehicle width
including the exterior mirrors, for current
steering wheel angle (dynamic)
?Yellow lane marking tires at current steering
wheel angle (dynamic)
AYellow guide line at a distance of approx-
imately 3 ft (1.0 m) from the rear of the vehi-
cle
BVehicle center axle (marker assistance)
Driving systems207
Driving and parking
Z
Page 210 of 398

CBumper
DRed guide line at a distance of approximately
12 in (0.30m) fromthe rear of the vehicle
The guide lines are shown when the transmis-
sion is in position R.
The distance specifications only apply to
objects that are at ground level.
:Front warning display
;Additional PARKTRONIC measurement
operational readiness indicator
=Rear warning display
Vehicles with PARKTRONIC: if PARKTRONIC is
operational (
Ypage 200), an additional opera-
tional readiness indicator will appear in
COMAND display ;. If the PARKTRONIC warn-
ing displays are active or light up, warning dis-
plays :and =are also active or light up cor-
respondingly in the COMAND display.
"Reverse parking" function
Backing up straight into a parking space
without turning the steering wheel
:White guide line without turning the steering
wheel, vehicle width including the exterior
mirrors (static)
;Yellow guide line for the vehicle width
including the exterior mirrors, for current
steering wheel angle (dynamic)
=Yellow guide line at a distance of approx-
imately 3 ft (1.0 m) from the rear of the vehi-
cle
?Red guide line at a distance of approximately
12 in (0.30 m) fromthe rear of the vehicle
XMake sure that the rear view camera is
switched on (Ypage 207).
The lane and the guide lines are shown.
XWith the help of white guide line :, check
whether the vehicle will fit into the parking
space.
XUsing white guide line :as a guide, carefully
back up until you reach the end position.
Red guide line ?is then at the end of the
parking space. The vehicle is almost parallel
in the parking space.
208Driving system s
Driving an d parking
Page 213 of 398

make sure that there are no persons, animals or
objects in the area in which you are maneuver-
ing.
You are always responsible for safety, and must
always pay attention to your surroundings when parking and maneuvering. This applies to the
areas behind, in front of and beside the vehicle.
You could otherwise endanger yourself and oth-
ers.
The 360° camera will not function or will func-
tion in a limited manner:
Rif the doors are open
Rif the exterior mirrors are folded in
Rif the trunk lid is open
Rin heavy rain, snow or fog
Rat night or in very dark places
Rif the cameras are exposed to very bright light
Rif the area is lit by fluorescent bulbs or LED
lighting (the display may flicker)
Rif the camera lenses fog up, e.g. when driving
into a heated garage in winter, causing a rapid
change in temperature
Rif the camera lenses are dirty or covered
Rif the vehicle components in which the cam-
eras are installed are damaged. In this event,
have the camera position and setting checked
at a qualified specialist workshop.
Do not use the 360° camera in this case. You
can otherwise injure others or cause damage to
objects or the vehicle.
The guide lines in the COMAND display show the
distances to your vehicle. The distances only
apply to road level.
The camera in the rear area is protected by
means of a flap. This flap opens when the 360°
camera is activated. Observe the notes on
cleaning (
Ypage 339). For technical reasons,
the flap may remain open briefly after the 360°
camera has been deactivated.
On vehicles with height-adjustable chassis,
depending on technical conditions, leaving the
standard height can result in:
Rinaccuracies in the guide lines
Rinaccuracies in the display of generated
images (top view)
Activation conditions
The 360° camera image can be displayed if:
Rthe multimedia system is switched on
Rthe 360° Camerafunction is switched on
iIf you are driving faster than at a moderate
speed and you turn on the 360° camera, a
warning message appears.
The warning message disappears if:
Ryou are again driving at a moderate speed
The 360° camera is then activated.
Rthe message is confirmed with the %
button.
Switching the 360° camera on and off
using the button
XTo switch on: press button:.
Depending on whether position Dor Ris
engaged, the following is shown:
Ra split screen with top view and the image
from the front camera or
Ra split screen with top view and the image
from the rear view camera
XTo switch off: press button:.
Activating the 360° camera using
reverse gear
The 360° camera images can be automatically
displayed by engaging reverse gear.
Driving systems211
Driving and parking
Z