2016 MERCEDES-BENZ B-Class ELECTRIC ignition
[x] Cancel search: ignitionPage 106 of 342
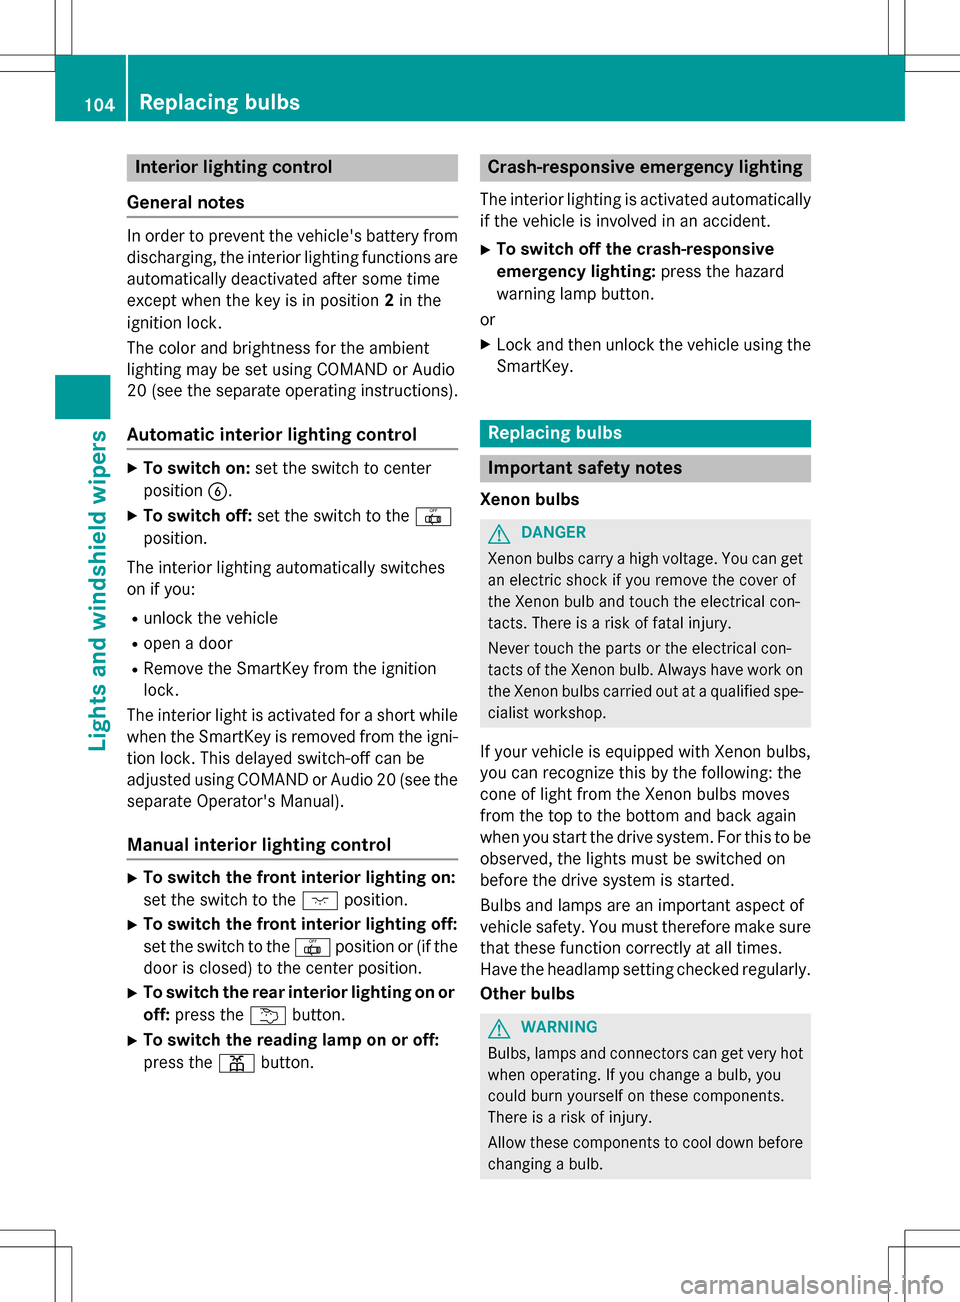
Interior lighting control
General notes
In order to prevent the vehicle's battery from discharging, the interior lighting functions are
automatically deactivated after some time
except when the key is in position 2in the
ignition lock.
The color and brightness for the ambient
lighting may be set using COMAND or Audio
20 (see the separate operating instructions).
Automatic interior lighting control
XTo switch on: set the switch to center
position B.
XTo switch off: set the switch to the |
position.
The interior lighting automatically swit ches
on if you:
Runlock the vehicle
Ropen a door
RRemove the Sm artKey from the ignition
lock.
The interior light is activated for a short while
when the SmartKey is removed from the igni-
tion lock. This delayed switch-off can be
adjusted using COMAND or Audio 20 (see the separate Operator's Manual).
Manual interior lighting control
XTo switch the front interior lighting on:
set the switch to the cposition.
XTo switch the front interior lighting off:
set the switch to the |position or (if the
door is closed) to the center position.
XTo switch the rear interior ligh ting on or
off: press the ubutton.
XTo switch the reading lamp on or off:
press the pbutton.
Crash-responsive emergency lighting
The interior lighting is activated automatically
if the vehicle is involved in an accident.
XTo switch off the crash-responsive
eme rgency lighti ng:press the hazard
warning lamp button.
or
XLock and then unlock the vehicle using the Sm artKey.
Replacing bulbs
Important safety notes
Xenon bulbs
GDANGER
Xenon bulbs carry a high voltage. You can get an electric shock if you remove the cover of
th e Xenon bulb and touch the electrical con-
tacts . There is a risk of fatal injury.
Never touch the parts or the electrical con-
tacts of th e Xenon bulb. Always have work on
th e Xenon bulbs carried out at a qualified spe-
cialist workshop.
If your vehicle is equipped with Xenon bulbs,
you can recognize th is by the following: the
cone of light from the Xenon bulbs moves
from the top to the bottom and back again
when you start the drive system. For this tobe
observed, the lights must be switched on
before the drive system is started.
Bulbs and lamps are an important aspect of
vehicle safety. You must therefore make sure
that these function correctly at all times.
Have the headlamp setting checked regularly.
Other bulbs
GWARNING
Bulbs, lamps and connectors can get very hot
when operating. If you changeabulb, you
could burn yourself on these components.
There is a risk of injury.
Allow these component s to cool down before
changing a bulb.
104Replacing bulbs
Lights and windshield wipers
Page 112 of 342
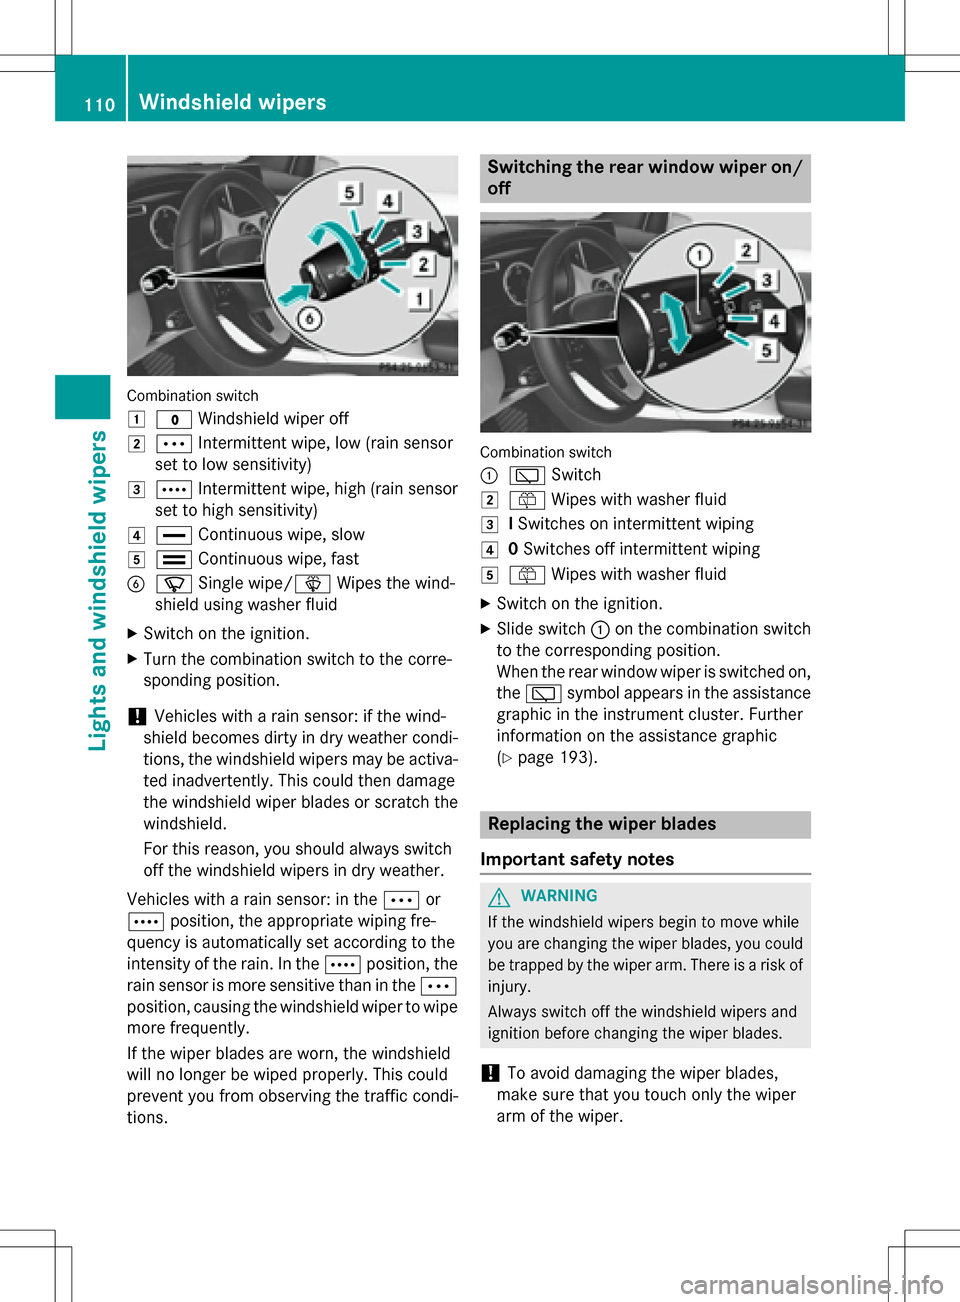
Combination switch
1
$Windshield wiper off
2ÄIntermittent wipe, low (rain sensor
set to low sensitivity)
3Å Intermittent wipe, high (rain sensor
set to high sensitivity)
4° Continuous wipe, slow
5¯Continuous wipe, fast
BíSingle wipe/î Wipes the wind-
shield using washer fluid
XSwitch on the ignition.
XTurn the combination switch to the corre-
sponding position.
!Vehicles with a rain sensor: if the wind-
shield becomes dirty in dry weather condi-
tions, the windshield wipers may be activa-
ted inadvertently. This could then damage
the windshield wiper blades or scratch the
windshield.
For this reason, you should always switch
off the windshield wipers in dry weather.
Vehicles with a rain sensor: in the Äor
Å position, the appropriate wiping fre-
quency is automatically set according to the
intensity of the rain. In the Åposition, the
rain sensor is more sensitive than in the Ä
position, causing the windshield wiper to wipe
more frequently.
If the wiper blades are worn, the windshield
will no longer be wiped properly. This could
prevent you from observing the traffic condi-
tions.
Switching the rear window wiper on/
off
Combination switch
:
è Switch
2ôWipes with washer fluid
3ISwitches on intermittent wiping
40 Switches off intermittent wiping
5ô Wipes with washer fluid
XSwitch on the ignition.
XSlide switch :on the combination switch
to the corresponding position.
When the rear window wiper is switched on,
the è symbol appears in the assistance
graphic in the instrument cluster. Further
information on the assistance graphic
(
Ypage 193).
Replacing the wiper blades
Important safety notes
GWARNING
If the windshield wipers begin to move while
you are changing the wiper blades, you could be trapped by the wiper arm. There is a risk of
injury.
Always switch off the windshield wipers and
ignition before changing the wiper blades.
!To avoid damaging the wiper blades,
make sure that you touch only the wiper
arm of the wiper.
110Windshield wipers
Lights and windshield wipers
Page 113 of 342
!Never open the hood/tailgate if a wiper
arm has been folded away from the wind-
shield/rear window.
Never fold a windshield wiper arm without a
wiper blade back onto the windshield/rear
window.
Hold the windshield wiper arm firmly when
you change the wiper blade. If you release
the wiper arm without a wiper blade and it
falls onto the windshield/rear window, the
windshield/rear window may be damaged
by the force of the impact.
Mercedes-Benz recommends that you have
the wiper blades changed at a qualified
specialist workshop.
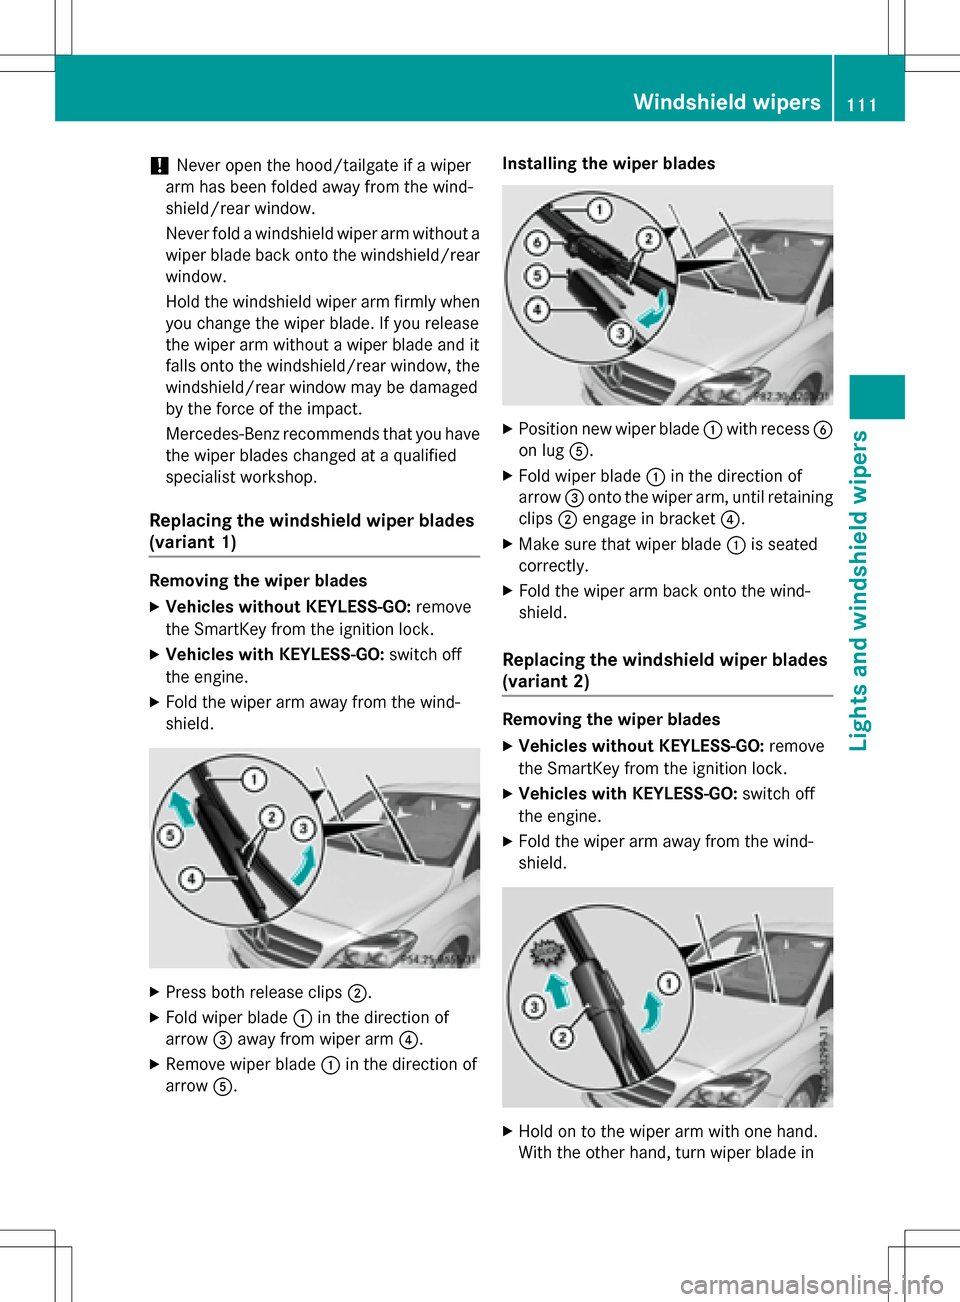
Replacing the windshield wiper blades
(variant 1)
Removing the wiper blades
XVehicles without KEYLESS-GO: remove
the SmartKey from the ignition lock.
XVehicles with KEYLESS-GO: switch off
the engine.
XFold the wiper arm away from the wind-
shield.
XPress both release clips ;.
XFold wiper blade:in the direction of
arrow =away from wiper arm ?.
XRemove wiper blade:in the direction of
arrow A. Installing the wiper blades
XPosition new wiper blade
:with recess B
on lug A.
XFold wiper blade :in the direction of
arrow =onto the wiper arm, until retaining
clips ;engage in bracket ?.
XMake sure that wiper blade :is seated
correctly.
XFold the wiper arm back onto the wind-
shield.
Replacing the windshield wiper blades
(variant 2)
Removing the wiper blades
XVehicles without KEYLESS-GO: remove
the SmartKey from the ignition lock.
XVehicles with KEYLESS-GO: switch off
the engine.
XFold the wiper arm away from the wind-
shield.
XHold on to the wiper arm with one hand.
With the other hand, turn wiper blade in
Windshield wipers111
Lights and windshield wipers
Z
Page 114 of 342
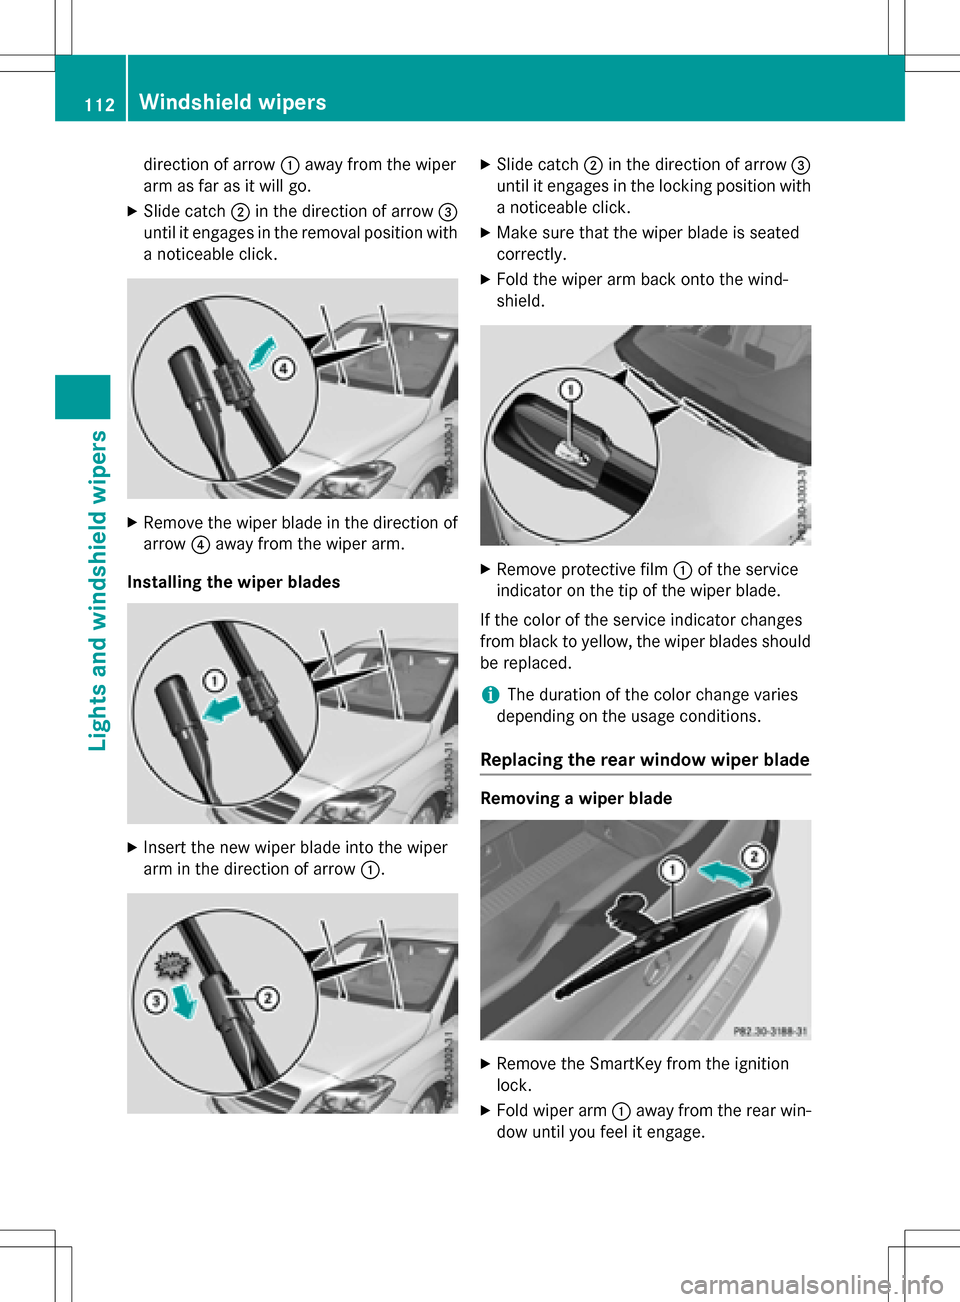
direction of arrow:away from the wiper
arm as far as it will go.
XSlide catch ;in the direction of arrow =
until it engages in the removal position with
a noticeable click.
XRemove the wiper blade in the direction of
arrow ?away from the wiper arm.
Installing the wiper blades
XInsert the new wiper blade into the wiper
arm in the direction of arrow :.
XSlide catch;in the direction of arrow =
until it engages in the locking position with a noticeable click.
XMake sure that the wiper blade is seated
correctly.
XFold the wiper arm back onto the wind-
shield.
XRemove protective film :of the service
indicator on the tip of the wiper blade.
If the color of the service indicator changes
from black to yellow, the wiper blades should
be replaced.
iThe duration of the color change varies
depending on the usage conditions.
Replacing the rear window wiper blade
Removing a wiper blade
XRemove the SmartKey from the ignition
lock.
XFold wiper arm :away from the rear win-
dow until you feel it engage.
112Windshield wipers
Lights and windshield wipers
Page 116 of 342
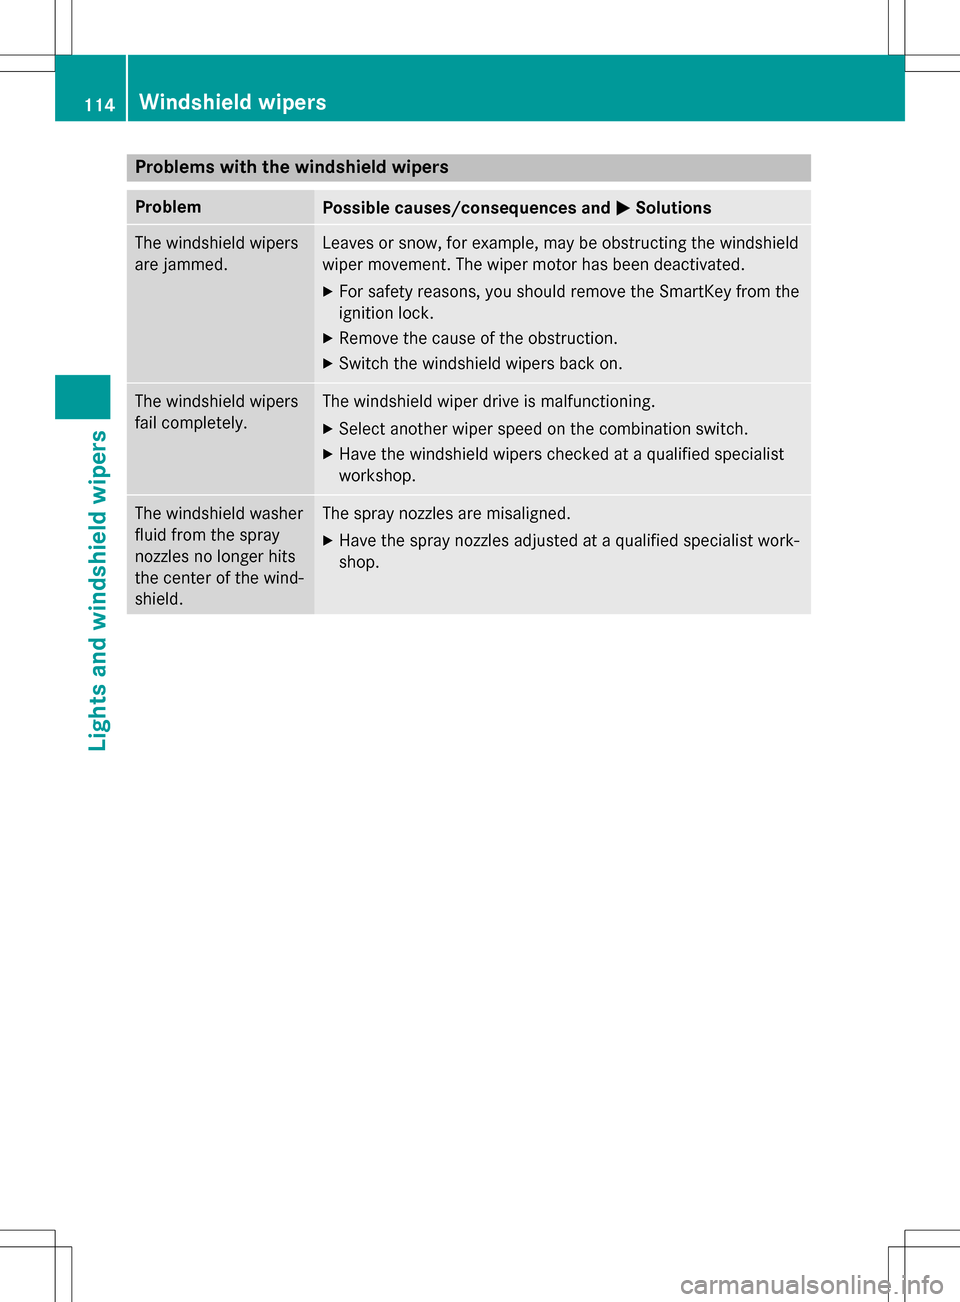
Problems with the windshield wipers
ProblemPossible causes/consequences andMSolutions
The windshield wipers
are jammed.Leaves or snow, for example, may be obstructing the windshield
wiper movement. The wiper motor has been deactivated.
XFor safety reasons, you should remove the SmartKey from the
ignition lock.
XRemove the cause of the obstruction.
XSwitch the windshield wipers back on.
The windshield wipers
fail completely.The windshield wiper drive is malfunctioning.
XSelect another wiper speed on the combination switch.
XHave the windshield wipers checked at a qualified specialist
workshop.
The windshield washer
fluid from the spray
nozzles no longer hits
the center of the wind-
shield.The spray nozzles are misaligned.
XHave the spray nozzles adjusted at a qualified specialist work-
shop.
114Windshield wipers
Lights and windshield wipers
Page 132 of 342
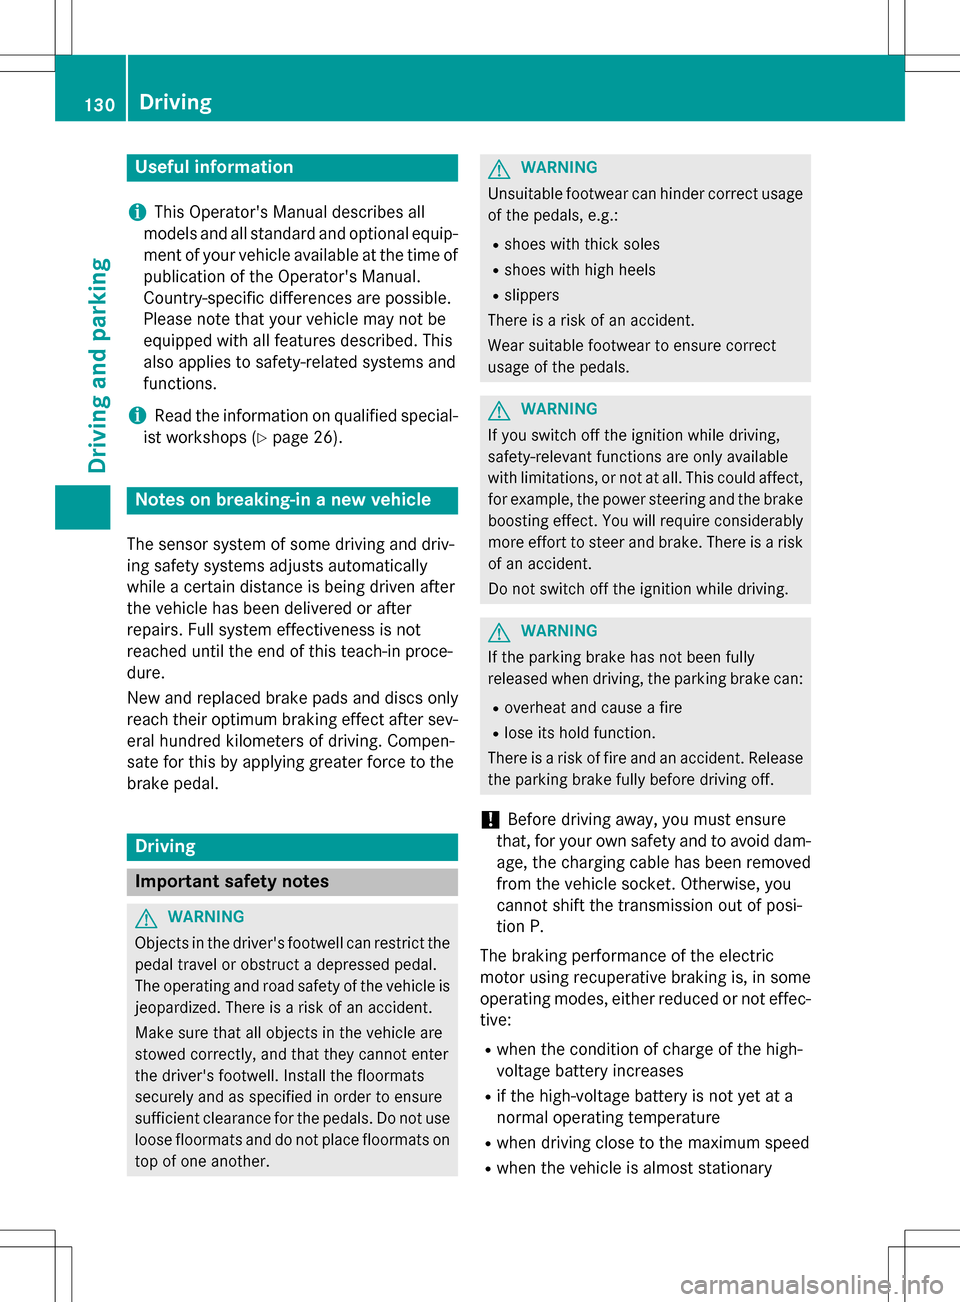
Useful information
i
This Operator's Manual describes all
models and all standard and optional equip-
ment of your vehicle available at the time of
publication of the Operator's Manual.
Country-specific differences are possible.
Please note that your vehicle may not be
equipped with all features described. This
also applies to safety-related systems and
functions.
iRead the information on qualified special-
ist workshops (
Ypage 26).
Notes on breaking-in a new vehicle
The sensor system of some driving and driv-
ing safety systems adjusts automatically
while a certain distance is being driven after
the vehicle has been delivered or after
repairs. Full system effectiveness is not
reached until the end of this teach-in proce-
dure.
New and replaced brake pads and discs only
reach their optimum braking effect after sev-
eral hundred kilometers of driving. Compen-
sate for this by applying greater force to the
brake pedal.
Driving
Important safety notes
GWARNING
Objects in the driver's footwell can restrict the pedal travel or obstruct a depressed pedal.
The operating and road safety of the vehicle is
jeopardized. There is a risk of an accident.
Make sure that all objects in the vehicle are
stowed correctly, and that they cannot enter
the driver's footwell. Install the floormats
securely and as specified in order to ensure
sufficient clearance for the pedals. Do not use
loose floormats and do not place floormats on
top of one another.
GWARNING
Unsuitable footwear can hinder correct usage of the pedals, e.g.:
Rshoes with thick soles
Rshoes with high heels
Rslippers
There is a risk of an accident.
Wear suitable footwear to ensure correct
usage of the pedals.
GWARNING
If you switch off the ignition while driving,
safety-relevant functions are only available
with limitations, or not at all. This could affect, for example, the power steering and the brake
boosting effect. You will require considerably
more effort to steer and brake. There is a risk
of an accident.
Do not switch off the ignition while driving.
GWARNING
If the parking brake has not been fully
released when driving, the parking brake can:
Roverheat and cause a fire
Rlose its hold function.
There is a risk of fire and an accident. Release
the parking brake fully before driving off.
!Before driving away, you must ensure
that, for your own safety and to avoid dam-
age, the charging cable has been removed
from the vehicle socket. Otherwise, you
cannot shift the transmission out of posi-
tion P.
The braking performance of the electric
motor using recuperative braking is, in some
operating modes, either reduced or not effec-
tive:
Rwhen the condition of charge of the high-
voltage battery increases
Rif the high-voltage battery is not yet at a
normal operating temperature
Rwhen driving close to the maximum speed
Rwhen the vehicle is almost stationary
130Driving
Driving and parking
Page 133 of 342
Rin transmission positionN
Rduring and after ESP stability control
If you do not make an additional effort to
apply the brake yourself, the braking effect
may not be sufficient. If necessary, counter-
act the reduced regenerative braking effect
by applying the brake yourself.
Before commencing your journey, ensure that the charging cable required for charging the
high-voltage battery is in the vehicle.
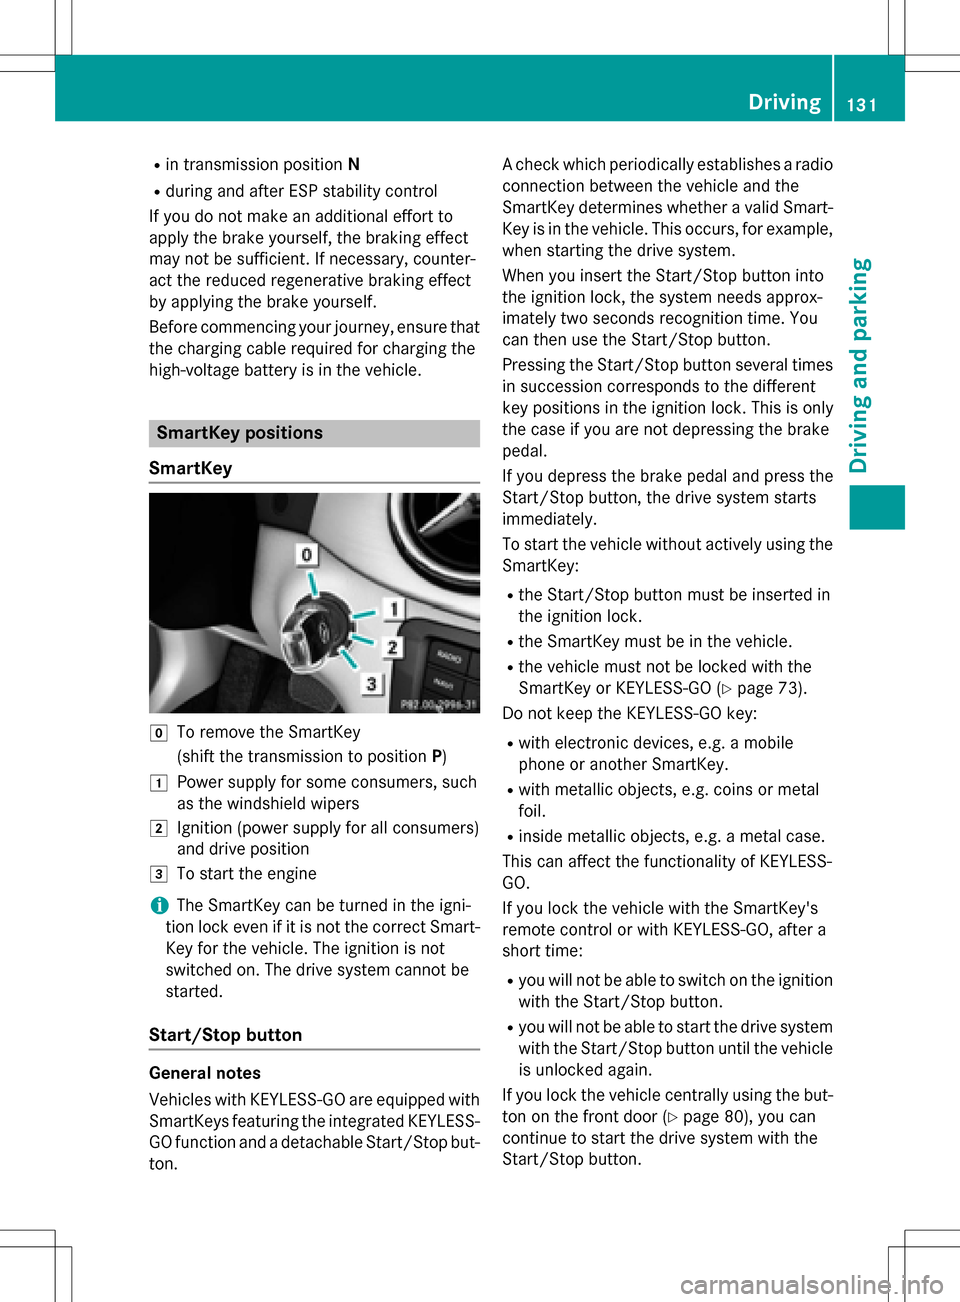
SmartKey positions
SmartKey
gTo remove the SmartKey
(shift the transmission to position P)
1Power supply for some consumers, such
as the windshield wipers
2Ignition (power supply for all consumers)
and drive position
3To start the engine
iThe SmartKey can be turned in the igni-
tion lock even if it is not the correct Smart- Key for the vehicle. The ignition is not
switched on. The drive system cannot be
started.
Start/Stop button
General notes
Vehicles with KEYLESS-GO are equipped with
SmartKeys featuring the integrated KEYLESS-GO function and a detachable Start/Stop but-
ton. A check which periodically establishes a radio
connection between the vehicle and the
SmartKey determines whether a valid Smart-
Key is in the vehicle. This occurs, for example,
when starting the drive system.
When you insert the Start/Stop button into
the ignition lock, the system needs approx-
imately two seconds recognition time. You
can then use the Start/Stop button.
Pressing the Start/Stop button several times
in succession corresponds to the different
key positions in the ignition lock. This is only
the case if you are not depressing the brake
pedal.
If you depress the brake pedal and press the
Start/Stop button, the drive system starts
immediately.
To start the vehicle without actively using the
SmartKey:
Rthe Start/Stop button must be inserted in
the ignition lock.
Rthe SmartKey must be in the vehicle.
Rthe vehicle must not be locked with the
SmartKey or KEYLESS-GO (
Ypage 73).
Do not keep the KEYLESS-GO key:
Rwith electronic devices, e.g. a mobile
phone or another SmartKey.
Rwith metallic objects, e.g. coins or metal
foil.
Rinside metallic objects, e.g. a metal case.
This can affect the functionality of KEYLESS-
GO.
If you lock the vehicle with the SmartKey's
remote control or with KEYLESS-GO, after a
short time:
Ryou will not be able to switch on the ignition
with the Start/Stop button.
Ryou will not be able to start the drive system
with the Start/Stop button until the vehicle is unlocked again.
If you lock the vehicle centrally using the but-
ton on the front door (
Ypage 80), you can
continue to start the drive system with the
Start/Stop button.
Driving131
Driving and parking
Z
Page 134 of 342
The drive system can be switched off while
the vehicle is in motion by pressing and hold-
ing the Start/Stop button for three seconds.
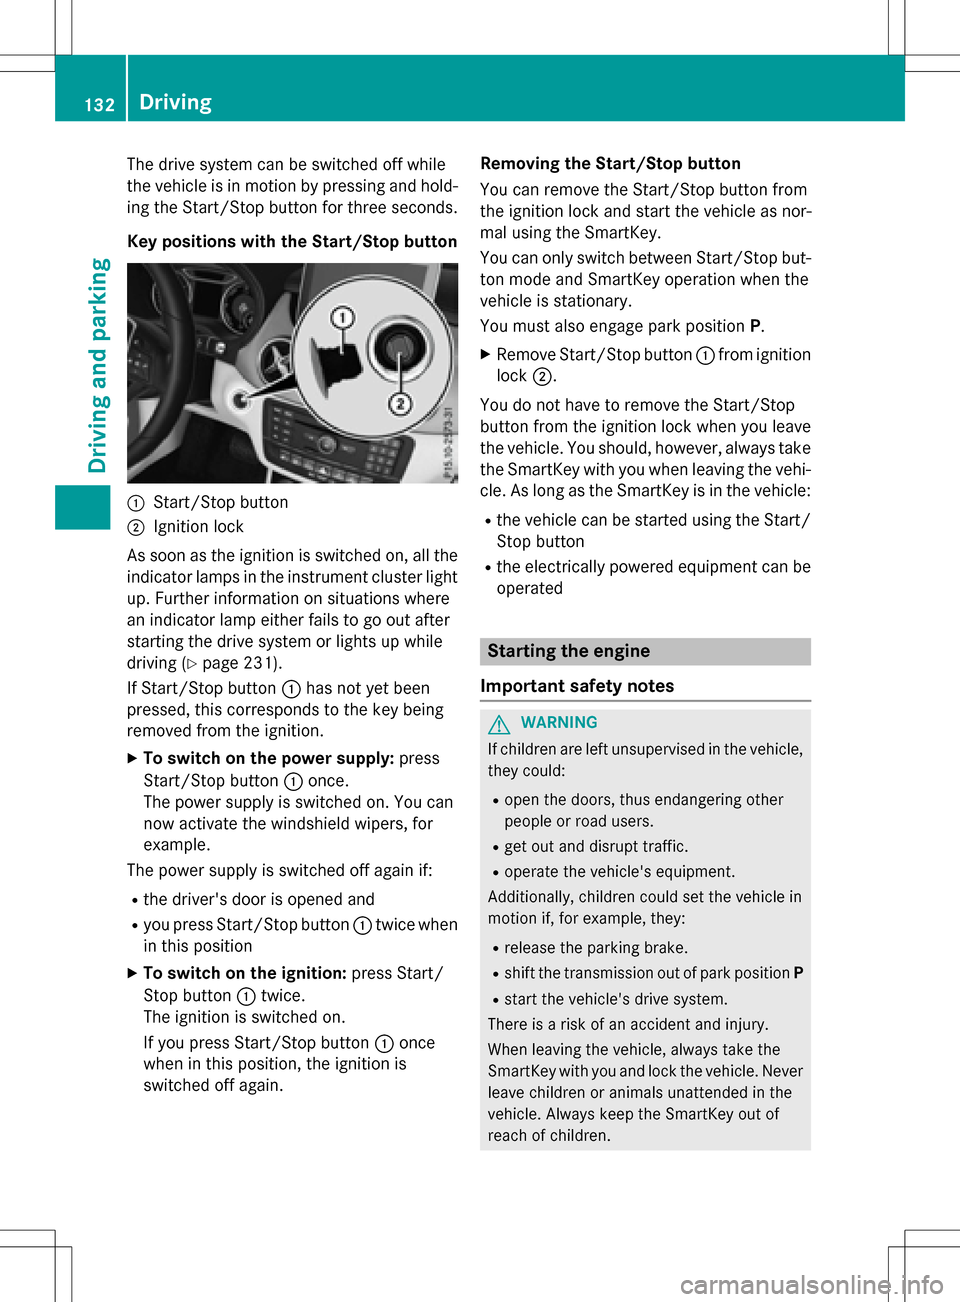
Key positions with the Start/Stop button
:Start/Stop button
;Ignition lock
As soon as the ignition is switched on, all the
indicator lamps in the instrument cluster light
up. Further information on situations where
an indicator lamp either fails to go out after
starting the drive system or lights up while
driving (
Ypage 231).
If Start/Stop button :has not yet been
pressed, this corresponds to the key being
removed from the ignition.
XTo switch on the power supply: press
Start/Stop button :once.
The power supply is switched on. You can
now activate the windshield wipers, for
example.
The power supply is switched off again if:
Rthe driver's door is opened and
Ryou press Start/Stop button :twice when
in this position
XTo switch on the ignition: press Start/
Stop button :twice.
The ignition is switched on.
If you press Start/Stop button :once
when in this position, the ignition is
switched off again. Removing the Start/Stop button
You can remove the Start/Stop button from
the ignition lock and start the vehicle as nor-
mal using the SmartKey.
You can only switch between Start/Stop but-
ton mode and SmartKey operation when the
vehicle is stationary.
You must also engage park position P.
XRemove Start/Stop button:from ignition
lock ;.
You do not have to remove the Start/Stop
button from the ignition lock when you leave
the vehicle. You should, however, always take
the SmartKey with you when leaving the vehi-
cle. As long as the SmartKey is in the vehicle:
Rthe vehicle can be started using the Start/ Stop button
Rthe electrically powered equipment can be
operated
Starting the engine
Important safety notes
GWARNING
If children are left unsupervised in the vehicle,
they could:
Ropen the doors, thus endangering other
people or road users.
Rget out and disrupt traffic.
Roperate the vehicle's equipment.
Additionally, children could set the vehicle in
motion if, for example, they:
Rrelease the parking brake.
Rshift the transmission out of park position P
Rstart the vehicle's drive system.
There is a risk of an accident and injury.
When leaving the vehicle, always take the
SmartKey with you and lock the vehicle. Never
leave children or animals unattended in the
vehicle. Always keep the SmartKey out of
reach of children.
132Driving
Driving and parking