Page 300 of 342

XTurn the SmartKey to position0in the igni-
tion lock and remove it.
XSecure the vehicle.
The towing eye can be used to pull the vehicle
onto a trailer or transporter for transporting
purposes.
Fuses
Important safety notes
GWARNING
If you manipulate or bridge a faulty fuse or if
you replace it with a fuse with a higher amper- age, the electric cables could be overloaded.
This could result in a fire. There is a risk of an
accident and injury.
Always replace faulty fuses with the specified
new fuses having the correct amperage.
Blown fuses must be replaced with fuses of
the same rating, which you can recognize by
the color and value. The fuse ratings are listed
in the fuse allocation chart.
If a newly inserted fuse also blows, have the
cause traced and rectified at a qualified spe-
cialist workshop, e.g. an authorized
Mercedes-Benz Center.
!Only use fuses that have been approved
for Mercedes-Benz vehicles and which
have the correct fuse rating for the system
concerned. Only use fuses marked with an
"S". Otherwise, components or systems
could be damaged.
The fuses in your vehicle serve to close down
faulty circuits. If a fuse blows, all the compo-
nents on the circuit and their functions stop
operating.
Before changing a fuse
XSecure the vehicle against rolling away
(
Ypage 153).
XSwitch off all electrical consumers.
XVehicles without KEYLESS-GO: remove
the SmartKey from the ignition lock.
XVehicles with KEYLESS-GO start-func-
tion or KEYLESS-GO: open the driver's
door.
The on-board electronics now have status
0. This is the same as the SmartKey having
been removed.
The fuses are located in various fuse boxes:
RFuse box in the engine compartment on the
left-hand side of the vehicle, when viewed
in the direction of travel
RFuse box in the front-passenger footwell
The fuse allocation chart is on the fuse box in
the front-passenger footwell (
Ypage 299).
Fuse box in the engine compartment
GWARNING
When the hood is open and the windshield
wipers are set in motion, you can be injured by
the wiper linkage. There is a risk of injury.
Always switch off the windshield wipers and
the ignition before opening the hood.
!Make sure that no moisture can enter the
fuse box when the cover is open.
!When closing the cover, make sure that it
is lying correctly on the fuse box. Moisture
seeping in or dirt could otherwise impair
the operation of the fuses.
298Fuses
Breakdown assistance
Page 313 of 342

Checking the tire pressure electroni-
cally
XMake sure that the SmartKey is in position2 in the ignition lock (
Ypage 131).
XPress =or; on the steering wheel
to select the Serv.
menu.
XPress the9or: button to select
Tire Pressure
.
XPress the abutton.
The current tire pressure of each tire is
shown in the multifunction display.
If the vehicle was parked for longer than
20 minutes, the Tire pressure will be
displayed after driving a few
minutesmessage is shown.
After a teach-in process, the tire pressure
monitor automatically detects new wheels or
new sensors. As long as a clear allocation of
the tire pressure value to the individual
wheels is not possible, the Tire Pressure
Monitor Activemessage is shown instead
of the tire pressure display. The tire pressures
are already being monitored.
Tire pressure monitor warning mes-
sages
If the tire pressure monitor detects a pressure loss in one or more tires, a warning message
is shown in the multifunction display. The yel-
low tire pressure warning lamp then lights up.
RIf the Please Correct Tire Pressure
message appears in the multifunction dis-
play, the tire pressure in at least one tire is
too low. The tire pressure must be correc-
ted when the opportunity arises.
RIf theCheck Tire Pressuremessage
appears in the multifunction display, the
tire pressure in one or more tires has drop-
ped significantly. The tires must be
checked.
RIf the Tire Pressure Warning Tire
Failuremessage appears in the multi-
function display, the tire pressure in one or
more tires has dropped suddenly. The tires
must be checked. Observe the instructions and safety notes in
the display messages in the "Tires" section
(
Ypage 223).
If the wheel positions on the vehicle are rota-
ted, the tire pressures may be displayed for
the wrong positions for a short time. This is
rectified after a few minutes of driving, and
the tire pressures are displayed for the cor-
rect positions.
Restarting the tire pressure monitor
When you restart the tire pressure monitor, all
existing warning messages are deleted and
the warning lamps go out. The monitor uses
the currently set tire pressures as the refer-
ence values for monitoring. In most cases, the
tire pressure monitor will automatically
detect the new reference values after you
have changed the tire pressure. However, you
can also define reference values manually as
described here. The tire pressure monitor
then monitors the new tire pressure values.
XSet the tire pressure to the value recom-
mended for the corresponding driving sit-
uation on the Tire and Loading Information
placard on the driver's side
B-pillar (
Ypage 305).
Additional tire pressure for various operat-
ing conditions can be found in the tire pres-
sure table in the charge socket flap
(
Ypage 148).
XMake sure that the tire pressure is correct
on all four wheels.
XMake sure that the SmartKey is in position
2 in the ignition lock (
Ypage 131).
XPress =or; on the steering wheel
to select the Serv.
menu.
XPress the9or: button to select
Tire Pressure
.
XPress the abutton.
The multifunction display shows the cur-
rent tire pressure for each tire or the Tire
Tire pressure311
Wheels and tires
Z
Page 326 of 342

XVehicles without KEYLESS-GO:remove
the SmartKey from the ignition lock.
XVehicles with KEYLESS-GO start-func-
tion or KEYLESS-GO: open the driver's
door.
The on-board electronics now have status
0 . This is the same as the SmartKey having
been removed.
XVehicles with KEYLESS-GO start-func-
tion or KEYLESS-GO: remove the Start/
Stop button from the ignition lock
(
Ypage 131).
XIf included in the vehicle equipment,
remove the tire-change tool kit from the
vehicle.
XSafeguard the vehicle against rolling away
(
Ypage 153).
Securing the vehicle to prevent it from
rolling away
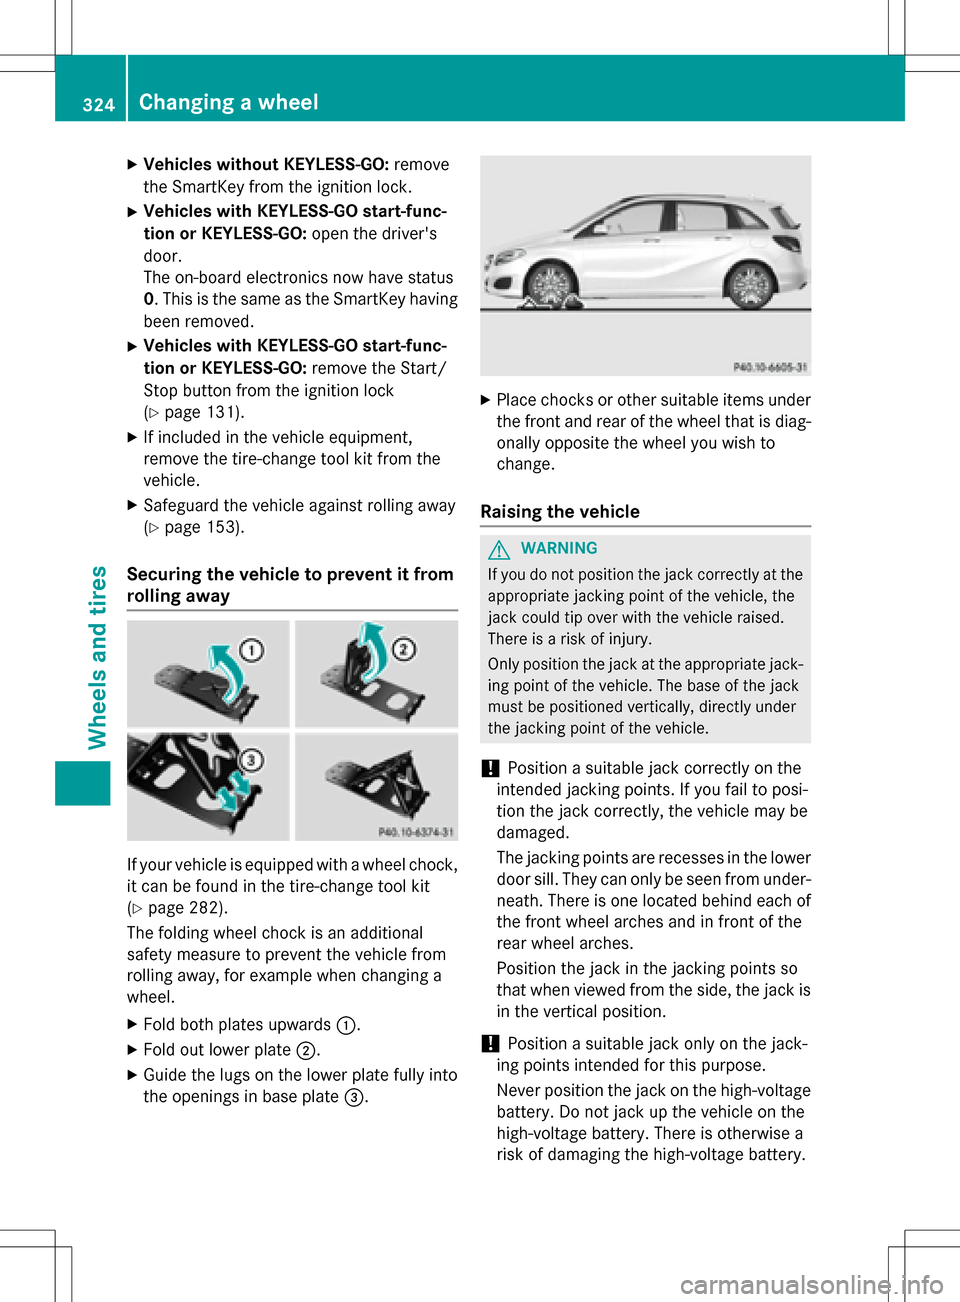
If your vehicle is equipped with a wheel chock,
it can be found in the tire-change tool kit
(
Ypage 282).
The folding wheel chock is an additional
safety measure to prevent the vehicle from
rolling away, for example when changing a
wheel.
XFold both plates upwards :.
XFold out lower plate;.
XGuide the lugs on the lower plate fully into
the openings in base plate =.
XPlace chocks or other suitable items under
the front and rear of the wheel that is diag-
onally opposite the wheel you wish to
change.
Raising the vehicle
GWARNING
If you do not position the jack correctly at the
appropriate jacking point of the vehicle, the
jack could tip over with the vehicle raised.
There is a risk of injury.
Only position the jack at the appropriate jack-
ing point of the vehicle. The base of the jack
must be positioned vertically, directly under
the jacking point of the vehicle.
!Position a suitable jack correctly on the
intended jacking points. If you fail to posi-
tion the jack correctly, the vehicle may be
damaged.
The jacking points are recesses in the lower
door sill. They can only be seen from under-
neath. There is one located behind each of
the front wheel arches and in front of the
rear wheel arches.
Position the jack in the jacking points so
that when viewed from the side, the jack is
in the vertical position.
!Position a suitable jack only on the jack-
ing points intended for this purpose.
Never position the jack on the high-voltage
battery. Do not jack up the vehicle on the
high-voltage battery. There is otherwise a
risk of damaging the high-voltage battery.
324Changing a wheel
Wheels and tires