2016 MERCEDES-BENZ B-Class ELECTRIC change time
[x] Cancel search: change timePage 3 of 342

Welcome to the world of Mercedes-Benz
We urge you to read this Operator's Manual
carefully and familiarize yourself with the
vehicle before driving. For your own safety
and a longer vehicle life, follow the instruc-
tions and warning notices in this manual.
Ignoring them could result in damage to the
vehicle or personal injury to you or others.
Vehicle damage caused by failure to follow
instructions is not covered by the Mercedes-
Benz Limited Warranty.
The equipment or product designation of your
vehicle may vary depending on:
Rmodel
Rorder
Rcountry specification
Ravailability
Mercedes-Benz therefore reserves the right
to introduce changes in the following areas:
Rdesign
Requipment
Rtechnical features
The equipment in your vehicle may therefore
differ from that shown in the descriptions and
illustrations.
The following are integral components of the
vehicle:
ROperator's Manual
RMaintenance Booklet
REquipment-dependent supplements
Keep these documents in the vehicle at all
times. If you sell the vehicle, always pass all
documents on to the new owner.
You can also use the Mercedes-Benz Guides
App:
Apple®iOS
Android™
Please note that the Mercedes-Benz Guides
App may not yet be available in your country.
The technical documentation team at
Daimler AG wishes you safe and pleasant
motoring.
Mercedes-Benz USA, LLC
Mercedes-Benz Canada, Inc.
A Daimler Company
2425847900
É2425847900hËÍ
Page 24 of 342

Information for customers in Califor-
nia
Under California law you may be entitled to a
replacement of your vehicle or a refund of the
purchase price or lease price, if after a rea-
sonable number of repair attempts
Mercedes-Benz USA, LLC and/or its author-
ized repair or service facilities fail to fix one or
more substantial defects or malfunctions in
the vehicle that are covered by its express
warranty. During the period of 18 months
from original delivery of the vehicle or the
accumulation of 18,000 miles (approximately
29,000 km) on the odometer of the vehicle,
whichever occurs first, a reasonable number
of repair attempts is presumed for a retail
buyer or lessee if one or more of the following
occurs:
(1) the same substantial defect or malfunc- tion results in a condition that is likely to
cause death or serious bodily injury if the
vehicle is driven, that defect or malfunc-
tion has been subject to repair two or
more times, and you have directly noti-
fied Mercedes-Benz USA, LLC in writing
of the need for its repair,
(2) the same substantial defect or malfunc- tion of a less serious nature than cate-
gory (1) has been subject to repair four or
more times and you hav
e directly notified
us in writing of the need for its repair, or
(3) the vehicle is out of service by reason of
repair of the same or different substantial
defects or malfunctions for a cumulative
total of more than 30 calendar days.
Please send your written notice to:
Mercedes-Benz USA, LLC
Customer Assistance Center
One Mercedes Drive
Montvale, NJ 07645-0350
Maintenance
The Service and Warranty Booklet describes
all the necessary maintenance work which
should be done at regular intervals.
Always have the Service and Warranty Book-
let with you when you bring the vehicle to an
authorized Mercedes-Benz Center. The ser-
vice advisor will record every service for you
in the Service and Warranty Booklet.
Breakdown assistance
The Mercedes-Benz Roadside Assistance
Program offers technical help in the event of a
breakdown. Calls to the toll-free Roadside
Assistance Hotline are answered by our
agents 24 hours a day, 365 days a year.
1-800-FOR-MERCedes(1-800-367-6372)
(USA)
1-800-387-0100 (Canada)
For additional information, refer to the
Mercedes-Benz Roadside Assistance Pro-
gram brochure (USA) or the "Roadside Assis- tance" section in theService and Warranty
booklet (Canada). You will find both in your
vehicle literature portfolio.
Change of address or change of own-
ership
In the event of a change of address, please
send us the "Notification of Address Change"
in the Service and Guarantee booklet or sim-
ply call the Mercedes-Benz Customer Assis-
tance Center (USA) at the hotline number
1-800-FOR-MERCedes(1-800-367-6372) or
Customer Service Center (Canada) at
1-800-387-0100. This will assist us in con-
tacting you in a timely manner should the
need arise.
If you sell your Mercedes, please leave the
entire literature in the vehicle so that it is
available to the next owner.
If you have purchased a used car, please send
us the "Notification of Used Car Purchase" in
22Introduction
Page 77 of 342

or
XLock or unlock the vehicle using KEYLESS-
GO. The SmartKey must be outside the
vehicle.
If you unlock the vehicle using the mechanical
key, the charge socket flap will not be
unlocked automatically.
Removing the mechanical key
XPush release catch :in the direction of
the arrow and at the same time remove
mechanical key ;from the SmartKey.
For further information about:
Runlocking the driver's door (Ypage 80)
Runlocking the cargo compartment
(
Ypage 82)
Rlocking the vehicle (Ypage 81)
Inserting the mechanical key
XPush mechanical key ;completely into
the SmartKey until it engages and release
catch :is back in its basic position.
SmartKey battery
Important safety notes
GWARNING
Batteries contain toxic and corrosive substan- ces. If batteries are swallowed, it can result in
severe health problems. There is a risk of fatalinjury.
Keep batteries out of the reach of children. If
a battery is swallowed, seek medical attention
immediately.
The SmartKey batteries contain perchlorate
material, which may require special handling
and regard for the environment. National
guidelines must be observed during disposal.
In California, see www.dtsc.ca.gov/
HazardousWaste/Perchlorate/
index.cfm.
Mercedes-Benz recommends that you have
the battery replaced at a qualified specialist
workshop.
Checking the battery
XPress the &or% button.
The battery is working properly if battery
check lamp :lights up briefly.
The battery is discharged if battery check
lamp :does not light up briefly.
XChange the battery (Ypage 75).
iIf the SmartKey battery is checked within
the signal reception range of the vehicle,
pressing the &or% button:
Rlocks or
Runlocks the vehicle
iYou can get a battery at any qualified spe-
cialist workshop.
Replacing the battery
You require a CR 2025 3 V cell battery.
SmartKey75
Opening and closing
Z
Page 106 of 342

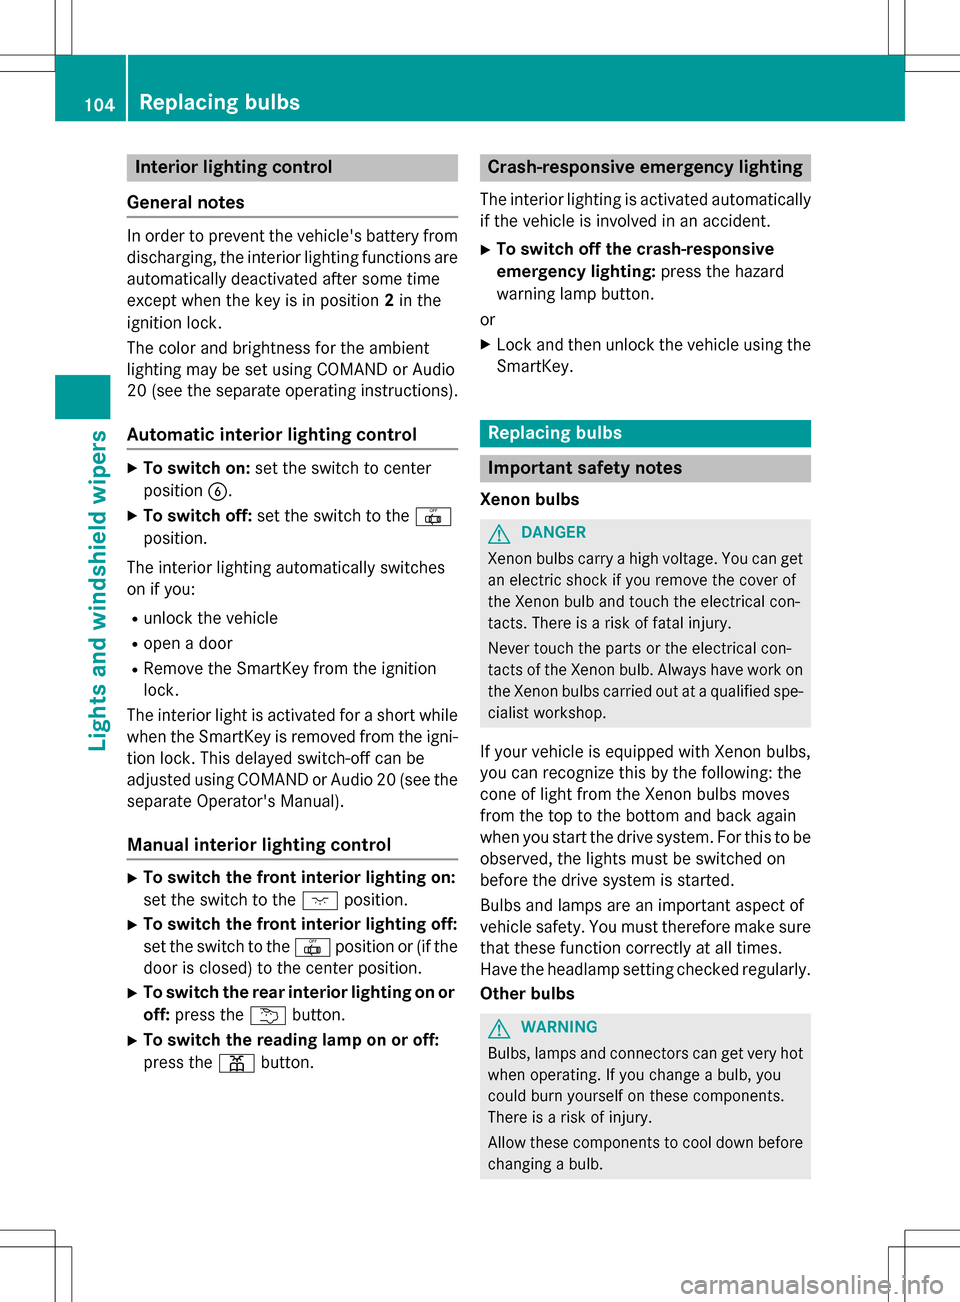
Interior lighting control
General notes
In order to prevent the vehicle's battery from discharging, the interior lighting functions are
automatically deactivated after some time
except when the key is in position 2in the
ignition lock.
The color and brightness for the ambient
lighting may be set using COMAND or Audio
20 (see the separate operating instructions).
Automatic interior lighting control
XTo switch on: set the switch to center
position B.
XTo switch off: set the switch to the |
position.
The interior lighting automatically swit ches
on if you:
Runlock the vehicle
Ropen a door
RRemove the Sm artKey from the ignition
lock.
The interior light is activated for a short while
when the SmartKey is removed from the igni-
tion lock. This delayed switch-off can be
adjusted using COMAND or Audio 20 (see the separate Operator's Manual).
Manual interior lighting control
XTo switch the front interior lighting on:
set the switch to the cposition.
XTo switch the front interior lighting off:
set the switch to the |position or (if the
door is closed) to the center position.
XTo switch the rear interior ligh ting on or
off: press the ubutton.
XTo switch the reading lamp on or off:
press the pbutton.
Crash-responsive emergency lighting
The interior lighting is activated automatically
if the vehicle is involved in an accident.
XTo switch off the crash-responsive
eme rgency lighti ng:press the hazard
warning lamp button.
or
XLock and then unlock the vehicle using the Sm artKey.
Replacing bulbs
Important safety notes
Xenon bulbs
GDANGER
Xenon bulbs carry a high voltage. You can get an electric shock if you remove the cover of
th e Xenon bulb and touch the electrical con-
tacts . There is a risk of fatal injury.
Never touch the parts or the electrical con-
tacts of th e Xenon bulb. Always have work on
th e Xenon bulbs carried out at a qualified spe-
cialist workshop.
If your vehicle is equipped with Xenon bulbs,
you can recognize th is by the following: the
cone of light from the Xenon bulbs moves
from the top to the bottom and back again
when you start the drive system. For this tobe
observed, the lights must be switched on
before the drive system is started.
Bulbs and lamps are an important aspect of
vehicle safety. You must therefore make sure
that these function correctly at all times.
Have the headlamp setting checked regularly.
Other bulbs
GWARNING
Bulbs, lamps and connectors can get very hot
when operating. If you changeabulb, you
could burn yourself on these components.
There is a risk of injury.
Allow these component s to cool down before
changing a bulb.
104Replacing bulbs
Lights and windshield wipers
Page 107 of 342

Do not use a bulb that has been dropped or if
its glass tube has been scratched.
The bulb may explode if:
Ryou touch it
Rit is hot
Ryou drop it
Ryou scratch it
Only operate bulbs in enclosed lamps
designed for that purpose. Only install spare
bulbs of the same type and the specified volt- age.
Marks on the glass tube reduce the service
life of the bulbs. Do not touch the glass tube
with your bare hands. If necessary, clean the
glass tube when cold with alcohol or spirit and
rub it off with a lint-free cloth.
Protect bulbs from moisture during opera-
tion. Do not allow bulbs to come into contact
with liquids.
There are bulbs other than the Xenon bulbs
that you cannot replace. Only replace the
bulbs listed (
Ypage 105). Have the bulbs that
you cannot replace yourself changed at a
qualified specialist workshop.
If you require assistance replacing bulbs, con-
sult a qualified specialist workshop.
If the new bulb still does not light up, consult
a qualified specialist workshop.
Bulbs and lamps are an important aspect of
vehicle sa fety. You must therefore make sure
that these function correctly at all times.
Have the headlamp setting checked regularly.
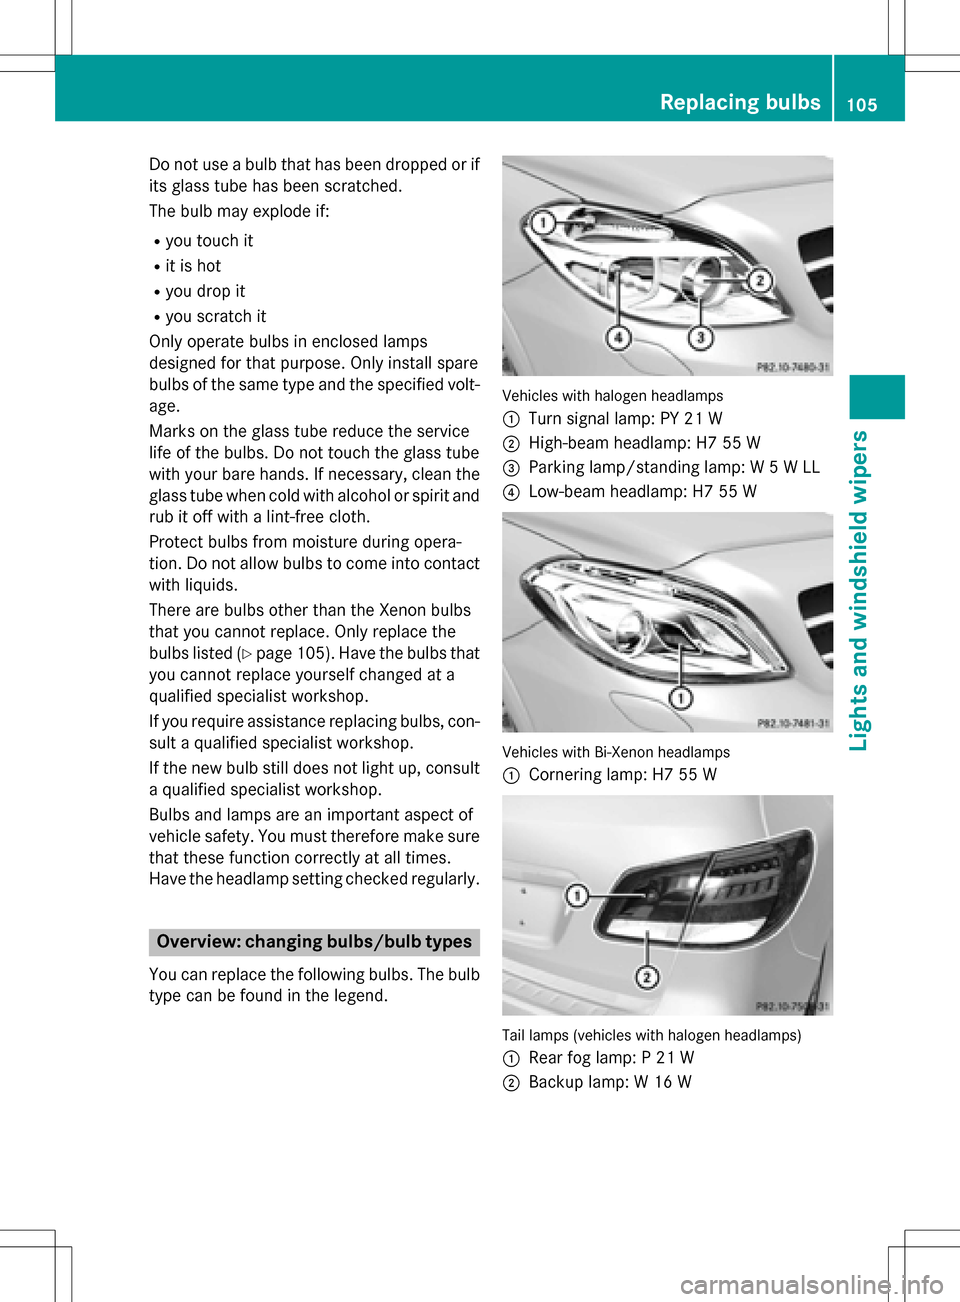
Overview: changing bulbs/bulb types
You can replace the following bulbs. The bulb
type can be found in the legend.
Vehicles with halogen headlamps
:
Turn signal lamp: PY 21 W
;High-beam headlamp: H7 55 W
=Parking lamp/standing lamp: W 5 W LL
?Low-beam headlamp: H7 55 W
Vehicles with Bi-Xenon headlamps
:
Cornering lamp: H7 55 W
Tail lamps (vehicles with halogen headlamps)
:
Rear fog lamp: P 21 W
;Backup lamp: W 16 W
Replacing bulbs105
Lights and windshield wipers
Z
Page 120 of 342

the front-passenger side as well. The indi-
cator lamp in theábutton goes out.
RIf you change the settings of the climate
control system, the climate status display
appears for approximately three seconds
at the bottom of the screen in the Audio/
COMAND display (see separate operating
instructions). You will see the current set-
tings of the various climate control func-
tions.
You can choose between various drive pro-
grams with the program selector button
(
Ypage 137).
If you have selected drive program E+:
Rthe cooling output is reduced when cooling
Rheat output is reduced when heating
Rthe time for which the rear window
defroster will run is reduced
If you have selected drive program Eor S, the
current climate settings are maintained.
Operating the climate control sys-
tems
Activating/deactivating climate con-
trol
General notes
When the climate control is switched off, the
air supply and air circulation are also
switched off. The windows could fog up.
Therefore, switch off climate control only
briefly
Dual-zone automatic climate control
XTurn the SmartKey to position 2in the igni-
tion lock (
Ypage 131).
XTo activate: press theÃbutton.
The indicator lamp in the Ãbutton lights
up. Airflow and air distribution are set to
automatic mode.
or
XPress the ^button.
The indicator lamp in the ^button goes
out. The previously selected settings are
restored.
XTo deactivate: press the^button.
The indicator lamp in the ^button lights
up.
iActivate climate control primarily using
the à button.
Switching cooling with air dehumidi-
fication on/off
General notes
If you deactivate the "Cooling with air-dehu-
midification" function, the air inside the vehi- cle will not be cooled. The air inside the vehi-
cle will also not be dehumidified. The win-
dows can fog up more quickly. Therefore, only
deactivate the "Cooling with air-dehumidifi-
cation" function briefly.
The "Cooling with air-dehumidification" func-
tion is operational when the vehicle is ready
to drive. The air inside the vehicle is cooled
and dehumidified according to the tempera-
ture selected.
Condensation may drip from the underside of
the vehicle when it is in cooling mode. This is
normal and not a sign that there is a malfunc- tion.
118Operating the climate control systems
Climate control
Page 122 of 342

Problems with the "Cooling with air dehumidification" function
ProblemPossible causes/consequences andMSolutions
The indicator lamp in
the¿ button
flashes three times or
remains off. The "Cool-
ing with air dehumidifi-
cation" function cannot
be switched on.Cooling with air dehumidification has been deactivated due to a
malfunction.
XVisit a qualified specialist workshop.
Setting climate control to automatic
General notes
In automatic mode, the set temperature is
maintained automatically at a constant level.
The system automatically regulates the tem-
perature of the dispensed air, the airflow and
the air distribution.
The automatic mode functions optimally
when the "Cooling with air dehumidification"
function is activated. If necessary, cooling
with air dehumidification can be deactivated.
If you deactivate the "Cooling with air-dehu-
midification" function, the air inside the vehi-
cle will not be cooled. The air inside the vehi-
cle will also not be dehumidified. The win-
dows can fog up more quickly. Therefore, only
deactivate the "Cooling with air-dehumidifi-
cation" function briefly.
Setting climate control to automatic
XTurn the SmartKey to position 2in the igni-
tion lock (
Ypage 131).
XSet the desired temperature.
XTo activate: press theÃbutton.
The indicator lamp in the Ãbutton lights
up. Automatic air distribution and airflow
are activated.
XTo switch to manual mode: press the
É orË button.
or
XPress the KorI button.
The indicator lamp in the Ãbutton goes
out. Automatic air distribution and airflow
are deactivated.
Setting the temperature
Different temperatures can be set for the
driver's and front-passenger sides. The set
temperature is automatically maintained at a
constant level.
XTurn the SmartKey to position 2in the igni-
tion lock (
Ypage 131).
XTo increase/reduce: turn thumbwheel:
or E counter-clockwise or clockwise. Only
change the temperature setting in small
increments. Start at 72 ‡ (22 †).
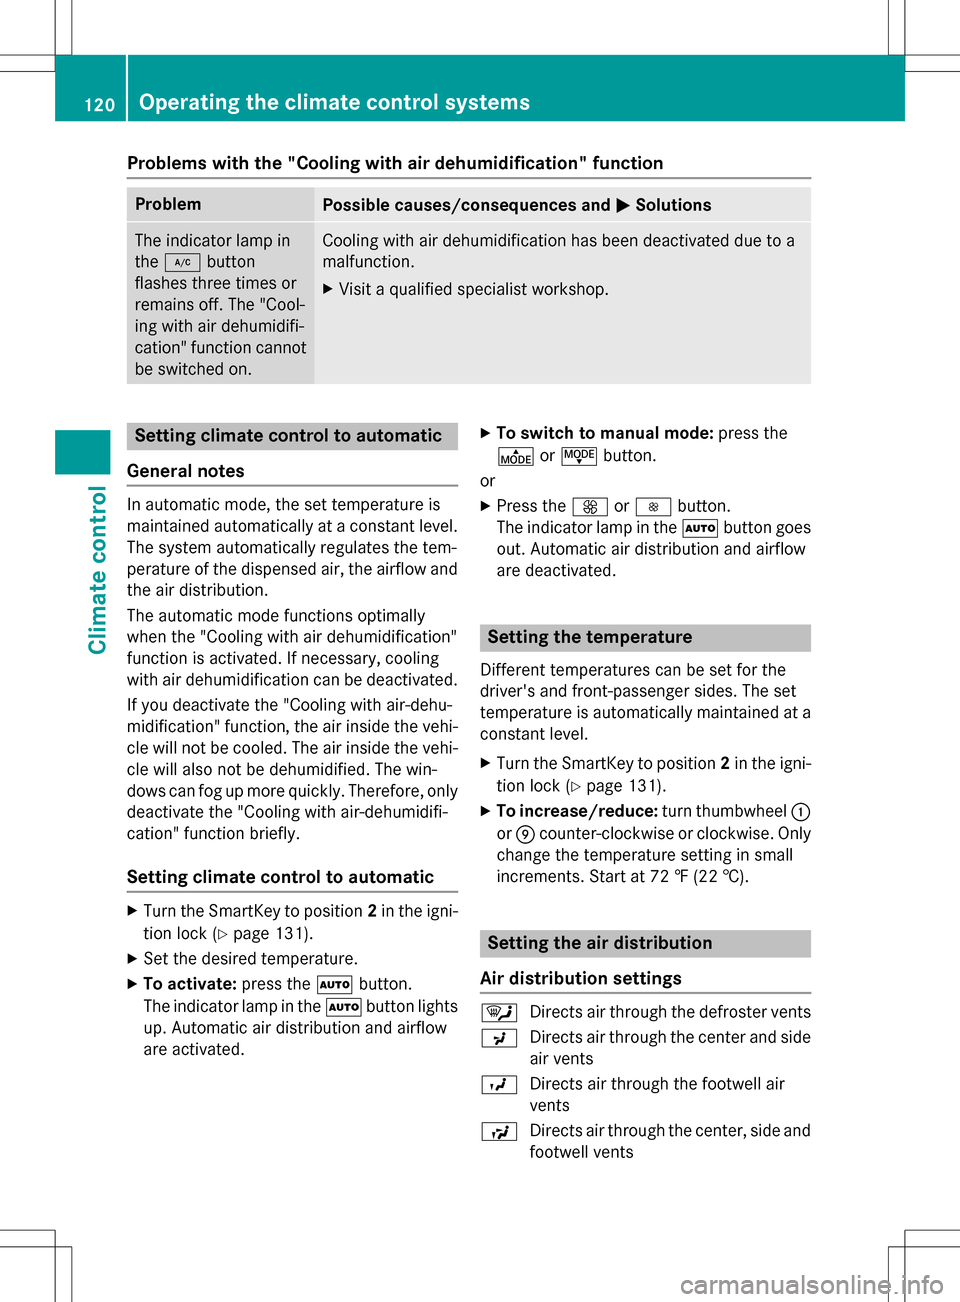
Setting the air distribution
Air distribution settings
¯ Directs air through the defroster vents
P Directs air through the center and side
air vents
O Directs air through the footwell air
vents
S Directs air through the center, side and
footwell vents
120Operating the climate control systems
Climate control
Page 146 of 342

As a result of its basic characteristics, the
amount of energy available from the high-
voltage battery decreases over the course of
its life.
This reduces:
Rthe maximum range that can be achieved
by the vehicle
Rthe maximum output (acceleration) of the
vehicle
You can actively reduce the energy consump-
tion of your vehicle in a number of ways, for
example, by:
Ran anticipatory driving style
Rreducing the use of electrical consumers
Rhaving the vehicle regularly maintained
The charging time of the high-voltage battery may change over the course of its life.
Observe the displays on energy usage
(
Ypage 188) and range (Ypage 188).
RANGE PLUS
If you activate RANGE PLUS, the operating
window of the battery will be extended at thenext charging process. An extended driving
range will be available to you for the next
journey.
Using RANGE PLUS shortens the service life
of the battery. Therefore, only use RANGE
PLUS if, for example:
Rlong journeys are planned or
Rthe availability of charging stations at the
destination is limited
The more often RANGE PLUS is used, the
more the extended range is reduced.
Therefore always check the range display
before every journey (
Ypage 188).
XTo switch on: press button:.
The green Indicator lamp lights up.
XTo switch off: press button:.
The indicator lamp goes out.
RANGE PLUS switches off automatically if:
Rthe charging cable is disconnected or
Rthe charging process is complete
Information on charging with RANGE PLUS
(
Ypage 195).
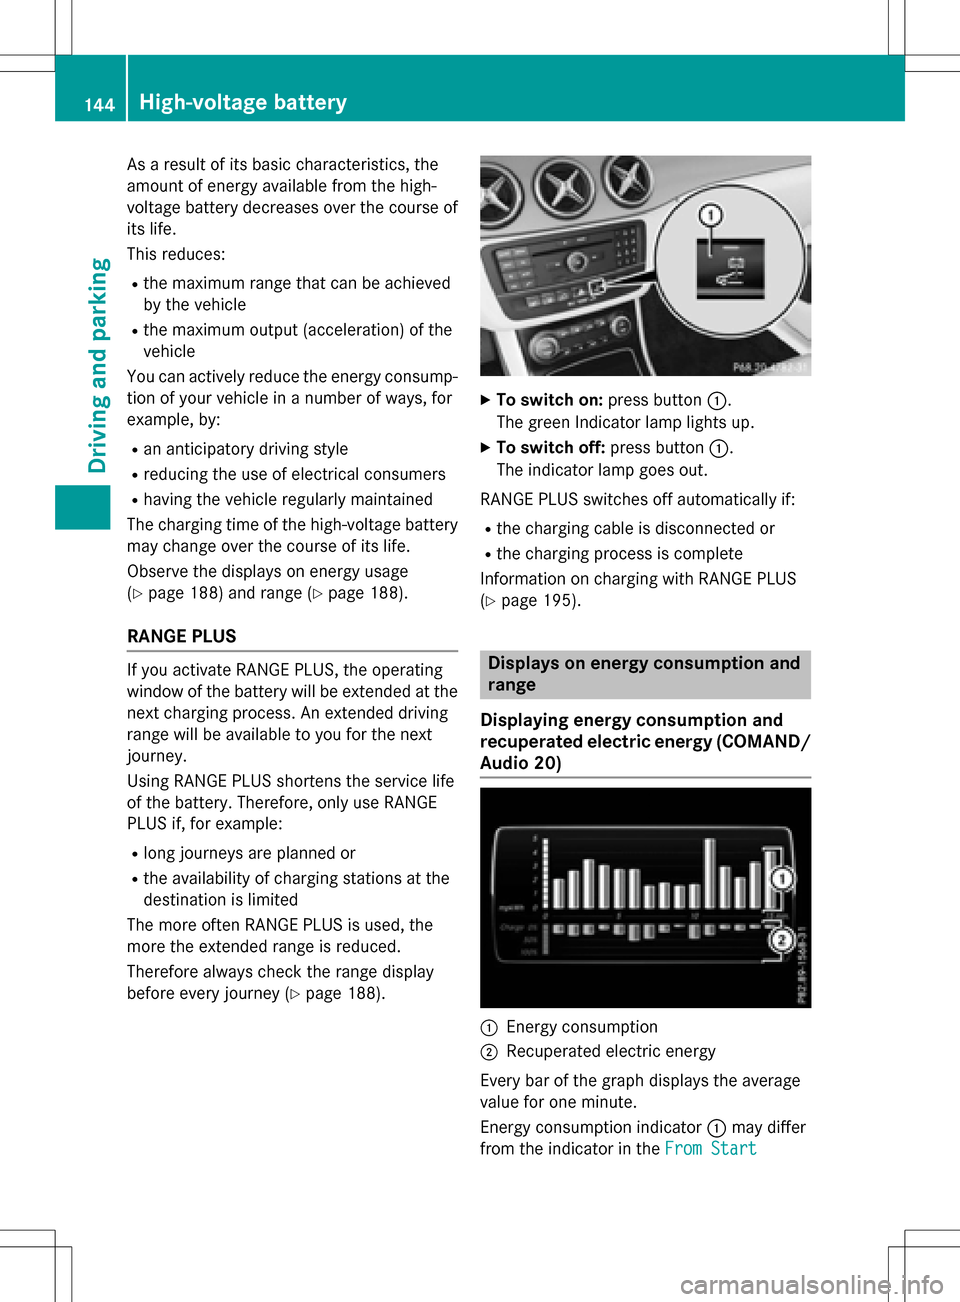
Displays on energy consumption and
range
Displaying energy consumption and
recuperated electric energy (COMAND/
Audio 20)
:Energy consumption
;Recuperated electric energy
Every bar of the graph displays the average
value for one minute.
Energy consumption indicator :may differ
from the indicator in the From Start
144High-voltage battery
Driving and parking