2016 MERCEDES-BENZ B-Class ELECTRIC phone
[x] Cancel search: phonePage 133 of 342
Rin transmission positionN
Rduring and after ESP stability control
If you do not make an additional effort to
apply the brake yourself, the braking effect
may not be sufficient. If necessary, counter-
act the reduced regenerative braking effect
by applying the brake yourself.
Before commencing your journey, ensure that the charging cable required for charging the
high-voltage battery is in the vehicle.
SmartKey positions
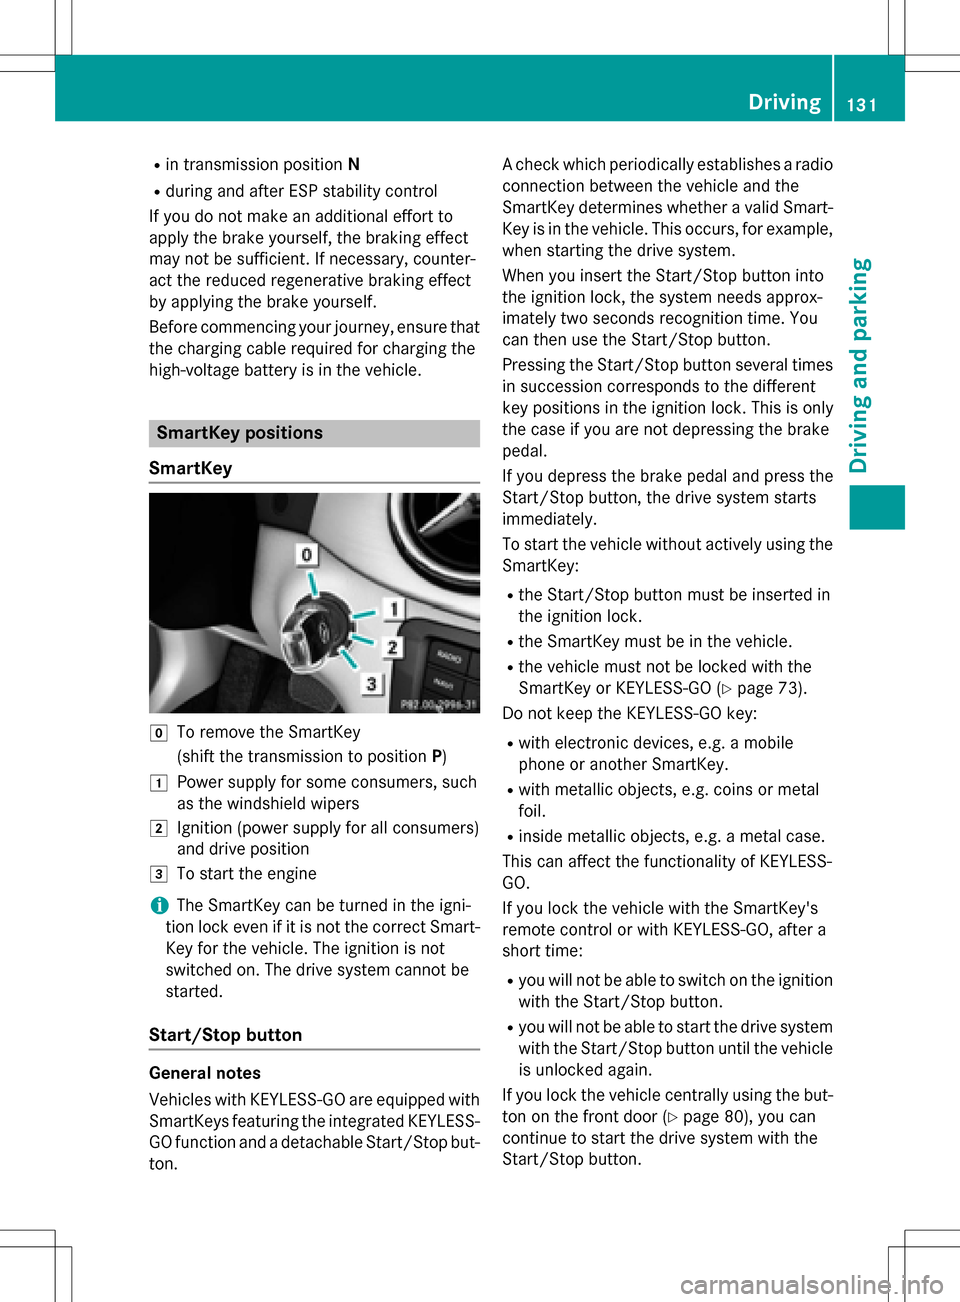
SmartKey
gTo remove the SmartKey
(shift the transmission to position P)
1Power supply for some consumers, such
as the windshield wipers
2Ignition (power supply for all consumers)
and drive position
3To start the engine
iThe SmartKey can be turned in the igni-
tion lock even if it is not the correct Smart- Key for the vehicle. The ignition is not
switched on. The drive system cannot be
started.
Start/Stop button
General notes
Vehicles with KEYLESS-GO are equipped with
SmartKeys featuring the integrated KEYLESS-GO function and a detachable Start/Stop but-
ton. A check which periodically establishes a radio
connection between the vehicle and the
SmartKey determines whether a valid Smart-
Key is in the vehicle. This occurs, for example,
when starting the drive system.
When you insert the Start/Stop button into
the ignition lock, the system needs approx-
imately two seconds recognition time. You
can then use the Start/Stop button.
Pressing the Start/Stop button several times
in succession corresponds to the different
key positions in the ignition lock. This is only
the case if you are not depressing the brake
pedal.
If you depress the brake pedal and press the
Start/Stop button, the drive system starts
immediately.
To start the vehicle without actively using the
SmartKey:
Rthe Start/Stop button must be inserted in
the ignition lock.
Rthe SmartKey must be in the vehicle.
Rthe vehicle must not be locked with the
SmartKey or KEYLESS-GO (
Ypage 73).
Do not keep the KEYLESS-GO key:
Rwith electronic devices, e.g. a mobile
phone or another SmartKey.
Rwith metallic objects, e.g. coins or metal
foil.
Rinside metallic objects, e.g. a metal case.
This can affect the functionality of KEYLESS-
GO.
If you lock the vehicle with the SmartKey's
remote control or with KEYLESS-GO, after a
short time:
Ryou will not be able to switch on the ignition
with the Start/Stop button.
Ryou will not be able to start the drive system
with the Start/Stop button until the vehicle is unlocked again.
If you lock the vehicle centrally using the but-
ton on the front door (
Ypage 80), you can
continue to start the drive system with the
Start/Stop button.
Driving131
Driving and parking
Z
Page 148 of 342
When the range is shown in color, a distinc-
tion is made between two areas:
RPale area:100% of range
RDark area: 80% of range
When route guidance is active, the route is
marked in color.
The range display with destination accessi-
bility on the COMAND/Audio 20 navigation
map is available on the 2D map display and a scale of 50 meters to 500 km.
Displaying the range and destination
accessibility via navigation mode:
XTo switch to navigation mode: press the
ß button.
The map shows the vehicle's current posi-
tion.
or
XFrom one of the other main functions:
slide 5the controller (e. g. in radio
mode).
The main function bar is displayed.
XTo select Navifrom the main function bar:
turn and press the controller.
The map shows the vehicle's current posi-
tion.
XTo call up e-Navigator: press theß
button.
XTo select Range on Mapin the navigation
menu: turn and press the controller.
The range and destination accessibility are
displayed on the navigation map.
Displaying the range and destination
accessibility via Mercedes-Benz Apps:
XSwitch on COMAND/Audio 20 (see the
separate operating instructions).
XSet access data and connect to the Internet
(see separate operating instructions)
XTo call up the telephone menu: press the
% button.
XTo switch to the main function bar: slide
5the controller.
XTo select TEL/®: press the controller.
XTo selectInternet: turn and press the
controller.
The menu with the Internet functions is dis-
played.
XTo select Mercedes-Benz Apps: turn and
press the controller.
The available Mercedes-Benz Apps
are
displayed.
XTo call up the e-Navigator App: turn and
press the controller.
The navigation map is displayed showing
the range and destination accessibility
Showing the view levels on the map:
XTo display the menu: slide6and press
the controller when the map appears.
The menu of the view levels opens. You may
choose from the following view levels:
Ravailable charging stations
Rcurrent route
Rcurrent vehicle position with vehicle
direction
Exiting the map display:
XPress the %button on the controller.
or
XTo select %: slide 6and press the
controller.
Charging high-voltage battery via the
electrical outlet
Charging cable
Important safety notes
!Only use the charging cable to charge the
high-voltage battery. Do not use the charg-
ing cable for other purposes. It may other-
wise be damaged.
The vehicle is supplied with a single-phase 12
A charging cable. Only use the charging cable
included with the vehicle, which has been
approved for vehicle use.
Pay attention to the "Important safety notes"
(
Ypage 140).
146High-voltage battery
Driving and parking
Page 151 of 342
XSlide fastener?to the right.
Socket cap =is open.
XInsert the power supply plug into the elec-
trical outlet to the stop.
XInsert the charging cable connector into
vehicle socket Bto the stop.
The high-voltage battery is being charged.
The vehicle must not be moved while the
charging cable is connected or during charg-
ing.
iDepending on the temperature, the
engine cooling system and battery cooling
system may audibly switch on when the
charging cable is connected or during the
charging process.
Removing the charging cable
!Before driving away, you must ensure
that, for your own safety and to avoid dam-
age, the charging cable has been removed
from the vehicle socket. Otherwise, you
cannot shift the transmission out of posi-
tion P.
When the charge level display reaches 100%, the battery is fully charged (
Ypage 184).
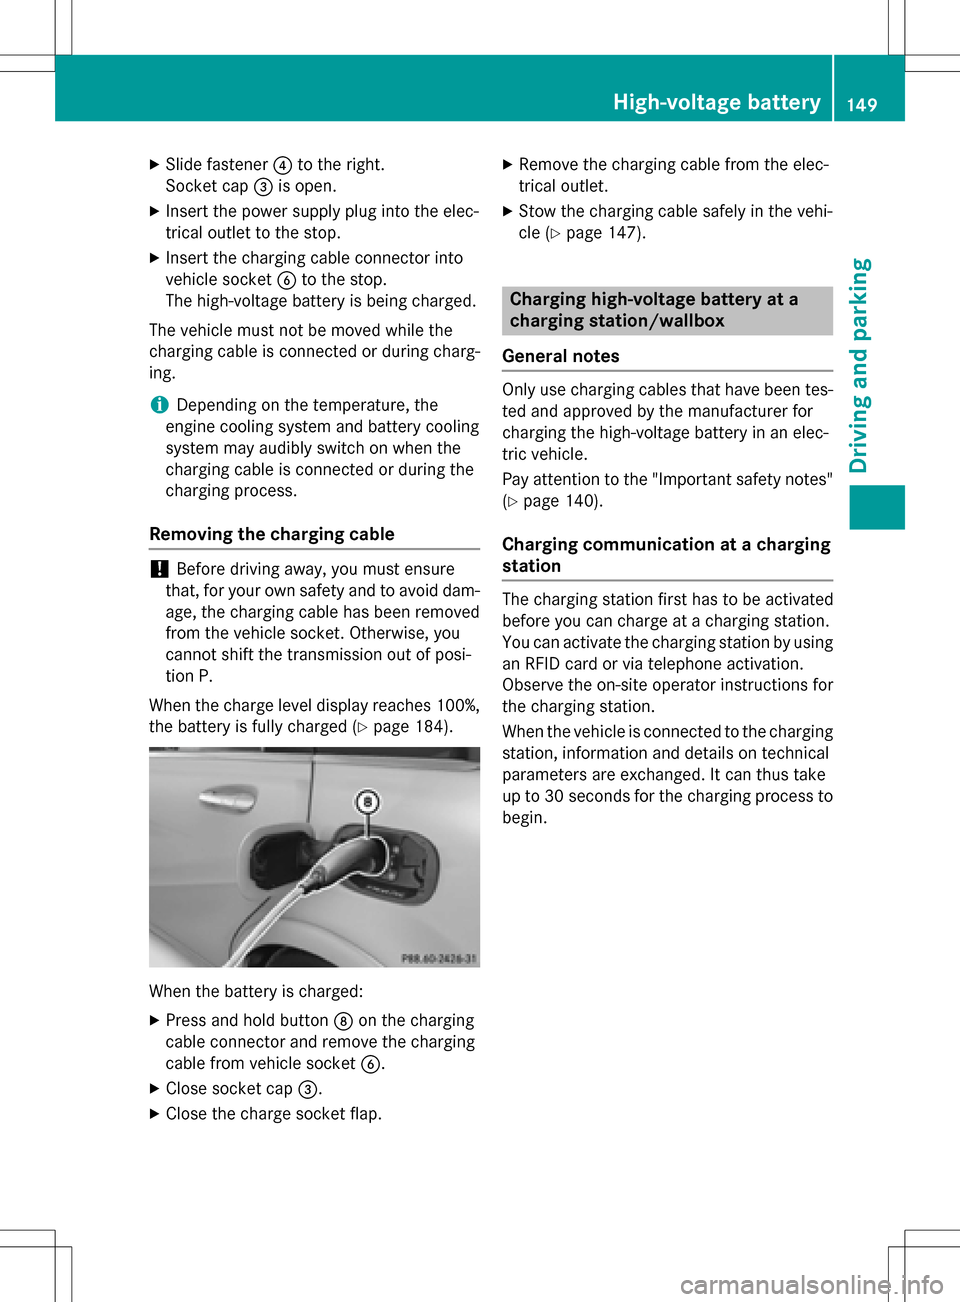
When the battery is charged:
XPress and hold button Don the charging
cable connector and remove the charging
cable from vehicle socket B.
XClose socket cap=.
XClose the charge socket flap.
XRemove the charging cable from the elec-
trical outlet.
XStow the charging cable safely in the vehi-
cle (
Ypage 147).
Charging high-voltage battery at a
charging station/wallbox
General notes
Only use charging cables that have been tes-
ted and approved by the manufacturer for
charging the high-voltage battery in an elec-
tric vehicle.
Pay attention to the "Important safety notes"
(
Ypage 140).
Charging communication at a charging
station
The charging station first has to be activated
before you can charge at a charging station.
You can activate the charging station by using
an RFID card or via telephone activation.
Observe the on-site operator instructions for
the charging station.
When the vehicle is connected to the charging
station, information and details on technical
parameters are exchanged. It can thus take
up to 30 seconds for the charging process to
begin.
High-voltage battery149
Driving and parking
Z
Page 154 of 342
Online access to the vehicle
General notes
GWARNING
If you operate information systems and com-
munication equipment integrated in the vehi-
cle while driving, you will be distracted from
traffic conditions. You could also lose control
of the vehicle. There is a risk of an accident.
Only operate the equipment when the traffic
situation permits. If you are not sure that this
is possible, park the vehicle paying attention
to traffic conditions and operate the equip-
ment when the vehicle is stationary.
You must observe the legal requirements for
the country in which you are currently driving
when operating integrated information sys-
tems and communications equipment.
Only use information systems and communi-
cations devices if this is permitted while driv-
ing and if the traffic situation permits. You
may otherwise be distracted from the traffic
conditions, cause an accident and injure
yourself and others.
From the "My Mercedes Electric - Vehicle
Homepage", you can call up remote query and
remote configuration functions for your vehi-
cle. This is possible from an Internet-enabled
computer, as well as many modern smart-
phones.
You can access the "Vehicle Homepage" via
your web browser.
Please call the Mercedes-Benz Customer
Assistance Center (USA) at the hotline num-
ber
1-800-FOR-MERCedes (1-800-367-6372)
to obtain the relevant Internet address.
In order to use the "Vehicle Homepage", you
must agree to the applicable terms of use.
The contractual periods of mbrace apply to
the "Vehicle Homepage". To use the "Vehicle
Homepage", you require an activated mbrace
access and a separate activation/registra-
tion for the "Vehicle Homepage". Further information about the supported end
devices, available languages and contractual
periods is available at any authorized
Mercedes-Benz Center.
In order to call up the "Vehicle Homepage",
the vehicle must be connected to the Inter-
net.
This is possible via the radio module
(
Ypage 153).
Notes on data protection
Bear in mind that the "Vehicle Homepage"
offers access to your data. Therefore, look
after the vehicle verification code (VVC) and
your user details carefully.
The vehicle verification code (VVC) is required
when you register for the first time on the
"Vehicle Homepage". Using this code, the
vehicle and the user access are linked to each
other on the "Vehicle Homepage", enabling
the intended usage. You can obtain further
information from an authorized Mercedes-
Benz Center.
Prevent unauthorized persons from
accessing this data.
Every person who has access to the informa-
tion stated can use the functions on the "Vehi-
cle Homepage".
RIf you sell your vehicle, you are obliged to
delete the vehicle from your personal area
on the "Vehicle Homepage". Additionally,
you must destroy documents containing
the vehicle verification code (VVC).
RIf you have bought a used vehicle, it is pos-
sible that the previous owner still has
access to the "Vehicle Homepage". If in
doubt, have a new vehicle verification code
(VVC) issued by the Mercedes-Benz Center
after purchase. With the code you can set
up access to your vehicle, as described in
the section "Setting up a personal area" on
the Vehicle Homepage". There, you may
also deactivate the existing access of the
previous owner.
152High-voltage battery
Driving and parking
Page 155 of 342
Calling up functions in the "My
Mercedes Electric - Vehicle Homepage"
The "My Mercedes Electric - Vehicle Home-
page" allows you access to information about
your vehicle and its functions using remote
query and remote configuration. For example,
climate control can be activated using remote
configuration which means that it need not be
set in the vehicle. Power for the climate con-
trol is primarily supplied via the charging
cable connected to the mains supply. In this
way, the range of the vehicle in most cases is
not reduced. If climate control is activated,
the battery charge level and thus the range
may be reduced. The "Vehicle Homepage"
provides you with information all about how
to use your vehicle.
If the vehicle is entered in your personal area
of the "Vehicle Homepage", you can also
access the following functions:
Rrequest the current condition of charge of
the high-voltage battery
Rprogram the departure time (Ypage 195)
Rorder and activate the "Pre-entry climate
control at departure time" function
If the vehicle is charging, the predicted charg-
ing time and the predicted range will also be
shown.
This data is estimated and may be influenced
by the following factors:
Routside temperature
Rswitched on consumers, e.g. climate con-
trol and seat heating
Rpersonal driving style
Rroad and traffic conditions
Rroute characteristics
Therefore, allow for a sufficient reserve.
iInformation on additional functions and
operating instructions can be found on the "Vehicle Homepage".
Connecting the vehicle to the Internet
Via a radio module
This function is not available in all countries
and requires an activated mbrace access.
You can use the "Vehicle Homepage" if the
vehicle has a connection to the Internet via a
mobile phone. The radio module uses a
mobile phone connection and transmits the
necessary data by radio. The vehicle auto-
matically recognizes whether a connection to
the Internet via the radio module is possible
or not. No presets are necessary.
To enable the transfer of data via the mobile
communications module, you do not need a
SIM card.
iRestrictions in reception are possible if
the vehicle is in an underground car park,
for example. Restrictions may also occur in areas with poor mobile network coverage.
Parking
Important safety notes
GWARNING
If you release the parking brake on uphill or
downhill gradients, the vehicle can begin to
move when in park position P. There is a risk
of an accident.
To avoid hazardous situations:
Rprevent the parked vehicle from rolling on
uphill or downhill gradients by always
applying the parking brake.
Rdo not park the vehicle on uphill or downhill
gradients if the parking brake is malfunc-
tioning.
Parking153
Driving and parking
Z
Page 159 of 342
Drivingtips
General notes
Important safety notes
GWARNING
If you switch off the ignition while driving,
safety-relevant functions are only available
with limitations, or not at all. This could affect, fo r example, the power steering and thebrake
boosting effect. You will require considerably
more effort to steer and brake. There is a risk
of an accident.
Do no t switch off the ignition while driving.
GWARNING
If you operate mobile communication equip-
ment while driving, you will be distracted from traffic conditions. You could also lose control
of the vehicle. There is a risk of an accident.
Only operate this equipment when the vehicle
is stationary.
Observe the legal requirements fo rth ecoun-
tr y in which you are driving. Some jurisdic-
tion s prohibit the driver from usingamobile
phone while drivin gavehicle.
If you makeacall while driving, always use
hands-free mode. Only operate the telephone
when the traffic situation permits. If you are
unsure, pull over to a safe location and stop
before operating the telephone.
Bear in mind that at a speed of only 30 mph
(approximately 50 km/h), the vehicle covers
a distance of 44 ft (approximately 14 m) per
second.
Drive sensibly – save energy
Observe the following tips to save energy:
RThe tires should always be inflated to the
recommended tire pressure.
RRemove unnecessary loads.
RRemove roof racks when they are not nee-
ded.
RAvoid frequent acceleration or braking. Energ
y consumption also increases when
driving in low or high outside temperatures, in
stop-start traffic, on short journeys and in
hilly terrain .
Drinking and driving
GWARNING
Drinking and drivin gand/o rtaking drugs and
driving are very dangerous combinations.
Even a small amount of alcohol or drugs can
affect your reflexes, perceptions and judg-
ment.
The possibility of a serious or even fatal acci-
dent is greatly increased when you drink or
take drugs and drive.
Do no t drink or take drugs and drive or allow
anyone to drive who has been drinkingor tak-
ing drugs.
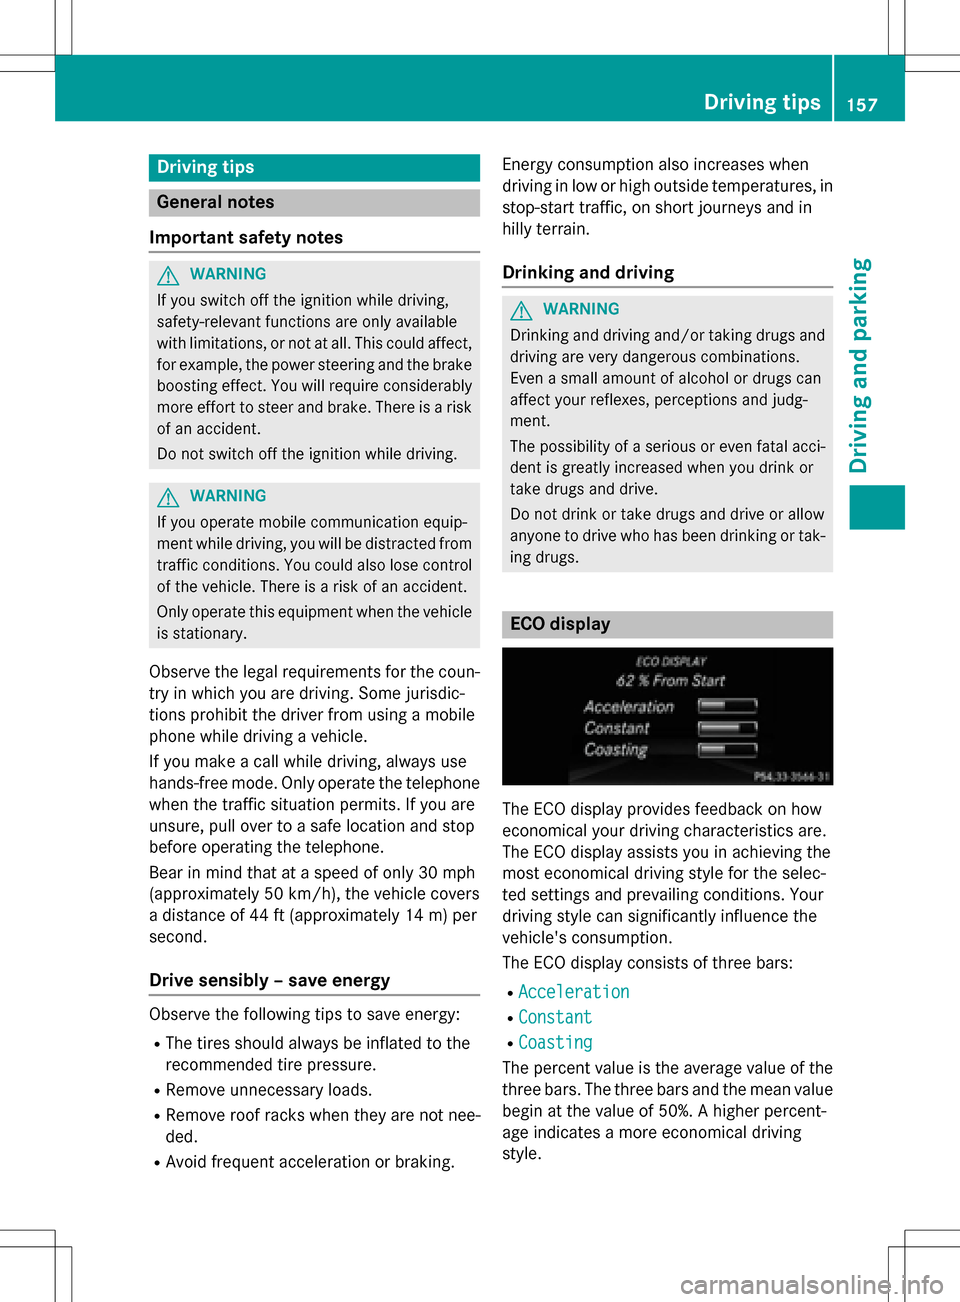
ECO display
The ECO display provides feedback on how
economical your driving characteristics are.
The ECO display assists you in achieving the
most economical driving style for the selec-
te d settings and prevailing conditions. Your
driving style can significantly influence the
vehicle's consumption .
The ECO display consists of three bars:
RAcceleration
RConstant
RCoasting
The percent value is the average value of the
three bars. The three bars and the mean value
begin at the value of 50%. A higher percent-
age indicates a more economical driving
style.
Driving tips157
Driving and parking
Z
Page 187 of 342

Vehicles with COMAND: switches on the
Voice Control System (see the separate
operating instructions)
=Right control panel
?Left control panel
ABack button
XTo activate the on-board computer:turn
the SmartKey to position 1in the ignition
lock.
You can control the multifunction display and
the settings in the on-board computer using
the buttons on the multifunction steering
wheel.
Left control panel
=
;RCalls up the menu and menu bar
9
:Press briefly:
RScrolls in lists
RSelects a submenu or function
RIn the Audiomenu: selects the
previous or next station, when
the preset list or station list is
active, or an audio track or video
scene
RIn the Tel(Telephone) menu:
switches to the phone book and
selects a name or telephone
number
9
:Press and hold:
RIn the Audiomenu: selects a pre-
set list or a station list in the
desired frequency range or an
audio track or video scene using
rapid scrolling
RIn the Tel(Telephone) menu:
starts rapid scrolling if the phone
book is open
aRConfirms the selection or display
message
RIn the Tel(Telephone) menu:
switches to the telephone book
and starts dialing the selected
number
Right control panel
8RMute
W
XRAdjusts the volume
~RRejects or ends a call
RExits the telephone book/redial
memory
6RMakes or accepts a call
RSwitches to the redial memory
Displays and operation185
On-board computer and displays
Z
Page 188 of 342
Back button
%Press briefly:
RBack
RVehicles with Audio 20:
Switches off voice-operated con-
trol for navigation (see manufac-
turer's operating instructions)
RVehicles with COMAND:
Switches off the Voice Control
System (see the separate oper-
ating instructions)
RHides display messages or calls
up the lastTrip
menu function
used
RExits the telephone book/redial
memory
%Press and hold:
RCalls up the standard display in
the Trip
menu
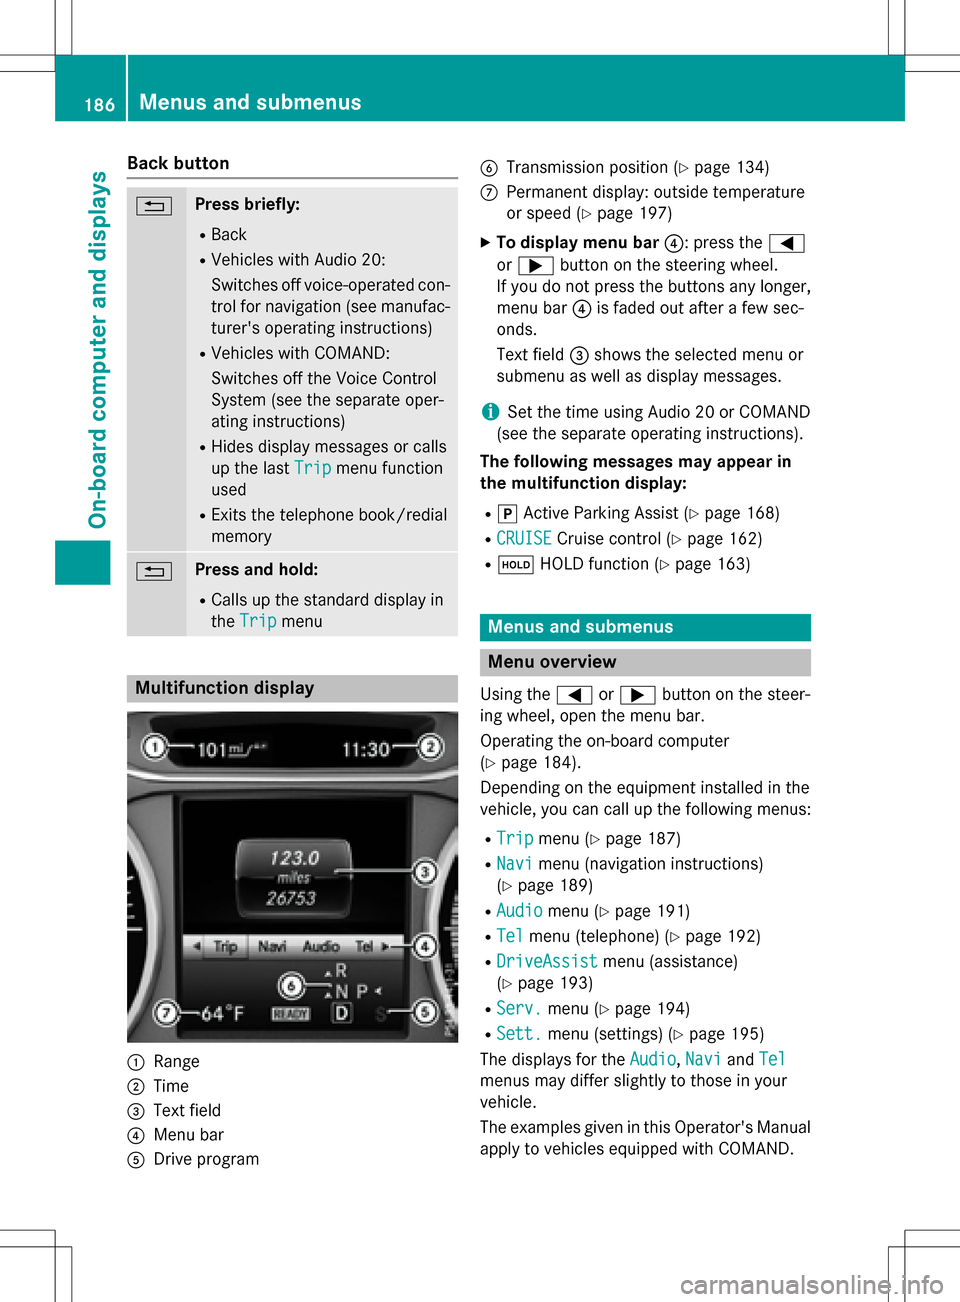
Multifunction display
:Range
;Time
=Text field
?Menu bar
ADrive program
BTransmission position (Ypage 134)
CPermanent display: outside temperature
or speed (
Ypage 197)
XTo display menu bar ?: press the=
or ; button on the steering wheel.
If you do not press the buttons any longer,
menu bar ?is faded out after a few sec-
onds.
Text field =shows the selected menu or
submenu as well as display messages.
iSet the time using Audio 20 or COMAND
(see the separate operating instructions).
The following messages may appear in
the multifunction display:
Rj Active Parking Assist (Ypage 168)
RCRUISECruise control (Ypage 162)
Rë HOLD function (Ypage 163)
Menus and submenus
Menu overview
Using the =or; button on the steer-
ing wheel, open the menu bar.
Operating the on-board computer
(
Ypage 184).
Depending on the equipment installed in the
vehicle, you can call up the following menus:
RTripmenu (Ypage 187)
RNavimenu (navigation instructions)
(
Ypage 189)
RAudiomenu (Ypage 191)
RTelmenu (telephone) (Ypage 192)
RDriveAssistmenu (assistance)
(
Ypage 193)
RServ.menu (Ypage 194)
RSett.menu (settings) (Ypage 195)
The displays for the Audio
,Naviand Tel
menus may differ slightly to those in your
vehicle.
The examples given in this Operator's Manual
apply to vehicles equipped with COMAND.
186Menus and submenus
On-board computer and displays